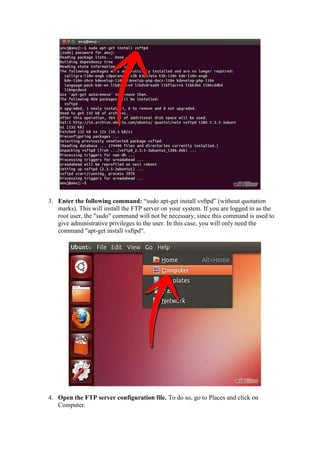
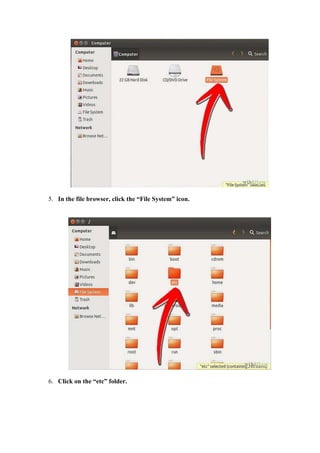
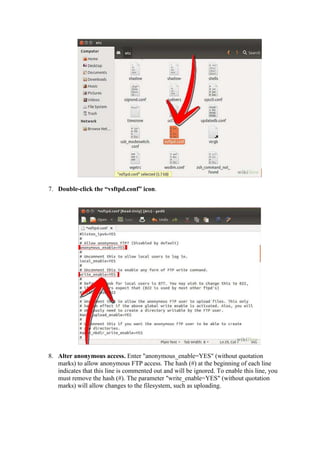
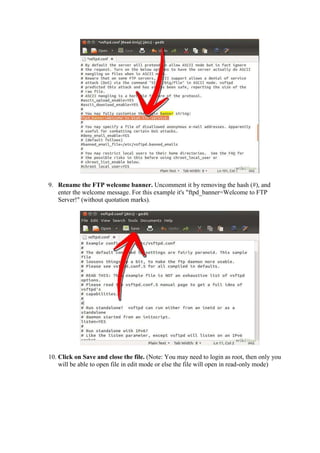
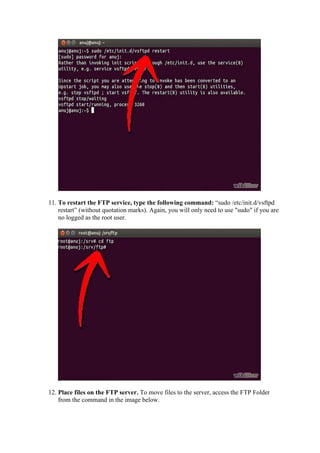
How to Set up FTP Server in Ubuntu 
Steps 
1. Boot up Ubuntu Linux. 
2. Go to Application, then select Accessories and chose Terminal
3. Enter the following command: “sudo apt-get install vsftpd” (without quotation 
marks). This will install the FTP server on your system. If you are logged in as the 
root user, the "sudo" command will not be necessary, since this command is used to 
give administrative privileges to the user. In this case, you will only need the 
command "apt-get install vsftpd". 
4. Open the FTP server configuration file. To do so, go to Places and click on 
Computer.
5. In the file browser, click the “File System” icon. 
6. Click on the “etc” folder.
7. Double-click the “vsftpd.conf” icon. 
8. Alter anonymous access. Enter "anonymous_enable=YES" (without quotation 
marks) to allow anonymous FTP access. The hash (#) at the beginning of each line 
indicates that this line is commented out and will be ignored. To enable this line, you 
must remove the hash (#). The parameter "write_enable=YES" (without quotation 
marks) will allow changes to the filesystem, such as uploading.
9. Rename the FTP welcome banner. Uncomment it by removing the hash (#), and 
enter the welcome message. For this example it's "ftpd_banner=Welcome to FTP 
Server!" (without quotation marks). 
10. Click on Save and close the file. (Note: You may need to login as root, then only you 
will be able to open file in edit mode or else the file will open in read-only mode)
11. To restart the FTP service, type the following command: “sudo /etc/init.d/vsftpd 
restart” (without quotation marks). Again, you will only need to use "sudo" if you are 
no logged as the root user. 
12. Place files on the FTP server. To move files to the server, access the FTP Folder 
from the command in the image below.

Cara Set Up FTP server di ubuntu

  • 1.
    How to Setup FTP Server in Ubuntu Steps 1. Boot up Ubuntu Linux. 2. Go to Application, then select Accessories and chose Terminal
  • 2.
    3. Enter thefollowing command: “sudo apt-get install vsftpd” (without quotation marks). This will install the FTP server on your system. If you are logged in as the root user, the "sudo" command will not be necessary, since this command is used to give administrative privileges to the user. In this case, you will only need the command "apt-get install vsftpd". 4. Open the FTP server configuration file. To do so, go to Places and click on Computer.
  • 3.
    5. In thefile browser, click the “File System” icon. 6. Click on the “etc” folder.
  • 4.
    7. Double-click the“vsftpd.conf” icon. 8. Alter anonymous access. Enter "anonymous_enable=YES" (without quotation marks) to allow anonymous FTP access. The hash (#) at the beginning of each line indicates that this line is commented out and will be ignored. To enable this line, you must remove the hash (#). The parameter "write_enable=YES" (without quotation marks) will allow changes to the filesystem, such as uploading.
  • 5.
    9. Rename theFTP welcome banner. Uncomment it by removing the hash (#), and enter the welcome message. For this example it's "ftpd_banner=Welcome to FTP Server!" (without quotation marks). 10. Click on Save and close the file. (Note: You may need to login as root, then only you will be able to open file in edit mode or else the file will open in read-only mode)
  • 6.
    11. To restartthe FTP service, type the following command: “sudo /etc/init.d/vsftpd restart” (without quotation marks). Again, you will only need to use "sudo" if you are no logged as the root user. 12. Place files on the FTP server. To move files to the server, access the FTP Folder from the command in the image below.