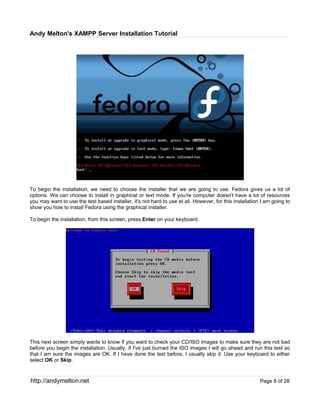
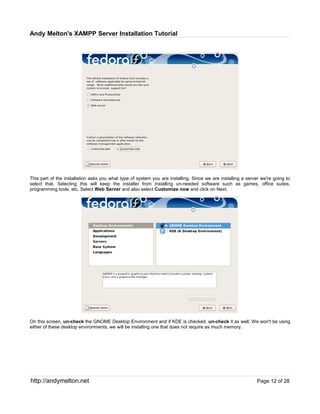
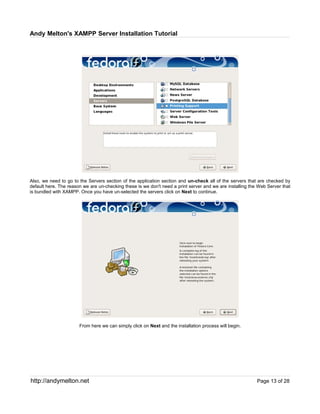
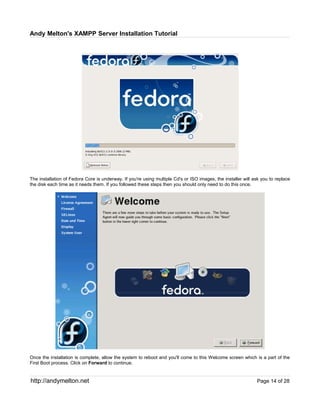
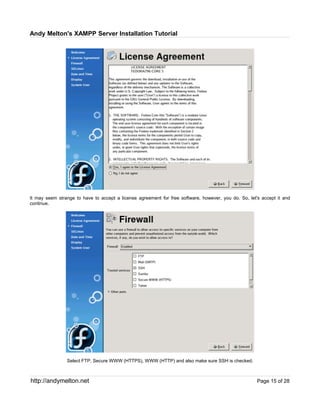
SlideShare a Scribd company logo
1 of 28
Download to read offline
Andy Melton's XAMPP Server Installation Tutorial

XAMPP Server

Finally, after the Thanksgiving holiday I am able to sit down and start this blog article. In this one I want to go
through the steps that are involved in setting up your own web server. This web server will be one that you can
actually use to host a real world website or you can use it for testing your website or application offline.

What is XAMPP?

I decided that the quickest way to get you up and running with your own web server would be to use Apache
Friend's XAMPP. XAMPP is an application that combines Apache (the web server), MySQL (database), PHP
(scripting language) and phpMyAdmin (database administration) all into one.

Normally, to set up a web server you'd have to install each of those individually. With XAMPP, you install one
application and you have a fully functional server. Now, you're probably thinking, “Well, if it's that easy then why
is this blog entry HUGE!?” Well. The reason this is a large entry is I am going to walk you through all the steps of
setting up XAMPP AND make sure that you set it up so that it is secure!

The default XAMPP installation is meant for developers on a local network, not for a real world installation,
however, there are ways of making the installation secure and ready for real world use. Also, there are a few
other things we'll need to do other than installing XAMPP to get things going.

Installing on Fedora Core 5

There are many distributions of Linux out there, my distribution of choice is Fedora Core. I prefer it because I've
always had the most luck with it and have friends who use it. The steps contained within this article could be
easily applied to Ubuntu or another distribution.

You may also be asking me why I am going to install this using an outdated version of Fedora. The main reason
for this is that I have not had the time to sit down and do an install of XAMPP and all the other needed
applications on Fedora Core 6 to make sure everything works. I know it works with Fedora Core 5 and 6 is still a
little buggy. Maybe next year when 7 comes out I'll update this article for installing it on 6!

Requirements

    ●   Fedora Core 5 ISO/CD/DVD
    ●   VMware Server or Dedicated hardware for installing
    ●   Public IP address of your DSL/Cable Internet connection

Optional Requirements

    ●   Domain Name


http://andymelton.net                                                                                  Page 1 of 28
Andy Melton's XAMPP Server Installation Tutorial

Setting up a virtual machine to install Fedora on

I am going to install Fedora into a virtual machine using VMware Server. It's a free virtualization product from
VMware. If you've got an old machine laying around then this would be a great project for you to be able to
revive that old piece of hardware, however, I'm using VMware Server because I can take screenshots of the
installation process and I also don't have a spare computer laying around!


After you have downloaded and installed VMware Server, the first thing you'll do is open up the application. It will
ask you whether you want to open up a virtual machine on your local host or a remote host. We'll choose local.


                   Now, we need to set up a virtual machine. Click on “New Virtual Machine”


We need to choose the “Custom” field here because we need to make additional changes in the configuration
rather than using the defaults.


http://andymelton.net                                                                                 Page 2 of 28
Andy Melton's XAMPP Server Installation Tutorial


          Next we choose the guest operating system. We are of course going to choose “Linux” here.


Since VMware does not diplay Fedora Core as a version, we are going to choose “Other Linux”. We'll re-name
the files so that it has Fedora attached to all of them.


Where it says “Virtual Machine Name” enter “Fedora Core Linux”, you could simply enter “Fedora”, “XAMPP”,
“Server”, whatever you like. If you need to change the location of the virtual machine, this is where you'll do it. I
have mine on a separate partition that can store the large file that the virtual disk creation utility will make.


Since we are using the custom configuration wizard, we can choose from the get-go whether or not we want to
make this virtual machine private or not. For the purposes of this tutorial and for my purposes, I always choose
not to make the virtual machine private.


http://andymelton.net                                                                                  Page 3 of 28
Andy Melton's XAMPP Server Installation Tutorial


From this screen you can do a couple of things. The first one is control the user that can power on the virtual
machine that you are creating. I normally leave the default here. Now, the second option is quite interesting.
Let's say that you are going to want to run this server at all times so you could test your software out as you work
without having to wait on the virtual machine to start up. You could choose to have your virtual machine boot up
when your computer starts up. For the purposes of this tutorial, we'll accept the default.


From here, you'll decide whether you want one or two processors running your virtual machine. I have never
experimented with two processors, I suppose I should at some point, however, I will probably wait until I have a
dual core machine. I usually leave this to the default of one processor.


This is where you will decide how much memory you want to allocate to your virtual machine. On the machine I
am setting up this virtual machine on I have 1 gig of RAM installed, so, I am going to leave the default value
here. If you have more RAM then you might want to add additional RAM to the VM (virtual machine).


http://andymelton.net                                                                                 Page 4 of 28
Andy Melton's XAMPP Server Installation Tutorial


Using a bridged network connection will give the virtual machine it's own dedicated IP address on your local area
network (LAN). This is what we need so we can configure the server later.


                                          Leave this set to the default.


Now, we need to create a new virtual disk. At this point in the process, if you had already created a virtual
machine you could use the previously created disk. The last option lets you use real hard disk space instead of a
virtual hard drive.


At this part of the wizard, make sure that you choose IDE disk type. If you use SCSI you will have problems
when you go to install Fedora, or, at least I have always had issues when I have tried to use that option, the
installer is unable to detect a hard drive.


http://andymelton.net                                                                              Page 5 of 28
Andy Melton's XAMPP Server Installation Tutorial


The next step is to allocate some disk space for the virtual machine. Depending on the amount of disk space
that you have available, you may or may not change the size of the virtual disk. If you have enough hard drive
space, stick with the default. Later, if you run out of disk space in the VM you can add an additional virtual disk.

Also, in this step I would highly recommend that you allocate all disk space now. Whenever I don't allocate the
disk space and let the drive grow as it needs to, I always seem to have performance issues.

I also never split the disk into 2GB files. The reason some people do this is so that it is easier to backup the
virtual machine and some file systems do not support files over the size of 2 gigabytes.


In the screen above, by default you will see “otherlinux” or something like that. You can change this to whatever
you like, leave it the default, I personally think it looks nicer to change it to something like “fedoracore5.vmdk” so
that you'll recognize the file as you're going through files on the host machine..


I should warn you, hopefully I'm not warning you too late. Make sure you close un-essential applications during
this process. Sometimes when I am doing this I forget to stop my music from playing and it drives me insane as
the disk is being created, it will play a couple of seconds, then cut out for about 5 minutes, then play 5 more
seconds. This has sometimes caused the disk creation process to fail, so, give it all the power you can give it!


http://andymelton.net                                                                                   Page 6 of 28
Andy Melton's XAMPP Server Installation Tutorial


I have the ISO images burned to CD, so, whenever I go through this process I need to tell VMware to use my
host's physical drive. I double click on the CD-ROM device in the “Devices” list and then tell VMware to use the
drive I have inserted the disc into. Make sure you tell it to connect the device at power on and to connect
exclusively to this virtual machine. If you want to access the physical drive from the host machine, you'll need to
disconnect the virtual machines control over the physical drive.


If you've just downloaded Fedora Core 5 you can easily tell VMware the location of the ISO images that you just
downloaded. It is on the same screen that I mentioned above. Just browse and navigate to the ISO image.
During the installation, you'll have to change the ISO image (if you've downloaded the 5 disc version). To do this,
simply right click on the CD-ROM drive in the lower right hand corner of your screen, click on edit and then
change the ISO image.

Once you have completed all of these steps, you can click on the Start button and we'll get started setting up
your XAMPP Server.


http://andymelton.net                                                                                Page 7 of 28
Andy Melton's XAMPP Server Installation Tutorial


To begin the installation, we need to choose the installer that we are going to use. Fedora gives us a lot of
options. We can choose to install in graphical or text mode. If you're computer doesn't have a lot of resources
you may want to use the test based installer, it's not hard to use at all. However, for this installation I am going to
show you how to install Fedora using the graphical installer.

To begin the installation, from this screen, press Enter on your keyboard.


This next screen simply wants to know if you want to check your CD/ISO images to make sure they are not bad
before you begin the installation. Usually, if I've just burned the ISO images I will go ahead and run this test so
that I am sure the images are OK. If I have done the test before, I usually skip it. Use your keyboard to either
select OK or Skip.


http://andymelton.net                                                                                    Page 8 of 28
Andy Melton's XAMPP Server Installation Tutorial


                                   Click on Next to continue installation.


Choose your language. Obviously, we'll choose English and click on Next. The next screen will ask you about
the type of keyboard you are using, select the type and click on Next on that screen as well.


http://andymelton.net                                                                         Page 9 of 28
Andy Melton's XAMPP Server Installation Tutorial


You may get a screen that says “The partition table on device hda was unreadable. To create new partitions it must be
initialized, causing loss of ALL DATA on this drive.” If you're installing onto a machine that you have valuable data and don't
want to wipe the hard drive, you might want to re-consider. If you're installing in a virtual machine environment or on a
computer where you don't mind erasing everything, we can safely continue. Remember, the way we've set this virtual
machine up so far is that it is contained, so it won't effect anything on your computer other than taking up additional disk
space.

The next step is to give Linux a partition on the hard drive. If you're installing onto an old computer that you don't mind
erasing every file on, you can simply click on Next and let Fedora take care of the partitioning for you. If you're on a dual boot
machine, you'll want to install Fedora onto a separate partition so that you don't damage the other operating system installed
on your machine. For the purposes of this tutorial, we'll simply select Next. You may get a message that asks if you want to
destroy all data, again, like before, if you're using a VM or on a dedicated system, you can safely say yes.


                                         Accept the default networking configuration.


http://andymelton.net                                                                                            Page 10 of 28
Andy Melton's XAMPP Server Installation Tutorial


                On this screen, make sure the region & time zone are correct and click on Next.


At this part of the installation you will enter your Root password. The root account is the account that gives you
access to make administrative changes to the system. Make it a strong password. Don't forget it. Enter it twice.
Click on Next to continue.


http://andymelton.net                                                                              Page 11 of 28
Andy Melton's XAMPP Server Installation Tutorial


This part of the installation asks you what type of system you are installing. Since we are installing a server we're going to
select that. Selecting this will keep the installer from installing un-needed software such as games, office suites,
programming tools, etc. Select Web Server and also select Customize now and click on Next.


On this screen, un-check the GNOME Desktop Environment and if KDE is checked, un-check it as well. We won't be using
either of these desktop environments, we will be installing one that does not require as much memory.


http://andymelton.net                                                                                         Page 12 of 28
Andy Melton's XAMPP Server Installation Tutorial


Also, we need to go to the Servers section of the application section and un-check all of the servers that are checked by
default here. The reason we are un-checking these is we don't need a print server and we are installing the Web Server that
is bundled with XAMPP. Once you have un-selected the servers click on Next to continue.


                       From here we can simply click on Next and the installation process will begin.


http://andymelton.net                                                                                      Page 13 of 28
Andy Melton's XAMPP Server Installation Tutorial


The installation of Fedora Core is underway. If you're using multiple Cd's or ISO images, the installer will ask you to replace
the disk each time as it needs them. If you followed these steps then you should only need to do this once.


Once the installation is complete, allow the system to reboot and you'll come to this Welcome screen which is a part of the
First Boot process. Click on Forward to continue.


http://andymelton.net                                                                                         Page 14 of 28
Andy Melton's XAMPP Server Installation Tutorial


It may seem strange to have to accept a license agreement for free software, however, you do. So, let's accept it and
continue.


                Select FTP, Secure WWW (HTTPS), WWW (HTTP) and also make sure SSH is checked.


http://andymelton.net                                                                                 Page 15 of 28
Andy Melton's XAMPP Server Installation Tutorial


                            Keep the default configuration of SELinux.


                         Make sure the date and time settings are correct.


http://andymelton.net                                                        Page 16 of 28
Andy Melton's XAMPP Server Installation Tutorial


Choose the resolution you'll want to use. Since I am using a virtual machine I always leave it at 800 x 600 and I also change
the color depth to Thousands of Colors. I seem to have less problems arise when I use that option.


Earlier we configured the root account. Now we need to set up a regular user. We won't be using the root account to login to


http://andymelton.net                                                                                        Page 17 of 28
Andy Melton's XAMPP Server Installation Tutorial

the system. We'll only use the root account when we need to make an administrative change. This is highly recommended as
using root can cause serious damage to the system if you delete a needed system file. Although not shown in this tutorial,
you may get a screen that asks you to configure your sound card. Click Finish to continue and login using the system user
account that you just created.


Now we're logged in and at a desktop. Now, you may be thinking, GEEZ, this looks really horrible. Well, it does, we're only
using the basic desktop environment, remember we didn't install one of the other desktop environments because we are
going to install a more minimalistic desktop environment that doesn't use a lot of system resources.

When you login to the system, Firefox should already be started up. You'll have to click with your mouse to activate a space
for it. With this minimalistic desktop environment, when you start up an application you have to either draw a space for it or
click somewhere to activate the application.

Once you get Firefox opened we need to go to http://freshrpms.net/


http://andymelton.net                                                                                        Page 18 of 28
Andy Melton's XAMPP Server Installation Tutorial


Here is a direct link to the file we need to download, if for some reason it does not work, follow the steps in the next
paragraph: http://ftp.freshrpms.net/pub/freshrpms/fedora/linux/5/freshrpms-release/freshrpms-release-1.1-1.fc.noarch.rpm

Remember, you'll have to click an area of the screen to activate the download manager.

Once you're on the FreshRPM website, click on Packages and then select Fedora Linux 5 (Bordeaux) current add-on
packages. On the left side of the screen, scroll down until you see a link titled freshrpms-release. Click on that link. Then at
the top of the next page click on freshrpms-release-1.1-1.fc.noarch.rpm under where it says: “The information on this page
is for freshrpms-release-1.1-1.fc.src.rpm, a source rpm you are probably more interested in these binaries built from it.” That
should take you to another page where you should see a link for freshrpms-release-1.1-1.fc.noarch.rpm. Finally, click the
link and simply save it to your hard disk. You will need to create a space for the download manager.


Click with the left mouse button in some space of the desktop and click on Kill. You should get an icon that looks rather grim.
Click on the Firefox window and it should close Firefox. If you're back at a terminal like the one above, good. If you're not,
then you'll need to click with the regular mouse button again and select xterm, draw a space for it and continue.

The first thing we'll need to do at the prompt is to type su press Enter and then enter our root password. Once you have
done that, type ls and press Enter, you should see a file listed in red with the name freshrpms-release-1.1-1.fc.noarch.rpm

Type rpm -ivh freshrpms-release-1.1-1.fc.noarch.rpm and press Enter.

The FreshRPMs package should now be installed and we can begin installing XFCE. At the prompt type yum -y
groupinstall XFCE and press Enter. This will install the XFCE desktop environment. You'll know it is done when the
installer says complete and drops to a command prompt.


http://andymelton.net                                                                                          Page 19 of 28
Andy Melton's XAMPP Server Installation Tutorial


Now click again with your left mouse button (the one that brings up the menu we brought up to use the Kill function) and click
on Exit. You should now be back to a login screen. Click on Session and then click on Xfce 4 and then click on Change
Session.


Enter your username and password pressing Enter for each and then it will ask you whether or not you want to make Xfce 4
the default for future sessions. Click on Make Default. This will ensure that Xfce loads each time you login.


                                 You should now be at a desktop like the one shown above.


http://andymelton.net                                                                                        Page 20 of 28
Andy Melton's XAMPP Server Installation Tutorial

The next thing that we are going to do is disable some of the un-needed services that start up when the operating system
starts. Doing this will free up some memory (RAM). To do this, on your desktop, right click, go to System and then
Services. You'll then be asked to enter your root password, enter it and press enter and the services screen will load.


If any of the following services are checked, un-check them: apmd, bluetooth, firstboot, diskdump, netdump, gpm, isdn
(unless you are using an ISDN connection), kudzu (unless you'll be adding new hardware to the machine), rpcgssd,
rpcidmapd, rpcsvcgssd.

There are other services that you could safely disable, however for the purposes of this tutorial I have decided to leave them
enabled due to the fact that you may need a feature due to your particular hardware configuration. Visit the following URL to
find a complete list of Fedora services, their descriptions and whether you can disable them or not. REMEMBER, you're
running a server, so, keep that in mind if you disable anything else.

http://www.mjmwired.net/resources/mjm-services-fc5.html

Once you have un-checked the un-needed services, at the top of the window, click on save and then close the window and
you'll want to reboot the system. Logoff, reboot and log back in to continue.


Download and Install XAMPP
The next thing that we need to do is download XAMPP. Open Firefox (Right click on desktop, point to Network, then click
on Firefox). Then enter the following URL: http://www.apachefriends.org/en/xampp.html


Once you're on that page, scroll down until you see “XAMPP for Linux”, when you do, click on that link, then scroll down and
click on the step 1 link for downloading. Then, click on the “XAMPP Linux #” (at the time of this writing the version number is
1.5.5a). Once you click that, you'll be taken to source forge where you'll choose a download location closest to you, then,
you'll be able to download the file. When you get the “Save to Disk” dialog, simply click on OK and let the file download into
your home directory (which is what will happen when you click on OK). For now, we can go ahead and close Firefox, or,
minimize it, we'll need it again later.


http://andymelton.net                                                                                          Page 21 of 28
Andy Melton's XAMPP Server Installation Tutorial


Right click on your desktop and click on Terminal and you should see a window similar to the one above. The first thing you
need to do is to change over to the root account, to do this type su and press enter, you'll then be required to enter your
root password. Enter the password and then continue with the next step.

To install XAMPP, you need to type in the following and press enter tar xvfz xampp-linux-1.5.5a.tar.gz -C /opt


To start XAMPP, at the prompt, type the following and press enter: /opt/lampp/lampp start
(on a sidenote, if you need to stop the server you can use the same command but replace start with stop)


Now we need to test the installation. With the browser open, enter the following address: http://localhost/
That should bring up a page with different languages to choose from, choose your language and you should then see
another page welcoming you to XAMPP for Linux.

Test on another machine, on same network.

NOTE: If you're using a virtual machine you could test this using the host machine.

Now, if you've got another machine on your local network. It would be a good idea to see if you could access the server from
another machine. You'll need to know the IP address of the server. To get the IP address, go back to the terminal and type
at the prompt: /sbin/ifconifg

Look for “inet addr” under the information for eth0. Eth0 is the primary network interface, if there are additional network cards
in your machine you'll get another address for those.

Typically it is a number such as 192.168.1.38 (that is the address of my server, yours will be different). Once you get the
address, go to another machine on the same network (it won't work outside of your network, yet) and type the URL as such:
http://192.168.1.38


http://andymelton.net                                                                                            Page 22 of 28
Andy Melton's XAMPP Server Installation Tutorial


Securing XAMPP


Now that we have XAMPP up and running, we need to make sure that it is secure. Out of the box, XAMPP is designed to
only run in a local network environment because many things are left open. Leaving these things open and un-protected
would be devastating to your website. Luckily, XAMPP on Linux is VERY easy to secure. Simply open up the terminal
change to root by entering “su” followed by the root password and then enter the following and press enter:

/opt/lampp/lampp security

You can now go to your XAMPP homepage and click on the security link on the side and make sure everything was
successfully secured.

Make XAMPP startup during boot

When you reboot your system, XAMPP will no longer be running. To make it startup whenever you reboot, follow the steps
on this site: http://www.apachefriends.org/en/faq-xampp-linux.html#fsl

DSL/Cable Modem Configuration


To allow users from outside of your network to access your web server we need to configure your DSL/Cable modem/router
so that HTTP & FTP access requests will reach your server. To do this, we'll need to access your Internet gateway (the
gateway is your dsl/cable modem/router). We need to know the IP address of the gateway device. Typically it is something
like 192.168.1.1 Since all gateway devices are different, you may have to check the documentation for the device, run
ipconfig (Windows) or ifconfig (Linux) or contact your ISP to find out the address. Once you find out the address, go to your
browser and enter it.

My gateway is a Westell WireSpeed 4 Port Router. I'll be using it to show you how to configure your connection. Your
gateway will probably be different but the process should fundamentally be the same.

First. I am going to point to Configuration then click on Service Configuration. Then I am going to click on define
custom service near the bottom of the screen. From the popup that appears, I am going to choose port forwarding.


http://andymelton.net                                                                                         Page 23 of 28
Andy Melton's XAMPP Server Installation Tutorial


In the Service Name field I am going to enter the name of the server, then the port and then the protocol that the service
uses. What you enter for the service name does not really matter, however, I do this so when I'm looking at the list of
services I will know exactly what is what. In the Global Port Range enter 80, enter 80 for Base Host Port as well. The
protocol is TCP. When you have the information entered above, click next and then close to continue.

The service is not activated immediately. Click on the dropdown list, scroll to the bottom and you'll see the service that you
just entered, select it and click enable. It will ask you which computer you would like for the data to be redirected to, you'll
need to know both the machine name of your computer or the IP address...it may not show one or the other. The computer
you want it to forward it to is the one you just installed XAMPP onto.

We'll need to do this a couple of times. The second time we'll enter FTP Server and the port for it is 21. We'll also need to set
up another service for secure HTTP access which is port 443.

You should now be able to test your web server outside of your network, go to a website such as Ipchicken.com and get your
public IP address. Ask a friend, family member or try to access your server from an Internet cafe or work.

If this does not work, your ISP may be blocking port 80 on your Internet connection. If that is the case, you'll have to change
the IP addresses from the default 80 to something else. You'll also have to change the port numbers in the server
configuration files. Once we get to making changes in the configuration files, I'll tell you where to make the change.

Domain Name Configuration

If you do not have a domain name then you can simply enter the IP address to get to your website. However, most likely you
will have a domain name that you will want to use to access your server, it's a lot easier for people to remember how to get to
your site with a domain name.


Whichever hosting company you use you'll need to point the @ record to your IP address and then point the WWW and FTP
records to the @ record.

If you're using GoDaddy you'll login to your account and go to the Domain Control Center and then the Total DNS and MX
Records section of the website to edit the DNS & MX records. Also, you'll need to change the nameservers to the GoDaddy
parked nameservers. The ones I use for my domain are:

PARK21.SECURESERVER.NET
PARK22.SECURESERVER.NET

If you're using GoDaddy, the nameservers above should work for your account as well.


http://andymelton.net                                                                                             Page 24 of 28
Andy Melton's XAMPP Server Installation Tutorial


Virtual Hosts

The setup that we have now will work as-is. However, what if you wanted to host a particular website in it's own folder or you
wanted to host multiple websites. What we need to do to get that going is set up a virtual host for each website.

Open up the terminal, type su and press enter, enter the root password and enter, then, enter the following and press enter:
cd /opt/lampp/etc/extra Once you are in that directory, you can enter this command and press enter: vi httpd-vhosts.conf


You've just opened the virtual host configuration file using an editing program called VI. To be able to make a change we'll
first need to press the “A” key on the keyboard to activate writing. Then, we'll scroll down to the virtual host configuration
area. The screen shot above will help you locate the section. You should see two sections like the one above. We'll be
working with the second one, leaving the first one alone.


A friend of mine helped me with configuring virtual hosts. Thanks, Kevin! (complexdistress.com). The configuration doesn't
include everything that the default has, but, it seems to work very well. The DocumentRoot may give you problems, you'll
need to create that directory by connecting via FTP and then creating it. The default FTP username for XAMPP is nobody
and then use whatever password you entered whenever you went through the security wizard.

Now that you've got the virtual host configured, you need to save the file press the Escape then Shift + ; and then type wq
this writes the file and quits the program. I always like to restart XAMPP after I do this to make sure the changes take effect.
At the prompt type: /opt/lampp/lampp restart

Using an alternative port for Apache

Some ISPs block customers from running web servers on their Internet connection. Some block it for security reasons. If
your ISP is one that does block access on port 80, which is the default for website traffic. You can change the default port
number to something like 1080 or 8080. You'll have to make sure wherever there is an 80 listed as the port number, you'll
have to change that to the port you decided to use. You'll need to make the change in the virtual host configuration file, the
DNS settings on your domain registrars website. You'll also have to edit a file called httpd.conf which is the configuration file
for Apache.


http://andymelton.net                                                                                            Page 25 of 28
Andy Melton's XAMPP Server Installation Tutorial

From a terminal, login as root, then type: cd /opt/lampp/etc and press enter. Once there, enter: vi httpd.conf Once the file
is open, scroll down until you see a section like the one above that says “Listen.” That is where you'll change the port for the
web server. Once you change it save the file like you did the virtual host file.

FTP Users

NOTE: The following steps are a re-write of the steps from: http://fedoraforum.org/forum/archive/index.php/t-966.html

The default installation of XAMPP includes an FTP account (username is nobody) that you can use if you're going to be the
only person uploading files to the server. However, if you are going to have multiple people accessing the server or want to
have different FTP accounts for each domain on the server, then, you'll need to set up additional FTP accounts.

The first thing we need to do is add a line to /etc/shells, open up the Terminal, login as root and then type: vi /etc/shells
When the file opens, after the last entry add the following: /bin/false Once you do that, save the file and exit.


Now, right click on your desktop and point to Other then Users and Groups. Once there we'll need to create a new group
called ftp-users.


Create as many users as you'll need, just make sure you change the Login shell to /bin/false and add them to the ftp-users
group.

The next thing that we need to do is to create some folders for the users. To do this we're going to use the terminal again, so
let's start it up and login as root. Now we need to navigate to the htdocs folder, type: cd /opt/lampp/htdocs once you're
there, we'll create the directories that we need for each user logging onto the server to upload files. To create a folder enter


http://andymelton.net                                                                                            Page 26 of 28
Andy Melton's XAMPP Server Installation Tutorial

mkdir foldername and then enter. Do that for as many folders as you'll need.

The next thing we need to do is to change the owner of each folder. If we created a folder in htdocs called username and we
also have a username in the users and groups then we'd enter the following command: chown -R username
/htdocs/username/

Now, we need to go back to the users and groups and change the home folder for each user. This way, whenever the user
FTP's into the server it will load the directories that you created for them.

Lock FTP Users to home directory

As it stands right now, FTP users can FTP in to the server and have the ability to see other peoples files on the server. What
we want to do is lock them into their own home directory, that we specified above. So, to do this, launch a terminal window,
enter cd /opt/lampp/etc

Next, we need to open a file named proftpd.conf, enter vi proftpd.conf, navigate to the location in the file that says
DocumentRoot /opt/lampp/htdocs, change that to say DocumentRoot ~ save the file and exit. Reboot XAMPP by entering
/opt/lampp/lampp restart.

The only downfall to doing this is that we'll need to create a new user for ourselves so we can quickly access the htdocs
folder via FTP. Now that you know how to create a user on the system and change the home directory, you should be able to
do this yourself.

Static IP Address (for local network)

Now that we have everything installed and are able to tell what our IP address range is. We might want to assign a static IP
address to the network card of the virtual machine or the system you just installed Fedora onto.


        Right click on your desktop, point to Other and then click on Network. You'll be asked for the root password.


In the devices list, select eth0, typically it is the only one listed. Then at the top of the screen click on Edit. Once you get to
the edit screen, look down to where there is an option for “Statically set IP address” and click the radio button beside it. Once
you do, enter an IP, remember, your IP address may be different. Open the terminal and type /sbin/ifconfig and press enter.
Find out what your current IP address is and use that for your static IP address.

You'll need to give it a subnet and default gateway as well, that information is also in the output of /sbin/ifconfig. Click on
OK and accept the changes, don't reboot yet though.


http://andymelton.net                                                                                             Page 27 of 28
Andy Melton's XAMPP Server Installation Tutorial


Click on the DNS tab and enter the Primary DNS address, it will more than likely be exactly the same address as the default
gateway address. Click on File then Save. Accept the changes, close network configuration window and reboot computer.

Static IP Address (Public IP Address)

Unfortunately, I am unable to give you a static IP address for your public IP address. Remember your public IP address is the
address that you have your domain pointing to. Most ISPs do not give their customers a static IP address, if you ask they
may be able to provide you with one but might want you to upgrade to a business account or pay an additional monthly fee.

There is hope. Although beyond the scope of this course, you can use a dynamic DNS service. What you would do is sign up
for their service, you would install some software on your computer and every time your public IP address changes, your
DNS address would be updated with that new IP address. The services I have looked into are a bit pricey, there are some
that offer free services but they do not allow you to use your own domain name with the free services.

If you're not looking to use these services you will want to make sure you check your public IP address on a regular basis to
make sure it has not changed. One of the best ways to check might be to simply change your homepage so you can check
regularly. When your public IP address does change, make sure to go back to your domain registrar and update the DNS
information.

Use a website such as IPChicken.com to check your public IP address.


The End

I greatly appreciate you taking the time to download this tutorial. I hope that you found it easy to use and understandable. I
hope you now have a fully functioning web server. If you have requests for future tutorials, please contact me on my website
at:

http://andymelton.net

Thanks again,
Andy T. Melton


http://andymelton.net                                                                                          Page 28 of 28

More Related Content

What's hot

Tech X Virtualization Tips
Tech X Virtualization TipsTech X Virtualization Tips
Tech X Virtualization TipsYoussef EL HADJ
 
VM201 - IdoSphere
VM201 - IdoSphereVM201 - IdoSphere
VM201 - IdoSphereCarl Tyler
 
AMD FX - 8.429GHZ World Record Fastest Processor
AMD FX - 8.429GHZ World Record Fastest ProcessorAMD FX - 8.429GHZ World Record Fastest Processor
AMD FX - 8.429GHZ World Record Fastest ProcessorIntizone @ Blogging Zone
 
Guide to dual booting
Guide to dual bootingGuide to dual booting
Guide to dual bootingMahfud Saja
 
Unit 5 Project - Babeli
Unit 5 Project - BabeliUnit 5 Project - Babeli
Unit 5 Project - BabeliLianna Babeli
 
openQRM how-to: Setup UEC and openQRM cloud
openQRM how-to: Setup UEC and openQRM cloudopenQRM how-to: Setup UEC and openQRM cloud
openQRM how-to: Setup UEC and openQRM cloudopenQRM Enterprise GmbH
 
Automated everything - Setting up an openQRM Cloud
Automated everything - Setting up an openQRM CloudAutomated everything - Setting up an openQRM Cloud
Automated everything - Setting up an openQRM CloudopenQRM Enterprise GmbH
 
Building your own Desktop Cloud Environment
Building your own Desktop Cloud EnvironmentBuilding your own Desktop Cloud Environment
Building your own Desktop Cloud EnvironmentJnaapti
 
Automated Amazon EC2 Cloud deployments with openQRM
Automated Amazon EC2 Cloud deployments with openQRMAutomated Amazon EC2 Cloud deployments with openQRM
Automated Amazon EC2 Cloud deployments with openQRMopenQRM Enterprise GmbH
 
200 ways to revive a hard drive
200 ways to revive a hard drive200 ways to revive a hard drive
200 ways to revive a hard driveMaozetiti
 
Installation steps about window server 2003 and windows XP in virtualbox
Installation steps about window server 2003 and windows XP in virtualbox Installation steps about window server 2003 and windows XP in virtualbox
Installation steps about window server 2003 and windows XP in virtualbox sekhonharman
 
Step by Step Installation of Oracle11gR2 on OEL5 and VMware
Step by Step Installation of Oracle11gR2 on OEL5 and VMwareStep by Step Installation of Oracle11gR2 on OEL5 and VMware
Step by Step Installation of Oracle11gR2 on OEL5 and VMwareJorge Batista
 
How to install windows 7 over the network using pxe booting and tftp
How to install windows 7 over the network using pxe booting and tftpHow to install windows 7 over the network using pxe booting and tftp
How to install windows 7 over the network using pxe booting and tftpRavi Kumar Lanke
 
Let’s talk virtualization
Let’s talk virtualizationLet’s talk virtualization
Let’s talk virtualizationEtienne Tremblay
 
Linux Desktop: From OS Install through Running the Applications
Linux Desktop: From OS Install through Running the ApplicationsLinux Desktop: From OS Install through Running the Applications
Linux Desktop: From OS Install through Running the ApplicationsJoe Litton
 

What's hot (18)

Tech X Virtualization Tips
Tech X Virtualization TipsTech X Virtualization Tips
Tech X Virtualization Tips
 
VM201 - IdoSphere
VM201 - IdoSphereVM201 - IdoSphere
VM201 - IdoSphere
 
AMD FX - 8.429GHZ World Record Fastest Processor
AMD FX - 8.429GHZ World Record Fastest ProcessorAMD FX - 8.429GHZ World Record Fastest Processor
AMD FX - 8.429GHZ World Record Fastest Processor
 
Guide to dual booting
Guide to dual bootingGuide to dual booting
Guide to dual booting
 
MDT Step public
MDT Step publicMDT Step public
MDT Step public
 
Unit 5 Project - Babeli
Unit 5 Project - BabeliUnit 5 Project - Babeli
Unit 5 Project - Babeli
 
openQRM how-to: Setup UEC and openQRM cloud
openQRM how-to: Setup UEC and openQRM cloudopenQRM how-to: Setup UEC and openQRM cloud
openQRM how-to: Setup UEC and openQRM cloud
 
Automated everything - Setting up an openQRM Cloud
Automated everything - Setting up an openQRM CloudAutomated everything - Setting up an openQRM Cloud
Automated everything - Setting up an openQRM Cloud
 
Building your own Desktop Cloud Environment
Building your own Desktop Cloud EnvironmentBuilding your own Desktop Cloud Environment
Building your own Desktop Cloud Environment
 
Automated Amazon EC2 Cloud deployments with openQRM
Automated Amazon EC2 Cloud deployments with openQRMAutomated Amazon EC2 Cloud deployments with openQRM
Automated Amazon EC2 Cloud deployments with openQRM
 
200 ways to revive a hard drive
200 ways to revive a hard drive200 ways to revive a hard drive
200 ways to revive a hard drive
 
Amazon Ec2
Amazon Ec2Amazon Ec2
Amazon Ec2
 
Prepping software for w7 deployment
Prepping software for w7 deploymentPrepping software for w7 deployment
Prepping software for w7 deployment
 
Installation steps about window server 2003 and windows XP in virtualbox
Installation steps about window server 2003 and windows XP in virtualbox Installation steps about window server 2003 and windows XP in virtualbox
Installation steps about window server 2003 and windows XP in virtualbox
 
Step by Step Installation of Oracle11gR2 on OEL5 and VMware
Step by Step Installation of Oracle11gR2 on OEL5 and VMwareStep by Step Installation of Oracle11gR2 on OEL5 and VMware
Step by Step Installation of Oracle11gR2 on OEL5 and VMware
 
How to install windows 7 over the network using pxe booting and tftp
How to install windows 7 over the network using pxe booting and tftpHow to install windows 7 over the network using pxe booting and tftp
How to install windows 7 over the network using pxe booting and tftp
 
Let’s talk virtualization
Let’s talk virtualizationLet’s talk virtualization
Let’s talk virtualization
 
Linux Desktop: From OS Install through Running the Applications
Linux Desktop: From OS Install through Running the ApplicationsLinux Desktop: From OS Install through Running the Applications
Linux Desktop: From OS Install through Running the Applications
 

Viewers also liked

Viewers also liked (16)

4. jsp
4. jsp4. jsp
4. jsp
 
Joomla!: phpMyAdmin for Beginners
Joomla!: phpMyAdmin for BeginnersJoomla!: phpMyAdmin for Beginners
Joomla!: phpMyAdmin for Beginners
 
Using XAMPP
Using XAMPPUsing XAMPP
Using XAMPP
 
Jsp Presentation +Mufix "3"
Jsp Presentation +Mufix "3"Jsp Presentation +Mufix "3"
Jsp Presentation +Mufix "3"
 
phpMyAdmin con Xampp
phpMyAdmin con XamppphpMyAdmin con Xampp
phpMyAdmin con Xampp
 
Introducing the MySQL Workbench CASE tool
Introducing the MySQL Workbench CASE toolIntroducing the MySQL Workbench CASE tool
Introducing the MySQL Workbench CASE tool
 
Jsp
JspJsp
Jsp
 
Jsp/Servlet
Jsp/ServletJsp/Servlet
Jsp/Servlet
 
Java/Servlet/JSP/JDBC
Java/Servlet/JSP/JDBCJava/Servlet/JSP/JDBC
Java/Servlet/JSP/JDBC
 
MySQL Database with phpMyAdmin
MySQL Database with  phpMyAdminMySQL Database with  phpMyAdmin
MySQL Database with phpMyAdmin
 
Introduction to xampp
Introduction to xamppIntroduction to xampp
Introduction to xampp
 
Jsp
JspJsp
Jsp
 
Java Web Programming [4/9] : JSP Basic
Java Web Programming [4/9] : JSP BasicJava Web Programming [4/9] : JSP Basic
Java Web Programming [4/9] : JSP Basic
 
Jsp ppt
Jsp pptJsp ppt
Jsp ppt
 
Xampp installation
Xampp installation Xampp installation
Xampp installation
 
JSF2 and JSP
JSF2 and JSPJSF2 and JSP
JSF2 and JSP
 

Similar to XAMPP Server Setup

How to Create a Windows Server 2008 Virtual Lab Using VirtualBox
How to Create a Windows Server 2008 Virtual Lab Using VirtualBoxHow to Create a Windows Server 2008 Virtual Lab Using VirtualBox
How to Create a Windows Server 2008 Virtual Lab Using VirtualBoxRusty Painter
 
12849144 how-to-install-a-cccam-server-on-windows
12849144 how-to-install-a-cccam-server-on-windows12849144 how-to-install-a-cccam-server-on-windows
12849144 how-to-install-a-cccam-server-on-windowsrajuy2r
 
Setting Up a Cloud Server - Part 1 - Transcript.pdf
Setting Up a Cloud Server - Part 1 - Transcript.pdfSetting Up a Cloud Server - Part 1 - Transcript.pdf
Setting Up a Cloud Server - Part 1 - Transcript.pdfShaiAlmog1
 
Installing mandriva linux mandriva community wiki
Installing mandriva linux   mandriva community wikiInstalling mandriva linux   mandriva community wiki
Installing mandriva linux mandriva community wikiAdolfo Nasol
 
Tutorial CentOS 5 untuk Webhosting
Tutorial CentOS 5 untuk WebhostingTutorial CentOS 5 untuk Webhosting
Tutorial CentOS 5 untuk WebhostingBeni Krisbiantoro
 
Becoming Linux Expert Series-Install Linux Operating System
Becoming Linux Expert Series-Install Linux Operating SystemBecoming Linux Expert Series-Install Linux Operating System
Becoming Linux Expert Series-Install Linux Operating Systemskbansal222
 
TechMentor Fall, 2011 - WDS Tricks You Didn't Know
TechMentor Fall, 2011 - WDS Tricks You Didn't KnowTechMentor Fall, 2011 - WDS Tricks You Didn't Know
TechMentor Fall, 2011 - WDS Tricks You Didn't KnowConcentrated Technology
 
Installing php and my sql locally using xampp
Installing php and my sql locally using xamppInstalling php and my sql locally using xampp
Installing php and my sql locally using xampppeyman Ghader Kurehpaz
 
Ci For The Web 2.0 Guy Or Gal
Ci For The Web 2.0 Guy Or GalCi For The Web 2.0 Guy Or Gal
Ci For The Web 2.0 Guy Or GalChad Woolley
 
Linux On V Mware ESXi
Linux On V Mware ESXiLinux On V Mware ESXi
Linux On V Mware ESXiMasafumi Ohta
 
L hammonds adventure
L hammonds adventureL hammonds adventure
L hammonds adventureMuhamad Fauzi
 
Dating Pro Installation Instructions
Dating Pro Installation InstructionsDating Pro Installation Instructions
Dating Pro Installation InstructionsPilot Group Ltd
 
Intoduction to VirtualBox English
Intoduction to VirtualBox EnglishIntoduction to VirtualBox English
Intoduction to VirtualBox EnglishKichiemon Adachi
 
Manual 70-410 _Yves
Manual 70-410 _YvesManual 70-410 _Yves
Manual 70-410 _YvesYves Mukusa
 
Dru lavigne servers-tutorial
Dru lavigne servers-tutorialDru lavigne servers-tutorial
Dru lavigne servers-tutorialDru Lavigne
 
FOSS_GNU/Linux
FOSS_GNU/LinuxFOSS_GNU/Linux
FOSS_GNU/LinuxYogesh Ks
 

Similar to XAMPP Server Setup (20)

How to Create a Windows Server 2008 Virtual Lab Using VirtualBox
How to Create a Windows Server 2008 Virtual Lab Using VirtualBoxHow to Create a Windows Server 2008 Virtual Lab Using VirtualBox
How to Create a Windows Server 2008 Virtual Lab Using VirtualBox
 
12849144 how-to-install-a-cccam-server-on-windows
12849144 how-to-install-a-cccam-server-on-windows12849144 how-to-install-a-cccam-server-on-windows
12849144 how-to-install-a-cccam-server-on-windows
 
Netezza All labs
Netezza All labsNetezza All labs
Netezza All labs
 
Setting Up a Cloud Server - Part 1 - Transcript.pdf
Setting Up a Cloud Server - Part 1 - Transcript.pdfSetting Up a Cloud Server - Part 1 - Transcript.pdf
Setting Up a Cloud Server - Part 1 - Transcript.pdf
 
Installing mandriva linux mandriva community wiki
Installing mandriva linux   mandriva community wikiInstalling mandriva linux   mandriva community wiki
Installing mandriva linux mandriva community wiki
 
phpTutorial1
phpTutorial1phpTutorial1
phpTutorial1
 
phpTutorial1
phpTutorial1phpTutorial1
phpTutorial1
 
Tutorial CentOS 5 untuk Webhosting
Tutorial CentOS 5 untuk WebhostingTutorial CentOS 5 untuk Webhosting
Tutorial CentOS 5 untuk Webhosting
 
Becoming Linux Expert Series-Install Linux Operating System
Becoming Linux Expert Series-Install Linux Operating SystemBecoming Linux Expert Series-Install Linux Operating System
Becoming Linux Expert Series-Install Linux Operating System
 
TechMentor Fall, 2011 - WDS Tricks You Didn't Know
TechMentor Fall, 2011 - WDS Tricks You Didn't KnowTechMentor Fall, 2011 - WDS Tricks You Didn't Know
TechMentor Fall, 2011 - WDS Tricks You Didn't Know
 
Installing php and my sql locally using xampp
Installing php and my sql locally using xamppInstalling php and my sql locally using xampp
Installing php and my sql locally using xampp
 
Ci For The Web 2.0 Guy Or Gal
Ci For The Web 2.0 Guy Or GalCi For The Web 2.0 Guy Or Gal
Ci For The Web 2.0 Guy Or Gal
 
Linux On V Mware ESXi
Linux On V Mware ESXiLinux On V Mware ESXi
Linux On V Mware ESXi
 
L hammonds adventure
L hammonds adventureL hammonds adventure
L hammonds adventure
 
Dating Pro Installation Instructions
Dating Pro Installation InstructionsDating Pro Installation Instructions
Dating Pro Installation Instructions
 
Intoduction to VirtualBox English
Intoduction to VirtualBox EnglishIntoduction to VirtualBox English
Intoduction to VirtualBox English
 
Manual 70-410 _Yves
Manual 70-410 _YvesManual 70-410 _Yves
Manual 70-410 _Yves
 
Dru lavigne servers-tutorial
Dru lavigne servers-tutorialDru lavigne servers-tutorial
Dru lavigne servers-tutorial
 
Deploying w7
Deploying w7Deploying w7
Deploying w7
 
FOSS_GNU/Linux
FOSS_GNU/LinuxFOSS_GNU/Linux
FOSS_GNU/Linux
 

More from tutorialsruby

<img src="../i/r_14.png" />
<img src="../i/r_14.png" /><img src="../i/r_14.png" />
<img src="../i/r_14.png" />tutorialsruby
 
TopStyle Help & <b>Tutorial</b>
TopStyle Help & <b>Tutorial</b>TopStyle Help & <b>Tutorial</b>
TopStyle Help & <b>Tutorial</b>tutorialsruby
 
The Art Institute of Atlanta IMD 210 Fundamentals of Scripting <b>...</b>
The Art Institute of Atlanta IMD 210 Fundamentals of Scripting <b>...</b>The Art Institute of Atlanta IMD 210 Fundamentals of Scripting <b>...</b>
The Art Institute of Atlanta IMD 210 Fundamentals of Scripting <b>...</b>tutorialsruby
 
<img src="../i/r_14.png" />
<img src="../i/r_14.png" /><img src="../i/r_14.png" />
<img src="../i/r_14.png" />tutorialsruby
 
<img src="../i/r_14.png" />
<img src="../i/r_14.png" /><img src="../i/r_14.png" />
<img src="../i/r_14.png" />tutorialsruby
 
Standardization and Knowledge Transfer – INS0
Standardization and Knowledge Transfer – INS0Standardization and Knowledge Transfer – INS0
Standardization and Knowledge Transfer – INS0tutorialsruby
 
0047ecaa6ea3e9ac0a13a2fe96f4de3bfd515c88f5d90c1fae79b956363d7f02c7fa060269
0047ecaa6ea3e9ac0a13a2fe96f4de3bfd515c88f5d90c1fae79b956363d7f02c7fa0602690047ecaa6ea3e9ac0a13a2fe96f4de3bfd515c88f5d90c1fae79b956363d7f02c7fa060269
0047ecaa6ea3e9ac0a13a2fe96f4de3bfd515c88f5d90c1fae79b956363d7f02c7fa060269tutorialsruby
 
BloggingWithStyle_2008
BloggingWithStyle_2008BloggingWithStyle_2008
BloggingWithStyle_2008tutorialsruby
 
BloggingWithStyle_2008
BloggingWithStyle_2008BloggingWithStyle_2008
BloggingWithStyle_2008tutorialsruby
 
cascadingstylesheets
cascadingstylesheetscascadingstylesheets
cascadingstylesheetstutorialsruby
 
cascadingstylesheets
cascadingstylesheetscascadingstylesheets
cascadingstylesheetstutorialsruby
 

More from tutorialsruby (20)

<img src="../i/r_14.png" />
<img src="../i/r_14.png" /><img src="../i/r_14.png" />
<img src="../i/r_14.png" />
 
TopStyle Help & <b>Tutorial</b>
TopStyle Help & <b>Tutorial</b>TopStyle Help & <b>Tutorial</b>
TopStyle Help & <b>Tutorial</b>
 
The Art Institute of Atlanta IMD 210 Fundamentals of Scripting <b>...</b>
The Art Institute of Atlanta IMD 210 Fundamentals of Scripting <b>...</b>The Art Institute of Atlanta IMD 210 Fundamentals of Scripting <b>...</b>
The Art Institute of Atlanta IMD 210 Fundamentals of Scripting <b>...</b>
 
<img src="../i/r_14.png" />
<img src="../i/r_14.png" /><img src="../i/r_14.png" />
<img src="../i/r_14.png" />
 
<img src="../i/r_14.png" />
<img src="../i/r_14.png" /><img src="../i/r_14.png" />
<img src="../i/r_14.png" />
 
Standardization and Knowledge Transfer – INS0
Standardization and Knowledge Transfer – INS0Standardization and Knowledge Transfer – INS0
Standardization and Knowledge Transfer – INS0
 
xhtml_basics
xhtml_basicsxhtml_basics
xhtml_basics
 
xhtml_basics
xhtml_basicsxhtml_basics
xhtml_basics
 
xhtml-documentation
xhtml-documentationxhtml-documentation
xhtml-documentation
 
xhtml-documentation
xhtml-documentationxhtml-documentation
xhtml-documentation
 
CSS
CSSCSS
CSS
 
CSS
CSSCSS
CSS
 
0047ecaa6ea3e9ac0a13a2fe96f4de3bfd515c88f5d90c1fae79b956363d7f02c7fa060269
0047ecaa6ea3e9ac0a13a2fe96f4de3bfd515c88f5d90c1fae79b956363d7f02c7fa0602690047ecaa6ea3e9ac0a13a2fe96f4de3bfd515c88f5d90c1fae79b956363d7f02c7fa060269
0047ecaa6ea3e9ac0a13a2fe96f4de3bfd515c88f5d90c1fae79b956363d7f02c7fa060269
 
0047ecaa6ea3e9ac0a13a2fe96f4de3bfd515c88f5d90c1fae79b956363d7f02c7fa060269
0047ecaa6ea3e9ac0a13a2fe96f4de3bfd515c88f5d90c1fae79b956363d7f02c7fa0602690047ecaa6ea3e9ac0a13a2fe96f4de3bfd515c88f5d90c1fae79b956363d7f02c7fa060269
0047ecaa6ea3e9ac0a13a2fe96f4de3bfd515c88f5d90c1fae79b956363d7f02c7fa060269
 
HowTo_CSS
HowTo_CSSHowTo_CSS
HowTo_CSS
 
HowTo_CSS
HowTo_CSSHowTo_CSS
HowTo_CSS
 
BloggingWithStyle_2008
BloggingWithStyle_2008BloggingWithStyle_2008
BloggingWithStyle_2008
 
BloggingWithStyle_2008
BloggingWithStyle_2008BloggingWithStyle_2008
BloggingWithStyle_2008
 
cascadingstylesheets
cascadingstylesheetscascadingstylesheets
cascadingstylesheets
 
cascadingstylesheets
cascadingstylesheetscascadingstylesheets
cascadingstylesheets
 

Recently uploaded

Install Stable Diffusion in windows machine
Install Stable Diffusion in windows machineInstall Stable Diffusion in windows machine
Install Stable Diffusion in windows machinePadma Pradeep
 
My INSURER PTE LTD - Insurtech Innovation Award 2024
My INSURER PTE LTD - Insurtech Innovation Award 2024My INSURER PTE LTD - Insurtech Innovation Award 2024
My INSURER PTE LTD - Insurtech Innovation Award 2024The Digital Insurer
 
Transcript: New from BookNet Canada for 2024: BNC CataList - Tech Forum 2024
Transcript: New from BookNet Canada for 2024: BNC CataList - Tech Forum 2024Transcript: New from BookNet Canada for 2024: BNC CataList - Tech Forum 2024
Transcript: New from BookNet Canada for 2024: BNC CataList - Tech Forum 2024BookNet Canada
 
Automating Business Process via MuleSoft Composer | Bangalore MuleSoft Meetup...
Automating Business Process via MuleSoft Composer | Bangalore MuleSoft Meetup...Automating Business Process via MuleSoft Composer | Bangalore MuleSoft Meetup...
Automating Business Process via MuleSoft Composer | Bangalore MuleSoft Meetup...shyamraj55
 
Scanning the Internet for External Cloud Exposures via SSL Certs
Scanning the Internet for External Cloud Exposures via SSL CertsScanning the Internet for External Cloud Exposures via SSL Certs
Scanning the Internet for External Cloud Exposures via SSL CertsRizwan Syed
 
Bun (KitWorks Team Study 노별마루 발표 2024.4.22)
Bun (KitWorks Team Study 노별마루 발표 2024.4.22)Bun (KitWorks Team Study 노별마루 발표 2024.4.22)
Bun (KitWorks Team Study 노별마루 발표 2024.4.22)Wonjun Hwang
 
"Debugging python applications inside k8s environment", Andrii Soldatenko
"Debugging python applications inside k8s environment", Andrii Soldatenko"Debugging python applications inside k8s environment", Andrii Soldatenko
"Debugging python applications inside k8s environment", Andrii SoldatenkoFwdays
 
Nell’iperspazio con Rocket: il Framework Web di Rust!
Nell’iperspazio con Rocket: il Framework Web di Rust!Nell’iperspazio con Rocket: il Framework Web di Rust!
Nell’iperspazio con Rocket: il Framework Web di Rust!Commit University
 
Understanding the Laravel MVC Architecture
Understanding the Laravel MVC ArchitectureUnderstanding the Laravel MVC Architecture
Understanding the Laravel MVC ArchitecturePixlogix Infotech
 
Artificial intelligence in cctv survelliance.pptx
Artificial intelligence in cctv survelliance.pptxArtificial intelligence in cctv survelliance.pptx
Artificial intelligence in cctv survelliance.pptxhariprasad279825
 
WordPress Websites for Engineers: Elevate Your Brand
WordPress Websites for Engineers: Elevate Your BrandWordPress Websites for Engineers: Elevate Your Brand
WordPress Websites for Engineers: Elevate Your Brandgvaughan
 
"LLMs for Python Engineers: Advanced Data Analysis and Semantic Kernel",Oleks...
"LLMs for Python Engineers: Advanced Data Analysis and Semantic Kernel",Oleks..."LLMs for Python Engineers: Advanced Data Analysis and Semantic Kernel",Oleks...
"LLMs for Python Engineers: Advanced Data Analysis and Semantic Kernel",Oleks...Fwdays
 
Unraveling Multimodality with Large Language Models.pdf
Unraveling Multimodality with Large Language Models.pdfUnraveling Multimodality with Large Language Models.pdf
Unraveling Multimodality with Large Language Models.pdfAlex Barbosa Coqueiro
 
Connect Wave/ connectwave Pitch Deck Presentation
Connect Wave/ connectwave Pitch Deck PresentationConnect Wave/ connectwave Pitch Deck Presentation
Connect Wave/ connectwave Pitch Deck PresentationSlibray Presentation
 
Advanced Test Driven-Development @ php[tek] 2024
Advanced Test Driven-Development @ php[tek] 2024Advanced Test Driven-Development @ php[tek] 2024
Advanced Test Driven-Development @ php[tek] 2024Scott Keck-Warren
 
Story boards and shot lists for my a level piece
Story boards and shot lists for my a level pieceStory boards and shot lists for my a level piece
Story boards and shot lists for my a level piececharlottematthew16
 
Human Factors of XR: Using Human Factors to Design XR Systems
Human Factors of XR: Using Human Factors to Design XR SystemsHuman Factors of XR: Using Human Factors to Design XR Systems
Human Factors of XR: Using Human Factors to Design XR SystemsMark Billinghurst
 
DevEX - reference for building teams, processes, and platforms
DevEX - reference for building teams, processes, and platformsDevEX - reference for building teams, processes, and platforms
DevEX - reference for building teams, processes, and platformsSergiu Bodiu
 
Kotlin Multiplatform & Compose Multiplatform - Starter kit for pragmatics
Kotlin Multiplatform & Compose Multiplatform - Starter kit for pragmaticsKotlin Multiplatform & Compose Multiplatform - Starter kit for pragmatics
Kotlin Multiplatform & Compose Multiplatform - Starter kit for pragmaticscarlostorres15106
 

Recently uploaded (20)

Install Stable Diffusion in windows machine
Install Stable Diffusion in windows machineInstall Stable Diffusion in windows machine
Install Stable Diffusion in windows machine
 
My INSURER PTE LTD - Insurtech Innovation Award 2024
My INSURER PTE LTD - Insurtech Innovation Award 2024My INSURER PTE LTD - Insurtech Innovation Award 2024
My INSURER PTE LTD - Insurtech Innovation Award 2024
 
Transcript: New from BookNet Canada for 2024: BNC CataList - Tech Forum 2024
Transcript: New from BookNet Canada for 2024: BNC CataList - Tech Forum 2024Transcript: New from BookNet Canada for 2024: BNC CataList - Tech Forum 2024
Transcript: New from BookNet Canada for 2024: BNC CataList - Tech Forum 2024
 
Automating Business Process via MuleSoft Composer | Bangalore MuleSoft Meetup...
Automating Business Process via MuleSoft Composer | Bangalore MuleSoft Meetup...Automating Business Process via MuleSoft Composer | Bangalore MuleSoft Meetup...
Automating Business Process via MuleSoft Composer | Bangalore MuleSoft Meetup...
 
Scanning the Internet for External Cloud Exposures via SSL Certs
Scanning the Internet for External Cloud Exposures via SSL CertsScanning the Internet for External Cloud Exposures via SSL Certs
Scanning the Internet for External Cloud Exposures via SSL Certs
 
Bun (KitWorks Team Study 노별마루 발표 2024.4.22)
Bun (KitWorks Team Study 노별마루 발표 2024.4.22)Bun (KitWorks Team Study 노별마루 발표 2024.4.22)
Bun (KitWorks Team Study 노별마루 발표 2024.4.22)
 
"Debugging python applications inside k8s environment", Andrii Soldatenko
"Debugging python applications inside k8s environment", Andrii Soldatenko"Debugging python applications inside k8s environment", Andrii Soldatenko
"Debugging python applications inside k8s environment", Andrii Soldatenko
 
Nell’iperspazio con Rocket: il Framework Web di Rust!
Nell’iperspazio con Rocket: il Framework Web di Rust!Nell’iperspazio con Rocket: il Framework Web di Rust!
Nell’iperspazio con Rocket: il Framework Web di Rust!
 
Understanding the Laravel MVC Architecture
Understanding the Laravel MVC ArchitectureUnderstanding the Laravel MVC Architecture
Understanding the Laravel MVC Architecture
 
Artificial intelligence in cctv survelliance.pptx
Artificial intelligence in cctv survelliance.pptxArtificial intelligence in cctv survelliance.pptx
Artificial intelligence in cctv survelliance.pptx
 
WordPress Websites for Engineers: Elevate Your Brand
WordPress Websites for Engineers: Elevate Your BrandWordPress Websites for Engineers: Elevate Your Brand
WordPress Websites for Engineers: Elevate Your Brand
 
"LLMs for Python Engineers: Advanced Data Analysis and Semantic Kernel",Oleks...
"LLMs for Python Engineers: Advanced Data Analysis and Semantic Kernel",Oleks..."LLMs for Python Engineers: Advanced Data Analysis and Semantic Kernel",Oleks...
"LLMs for Python Engineers: Advanced Data Analysis and Semantic Kernel",Oleks...
 
DMCC Future of Trade Web3 - Special Edition
DMCC Future of Trade Web3 - Special EditionDMCC Future of Trade Web3 - Special Edition
DMCC Future of Trade Web3 - Special Edition
 
Unraveling Multimodality with Large Language Models.pdf
Unraveling Multimodality with Large Language Models.pdfUnraveling Multimodality with Large Language Models.pdf
Unraveling Multimodality with Large Language Models.pdf
 
Connect Wave/ connectwave Pitch Deck Presentation
Connect Wave/ connectwave Pitch Deck PresentationConnect Wave/ connectwave Pitch Deck Presentation
Connect Wave/ connectwave Pitch Deck Presentation
 
Advanced Test Driven-Development @ php[tek] 2024
Advanced Test Driven-Development @ php[tek] 2024Advanced Test Driven-Development @ php[tek] 2024
Advanced Test Driven-Development @ php[tek] 2024
 
Story boards and shot lists for my a level piece
Story boards and shot lists for my a level pieceStory boards and shot lists for my a level piece
Story boards and shot lists for my a level piece
 
Human Factors of XR: Using Human Factors to Design XR Systems
Human Factors of XR: Using Human Factors to Design XR SystemsHuman Factors of XR: Using Human Factors to Design XR Systems
Human Factors of XR: Using Human Factors to Design XR Systems
 
DevEX - reference for building teams, processes, and platforms
DevEX - reference for building teams, processes, and platformsDevEX - reference for building teams, processes, and platforms
DevEX - reference for building teams, processes, and platforms
 
Kotlin Multiplatform & Compose Multiplatform - Starter kit for pragmatics
Kotlin Multiplatform & Compose Multiplatform - Starter kit for pragmaticsKotlin Multiplatform & Compose Multiplatform - Starter kit for pragmatics
Kotlin Multiplatform & Compose Multiplatform - Starter kit for pragmatics
 

XAMPP Server Setup

  • 1. Andy Melton's XAMPP Server Installation Tutorial XAMPP Server Finally, after the Thanksgiving holiday I am able to sit down and start this blog article. In this one I want to go through the steps that are involved in setting up your own web server. This web server will be one that you can actually use to host a real world website or you can use it for testing your website or application offline. What is XAMPP? I decided that the quickest way to get you up and running with your own web server would be to use Apache Friend's XAMPP. XAMPP is an application that combines Apache (the web server), MySQL (database), PHP (scripting language) and phpMyAdmin (database administration) all into one. Normally, to set up a web server you'd have to install each of those individually. With XAMPP, you install one application and you have a fully functional server. Now, you're probably thinking, “Well, if it's that easy then why is this blog entry HUGE!?” Well. The reason this is a large entry is I am going to walk you through all the steps of setting up XAMPP AND make sure that you set it up so that it is secure! The default XAMPP installation is meant for developers on a local network, not for a real world installation, however, there are ways of making the installation secure and ready for real world use. Also, there are a few other things we'll need to do other than installing XAMPP to get things going. Installing on Fedora Core 5 There are many distributions of Linux out there, my distribution of choice is Fedora Core. I prefer it because I've always had the most luck with it and have friends who use it. The steps contained within this article could be easily applied to Ubuntu or another distribution. You may also be asking me why I am going to install this using an outdated version of Fedora. The main reason for this is that I have not had the time to sit down and do an install of XAMPP and all the other needed applications on Fedora Core 6 to make sure everything works. I know it works with Fedora Core 5 and 6 is still a little buggy. Maybe next year when 7 comes out I'll update this article for installing it on 6! Requirements ● Fedora Core 5 ISO/CD/DVD ● VMware Server or Dedicated hardware for installing ● Public IP address of your DSL/Cable Internet connection Optional Requirements ● Domain Name http://andymelton.net Page 1 of 28
  • 2. Andy Melton's XAMPP Server Installation Tutorial Setting up a virtual machine to install Fedora on I am going to install Fedora into a virtual machine using VMware Server. It's a free virtualization product from VMware. If you've got an old machine laying around then this would be a great project for you to be able to revive that old piece of hardware, however, I'm using VMware Server because I can take screenshots of the installation process and I also don't have a spare computer laying around! After you have downloaded and installed VMware Server, the first thing you'll do is open up the application. It will ask you whether you want to open up a virtual machine on your local host or a remote host. We'll choose local. Now, we need to set up a virtual machine. Click on “New Virtual Machine” We need to choose the “Custom” field here because we need to make additional changes in the configuration rather than using the defaults. http://andymelton.net Page 2 of 28
  • 3. Andy Melton's XAMPP Server Installation Tutorial Next we choose the guest operating system. We are of course going to choose “Linux” here. Since VMware does not diplay Fedora Core as a version, we are going to choose “Other Linux”. We'll re-name the files so that it has Fedora attached to all of them. Where it says “Virtual Machine Name” enter “Fedora Core Linux”, you could simply enter “Fedora”, “XAMPP”, “Server”, whatever you like. If you need to change the location of the virtual machine, this is where you'll do it. I have mine on a separate partition that can store the large file that the virtual disk creation utility will make. Since we are using the custom configuration wizard, we can choose from the get-go whether or not we want to make this virtual machine private or not. For the purposes of this tutorial and for my purposes, I always choose not to make the virtual machine private. http://andymelton.net Page 3 of 28
  • 4. Andy Melton's XAMPP Server Installation Tutorial From this screen you can do a couple of things. The first one is control the user that can power on the virtual machine that you are creating. I normally leave the default here. Now, the second option is quite interesting. Let's say that you are going to want to run this server at all times so you could test your software out as you work without having to wait on the virtual machine to start up. You could choose to have your virtual machine boot up when your computer starts up. For the purposes of this tutorial, we'll accept the default. From here, you'll decide whether you want one or two processors running your virtual machine. I have never experimented with two processors, I suppose I should at some point, however, I will probably wait until I have a dual core machine. I usually leave this to the default of one processor. This is where you will decide how much memory you want to allocate to your virtual machine. On the machine I am setting up this virtual machine on I have 1 gig of RAM installed, so, I am going to leave the default value here. If you have more RAM then you might want to add additional RAM to the VM (virtual machine). http://andymelton.net Page 4 of 28
  • 5. Andy Melton's XAMPP Server Installation Tutorial Using a bridged network connection will give the virtual machine it's own dedicated IP address on your local area network (LAN). This is what we need so we can configure the server later. Leave this set to the default. Now, we need to create a new virtual disk. At this point in the process, if you had already created a virtual machine you could use the previously created disk. The last option lets you use real hard disk space instead of a virtual hard drive. At this part of the wizard, make sure that you choose IDE disk type. If you use SCSI you will have problems when you go to install Fedora, or, at least I have always had issues when I have tried to use that option, the installer is unable to detect a hard drive. http://andymelton.net Page 5 of 28
  • 6. Andy Melton's XAMPP Server Installation Tutorial The next step is to allocate some disk space for the virtual machine. Depending on the amount of disk space that you have available, you may or may not change the size of the virtual disk. If you have enough hard drive space, stick with the default. Later, if you run out of disk space in the VM you can add an additional virtual disk. Also, in this step I would highly recommend that you allocate all disk space now. Whenever I don't allocate the disk space and let the drive grow as it needs to, I always seem to have performance issues. I also never split the disk into 2GB files. The reason some people do this is so that it is easier to backup the virtual machine and some file systems do not support files over the size of 2 gigabytes. In the screen above, by default you will see “otherlinux” or something like that. You can change this to whatever you like, leave it the default, I personally think it looks nicer to change it to something like “fedoracore5.vmdk” so that you'll recognize the file as you're going through files on the host machine.. I should warn you, hopefully I'm not warning you too late. Make sure you close un-essential applications during this process. Sometimes when I am doing this I forget to stop my music from playing and it drives me insane as the disk is being created, it will play a couple of seconds, then cut out for about 5 minutes, then play 5 more seconds. This has sometimes caused the disk creation process to fail, so, give it all the power you can give it! http://andymelton.net Page 6 of 28
  • 7. Andy Melton's XAMPP Server Installation Tutorial I have the ISO images burned to CD, so, whenever I go through this process I need to tell VMware to use my host's physical drive. I double click on the CD-ROM device in the “Devices” list and then tell VMware to use the drive I have inserted the disc into. Make sure you tell it to connect the device at power on and to connect exclusively to this virtual machine. If you want to access the physical drive from the host machine, you'll need to disconnect the virtual machines control over the physical drive. If you've just downloaded Fedora Core 5 you can easily tell VMware the location of the ISO images that you just downloaded. It is on the same screen that I mentioned above. Just browse and navigate to the ISO image. During the installation, you'll have to change the ISO image (if you've downloaded the 5 disc version). To do this, simply right click on the CD-ROM drive in the lower right hand corner of your screen, click on edit and then change the ISO image. Once you have completed all of these steps, you can click on the Start button and we'll get started setting up your XAMPP Server. http://andymelton.net Page 7 of 28
  • 8. Andy Melton's XAMPP Server Installation Tutorial To begin the installation, we need to choose the installer that we are going to use. Fedora gives us a lot of options. We can choose to install in graphical or text mode. If you're computer doesn't have a lot of resources you may want to use the test based installer, it's not hard to use at all. However, for this installation I am going to show you how to install Fedora using the graphical installer. To begin the installation, from this screen, press Enter on your keyboard. This next screen simply wants to know if you want to check your CD/ISO images to make sure they are not bad before you begin the installation. Usually, if I've just burned the ISO images I will go ahead and run this test so that I am sure the images are OK. If I have done the test before, I usually skip it. Use your keyboard to either select OK or Skip. http://andymelton.net Page 8 of 28
  • 9. Andy Melton's XAMPP Server Installation Tutorial Click on Next to continue installation. Choose your language. Obviously, we'll choose English and click on Next. The next screen will ask you about the type of keyboard you are using, select the type and click on Next on that screen as well. http://andymelton.net Page 9 of 28
  • 10. Andy Melton's XAMPP Server Installation Tutorial You may get a screen that says “The partition table on device hda was unreadable. To create new partitions it must be initialized, causing loss of ALL DATA on this drive.” If you're installing onto a machine that you have valuable data and don't want to wipe the hard drive, you might want to re-consider. If you're installing in a virtual machine environment or on a computer where you don't mind erasing everything, we can safely continue. Remember, the way we've set this virtual machine up so far is that it is contained, so it won't effect anything on your computer other than taking up additional disk space. The next step is to give Linux a partition on the hard drive. If you're installing onto an old computer that you don't mind erasing every file on, you can simply click on Next and let Fedora take care of the partitioning for you. If you're on a dual boot machine, you'll want to install Fedora onto a separate partition so that you don't damage the other operating system installed on your machine. For the purposes of this tutorial, we'll simply select Next. You may get a message that asks if you want to destroy all data, again, like before, if you're using a VM or on a dedicated system, you can safely say yes. Accept the default networking configuration. http://andymelton.net Page 10 of 28
  • 11. Andy Melton's XAMPP Server Installation Tutorial On this screen, make sure the region & time zone are correct and click on Next. At this part of the installation you will enter your Root password. The root account is the account that gives you access to make administrative changes to the system. Make it a strong password. Don't forget it. Enter it twice. Click on Next to continue. http://andymelton.net Page 11 of 28
  • 12. Andy Melton's XAMPP Server Installation Tutorial This part of the installation asks you what type of system you are installing. Since we are installing a server we're going to select that. Selecting this will keep the installer from installing un-needed software such as games, office suites, programming tools, etc. Select Web Server and also select Customize now and click on Next. On this screen, un-check the GNOME Desktop Environment and if KDE is checked, un-check it as well. We won't be using either of these desktop environments, we will be installing one that does not require as much memory. http://andymelton.net Page 12 of 28
  • 13. Andy Melton's XAMPP Server Installation Tutorial Also, we need to go to the Servers section of the application section and un-check all of the servers that are checked by default here. The reason we are un-checking these is we don't need a print server and we are installing the Web Server that is bundled with XAMPP. Once you have un-selected the servers click on Next to continue. From here we can simply click on Next and the installation process will begin. http://andymelton.net Page 13 of 28
  • 14. Andy Melton's XAMPP Server Installation Tutorial The installation of Fedora Core is underway. If you're using multiple Cd's or ISO images, the installer will ask you to replace the disk each time as it needs them. If you followed these steps then you should only need to do this once. Once the installation is complete, allow the system to reboot and you'll come to this Welcome screen which is a part of the First Boot process. Click on Forward to continue. http://andymelton.net Page 14 of 28
  • 15. Andy Melton's XAMPP Server Installation Tutorial It may seem strange to have to accept a license agreement for free software, however, you do. So, let's accept it and continue. Select FTP, Secure WWW (HTTPS), WWW (HTTP) and also make sure SSH is checked. http://andymelton.net Page 15 of 28
  • 16. Andy Melton's XAMPP Server Installation Tutorial Keep the default configuration of SELinux. Make sure the date and time settings are correct. http://andymelton.net Page 16 of 28
  • 17. Andy Melton's XAMPP Server Installation Tutorial Choose the resolution you'll want to use. Since I am using a virtual machine I always leave it at 800 x 600 and I also change the color depth to Thousands of Colors. I seem to have less problems arise when I use that option. Earlier we configured the root account. Now we need to set up a regular user. We won't be using the root account to login to http://andymelton.net Page 17 of 28
  • 18. Andy Melton's XAMPP Server Installation Tutorial the system. We'll only use the root account when we need to make an administrative change. This is highly recommended as using root can cause serious damage to the system if you delete a needed system file. Although not shown in this tutorial, you may get a screen that asks you to configure your sound card. Click Finish to continue and login using the system user account that you just created. Now we're logged in and at a desktop. Now, you may be thinking, GEEZ, this looks really horrible. Well, it does, we're only using the basic desktop environment, remember we didn't install one of the other desktop environments because we are going to install a more minimalistic desktop environment that doesn't use a lot of system resources. When you login to the system, Firefox should already be started up. You'll have to click with your mouse to activate a space for it. With this minimalistic desktop environment, when you start up an application you have to either draw a space for it or click somewhere to activate the application. Once you get Firefox opened we need to go to http://freshrpms.net/ http://andymelton.net Page 18 of 28
  • 19. Andy Melton's XAMPP Server Installation Tutorial Here is a direct link to the file we need to download, if for some reason it does not work, follow the steps in the next paragraph: http://ftp.freshrpms.net/pub/freshrpms/fedora/linux/5/freshrpms-release/freshrpms-release-1.1-1.fc.noarch.rpm Remember, you'll have to click an area of the screen to activate the download manager. Once you're on the FreshRPM website, click on Packages and then select Fedora Linux 5 (Bordeaux) current add-on packages. On the left side of the screen, scroll down until you see a link titled freshrpms-release. Click on that link. Then at the top of the next page click on freshrpms-release-1.1-1.fc.noarch.rpm under where it says: “The information on this page is for freshrpms-release-1.1-1.fc.src.rpm, a source rpm you are probably more interested in these binaries built from it.” That should take you to another page where you should see a link for freshrpms-release-1.1-1.fc.noarch.rpm. Finally, click the link and simply save it to your hard disk. You will need to create a space for the download manager. Click with the left mouse button in some space of the desktop and click on Kill. You should get an icon that looks rather grim. Click on the Firefox window and it should close Firefox. If you're back at a terminal like the one above, good. If you're not, then you'll need to click with the regular mouse button again and select xterm, draw a space for it and continue. The first thing we'll need to do at the prompt is to type su press Enter and then enter our root password. Once you have done that, type ls and press Enter, you should see a file listed in red with the name freshrpms-release-1.1-1.fc.noarch.rpm Type rpm -ivh freshrpms-release-1.1-1.fc.noarch.rpm and press Enter. The FreshRPMs package should now be installed and we can begin installing XFCE. At the prompt type yum -y groupinstall XFCE and press Enter. This will install the XFCE desktop environment. You'll know it is done when the installer says complete and drops to a command prompt. http://andymelton.net Page 19 of 28
  • 20. Andy Melton's XAMPP Server Installation Tutorial Now click again with your left mouse button (the one that brings up the menu we brought up to use the Kill function) and click on Exit. You should now be back to a login screen. Click on Session and then click on Xfce 4 and then click on Change Session. Enter your username and password pressing Enter for each and then it will ask you whether or not you want to make Xfce 4 the default for future sessions. Click on Make Default. This will ensure that Xfce loads each time you login. You should now be at a desktop like the one shown above. http://andymelton.net Page 20 of 28
  • 21. Andy Melton's XAMPP Server Installation Tutorial The next thing that we are going to do is disable some of the un-needed services that start up when the operating system starts. Doing this will free up some memory (RAM). To do this, on your desktop, right click, go to System and then Services. You'll then be asked to enter your root password, enter it and press enter and the services screen will load. If any of the following services are checked, un-check them: apmd, bluetooth, firstboot, diskdump, netdump, gpm, isdn (unless you are using an ISDN connection), kudzu (unless you'll be adding new hardware to the machine), rpcgssd, rpcidmapd, rpcsvcgssd. There are other services that you could safely disable, however for the purposes of this tutorial I have decided to leave them enabled due to the fact that you may need a feature due to your particular hardware configuration. Visit the following URL to find a complete list of Fedora services, their descriptions and whether you can disable them or not. REMEMBER, you're running a server, so, keep that in mind if you disable anything else. http://www.mjmwired.net/resources/mjm-services-fc5.html Once you have un-checked the un-needed services, at the top of the window, click on save and then close the window and you'll want to reboot the system. Logoff, reboot and log back in to continue. Download and Install XAMPP The next thing that we need to do is download XAMPP. Open Firefox (Right click on desktop, point to Network, then click on Firefox). Then enter the following URL: http://www.apachefriends.org/en/xampp.html Once you're on that page, scroll down until you see “XAMPP for Linux”, when you do, click on that link, then scroll down and click on the step 1 link for downloading. Then, click on the “XAMPP Linux #” (at the time of this writing the version number is 1.5.5a). Once you click that, you'll be taken to source forge where you'll choose a download location closest to you, then, you'll be able to download the file. When you get the “Save to Disk” dialog, simply click on OK and let the file download into your home directory (which is what will happen when you click on OK). For now, we can go ahead and close Firefox, or, minimize it, we'll need it again later. http://andymelton.net Page 21 of 28
  • 22. Andy Melton's XAMPP Server Installation Tutorial Right click on your desktop and click on Terminal and you should see a window similar to the one above. The first thing you need to do is to change over to the root account, to do this type su and press enter, you'll then be required to enter your root password. Enter the password and then continue with the next step. To install XAMPP, you need to type in the following and press enter tar xvfz xampp-linux-1.5.5a.tar.gz -C /opt To start XAMPP, at the prompt, type the following and press enter: /opt/lampp/lampp start (on a sidenote, if you need to stop the server you can use the same command but replace start with stop) Now we need to test the installation. With the browser open, enter the following address: http://localhost/ That should bring up a page with different languages to choose from, choose your language and you should then see another page welcoming you to XAMPP for Linux. Test on another machine, on same network. NOTE: If you're using a virtual machine you could test this using the host machine. Now, if you've got another machine on your local network. It would be a good idea to see if you could access the server from another machine. You'll need to know the IP address of the server. To get the IP address, go back to the terminal and type at the prompt: /sbin/ifconifg Look for “inet addr” under the information for eth0. Eth0 is the primary network interface, if there are additional network cards in your machine you'll get another address for those. Typically it is a number such as 192.168.1.38 (that is the address of my server, yours will be different). Once you get the address, go to another machine on the same network (it won't work outside of your network, yet) and type the URL as such: http://192.168.1.38 http://andymelton.net Page 22 of 28
  • 23. Andy Melton's XAMPP Server Installation Tutorial Securing XAMPP Now that we have XAMPP up and running, we need to make sure that it is secure. Out of the box, XAMPP is designed to only run in a local network environment because many things are left open. Leaving these things open and un-protected would be devastating to your website. Luckily, XAMPP on Linux is VERY easy to secure. Simply open up the terminal change to root by entering “su” followed by the root password and then enter the following and press enter: /opt/lampp/lampp security You can now go to your XAMPP homepage and click on the security link on the side and make sure everything was successfully secured. Make XAMPP startup during boot When you reboot your system, XAMPP will no longer be running. To make it startup whenever you reboot, follow the steps on this site: http://www.apachefriends.org/en/faq-xampp-linux.html#fsl DSL/Cable Modem Configuration To allow users from outside of your network to access your web server we need to configure your DSL/Cable modem/router so that HTTP & FTP access requests will reach your server. To do this, we'll need to access your Internet gateway (the gateway is your dsl/cable modem/router). We need to know the IP address of the gateway device. Typically it is something like 192.168.1.1 Since all gateway devices are different, you may have to check the documentation for the device, run ipconfig (Windows) or ifconfig (Linux) or contact your ISP to find out the address. Once you find out the address, go to your browser and enter it. My gateway is a Westell WireSpeed 4 Port Router. I'll be using it to show you how to configure your connection. Your gateway will probably be different but the process should fundamentally be the same. First. I am going to point to Configuration then click on Service Configuration. Then I am going to click on define custom service near the bottom of the screen. From the popup that appears, I am going to choose port forwarding. http://andymelton.net Page 23 of 28
  • 24. Andy Melton's XAMPP Server Installation Tutorial In the Service Name field I am going to enter the name of the server, then the port and then the protocol that the service uses. What you enter for the service name does not really matter, however, I do this so when I'm looking at the list of services I will know exactly what is what. In the Global Port Range enter 80, enter 80 for Base Host Port as well. The protocol is TCP. When you have the information entered above, click next and then close to continue. The service is not activated immediately. Click on the dropdown list, scroll to the bottom and you'll see the service that you just entered, select it and click enable. It will ask you which computer you would like for the data to be redirected to, you'll need to know both the machine name of your computer or the IP address...it may not show one or the other. The computer you want it to forward it to is the one you just installed XAMPP onto. We'll need to do this a couple of times. The second time we'll enter FTP Server and the port for it is 21. We'll also need to set up another service for secure HTTP access which is port 443. You should now be able to test your web server outside of your network, go to a website such as Ipchicken.com and get your public IP address. Ask a friend, family member or try to access your server from an Internet cafe or work. If this does not work, your ISP may be blocking port 80 on your Internet connection. If that is the case, you'll have to change the IP addresses from the default 80 to something else. You'll also have to change the port numbers in the server configuration files. Once we get to making changes in the configuration files, I'll tell you where to make the change. Domain Name Configuration If you do not have a domain name then you can simply enter the IP address to get to your website. However, most likely you will have a domain name that you will want to use to access your server, it's a lot easier for people to remember how to get to your site with a domain name. Whichever hosting company you use you'll need to point the @ record to your IP address and then point the WWW and FTP records to the @ record. If you're using GoDaddy you'll login to your account and go to the Domain Control Center and then the Total DNS and MX Records section of the website to edit the DNS & MX records. Also, you'll need to change the nameservers to the GoDaddy parked nameservers. The ones I use for my domain are: PARK21.SECURESERVER.NET PARK22.SECURESERVER.NET If you're using GoDaddy, the nameservers above should work for your account as well. http://andymelton.net Page 24 of 28
  • 25. Andy Melton's XAMPP Server Installation Tutorial Virtual Hosts The setup that we have now will work as-is. However, what if you wanted to host a particular website in it's own folder or you wanted to host multiple websites. What we need to do to get that going is set up a virtual host for each website. Open up the terminal, type su and press enter, enter the root password and enter, then, enter the following and press enter: cd /opt/lampp/etc/extra Once you are in that directory, you can enter this command and press enter: vi httpd-vhosts.conf You've just opened the virtual host configuration file using an editing program called VI. To be able to make a change we'll first need to press the “A” key on the keyboard to activate writing. Then, we'll scroll down to the virtual host configuration area. The screen shot above will help you locate the section. You should see two sections like the one above. We'll be working with the second one, leaving the first one alone. A friend of mine helped me with configuring virtual hosts. Thanks, Kevin! (complexdistress.com). The configuration doesn't include everything that the default has, but, it seems to work very well. The DocumentRoot may give you problems, you'll need to create that directory by connecting via FTP and then creating it. The default FTP username for XAMPP is nobody and then use whatever password you entered whenever you went through the security wizard. Now that you've got the virtual host configured, you need to save the file press the Escape then Shift + ; and then type wq this writes the file and quits the program. I always like to restart XAMPP after I do this to make sure the changes take effect. At the prompt type: /opt/lampp/lampp restart Using an alternative port for Apache Some ISPs block customers from running web servers on their Internet connection. Some block it for security reasons. If your ISP is one that does block access on port 80, which is the default for website traffic. You can change the default port number to something like 1080 or 8080. You'll have to make sure wherever there is an 80 listed as the port number, you'll have to change that to the port you decided to use. You'll need to make the change in the virtual host configuration file, the DNS settings on your domain registrars website. You'll also have to edit a file called httpd.conf which is the configuration file for Apache. http://andymelton.net Page 25 of 28
  • 26. Andy Melton's XAMPP Server Installation Tutorial From a terminal, login as root, then type: cd /opt/lampp/etc and press enter. Once there, enter: vi httpd.conf Once the file is open, scroll down until you see a section like the one above that says “Listen.” That is where you'll change the port for the web server. Once you change it save the file like you did the virtual host file. FTP Users NOTE: The following steps are a re-write of the steps from: http://fedoraforum.org/forum/archive/index.php/t-966.html The default installation of XAMPP includes an FTP account (username is nobody) that you can use if you're going to be the only person uploading files to the server. However, if you are going to have multiple people accessing the server or want to have different FTP accounts for each domain on the server, then, you'll need to set up additional FTP accounts. The first thing we need to do is add a line to /etc/shells, open up the Terminal, login as root and then type: vi /etc/shells When the file opens, after the last entry add the following: /bin/false Once you do that, save the file and exit. Now, right click on your desktop and point to Other then Users and Groups. Once there we'll need to create a new group called ftp-users. Create as many users as you'll need, just make sure you change the Login shell to /bin/false and add them to the ftp-users group. The next thing that we need to do is to create some folders for the users. To do this we're going to use the terminal again, so let's start it up and login as root. Now we need to navigate to the htdocs folder, type: cd /opt/lampp/htdocs once you're there, we'll create the directories that we need for each user logging onto the server to upload files. To create a folder enter http://andymelton.net Page 26 of 28
  • 27. Andy Melton's XAMPP Server Installation Tutorial mkdir foldername and then enter. Do that for as many folders as you'll need. The next thing we need to do is to change the owner of each folder. If we created a folder in htdocs called username and we also have a username in the users and groups then we'd enter the following command: chown -R username /htdocs/username/ Now, we need to go back to the users and groups and change the home folder for each user. This way, whenever the user FTP's into the server it will load the directories that you created for them. Lock FTP Users to home directory As it stands right now, FTP users can FTP in to the server and have the ability to see other peoples files on the server. What we want to do is lock them into their own home directory, that we specified above. So, to do this, launch a terminal window, enter cd /opt/lampp/etc Next, we need to open a file named proftpd.conf, enter vi proftpd.conf, navigate to the location in the file that says DocumentRoot /opt/lampp/htdocs, change that to say DocumentRoot ~ save the file and exit. Reboot XAMPP by entering /opt/lampp/lampp restart. The only downfall to doing this is that we'll need to create a new user for ourselves so we can quickly access the htdocs folder via FTP. Now that you know how to create a user on the system and change the home directory, you should be able to do this yourself. Static IP Address (for local network) Now that we have everything installed and are able to tell what our IP address range is. We might want to assign a static IP address to the network card of the virtual machine or the system you just installed Fedora onto. Right click on your desktop, point to Other and then click on Network. You'll be asked for the root password. In the devices list, select eth0, typically it is the only one listed. Then at the top of the screen click on Edit. Once you get to the edit screen, look down to where there is an option for “Statically set IP address” and click the radio button beside it. Once you do, enter an IP, remember, your IP address may be different. Open the terminal and type /sbin/ifconfig and press enter. Find out what your current IP address is and use that for your static IP address. You'll need to give it a subnet and default gateway as well, that information is also in the output of /sbin/ifconfig. Click on OK and accept the changes, don't reboot yet though. http://andymelton.net Page 27 of 28
  • 28. Andy Melton's XAMPP Server Installation Tutorial Click on the DNS tab and enter the Primary DNS address, it will more than likely be exactly the same address as the default gateway address. Click on File then Save. Accept the changes, close network configuration window and reboot computer. Static IP Address (Public IP Address) Unfortunately, I am unable to give you a static IP address for your public IP address. Remember your public IP address is the address that you have your domain pointing to. Most ISPs do not give their customers a static IP address, if you ask they may be able to provide you with one but might want you to upgrade to a business account or pay an additional monthly fee. There is hope. Although beyond the scope of this course, you can use a dynamic DNS service. What you would do is sign up for their service, you would install some software on your computer and every time your public IP address changes, your DNS address would be updated with that new IP address. The services I have looked into are a bit pricey, there are some that offer free services but they do not allow you to use your own domain name with the free services. If you're not looking to use these services you will want to make sure you check your public IP address on a regular basis to make sure it has not changed. One of the best ways to check might be to simply change your homepage so you can check regularly. When your public IP address does change, make sure to go back to your domain registrar and update the DNS information. Use a website such as IPChicken.com to check your public IP address. The End I greatly appreciate you taking the time to download this tutorial. I hope that you found it easy to use and understandable. I hope you now have a fully functioning web server. If you have requests for future tutorials, please contact me on my website at: http://andymelton.net Thanks again, Andy T. Melton http://andymelton.net Page 28 of 28