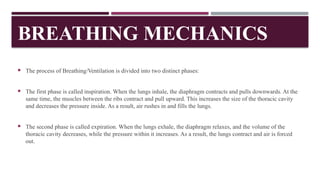
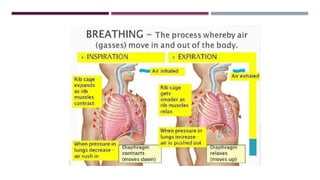
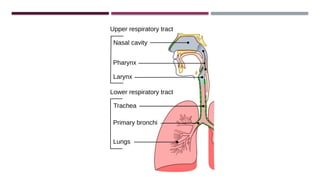
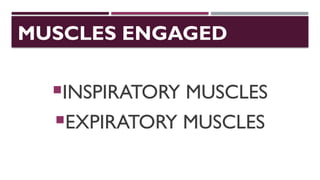
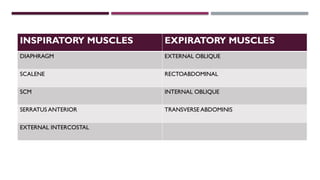
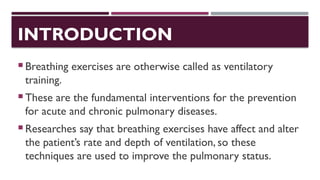
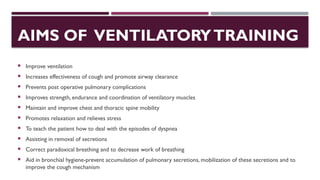
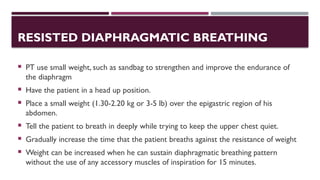
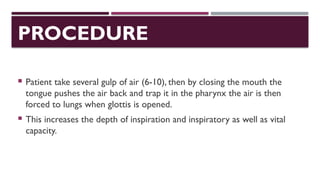
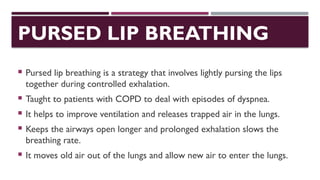
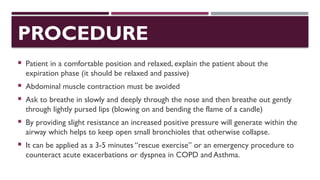
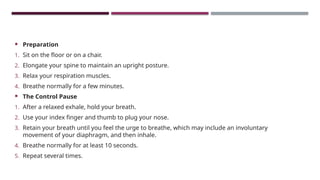
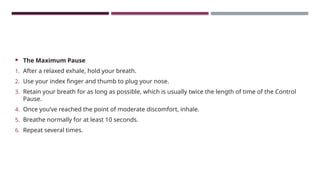
BREATHING EXERCISES
DR. DEEPAKYADAV
(HEART-LUNGTRANSPLANT PHYSICAL THERAPIST)
ASSISTANT PROFESSOR
DOLPHIN INSTITUTE OF BIOMEDICAL AND NATURAL SCIENCES
BREATHING?
VENTILATION?
RESPIRATION?
BREATHING MECHANICS
 The process of Breathing/Ventilation is divided into two distinct phases:
 The first phase is called inspiration. When the lungs inhale, the diaphragm contracts and pulls downwards. At the
same time, the muscles between the ribs contract and pull upward. This increases the size of the thoracic cavity
and decreases the pressure inside. As a result, air rushes in and fills the lungs.
 The second phase is called expiration. When the lungs exhale, the diaphragm relaxes, and the volume of the
thoracic cavity decreases, while the pressure within it increases. As a result, the lungs contract and air is forced
out.
BREATHING AND RESPIRATION
 ANATOMY
 PHYSIOLOGY
 BIOCHEMISTRY
 MECHANICS
UPPER RESPIRATORYTRACT
LOWER RESPIRATORYTRACT
MUSCLES ENGAGED
INSPIRATORY MUSCLES
EXPIRATORY MUSCLES
INSPIRATORY MUSCLES EXPIRATORY MUSCLES
DIAPHRAGM EXTERNAL OBLIQUE
SCALENE RECTOABDOMINAL
SCM INTERNAL OBLIQUE
SERRATUS ANTERIOR TRANSVERSE ABDOMINIS
EXTERNAL INTERCOSTAL
INTRODUCTION
 Breathing exercises are otherwise called as ventilatory
training.
 These are the fundamental interventions for the prevention
for acute and chronic pulmonary diseases.
 Researches say that breathing exercises have affect and alter
the patient’s rate and depth of ventilation, so these
techniques are used to improve the pulmonary status.
AIMS OF VENTILATORYTRAINING
 Improve ventilation
 Increases effectiveness of cough and promote airway clearance
 Prevents post operative pulmonary complications
 Improves strength, endurance and coordination of ventilatory muscles
 Maintain and improve chest and thoracic spine mobility
 Promotes relaxation and relieves stress
 To teach the patient how to deal with the episodes of dyspnea
 Assisting in removal of secretions
 Correct paradoxical breathing and to decrease work of breathing
 Aid in bronchial hygiene-prevent accumulation of pulmonary secretions, mobilization of these secretions and to
improve the cough mechanism
PRINCIPLES
 Areas of exercises
 Explanation and instructions to the patient
 Patient position
 Evaluate the patient
 Demonstration of exercise
 Patient practice
PROCEDURE
 Choose a quite area to get a proper interaction with minimal distraction
 Explain the patient about the aim and how it works for his impairment
 Have the patient in semi-fowlers position, flexing the hip and knees with pillow support, to relax abdominal
muscles.
 Other positions such as supine, sitting, or standing may be used as the patient progresses during treatment.
 Observe and access the patient’s spontaneous breathing pattern while at rest and during activity.
 Determine whether Rx is indicated or not.
 If necessary teach the patient relaxation techniques, relax the muscles of upper thorax neck and shoulder to
minimize the use of accessary muscle work.
 Special attention on SCM, upper trapezius and levator scapulae.
 Demonstrate the patient breathing pattern.
 Have the patient practice the correct technique in variety of positions at rest and with activity.
PRECAUTIONS
 Never allow the patient to force expiration-it may increase the turbulence
in the airway which leads to bronchospasm and airway resistance.
 Avoid prolonged expiration-it causes the patient to gasp with the next
inspiration and the breathing pattern become irregular and inefficient.
 Do not allow the patient to start inspiration with accessory muscles and
upper chest, advise him that upper chest should be quiet during breathing.
 Allow the patient to perform deep breathing only for 3-4 times (inspiration
and expiration) to avoid hyperventilation.
INDICATIONS
 Cystic fibrosis
 Bronchiectasis
 Atelectasis
 Lung abscess
 Pneumonias
 Acute lung diseases
 For patients with a high spinal cord lesion/spinal cord injury, myopathies etc.
 COPD-emphysema, CB
 After surgeries (thoracic, abdominal, orthopedic)
 Bed-ridden patients (retained secretions)
 As relaxation procedures
CONTRAINDICATIONS
 Severe pain and discomfort
 Acute medical or surgical emergency
 Patients with reduced conscious level
 Increased ICP
 Unstable head or neck injury
 Active hemorrhage with hemodynamic instability or hemoptysis
 Flail chest
 Uncontrolled hypertension
Rib or vertebral fractures or osteoporosis
Acute asthma or tuberculosis
Patients who have recently experienced a
heart attack
Bronchial hemorrhage
Emphysema
Untreated pneumothorax
TYPES OF BREATHING EXERCISES
 Diaphragmatic breathing
 Glossopharangeal breathing
 Pursed lip breathing
 Segmental/costal expansion exercises
 Apical
 Lateral
 Posterior
DIAPHRAGMATIC BREATHING
 Diaphragm is the primary muscle for breathing
 Diaphragm controls breathing at an involuntary level, a patient with primary
pulmonary condition like COPD can be taught breathing control by optimal use of
diaphragm and relaxation of accessary muscles
 Its also used to mobilize lung secretion in PD
PROCEDURE
 Prepare the patient in relaxed and comfortable position in which the gravity assist the diaphragm such as semi-
fowlers position.
 If you notice any accessory muscle activation, stop him and do relaxation techniques.
 Place your hands over rectus abdominis just below the anterior costal margin.Ask the patient to breath slowly
and deeply via nose by keeping the shoulder relaxed and upper chest quiet allowing the abdominal to rise.
 Now ask him to slowly let the air out using controlled expiration through mouth.
 Have him to practice this for 2-4 times. If he finds any difficulty in using diaphragm, have the patient inhale several
times in succession through the nose by using sniffing action this facilitates the diaphragm.
 For self monitor, have the patient’s hand over the anterior costal margin and feel the movement.
 After he understands and able to do the controlled breathing using a diaphragmatic pattern keep the shoulder
relaxed and practice in variety of positions and during activity.
RESISTED DIAPHRAGMATIC BREATHING
 PT use small weight, such as sandbag to strengthen and improve the endurance of
the diaphragm
 Have the patient in a head up position.
 Place a small weight (1.30-2.20 kg or 3-5 lb) over the epigastric region of his
abdomen.
 Tell the patient to breath in deeply while trying to keep the upper chest quiet.
 Gradually increase the time that the patient breaths against the resistance of weight
 Weight can be increased when he can sustain diaphragmatic breathing pattern
without the use of any accessory muscles of inspiration for 15 minutes.
GLOSSOPHARANGEAL BREATHING
 It is a means of increasing a patient’s inspiratory capacity when there is a severe
weakness of the muscle of inspiration.
 It is taught to the patients who have difficulty in deep breathing.
 It is used primarily for ventilatory dependent patients due to absent or incomplete
innervation of diaphragm because of high cervical cord injury or neuromuscular
disorders.
 Glossopharangeal breathing with inspiratory action of neck muscles can reduce
ventilatory dependence or can be used as an emergency procedure for malfunctioning of
ventilator.
PROCEDURE
 Patient take several gulp of air (6-10), then by closing the mouth the
tongue pushes the air back and trap it in the pharynx the air is then
forced to lungs when glottis is opened.
 This increases the depth of inspiration and inspiratory as well as vital
capacity.
PURSED LIP BREATHING
 Pursed lip breathing is a strategy that involves lightly pursing the lips
together during controlled exhalation.
 Taught to patients with COPD to deal with episodes of dyspnea.
 It helps to improve ventilation and releases trapped air in the lungs.
 Keeps the airways open longer and prolonged exhalation slows the
breathing rate.
 It moves old air out of the lungs and allow new air to enter the lungs.
PROCEDURE
 Patient in a comfortable position and relaxed, explain the patient about the
expiration phase (it should be relaxed and passive)
 Abdominal muscle contraction must be avoided
 Ask to breathe in slowly and deeply through the nose and then breathe out gently
through lightly pursed lips (blowing on and bending the flame of a candle)
 By providing slight resistance an increased positive pressure will generate within the
airway which helps to keep open small bronchioles that otherwise collapse.
 It can be applied as a 3-5 minutes “rescue exercise” or an emergency procedure to
counteract acute exacerbations or dyspnea in COPD and Asthma.
SEGMENTAL BREATHING
 It is performed on a segment of lung, or a section of chest wall that
needs increased ventilation or movement.
 Hypoventilation occur in certain areas of the lungs because of chest wall
fibrosis, pain after surgery, atelectasis, trauma to chest wall, pneumonia
and post mastectomy scar.
 Therefore, it will be important to emphasize expansion of such areas of
the lungs and chest wall.
ADVANTAGES OF SEGMENTAL BREATHING
 Prevents accumulation of pleural fluid and secretions
 Decreases paradoxical breathing
 Decreases panic episodes
 Improves chest mobility
TECHNIQUES
Lateral costal expansion
Posterior basal expansion
Right middle lobe or lingula expansion
Apical expansion
LATERAL COSTAL EXPANSION
 This is sometimes called as lateral basal expansion and may be done unilaterally or bilaterally.
 The patient may be sitting or in a hook lying position.
 Place your hands along the lateral aspects of the lower ribs.
 Ask the patient to breathe out and feel the rib cage move downward and inward.
 As the patient breathes out, place firm downwards pressure into the ribs with the palms of your hands.
 Just prior to inspiration, apply a quick stretch on the external intercostals to facilitate their contraction.
 Apply light manual resistance to the lower ribs to increase sensory awareness as the patient breathes in deeply
and the chest expands.
 When the patient breathes out, assist by gently squeezing the rib cage in a downward and inward direction.
 The patient may then taught to perform the maneuver independently, ask him to apply resistance with his hands
or with a towel.
POSTERIOR BASAL EXPANSION
 This form of segmental breathing is important for the post surgical patients who is in bed in a semi-reclining
position for an extended period of time.
 Secretion often accumulate over the posterior segments of lower lobes.
Procedure
 Have the patient sit and lean forward on a pillow, slightly bending the hips.
 Place the PT hand over the posterior aspect of the lower rib and do the same procedure in lateral costal
expansion.
RIGHT MIDDLE LOBE OR LINGULA EXPANSION
 While the patient in sitting place your hand at either the right or left
side of the patient’s chest just below the axilla, and follow the same
procedure in lateral costal expansion.
APICAL EXPANSION
BUTEYKO BREATHING
 Buteyko breathing uses breath retention exercises to control the speed and volume of your breath. This
helps you breathe more slowly, calmly, and effectively.
 A Ukrainian doctor, Konstantin Buteyko, created the therapeutic Buteyko breathing technique (BBT)
in the 1950s.
 The benefits of Buteyko breathing include enhanced breath control, which helps to prevent
breathlessness and promote proper breathing patterns. It’s used to manage and improve a variety of
conditions, including asthma, anxiety, and sleep concerns.
 Continue reading to learn more about the benefits of Buteyko breathing, how to do it, as well as
considerations and alternatives.
BENEFITS
 Buteyko breathing has several benefits that relate to its ability to improve breath awareness, encourage
nostril breathing, and limit overbreathing.
 By practicing the technique you’ll learn to breathe properly and efficiently, which can help prevent
issues such as wheezing, coughing, and feeling short of breath. It can also help to alleviate unnecessary
coughing and clear blocked nasal passages.
Regulates breathing
 Buteyko breathing is ideal for people who may breathe too much or hyperventilate, which is common
in people with conditions such as asthma and anxiety.
 It’s also helpful for people who find it challenging to breathe while doing strenuous activities.
Additionally, Buteyko breathing can help alleviate stress and improve athletic performance, as well as
improve sleep quality by promoting deep sleep, reducing snoring, and relieving sleep apnea.
Helps with asthma and anxiety
 Buteyko breathing is often used to treat and manage asthma since it helps to prevent overbreathing,
which can be connected to the condition. Hyperventilation can lead to hypocapnia, which leads to low
carbon dioxide levels.
 Practicing BBT can help you learn to stabilize your breathing patterns by lowering your tidal volume
and respiratory rate. It also helps to balance carbon dioxide levels and reduce anxiety.
 Several older studies point to the effectiveness of Buteyko breathing in improving asthma symptoms.
In a small 2000 study, people who did Buteyko breathing exercises by video improved their quality of
life and reduced their need for bronchodilator intake more than the group who watched a placebo
video.
 Research from 2008 found that people who practiced Buteyko breathing were able to better control
their asthma symptoms. They also reduced their need for inhaled corticosteroid therapy.
 Preparation
1. Sit on the floor or on a chair.
2. Elongate your spine to maintain an upright posture.
3. Relax your respiration muscles.
4. Breathe normally for a few minutes.
 The Control Pause
1. After a relaxed exhale, hold your breath.
2. Use your index finger and thumb to plug your nose.
3. Retain your breath until you feel the urge to breathe, which may include an involuntary
movement of your diaphragm, and then inhale.
4. Breathe normally for at least 10 seconds.
5. Repeat several times.
 The Maximum Pause
1. After a relaxed exhale, hold your breath.
2. Use your index finger and thumb to plug your nose.
3. Retain your breath for as long as possible, which is usually twice the length of time of the Control
Pause.
4. Once you’ve reached the point of moderate discomfort, inhale.
5. Breathe normally for at least 10 seconds.
6. Repeat several times.
THANK YOU

Breathing exercises, types, indications, containdications.pptx

  • 1.
    BREATHING EXERCISES DR. DEEPAKYADAV (HEART-LUNGTRANSPLANTPHYSICAL THERAPIST) ASSISTANT PROFESSOR DOLPHIN INSTITUTE OF BIOMEDICAL AND NATURAL SCIENCES
  • 2.
  • 3.
    BREATHING MECHANICS  Theprocess of Breathing/Ventilation is divided into two distinct phases:  The first phase is called inspiration. When the lungs inhale, the diaphragm contracts and pulls downwards. At the same time, the muscles between the ribs contract and pull upward. This increases the size of the thoracic cavity and decreases the pressure inside. As a result, air rushes in and fills the lungs.  The second phase is called expiration. When the lungs exhale, the diaphragm relaxes, and the volume of the thoracic cavity decreases, while the pressure within it increases. As a result, the lungs contract and air is forced out.
  • 5.
    BREATHING AND RESPIRATION ANATOMY  PHYSIOLOGY  BIOCHEMISTRY  MECHANICS
  • 6.
  • 8.
  • 9.
    INSPIRATORY MUSCLES EXPIRATORYMUSCLES DIAPHRAGM EXTERNAL OBLIQUE SCALENE RECTOABDOMINAL SCM INTERNAL OBLIQUE SERRATUS ANTERIOR TRANSVERSE ABDOMINIS EXTERNAL INTERCOSTAL
  • 10.
    INTRODUCTION  Breathing exercisesare otherwise called as ventilatory training.  These are the fundamental interventions for the prevention for acute and chronic pulmonary diseases.  Researches say that breathing exercises have affect and alter the patient’s rate and depth of ventilation, so these techniques are used to improve the pulmonary status.
  • 11.
    AIMS OF VENTILATORYTRAINING Improve ventilation  Increases effectiveness of cough and promote airway clearance  Prevents post operative pulmonary complications  Improves strength, endurance and coordination of ventilatory muscles  Maintain and improve chest and thoracic spine mobility  Promotes relaxation and relieves stress  To teach the patient how to deal with the episodes of dyspnea  Assisting in removal of secretions  Correct paradoxical breathing and to decrease work of breathing  Aid in bronchial hygiene-prevent accumulation of pulmonary secretions, mobilization of these secretions and to improve the cough mechanism
  • 12.
    PRINCIPLES  Areas ofexercises  Explanation and instructions to the patient  Patient position  Evaluate the patient  Demonstration of exercise  Patient practice
  • 13.
    PROCEDURE  Choose aquite area to get a proper interaction with minimal distraction  Explain the patient about the aim and how it works for his impairment  Have the patient in semi-fowlers position, flexing the hip and knees with pillow support, to relax abdominal muscles.  Other positions such as supine, sitting, or standing may be used as the patient progresses during treatment.  Observe and access the patient’s spontaneous breathing pattern while at rest and during activity.  Determine whether Rx is indicated or not.  If necessary teach the patient relaxation techniques, relax the muscles of upper thorax neck and shoulder to minimize the use of accessary muscle work.  Special attention on SCM, upper trapezius and levator scapulae.  Demonstrate the patient breathing pattern.  Have the patient practice the correct technique in variety of positions at rest and with activity.
  • 14.
    PRECAUTIONS  Never allowthe patient to force expiration-it may increase the turbulence in the airway which leads to bronchospasm and airway resistance.  Avoid prolonged expiration-it causes the patient to gasp with the next inspiration and the breathing pattern become irregular and inefficient.  Do not allow the patient to start inspiration with accessory muscles and upper chest, advise him that upper chest should be quiet during breathing.  Allow the patient to perform deep breathing only for 3-4 times (inspiration and expiration) to avoid hyperventilation.
  • 15.
    INDICATIONS  Cystic fibrosis Bronchiectasis  Atelectasis  Lung abscess  Pneumonias  Acute lung diseases  For patients with a high spinal cord lesion/spinal cord injury, myopathies etc.  COPD-emphysema, CB  After surgeries (thoracic, abdominal, orthopedic)  Bed-ridden patients (retained secretions)  As relaxation procedures
  • 16.
    CONTRAINDICATIONS  Severe painand discomfort  Acute medical or surgical emergency  Patients with reduced conscious level  Increased ICP  Unstable head or neck injury  Active hemorrhage with hemodynamic instability or hemoptysis  Flail chest  Uncontrolled hypertension
  • 17.
    Rib or vertebralfractures or osteoporosis Acute asthma or tuberculosis Patients who have recently experienced a heart attack Bronchial hemorrhage Emphysema Untreated pneumothorax
  • 18.
    TYPES OF BREATHINGEXERCISES  Diaphragmatic breathing  Glossopharangeal breathing  Pursed lip breathing  Segmental/costal expansion exercises  Apical  Lateral  Posterior
  • 19.
    DIAPHRAGMATIC BREATHING  Diaphragmis the primary muscle for breathing  Diaphragm controls breathing at an involuntary level, a patient with primary pulmonary condition like COPD can be taught breathing control by optimal use of diaphragm and relaxation of accessary muscles  Its also used to mobilize lung secretion in PD
  • 20.
    PROCEDURE  Prepare thepatient in relaxed and comfortable position in which the gravity assist the diaphragm such as semi- fowlers position.  If you notice any accessory muscle activation, stop him and do relaxation techniques.  Place your hands over rectus abdominis just below the anterior costal margin.Ask the patient to breath slowly and deeply via nose by keeping the shoulder relaxed and upper chest quiet allowing the abdominal to rise.  Now ask him to slowly let the air out using controlled expiration through mouth.  Have him to practice this for 2-4 times. If he finds any difficulty in using diaphragm, have the patient inhale several times in succession through the nose by using sniffing action this facilitates the diaphragm.  For self monitor, have the patient’s hand over the anterior costal margin and feel the movement.  After he understands and able to do the controlled breathing using a diaphragmatic pattern keep the shoulder relaxed and practice in variety of positions and during activity.
  • 22.
    RESISTED DIAPHRAGMATIC BREATHING PT use small weight, such as sandbag to strengthen and improve the endurance of the diaphragm  Have the patient in a head up position.  Place a small weight (1.30-2.20 kg or 3-5 lb) over the epigastric region of his abdomen.  Tell the patient to breath in deeply while trying to keep the upper chest quiet.  Gradually increase the time that the patient breaths against the resistance of weight  Weight can be increased when he can sustain diaphragmatic breathing pattern without the use of any accessory muscles of inspiration for 15 minutes.
  • 23.
    GLOSSOPHARANGEAL BREATHING  Itis a means of increasing a patient’s inspiratory capacity when there is a severe weakness of the muscle of inspiration.  It is taught to the patients who have difficulty in deep breathing.  It is used primarily for ventilatory dependent patients due to absent or incomplete innervation of diaphragm because of high cervical cord injury or neuromuscular disorders.  Glossopharangeal breathing with inspiratory action of neck muscles can reduce ventilatory dependence or can be used as an emergency procedure for malfunctioning of ventilator.
  • 24.
    PROCEDURE  Patient takeseveral gulp of air (6-10), then by closing the mouth the tongue pushes the air back and trap it in the pharynx the air is then forced to lungs when glottis is opened.  This increases the depth of inspiration and inspiratory as well as vital capacity.
  • 25.
    PURSED LIP BREATHING Pursed lip breathing is a strategy that involves lightly pursing the lips together during controlled exhalation.  Taught to patients with COPD to deal with episodes of dyspnea.  It helps to improve ventilation and releases trapped air in the lungs.  Keeps the airways open longer and prolonged exhalation slows the breathing rate.  It moves old air out of the lungs and allow new air to enter the lungs.
  • 26.
    PROCEDURE  Patient ina comfortable position and relaxed, explain the patient about the expiration phase (it should be relaxed and passive)  Abdominal muscle contraction must be avoided  Ask to breathe in slowly and deeply through the nose and then breathe out gently through lightly pursed lips (blowing on and bending the flame of a candle)  By providing slight resistance an increased positive pressure will generate within the airway which helps to keep open small bronchioles that otherwise collapse.  It can be applied as a 3-5 minutes “rescue exercise” or an emergency procedure to counteract acute exacerbations or dyspnea in COPD and Asthma.
  • 27.
    SEGMENTAL BREATHING  Itis performed on a segment of lung, or a section of chest wall that needs increased ventilation or movement.  Hypoventilation occur in certain areas of the lungs because of chest wall fibrosis, pain after surgery, atelectasis, trauma to chest wall, pneumonia and post mastectomy scar.  Therefore, it will be important to emphasize expansion of such areas of the lungs and chest wall.
  • 28.
    ADVANTAGES OF SEGMENTALBREATHING  Prevents accumulation of pleural fluid and secretions  Decreases paradoxical breathing  Decreases panic episodes  Improves chest mobility
  • 29.
    TECHNIQUES Lateral costal expansion Posteriorbasal expansion Right middle lobe or lingula expansion Apical expansion
  • 30.
    LATERAL COSTAL EXPANSION This is sometimes called as lateral basal expansion and may be done unilaterally or bilaterally.  The patient may be sitting or in a hook lying position.  Place your hands along the lateral aspects of the lower ribs.  Ask the patient to breathe out and feel the rib cage move downward and inward.  As the patient breathes out, place firm downwards pressure into the ribs with the palms of your hands.  Just prior to inspiration, apply a quick stretch on the external intercostals to facilitate their contraction.  Apply light manual resistance to the lower ribs to increase sensory awareness as the patient breathes in deeply and the chest expands.  When the patient breathes out, assist by gently squeezing the rib cage in a downward and inward direction.  The patient may then taught to perform the maneuver independently, ask him to apply resistance with his hands or with a towel.
  • 31.
    POSTERIOR BASAL EXPANSION This form of segmental breathing is important for the post surgical patients who is in bed in a semi-reclining position for an extended period of time.  Secretion often accumulate over the posterior segments of lower lobes. Procedure  Have the patient sit and lean forward on a pillow, slightly bending the hips.  Place the PT hand over the posterior aspect of the lower rib and do the same procedure in lateral costal expansion.
  • 33.
    RIGHT MIDDLE LOBEOR LINGULA EXPANSION  While the patient in sitting place your hand at either the right or left side of the patient’s chest just below the axilla, and follow the same procedure in lateral costal expansion.
  • 34.
  • 35.
    BUTEYKO BREATHING  Buteykobreathing uses breath retention exercises to control the speed and volume of your breath. This helps you breathe more slowly, calmly, and effectively.  A Ukrainian doctor, Konstantin Buteyko, created the therapeutic Buteyko breathing technique (BBT) in the 1950s.  The benefits of Buteyko breathing include enhanced breath control, which helps to prevent breathlessness and promote proper breathing patterns. It’s used to manage and improve a variety of conditions, including asthma, anxiety, and sleep concerns.  Continue reading to learn more about the benefits of Buteyko breathing, how to do it, as well as considerations and alternatives.
  • 36.
    BENEFITS  Buteyko breathinghas several benefits that relate to its ability to improve breath awareness, encourage nostril breathing, and limit overbreathing.  By practicing the technique you’ll learn to breathe properly and efficiently, which can help prevent issues such as wheezing, coughing, and feeling short of breath. It can also help to alleviate unnecessary coughing and clear blocked nasal passages. Regulates breathing  Buteyko breathing is ideal for people who may breathe too much or hyperventilate, which is common in people with conditions such as asthma and anxiety.  It’s also helpful for people who find it challenging to breathe while doing strenuous activities. Additionally, Buteyko breathing can help alleviate stress and improve athletic performance, as well as improve sleep quality by promoting deep sleep, reducing snoring, and relieving sleep apnea.
  • 37.
    Helps with asthmaand anxiety  Buteyko breathing is often used to treat and manage asthma since it helps to prevent overbreathing, which can be connected to the condition. Hyperventilation can lead to hypocapnia, which leads to low carbon dioxide levels.  Practicing BBT can help you learn to stabilize your breathing patterns by lowering your tidal volume and respiratory rate. It also helps to balance carbon dioxide levels and reduce anxiety.  Several older studies point to the effectiveness of Buteyko breathing in improving asthma symptoms. In a small 2000 study, people who did Buteyko breathing exercises by video improved their quality of life and reduced their need for bronchodilator intake more than the group who watched a placebo video.  Research from 2008 found that people who practiced Buteyko breathing were able to better control their asthma symptoms. They also reduced their need for inhaled corticosteroid therapy.
  • 38.
     Preparation 1. Siton the floor or on a chair. 2. Elongate your spine to maintain an upright posture. 3. Relax your respiration muscles. 4. Breathe normally for a few minutes.  The Control Pause 1. After a relaxed exhale, hold your breath. 2. Use your index finger and thumb to plug your nose. 3. Retain your breath until you feel the urge to breathe, which may include an involuntary movement of your diaphragm, and then inhale. 4. Breathe normally for at least 10 seconds. 5. Repeat several times.
  • 39.
     The MaximumPause 1. After a relaxed exhale, hold your breath. 2. Use your index finger and thumb to plug your nose. 3. Retain your breath for as long as possible, which is usually twice the length of time of the Control Pause. 4. Once you’ve reached the point of moderate discomfort, inhale. 5. Breathe normally for at least 10 seconds. 6. Repeat several times.
  • 40.