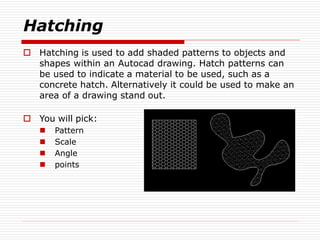
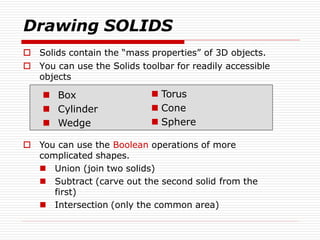
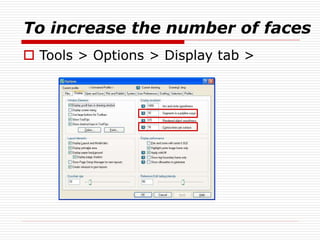
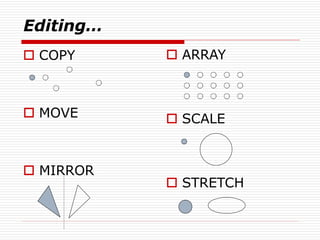
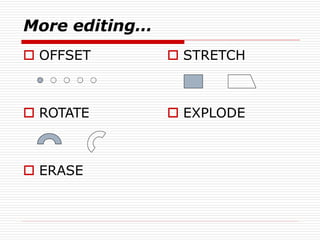
Introduction to AutoCAD
M.Gangadhar
civil 3rd year
20NR1A0121
 The computer-aided drafting program,
AutoCAD, is the most common such program.
It has many, any aids to drawing construction
plans and detail drawings. If changes are later
made in the design, it is quick and easy to
change the drawing in AutoCAD.
 a considerable amount of time and money
as compared to traditional prototyping, as
well as facilitating communication and
testing
 Drawing is the language of engineers
 The AutoCAD or computer aided design machine has
been a great help to engineers and also for several
architectures that are finding it impossible to deal with
drawings and plans of the project engineering work and
the bring on the verge of perfection.
 Autocad or commonly known as computer aided design
is a software application for writing and design 2D and
3D. He came on stage during the month of December
nineteen hundred and eighty two.
 AutoCAD is a software application for both 2D and 3D
computer-aided design (CAD) and drafting — available
since 1982 as a desktop application and since 2010 as a
mobile web- and cloud-based app, currently marketed as
Autocad 360.
 Developed and marketed by Autodesk, Inc., Autocad was first
released in December 1982 — having been purchased a year
prior in its original form by Autodesk founder John Walker. The
software is currently marketed in its
eighteenth generation.
OUTLINE
 Giving commands
 Object snap
 Zooming and panning
 Drawing 2D shapes
 Drawing 3D shapes
 Editing
 UCS
 Assignment
 Drawings are prepared in different
sizes
6
Sl. No. Designation
Trimmed Size
in mm
Un Trimmed
Size (Min) in
mm
1 A0 841 x 1189 880 x 1230
2 A1 594 x 841 625 x 880
3 A2 420 x 594 450 x 625
4 A3 297 x 420 330 x 450
5 A4 210 x 297 240 x 330
6 A5 148 x 210 165 x 240
PAPER SIZE
Page set up for AUTOCAD
Drawing
 Z enter
 S enter
 N enter
 Choose your scale 1:100
 P enter
How do we give a command?
 Command line
 Toolbars
(view/Toolbars)
 Drop-down menus
You can pick any one(s) that you are comfortable with.
What is OSNAP?
 Osnap (Object Snap) settings make it easier
to select a 2d object’s points
 Endpoint
 Midpoint
 Perpendicular
 Center
 İntersection
Osnap will be active when
AutoCAD is expecting you to
pick a point on the working area
Type osnap on your
command window:
Zooming...
 You will need to zoom in and out while drawing
with AutoCAD. This doesnt change your objects
or UCS, only the way you see your working
space. This can be done in many ways:
1. Scroll bars
2. Typing z or zoom in your command window.
 All
 Center
 Dynamic
 Extents
 Previous
 Scale
 Window
Lets draw a LINE:
 remember that AutoCAD recognizes an
object by its coordinates. You will need two
given points to draw a line.
(x2,y2,z2)
(x1,y1,z1)
 You can start at a random point on your
WCS for your FIRST POINT, but you should
specify the coordinates of your SECOND
POINT.
Lets draw a LINE (1):
1. Give the command
 Type “line” on the command window, OR
 Click on the line icon on the Draw toolbar, OR
 Select Line on the Draw menu
2. Specify the first point (a)
 Click on a random point on your working area
(black space)
3. Specify the second point in relation to the
first point
 @distance<degrees
 @5<30
30
a
b
Lets draw a LINE (2):
1. Hit F8 (ortho on)
2. Give the command
3. Specify the first point
4. Specify the second point in relation to the
first point
 Point the cursor to the left hand side. You will
see that the cursor snaps only to 0o
-90o
-180o
-
270o
 Type 7 and hit enter
a b
7 units
Lets draw a LINE (3):
If we know the coordinates of the line we want
to draw, we can simply type them into the
command line. (However, this mostly is
not the case.)
1. Give the command
2. Specify the first point (4,8,11)
3. Specify the second point (5,11,23)
a
(4,8,11)
b
(5,22,13)
What else?
 Rectangle: two diagonal lines
(pick first point, select the second one
with relation to the first. @5<-33)
 Circle/Arc: center and radius
 Polygon: specify the number of
edges and length of a side
a
b
a
d
d
A small tip: you can use the EXPLODE command for the
tool to split the object into its components or lines
Editing…
 COPY
 MOVE
 MIRROR
 ARRAY
 SCALE
 STRETCH
More editing…
 STRETCH
 EXPLODE
 OFFSET
 ROTATE
 ERASE
Polyline (pline)
 The PLINE command creates a chain line
with multiple vertexes and straight or
circular segments between the vertexes
 Draw a closed shape with the pline
command:
 Then type PEDIT (polyline edit) on the
command line and see what you can do
with it:
Enter an option [Close/Join/Width/Edit
vertex/Fit/Spline/Decurve/Ltype gen/Undo]:
Try Width and Spline
Hatching
 Hatching is used to add shaded patterns to objects and
shapes within an Autocad drawing. Hatch patterns can
be used to indicate a material to be used, such as a
concrete hatch. Alternatively it could be used to make an
area of a drawing stand out.
 You will pick:
 Pattern
 Scale
 Angle
 points
 Solids contain the “mass properties” of 3D objects.
 You can use the Solids toolbar for readily accessible
objects
 Box
 Cylinder
 Wedge
 You can use the Boolean operations of more
complicated shapes.
 Union (join two solids)
 Subtract (carve out the second solid from the
first)
 Intersection (only the common area)
Drawing SOLIDS
 Torus
 Cone
 Sphere
To increase the number of faces
 Tools > Options > Display tab >
We can create solids by extruding as well
 If you “extrude” a surface into the third
dimension, you simply add a thickness in
section. This basically is same as creating a
“solid” object
Extrude 5
units 5 units
Extrude -4
units
4 units
UCS and WCS
 The AutoCAD world is 3 dimensional. However, if we
want to draw a 2d object, such as a plan or a section,
we will use only 2 dimensions (x and y).
 WCS (world coordinate system) is the imaginary plane
that is parallel to the ground. It is the default coordinate
system.
 Modifications made to the World Coordinate System
(WCS) result in a User Coordinate System (UCS). It is
the plane that you work on. It enables the user to draw
3 dimensional objects.
 To create a new UCS, type ucs on the command window,
then say New and specify 3 points on your new UCS
plane.
AUTO CAD PPT.pptx

AUTO CAD PPT.pptx

  • 1.
  • 2.
     The computer-aideddrafting program, AutoCAD, is the most common such program. It has many, any aids to drawing construction plans and detail drawings. If changes are later made in the design, it is quick and easy to change the drawing in AutoCAD.  a considerable amount of time and money as compared to traditional prototyping, as well as facilitating communication and testing
  • 3.
     Drawing isthe language of engineers  The AutoCAD or computer aided design machine has been a great help to engineers and also for several architectures that are finding it impossible to deal with drawings and plans of the project engineering work and the bring on the verge of perfection.  Autocad or commonly known as computer aided design is a software application for writing and design 2D and 3D. He came on stage during the month of December nineteen hundred and eighty two.
  • 4.
     AutoCAD isa software application for both 2D and 3D computer-aided design (CAD) and drafting — available since 1982 as a desktop application and since 2010 as a mobile web- and cloud-based app, currently marketed as Autocad 360.  Developed and marketed by Autodesk, Inc., Autocad was first released in December 1982 — having been purchased a year prior in its original form by Autodesk founder John Walker. The software is currently marketed in its eighteenth generation.
  • 5.
    OUTLINE  Giving commands Object snap  Zooming and panning  Drawing 2D shapes  Drawing 3D shapes  Editing  UCS  Assignment  Drawings are prepared in different sizes
  • 6.
    6 Sl. No. Designation TrimmedSize in mm Un Trimmed Size (Min) in mm 1 A0 841 x 1189 880 x 1230 2 A1 594 x 841 625 x 880 3 A2 420 x 594 450 x 625 4 A3 297 x 420 330 x 450 5 A4 210 x 297 240 x 330 6 A5 148 x 210 165 x 240 PAPER SIZE
  • 7.
    Page set upfor AUTOCAD Drawing  Z enter  S enter  N enter  Choose your scale 1:100  P enter
  • 8.
    How do wegive a command?  Command line  Toolbars (view/Toolbars)  Drop-down menus You can pick any one(s) that you are comfortable with.
  • 9.
    What is OSNAP? Osnap (Object Snap) settings make it easier to select a 2d object’s points  Endpoint  Midpoint  Perpendicular  Center  İntersection Osnap will be active when AutoCAD is expecting you to pick a point on the working area Type osnap on your command window:
  • 10.
    Zooming...  You willneed to zoom in and out while drawing with AutoCAD. This doesnt change your objects or UCS, only the way you see your working space. This can be done in many ways: 1. Scroll bars 2. Typing z or zoom in your command window.  All  Center  Dynamic  Extents  Previous  Scale  Window
  • 11.
    Lets draw aLINE:  remember that AutoCAD recognizes an object by its coordinates. You will need two given points to draw a line. (x2,y2,z2) (x1,y1,z1)  You can start at a random point on your WCS for your FIRST POINT, but you should specify the coordinates of your SECOND POINT.
  • 12.
    Lets draw aLINE (1): 1. Give the command  Type “line” on the command window, OR  Click on the line icon on the Draw toolbar, OR  Select Line on the Draw menu 2. Specify the first point (a)  Click on a random point on your working area (black space) 3. Specify the second point in relation to the first point  @distance<degrees  @5<30 30 a b
  • 13.
    Lets draw aLINE (2): 1. Hit F8 (ortho on) 2. Give the command 3. Specify the first point 4. Specify the second point in relation to the first point  Point the cursor to the left hand side. You will see that the cursor snaps only to 0o -90o -180o - 270o  Type 7 and hit enter a b 7 units
  • 14.
    Lets draw aLINE (3): If we know the coordinates of the line we want to draw, we can simply type them into the command line. (However, this mostly is not the case.) 1. Give the command 2. Specify the first point (4,8,11) 3. Specify the second point (5,11,23) a (4,8,11) b (5,22,13)
  • 15.
    What else?  Rectangle:two diagonal lines (pick first point, select the second one with relation to the first. @5<-33)  Circle/Arc: center and radius  Polygon: specify the number of edges and length of a side a b a d d A small tip: you can use the EXPLODE command for the tool to split the object into its components or lines
  • 16.
    Editing…  COPY  MOVE MIRROR  ARRAY  SCALE  STRETCH
  • 17.
    More editing…  STRETCH EXPLODE  OFFSET  ROTATE  ERASE
  • 18.
    Polyline (pline)  ThePLINE command creates a chain line with multiple vertexes and straight or circular segments between the vertexes  Draw a closed shape with the pline command:  Then type PEDIT (polyline edit) on the command line and see what you can do with it: Enter an option [Close/Join/Width/Edit vertex/Fit/Spline/Decurve/Ltype gen/Undo]: Try Width and Spline
  • 19.
    Hatching  Hatching isused to add shaded patterns to objects and shapes within an Autocad drawing. Hatch patterns can be used to indicate a material to be used, such as a concrete hatch. Alternatively it could be used to make an area of a drawing stand out.  You will pick:  Pattern  Scale  Angle  points
  • 20.
     Solids containthe “mass properties” of 3D objects.  You can use the Solids toolbar for readily accessible objects  Box  Cylinder  Wedge  You can use the Boolean operations of more complicated shapes.  Union (join two solids)  Subtract (carve out the second solid from the first)  Intersection (only the common area) Drawing SOLIDS  Torus  Cone  Sphere
  • 21.
    To increase thenumber of faces  Tools > Options > Display tab >
  • 22.
    We can createsolids by extruding as well  If you “extrude” a surface into the third dimension, you simply add a thickness in section. This basically is same as creating a “solid” object Extrude 5 units 5 units Extrude -4 units 4 units
  • 23.
    UCS and WCS The AutoCAD world is 3 dimensional. However, if we want to draw a 2d object, such as a plan or a section, we will use only 2 dimensions (x and y).  WCS (world coordinate system) is the imaginary plane that is parallel to the ground. It is the default coordinate system.  Modifications made to the World Coordinate System (WCS) result in a User Coordinate System (UCS). It is the plane that you work on. It enables the user to draw 3 dimensional objects.  To create a new UCS, type ucs on the command window, then say New and specify 3 points on your new UCS plane.