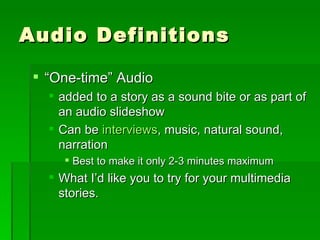
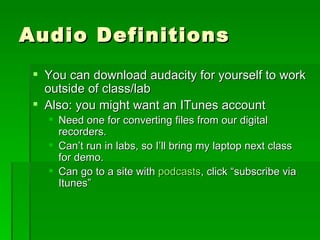
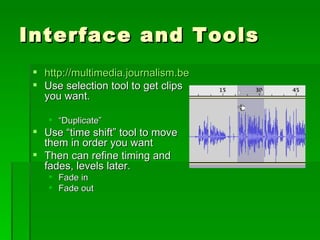
Adding Audio to Story Design Using Audacity
Audio Definitions “ One-time” Audio  added to a story as a sound bite or as part of an audio slideshow Can be  interviews , music, natural sound, narration Best to make it only 2-3 minutes maximum What I’d like you to try for your multimedia stories.
Audio Definitions You can download audacity for yourself to work outside of class/lab Also: you might want an ITunes account Need one for converting files from our digital recorders. Can’t run in labs, so I’ll bring my laptop next class for demo. Can go to a site with  podcasts , click “subscribe via Itunes”
About Audio and Wordpress Need an upgraded account with to “embed” or directly upload audio. So instead must upload it to Otterbein web server or other host and link to it.
Getting Started with Audacity Software is unstable, so save often (.aup file) Sound files need to be in correct format Our digital recorders use WMA. Must convert to WAV using ITunes or other converter (I did this for you)
Demo Watch now, try it in a minute with a sample (long!) clip from an interview. I’ll show you “down-n-dirty” techniques, and you use audio clip to try it. More resources http://multimedia.journalism.berkeley.edu/tutorials/audacity/
Interface and Tools http://multimedia.journalism.berkeley.edu/tutorials/audacity/workspace/ Use selection tool to get clips you want. “ Duplicate” Use “time shift” tool to move them in order you want Then can refine timing and fades, levels later. Fade in Fade out
Tips Any track is made of multiple clips. If tracks overlap, so will the sound. Use “stop” instead of “pause” buttons. Can use space bar to start and stop playback If selection tool active, can click in diff. parts of tracks to preview that part. Track runs vertically across software window (this is long interview) Can zoom in; time “ruler” goes from minutes to seconds If lost, Under “view” “Fit in Window” “ Control Z” to undo works!
Tips I prefer “copy” or “split” to cutting because keeps original track in tact. Play around!
Saving Save once .aup, “Project” Allows you to return to it and edit Save again, in format that can be used on web  WAV or MP3 format
 
Uploading to Web Upload to Otterbein (will stay a year after graduation) or another site that allows file uploads. Go to Desktop, Web Folder Drag from your file to this folder=ftp Once get it on “web host,” figure out the URL:  http://students.otterbein.edu/yourname/audiofilename.mp3
In WP In post or page’s story editor,  Choose “insert audio” Type in the URL, and link to it. For final design, perhaps get a clip art of audio speaker icon so user know what they will get: an audio clip download!

Audacity

  • 1.
    Adding Audio toStory Design Using Audacity
  • 2.
    Audio Definitions “One-time” Audio added to a story as a sound bite or as part of an audio slideshow Can be interviews , music, natural sound, narration Best to make it only 2-3 minutes maximum What I’d like you to try for your multimedia stories.
  • 3.
    Audio Definitions Youcan download audacity for yourself to work outside of class/lab Also: you might want an ITunes account Need one for converting files from our digital recorders. Can’t run in labs, so I’ll bring my laptop next class for demo. Can go to a site with podcasts , click “subscribe via Itunes”
  • 4.
    About Audio andWordpress Need an upgraded account with to “embed” or directly upload audio. So instead must upload it to Otterbein web server or other host and link to it.
  • 5.
    Getting Started withAudacity Software is unstable, so save often (.aup file) Sound files need to be in correct format Our digital recorders use WMA. Must convert to WAV using ITunes or other converter (I did this for you)
  • 6.
    Demo Watch now,try it in a minute with a sample (long!) clip from an interview. I’ll show you “down-n-dirty” techniques, and you use audio clip to try it. More resources http://multimedia.journalism.berkeley.edu/tutorials/audacity/
  • 7.
    Interface and Toolshttp://multimedia.journalism.berkeley.edu/tutorials/audacity/workspace/ Use selection tool to get clips you want. “ Duplicate” Use “time shift” tool to move them in order you want Then can refine timing and fades, levels later. Fade in Fade out
  • 8.
    Tips Any trackis made of multiple clips. If tracks overlap, so will the sound. Use “stop” instead of “pause” buttons. Can use space bar to start and stop playback If selection tool active, can click in diff. parts of tracks to preview that part. Track runs vertically across software window (this is long interview) Can zoom in; time “ruler” goes from minutes to seconds If lost, Under “view” “Fit in Window” “ Control Z” to undo works!
  • 9.
    Tips I prefer“copy” or “split” to cutting because keeps original track in tact. Play around!
  • 10.
    Saving Save once.aup, “Project” Allows you to return to it and edit Save again, in format that can be used on web WAV or MP3 format
  • 11.
  • 12.
    Uploading to WebUpload to Otterbein (will stay a year after graduation) or another site that allows file uploads. Go to Desktop, Web Folder Drag from your file to this folder=ftp Once get it on “web host,” figure out the URL: http://students.otterbein.edu/yourname/audiofilename.mp3
  • 13.
    In WP Inpost or page’s story editor, Choose “insert audio” Type in the URL, and link to it. For final design, perhaps get a clip art of audio speaker icon so user know what they will get: an audio clip download!

Editor's Notes

  • #13 Adjust levels using envelope Move tracks with fades.