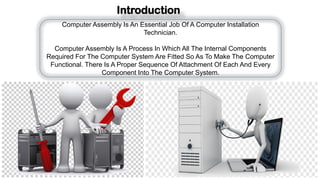
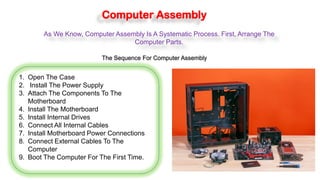
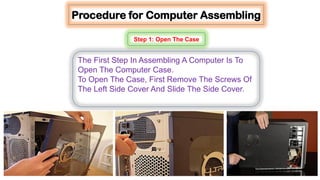
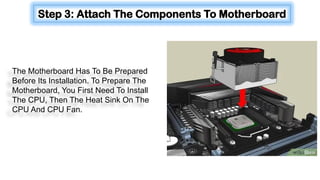
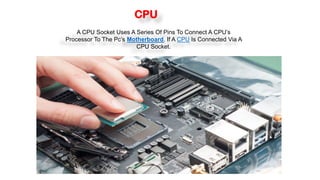
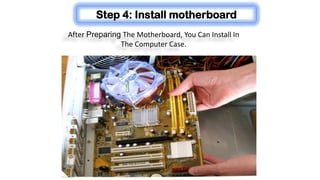
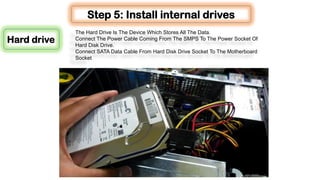
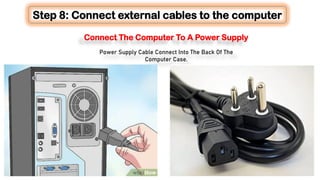
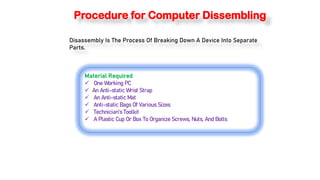
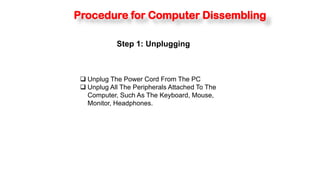
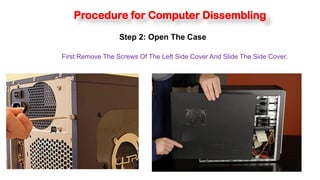
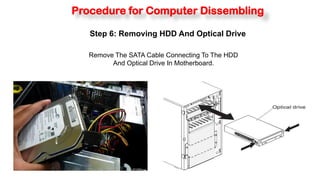
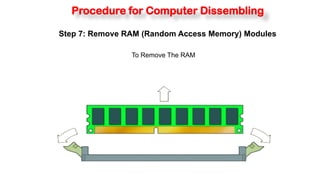
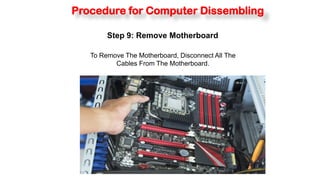
SlideShare a Scribd company logo
1 of 33
Download to read offline
CORE MODULE 1
Fundamentals of Computer Hardware &
Networking
Assembling and Disassembling PC
Computer Assembly Is An Essential Job Of A Computer Installation
Technician.
Computer Assembly Is A Process In Which All The Internal Components
Required For The Computer System Are Fitted So As To Make The Computer
Functional. There Is A Proper Sequence Of Attachment Of Each And Every
Component Into The Computer System.
Introduction
Computer Assembly
As We Know, Computer Assembly Is A Systematic Process. First, Arrange The
Computer Parts.
The Sequence For Computer Assembly
1. Open The Case
2. Install The Power Supply
3. Attach The Components To The
Motherboard
4. Install The Motherboard
5. Install Internal Drives
6. Connect All Internal Cables
7. Install Motherboard Power Connections
8. Connect External Cables To The
Computer
9. Boot The Computer For The First Time.
Material Required
 Computer Case, With Power
Supply Installed
 Motherboard
 CPU
 Heat Sink/Fan Assembly
 Thermal Compound
 RAM Module(s)
 Motherboard Standoffs And
Screws
 Anti-static Wrist Strap And
Anti-static Mat
 Tool Kit
Procedure for Computer Assembling
Step 1: Open The Case
The First Step In Assembling A Computer Is To
Open The Computer Case.
To Open The Case, First Remove The Screws Of
The Left Side Cover And Slide The Side Cover.
Step 2: Install The Power Supply
The Next Step Is To Install A Power Supply.
There Are Usually Four Screws That Attach
The Power Supply To The Case.
Step 3: Attach The Components To Motherboard
The Motherboard Has To Be Prepared
Before Its Installation. To Prepare The
Motherboard, You First Need To Install
The CPU, Then The Heat Sink On The
CPU And CPU Fan.
CPU
A CPU Socket Uses A Series Of Pins To Connect A CPU’s
Processor To The Pc’s Motherboard. If A CPU Is Connected Via A
CPU Socket.
Heat sink and fan assembly
A Heat Sink And Fan (HSF) Is An Active Cooling Solution
Used To Cool Down Integrated Circuits In Computer Systems,
Commonly The Central Processing Unit (CPU).
Connect The Assembly Power Cable To The CPU Fan
Connector On The Motherboard.
Installation of RAM
To Install The RAM First On The Motherboard
And Then Fix The Motherboard In The Case. To
Install RAM, First Ensure Its Compatibility With
The Motherboard.
After Preparing The Motherboard, You Can Install In
The Computer Case.
Step 4: Install motherboard
The Hard Drive Is The Device Which Stores All The Data.
Connect The Power Cable Coming From The SMPS To The Power Socket Of
Hard Disk Drive.
Connect SATA Data Cable From Hard Disk Drive Socket To The Motherboard
Socket
Step 5: Install internal drives
Hard drive
Power Cables Are Used To Distribute Electricity From The Power
Supply To The Motherboard And Other Components. Data Cables
Transmit Data Between The Motherboard And Storage Devices,
Such As Hard Drives.
Step 6: Connect all internal cables
The Advanced Technology Extended (ATX) Main Power Connector
Will Have Either 20 Or 24 Pins.
Step 7: Install motherboard power connections
Step 8: Connect external cables to the computer
Connecting Monitor
The VGA Cable Is Used To Connect To Monitor.
Step 8: Connect external cables to the computer
Connecting Keyboard
If It Uses A USB Connector, Plug It Into Any Of
The USB Ports On The Back Of The Computer.
Step 8: Connect external cables to the computer
Connecting Headphones Or Speakers, And Microphone
Connect The External Speakers Or Headphones, To
Computer’s Audio Port (Either On The Front Or Back Of
The Computer Case).
Step 8: Connect external cables to the computer
Connect The Computer To A Power Supply
Power Supply Cable Connect Into The Back Of The
Computer Case.
Step 8: Connect external cables to the computer
Connecting Printer, Scanner, Webcam
Step 9: Starting the computer
Always Remember That The First Step Is To Push Power Button Of The
CPU Than The Monitor’s. An Operating System Or System Software
Like Window Or Linux Will Start Loading, Now Your Computer Is Ready
To Use.
Procedure for Computer Dissembling
Disassembly Is The Process Of Breaking Down A Device Into Separate
Parts.
Material Required
 One Working PC
 An Anti-static Wrist Strap
 An Anti-static Mat
 Anti-static Bags Of Various Sizes
 Technician’s Toolkit
 A Plastic Cup Or Box To Organize Screws, Nuts, And Bolts
Procedure for Computer Dissembling
Step 1: Unplugging
 Unplug The Power Cord From The PC
 Unplug All The Peripherals Attached To The
Computer, Such As The Keyboard, Mouse,
Monitor, Headphones.
Procedure for Computer Dissembling
Step 2: Open The Case
First Remove The Screws Of The Left Side Cover And Slide The Side Cover.
Procedure for Computer Dissembling
Step 3: Disconnect All The Connectors
Disconnect All The Connectors Connected To The
Motherboard. These Include SATA Power Cable And Data
Cable Of HDD As Well As SATA Cable Of Optical Drive
Procedure for Computer Dissembling
Step 4: Remove The Fan
Remove The Fan Now.
Procedure for Computer Dissembling
Step 5: Remove The Power Supply
Remove The Power Supply Is Connected To The
Motherboard By A 20-pin Connector And 4-pin
Connector.
Procedure for Computer Dissembling
Step 6: Removing HDD And Optical Drive
Remove The SATA Cable Connecting To The HDD
And Optical Drive In Motherboard.
Procedure for Computer Dissembling
Step 7: Remove RAM (Random Access Memory) Modules
To Remove The RAM
Procedure for Computer Dissembling
Step 8: Remove Expansion Cards
To Remove The Expansion Cards, Disconnect The
Cables Attached To It.
Procedure for Computer Dissembling
Step 9: Remove Motherboard
To Remove The Motherboard, Disconnect All The
Cables From The Motherboard.
Procedure for Computer Dissembling
Step 10: Reassemble The Components
 Identify Every Component And Take Its Photograph.
 After Identification Of Each Component, Put All The
Components Back In Their Place And Ensure That All
Cables And Wires Are Connected At The Right Place To
Avoid Further Troubleshooting.
Assembling and disassembling pc. pdf

More Related Content

What's hot

Motherboard components and their functions
Motherboard components and their functionsMotherboard components and their functions
Motherboard components and their functionsBESOR ACADEMY
 
Computer Assembly and Disassembly (2nd Lesson part 2).ppt
Computer Assembly and Disassembly (2nd Lesson part 2).pptComputer Assembly and Disassembly (2nd Lesson part 2).ppt
Computer Assembly and Disassembly (2nd Lesson part 2).pptJonathanOcampo23
 
Common Computer Faults and Problems
Common Computer Faults and ProblemsCommon Computer Faults and Problems
Common Computer Faults and ProblemsSef Cambaliza
 
Installing windows 10 and creating a bootable usb
Installing windows 10 and creating a bootable usbInstalling windows 10 and creating a bootable usb
Installing windows 10 and creating a bootable usbArsalan Qureshi
 
Computer Troubleshooting
Computer TroubleshootingComputer Troubleshooting
Computer TroubleshootingLisa Hartman
 
Bios ( Basic Input Output System )
Bios ( Basic Input Output System )Bios ( Basic Input Output System )
Bios ( Basic Input Output System )Jesthine Nesshal
 
BIOS basic input output system
BIOS basic input output systemBIOS basic input output system
BIOS basic input output systemVipul Buchade
 
2nd lesson installing operating system
2nd lesson installing operating system2nd lesson installing operating system
2nd lesson installing operating systemRaiza Janelle
 
Installing and configuring computer System
Installing and configuring computer SystemInstalling and configuring computer System
Installing and configuring computer Systemiankeithsomoza
 
Internal System Unit Components
Internal System Unit ComponentsInternal System Unit Components
Internal System Unit Componentsolivixjohnson
 
Parts of System Unit
Parts of System UnitParts of System Unit
Parts of System UnitSef Cambaliza
 
Install computer system,devices and peripherals
Install computer system,devices and peripheralsInstall computer system,devices and peripherals
Install computer system,devices and peripheralsRaiza Janelle
 
Basic Computer Troubleshooting
Basic Computer TroubleshootingBasic Computer Troubleshooting
Basic Computer TroubleshootingMeredith Martin
 
TLE ICT CSS 10 Cot lesson plan1
TLE ICT CSS 10 Cot lesson plan1TLE ICT CSS 10 Cot lesson plan1
TLE ICT CSS 10 Cot lesson plan1Leonel Rivas
 
Steps to disassemble the computer system
Steps to disassemble the computer systemSteps to disassemble the computer system
Steps to disassemble the computer systemAnanthkumar6965
 
Lesson plan storage devices(latest)
Lesson plan storage devices(latest)Lesson plan storage devices(latest)
Lesson plan storage devices(latest)fizahPhd
 

What's hot (20)

Motherboard components and their functions
Motherboard components and their functionsMotherboard components and their functions
Motherboard components and their functions
 
Power supply
Power supplyPower supply
Power supply
 
Computer Assembly and Disassembly (2nd Lesson part 2).ppt
Computer Assembly and Disassembly (2nd Lesson part 2).pptComputer Assembly and Disassembly (2nd Lesson part 2).ppt
Computer Assembly and Disassembly (2nd Lesson part 2).ppt
 
Common Computer Faults and Problems
Common Computer Faults and ProblemsCommon Computer Faults and Problems
Common Computer Faults and Problems
 
Installing windows 10 and creating a bootable usb
Installing windows 10 and creating a bootable usbInstalling windows 10 and creating a bootable usb
Installing windows 10 and creating a bootable usb
 
Computer hardware
Computer hardwareComputer hardware
Computer hardware
 
Computer maintenance
Computer maintenanceComputer maintenance
Computer maintenance
 
Computer Troubleshooting
Computer TroubleshootingComputer Troubleshooting
Computer Troubleshooting
 
Bios ( Basic Input Output System )
Bios ( Basic Input Output System )Bios ( Basic Input Output System )
Bios ( Basic Input Output System )
 
BIOS basic input output system
BIOS basic input output systemBIOS basic input output system
BIOS basic input output system
 
2nd lesson installing operating system
2nd lesson installing operating system2nd lesson installing operating system
2nd lesson installing operating system
 
Installing and configuring computer System
Installing and configuring computer SystemInstalling and configuring computer System
Installing and configuring computer System
 
Internal System Unit Components
Internal System Unit ComponentsInternal System Unit Components
Internal System Unit Components
 
Installing Operating System
Installing Operating System Installing Operating System
Installing Operating System
 
Parts of System Unit
Parts of System UnitParts of System Unit
Parts of System Unit
 
Install computer system,devices and peripherals
Install computer system,devices and peripheralsInstall computer system,devices and peripherals
Install computer system,devices and peripherals
 
Basic Computer Troubleshooting
Basic Computer TroubleshootingBasic Computer Troubleshooting
Basic Computer Troubleshooting
 
TLE ICT CSS 10 Cot lesson plan1
TLE ICT CSS 10 Cot lesson plan1TLE ICT CSS 10 Cot lesson plan1
TLE ICT CSS 10 Cot lesson plan1
 
Steps to disassemble the computer system
Steps to disassemble the computer systemSteps to disassemble the computer system
Steps to disassemble the computer system
 
Lesson plan storage devices(latest)
Lesson plan storage devices(latest)Lesson plan storage devices(latest)
Lesson plan storage devices(latest)
 

Similar to Assembling and disassembling pc. pdf

Css grade 11 week 3
Css grade 11 week 3Css grade 11 week 3
Css grade 11 week 3Danilo Anos
 
Assemble a desktop pc
Assemble a desktop pcAssemble a desktop pc
Assemble a desktop pcRajat Gupta
 
Computer 10 Other Parts of the Internal System Unit
Computer 10 Other Parts of the Internal System UnitComputer 10 Other Parts of the Internal System Unit
Computer 10 Other Parts of the Internal System UnitJessaBejer1
 
Computer hardware basic -shashank
Computer hardware basic  -shashankComputer hardware basic  -shashank
Computer hardware basic -shashanktechbed
 
Css grade 11 week 4
Css grade 11 week 4Css grade 11 week 4
Css grade 11 week 4Danilo Anos
 
pc assembly 1111111pc assembly 1111111- Copy.pptx
pc assembly 1111111pc assembly 1111111- Copy.pptxpc assembly 1111111pc assembly 1111111- Copy.pptx
pc assembly 1111111pc assembly 1111111- Copy.pptxCarloCimacio
 
PC Assembly, PC Disassembly, and Connecting PC Peripherals
PC Assembly, PC Disassembly, and Connecting PC PeripheralsPC Assembly, PC Disassembly, and Connecting PC Peripherals
PC Assembly, PC Disassembly, and Connecting PC PeripheralsAldosPauloSegundo
 
Computer Assembly.pptx
Computer Assembly.pptxComputer Assembly.pptx
Computer Assembly.pptxAndrew_Braza
 
SYSTEM ADMINISTRATION AND MAINTENANCE NOTES PERIYAR UNIVERSITY
SYSTEM ADMINISTRATION AND MAINTENANCE NOTES PERIYAR UNIVERSITYSYSTEM ADMINISTRATION AND MAINTENANCE NOTES PERIYAR UNIVERSITY
SYSTEM ADMINISTRATION AND MAINTENANCE NOTES PERIYAR UNIVERSITYGOKUL SREE
 
Assembling_a_Computer.ppt
Assembling_a_Computer.pptAssembling_a_Computer.ppt
Assembling_a_Computer.pptrafi266513
 

Similar to Assembling and disassembling pc. pdf (20)

Css grade 11 week 3
Css grade 11 week 3Css grade 11 week 3
Css grade 11 week 3
 
Assemble a desktop pc
Assemble a desktop pcAssemble a desktop pc
Assemble a desktop pc
 
Computer 10 Other Parts of the Internal System Unit
Computer 10 Other Parts of the Internal System UnitComputer 10 Other Parts of the Internal System Unit
Computer 10 Other Parts of the Internal System Unit
 
Computer hardware basic -shashank
Computer hardware basic  -shashankComputer hardware basic  -shashank
Computer hardware basic -shashank
 
Css grade 11 week 4
Css grade 11 week 4Css grade 11 week 4
Css grade 11 week 4
 
pc assembly 1111111pc assembly 1111111- Copy.pptx
pc assembly 1111111pc assembly 1111111- Copy.pptxpc assembly 1111111pc assembly 1111111- Copy.pptx
pc assembly 1111111pc assembly 1111111- Copy.pptx
 
Dasar komputer chapter3
Dasar komputer chapter3Dasar komputer chapter3
Dasar komputer chapter3
 
Assembling the computer
Assembling the computerAssembling the computer
Assembling the computer
 
ASSEMBLY-AND-DISASSEMBLY (1).pptx
ASSEMBLY-AND-DISASSEMBLY (1).pptxASSEMBLY-AND-DISASSEMBLY (1).pptx
ASSEMBLY-AND-DISASSEMBLY (1).pptx
 
ASSEMBLY-AND-DISASSEMBLY.pptx
ASSEMBLY-AND-DISASSEMBLY.pptxASSEMBLY-AND-DISASSEMBLY.pptx
ASSEMBLY-AND-DISASSEMBLY.pptx
 
ASSEMBLY-AND-DISASSEMBLY.pptx
ASSEMBLY-AND-DISASSEMBLY.pptxASSEMBLY-AND-DISASSEMBLY.pptx
ASSEMBLY-AND-DISASSEMBLY.pptx
 
ict 10 4 second q.pptx
ict 10 4 second q.pptxict 10 4 second q.pptx
ict 10 4 second q.pptx
 
PC Assembly, PC Disassembly, and Connecting PC Peripherals
PC Assembly, PC Disassembly, and Connecting PC PeripheralsPC Assembly, PC Disassembly, and Connecting PC Peripherals
PC Assembly, PC Disassembly, and Connecting PC Peripherals
 
2.3
2.32.3
2.3
 
Computer Assembly.pptx
Computer Assembly.pptxComputer Assembly.pptx
Computer Assembly.pptx
 
SYSTEM ADMINISTRATION AND MAINTENANCE NOTES PERIYAR UNIVERSITY
SYSTEM ADMINISTRATION AND MAINTENANCE NOTES PERIYAR UNIVERSITYSYSTEM ADMINISTRATION AND MAINTENANCE NOTES PERIYAR UNIVERSITY
SYSTEM ADMINISTRATION AND MAINTENANCE NOTES PERIYAR UNIVERSITY
 
System unit
System unitSystem unit
System unit
 
The Computer System
The Computer SystemThe Computer System
The Computer System
 
what can computers do
what can computers dowhat can computers do
what can computers do
 
Assembling_a_Computer.ppt
Assembling_a_Computer.pptAssembling_a_Computer.ppt
Assembling_a_Computer.ppt
 

More from JohnRebenRequinto1

Marxian Doctrine. Reporting -John Rpptx
Marxian Doctrine. Reporting  -John RpptxMarxian Doctrine. Reporting  -John Rpptx
Marxian Doctrine. Reporting -John RpptxJohnRebenRequinto1
 
motherboardppt-131020054233-phpapp02.pdf
motherboardppt-131020054233-phpapp02.pdfmotherboardppt-131020054233-phpapp02.pdf
motherboardppt-131020054233-phpapp02.pdfJohnRebenRequinto1
 
cssl07-preparingyourbootabledrive-180816061937 (1).pdf
cssl07-preparingyourbootabledrive-180816061937 (1).pdfcssl07-preparingyourbootabledrive-180816061937 (1).pdf
cssl07-preparingyourbootabledrive-180816061937 (1).pdfJohnRebenRequinto1
 

More from JohnRebenRequinto1 (7)

Marxian Doctrine. Reporting -John Rpptx
Marxian Doctrine. Reporting  -John RpptxMarxian Doctrine. Reporting  -John Rpptx
Marxian Doctrine. Reporting -John Rpptx
 
motherboardppt-131020054233-phpapp02.pdf
motherboardppt-131020054233-phpapp02.pdfmotherboardppt-131020054233-phpapp02.pdf
motherboardppt-131020054233-phpapp02.pdf
 
P2P Lecture.ppt
P2P Lecture.pptP2P Lecture.ppt
P2P Lecture.ppt
 
cssl07-preparingyourbootabledrive-180816061937 (1).pdf
cssl07-preparingyourbootabledrive-180816061937 (1).pdfcssl07-preparingyourbootabledrive-180816061937 (1).pdf
cssl07-preparingyourbootabledrive-180816061937 (1).pdf
 
Computer-software (1).pptx
Computer-software (1).pptxComputer-software (1).pptx
Computer-software (1).pptx
 
IP-Address (1).pptx
IP-Address (1).pptxIP-Address (1).pptx
IP-Address (1).pptx
 
Tools-and-Equipment.pptx
Tools-and-Equipment.pptxTools-and-Equipment.pptx
Tools-and-Equipment.pptx
 

Recently uploaded

Q4-W6-Restating Informational Text Grade 3
Q4-W6-Restating Informational Text Grade 3Q4-W6-Restating Informational Text Grade 3
Q4-W6-Restating Informational Text Grade 3JemimahLaneBuaron
 
Call Girls in Dwarka Mor Delhi Contact Us 9654467111
Call Girls in Dwarka Mor Delhi Contact Us 9654467111Call Girls in Dwarka Mor Delhi Contact Us 9654467111
Call Girls in Dwarka Mor Delhi Contact Us 9654467111Sapana Sha
 
_Math 4-Q4 Week 5.pptx Steps in Collecting Data
_Math 4-Q4 Week 5.pptx Steps in Collecting Data_Math 4-Q4 Week 5.pptx Steps in Collecting Data
_Math 4-Q4 Week 5.pptx Steps in Collecting DataJhengPantaleon
 
Mastering the Unannounced Regulatory Inspection
Mastering the Unannounced Regulatory InspectionMastering the Unannounced Regulatory Inspection
Mastering the Unannounced Regulatory InspectionSafetyChain Software
 
Micromeritics - Fundamental and Derived Properties of Powders
Micromeritics - Fundamental and Derived Properties of PowdersMicromeritics - Fundamental and Derived Properties of Powders
Micromeritics - Fundamental and Derived Properties of PowdersChitralekhaTherkar
 
Arihant handbook biology for class 11 .pdf
Arihant handbook biology for class 11 .pdfArihant handbook biology for class 11 .pdf
Arihant handbook biology for class 11 .pdfchloefrazer622
 
Employee wellbeing at the workplace.pptx
Employee wellbeing at the workplace.pptxEmployee wellbeing at the workplace.pptx
Employee wellbeing at the workplace.pptxNirmalaLoungPoorunde1
 
Crayon Activity Handout For the Crayon A
Crayon Activity Handout For the Crayon ACrayon Activity Handout For the Crayon A
Crayon Activity Handout For the Crayon AUnboundStockton
 
Alper Gobel In Media Res Media Component
Alper Gobel In Media Res Media ComponentAlper Gobel In Media Res Media Component
Alper Gobel In Media Res Media ComponentInMediaRes1
 
CARE OF CHILD IN INCUBATOR..........pptx
CARE OF CHILD IN INCUBATOR..........pptxCARE OF CHILD IN INCUBATOR..........pptx
CARE OF CHILD IN INCUBATOR..........pptxGaneshChakor2
 
The Most Excellent Way | 1 Corinthians 13
The Most Excellent Way | 1 Corinthians 13The Most Excellent Way | 1 Corinthians 13
The Most Excellent Way | 1 Corinthians 13Steve Thomason
 
A Critique of the Proposed National Education Policy Reform
A Critique of the Proposed National Education Policy ReformA Critique of the Proposed National Education Policy Reform
A Critique of the Proposed National Education Policy ReformChameera Dedduwage
 
PSYCHIATRIC History collection FORMAT.pptx
PSYCHIATRIC   History collection FORMAT.pptxPSYCHIATRIC   History collection FORMAT.pptx
PSYCHIATRIC History collection FORMAT.pptxPoojaSen20
 
Presiding Officer Training module 2024 lok sabha elections
Presiding Officer Training module 2024 lok sabha electionsPresiding Officer Training module 2024 lok sabha elections
Presiding Officer Training module 2024 lok sabha electionsanshu789521
 
MENTAL STATUS EXAMINATION format.docx
MENTAL     STATUS EXAMINATION format.docxMENTAL     STATUS EXAMINATION format.docx
MENTAL STATUS EXAMINATION format.docxPoojaSen20
 
18-04-UA_REPORT_MEDIALITERAСY_INDEX-DM_23-1-final-eng.pdf
18-04-UA_REPORT_MEDIALITERAСY_INDEX-DM_23-1-final-eng.pdf18-04-UA_REPORT_MEDIALITERAСY_INDEX-DM_23-1-final-eng.pdf
18-04-UA_REPORT_MEDIALITERAСY_INDEX-DM_23-1-final-eng.pdfssuser54595a
 
Organic Name Reactions for the students and aspirants of Chemistry12th.pptx
Organic Name Reactions  for the students and aspirants of Chemistry12th.pptxOrganic Name Reactions  for the students and aspirants of Chemistry12th.pptx
Organic Name Reactions for the students and aspirants of Chemistry12th.pptxVS Mahajan Coaching Centre
 
Sanyam Choudhary Chemistry practical.pdf
Sanyam Choudhary Chemistry practical.pdfSanyam Choudhary Chemistry practical.pdf
Sanyam Choudhary Chemistry practical.pdfsanyamsingh5019
 

Recently uploaded (20)

Q4-W6-Restating Informational Text Grade 3
Q4-W6-Restating Informational Text Grade 3Q4-W6-Restating Informational Text Grade 3
Q4-W6-Restating Informational Text Grade 3
 
Call Girls in Dwarka Mor Delhi Contact Us 9654467111
Call Girls in Dwarka Mor Delhi Contact Us 9654467111Call Girls in Dwarka Mor Delhi Contact Us 9654467111
Call Girls in Dwarka Mor Delhi Contact Us 9654467111
 
_Math 4-Q4 Week 5.pptx Steps in Collecting Data
_Math 4-Q4 Week 5.pptx Steps in Collecting Data_Math 4-Q4 Week 5.pptx Steps in Collecting Data
_Math 4-Q4 Week 5.pptx Steps in Collecting Data
 
Mastering the Unannounced Regulatory Inspection
Mastering the Unannounced Regulatory InspectionMastering the Unannounced Regulatory Inspection
Mastering the Unannounced Regulatory Inspection
 
Micromeritics - Fundamental and Derived Properties of Powders
Micromeritics - Fundamental and Derived Properties of PowdersMicromeritics - Fundamental and Derived Properties of Powders
Micromeritics - Fundamental and Derived Properties of Powders
 
Arihant handbook biology for class 11 .pdf
Arihant handbook biology for class 11 .pdfArihant handbook biology for class 11 .pdf
Arihant handbook biology for class 11 .pdf
 
Employee wellbeing at the workplace.pptx
Employee wellbeing at the workplace.pptxEmployee wellbeing at the workplace.pptx
Employee wellbeing at the workplace.pptx
 
Crayon Activity Handout For the Crayon A
Crayon Activity Handout For the Crayon ACrayon Activity Handout For the Crayon A
Crayon Activity Handout For the Crayon A
 
Alper Gobel In Media Res Media Component
Alper Gobel In Media Res Media ComponentAlper Gobel In Media Res Media Component
Alper Gobel In Media Res Media Component
 
CARE OF CHILD IN INCUBATOR..........pptx
CARE OF CHILD IN INCUBATOR..........pptxCARE OF CHILD IN INCUBATOR..........pptx
CARE OF CHILD IN INCUBATOR..........pptx
 
Model Call Girl in Bikash Puri Delhi reach out to us at 🔝9953056974🔝
Model Call Girl in Bikash Puri  Delhi reach out to us at 🔝9953056974🔝Model Call Girl in Bikash Puri  Delhi reach out to us at 🔝9953056974🔝
Model Call Girl in Bikash Puri Delhi reach out to us at 🔝9953056974🔝
 
The Most Excellent Way | 1 Corinthians 13
The Most Excellent Way | 1 Corinthians 13The Most Excellent Way | 1 Corinthians 13
The Most Excellent Way | 1 Corinthians 13
 
A Critique of the Proposed National Education Policy Reform
A Critique of the Proposed National Education Policy ReformA Critique of the Proposed National Education Policy Reform
A Critique of the Proposed National Education Policy Reform
 
PSYCHIATRIC History collection FORMAT.pptx
PSYCHIATRIC   History collection FORMAT.pptxPSYCHIATRIC   History collection FORMAT.pptx
PSYCHIATRIC History collection FORMAT.pptx
 
Staff of Color (SOC) Retention Efforts DDSD
Staff of Color (SOC) Retention Efforts DDSDStaff of Color (SOC) Retention Efforts DDSD
Staff of Color (SOC) Retention Efforts DDSD
 
Presiding Officer Training module 2024 lok sabha elections
Presiding Officer Training module 2024 lok sabha electionsPresiding Officer Training module 2024 lok sabha elections
Presiding Officer Training module 2024 lok sabha elections
 
MENTAL STATUS EXAMINATION format.docx
MENTAL     STATUS EXAMINATION format.docxMENTAL     STATUS EXAMINATION format.docx
MENTAL STATUS EXAMINATION format.docx
 
18-04-UA_REPORT_MEDIALITERAСY_INDEX-DM_23-1-final-eng.pdf
18-04-UA_REPORT_MEDIALITERAСY_INDEX-DM_23-1-final-eng.pdf18-04-UA_REPORT_MEDIALITERAСY_INDEX-DM_23-1-final-eng.pdf
18-04-UA_REPORT_MEDIALITERAСY_INDEX-DM_23-1-final-eng.pdf
 
Organic Name Reactions for the students and aspirants of Chemistry12th.pptx
Organic Name Reactions  for the students and aspirants of Chemistry12th.pptxOrganic Name Reactions  for the students and aspirants of Chemistry12th.pptx
Organic Name Reactions for the students and aspirants of Chemistry12th.pptx
 
Sanyam Choudhary Chemistry practical.pdf
Sanyam Choudhary Chemistry practical.pdfSanyam Choudhary Chemistry practical.pdf
Sanyam Choudhary Chemistry practical.pdf
 

Assembling and disassembling pc. pdf

  • 1. CORE MODULE 1 Fundamentals of Computer Hardware & Networking Assembling and Disassembling PC
  • 2. Computer Assembly Is An Essential Job Of A Computer Installation Technician. Computer Assembly Is A Process In Which All The Internal Components Required For The Computer System Are Fitted So As To Make The Computer Functional. There Is A Proper Sequence Of Attachment Of Each And Every Component Into The Computer System. Introduction
  • 3. Computer Assembly As We Know, Computer Assembly Is A Systematic Process. First, Arrange The Computer Parts. The Sequence For Computer Assembly 1. Open The Case 2. Install The Power Supply 3. Attach The Components To The Motherboard 4. Install The Motherboard 5. Install Internal Drives 6. Connect All Internal Cables 7. Install Motherboard Power Connections 8. Connect External Cables To The Computer 9. Boot The Computer For The First Time.
  • 4. Material Required  Computer Case, With Power Supply Installed  Motherboard  CPU  Heat Sink/Fan Assembly  Thermal Compound  RAM Module(s)  Motherboard Standoffs And Screws  Anti-static Wrist Strap And Anti-static Mat  Tool Kit
  • 5. Procedure for Computer Assembling Step 1: Open The Case The First Step In Assembling A Computer Is To Open The Computer Case. To Open The Case, First Remove The Screws Of The Left Side Cover And Slide The Side Cover.
  • 6. Step 2: Install The Power Supply The Next Step Is To Install A Power Supply. There Are Usually Four Screws That Attach The Power Supply To The Case.
  • 7. Step 3: Attach The Components To Motherboard The Motherboard Has To Be Prepared Before Its Installation. To Prepare The Motherboard, You First Need To Install The CPU, Then The Heat Sink On The CPU And CPU Fan.
  • 8. CPU A CPU Socket Uses A Series Of Pins To Connect A CPU’s Processor To The Pc’s Motherboard. If A CPU Is Connected Via A CPU Socket.
  • 9. Heat sink and fan assembly A Heat Sink And Fan (HSF) Is An Active Cooling Solution Used To Cool Down Integrated Circuits In Computer Systems, Commonly The Central Processing Unit (CPU).
  • 10. Connect The Assembly Power Cable To The CPU Fan Connector On The Motherboard.
  • 11. Installation of RAM To Install The RAM First On The Motherboard And Then Fix The Motherboard In The Case. To Install RAM, First Ensure Its Compatibility With The Motherboard.
  • 12. After Preparing The Motherboard, You Can Install In The Computer Case. Step 4: Install motherboard
  • 13. The Hard Drive Is The Device Which Stores All The Data. Connect The Power Cable Coming From The SMPS To The Power Socket Of Hard Disk Drive. Connect SATA Data Cable From Hard Disk Drive Socket To The Motherboard Socket Step 5: Install internal drives Hard drive
  • 14. Power Cables Are Used To Distribute Electricity From The Power Supply To The Motherboard And Other Components. Data Cables Transmit Data Between The Motherboard And Storage Devices, Such As Hard Drives. Step 6: Connect all internal cables
  • 15. The Advanced Technology Extended (ATX) Main Power Connector Will Have Either 20 Or 24 Pins. Step 7: Install motherboard power connections
  • 16. Step 8: Connect external cables to the computer Connecting Monitor The VGA Cable Is Used To Connect To Monitor.
  • 17. Step 8: Connect external cables to the computer Connecting Keyboard If It Uses A USB Connector, Plug It Into Any Of The USB Ports On The Back Of The Computer.
  • 18. Step 8: Connect external cables to the computer Connecting Headphones Or Speakers, And Microphone Connect The External Speakers Or Headphones, To Computer’s Audio Port (Either On The Front Or Back Of The Computer Case).
  • 19. Step 8: Connect external cables to the computer Connect The Computer To A Power Supply Power Supply Cable Connect Into The Back Of The Computer Case.
  • 20. Step 8: Connect external cables to the computer Connecting Printer, Scanner, Webcam
  • 21. Step 9: Starting the computer Always Remember That The First Step Is To Push Power Button Of The CPU Than The Monitor’s. An Operating System Or System Software Like Window Or Linux Will Start Loading, Now Your Computer Is Ready To Use.
  • 22. Procedure for Computer Dissembling Disassembly Is The Process Of Breaking Down A Device Into Separate Parts. Material Required  One Working PC  An Anti-static Wrist Strap  An Anti-static Mat  Anti-static Bags Of Various Sizes  Technician’s Toolkit  A Plastic Cup Or Box To Organize Screws, Nuts, And Bolts
  • 23. Procedure for Computer Dissembling Step 1: Unplugging  Unplug The Power Cord From The PC  Unplug All The Peripherals Attached To The Computer, Such As The Keyboard, Mouse, Monitor, Headphones.
  • 24. Procedure for Computer Dissembling Step 2: Open The Case First Remove The Screws Of The Left Side Cover And Slide The Side Cover.
  • 25. Procedure for Computer Dissembling Step 3: Disconnect All The Connectors Disconnect All The Connectors Connected To The Motherboard. These Include SATA Power Cable And Data Cable Of HDD As Well As SATA Cable Of Optical Drive
  • 26. Procedure for Computer Dissembling Step 4: Remove The Fan Remove The Fan Now.
  • 27. Procedure for Computer Dissembling Step 5: Remove The Power Supply Remove The Power Supply Is Connected To The Motherboard By A 20-pin Connector And 4-pin Connector.
  • 28. Procedure for Computer Dissembling Step 6: Removing HDD And Optical Drive Remove The SATA Cable Connecting To The HDD And Optical Drive In Motherboard.
  • 29. Procedure for Computer Dissembling Step 7: Remove RAM (Random Access Memory) Modules To Remove The RAM
  • 30. Procedure for Computer Dissembling Step 8: Remove Expansion Cards To Remove The Expansion Cards, Disconnect The Cables Attached To It.
  • 31. Procedure for Computer Dissembling Step 9: Remove Motherboard To Remove The Motherboard, Disconnect All The Cables From The Motherboard.
  • 32. Procedure for Computer Dissembling Step 10: Reassemble The Components  Identify Every Component And Take Its Photograph.  After Identification Of Each Component, Put All The Components Back In Their Place And Ensure That All Cables And Wires Are Connected At The Right Place To Avoid Further Troubleshooting.