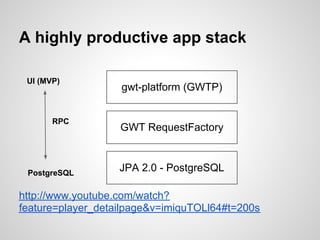
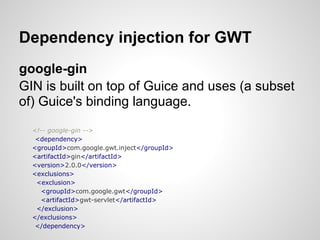
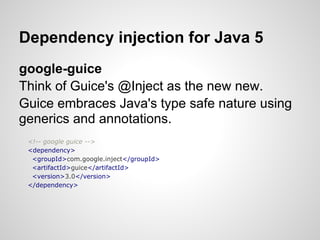
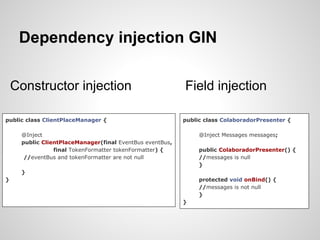
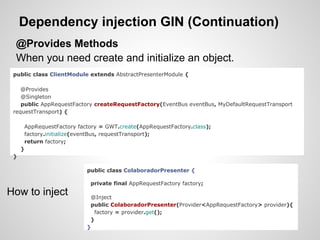
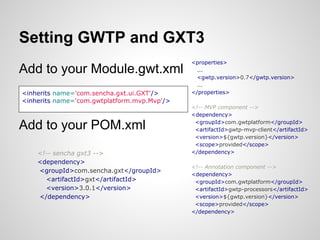
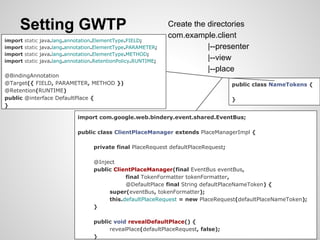
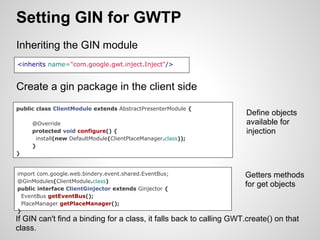
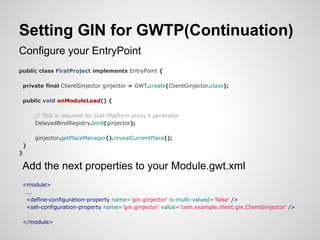
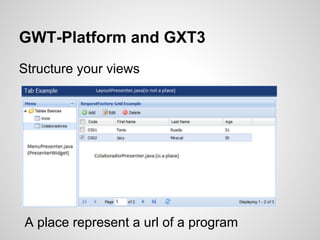
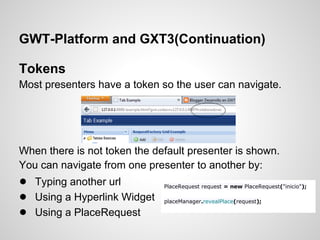
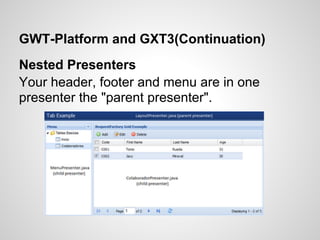
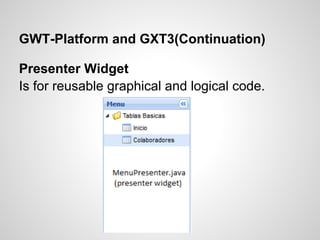
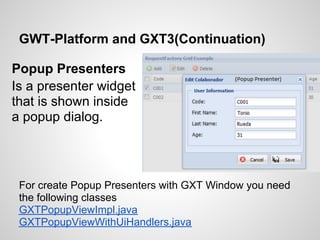
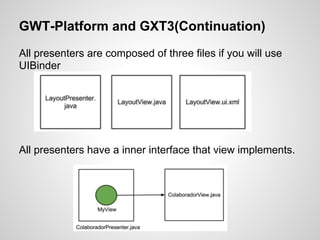
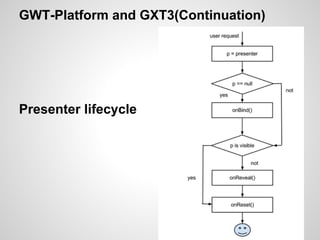
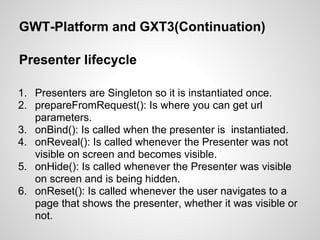
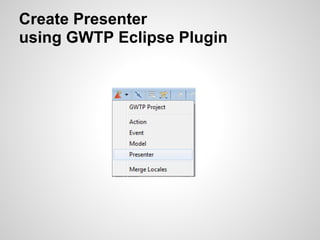
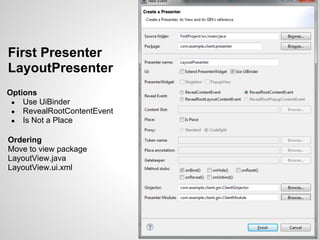
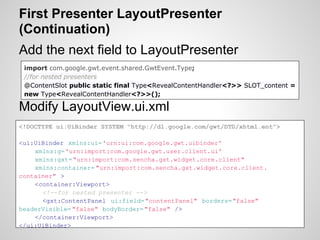
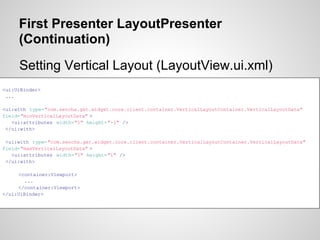
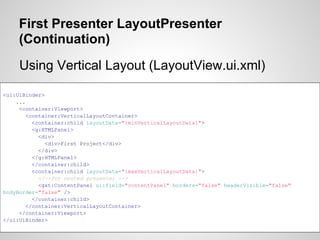
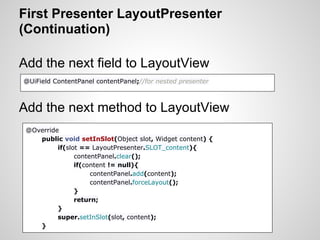
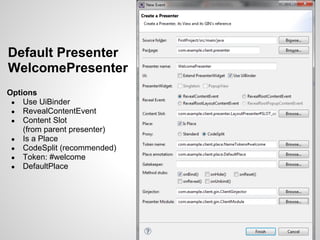
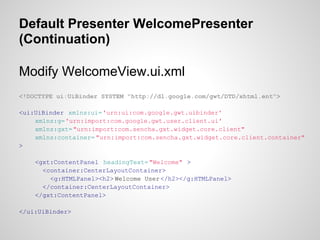
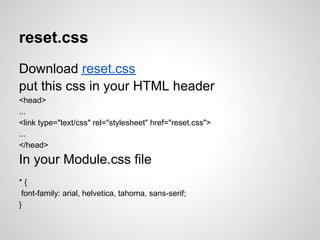
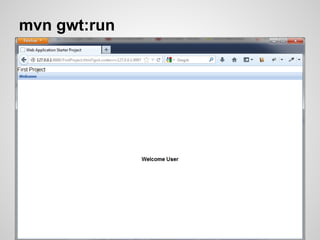
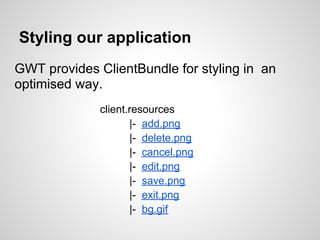
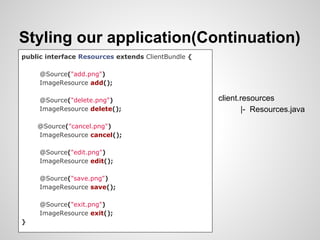
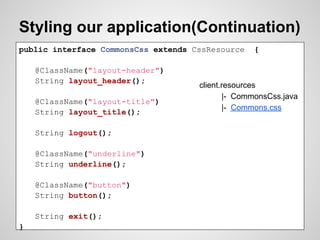
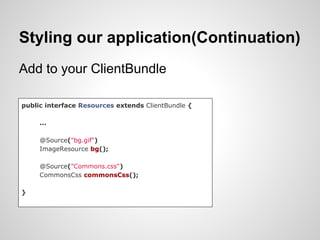
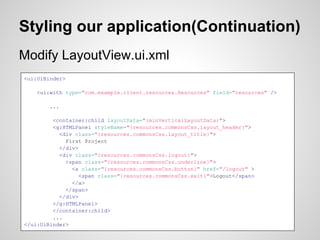
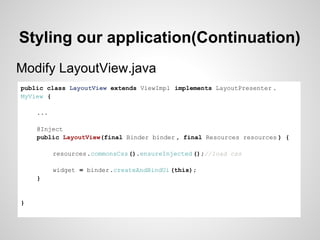
Architecting your GWT
       application with GWT-
              Platform


Juan Manuel Rojas R.
http://rhemsolutions.com/   Lima, Perú 26/10/2012
Architecting your GWT application
Google found that a Model-view-presenter
(MVP) architecture works best when
developing GWT apps
https://developers.google.com/web-toolkit/articles/mvp-
architecture


Model View Presenter Frameworks
Mvp4g
gwt-dispatch
gwt-platform
GWT-Platform
It's an open source MVP framework, that
supports many nice features of GWT, including
code splitting and history management, with a
simple annotation-based API.
A highly productive app stack

 UI (MVP)
                   gwt-platform (GWTP)


       RPC
                   GWT RequestFactory


 PostgreSQL
                   JPA 2.0 - PostgreSQL

http://www.youtube.com/watch?
feature=player_detailpage&v=imiquTOLl64#t=200s
Google Plugin for Eclipse
Update sites

Eclipse 4.2 (Juno)
http://dl.google.com/eclipse/plugin/4.2
GWTP Eclipse Plugin
To install the GWTP Eclipse Plugin, from
Eclipse go to Help > Install New Software

Click on Add...
Name: GWTP
Location: http://plugin.gwt-platform.googlecode.com/hg/update
Clean example code
1. Delete theme lines from Module.gwt.xml
2. Delete files from
                                     Entry point
   client package
    GreetingService                  package com.example.client;
    GreetingServiceAsync
   server package,                   import com.google.gwt.core.client.EntryPoint;
                                     import com.google.gwt.user.client.Window;
    GreetingServiceImpl
   shared packaged                   public class FirstProject implements EntryPoint {
    FieldVerifier
   src/test/java                       public void onModuleLoad() {
    GwtTestFirstProject                  Window.alert("empty project");
                                       }
   src/test/resources
                                     }
    FirstProjectJUnit.gwt.xml
3. Clean Css file and html table code src/main/webapp
4. Delete servlet definition from web.xml src/main/webapp/WEB-INF
Dependency injection (DI)
Separate behavior from dependency resolution.

Injects the dependent element (object or value
etc) to the destination automatically.

Reduction of boilerplate code in the application
objects since all work to initialize or set up
dependencies is handled by a provider
component.
http://en.wikipedia.org/wiki/Dependency_injection
Dependency injection for GWT
google-gin
GIN is built on top of Guice and uses (a subset
of) Guice's binding language.

  <!-- google-gin -->
   <dependency>
  <groupId>com.google.gwt.inject</groupId>
  <artifactId>gin</artifactId>
  <version>2.0.0</version>
  <exclusions>
   <exclusion>
    <groupId>com.google.gwt</groupId>
    <artifactId>gwt-servlet</artifactId>
   </exclusion>
  </exclusions>
   </dependency>
Dependency injection for Java 5
google-guice
Think of Guice's @Inject as the new new.
Guice embraces Java's type safe nature using
generics and annotations.
 <!-- google guice -->
 <dependency>
  <groupId>com.google.inject</groupId>
  <artifactId>guice</artifactId>
  <version>3.0</version>
 </dependency>
Dependency injection GIN

    Constructor injection                                 Field injection

public class ClientPlaceManager {                         public class ColaboradorPresenter {

     @Inject                                                   @Inject Messages messages;
     public ClientPlaceManager(final EventBus eventBus,
                final TokenFormatter tokenFormatter) {         public ColaboradorPresenter() {
      //eventBus and tokenFormatter are not null               //messages is null
                                                               }
     }
}                                                              protected void onBind() {
                                                               //messages is not null
                                                               }
                                                          }
Dependency injection GIN (Continuation)
 @Provides Methods
 When you need create and initialize an object.
 public class ClientModule extends AbstractPresenterModule {

    @Provides
    @Singleton
    public AppRequestFactory createRequestFactory(EventBus eventBus, MyDefaultRequestTransport
 requestTransport) {

      AppRequestFactory factory = GWT.create(AppRequestFactory.class);
      factory.initialize(eventBus, requestTransport);
      return factory;
     }
 }

                           public class ColaboradorPresenter {

                            private final AppRequestFactory factory;
How to inject               @Inject
                            public ColaboradorPresenter(Provider<AppRequestFactory> provider){
                             factory = provider.get();
                            }
                           }
Setting GWTP and GXT3
                                             <properties>
Add to your Module.gwt.xml                     ...
                                               <gwtp.version>0.7</gwtp.version>
                                               ...
<inherits name='com.sencha.gxt.ui.GXT'/>     </properties>
<inherits name='com.gwtplatform.mvp.Mvp'/>
                                             <!-- MVP component -->
                                             <dependency>

Add to your POM.xml                           <groupId>com.gwtplatform</groupId>
                                              <artifactId>gwtp-mvp-client</artifactId>
                                              <version>${gwtp.version}</version>
                                              <scope>provided</scope>
    <!-- sencha gxt3 -->                     </dependency>
    <dependency>
                                             <!-- Annotation component -->
    <groupId>com.sencha.gxt</groupId>
                                             <dependency>
      <artifactId>gxt</artifactId>            <groupId>com.gwtplatform</groupId>
      <version>3.0.1</version>                <artifactId>gwtp-processors</artifactId>
    </dependency>                             <version>${gwtp.version}</version>
                                              <scope>provided</scope>
                                             </dependency>
Setting GWTP                                                 Create the directories
                                                                  com.example.client
import   static   java.lang.annotation.ElementType.FIELD;
import   static   java.lang.annotation.ElementType.PARAMETER;                |--presenter
import   static   java.lang.annotation.ElementType.METHOD;
import   static   java.lang.annotation.RetentionPolicy.RUNTIME;
                                                                             |--view
                                                                             |--place
@BindingAnnotation
@Target({ FIELD, PARAMETER, METHOD })                                                   public class NameTokens {
@Retention(RUNTIME)
public @interface DefaultPlace {                                                        }
}

                                import com.google.web.bindery.event.shared.EventBus;

                                public class ClientPlaceManager extends PlaceManagerImpl {

                                      private final PlaceRequest defaultPlaceRequest;

                                      @Inject
                                      public ClientPlaceManager(final EventBus eventBus,
                                                 final TokenFormatter tokenFormatter,
                                                 @DefaultPlace final String defaultPlaceNameToken) {
                                           super(eventBus, tokenFormatter);
                                           this.defaultPlaceRequest = new PlaceRequest(defaultPlaceNameToken);
                                      }

                                      public void revealDefaultPlace() {
                                           revealPlace(defaultPlaceRequest, false);
                                      }
Setting GIN for GWTP
Inheriting the GIN module
<inherits name="com.google.gwt.inject.Inject"/>


Create a gin package in the client side
public class ClientModule extends AbstractPresenterModule {
                                                                      Define objects
     @Override                                                        available for
     protected void configure() {                                     injection
      install(new DefaultModule(ClientPlaceManager.class));
     }
}


import com.google.web.bindery.event.shared.EventBus;                 Getters methods
@GinModules(ClientModule.class)
public interface ClientGinjector extends Ginjector {
                                                                     for get objects
 EventBus getEventBus();
 PlaceManager getPlaceManager();
}
If GIN can't find a binding for a class, it falls back to calling GWT.create() on that
class.
Setting GIN for GWTP(Continuation)
Configure your EntryPoint
public class FirstProject implements EntryPoint {

 private final ClientGinjector ginjector = GWT.create(ClientGinjector.class);

 public void onModuleLoad() {

     // This is required for Gwt-Platform proxy's generator
     DelayedBindRegistry.bind(ginjector);

     ginjector.getPlaceManager().revealCurrentPlace();
 }
}

 Add the next properties to your Module.gwt.xml
 <module>
  ...
  <define-configuration-property name='gin.ginjector' is-multi-valued='false' />
  <set-configuration-property name='gin.ginjector' value='com.example.client.gin.ClientGinjector' />

 </module>
GWT-Platform and GXT3
Structure your views


A place represent a url of a program
GWT-Platform and GXT3(Continuation)

Tokens
Most presenters have a token so the user can navigate.


When there is not token the default presenter is shown.
You can navigate from one presenter to another by:
● Typing another url          PlaceRequest request = new PlaceRequest("inicio");

● Using a Hyperlink Widget    placeManager.revealPlace(request);

● Using a PlaceRequest
GWT-Platform and GXT3(Continuation)
Nested Presenters
Your header, footer and menu are in one
presenter the "parent presenter".
GWT-Platform and GXT3(Continuation)

Presenter Widget
Is for reusable graphical and logical code.
GWT-Platform and GXT3(Continuation)

Popup Presenters
Is a presenter widget
that is shown inside
a popup dialog.


 For create Popup Presenters with GXT Window you need
 the following classes
 GXTPopupViewImpl.java
 GXTPopupViewWithUiHandlers.java
GWT-Platform and GXT3(Continuation)
All presenters are composed of three files if you will use
UIBinder


All presenters have a inner interface that view implements.
GWT-Platform and GXT3(Continuation)


Presenter lifecycle
GWT-Platform and GXT3(Continuation)

Presenter lifecycle

1. Presenters are Singleton so it is instantiated once.
2. prepareFromRequest(): Is where you can get url
   parameters.
3. onBind(): Is called when the presenter is instantiated.
4. onReveal(): Is called whenever the Presenter was not
   visible on screen and becomes visible.
5. onHide(): Is called whenever the Presenter was visible
   on screen and is being hidden.
6. onReset(): Is called whenever the user navigates to a
   page that shows the presenter, whether it was visible or
   not.
Create Presenter
using GWTP Eclipse Plugin
First Presenter
LayoutPresenter
Options
 ● Use UiBinder
 ● RevealRootContentEvent
 ● Is Not a Place


Ordering
Move to view package
LayoutView.java
LayoutView.ui.xml
First Presenter LayoutPresenter
(Continuation)
Deprecated shared.EventBus

GWTP Eclipse Plugin use EventBus from event.shared
next this package was deprecated and change to web.
bindery.event.shared.

* Is important to do the next in every presenter you create
with GWTP Eclipse Plugin

Delete
import com.google.gwt.event.shared.EventBus
Replace by
import com.google.web.bindery.event.shared.EventBus;
First Presenter LayoutPresenter
(Continuation)
Add the next field to LayoutPresenter
 import com.google.gwt.event.shared.GwtEvent.Type;
 //for nested presenters
 @ContentSlot public static final Type<RevealContentHandler<?>> SLOT_content =
 new Type<RevealContentHandler<?>>();

Modify LayoutView.ui.xml
<!DOCTYPE ui:UiBinder SYSTEM "http://dl.google.com/gwt/DTD/xhtml.ent">

<ui:UiBinder xmlns:ui='urn:ui:com.google.gwt.uibinder'
    xmlns:g='urn:import:com.google.gwt.user.client.ui'
    xmlns:gxt= "urn:import:com.sencha.gxt.widget.core.client"
    xmlns:container= "urn:import:com.sencha.gxt.widget.core.client.
container" >
    <container:Viewport>
      <!--for nested presenter -->
      <gxt:ContentPanel ui:field="contentPanel" borders="false"
headerVisible= "false" bodyBorder= "false" />
    </container:Viewport>
</ui:UiBinder>
First Presenter LayoutPresenter
     (Continuation)
     Setting Vertical Layout (LayoutView.ui.xml)
<ui:UiBinder>
 ...

<ui:with type="com.sencha.gxt.widget.core.client.container.VerticalLayoutContainer.VerticalLayoutData"
field="minVerticalLayoutData" >
   <ui:attributes width="1" height="-1" />
 </ui:with>

 <ui:with type="com.sencha.gxt.widget.core.client.container.VerticalLayoutContainer.VerticalLayoutData"
field="maxVerticalLayoutData" >
   <ui:attributes width="1" height="1" />
 </ui:with>

     <container:Viewport>
        ...
     </container:Viewport>
</ui:UiBinder>
First Presenter LayoutPresenter
     (Continuation)
     Using Vertical Layout (LayoutView.ui.xml)

<ui:UiBinder>
    ...
     <container:Viewport>
        <container:VerticalLayoutContainer>
          <container:child layoutData="{minVerticalLayoutData}">
          <g:HTMLPanel>
            <div>
              <div>First Project</div>
            </div>
          </g:HTMLPanel>
          </container:child>
          <container:child layoutData="{maxVerticalLayoutData}">
            <!--for nested presenter -->
            <gxt:ContentPanel ui:field="contentPanel" borders="false" headerVisible="false"
bodyBorder="false" />
          </container:child>
        </container:VerticalLayoutContainer>
     </container:Viewport>
</ui:UiBinder>
First Presenter LayoutPresenter
(Continuation)

Add the next field to LayoutView
@UiField ContentPanel contentPanel;//for nested presenter


Add the next method to LayoutView
 @Override
    public void setInSlot(Object slot, Widget content) {
          if(slot == LayoutPresenter.SLOT_content){
                contentPanel.clear();
                if(content != null){
                     contentPanel.add(content);
                     contentPanel.forceLayout();
                }
                return;
          }
          super.setInSlot(slot, content);
    }
Default Presenter
WelcomePresenter
Options
 ● Use UiBinder
 ● RevealContentEvent
 ● Content Slot
    (from parent presenter)
 ● Is a Place
 ● CodeSplit (recommended)
 ● Token: #welcome
 ● DefaultPlace
Default Presenter WelcomePresenter
(Continuation)

Modify WelcomeView.ui.xml
<!DOCTYPE ui:UiBinder SYSTEM "http://dl.google.com/gwt/DTD/xhtml.ent">

<ui:UiBinder xmlns:ui='urn:ui:com.google.gwt.uibinder'
    xmlns:g='urn:import:com.google.gwt.user.client.ui'
    xmlns:gxt= "urn:import:com.sencha.gxt.widget.core.client"
    xmlns:container= "urn:import:com.sencha.gxt.widget.core.client.container"
>

    <gxt:ContentPanel headingText= "Welcome" >
      <container:CenterLayoutContainer>
        <g:HTMLPanel><h2> Welcome User </h2></g:HTMLPanel>
      </container:CenterLayoutContainer>
    </gxt:ContentPanel>

</ui:UiBinder>
reset.css
Download reset.css
put this css in your HTML header
<head>
...
<link type="text/css" rel="stylesheet" href="reset.css">
...
</head>

In your Module.css file
*{
 font-family: arial, helvetica, tahoma, sans-serif;
}
mvn gwt:run
Styling our application
GWT provides ClientBundle for styling in an
optimised way.
              client.resources
                     |- add.png
                     |- delete.png
                     |- cancel.png
                     |- edit.png
                     |- save.png
                     |- exit.png
                     |- bg.gif
Styling our application(Continuation)
public interface Resources extends ClientBundle {

     @Source("add.png")
     ImageResource add();

     @Source("delete.png")                          client.resources
     ImageResource delete();                               |- Resources.java

    @Source("cancel.png")
    ImageResource cancel();

     @Source("edit.png")
     ImageResource edit();

     @Source("save.png")
     ImageResource save();

     @Source("exit.png")
     ImageResource exit();
}
Styling our application(Continuation)
public interface CommonsCss extends CssResource   {

    @ClassName("layout-header")
    String layout_header();
                                     client.resources
                                            |- CommonsCss.java
    @ClassName("layout-title")
                                            |- Commons.css
    String layout_title();

    String logout();

    @ClassName("underline")
    String underline();

    @ClassName("button")
    String button();

    String exit();
}
Styling our application(Continuation)
Add to your ClientBundle

public interface Resources extends ClientBundle {

     ...

     @Source("bg.gif")
     ImageResource bg();

     @Source("Commons.css")
     CommonsCss commonsCss();

}
Styling our application(Continuation)
Modify LayoutView.ui.xml
<ui:UiBinder>

    <ui:with type="com.example.client.resources.Resources" field="resources" />

        ...

         <container:child layoutData="{minVerticalLayoutData}">
         <g:HTMLPanel styleName="{resources.commonsCss.layout_header}">
           <div class="{resources.commonsCss.layout_title}">
             First Project
           </div>
           <div class="{resources.commonsCss.logout}">
             <span class="{resources.commonsCss.underline}">
               <a class="{resources.commonsCss.button}" href="/logout" >
                  <span class="{resources.commonsCss.exit}">Logout</span>
               </a>
             </span>
           </div>
         </g:HTMLPanel>
         </container:child>
         ...
</ui:UiBinder>
Styling our application(Continuation)
Modify LayoutView.java
public class LayoutView extends ViewImpl implements LayoutPresenter .
MyView {

    ...

    @Inject
    public LayoutView(final Binder binder , final Resources resources ) {

          resources.commonsCss ().ensureInjected ();//load css

          widget = binder.createAndBindUi (this);
    }


}
mvn gwt:run


              Thanks
References
http://www.youtube.com/playlist?
list=PL29DDDC847F63AF82
http://code.google.com/p/google-gin/wiki/GinTutorial
http://code.google.com/p/google-guice/

http://www.youtube.com/watch?
v=1iLg_qWTrXY&feature=relmfu
http://www.sencha.com/examples/#ExamplePlace:
centerlayout(uibinder)
http://code.google.com/p/google-web-
toolkit/wiki/CssResource#Image_Sprites

Architecting your GWT applications with GWT-Platform - Lesson 02

  • 1.
    Architecting your GWT application with GWT- Platform Juan Manuel Rojas R. http://rhemsolutions.com/ Lima, Perú 26/10/2012
  • 2.
    Architecting your GWTapplication Google found that a Model-view-presenter (MVP) architecture works best when developing GWT apps https://developers.google.com/web-toolkit/articles/mvp- architecture Model View Presenter Frameworks Mvp4g gwt-dispatch gwt-platform
  • 3.
    GWT-Platform It's an opensource MVP framework, that supports many nice features of GWT, including code splitting and history management, with a simple annotation-based API.
  • 4.
    A highly productiveapp stack UI (MVP) gwt-platform (GWTP) RPC GWT RequestFactory PostgreSQL JPA 2.0 - PostgreSQL http://www.youtube.com/watch? feature=player_detailpage&v=imiquTOLl64#t=200s
  • 5.
    Google Plugin forEclipse Update sites Eclipse 4.2 (Juno) http://dl.google.com/eclipse/plugin/4.2
  • 6.
    GWTP Eclipse Plugin Toinstall the GWTP Eclipse Plugin, from Eclipse go to Help > Install New Software Click on Add... Name: GWTP Location: http://plugin.gwt-platform.googlecode.com/hg/update
  • 7.
    Clean example code 1.Delete theme lines from Module.gwt.xml 2. Delete files from Entry point client package GreetingService package com.example.client; GreetingServiceAsync server package, import com.google.gwt.core.client.EntryPoint; import com.google.gwt.user.client.Window; GreetingServiceImpl shared packaged public class FirstProject implements EntryPoint { FieldVerifier src/test/java public void onModuleLoad() { GwtTestFirstProject Window.alert("empty project"); } src/test/resources } FirstProjectJUnit.gwt.xml 3. Clean Css file and html table code src/main/webapp 4. Delete servlet definition from web.xml src/main/webapp/WEB-INF
  • 8.
    Dependency injection (DI) Separatebehavior from dependency resolution. Injects the dependent element (object or value etc) to the destination automatically. Reduction of boilerplate code in the application objects since all work to initialize or set up dependencies is handled by a provider component. http://en.wikipedia.org/wiki/Dependency_injection
  • 9.
    Dependency injection forGWT google-gin GIN is built on top of Guice and uses (a subset of) Guice's binding language. <!-- google-gin --> <dependency> <groupId>com.google.gwt.inject</groupId> <artifactId>gin</artifactId> <version>2.0.0</version> <exclusions> <exclusion> <groupId>com.google.gwt</groupId> <artifactId>gwt-servlet</artifactId> </exclusion> </exclusions> </dependency>
  • 10.
    Dependency injection forJava 5 google-guice Think of Guice's @Inject as the new new. Guice embraces Java's type safe nature using generics and annotations. <!-- google guice --> <dependency> <groupId>com.google.inject</groupId> <artifactId>guice</artifactId> <version>3.0</version> </dependency>
  • 11.
    Dependency injection GIN Constructor injection Field injection public class ClientPlaceManager { public class ColaboradorPresenter { @Inject @Inject Messages messages; public ClientPlaceManager(final EventBus eventBus, final TokenFormatter tokenFormatter) { public ColaboradorPresenter() { //eventBus and tokenFormatter are not null //messages is null } } } protected void onBind() { //messages is not null } }
  • 12.
    Dependency injection GIN(Continuation) @Provides Methods When you need create and initialize an object. public class ClientModule extends AbstractPresenterModule { @Provides @Singleton public AppRequestFactory createRequestFactory(EventBus eventBus, MyDefaultRequestTransport requestTransport) { AppRequestFactory factory = GWT.create(AppRequestFactory.class); factory.initialize(eventBus, requestTransport); return factory; } } public class ColaboradorPresenter { private final AppRequestFactory factory; How to inject @Inject public ColaboradorPresenter(Provider<AppRequestFactory> provider){ factory = provider.get(); } }
  • 13.
    Setting GWTP andGXT3 <properties> Add to your Module.gwt.xml ... <gwtp.version>0.7</gwtp.version> ... <inherits name='com.sencha.gxt.ui.GXT'/> </properties> <inherits name='com.gwtplatform.mvp.Mvp'/> <!-- MVP component --> <dependency> Add to your POM.xml <groupId>com.gwtplatform</groupId> <artifactId>gwtp-mvp-client</artifactId> <version>${gwtp.version}</version> <scope>provided</scope> <!-- sencha gxt3 --> </dependency> <dependency> <!-- Annotation component --> <groupId>com.sencha.gxt</groupId> <dependency> <artifactId>gxt</artifactId> <groupId>com.gwtplatform</groupId> <version>3.0.1</version> <artifactId>gwtp-processors</artifactId> </dependency> <version>${gwtp.version}</version> <scope>provided</scope> </dependency>
  • 14.
    Setting GWTP Create the directories com.example.client import static java.lang.annotation.ElementType.FIELD; import static java.lang.annotation.ElementType.PARAMETER; |--presenter import static java.lang.annotation.ElementType.METHOD; import static java.lang.annotation.RetentionPolicy.RUNTIME; |--view |--place @BindingAnnotation @Target({ FIELD, PARAMETER, METHOD }) public class NameTokens { @Retention(RUNTIME) public @interface DefaultPlace { } } import com.google.web.bindery.event.shared.EventBus; public class ClientPlaceManager extends PlaceManagerImpl { private final PlaceRequest defaultPlaceRequest; @Inject public ClientPlaceManager(final EventBus eventBus, final TokenFormatter tokenFormatter, @DefaultPlace final String defaultPlaceNameToken) { super(eventBus, tokenFormatter); this.defaultPlaceRequest = new PlaceRequest(defaultPlaceNameToken); } public void revealDefaultPlace() { revealPlace(defaultPlaceRequest, false); }
  • 15.
    Setting GIN forGWTP Inheriting the GIN module <inherits name="com.google.gwt.inject.Inject"/> Create a gin package in the client side public class ClientModule extends AbstractPresenterModule { Define objects @Override available for protected void configure() { injection install(new DefaultModule(ClientPlaceManager.class)); } } import com.google.web.bindery.event.shared.EventBus; Getters methods @GinModules(ClientModule.class) public interface ClientGinjector extends Ginjector { for get objects EventBus getEventBus(); PlaceManager getPlaceManager(); } If GIN can't find a binding for a class, it falls back to calling GWT.create() on that class.
  • 16.
    Setting GIN forGWTP(Continuation) Configure your EntryPoint public class FirstProject implements EntryPoint { private final ClientGinjector ginjector = GWT.create(ClientGinjector.class); public void onModuleLoad() { // This is required for Gwt-Platform proxy's generator DelayedBindRegistry.bind(ginjector); ginjector.getPlaceManager().revealCurrentPlace(); } } Add the next properties to your Module.gwt.xml <module> ... <define-configuration-property name='gin.ginjector' is-multi-valued='false' /> <set-configuration-property name='gin.ginjector' value='com.example.client.gin.ClientGinjector' /> </module>
  • 17.
    GWT-Platform and GXT3 Structureyour views A place represent a url of a program
  • 18.
    GWT-Platform and GXT3(Continuation) Tokens Mostpresenters have a token so the user can navigate. When there is not token the default presenter is shown. You can navigate from one presenter to another by: ● Typing another url PlaceRequest request = new PlaceRequest("inicio"); ● Using a Hyperlink Widget placeManager.revealPlace(request); ● Using a PlaceRequest
  • 19.
    GWT-Platform and GXT3(Continuation) NestedPresenters Your header, footer and menu are in one presenter the "parent presenter".
  • 20.
    GWT-Platform and GXT3(Continuation) PresenterWidget Is for reusable graphical and logical code.
  • 21.
    GWT-Platform and GXT3(Continuation) PopupPresenters Is a presenter widget that is shown inside a popup dialog. For create Popup Presenters with GXT Window you need the following classes GXTPopupViewImpl.java GXTPopupViewWithUiHandlers.java
  • 22.
    GWT-Platform and GXT3(Continuation) Allpresenters are composed of three files if you will use UIBinder All presenters have a inner interface that view implements.
  • 23.
  • 24.
    GWT-Platform and GXT3(Continuation) Presenterlifecycle 1. Presenters are Singleton so it is instantiated once. 2. prepareFromRequest(): Is where you can get url parameters. 3. onBind(): Is called when the presenter is instantiated. 4. onReveal(): Is called whenever the Presenter was not visible on screen and becomes visible. 5. onHide(): Is called whenever the Presenter was visible on screen and is being hidden. 6. onReset(): Is called whenever the user navigates to a page that shows the presenter, whether it was visible or not.
  • 25.
  • 26.
    First Presenter LayoutPresenter Options ●Use UiBinder ● RevealRootContentEvent ● Is Not a Place Ordering Move to view package LayoutView.java LayoutView.ui.xml
  • 27.
    First Presenter LayoutPresenter (Continuation) Deprecatedshared.EventBus GWTP Eclipse Plugin use EventBus from event.shared next this package was deprecated and change to web. bindery.event.shared. * Is important to do the next in every presenter you create with GWTP Eclipse Plugin Delete import com.google.gwt.event.shared.EventBus Replace by import com.google.web.bindery.event.shared.EventBus;
  • 28.
    First Presenter LayoutPresenter (Continuation) Addthe next field to LayoutPresenter import com.google.gwt.event.shared.GwtEvent.Type; //for nested presenters @ContentSlot public static final Type<RevealContentHandler<?>> SLOT_content = new Type<RevealContentHandler<?>>(); Modify LayoutView.ui.xml <!DOCTYPE ui:UiBinder SYSTEM "http://dl.google.com/gwt/DTD/xhtml.ent"> <ui:UiBinder xmlns:ui='urn:ui:com.google.gwt.uibinder' xmlns:g='urn:import:com.google.gwt.user.client.ui' xmlns:gxt= "urn:import:com.sencha.gxt.widget.core.client" xmlns:container= "urn:import:com.sencha.gxt.widget.core.client. container" > <container:Viewport> <!--for nested presenter --> <gxt:ContentPanel ui:field="contentPanel" borders="false" headerVisible= "false" bodyBorder= "false" /> </container:Viewport> </ui:UiBinder>
  • 29.
    First Presenter LayoutPresenter (Continuation) Setting Vertical Layout (LayoutView.ui.xml) <ui:UiBinder> ... <ui:with type="com.sencha.gxt.widget.core.client.container.VerticalLayoutContainer.VerticalLayoutData" field="minVerticalLayoutData" > <ui:attributes width="1" height="-1" /> </ui:with> <ui:with type="com.sencha.gxt.widget.core.client.container.VerticalLayoutContainer.VerticalLayoutData" field="maxVerticalLayoutData" > <ui:attributes width="1" height="1" /> </ui:with> <container:Viewport> ... </container:Viewport> </ui:UiBinder>
  • 30.
    First Presenter LayoutPresenter (Continuation) Using Vertical Layout (LayoutView.ui.xml) <ui:UiBinder> ... <container:Viewport> <container:VerticalLayoutContainer> <container:child layoutData="{minVerticalLayoutData}"> <g:HTMLPanel> <div> <div>First Project</div> </div> </g:HTMLPanel> </container:child> <container:child layoutData="{maxVerticalLayoutData}"> <!--for nested presenter --> <gxt:ContentPanel ui:field="contentPanel" borders="false" headerVisible="false" bodyBorder="false" /> </container:child> </container:VerticalLayoutContainer> </container:Viewport> </ui:UiBinder>
  • 31.
    First Presenter LayoutPresenter (Continuation) Addthe next field to LayoutView @UiField ContentPanel contentPanel;//for nested presenter Add the next method to LayoutView @Override public void setInSlot(Object slot, Widget content) { if(slot == LayoutPresenter.SLOT_content){ contentPanel.clear(); if(content != null){ contentPanel.add(content); contentPanel.forceLayout(); } return; } super.setInSlot(slot, content); }
  • 32.
    Default Presenter WelcomePresenter Options ●Use UiBinder ● RevealContentEvent ● Content Slot (from parent presenter) ● Is a Place ● CodeSplit (recommended) ● Token: #welcome ● DefaultPlace
  • 33.
    Default Presenter WelcomePresenter (Continuation) ModifyWelcomeView.ui.xml <!DOCTYPE ui:UiBinder SYSTEM "http://dl.google.com/gwt/DTD/xhtml.ent"> <ui:UiBinder xmlns:ui='urn:ui:com.google.gwt.uibinder' xmlns:g='urn:import:com.google.gwt.user.client.ui' xmlns:gxt= "urn:import:com.sencha.gxt.widget.core.client" xmlns:container= "urn:import:com.sencha.gxt.widget.core.client.container" > <gxt:ContentPanel headingText= "Welcome" > <container:CenterLayoutContainer> <g:HTMLPanel><h2> Welcome User </h2></g:HTMLPanel> </container:CenterLayoutContainer> </gxt:ContentPanel> </ui:UiBinder>
  • 34.
    reset.css Download reset.css put thiscss in your HTML header <head> ... <link type="text/css" rel="stylesheet" href="reset.css"> ... </head> In your Module.css file *{ font-family: arial, helvetica, tahoma, sans-serif; }
  • 35.
  • 36.
    Styling our application GWTprovides ClientBundle for styling in an optimised way. client.resources |- add.png |- delete.png |- cancel.png |- edit.png |- save.png |- exit.png |- bg.gif
  • 37.
    Styling our application(Continuation) publicinterface Resources extends ClientBundle { @Source("add.png") ImageResource add(); @Source("delete.png") client.resources ImageResource delete(); |- Resources.java @Source("cancel.png") ImageResource cancel(); @Source("edit.png") ImageResource edit(); @Source("save.png") ImageResource save(); @Source("exit.png") ImageResource exit(); }
  • 38.
    Styling our application(Continuation) publicinterface CommonsCss extends CssResource { @ClassName("layout-header") String layout_header(); client.resources |- CommonsCss.java @ClassName("layout-title") |- Commons.css String layout_title(); String logout(); @ClassName("underline") String underline(); @ClassName("button") String button(); String exit(); }
  • 39.
    Styling our application(Continuation) Addto your ClientBundle public interface Resources extends ClientBundle { ... @Source("bg.gif") ImageResource bg(); @Source("Commons.css") CommonsCss commonsCss(); }
  • 40.
    Styling our application(Continuation) ModifyLayoutView.ui.xml <ui:UiBinder> <ui:with type="com.example.client.resources.Resources" field="resources" /> ... <container:child layoutData="{minVerticalLayoutData}"> <g:HTMLPanel styleName="{resources.commonsCss.layout_header}"> <div class="{resources.commonsCss.layout_title}"> First Project </div> <div class="{resources.commonsCss.logout}"> <span class="{resources.commonsCss.underline}"> <a class="{resources.commonsCss.button}" href="/logout" > <span class="{resources.commonsCss.exit}">Logout</span> </a> </span> </div> </g:HTMLPanel> </container:child> ... </ui:UiBinder>
  • 41.
    Styling our application(Continuation) ModifyLayoutView.java public class LayoutView extends ViewImpl implements LayoutPresenter . MyView { ... @Inject public LayoutView(final Binder binder , final Resources resources ) { resources.commonsCss ().ensureInjected ();//load css widget = binder.createAndBindUi (this); } }
  • 42.
  • 43.