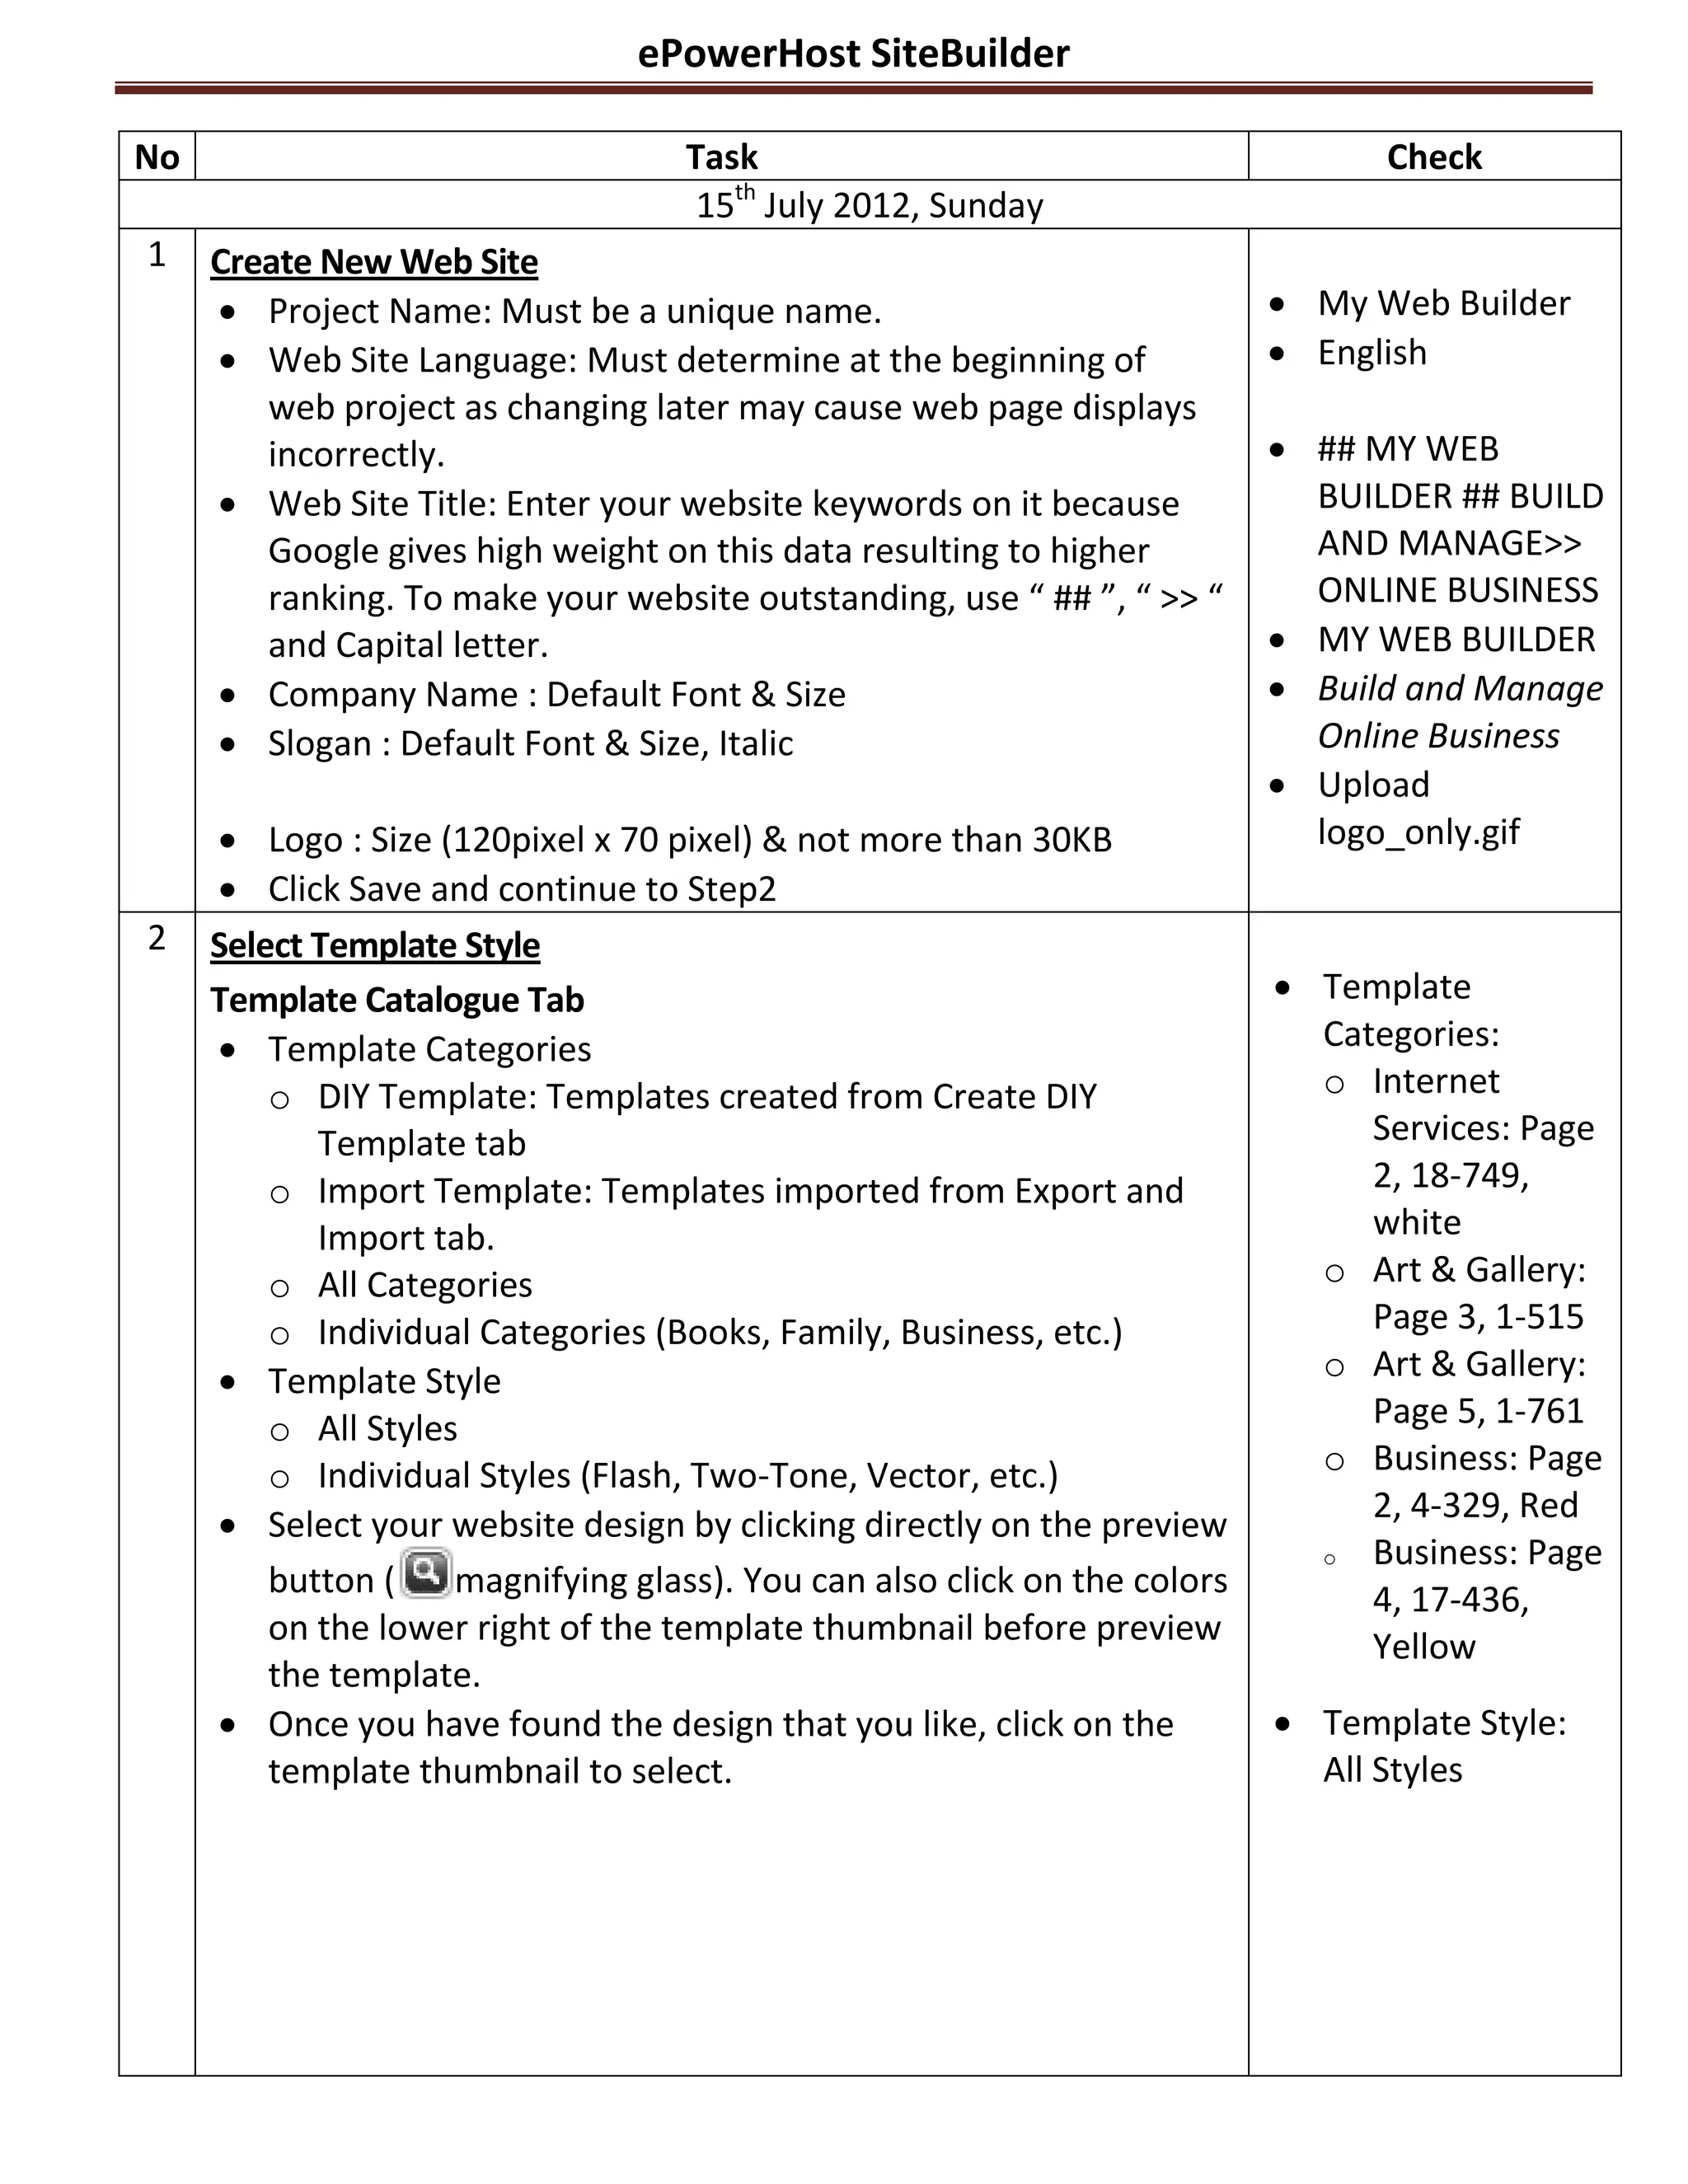
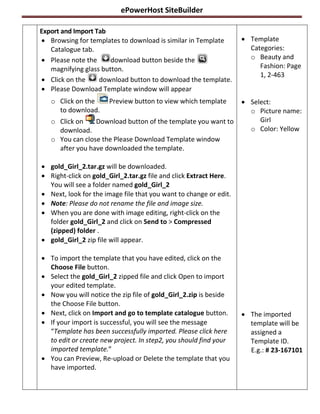
ePowerHost SiteBuilder

No                                  Task                                         Check
                                     15th July 2012, Sunday
1    Create New Web Site
      Project Name: Must be a unique name.                                 My Web Builder
      Web Site Language: Must determine at the beginning of                English
        web project as changing later may cause web page displays
        incorrectly.                                                        ## MY WEB
      Web Site Title: Enter your website keywords on it because             BUILDER ## BUILD
        Google gives high weight on this data resulting to higher            AND MANAGE>>
        ranking. To make your website outstanding, use “ ## ”, “ >> “        ONLINE BUSINESS
        and Capital letter.                                                 MY WEB BUILDER
      Company Name : Default Font & Size                                   Build and Manage
      Slogan : Default Font & Size, Italic                                  Online Business
                                                                            Upload
      Logo : Size (120pixel x 70 pixel) & not more than 30KB                logo_only.gif
      Click Save and continue to Step2
2    Select Template Style
     Template Catalogue Tab                                                 Template
      Template Categories                                                   Categories:
         o DIY Template: Templates created from Create DIY                   o Internet
            Template tab                                                        Services: Page
         o Import Template: Templates imported from Export and                  2, 18-749,
            Import tab.                                                         white
         o All Categories                                                    o Art & Gallery:
         o Individual Categories (Books, Family, Business, etc.)                Page 3, 1-515
      Template Style                                                        o Art & Gallery:
         o All Styles                                                           Page 5, 1-761
         o Individual Styles (Flash, Two-Tone, Vector, etc.)                 o Business: Page
                                                                                2, 4-329, Red
      Select your website design by clicking directly on the preview
                                                                             o  Business: Page
         button (    magnifying glass). You can also click on the colors        4, 17-436,
         on the lower right of the template thumbnail before preview            Yellow
         the template.
      Once you have found the design that you like, click on the           Template Style:
         template thumbnail to select.                                       All Styles
ePowerHost SiteBuilder

Export and Import Tab
 Browsing for templates to download is similar in Template         Template
   Catalogue tab.                                                    Categories:
 Please note the      download button beside the                    o Beauty and
   magnifying glass button.                                             Fashion: Page
                                                                        1, 2-463
 Click on the     download button to download the template.
 Please Download Template window will appear
   o Click on the     Preview button to view which template         Select:
     to download.                                                    o Picture name:
   o Click on    Download button of the template you want to            Girl
     download.                                                       o Color: Yellow
   o You can close the Please Download Template window
     after you have downloaded the template.

 gold_Girl_2.tar.gz will be downloaded.
 Right-click on gold_Girl_2.tar.gz file and click Extract Here.
  You will see a folder named gold_Girl_2
 Next, look for the image file that you want to change or edit.
 Note: Please do not rename the file and image size.
 When you are done with image editing, right-click on the
  folder gold_Girl_2 and click on Send to > Compressed
  (zipped) folder .
 gold_Girl_2 zip file will appear.

 To import the template that you have edited, click on the
  Choose File button.
 Select the gold_Girl_2 zipped file and click Open to import
  your edited template.
 Now you will notice the zip file of gold_Girl_2.zip is beside
  the Choose File button.
 Next, click on Import and go to template catalogue button.        The imported
 If your import is successful, you will see the message             template will be
  “Template has been successfully imported. Please click here        assigned a
  to edit or create new project. In step2, you should find your      Template ID.
  imported template.”                                                E.g.: # 23-167101
 You can Preview, Re-upload or Delete the template that you
  have imported.
ePowerHost SiteBuilder

3   Select Your Web Site Style
     You can change the color scheme, picture style, navigator
        style, navigator color, and default font family.
     Color: Click to change available colors
     Picture: Options of Click or Off
     Position and Resolution
     Font
     Navigator: Choose the type design that you like
     Move: Click and drag to move the Logo, Company Name &
        Slogan. You can also Auto Positions.

     Site Wide: Edit top, Edit bottom, Edit side1, Edit Side2. Here,  Section 1: Picture
      you can embed code for example Add Picture, insert Youtube  Section 2: Insert
      movie, Google Adsense code, insert flash banner & etc.            Media/Video >>
     Note: When you have edited any of the Site Wide section, it       In Youtube,
      will turn into green.                                             search gratitude
     When you are done, click “Save” to proceed to Step 4.             dance -
                                                                        http://www.youtube.c
                                                                        om/watch?v=QeLbrGs
                                                                        pigg
                                                                      Then, click Share,
                                                                       click Embed &
                                                                       copy the iframe
                                                                       code.
                                                                      Section 3:
                                                                       HitCounter code-
                                                                       http://freehitcou
                                                                       ntercode.com/
                                                                      Section 4: Flash
                                                                       Banner
4   Page Structure
     Select suggested page structure & click the Move button.        Move: About Us,
     Then arrange your page structure by clicking on the Move         Products, Order
       Up or Move Down button.                                         (set as sub-
                                                                       menu), Portfolio,
     You can add extra Components. Extra components have a            Contact Us
      pre-built script for its own specific task.                     Component:
     Click Save and proceed to Step 5.                                Photo Album
     Note: If you see Warning message in Step 5, please follow
      the on screen instructions.
ePowerHost SiteBuilder

5   Site Content
     Click "WYSIWYG Editor" to add or edit the content on your        Photo Album:
        web page.                                                       o Upload
     In Page List Navigator, you will see your created pages.            Image>Create
                                                                          Directory:
     Click              to edit the page.                                Showcase
     Click "Delete" to delete the web page. Be careful, the            o Click Choose
      deleted page cannot be restored.                                    File to upload
     Click "Manage" to manage the extra component.                       Photos
                                                                       Manage Image:
                                                                        o Click on
                                                                          Showcase
                                                                          folder
                                                                        o Change Image
                                                                          Description
                                                                        o Click Save
                                                                       Header & Footer:
                                                                        o Header> Web
                                                                          Builder Header
                                                                        o Footer> Web
                                                                          Builder Footer

6   Extras – Custom Web Page Title
     Click "Edit" to edit web page title or click "Reset" to get a    Meta Keyword:
        default value.                                                  Web Builder,
     Meta Tags: Enter keywords and description                         Website Builder,
                                                                        Easy Web Builder
                                                                       Meta Description:
                                                                        Easy 7 steps
                                                                        website builder


     Page Effect: It can only perform in IE browser.
     Page Name
ePowerHost SiteBuilder

7   Publish
     Every time you edit the web pages, you need to publish           Text box:
       them. The actual web site will not reflect the change until      sitebuilder
       you do this step.
     Leave blank if this site is to appear when you visit
       YourDomainName.com
     If you want to publish to YourDomainName.com/test/ enter
       test on the text box
     When you are done, click Publish Button to publish your site.
     Note: Please wait for few minutes until the whole process of
       building your website is done.
     http://epowerhost.net/sitebuilder/tryout/users/rvstryoutant
       honywee19/sitebuilder/index.php
     http://bit.ly/MyWebBuilder

Epowerhost Website Builder

  • 1.
    ePowerHost SiteBuilder No Task Check 15th July 2012, Sunday 1 Create New Web Site  Project Name: Must be a unique name.  My Web Builder  Web Site Language: Must determine at the beginning of  English web project as changing later may cause web page displays incorrectly.  ## MY WEB  Web Site Title: Enter your website keywords on it because BUILDER ## BUILD Google gives high weight on this data resulting to higher AND MANAGE>> ranking. To make your website outstanding, use “ ## ”, “ >> “ ONLINE BUSINESS and Capital letter.  MY WEB BUILDER  Company Name : Default Font & Size  Build and Manage  Slogan : Default Font & Size, Italic Online Business  Upload  Logo : Size (120pixel x 70 pixel) & not more than 30KB logo_only.gif  Click Save and continue to Step2 2 Select Template Style Template Catalogue Tab  Template  Template Categories Categories: o DIY Template: Templates created from Create DIY o Internet Template tab Services: Page o Import Template: Templates imported from Export and 2, 18-749, Import tab. white o All Categories o Art & Gallery: o Individual Categories (Books, Family, Business, etc.) Page 3, 1-515  Template Style o Art & Gallery: o All Styles Page 5, 1-761 o Individual Styles (Flash, Two-Tone, Vector, etc.) o Business: Page 2, 4-329, Red  Select your website design by clicking directly on the preview o Business: Page button ( magnifying glass). You can also click on the colors 4, 17-436, on the lower right of the template thumbnail before preview Yellow the template.  Once you have found the design that you like, click on the  Template Style: template thumbnail to select. All Styles
  • 2.
    ePowerHost SiteBuilder Export andImport Tab  Browsing for templates to download is similar in Template  Template Catalogue tab. Categories:  Please note the download button beside the o Beauty and magnifying glass button. Fashion: Page 1, 2-463  Click on the download button to download the template.  Please Download Template window will appear o Click on the Preview button to view which template  Select: to download. o Picture name: o Click on Download button of the template you want to Girl download. o Color: Yellow o You can close the Please Download Template window after you have downloaded the template.  gold_Girl_2.tar.gz will be downloaded.  Right-click on gold_Girl_2.tar.gz file and click Extract Here. You will see a folder named gold_Girl_2  Next, look for the image file that you want to change or edit.  Note: Please do not rename the file and image size.  When you are done with image editing, right-click on the folder gold_Girl_2 and click on Send to > Compressed (zipped) folder .  gold_Girl_2 zip file will appear.  To import the template that you have edited, click on the Choose File button.  Select the gold_Girl_2 zipped file and click Open to import your edited template.  Now you will notice the zip file of gold_Girl_2.zip is beside the Choose File button.  Next, click on Import and go to template catalogue button.  The imported  If your import is successful, you will see the message template will be “Template has been successfully imported. Please click here assigned a to edit or create new project. In step2, you should find your Template ID. imported template.” E.g.: # 23-167101  You can Preview, Re-upload or Delete the template that you have imported.
  • 3.
    ePowerHost SiteBuilder 3 Select Your Web Site Style  You can change the color scheme, picture style, navigator style, navigator color, and default font family.  Color: Click to change available colors  Picture: Options of Click or Off  Position and Resolution  Font  Navigator: Choose the type design that you like  Move: Click and drag to move the Logo, Company Name & Slogan. You can also Auto Positions.  Site Wide: Edit top, Edit bottom, Edit side1, Edit Side2. Here,  Section 1: Picture you can embed code for example Add Picture, insert Youtube  Section 2: Insert movie, Google Adsense code, insert flash banner & etc. Media/Video >>  Note: When you have edited any of the Site Wide section, it In Youtube, will turn into green. search gratitude  When you are done, click “Save” to proceed to Step 4. dance - http://www.youtube.c om/watch?v=QeLbrGs pigg  Then, click Share, click Embed & copy the iframe code.  Section 3: HitCounter code- http://freehitcou ntercode.com/  Section 4: Flash Banner 4 Page Structure  Select suggested page structure & click the Move button.  Move: About Us,  Then arrange your page structure by clicking on the Move Products, Order Up or Move Down button. (set as sub- menu), Portfolio,  You can add extra Components. Extra components have a Contact Us pre-built script for its own specific task.  Component:  Click Save and proceed to Step 5. Photo Album  Note: If you see Warning message in Step 5, please follow the on screen instructions.
  • 4.
    ePowerHost SiteBuilder 5 Site Content  Click "WYSIWYG Editor" to add or edit the content on your  Photo Album: web page. o Upload  In Page List Navigator, you will see your created pages. Image>Create Directory:  Click to edit the page. Showcase  Click "Delete" to delete the web page. Be careful, the o Click Choose deleted page cannot be restored. File to upload  Click "Manage" to manage the extra component. Photos  Manage Image: o Click on Showcase folder o Change Image Description o Click Save  Header & Footer: o Header> Web Builder Header o Footer> Web Builder Footer 6 Extras – Custom Web Page Title  Click "Edit" to edit web page title or click "Reset" to get a  Meta Keyword: default value. Web Builder,  Meta Tags: Enter keywords and description Website Builder, Easy Web Builder  Meta Description: Easy 7 steps website builder  Page Effect: It can only perform in IE browser.  Page Name
  • 5.
    ePowerHost SiteBuilder 7 Publish  Every time you edit the web pages, you need to publish  Text box: them. The actual web site will not reflect the change until sitebuilder you do this step.  Leave blank if this site is to appear when you visit YourDomainName.com  If you want to publish to YourDomainName.com/test/ enter test on the text box  When you are done, click Publish Button to publish your site.  Note: Please wait for few minutes until the whole process of building your website is done.  http://epowerhost.net/sitebuilder/tryout/users/rvstryoutant honywee19/sitebuilder/index.php  http://bit.ly/MyWebBuilder