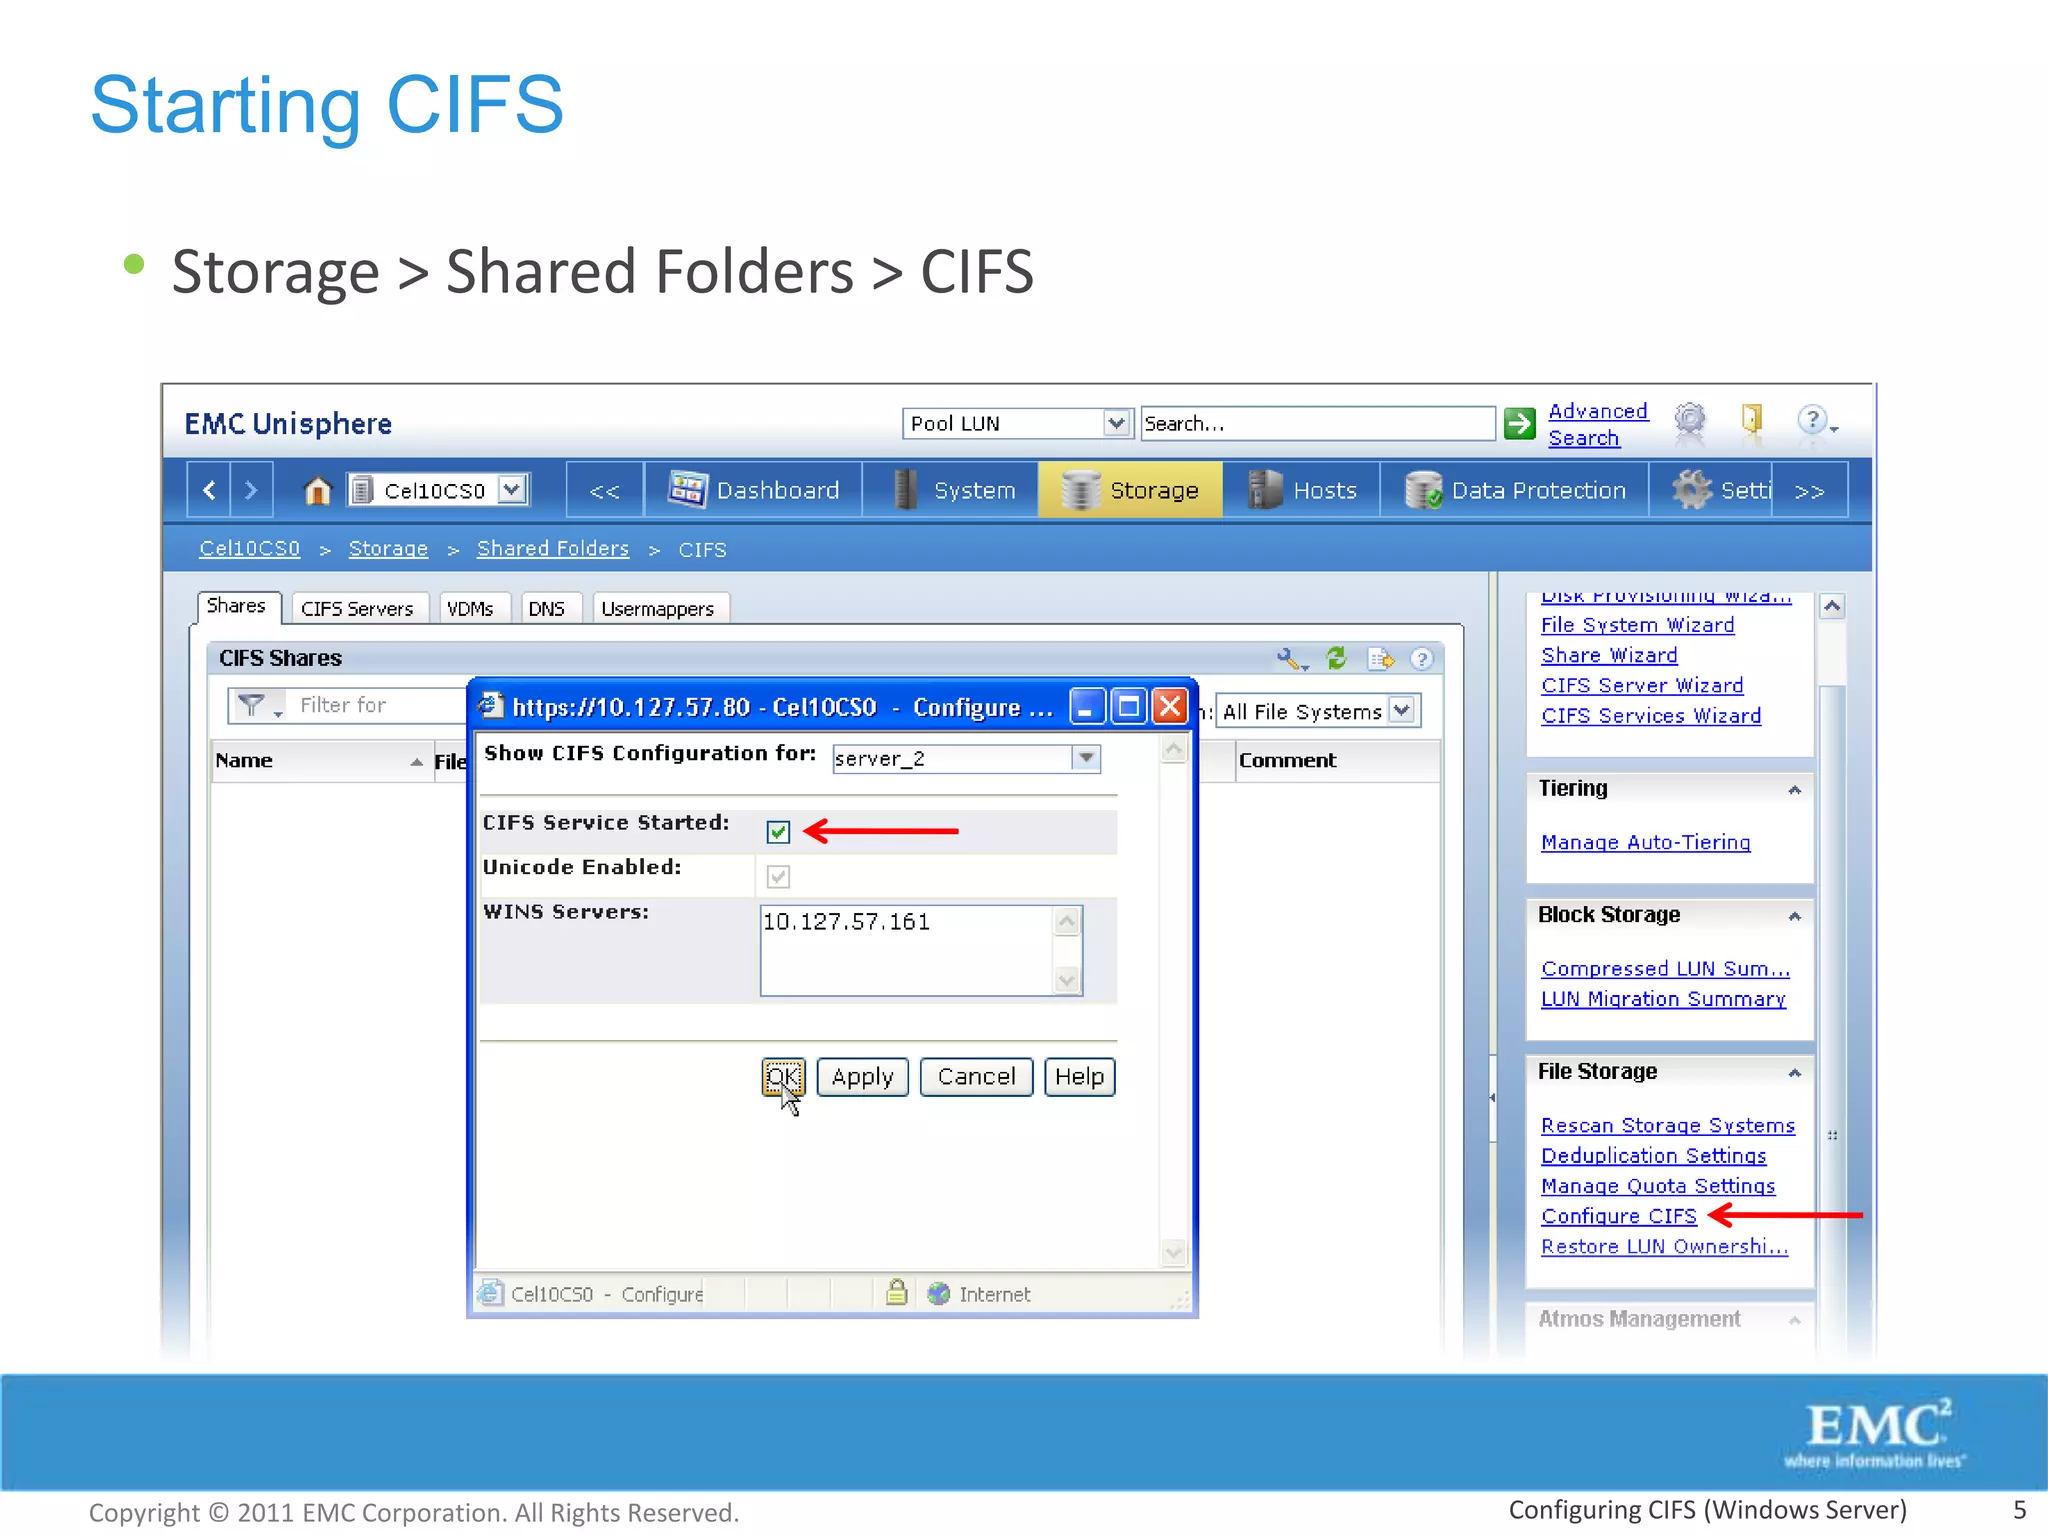
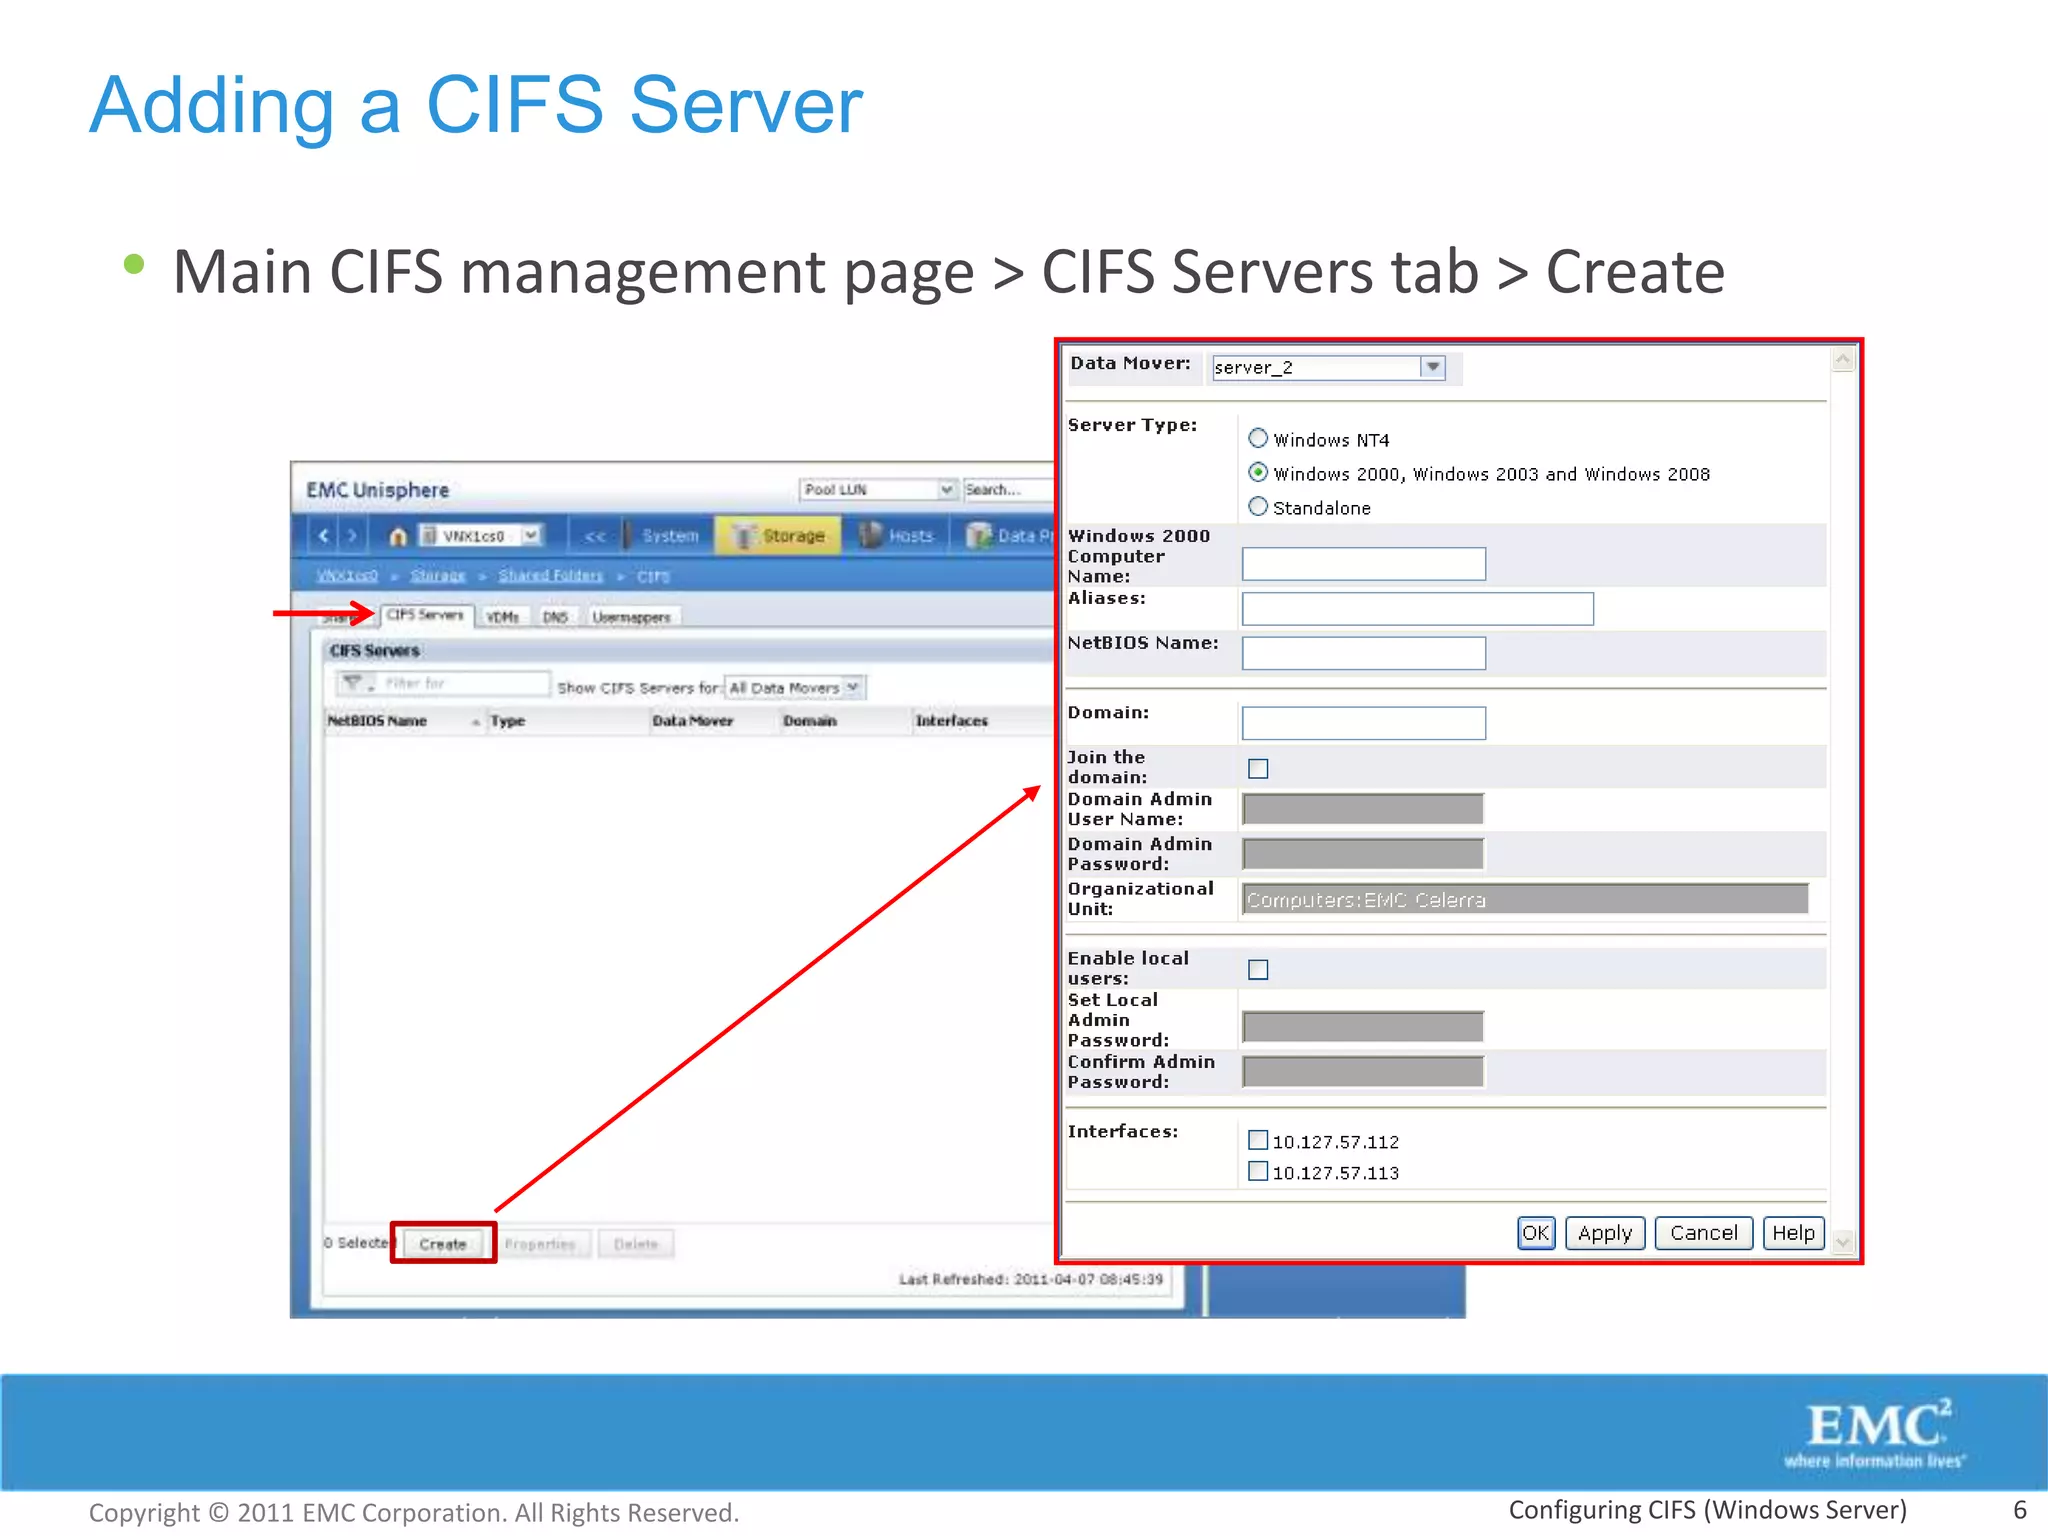
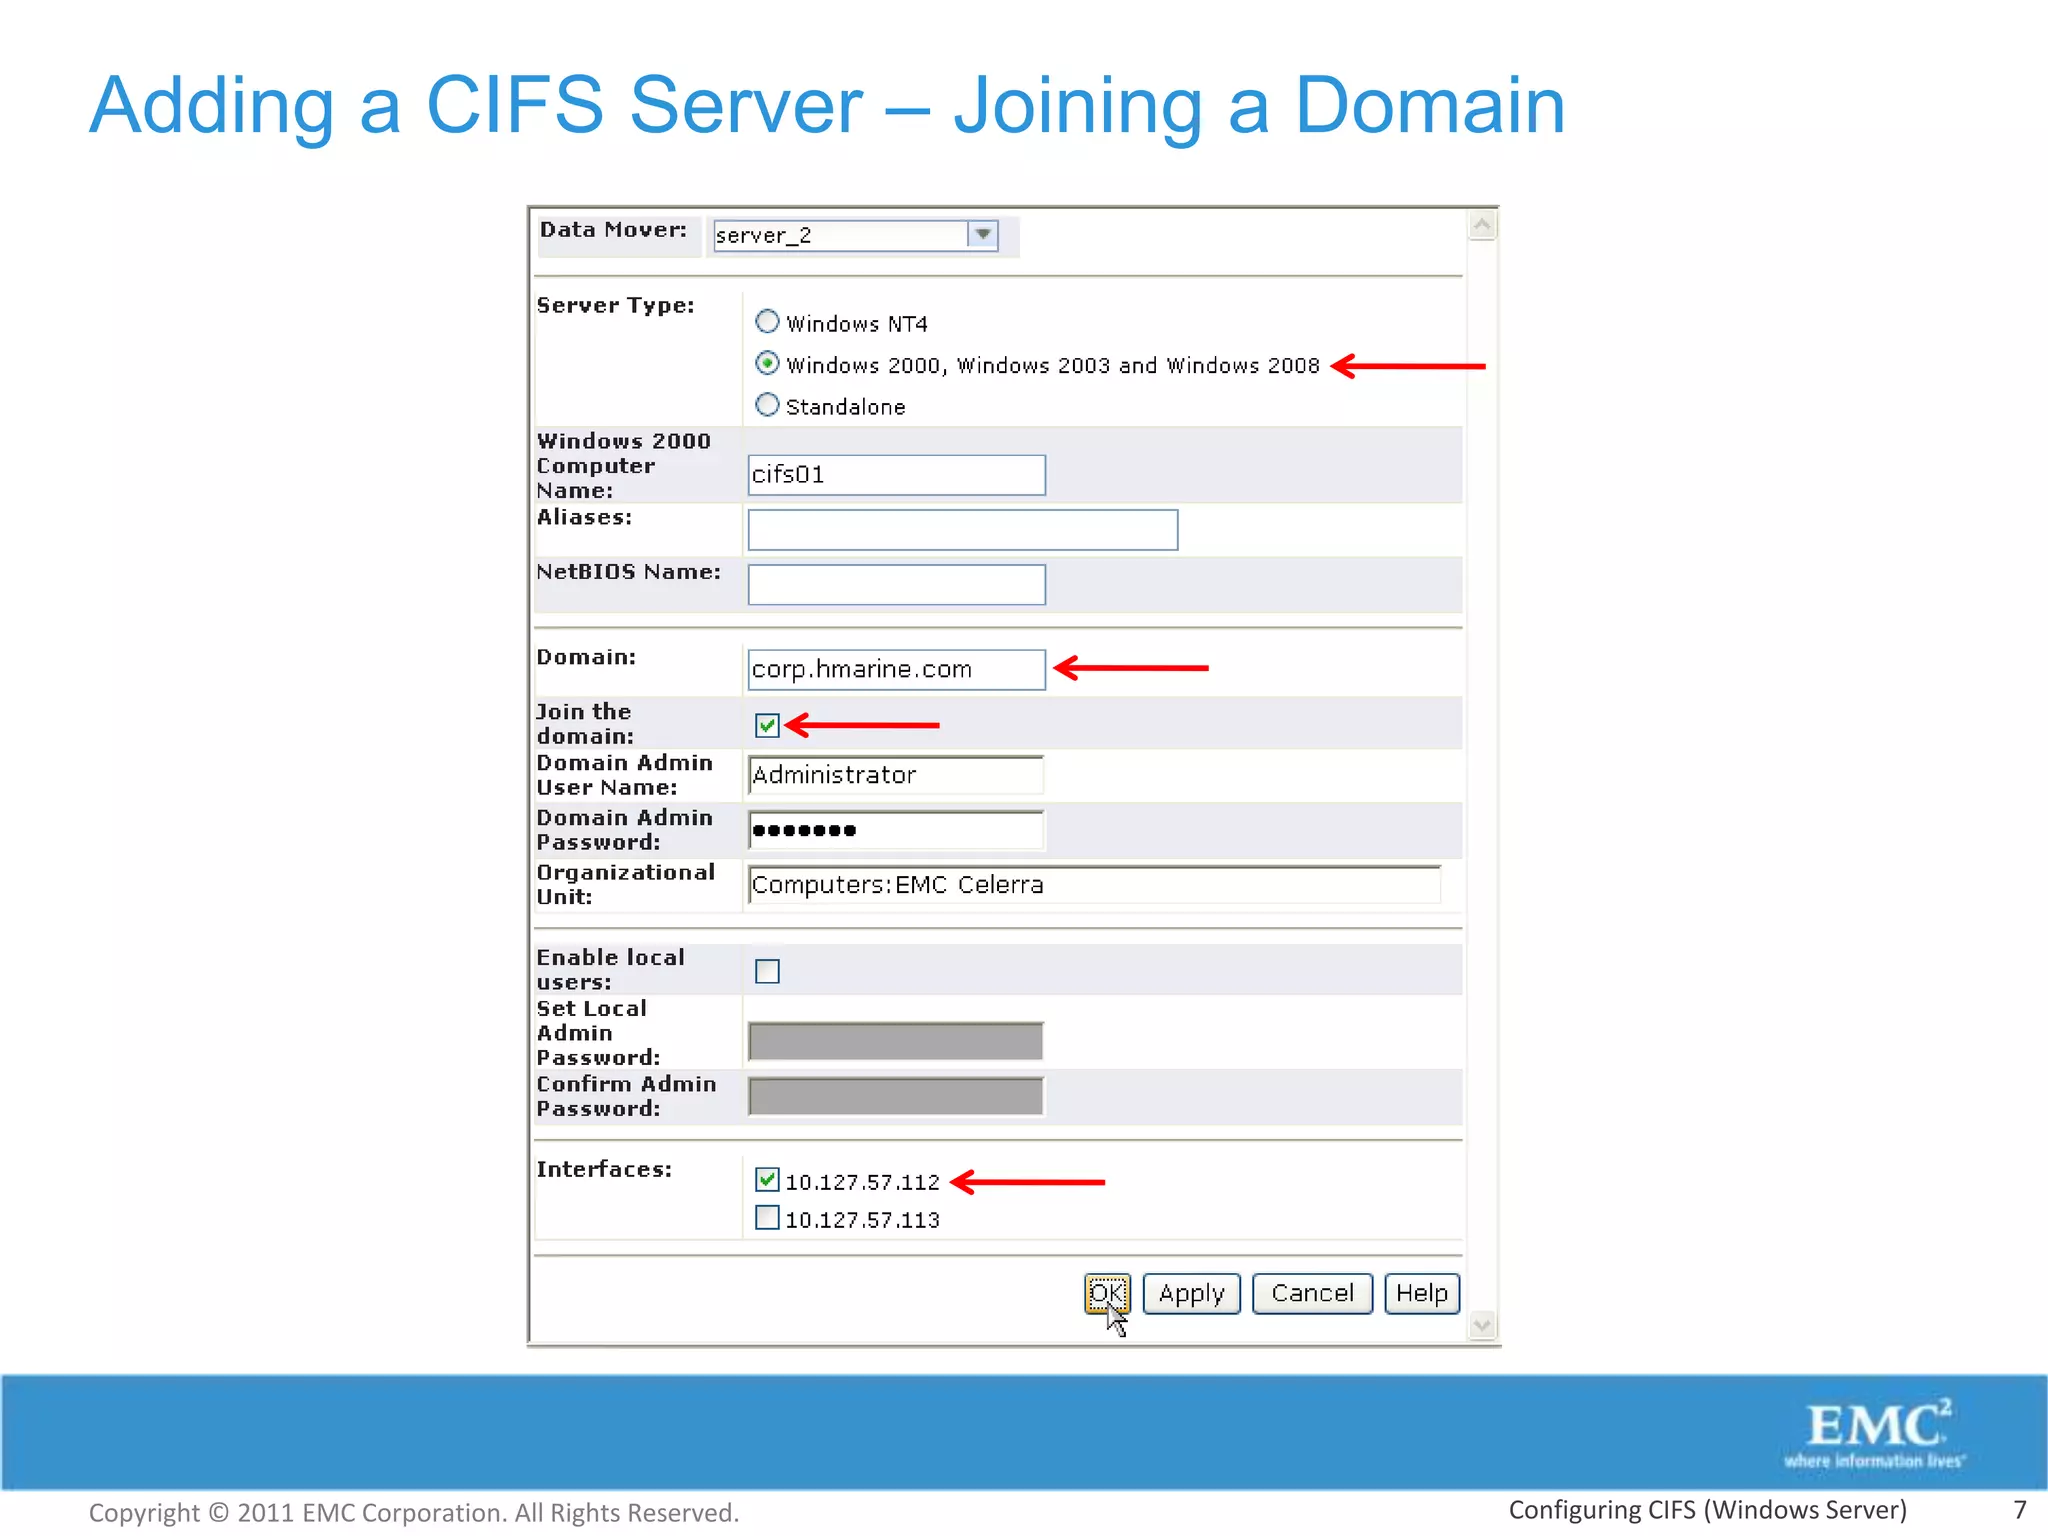
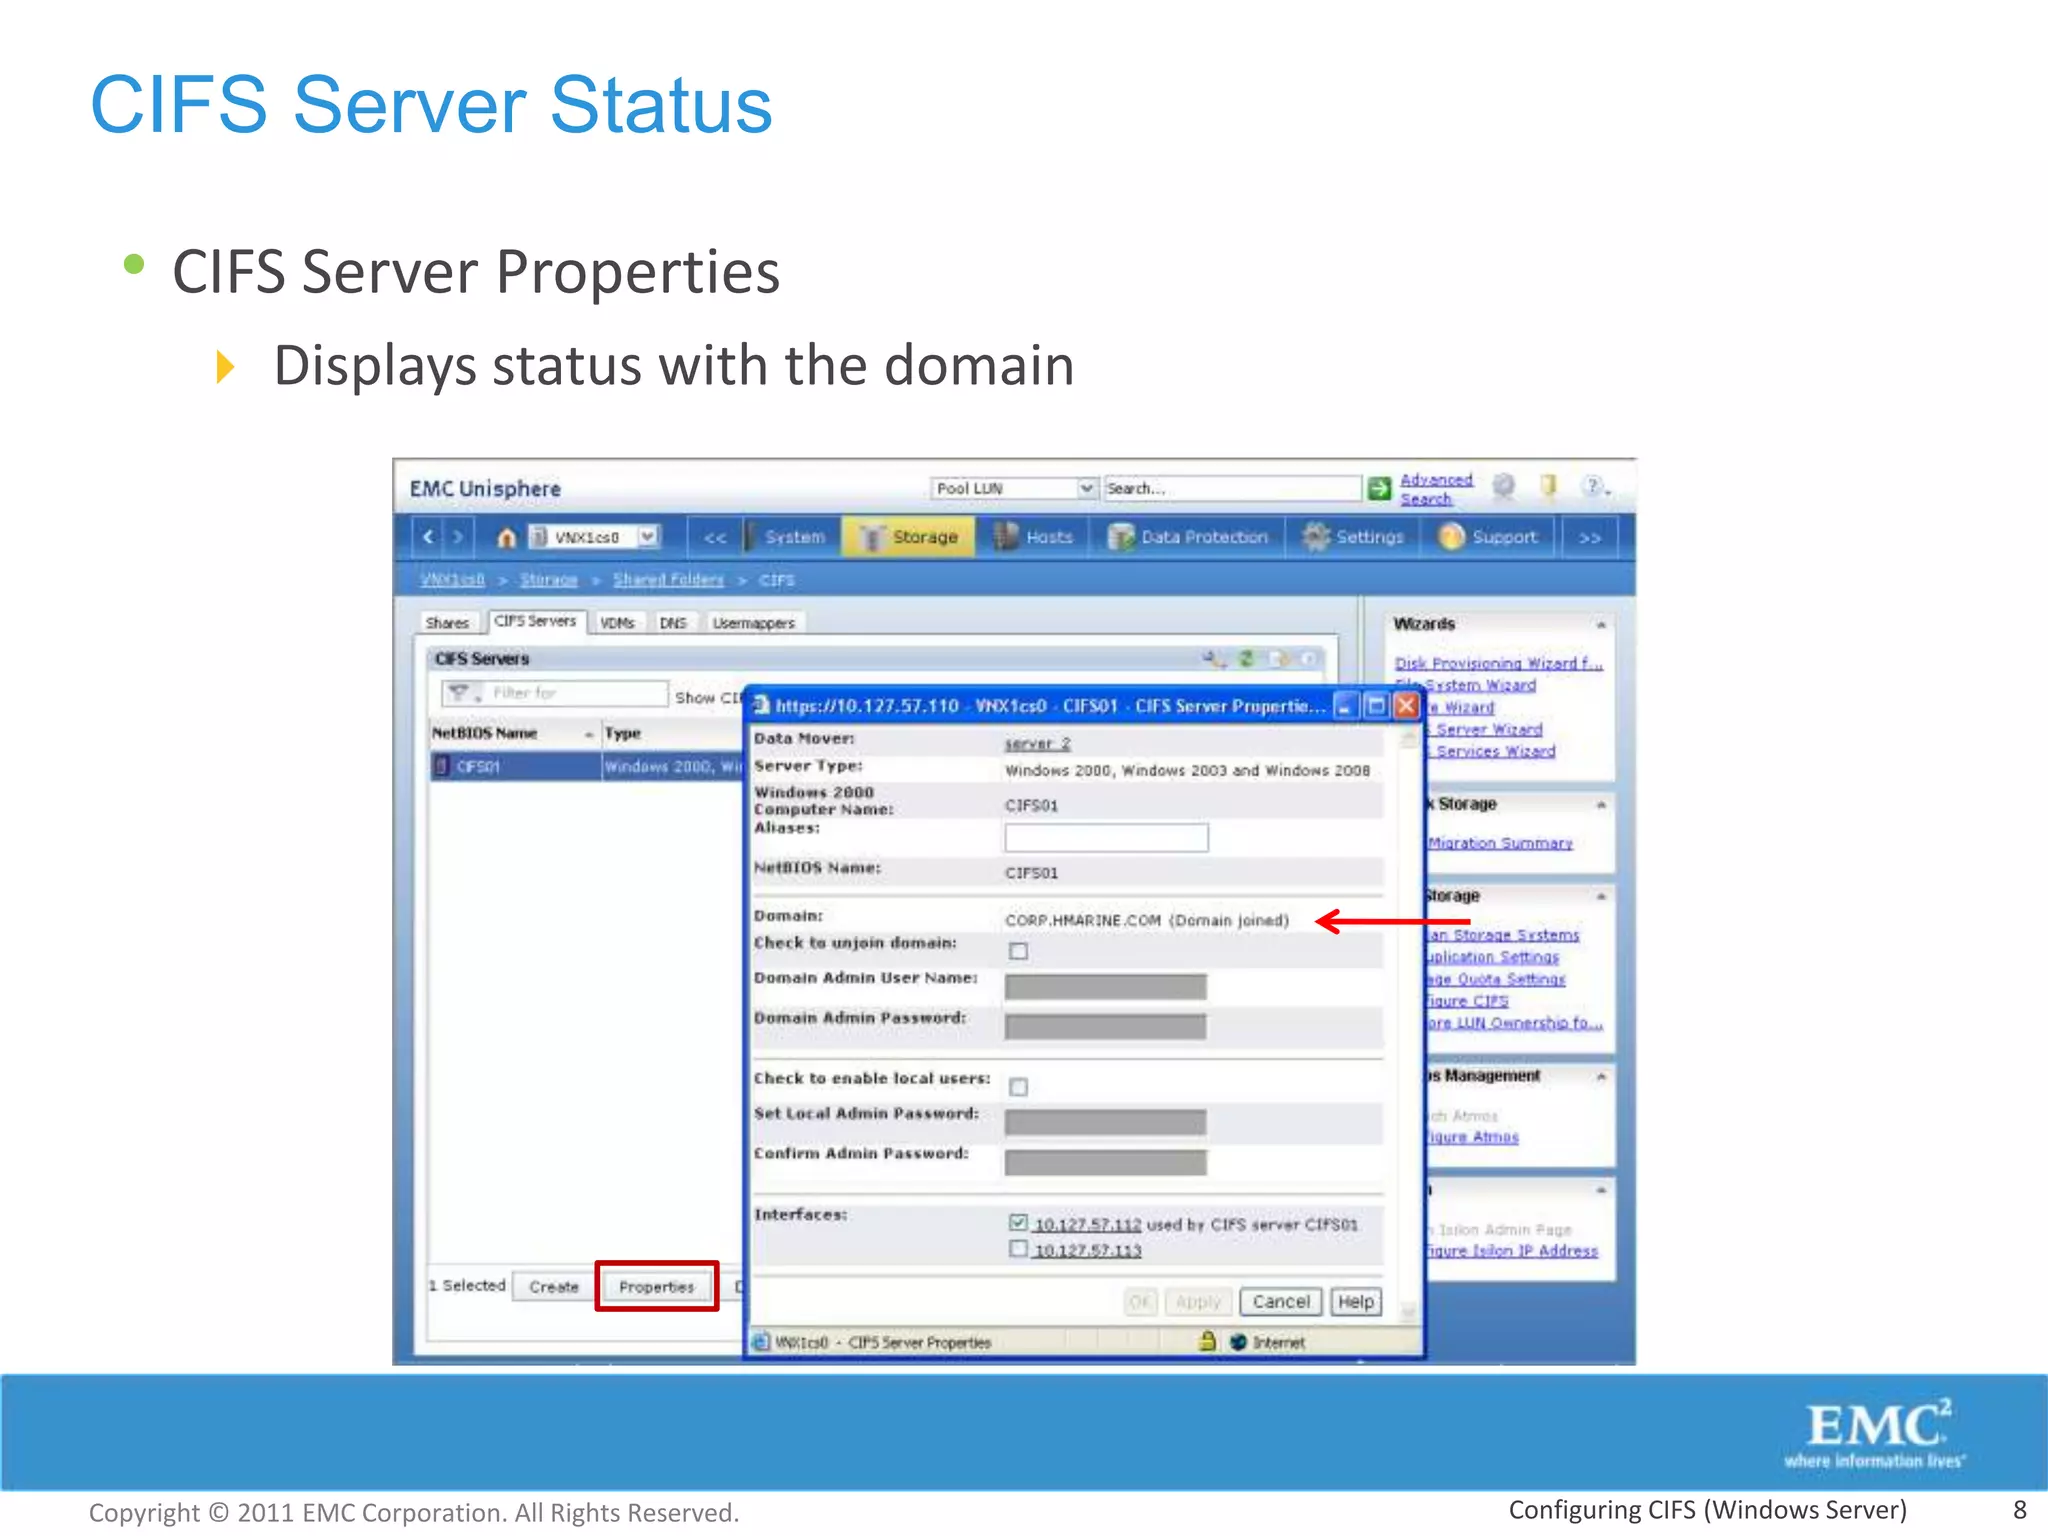
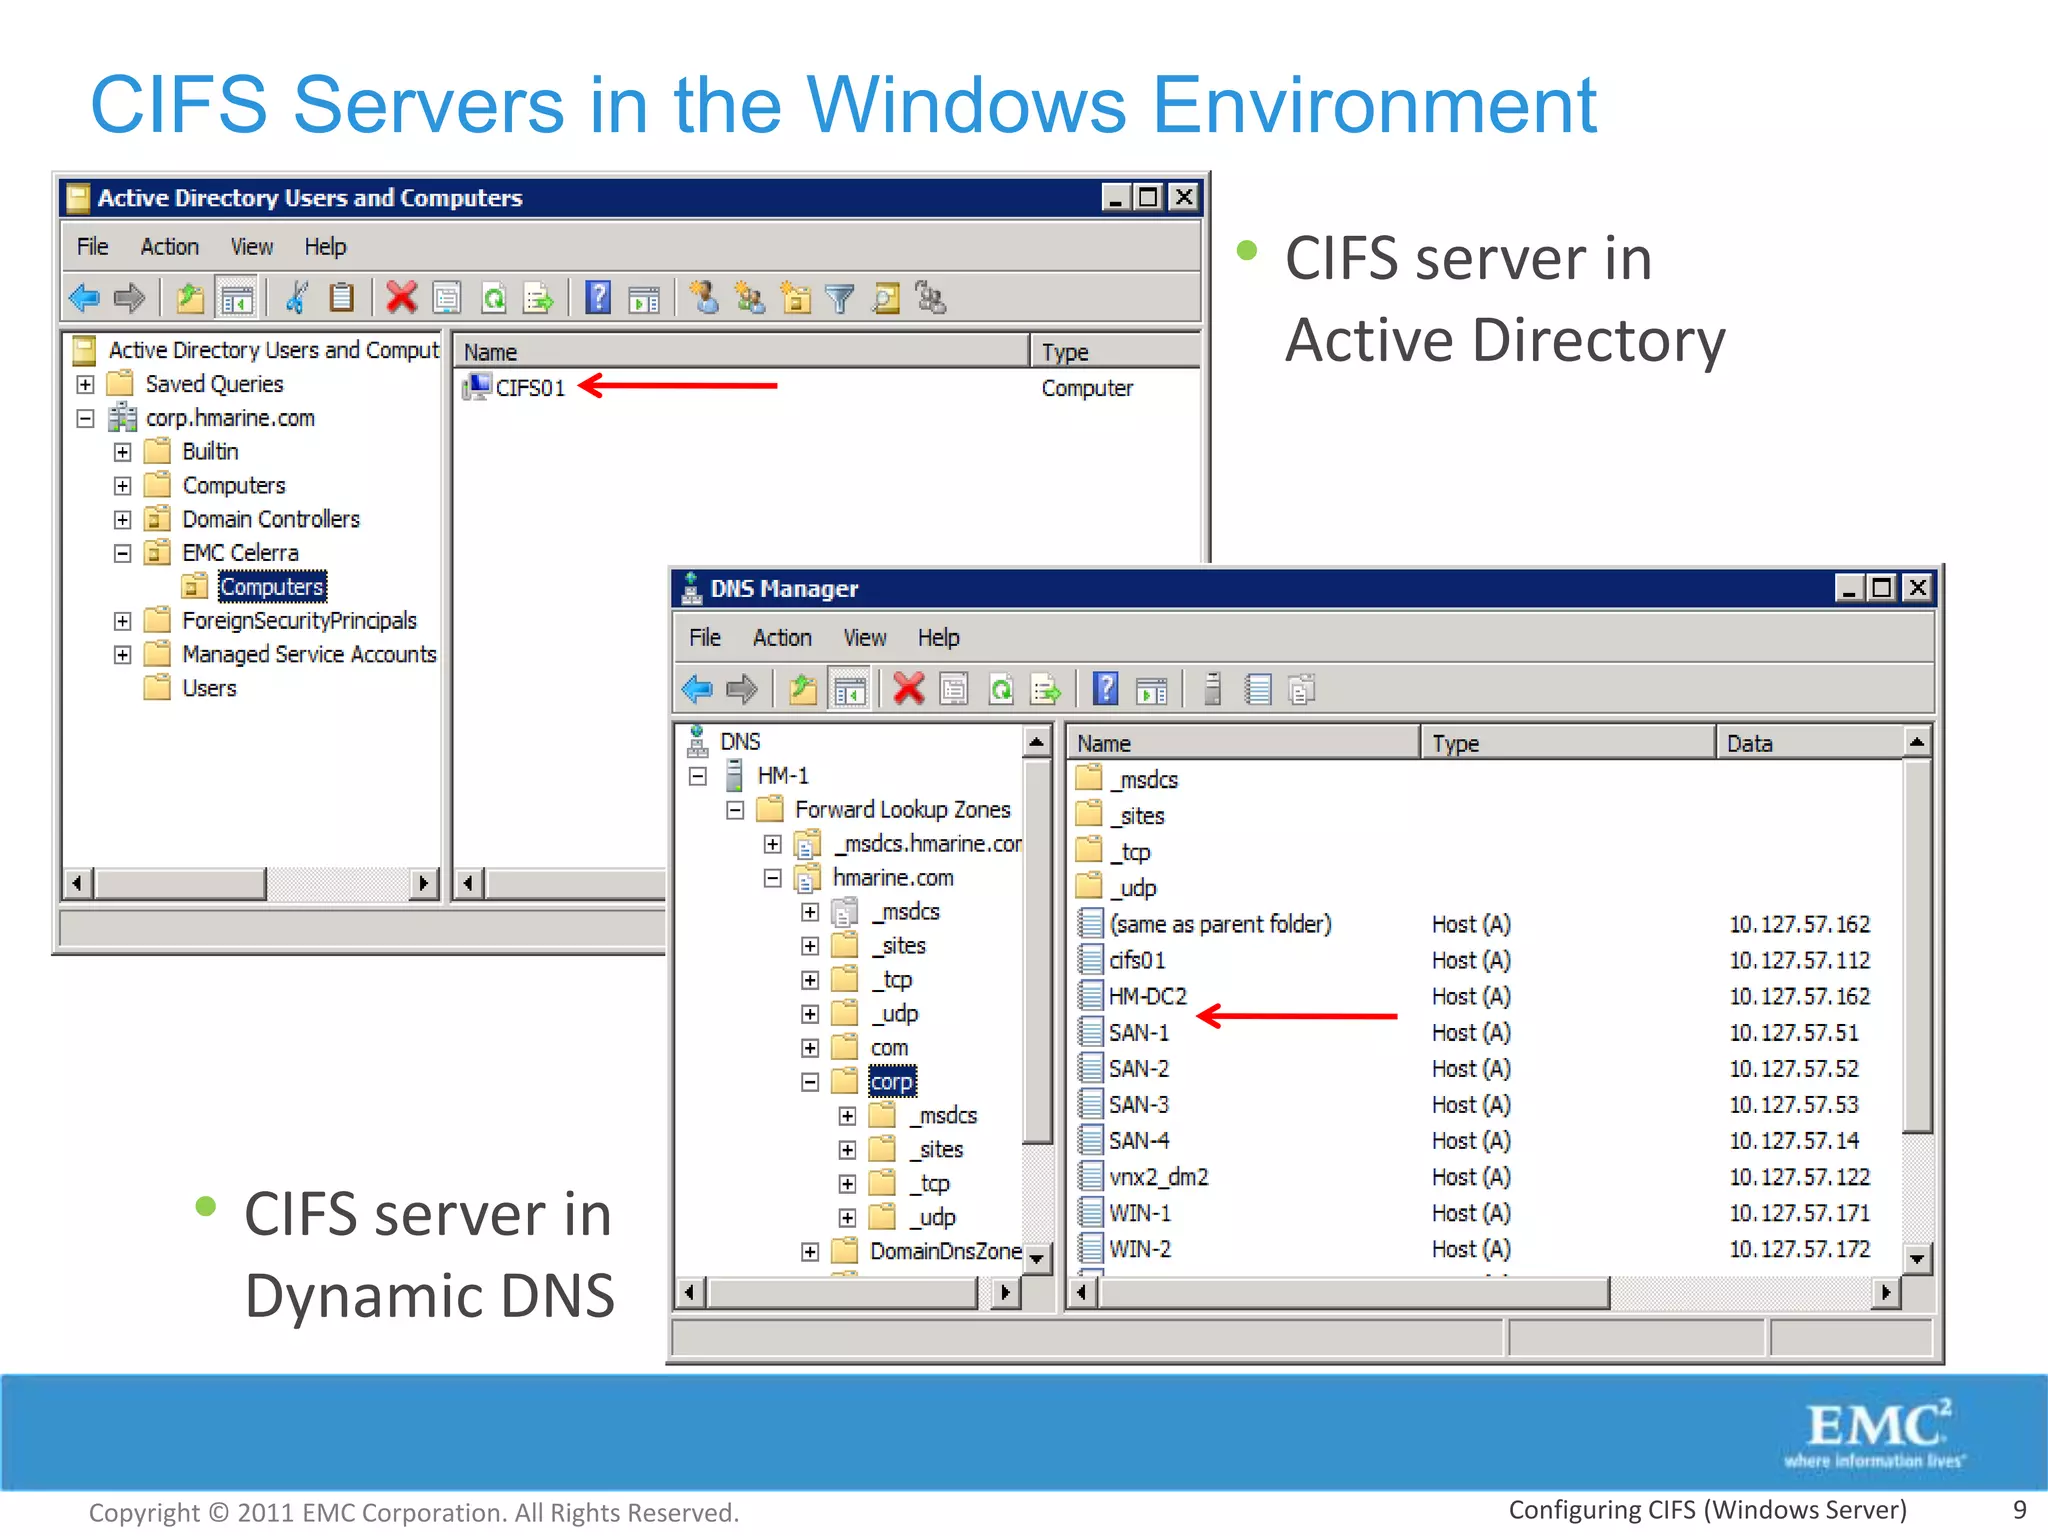
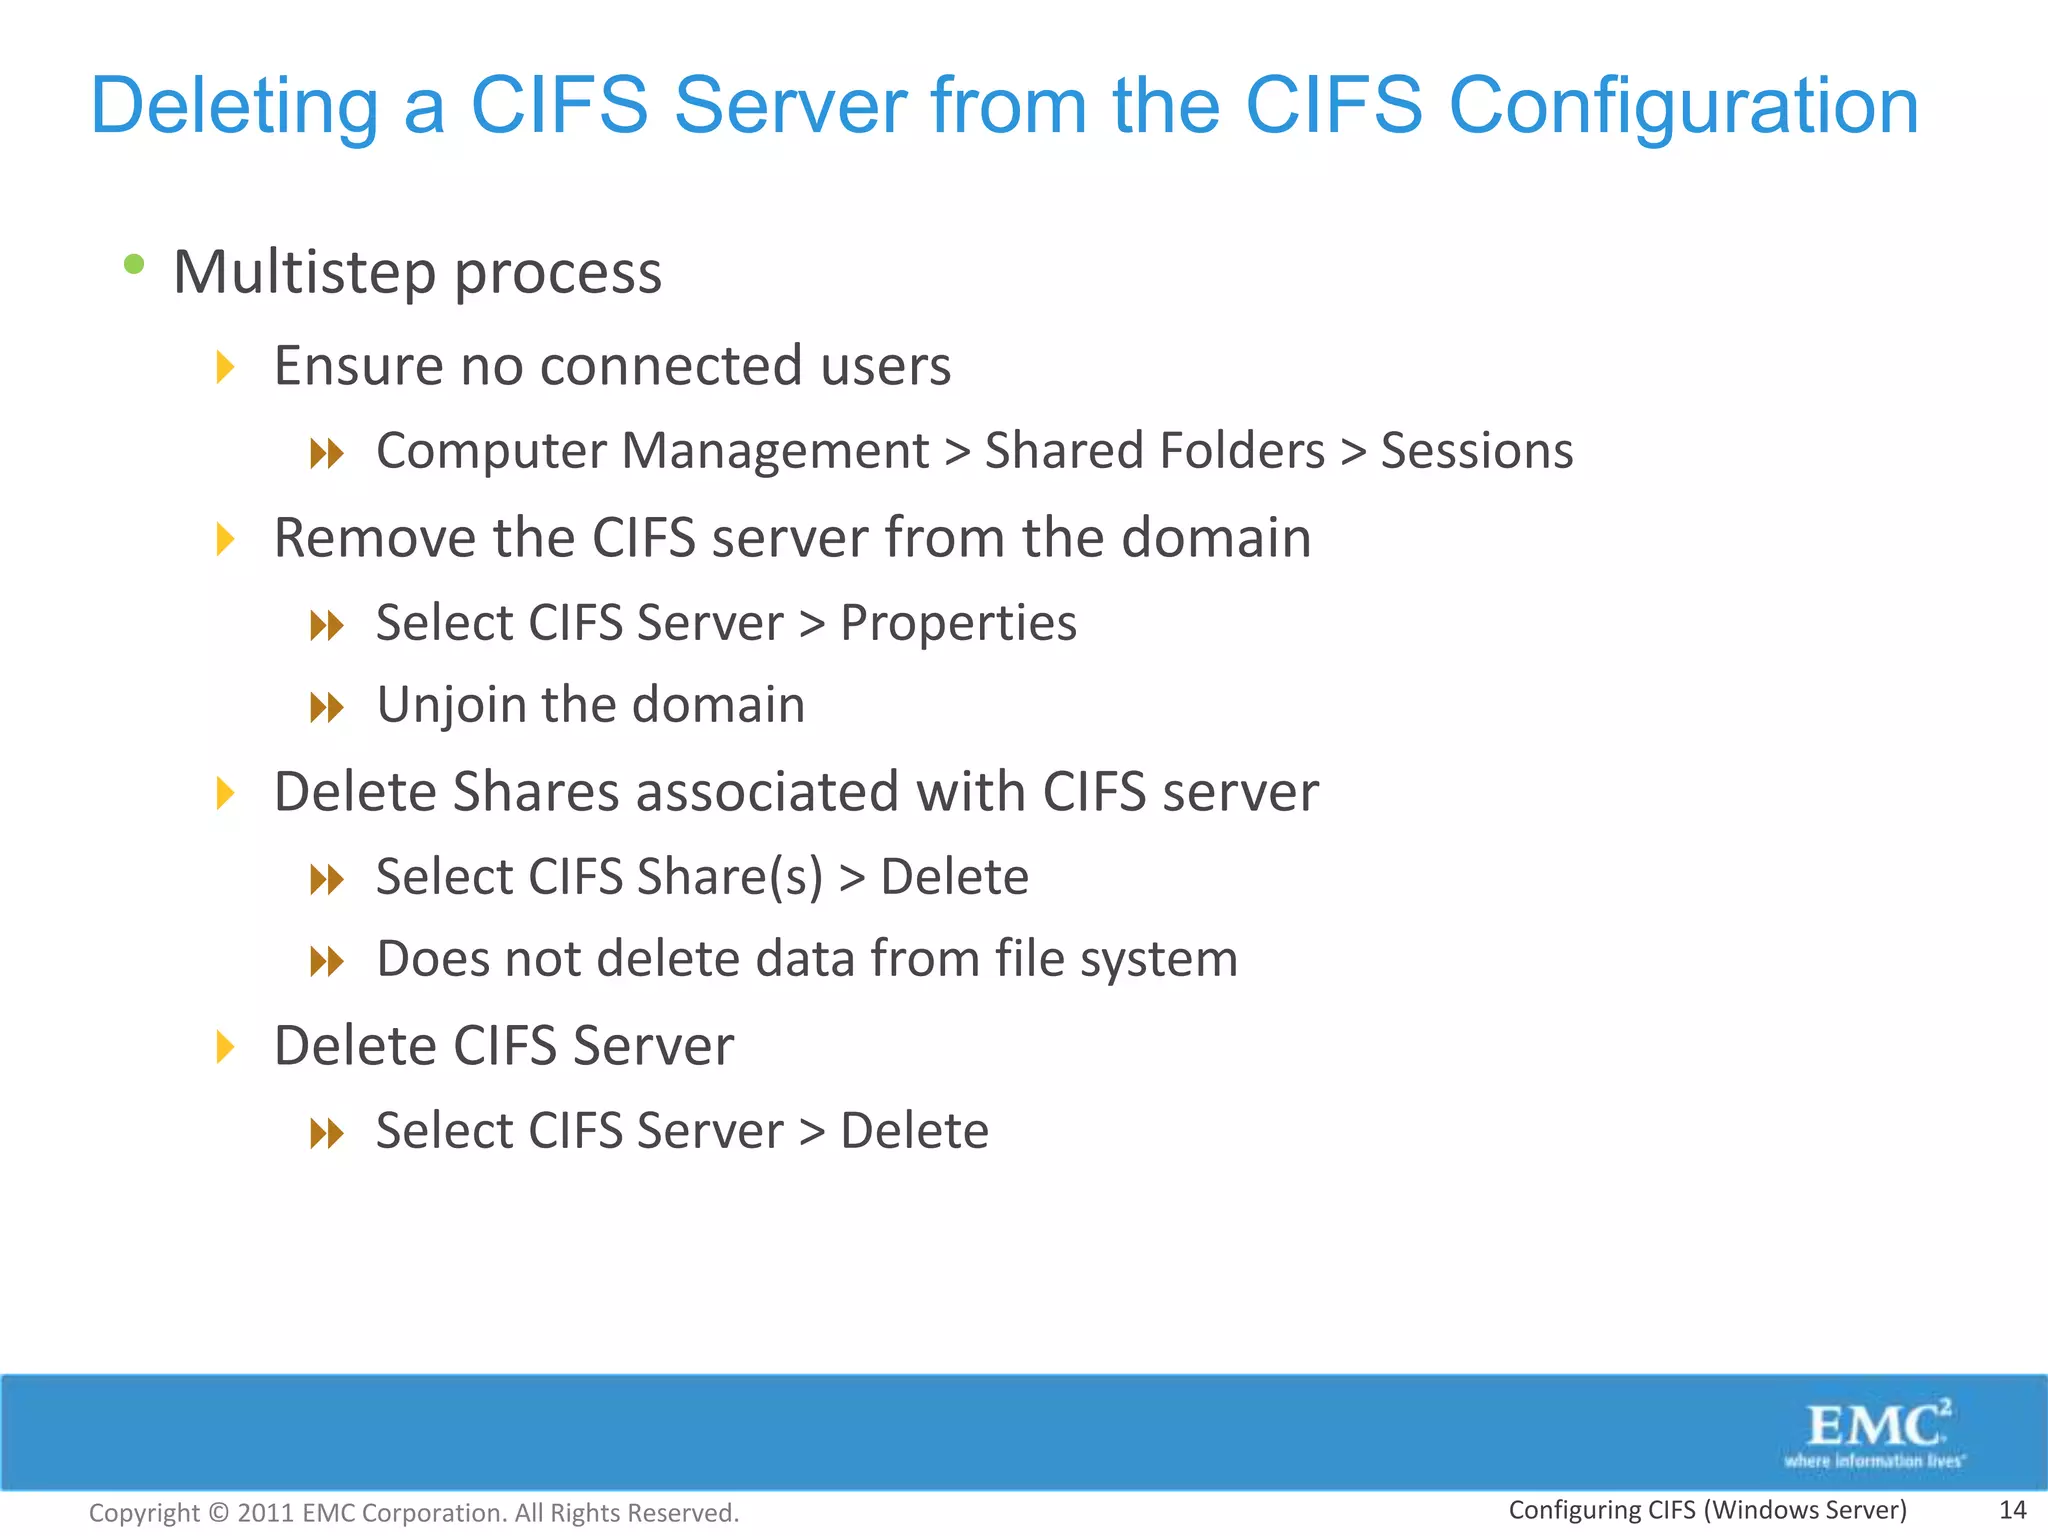
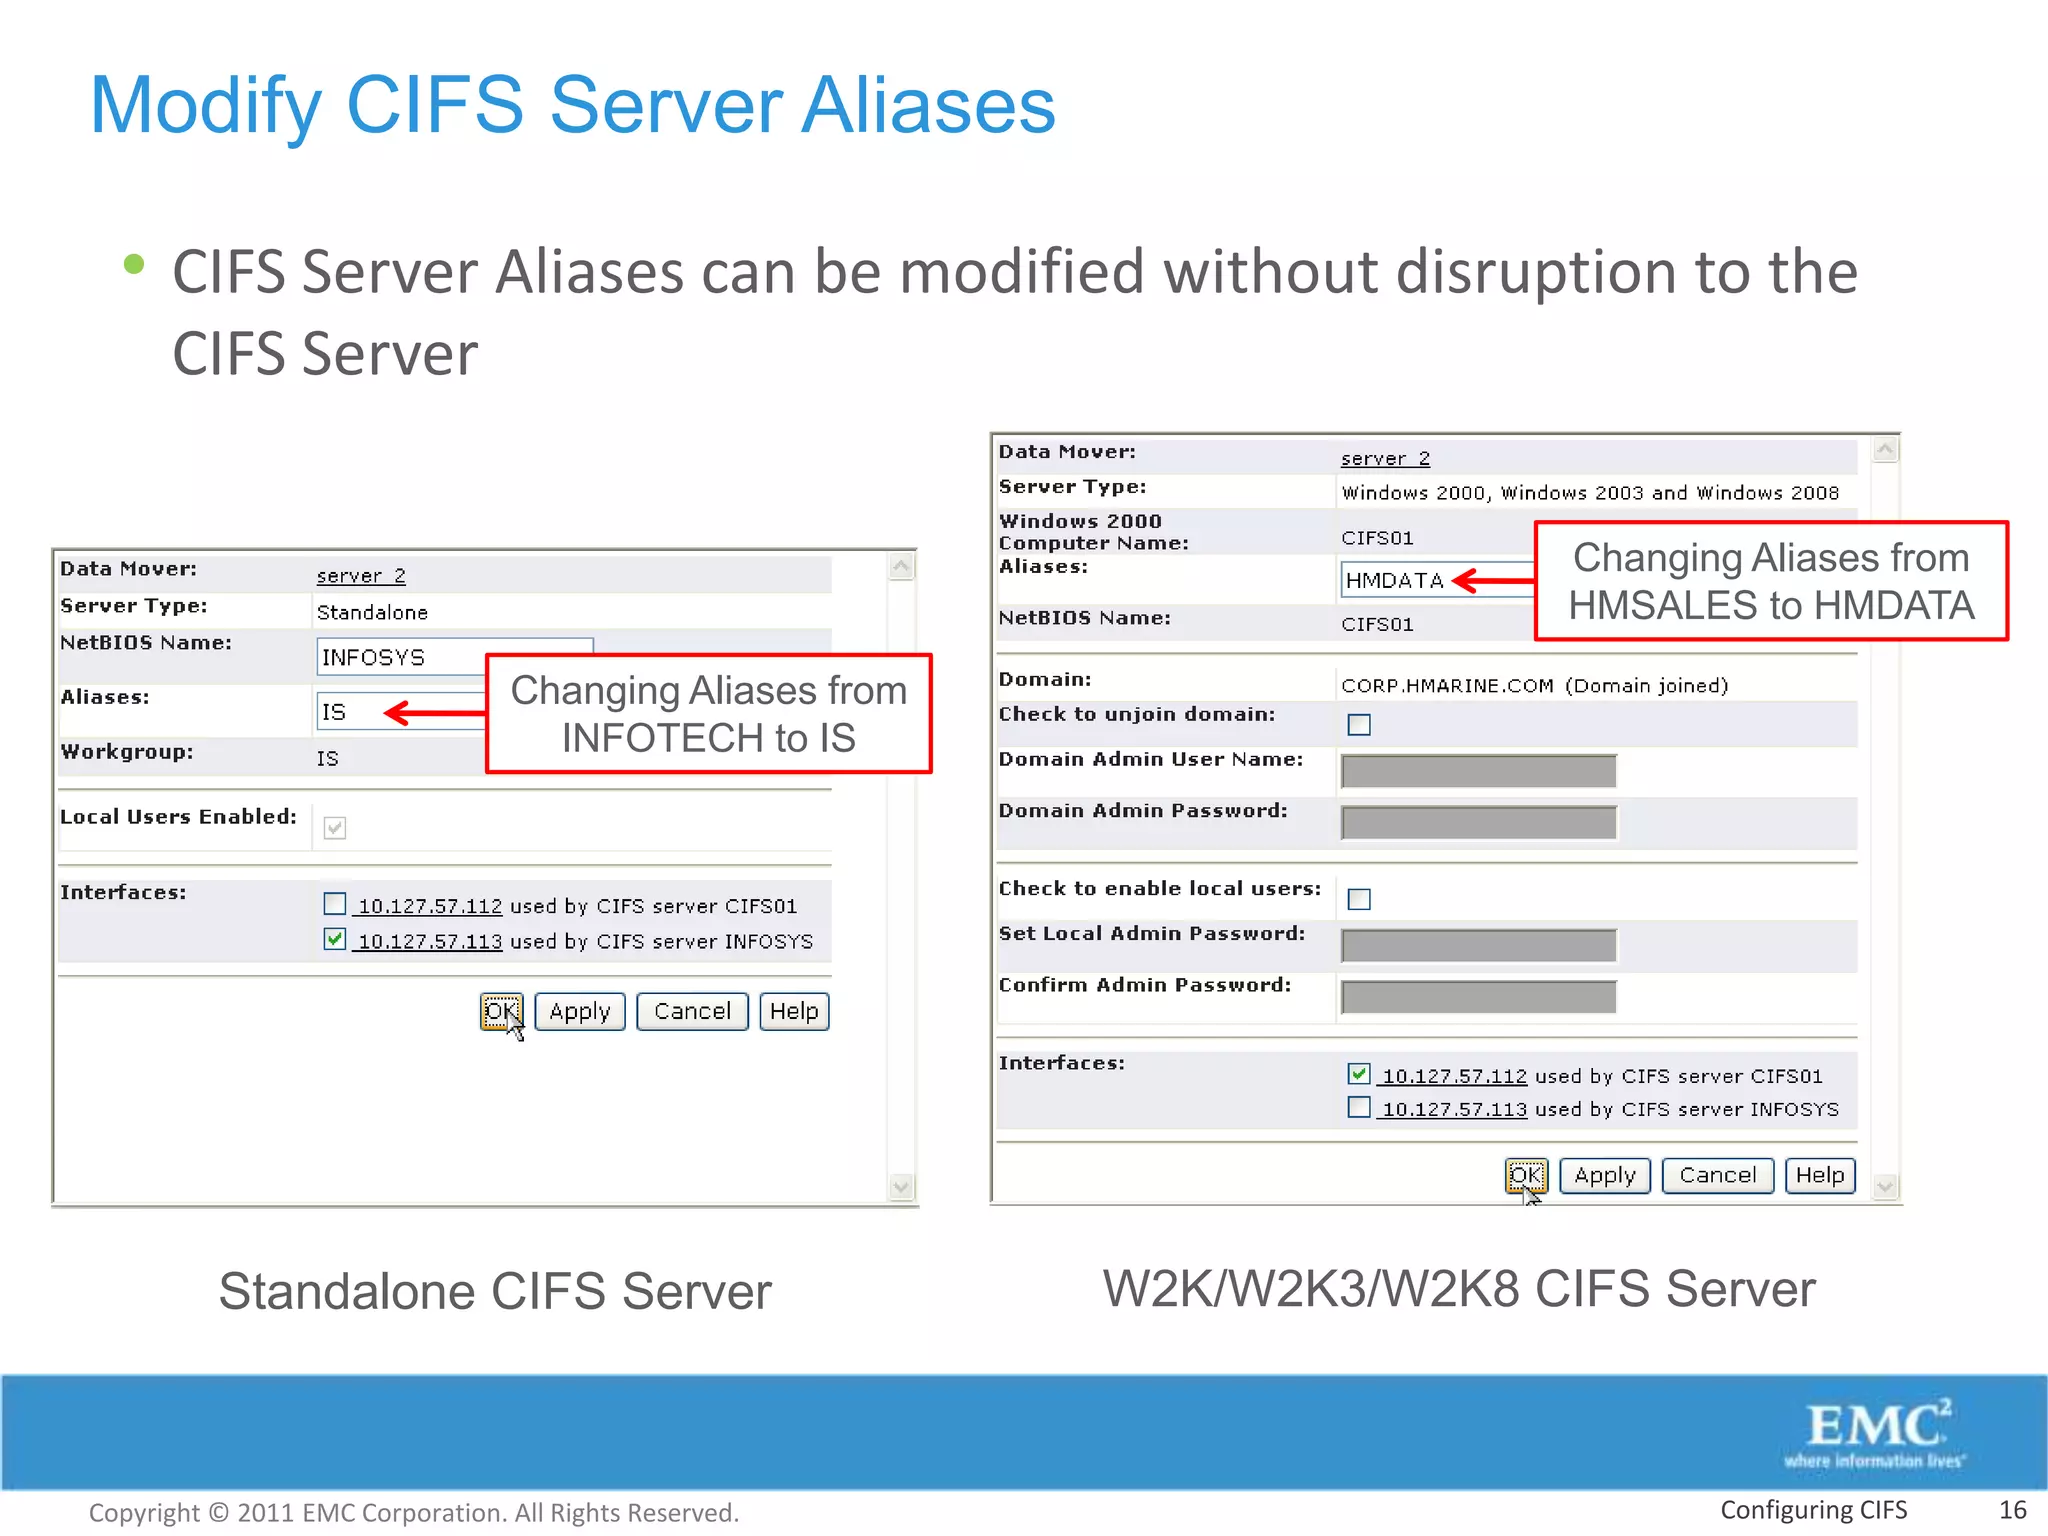
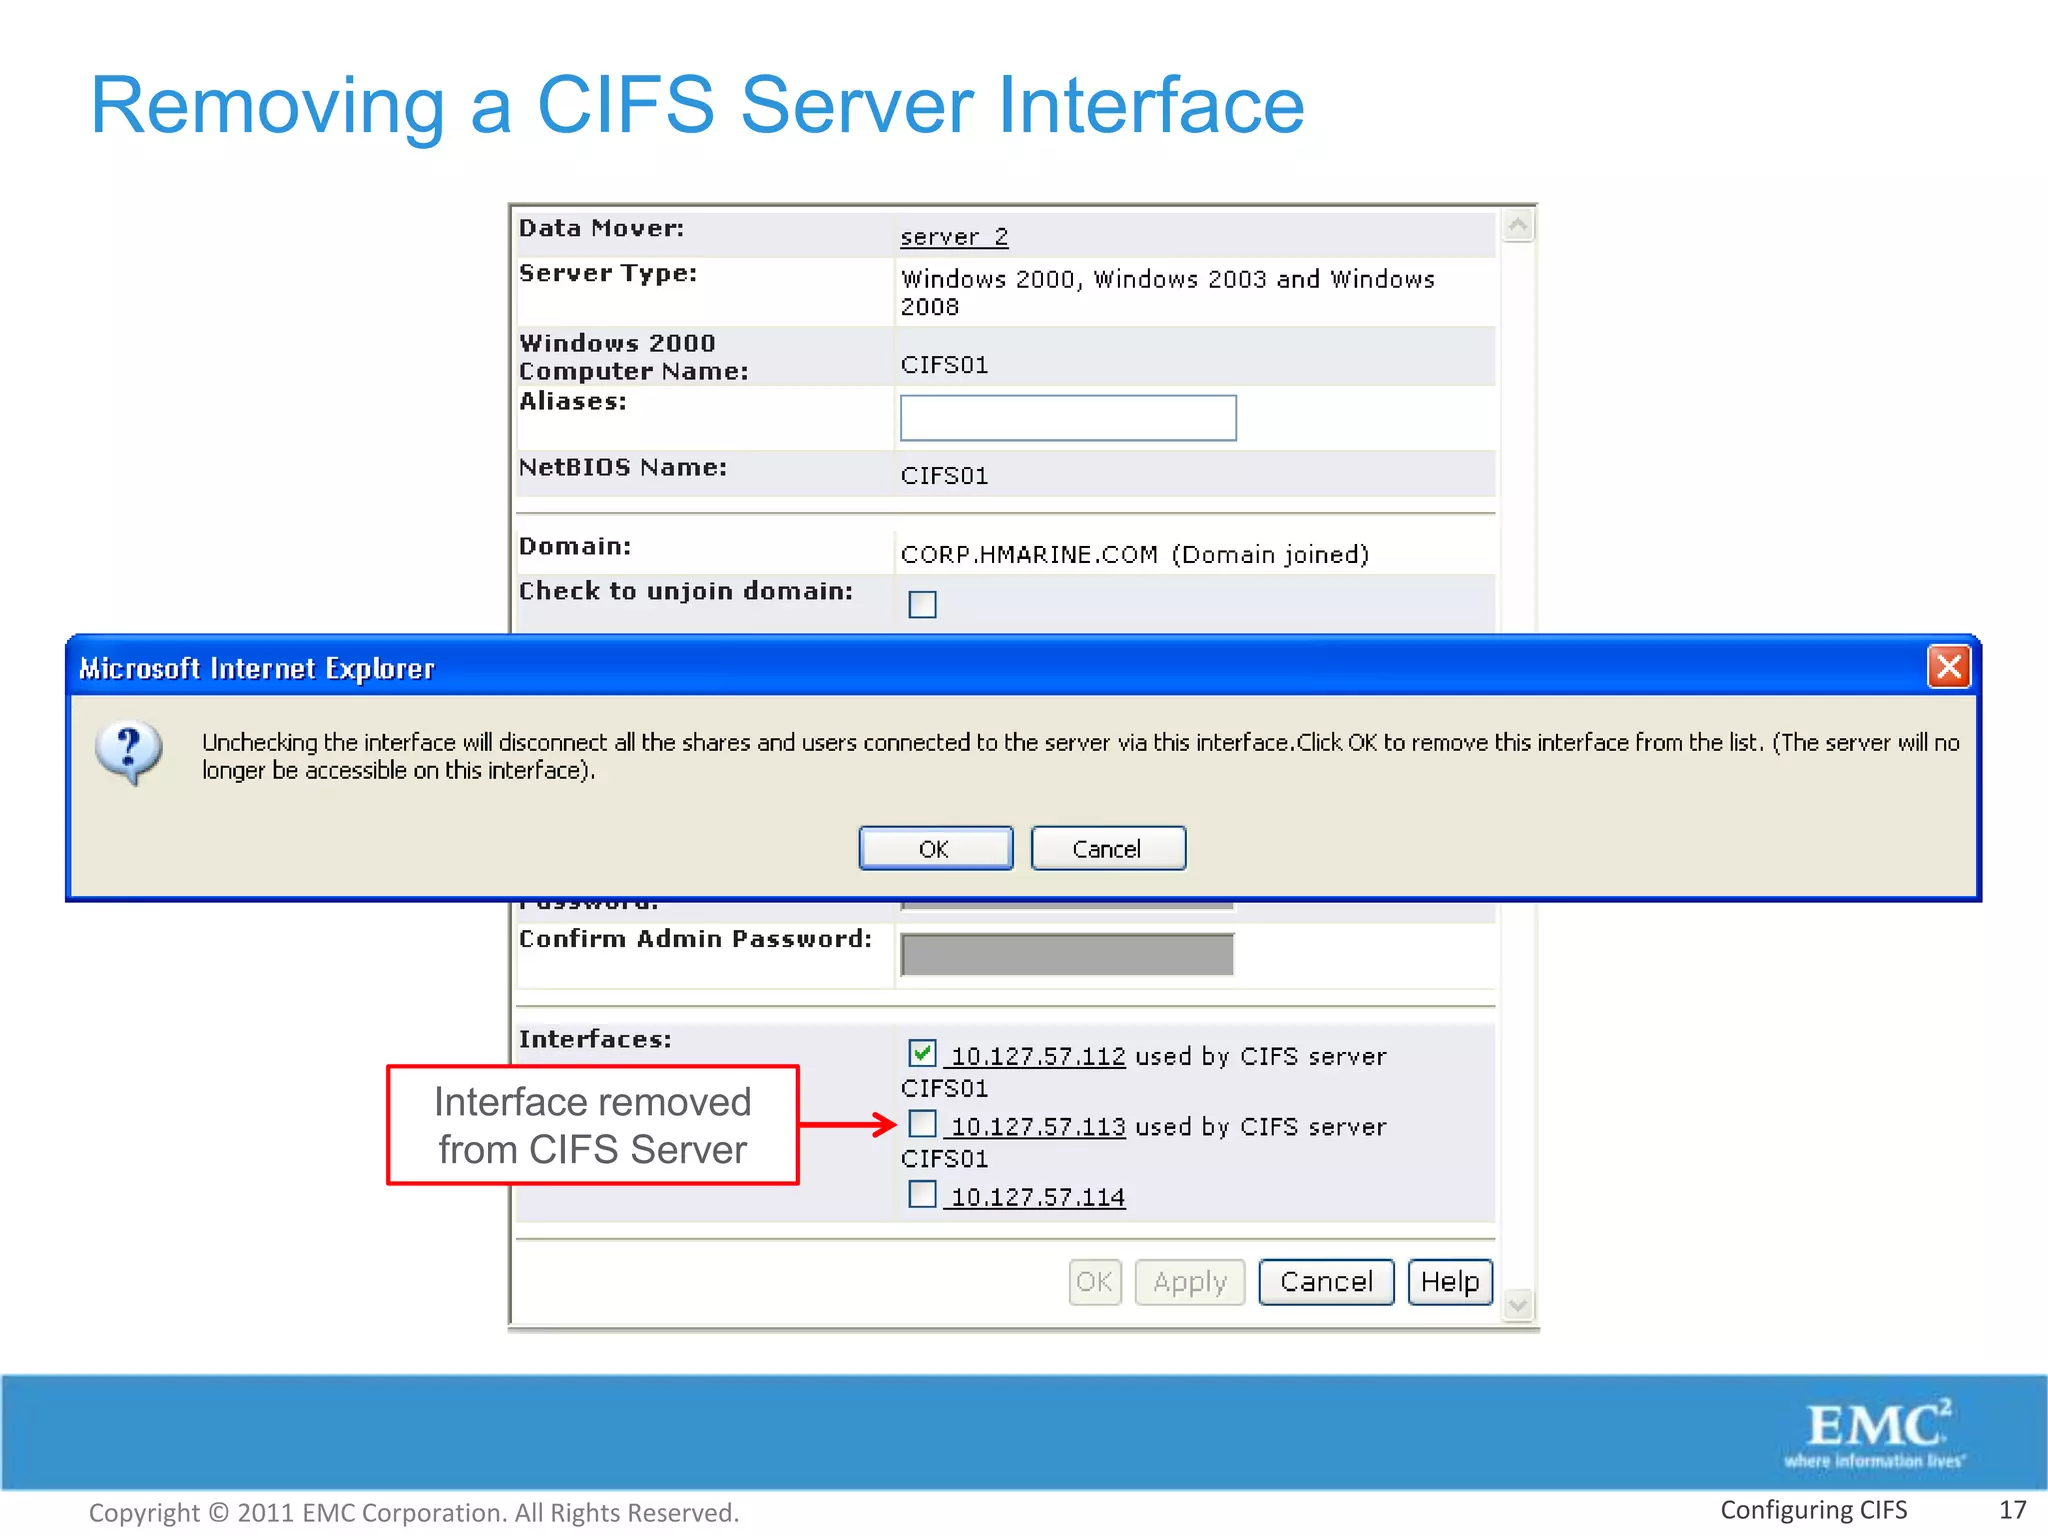
Module 13: Configuring CIFS (Windows Server)


                   Upon completion of this module, you should be able to:
                   • Create and join a CIFS server to a Windows Domain
                   • Make VNX file systems available in a Windows environment


Copyright © 2011 EMC Corporation. All Rights Reserved.             Configuring CIFS (Windows Server)   1
Module 13: Configuring CIFS (Windows
       Server)

       Lesson 1: Create and Join a CIFS Server to a Windows Domain
                   During this lesson the following topics are covered:
                   • Define a CIFS server
                   • Start CIFS
                   • Create a CIFS Server
                   • Join a CIFS Server to the domain


Copyright © 2011 EMC Corporation. All Rights Reserved.                    Configuring CIFS (Windows Server)   2
Preparation for CIFS
                                                         • System > Data Movers >
                                                          Select Data Mover >
                                                          Properties


                                              • Dynamic DNS

Copyright © 2011 EMC Corporation. All Rights Reserved.                    Configuring CIFS (Windows Server)   3
CIFS Management in Unisphere

  • Storage > Shared Folders > CIFS


Copyright © 2011 EMC Corporation. All Rights Reserved.   Configuring CIFS (Windows Server)   4
Starting CIFS

  • Storage > Shared Folders > CIFS


Copyright © 2011 EMC Corporation. All Rights Reserved.   Configuring CIFS (Windows Server)   5
Adding a CIFS Server

  • Main CIFS management page > CIFS Servers tab > Create


Copyright © 2011 EMC Corporation. All Rights Reserved.   Configuring CIFS (Windows Server)   6
Adding a CIFS Server – Joining a Domain


Copyright © 2011 EMC Corporation. All Rights Reserved.   Configuring CIFS (Windows Server)   7
CIFS Server Status

  • CIFS Server Properties
         Displays status with the domain


Copyright © 2011 EMC Corporation. All Rights Reserved.   Configuring CIFS (Windows Server)   8
CIFS Servers in the Windows Environment
                                                         • CIFS server in
                                                          Active Directory


        • CIFS server in
            Dynamic DNS


Copyright © 2011 EMC Corporation. All Rights Reserved.             Configuring CIFS (Windows Server)   9
Module 13: Configuring CIFS (Windows
       Server)

       Lesson 2: File System Access via CIFS
                   During this lesson the following topics are covered:
                   • Export a file system as a CIFS share
                   • Describe the difference between local and global shares
                   • Start/stop the CIFS service
                   • Describe Computer and NetBIOS names and aliasing
                   • Modify CIFS server NetBIOS name and Alias
                   • Modify CIFS server Interface Definition


Copyright © 2011 EMC Corporation. All Rights Reserved.               Configuring CIFS (Windows Server)   10
Exporting a File System as a CIFS Share -
Unisphere
 • Storage > Shared Folders > CIFS > Create


Copyright © 2011 EMC Corporation. All Rights Reserved.   Configuring CIFS (Windows Server)   11
Global Shares versus Local Shares

  • When a share is created it can be exported as:
         Global share
            Accessible from all CIFS servers on a Data Mover
         Local Share
            Accessed from a single specific CIFS server
            Shares created with Microsoft tools are local shares by default
                          Controlled with a VNX parameter


                        Global Share                         Local Share


Copyright © 2011 EMC Corporation. All Rights Reserved.            Configuring CIFS (Windows Server)   12
Start/Stop the CIFS Service

  • Stop and Restart CIFS service after Changes
         Usermapper configuration
         WINS settings for legacy NT4 domains
         Other CIFS related changes
  • Storage > Shared Folders > CIFS > Configure CIFS


Copyright © 2011 EMC Corporation. All Rights Reserved.   Configuring CIFS (Windows Server)   13
Deleting a CIFS Server from the CIFS Configuration

  • Multistep process
         Ensure no connected users
            Computer Management > Shared Folders > Sessions
         Remove the CIFS server from the domain
            Select CIFS Server > Properties
            Unjoin the domain
         Delete Shares associated with CIFS server
            Select CIFS Share(s) > Delete
            Does not delete data from file system
         Delete CIFS Server
            Select CIFS Server > Delete


Copyright © 2011 EMC Corporation. All Rights Reserved.   Configuring CIFS (Windows Server)   14
Modify CIFS Server NetBIOS Name

  • During a NetBIOS rename, all clients will be temporarily
      disconnected
  •   During the process, shares associated with the original NetBIOS
      are not available to the clients
         Shares will be re-associated to the new NetBIOS name
               automatically once the rename operation is complete

                                                         Changing NetBIOS name from
                                                          INFOSYSTEM to INFOSYS


Copyright © 2011 EMC Corporation. All Rights Reserved.                            Configuring CIFS   15
Modify CIFS Server Aliases

  • CIFS Server Aliases can be modified without disruption to the
      CIFS Server

                                                                          Changing Aliases from
                                                                          HMSALES to HMDATA

                                  Changing Aliases from
                                    INFOTECH to IS


          Standalone CIFS Server                          W2K/W2K3/W2K8 CIFS Server


Copyright © 2011 EMC Corporation. All Rights Reserved.                           Configuring CIFS   16
Removing a CIFS Server Interface


                            Interface removed
                            from CIFS Server


Copyright © 2011 EMC Corporation. All Rights Reserved.   Configuring CIFS   17
Module Summary
Key points covered in this module:
• Create and join a CIFS server to a Windows AD domain
• Make a VNX file systems available in a Windows environment


Copyright © 2011 EMC Corporation. All Rights Reserved.   Configuring CIFS (Windows Server)   18
Check Your Knowledge
• Which defines a global CIFS share?
           Available to all CIFS clients
           Available on all CIFS Server interfaces
           Available to all CIFS Servers on the Data Mover
           Available on all production Data Movers in a VNX
• What happens by default when a CIFS Server joins a Windows domain?
           A CIFS share named Top$ is created for the CIFS Server
           The OU EMC Celerra is created within Active Directory
           An Administrative account is created on the Data Mover
           The CIFS Server time is automatically synchronized to AD
• How is a VNX file system made available to CIFS?
           By adding an Alias name to the CIFS Server
           By creating a CIFS share for the CIFS Server
           Through the CIFS Server NetBIOS name in DNS
           Through the EMC Celerra OU container in Windows


Copyright © 2011 EMC Corporation. All Rights Reserved.            Configuring CIFS (Windows Server)   19
Check Your Knowledge - Answers
• Which defines a global CIFS share?
           Available to all CIFS clients
           Available on all Data Mover interfaces
           Available to all CIFS Servers on the Data Mover ***
           Available on all production Data Movers in a VNX
• What happens by default when a CIFS Server joins a Windows domain?
           A CIFS share named Top$ is created for the CIFS Server
           The OU EMC Celerra is created within Active Directory***
           An Administrative account is created on the Data Mover
           The CIFS Server time is automatically synchronized to AD
• How is a VNX file system made available to CIFS?
           By adding an Alias name to the CIFS Server
           By creating a CIFS share for the CIFS Server***
           Through the CIFS Server NetBIOS name in DNS
           Through the EMC Celerra OU container in Windows


Copyright © 2011 EMC Corporation. All Rights Reserved.            Configuring CIFS (Windows Server)   20
Check Your Knowledge
• How is a VNX file system made available to CIFS?
       By adding an Alias name to the CIFS Server
       By creating a CIFS share for the CIFS Server
       Through the CIFS Server NetBIOS name in DNS
       Through the EMC Celerra OU container in Windows
• What is true of a NetBIOS name?
       Its name resolution is provided by DDNS
       Its name resolution is provided by WINS
       Is the name of the CIFS server in the EMC Celerra OU
       Is authenticated to the AD domain with Kerberos


Copyright © 2011 EMC Corporation. All Rights Reserved.         Configuring CIFS   21
Check Your Knowledge - Answers
• How is a VNX file system made available to CIFS?
       By adding an Alias name to the CIFS Server
       By creating a CIFS share for the CIFS Server ***
       Through the CIFS Server NetBIOS name in DNS
       Through the EMC Celerra OU container in Windows
• What is true of a NetBIOS name?
       Its name resolution is provided by DDNS
       Its name resolution is provided by WINS ***
       Is the name of the CIFS server in the EMC Celerra OU
       Is authenticated to the AD domain with Kerberos


Copyright © 2011 EMC Corporation. All Rights Reserved.         Configuring CIFS   22
This slide intentionally left blank.


Copyright © 2011 EMC Corporation. All Rights Reserved.                        Configuring CIFS (Windows Server)   23

666 vnx unifiedimp_m13 configuring cifs

  • 1.
    Module 13: ConfiguringCIFS (Windows Server) Upon completion of this module, you should be able to: • Create and join a CIFS server to a Windows Domain • Make VNX file systems available in a Windows environment Copyright © 2011 EMC Corporation. All Rights Reserved. Configuring CIFS (Windows Server) 1
  • 2.
    Module 13: ConfiguringCIFS (Windows Server) Lesson 1: Create and Join a CIFS Server to a Windows Domain During this lesson the following topics are covered: • Define a CIFS server • Start CIFS • Create a CIFS Server • Join a CIFS Server to the domain Copyright © 2011 EMC Corporation. All Rights Reserved. Configuring CIFS (Windows Server) 2
  • 3.
    Preparation for CIFS • System > Data Movers > Select Data Mover > Properties • Dynamic DNS Copyright © 2011 EMC Corporation. All Rights Reserved. Configuring CIFS (Windows Server) 3
  • 4.
    CIFS Management inUnisphere • Storage > Shared Folders > CIFS Copyright © 2011 EMC Corporation. All Rights Reserved. Configuring CIFS (Windows Server) 4
  • 5.
    Starting CIFS • Storage > Shared Folders > CIFS Copyright © 2011 EMC Corporation. All Rights Reserved. Configuring CIFS (Windows Server) 5
  • 6.
    Adding a CIFSServer • Main CIFS management page > CIFS Servers tab > Create Copyright © 2011 EMC Corporation. All Rights Reserved. Configuring CIFS (Windows Server) 6
  • 7.
    Adding a CIFSServer – Joining a Domain Copyright © 2011 EMC Corporation. All Rights Reserved. Configuring CIFS (Windows Server) 7
  • 8.
    CIFS Server Status • CIFS Server Properties  Displays status with the domain Copyright © 2011 EMC Corporation. All Rights Reserved. Configuring CIFS (Windows Server) 8
  • 9.
    CIFS Servers inthe Windows Environment • CIFS server in Active Directory • CIFS server in Dynamic DNS Copyright © 2011 EMC Corporation. All Rights Reserved. Configuring CIFS (Windows Server) 9
  • 10.
    Module 13: ConfiguringCIFS (Windows Server) Lesson 2: File System Access via CIFS During this lesson the following topics are covered: • Export a file system as a CIFS share • Describe the difference between local and global shares • Start/stop the CIFS service • Describe Computer and NetBIOS names and aliasing • Modify CIFS server NetBIOS name and Alias • Modify CIFS server Interface Definition Copyright © 2011 EMC Corporation. All Rights Reserved. Configuring CIFS (Windows Server) 10
  • 11.
    Exporting a FileSystem as a CIFS Share - Unisphere • Storage > Shared Folders > CIFS > Create Copyright © 2011 EMC Corporation. All Rights Reserved. Configuring CIFS (Windows Server) 11
  • 12.
    Global Shares versusLocal Shares • When a share is created it can be exported as:  Global share  Accessible from all CIFS servers on a Data Mover  Local Share  Accessed from a single specific CIFS server  Shares created with Microsoft tools are local shares by default  Controlled with a VNX parameter Global Share Local Share Copyright © 2011 EMC Corporation. All Rights Reserved. Configuring CIFS (Windows Server) 12
  • 13.
    Start/Stop the CIFSService • Stop and Restart CIFS service after Changes  Usermapper configuration  WINS settings for legacy NT4 domains  Other CIFS related changes • Storage > Shared Folders > CIFS > Configure CIFS Copyright © 2011 EMC Corporation. All Rights Reserved. Configuring CIFS (Windows Server) 13
  • 14.
    Deleting a CIFSServer from the CIFS Configuration • Multistep process  Ensure no connected users  Computer Management > Shared Folders > Sessions  Remove the CIFS server from the domain  Select CIFS Server > Properties  Unjoin the domain  Delete Shares associated with CIFS server  Select CIFS Share(s) > Delete  Does not delete data from file system  Delete CIFS Server  Select CIFS Server > Delete Copyright © 2011 EMC Corporation. All Rights Reserved. Configuring CIFS (Windows Server) 14
  • 15.
    Modify CIFS ServerNetBIOS Name • During a NetBIOS rename, all clients will be temporarily disconnected • During the process, shares associated with the original NetBIOS are not available to the clients  Shares will be re-associated to the new NetBIOS name automatically once the rename operation is complete Changing NetBIOS name from INFOSYSTEM to INFOSYS Copyright © 2011 EMC Corporation. All Rights Reserved. Configuring CIFS 15
  • 16.
    Modify CIFS ServerAliases • CIFS Server Aliases can be modified without disruption to the CIFS Server Changing Aliases from HMSALES to HMDATA Changing Aliases from INFOTECH to IS Standalone CIFS Server W2K/W2K3/W2K8 CIFS Server Copyright © 2011 EMC Corporation. All Rights Reserved. Configuring CIFS 16
  • 17.
    Removing a CIFSServer Interface Interface removed from CIFS Server Copyright © 2011 EMC Corporation. All Rights Reserved. Configuring CIFS 17
  • 18.
    Module Summary Key pointscovered in this module: • Create and join a CIFS server to a Windows AD domain • Make a VNX file systems available in a Windows environment Copyright © 2011 EMC Corporation. All Rights Reserved. Configuring CIFS (Windows Server) 18
  • 19.
    Check Your Knowledge •Which defines a global CIFS share?  Available to all CIFS clients  Available on all CIFS Server interfaces  Available to all CIFS Servers on the Data Mover  Available on all production Data Movers in a VNX • What happens by default when a CIFS Server joins a Windows domain?  A CIFS share named Top$ is created for the CIFS Server  The OU EMC Celerra is created within Active Directory  An Administrative account is created on the Data Mover  The CIFS Server time is automatically synchronized to AD • How is a VNX file system made available to CIFS?  By adding an Alias name to the CIFS Server  By creating a CIFS share for the CIFS Server  Through the CIFS Server NetBIOS name in DNS  Through the EMC Celerra OU container in Windows Copyright © 2011 EMC Corporation. All Rights Reserved. Configuring CIFS (Windows Server) 19
  • 20.
    Check Your Knowledge- Answers • Which defines a global CIFS share?  Available to all CIFS clients  Available on all Data Mover interfaces  Available to all CIFS Servers on the Data Mover ***  Available on all production Data Movers in a VNX • What happens by default when a CIFS Server joins a Windows domain?  A CIFS share named Top$ is created for the CIFS Server  The OU EMC Celerra is created within Active Directory***  An Administrative account is created on the Data Mover  The CIFS Server time is automatically synchronized to AD • How is a VNX file system made available to CIFS?  By adding an Alias name to the CIFS Server  By creating a CIFS share for the CIFS Server***  Through the CIFS Server NetBIOS name in DNS  Through the EMC Celerra OU container in Windows Copyright © 2011 EMC Corporation. All Rights Reserved. Configuring CIFS (Windows Server) 20
  • 21.
    Check Your Knowledge •How is a VNX file system made available to CIFS?  By adding an Alias name to the CIFS Server  By creating a CIFS share for the CIFS Server  Through the CIFS Server NetBIOS name in DNS  Through the EMC Celerra OU container in Windows • What is true of a NetBIOS name?  Its name resolution is provided by DDNS  Its name resolution is provided by WINS  Is the name of the CIFS server in the EMC Celerra OU  Is authenticated to the AD domain with Kerberos Copyright © 2011 EMC Corporation. All Rights Reserved. Configuring CIFS 21
  • 22.
    Check Your Knowledge- Answers • How is a VNX file system made available to CIFS?  By adding an Alias name to the CIFS Server  By creating a CIFS share for the CIFS Server ***  Through the CIFS Server NetBIOS name in DNS  Through the EMC Celerra OU container in Windows • What is true of a NetBIOS name?  Its name resolution is provided by DDNS  Its name resolution is provided by WINS ***  Is the name of the CIFS server in the EMC Celerra OU  Is authenticated to the AD domain with Kerberos Copyright © 2011 EMC Corporation. All Rights Reserved. Configuring CIFS 22
  • 23.
    This slide intentionallyleft blank. Copyright © 2011 EMC Corporation. All Rights Reserved. Configuring CIFS (Windows Server) 23

Editor's Notes

  • #2 This module demonstrates how to provide CIFS storage access to a VNX system.
  • #3 This lesson demonstrates how to create and join a CIFS server into the domain.
  • #8 The Create CIFS Server configuration window has several sections for creating and configuring a CIFS server. The first section has a drop-down to select the Data Mover that will hold the CIFS server. The Data Movers can be physical or Virtual Data Movers. The Server Type section defines the behavior of the CIFS server. There are three options of CIFS servers: Windows NT4 (Windows NT domain member), Windows 2000/2003/2008 (AD membership) and standalone (local login) servers. The section will have different fields corresponding to the type of server selected. The screen show has fields for the Windows 2000 Computer Name, Aliases and NetBIOS Name. The slide illustrates creating a Windows 2000/2003/2008 server named cifs01. Next is the Domain section which has fields for the Windows Domain, a checkbox option for joining the domain, credential fields for a Domain user with the rights to add computers into the domain and the Organizational Unit that the CIFS server will be added into. The default organizational unit (OU) for a Data Mover’s CIFS server is Computers:EMC Celerra.The next section is for enabling local users on the CIFS server and setting a local Admin password.The final step is to select an interface. If no interface is specified, the associated CIFS server uses all unassigned interfaces on that Data Mover. This configuration is known as the default CIFS server.To verify if server was configured properly use the CLI command: server_cifs <movername>
  • #11 This lesson focuses on making a file system available to a CIFS client.
  • #12 To export a file system for CIFS, in Unisphere click Storage > Shared Folders > CIFS > Create. The first step for creating a CIFS share is to select a Data Mover for the share, it is selected from a drop-down menu. Only Primary Data Movers will be displayed – either physical or Virtual Data Movers. In the CIFS Share Name field, a share name must be input. The share name will be the name of the share that the CIFS server presents to the network. It does not have to be the same name as the file system pathname that is exported. Next, select the desired File System from the drop-down menu. Only file systems that are mounted to the selected Data Mover will be displayed. Next select the file system Path name to export. When creating an initial share on a file system, the only pathname available will be to the top-level of the file system. The field only accepts pathnames that exist and it will not create any structure that does not already exist. Make sure you check the corresponding CIFS Server. Click OK when done.
  • #14 The CIFS service must be stopped and restarted for any changes in the configuration to take effect. Such change could include but not be limited to: Adding/changing the External Usermapper address Adding/changing the address of the WINS server Changing the security modeTo start or stop CIFS, access the main CIFS page, then from the Tasks pane File Storage section, select Configure CIFS.
  • #15 Deleting a CIFS server is a multi-step process. Please note that a CIFS server can be removed directly in Unisphere without performing all these steps. These steps represent a best practice for removing a CIFS server to prevent any data loss from in-process write operations or incomplete removal.The first step is to ensure that there are no users actively accessing the CIFS server. This can be done using Computer Management and connecting to the CIFS server and checking for any open sessions to users.The next step is to remove the CIFS server from the domain. This is done in the Unisphere GUI on the main CIFS page. Select the specific CIFS Server’s properties and perform the unjoin operation.Next is to delete any CIFS shares that are specifically associated with the CIFS Server. This is done in the Unisphere GUI on the main CIFS page. From the CIFS Shares tab, select Shares related to the CIFS server and delete them. The delete shares operation does not delete data from the file system, it simply removes the sharing of the data.Finally the CIFS server can be deleted. From the main CIFS page in Unisphere, select the specific CIFS server from the CIFS Servers tab and delete it.Using this multistep process prevents removal of a CIFS Server when write operations are in process and clears the CIFS configuration of the CIFS Server completely.
  • #19 Listed are the key points covered in this module.
  • #20 Test the knowledge acquired through this training by answering the questions in this slide. Continue to the next page for the answer key.
  • #21 Displayed here are the answers from the previous slide. Please take a moment to review them.
  • #22 Test the knowledge acquired through this training by answering the questions in this slide. Continue to the next page for the answer key.
  • #23 Displayed here are the answers from the previous slide. Please take a moment to review them.