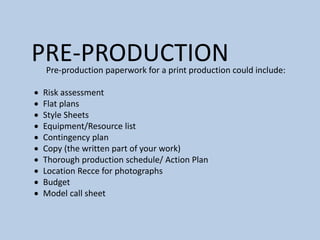
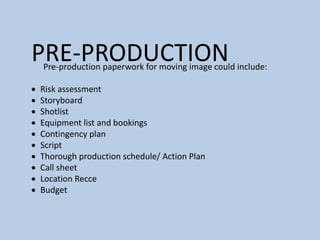
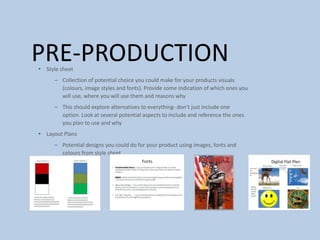
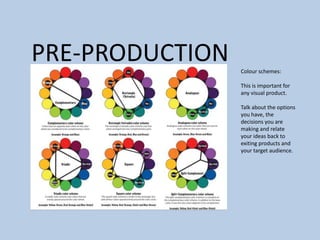
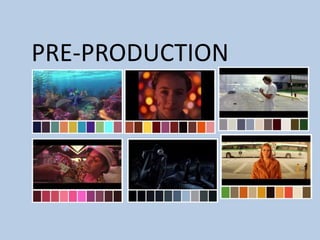
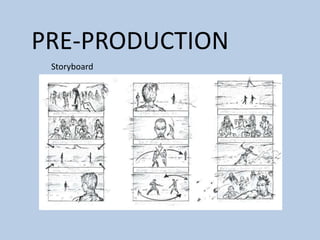
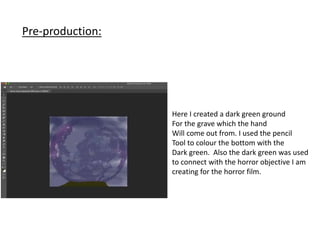
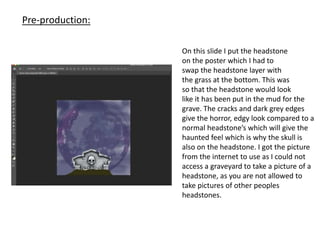
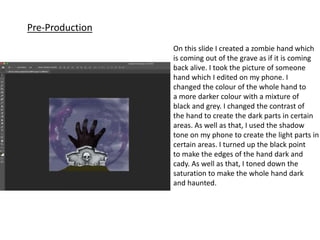
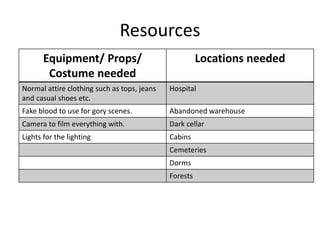
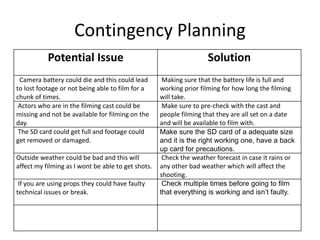
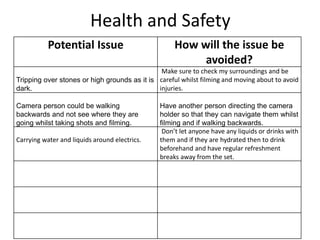
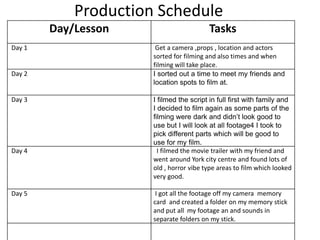
Pre-Production
Resources
Pre-production is important for the smooth running of a project. It
is for you to go through final development and organisation for
your project before you start production.
The pre-production tasks you do will depend on your project. You
need to undertake appropriate tasks in order to make your project
work.
A production schedule should be in everyone’s project.
The blue slides are here to give advice. This advice can also be
found in the main lecture. Delete when you don’t need it. Don’t
submit your work with this in.
PRE-PRODUCTION
Pre-production paperwork for a print production could include:
 Risk assessment
 Flat plans
 Style Sheets
 Equipment/Resource list
 Contingency plan
 Copy (the written part of your work)
 Thorough production schedule/ Action Plan
 Location Recce for photographs
 Budget
 Model call sheet
PRE-PRODUCTION
Pre-production paperwork for moving image could include:
 Risk assessment
 Storyboard
 Shotlist
 Equipment list and bookings
 Contingency plan
 Script
 Thorough production schedule/ Action Plan
 Call sheet
 Location Recce
 Budget
PRE-PRODUCTION
Pre-production paperwork for a video game production could
include:
 Risk assessment
 Sound effect list
 Music list
 Style sheet or other visual planning
 Contingency plan
 Scene plan
 Thorough production schedule/ Action Plan
 Budget
PRE-PRODUCTION
Pre-production paperwork for an audio production could include:
 Risk assessment
 Sound effect list
 Music list
 Equipment/Resource list
 Script/Questions
 Contingency plan
 Location plan
 Contributor information (interviewees/guests/actors)
 Thorough production schedule/ Action Plan
 Budget
PRE-PRODUCTION
• Style sheet
– Collection of potential choice you could make for your products visuals
(colours, image styles and fonts). Provide some indication of which ones you
will use, where you will use them and reasons why
– This should explore alternatives to everything- don’t just include one
option. Look at several potential aspects to include and reference the ones
you plan to use and why
• Layout Plans
– Potential designs you could do for your product using images, fonts and
colours from style sheet
PRE-PRODUCTION Colour schemes:
This is important for
any visual product.
Talk about the options
you have, the
decisions you are
making and relate
your ideas back to
exiting products and
your target audience.
PRE-PRODUCTION
PRE-PRODUCTION
Storyboard
Pre-production
• What are you making? (explain what you have been asked to do) I am going to
be creating a horror film with a little twist as I am going to try have it filmed
backwards in parts for a extra thrill and enigma for the audience.
• Why? (What is the purpose of making your Film) I am making a horror film as
that is my favourite genre of film as horror movies always keep you watching
and in suspense with the shots and also the enigmas of the movie making the
audience watch more to find out what happens leaving you on a cliff hanger in
some cases.
• Who is it for? (Audience) My audience are mainly teenagers and early aged
adults in their 20’s who like gruesome horror movies with different aspects
added to it compared to your usual, typical horror film.
• Where will it appear/on what? (How will audience see it) I will create the film
and hopefully upload it onto YouTube for people to view and watch for free
and hopefully get feedback as well.
Reflection:
Pre-production:
Use this space to document whatever pre-production work you did for your project. It will vary
from person to person and project to project. You will need to add more slides. Delete this
advice once you don’t need it.
This is a picture which I found to show how I
will make my poster for my horror film. The hand
is crumbly and old to create a horror , zombie
effect . I did this as I took a picture of a hand
and then on photo shop I edited the hand to
give it a zombie texture.
Pre-production:
Here I used the brush tool to use
different shades of purple which I
painted over the background. This
helped me create the misty effect
which makes the poster have the
horror, enigma style to it and also the
different shades give a more horror
unusual feel rather than a solid
style tone of purple.
This makes it more interesting
unique compared to using a standard
purple.
Pre-production:
Here I used the magic tool which helped me get
parts of the moon to make it purple for my
experiments. The magic tool helped me pick
certain bits which I added a purple onto to give a
zombie horror feel as purple is very dark in your
face but parts are light. This was to make the
outer edge of the moon brighter and this gives it
a mysterious haunted looking vibe as they are all
different shades of purple which will catch the
viewers attention. The blue cloudy background
gives the horror feel and as if something unusual
will happen in the film.
Pre-production:
Here I created a dark green ground
For the grave which the hand
Will come out from. I used the pencil
Tool to colour the bottom with the
Dark green. Also the dark green was used
to connect with the horror objective I am
creating for the horror film.
On this slide I put the headstone
on the poster which I had to
swap the headstone layer with
the grass at the bottom. This was
so that the headstone would look
like it has been put in the mud for the
grave. The cracks and dark grey edges
give the horror, edgy look compared to a
normal headstone’s which will give the
haunted feel which is why the skull is
also on the headstone. I got the picture
from the internet to use as I could not
access a graveyard to take a picture of a
headstone, as you are not allowed to
take pictures of other peoples
headstones.
Pre-production:
Pre-Production
On this slide I created a zombie hand which
is coming out of the grave as if it is coming
back alive. I took the picture of someone
hand which I edited on my phone. I
changed the colour of the whole hand to
a more darker colour with a mixture of
black and grey. I changed the contrast of
the hand to create the dark parts in certain
areas. As well as that, I used the shadow
tone on my phone to create the light parts in
certain areas. I turned up the black point
to make the edges of the hand dark and
cady. As well as that, I toned down the
saturation to make the whole hand dark
and haunted.
Resources
Equipment/ Props/
Costume needed
Locations needed
Normal attire clothing such as tops, jeans
and casual shoes etc.
Hospital
Fake blood to use for gory scenes. Abandoned warehouse
Camera to film everything with. Dark cellar
Lights for the lighting Cabins
Cemeteries
Dorms
Forests
Contingency Planning
Potential Issue Solution
Camera battery could die and this could lead
to lost footage or not being able to film for a
chunk of times.
Making sure that the battery life is full and
working prior filming for how long the filming
will take.
Actors who are in the filming cast could be
missing and not be available for filming on the
day.
Make sure to pre-check with the cast and
people filming that they are all set on a date
and will be available to film with.
The SD card could get full and footage could
get removed or damaged.
Make sure the SD card of a adequate size
and it is the right working one, have a back
up card for precautions.
Outside weather could be bad and this will
affect my filming as I wont be able to get shots.
Check the weather forecast in case it rains or
any other bad weather which will affect the
shooting.
If you are using props they could have faulty
technical issues or break.
Check multiple times before going to film
that everything is working and isn’t faulty.
Health and Safety
Potential Issue How will the issue be
avoided?
Tripping over stones or high grounds as it is
dark.
Make sure to check my surroundings and be
careful whilst filming and moving about to avoid
injuries.
Camera person could be walking
backwards and not see where they are
going whilst taking shots and filming.
Have another person directing the camera
holder so that they can navigate them whilst
filming and if walking backwards.
Carrying water and liquids around electrics.
Don’t let anyone have any liquids or drinks with
them and if they are hydrated then to drink
beforehand and have regular refreshment
breaks away from the set.
Production Schedule
Day/Lesson Tasks
Day 1 Get a camera ,props , location and actors
sorted for filming and also times and when
filming will take place.
Day 2 I sorted out a time to meet my friends and
location spots to film at.
Day 3 I filmed the script in full first with family and
I decided to film again as some parts of the
filming were dark and didn’t look good to
use but I will look at all footage4 I took to
pick different parts which will be good to
use for my film.
Day 4 I filmed the movie trailer with my friend and
went around York city centre and found lots of
old , horror vibe type areas to film which looked
very good.
Day 5 I got all the footage off my camera memory
card and created a folder on my memory stick
and put all my footage an and sounds in
separate folders on my stick.

4. pre production (1)

  • 1.
  • 2.
    Resources Pre-production is importantfor the smooth running of a project. It is for you to go through final development and organisation for your project before you start production. The pre-production tasks you do will depend on your project. You need to undertake appropriate tasks in order to make your project work. A production schedule should be in everyone’s project. The blue slides are here to give advice. This advice can also be found in the main lecture. Delete when you don’t need it. Don’t submit your work with this in.
  • 3.
    PRE-PRODUCTION Pre-production paperwork fora print production could include:  Risk assessment  Flat plans  Style Sheets  Equipment/Resource list  Contingency plan  Copy (the written part of your work)  Thorough production schedule/ Action Plan  Location Recce for photographs  Budget  Model call sheet
  • 4.
    PRE-PRODUCTION Pre-production paperwork formoving image could include:  Risk assessment  Storyboard  Shotlist  Equipment list and bookings  Contingency plan  Script  Thorough production schedule/ Action Plan  Call sheet  Location Recce  Budget
  • 5.
    PRE-PRODUCTION Pre-production paperwork fora video game production could include:  Risk assessment  Sound effect list  Music list  Style sheet or other visual planning  Contingency plan  Scene plan  Thorough production schedule/ Action Plan  Budget
  • 6.
    PRE-PRODUCTION Pre-production paperwork foran audio production could include:  Risk assessment  Sound effect list  Music list  Equipment/Resource list  Script/Questions  Contingency plan  Location plan  Contributor information (interviewees/guests/actors)  Thorough production schedule/ Action Plan  Budget
  • 7.
    PRE-PRODUCTION • Style sheet –Collection of potential choice you could make for your products visuals (colours, image styles and fonts). Provide some indication of which ones you will use, where you will use them and reasons why – This should explore alternatives to everything- don’t just include one option. Look at several potential aspects to include and reference the ones you plan to use and why • Layout Plans – Potential designs you could do for your product using images, fonts and colours from style sheet
  • 8.
    PRE-PRODUCTION Colour schemes: Thisis important for any visual product. Talk about the options you have, the decisions you are making and relate your ideas back to exiting products and your target audience.
  • 9.
  • 10.
  • 11.
    Pre-production • What areyou making? (explain what you have been asked to do) I am going to be creating a horror film with a little twist as I am going to try have it filmed backwards in parts for a extra thrill and enigma for the audience. • Why? (What is the purpose of making your Film) I am making a horror film as that is my favourite genre of film as horror movies always keep you watching and in suspense with the shots and also the enigmas of the movie making the audience watch more to find out what happens leaving you on a cliff hanger in some cases. • Who is it for? (Audience) My audience are mainly teenagers and early aged adults in their 20’s who like gruesome horror movies with different aspects added to it compared to your usual, typical horror film. • Where will it appear/on what? (How will audience see it) I will create the film and hopefully upload it onto YouTube for people to view and watch for free and hopefully get feedback as well. Reflection:
  • 12.
    Pre-production: Use this spaceto document whatever pre-production work you did for your project. It will vary from person to person and project to project. You will need to add more slides. Delete this advice once you don’t need it. This is a picture which I found to show how I will make my poster for my horror film. The hand is crumbly and old to create a horror , zombie effect . I did this as I took a picture of a hand and then on photo shop I edited the hand to give it a zombie texture.
  • 13.
    Pre-production: Here I usedthe brush tool to use different shades of purple which I painted over the background. This helped me create the misty effect which makes the poster have the horror, enigma style to it and also the different shades give a more horror unusual feel rather than a solid style tone of purple. This makes it more interesting unique compared to using a standard purple.
  • 14.
    Pre-production: Here I usedthe magic tool which helped me get parts of the moon to make it purple for my experiments. The magic tool helped me pick certain bits which I added a purple onto to give a zombie horror feel as purple is very dark in your face but parts are light. This was to make the outer edge of the moon brighter and this gives it a mysterious haunted looking vibe as they are all different shades of purple which will catch the viewers attention. The blue cloudy background gives the horror feel and as if something unusual will happen in the film.
  • 15.
    Pre-production: Here I createda dark green ground For the grave which the hand Will come out from. I used the pencil Tool to colour the bottom with the Dark green. Also the dark green was used to connect with the horror objective I am creating for the horror film.
  • 16.
    On this slideI put the headstone on the poster which I had to swap the headstone layer with the grass at the bottom. This was so that the headstone would look like it has been put in the mud for the grave. The cracks and dark grey edges give the horror, edgy look compared to a normal headstone’s which will give the haunted feel which is why the skull is also on the headstone. I got the picture from the internet to use as I could not access a graveyard to take a picture of a headstone, as you are not allowed to take pictures of other peoples headstones. Pre-production:
  • 17.
    Pre-Production On this slideI created a zombie hand which is coming out of the grave as if it is coming back alive. I took the picture of someone hand which I edited on my phone. I changed the colour of the whole hand to a more darker colour with a mixture of black and grey. I changed the contrast of the hand to create the dark parts in certain areas. As well as that, I used the shadow tone on my phone to create the light parts in certain areas. I turned up the black point to make the edges of the hand dark and cady. As well as that, I toned down the saturation to make the whole hand dark and haunted.
  • 18.
    Resources Equipment/ Props/ Costume needed Locationsneeded Normal attire clothing such as tops, jeans and casual shoes etc. Hospital Fake blood to use for gory scenes. Abandoned warehouse Camera to film everything with. Dark cellar Lights for the lighting Cabins Cemeteries Dorms Forests
  • 19.
    Contingency Planning Potential IssueSolution Camera battery could die and this could lead to lost footage or not being able to film for a chunk of times. Making sure that the battery life is full and working prior filming for how long the filming will take. Actors who are in the filming cast could be missing and not be available for filming on the day. Make sure to pre-check with the cast and people filming that they are all set on a date and will be available to film with. The SD card could get full and footage could get removed or damaged. Make sure the SD card of a adequate size and it is the right working one, have a back up card for precautions. Outside weather could be bad and this will affect my filming as I wont be able to get shots. Check the weather forecast in case it rains or any other bad weather which will affect the shooting. If you are using props they could have faulty technical issues or break. Check multiple times before going to film that everything is working and isn’t faulty.
  • 20.
    Health and Safety PotentialIssue How will the issue be avoided? Tripping over stones or high grounds as it is dark. Make sure to check my surroundings and be careful whilst filming and moving about to avoid injuries. Camera person could be walking backwards and not see where they are going whilst taking shots and filming. Have another person directing the camera holder so that they can navigate them whilst filming and if walking backwards. Carrying water and liquids around electrics. Don’t let anyone have any liquids or drinks with them and if they are hydrated then to drink beforehand and have regular refreshment breaks away from the set.
  • 21.
    Production Schedule Day/Lesson Tasks Day1 Get a camera ,props , location and actors sorted for filming and also times and when filming will take place. Day 2 I sorted out a time to meet my friends and location spots to film at. Day 3 I filmed the script in full first with family and I decided to film again as some parts of the filming were dark and didn’t look good to use but I will look at all footage4 I took to pick different parts which will be good to use for my film. Day 4 I filmed the movie trailer with my friend and went around York city centre and found lots of old , horror vibe type areas to film which looked very good. Day 5 I got all the footage off my camera memory card and created a folder on my memory stick and put all my footage an and sounds in separate folders on my stick.

Editor's Notes

  • #13 Use this space to document whatever pre-production work you did for your project. It will vary from person to person and project to project.
  • #14 Use this space to document whatever pre-production work you did for your project. It will vary from person to person and project to project.
  • #15 Use this space to document whatever pre-production work you did for your project. It will vary from person to person and project to project.
  • #16 Use this space to document whatever pre-production work you did for your project. It will vary from person to person and project to project.