- The document introduces Chef server and client/server model where the Chef server stores and distributes cookbooks and configuration to clients running chef-client.
- It discusses Chef terminology like nodes, which are systems being configured by Chef, and roles which allow grouping common configuration for types of nodes.
- Steps are provided to setup a workstation, install Chef, and configure it to use a Hosted Chef server. Cookbooks and a role are uploaded, and a node is bootstrapped to apply the configuration.
- Additional sections cover creating cloud instances with knife plugins for Brightbox and Rackspace clouds, then bootstrapping the instances to apply the Chef configuration.
![Press the Get a new key button and download the .pem file.
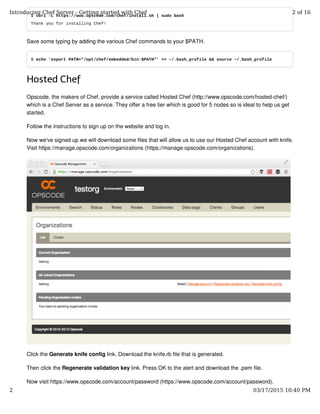
Using Hosted Chef
We'll now use Hosted Chef along with the chef repository we made in the previous chapter. Firstly, let's
download our chef repository.
$ wget http://gettingstartedwithchef.com/downloads/cp1.tgz
--2013-06-09 13:36:15-- http://gettingstartedwithchef.com/downloads/cp1.tgz
Resolving gettingstartedwithchef.com (gettingstartedwithchef.com)... 80.68.93.116
Connecting to gettingstartedwithchef.com (gettingstartedwithchef.com)|80.68.93.116|:80... connected.
HTTP request sent, awaiting response... 200 OK
Length: 300046 (293K) [text/plain]
Saving to: ‘cp1.tgz’
100%[===============================================================================>] 300,046 1.7
8MB/s in 0.2s
2013-06-09 13:36:15 (1.78 MB/s) - ‘cp1.tgz’ saved [300046/300046]
$ tar zxf cp1.tgz
$ cd chef-repo
We now have everything we need, so let's start using Hosted Chef. Firstly, we need to tell knife to use Hosted
Chef. To do this we need to copy the files we just downloaded from Hosted Chef to our repository.
$ mv ~/Downloads/*.pem .chef/
$ mv ~/Downloads/knife.rb .chef/
Let's check that knife can talk to Hosted Chef.
$ knife client list
org_name-validator
Introducing Chef Server - Getting started with Chef 3 of 16
3 03/17/2015 10:40 PM](https://image.slidesharecdn.com/3-chef-serverclient-150514150532-lva1-app6891/85/Cloud-Automation-with-Opscode-Chef-3-320.jpg)
!["org_name" will be whatever you entered as your organisation name when signing up for Hosted Chef.
Uploading Cookbooks
Before we can configure our node with chef-client, we need to upload our cookbooks to the Chef server. We
do that with knife.
$ knife cookbook upload --all
Uploading apache2 [1.6.0]
Uploading apt [1.9.0]
Uploading aws [0.100.6]
Uploading build-essential [1.3.4]
Uploading chef_handler [1.1.4]
Uploading database [1.3.12]
Uploading iis [1.6.6]
Uploading mysql [2.1.2]
Uploading openssl [1.0.2]
Uploading php [1.1.8]
Uploading phpapp [0.1.0]
Uploading postgresql [2.2.2]
Uploading powershell [1.1.2]
Uploading windows [1.12.4]
Uploading xfs [1.1.0]
Uploading xml [1.2.0]
Uploading yum [3.0.4]
Uploading yum-epel [0.2.0]
Uploaded all cookbooks.
Roles
We used a single JSON file to configure our node with chef-solo but what if we have multiple nodes? We
should probably find a better solution to this. A Chef role allows us to group configuration for types of nodes
together. We'll expand on this in a later chapter but for now we'll create a role for our WordPress setup.
$ knife role create phpapp
You may receive the following error if you do not have an EDITOR environment variable set.
ERROR: RuntimeError: Please set EDITOR environment variable
You can resolve this quickly with the --editor option. e.g. --editor vi or --editor nano etc.
We are then presented with the basic structure of the role as a JSON file.
Introducing Chef Server - Getting started with Chef 4 of 16
4 03/17/2015 10:40 PM](https://image.slidesharecdn.com/3-chef-serverclient-150514150532-lva1-app6891/85/Cloud-Automation-with-Opscode-Chef-4-320.jpg)
![{
"name": "phpapp",
"description": "",
"json_class": "Chef::Role",
"default_attributes": {
},
"override_attributes": {
},
"chef_type": "role",
"run_list": [
],
"env_run_lists": {
}
}
We'll go through what the fields actually mean. The name you can probably guess - the name of the role. It's
a good idea to put something descriptive in the description field. You may remember that we discussed
attributes in the last chapter, default_attributes allows us to set attributes and override_attributes lets us
specify attributes that override attributes defined as defaults elsewhere. We've already created a run_list in
our JSON file in the last chapter so let's add that first. It's safe to ignore the fields that have not been
mentioned for now.
{
"name": "phpapp",
"description": "",
"json_class": "Chef::Role",
"default_attributes": {
},
"override_attributes": {
},
"chef_type": "role",
"run_list": [
"recipe[apt]", "recipe[phpapp]"
],
"env_run_lists": {
}
}
Enter our run list, highlighted in green. We should now specify some attributes. We don't need to specify the
attributes for the mysql cookbook as it creates secure random passwords automatically in chef-client mode.
Our phpapp cookbook requires us to specify a password attribute so let's add that to default_attributes.
Introducing Chef Server - Getting started with Chef 5 of 16
5 03/17/2015 10:40 PM](https://image.slidesharecdn.com/3-chef-serverclient-150514150532-lva1-app6891/85/Cloud-Automation-with-Opscode-Chef-5-320.jpg)
![{
"name": "phpapp",
"description": "",
"json_class": "Chef::Role",
"default_attributes": {
"phpapp": {"db_password": "212b09752d173876a84d374333ae1ffe"}
},
"override_attributes": {
},
"chef_type": "role",
"run_list": [
"recipe[apt]", "recipe[phpapp]"
],
"env_run_lists": {
}
}
Add the code in green above. Save the file. The role will be uploaded to Hosted Chef and knife will display the
following message.
Created role[phpapp]
Let's confirm the role is on the server.
$ knife role list
phpapp
Finally, we should download the role from the server and place it into our roles directory for safe keeping.
$ knife role show phpapp -d -Fjson > roles/phpapp.json
Having the file in our chef repository allows us to edit the role at our leisure and check it into version control
systems such as Git, something we'll get to in a later chapter. We can upload the file to Hosted Chef again
using the following command.
$ knife role from file roles/phpapp.json
Updated Role phpapp!
We're now ready to bootstrap our new node with knife.
Bootstrapping a node with Knife
Now use your cloud control panel or your virtual machine software to create a new Ubuntu box.
If you are using a new Rackspace Cloud instance replace "password" with the root password and
"hostname" with it's hostname or IP address and run the following command.
Introducing Chef Server - Getting started with Chef 6 of 16
6 03/17/2015 10:40 PM](https://image.slidesharecdn.com/3-chef-serverclient-150514150532-lva1-app6891/85/Cloud-Automation-with-Opscode-Chef-6-320.jpg)
![$ knife bootstrap --run-list "role[phpapp]" --json-attributes "{"phpapp": {"server_name": "intro.
hellofutu.re"}}" --ssh-user root --ssh-password password hostname
Otherwise the knife bootstrap command you need will be specific to your setup. To use a ssh key and sudo
before executing the bootstrap you might use the following command, replacing hostname with the hostname
or IP address of the machine you intend to bootstrap. You can find more details of the options knife bootstrap
(http://docs.opscode.com/knife_bootstrap.html) accepts in the documentation.
$ knife bootstrap --run-list "role[phpapp]" --json-attributes "{"phpapp": {"server_name": "intro.
hellofutu.re"}}" --sudo hostname
You'll see some output along these lines.
Bootstrapping Chef on intro.hellofutu.re
..
intro.hellofutu.re
intro.hellofutu.re Chef Client finished, 61 resources updated
intro.hellofutu.re
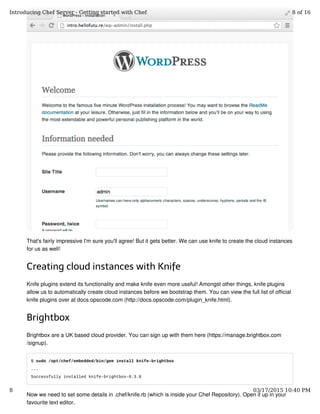
And if you visit your new node in your web browser you'll see the following.
Introducing Chef Server - Getting started with Chef 7 of 16
7 03/17/2015 10:40 PM](https://image.slidesharecdn.com/3-chef-serverclient-150514150532-lva1-app6891/85/Cloud-Automation-with-Opscode-Chef-7-320.jpg)
![knife[:brightbox_client_id] = "xxx-xxxxx"
knife[:brightbox_secret] = "xxxxxxxxxxxxxxx"
Add the code in green but enter your API client id and secret which you can obtain from your Brightbox
account settings page.
Save the file.
We can test to see if that's worked using the following command.
$ knife brightbox flavor list
ID Name Handle Architecture RAM Disk Cores
typ-4nssg High IO Nano nano.high-io 0-bit 512 MB 20 GB 2
typ-c8awf Standard Nano nano 0-bit 512 MB 20 GB 1
typ-b1gmb Standard Mini mini 0-bit 1024 MB 40 GB 2
typ-iqisj High IO Mini mini.high-io 0-bit 1024 MB 40 GB 4
typ-urtky High IO Small small.high-io 0-bit 2048 MB 80 GB 4
typ-8fych Standard Small small 0-bit 2048 MB 80 GB 2
typ-qdiwq High IO Medium medium.high-io 0-bit 4096 MB 160 GB 8
typ-1j0zf Standard Medium medium 0-bit 4096 MB 160 GB 4
typ-mlbt7 High IO Large large.high-io 0-bit 8192 MB 320 GB 8
typ-1e0xr Standard Large large 0-bit 8192 MB 320 GB 4
typ-wdicw High IO XL xl.high-io 0-bit 16384 MB 640 GB 8
typ-a4aqc Standard XL xl 0-bit 16384 MB 640 GB 4
typ-lr76m High IO XXL xxl.high-io 0-bit 32768 MB 1280 GB 8
typ-vs01b Standard XXL xxl 0-bit 32768 MB 1280 GB 4
We can get a list of images (operating systems) with the following command.
$ knife brightbox image list
ID Name Status
img-t3xyp Blank Disk Image public
img-r726y FreeBSD 9.0 minimal public
img-hnigl Windows 2008 Server R2 public
img-g8ia6 ubuntu-raring-13.04-amd64-server public
img-u3ttt ubuntu-raring-13.04-i386-server public
img-6isnq ubuntu-raring-daily-amd64-server public
img-rttkx ubuntu-raring-daily-i386-server public
img-nhjvo ubuntu-saucy-daily-amd64-server public
img-q1ts8 ubuntu-saucy-daily-i386-server public
So let's provision and bootstrap a cloud instance with Brightbox.
Heads up! Before you can bootstrap with Brightbox you need to enter your SSH public key in the
dashboard.
We'll use the flavor "typ-c8awf" and the Ubuntu 13.04 image "img-g8ia6".
Introducing Chef Server - Getting started with Chef 9 of 16
9 03/17/2015 10:40 PM](https://image.slidesharecdn.com/3-chef-serverclient-150514150532-lva1-app6891/85/Cloud-Automation-with-Opscode-Chef-9-320.jpg)
![$ knife brightbox server create --flavor typ-c8awf --image img-g8ia6 --run-list "role[phpapp]" --distr
o chef-full
After a while we'll see the following result.
xxx.xxx.xx.xx Chef Client finished, 73 resources updated
xxx.xxx.xx.xx
Instance ID: srv-5ple0
Name:
Flavor: typ-c8awf
Image: ubuntu-raring-13.04-amd64-server
Public IP Address: 109.107.35.66
Private IP Address: 10.242.34.174
Environment: _default
Run List: role[phpapp]
Visit the Public IP Address in your browser and you'll see the WordPress install page.
Rackspace Cloud
We'll start by creating a Rackspace Cloud instance. First we need to install the knife-rackspace plugin.
$ sudo /opt/chef/embedded/bin/gem install knife-rackspace
...
Successfully installed knife-rackspace-0.7.0
Now we need to set some details in .chef/knife.rb (which is inside your Chef Repository). Open it up in your
favourite text editor.
knife[:rackspace_api_username] = "testorg"
knife[:rackspace_api_key] = "APIKEY"
Add the green lines above. Remember to replace testorg and APIKEY with your Rackspace username and
API key.
If you don't live in America you will need to specify an alternative authentication URL. Below is an example for
the UK. Valid regions are: "dfw" "ord" "lon" and "syd".
knife[:rackspace_api_username] = "testorg"
knife[:rackspace_api_key] = "APIKEY"
knife[:rackspace_auth_url] = "https://lon.identity.api.rackspacecloud.com/v2.0"
Save knife.rb. We can test to see if that's worked using the following command.
Introducing Chef Server - Getting started with Chef 10 of 16
10 03/17/2015 10:40 PM](https://image.slidesharecdn.com/3-chef-serverclient-150514150532-lva1-app6891/85/Cloud-Automation-with-Opscode-Chef-10-320.jpg)
![$ knife rackspace flavor list
ID Name VCPUs RAM Disk
2 512MB Standard Instance 1 512 20 GB
3 1GB Standard Instance 1 1024 40 GB
4 2GB Standard Instance 2 2048 80 GB
5 4GB Standard Instance 2 4096 160 GB
6 8GB Standard Instance 4 8192 320 GB
7 15GB Standard Instance 6 15360 620 GB
8 30GB Standard Instance 8 30720 1200 GB
We can get a list of available images (operating systems) with the following command.
$ knife rackspace image list
ID Name
32b7d027-8a40-458b-9e73-bd719d660df6 Arch 2013.6
e0ed4adb-3a00-433e-a0ac-a51f1bc1ea3d CentOS 6.4
81877a6e-9e87-4b1f-93f3-b176e25f3c4a Debian 7 (Wheezy)
f3a23d0a-de1b-4eb7-994f-5f0de9d8d7a0 Fedora 19 (Schrodinger's Cat)
ccaf99bc-472a-46ea-a125-d3ecfca66695 FreeBSD 9.1
bb8c27f9-f3cf-4606-9a88-8a2123e02290 Gentoo 13.2
8958846f-679b-454e-9232-20d3792fc5d7 OpenSUSE 12.3
16e6c0ae-f881-4180-95b0-3450fe3f8e96 Red Hat Enterprise Linux 6.4
23cebbc9-3219-4a27-9210-d63e1af7181b Ubuntu 13.04 (Raring Ringtail)
48df4181-040e-4821-8723-d9e4ba908d2f Windows Server 2008 R2 SP1
We can now provision and bootstrap a server with the following command. From the commands above we
know we want a flavor of "2" and the Ubuntu 13.04 image which is catchily entitled
"23cebbc9-3219-4a27-9210-d63e1af7181b".
$ knife rackspace server create --flavor 2 --image 23cebbc9-3219-4a27-9210-d63e1af7181b --run-list "ro
le[phpapp]"
...
After a while your instance will be created, bootstrapped and Chef will be run and something similar to below
will be displayed.
Introducing Chef Server - Getting started with Chef 11 of 16
11 03/17/2015 10:40 PM](https://image.slidesharecdn.com/3-chef-serverclient-150514150532-lva1-app6891/85/Cloud-Automation-with-Opscode-Chef-11-320.jpg)
![192.168.9.199 Chef Client finished, 61 resources updated
192.168.9.199
Instance ID: xxxxxxxx-xxxx-xxxx-xxxx-xxxxxxxxxxxx
Host ID: xxxxxxxxxxxxxxxxxxxxxxxxxxxxxxxxxxxxxxxxxxxxxxxxxxxxxxxx
Name: rs-xxxxxxxxxxxxxxxxx
Flavor: 512MB Standard Instance
Image: Ubuntu 13.04 (Raring Ringtail)
Metadata: []
Public DNS Name: 192-168-9-199.static.cloud-ips.com
Public IP Address: 192.168.9.199
Private IP Address: 10.9.3.199
Password: xxxxxxxxxxxx
Environment: _default
Run List: role[phpapp]
Visit the Public IP Address in your browser and you will once again see the WordPress install page.
We can even use knife to clean up our servers. Get a list of servers with the following command.
$ knife rackspace server list
Instance ID Name Public IP Private IP Flavor Image State
xxxxxxxx rs-x 192.168.9.199 10.9.1.199 2 23cebbc9-3219-4a27-9210-d63e1af7181b active
We can delete the server we just created with the following command. We also need to remove references to
the server from our Hosted Chef account. We do this with the --purge option. Replace INSTANCE_ID with the
value under Instance ID from the server list command above.
$ knife rackspace server delete --purge INSTANCE_ID
Instance ID: xxxxxxxx-xxxx-xxxx-xxxx-xxxxxxxxxxxx
Host ID: xxxxxxxxxxxxxxxxxxxxxxxxxxxxxxxxxxxxxxxxxxxxxxxxxxxxxxxx
Name: rs-xxxxxxxxxxxxxxxxx
Flavor: 512MB Standard Instance
Image: Ubuntu 13.04 (Raring Ringtail)
Public IP Address: 192.168.9.199
Private IP Address: 10.9.1.199
Do you really want to delete this server? (Y/N) y
WARNING: Deleted server xxxxxxxx-xxxx-xxxx-xxxx-xxxxxxxxxxxx
WARNING: Deleted node rs-xxxxxxxxxxxxxxxxx
WARNING: Deleted client rs-xxxxxxxxxxxxxxxxx
Amazon Cloud
We can also use knife to bootstrap Amazon EC2 instances. First install the plugin.
Introducing Chef Server - Getting started with Chef 12 of 16
12 03/17/2015 10:40 PM](https://image.slidesharecdn.com/3-chef-serverclient-150514150532-lva1-app6891/85/Cloud-Automation-with-Opscode-Chef-12-320.jpg)
![$ sudo /opt/chef/embedded/bin/gem install knife-ec2
...
Successfully installed knife-ec2-0.6.4
You need to obtain the following information for your Amazon AWS account. It can all be found or set-up
inside the Amazon AWS console.
access key id
secret access key
name of the ssh key you want to use
an Ubuntu 12.04 or 13.04 AMI
the AWS region you want to use
the name of a security group that allows SSH and web access
We should now configure knife with those details. Open .chef/knife.rb.
knife[:aws_access_key_id] = "XXXXXXXXXXXXXXXXXXXX"
knife[:aws_secret_access_key] = "XXXXXXXXXXXXXXXXXXXXXXXXXXXXXXXXXXXXXXXX"
knife[:aws_ssh_key_id] = "sshkey"
Add the lines in green, entering your access key id, secret access key and ssh key name without .pem. Save
the file.
We can now access a list of cloud instances with the following command. Cloud servers will be listed whether
they have been created with knife or not.
$ knife ec2 server list
Instance ID Name Public IP Private IP Flavor Image SSH Key Security Groups State
I have no servers listed. This is because my servers reside in the region eu-west-1. We can specify a region
by using the option --region.
$ knife ec2 server list --region eu-west1
Instance ID Name Public IP Private IP Flavor Image SSH Key Security Groups State
i-xxxxxxxx serr01 x.x.x.x x.x.x.x m1.small ami-3d160149 sshkey www, default running
I can use knife to provision and bootstrap a cloud instance with the following command.
$ knife ec2 server create --run-list "role[phpapp]" -I ami-3d160149 --region eu-west-1 -G www,default
-x ubuntu --node-name server01 --identity-file ~/.ssh/sshkey.pem
...
After a while we'll see the following result.
Introducing Chef Server - Getting started with Chef 13 of 16
13 03/17/2015 10:40 PM](https://image.slidesharecdn.com/3-chef-serverclient-150514150532-lva1-app6891/85/Cloud-Automation-with-Opscode-Chef-13-320.jpg)
![ec2-x-x-x-x.eu-west-1.compute.amazonaws.com Chef Client finished, 57 resources updated
ec2-x-x-x-x.eu-west-1.compute.amazonaws.com
Instance ID: i-xxxxxxxx
Flavor: m1.small
Image: ami-3d160149
Region: eu-west-1
Availability Zone: eu-west-1a
Security Groups: www, default
Security Group Ids: default
Tags: {"Name"=>"server01"}
SSH Key: sshkey
Root Device Type: ebs
Root Volume ID: vol-xxxxxxxx
Root Device Name: /dev/sda1
Root Device Delete on Terminate: true
Public DNS Name: ec2-x-x-x-x.eu-west-1.compute.amazonaws.com
Public IP Address: x.x.x.x
Private DNS Name: ip-x-x-x-x.eu-west-1.compute.internal
Private IP Address: x.x.x.x
Environment: _default
Run List: role[phpapp]
Visit the Public DNS Name in your browser and you'll see the WordPress install page.
You can also delete instances you no longer need with knife. Using the instance ID from the output of the
server create command above, we can delete the instance we just made using the following command.
$ knife ec2 server delete --purge --region eu-west-1 i-xxxxxxxx --node-name server01
Instance ID: i-xxxxxxxx
Flavor: m1.small
Image: ami-xxxxxxxx
Region: eu-west-1
Availability Zone: eu-west-1a
SSH Key: sshkey
Root Device Type: ebs
Do you really want to delete this server? (Y/N) y
WARNING: Deleted server i-xxxxxxxx
WARNING: Deleted node server01
WARNING: Deleted client server01
The command used some extra options, here's why:
--purge
ensures the server is also deleted from our Hosted Chef account
--node-name
required when using --purge if the server name is different from the instance ID
--region
Introducing Chef Server - Getting started with Chef 14 of 16
14 03/17/2015 10:40 PM](https://image.slidesharecdn.com/3-chef-serverclient-150514150532-lva1-app6891/85/Cloud-Automation-with-Opscode-Chef-14-320.jpg)