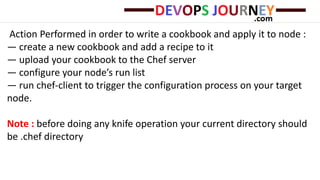
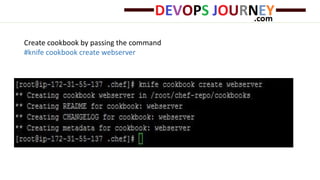
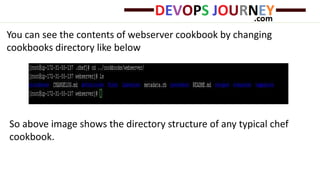
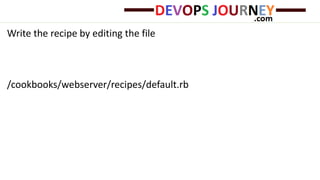
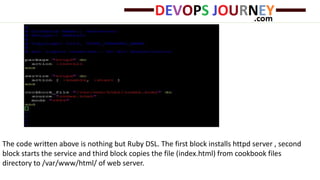
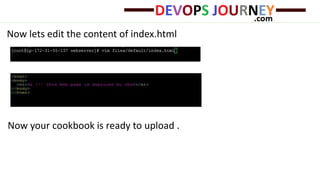
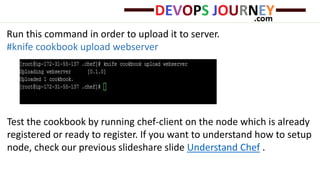
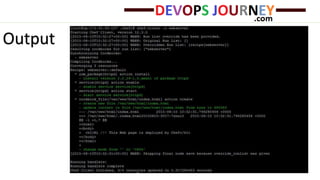
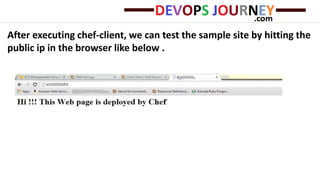
Write your first cookbook step by step
- Ishant Kumar
Here, we’ll talk about how to write your first cookbook step by step. If
you are curious to know how to setup Chef Environment, you can
always have a look in our slideshare slide Understand Chef.
A cookbook is the fundamental unit of configuration and policy
distribution. Each cookbook defines a scenario, such as everything
needed to install and configure httpd server, and then it contains all of
the components that are required to support that scenario.
Action Performed in order to write a cookbook and apply it to node :
— create a new cookbook and add a recipe to it
— upload your cookbook to the Chef server
— configure your node’s run list
— run chef-client to trigger the configuration process on your target
node.
Note : before doing any knife operation your current directory should
be .chef directory
Create cookbook by passing the command
#knife cookbook create webserver
You can see the contents of webserver cookbook by changing
cookbooks directory like below
So above image shows the directory structure of any typical chef
cookbook.
Write the recipe by editing the file
/cookbooks/webserver/recipes/default.rb
The code written above is nothing but Ruby DSL. The first block installs httpd server , second
block starts the service and third block copies the file (index.html) from cookbook files
directory to /var/www/html/ of web server.
Now lets edit the content of index.html
Now your cookbook is ready to upload .
Run this command in order to upload it to server.
#knife cookbook upload webserver
Test the cookbook by running chef-client on the node which is already
registered or ready to register. If you want to understand how to setup
node, check our previous slideshare slide Understand Chef .
Output
After executing chef-client, we can test the sample site by hitting the
public ip in the browser like below .
[Optional ] We can also bootstrap the node :
If we have any machine with public IP and its credentials
From knife we’ll bootstrap a node (e.g. EC2 Instance) with its public ip,
assign it a Chef Recipe and will run chef-client.
Bootstrap means it will connect to EC2 instance, will install chef-client
, copy validation key & client.rb and run chef-client. As we are passing
recipe name in bootstrap command it will also run the cookbook
recipe on node by putting recipe in its run list.
Command :
knife bootstrap <machine_ip> -x user_name -i <key_path> -r
recipe[recipe_name] –sudo
For Example :
knife bootstrap <machineIP> -x ec2-user -i xyz.pem -r recipe[test] –
sudo
This will install httpd server on machine and we can test the sample
site by hitting the public ip in the browser like below .
Thanks
Looking Forward for your interest in DevOpsJourney.com
http://devopsjourney.com
Email us: mail@devopsjourney.com

How to Write Chef Cookbook

  • 1.
    Write your firstcookbook step by step - Ishant Kumar
  • 2.
    Here, we’ll talkabout how to write your first cookbook step by step. If you are curious to know how to setup Chef Environment, you can always have a look in our slideshare slide Understand Chef. A cookbook is the fundamental unit of configuration and policy distribution. Each cookbook defines a scenario, such as everything needed to install and configure httpd server, and then it contains all of the components that are required to support that scenario.
  • 3.
    Action Performed inorder to write a cookbook and apply it to node : — create a new cookbook and add a recipe to it — upload your cookbook to the Chef server — configure your node’s run list — run chef-client to trigger the configuration process on your target node. Note : before doing any knife operation your current directory should be .chef directory
  • 4.
    Create cookbook bypassing the command #knife cookbook create webserver
  • 5.
    You can seethe contents of webserver cookbook by changing cookbooks directory like below So above image shows the directory structure of any typical chef cookbook.
  • 6.
    Write the recipeby editing the file /cookbooks/webserver/recipes/default.rb
  • 7.
    The code writtenabove is nothing but Ruby DSL. The first block installs httpd server , second block starts the service and third block copies the file (index.html) from cookbook files directory to /var/www/html/ of web server.
  • 8.
    Now lets editthe content of index.html Now your cookbook is ready to upload .
  • 9.
    Run this commandin order to upload it to server. #knife cookbook upload webserver Test the cookbook by running chef-client on the node which is already registered or ready to register. If you want to understand how to setup node, check our previous slideshare slide Understand Chef .
  • 10.
  • 11.
    After executing chef-client,we can test the sample site by hitting the public ip in the browser like below .
  • 12.
    [Optional ] Wecan also bootstrap the node : If we have any machine with public IP and its credentials From knife we’ll bootstrap a node (e.g. EC2 Instance) with its public ip, assign it a Chef Recipe and will run chef-client. Bootstrap means it will connect to EC2 instance, will install chef-client , copy validation key & client.rb and run chef-client. As we are passing recipe name in bootstrap command it will also run the cookbook recipe on node by putting recipe in its run list.
  • 13.
    Command : knife bootstrap<machine_ip> -x user_name -i <key_path> -r recipe[recipe_name] –sudo For Example : knife bootstrap <machineIP> -x ec2-user -i xyz.pem -r recipe[test] – sudo
  • 14.
    This will installhttpd server on machine and we can test the sample site by hitting the public ip in the browser like below .
  • 15.
    Thanks Looking Forward foryour interest in DevOpsJourney.com http://devopsjourney.com Email us: mail@devopsjourney.com