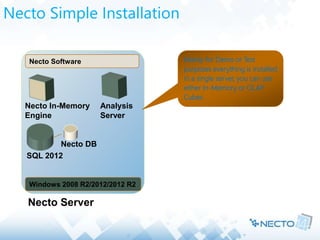
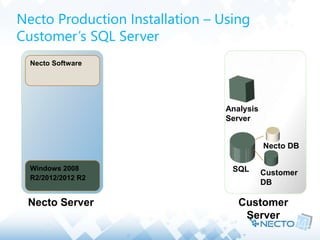
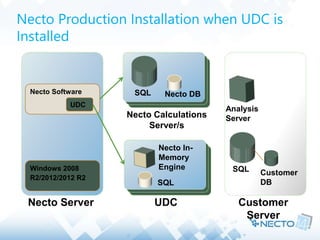
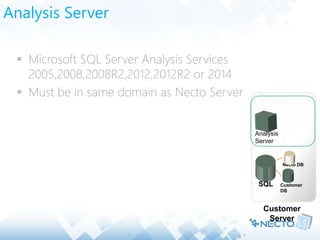
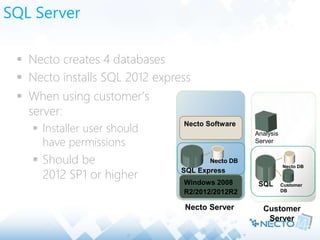
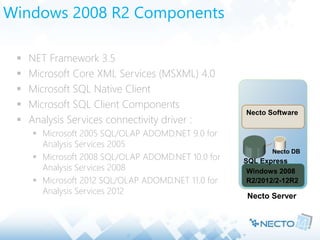
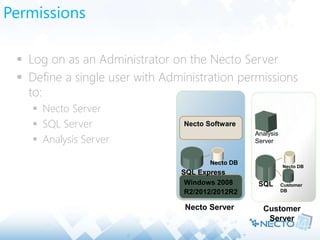
Necto Training
Module 22: Necto
Installation and
Migration
Objectives
 By the end of this lesson you will be able to
 Perform a Necto Installation
 Perform a migration from NovaView to Necto
Agenda
 Server Architecture
 Prerequisites
 Windows 2008/2012 configuration
 Installation Process
 Post Installation Configuration
Server Architecture
Before Necto Installation
Analysis
Server
SQL Customer
DB
Customer
Server
Necto Server
Windows 2008
R2/2012/2012 R2
Usually already
exists
New server must be
prepared for Necto
Necto Simple Installation
Windows 2008 R2/2012/2012 R2
SQL 2012
Necto DB
Necto Software
Necto Server
Necto In-Memory
Engine
Mainly for Demo or Test
purposes everything is installed
in a single server, you can use
either In-Memory or OLAP
Cubes
Analysis
Server
Necto Production Installation – Using
Customer’s SQL Server
SQL Customer
DB
Windows 2008
R2/2012/2012 R2
Necto DB
Necto Software
Necto Server Customer
Server
Analysis
Server
SQL
Necto Production Installation when UDC is
Installed
Windows 2008
R2/2012/2012 R2
Necto Software
Necto Server Customer
Server
SQL Customer
DB
UDC
Necto DB
Necto Calculations
Server/s
Analysis
Server
Necto In-
Memory
Engine
SQL
UDC
Prerequisites
Analysis Server
 Microsoft SQL Server Analysis Services
2005,2008,2008R2,2012,2012R2 or 2014
 Must be in same domain as Necto Server
SQL Customer
DB
Necto DB
Customer
Server
Analysis
Server
SQL Server
 Necto creates 4 databases
 Necto installs SQL 2012 express
SQL Customer
DB
Necto DB
Customer
Server
Windows 2008
R2/2012/2012R2
SQL Express
Necto DB
Necto Software
Necto Server
Analysis
Server
 When using customer’s
server:
 Installer user should
have permissions
 Should be
2012 SP1 or higher
Windows 2008 R2 Components
 NET Framework 3.5
 Microsoft Core XML Services (MSXML) 4.0
 Microsoft SQL Native Client
 Microsoft SQL Client Components
 Analysis Services connectivity driver :
 Microsoft 2005 SQL/OLAP ADOMD.NET 9.0 for
Analysis Services 2005
 Microsoft 2008 SQL/OLAP ADOMD.NET 10.0 for
Analysis Services 2008
 Microsoft 2012 SQL/OLAP ADOMD.NET 11.0 for
Analysis Services 2012
Windows 2008
R2/2012/2-12R2
SQL Express
Necto DB
Necto Software
Necto Server
Permissions
 Log on as an Administrator on the Necto Server
 Define a single user with Administration permissions
to:
 Necto Server
 SQL Server
 Analysis Server
SQL Customer
DB
Necto DB
Customer
Server
Windows 2008
R2/2012/2012R2
SQL Express
Necto DB
Necto Software
Necto Server
Analysis
Server
Ports
 Necto uses the following ports (should be opened)
 4444 – Website (user interface)
 2383 – Connection to Analysis Server
 9985, 9999, 9961 – Necto services
GIS Requirements
 If you are going to use the GIS mapping component
of Necto you will require open access to the internet
for the following sites
 Arcgis.com
 Acrgisonline.com
Installation Process
Necto Installation Files
 Necto Installation file: Necto_Setup_x.x.x.x.x.exe
 x.x.x.x.x represents the GA build of Necto 14
 Necto License file
Necto Installation Files
 Simple installation
 Single machine required
 Production Installation
 Multiple machines required
 The Installer must be run on each machine (Installer
and license file required on each machine)
Extract Installation Files
Double-click to extract
installation files
Extract Installation Files
Once Extraction has
occurred you may be asked
to restart you machine to
proceed
Restart the machine and
continue to installation by
executing
PanoramaNectoSuite.cmd
Installation Wizard Starts
Locate License File
Provide Installation Directory
Choose Installation Type
For the simple installation you will
get this prompt
Choose Installation Type
Clicking on either option will show
this prompt for the installer to
check for missing components,
before continuing
Once again you maybe asked
to restart the machine at this
point
Simple Installation
Define Account for Necto Services
Account (Active Directory
e.g. domainuser) should
have administrator rights
on:
• Necto Server
• SQL Server
• OLAP Server
Simple Installation
Production Installation
Define Account for Necto Services
Account should have
administrator rights on:
• Necto Server
• SQL Server
• OLAP Server
Install Other Necto servers first
Select ‘Other Necto Servers’, on the
machine that will eventually become
either the Necto Database and or the
Necto In-Memory engine machine
Production Installation Other Servers
Install Other Necto Application Server
Select ‘Necto Application Server’, on the
machine that will host Necto itself.
Install Other Necto Application Server
On the Application Server, specify where
to look for the Necto Databases
On the Application Server, specify
where to look for the Necto In-Memory
engine or an instance of SQL 2012
Tabular
The Necto installation will
check the information you
added is correct, and
prompt you if it is not.
Production Installation Application Server
Upgrade Installation
Extract Installation Files
Double-click to extract
installation files
Locate License File
Take a backup of the current Installation files
Installation Upgrade
Restart Server
Post Installation Configuration
IIS Post-Install Configuration
 In IIS, validate that Necto virtual directories and applications:
 Are set to use ASP.NET 3.5
 ASP.NET Impersonation is disabled
 Make sure that “Windows Authentication” is installed and
enabled
SQL Post-Install Configuration
 SQL must be set to Mixed Authentication mode
IE Security Configuration - for each Client
Station
 Disable IE Enhanced Security Configuration
 Add Panorama Website to Trusted Sites
Necto
Server
Web
Validating Installation
 Open Necto Web UI
 Connect to a Data source
 Create your first Workboard (Check the data for
validity)
Thank you
Any Questions?

22 - Panorama Necto 14 installation and upgrades - visualization & data discovery solution

  • 1.
    Necto Training Module 22:Necto Installation and Migration
  • 2.
    Objectives  By theend of this lesson you will be able to  Perform a Necto Installation  Perform a migration from NovaView to Necto
  • 3.
    Agenda  Server Architecture Prerequisites  Windows 2008/2012 configuration  Installation Process  Post Installation Configuration
  • 4.
  • 5.
    Before Necto Installation Analysis Server SQLCustomer DB Customer Server Necto Server Windows 2008 R2/2012/2012 R2 Usually already exists New server must be prepared for Necto
  • 6.
    Necto Simple Installation Windows2008 R2/2012/2012 R2 SQL 2012 Necto DB Necto Software Necto Server Necto In-Memory Engine Mainly for Demo or Test purposes everything is installed in a single server, you can use either In-Memory or OLAP Cubes Analysis Server
  • 7.
    Necto Production Installation– Using Customer’s SQL Server SQL Customer DB Windows 2008 R2/2012/2012 R2 Necto DB Necto Software Necto Server Customer Server Analysis Server
  • 8.
    SQL Necto Production Installationwhen UDC is Installed Windows 2008 R2/2012/2012 R2 Necto Software Necto Server Customer Server SQL Customer DB UDC Necto DB Necto Calculations Server/s Analysis Server Necto In- Memory Engine SQL UDC
  • 9.
  • 10.
    Analysis Server  MicrosoftSQL Server Analysis Services 2005,2008,2008R2,2012,2012R2 or 2014  Must be in same domain as Necto Server SQL Customer DB Necto DB Customer Server Analysis Server
  • 11.
    SQL Server  Nectocreates 4 databases  Necto installs SQL 2012 express SQL Customer DB Necto DB Customer Server Windows 2008 R2/2012/2012R2 SQL Express Necto DB Necto Software Necto Server Analysis Server  When using customer’s server:  Installer user should have permissions  Should be 2012 SP1 or higher
  • 12.
    Windows 2008 R2Components  NET Framework 3.5  Microsoft Core XML Services (MSXML) 4.0  Microsoft SQL Native Client  Microsoft SQL Client Components  Analysis Services connectivity driver :  Microsoft 2005 SQL/OLAP ADOMD.NET 9.0 for Analysis Services 2005  Microsoft 2008 SQL/OLAP ADOMD.NET 10.0 for Analysis Services 2008  Microsoft 2012 SQL/OLAP ADOMD.NET 11.0 for Analysis Services 2012 Windows 2008 R2/2012/2-12R2 SQL Express Necto DB Necto Software Necto Server
  • 13.
    Permissions  Log onas an Administrator on the Necto Server  Define a single user with Administration permissions to:  Necto Server  SQL Server  Analysis Server SQL Customer DB Necto DB Customer Server Windows 2008 R2/2012/2012R2 SQL Express Necto DB Necto Software Necto Server Analysis Server
  • 14.
    Ports  Necto usesthe following ports (should be opened)  4444 – Website (user interface)  2383 – Connection to Analysis Server  9985, 9999, 9961 – Necto services
  • 15.
    GIS Requirements  Ifyou are going to use the GIS mapping component of Necto you will require open access to the internet for the following sites  Arcgis.com  Acrgisonline.com
  • 16.
  • 17.
    Necto Installation Files Necto Installation file: Necto_Setup_x.x.x.x.x.exe  x.x.x.x.x represents the GA build of Necto 14  Necto License file
  • 18.
    Necto Installation Files Simple installation  Single machine required  Production Installation  Multiple machines required  The Installer must be run on each machine (Installer and license file required on each machine)
  • 19.
    Extract Installation Files Double-clickto extract installation files
  • 20.
    Extract Installation Files OnceExtraction has occurred you may be asked to restart you machine to proceed Restart the machine and continue to installation by executing PanoramaNectoSuite.cmd
  • 21.
  • 22.
  • 23.
  • 24.
    Choose Installation Type Forthe simple installation you will get this prompt
  • 25.
    Choose Installation Type Clickingon either option will show this prompt for the installer to check for missing components, before continuing Once again you maybe asked to restart the machine at this point
  • 26.
  • 27.
    Define Account forNecto Services Account (Active Directory e.g. domainuser) should have administrator rights on: • Necto Server • SQL Server • OLAP Server
  • 28.
  • 29.
  • 30.
    Define Account forNecto Services Account should have administrator rights on: • Necto Server • SQL Server • OLAP Server
  • 31.
    Install Other Nectoservers first Select ‘Other Necto Servers’, on the machine that will eventually become either the Necto Database and or the Necto In-Memory engine machine
  • 32.
  • 33.
    Install Other NectoApplication Server Select ‘Necto Application Server’, on the machine that will host Necto itself.
  • 34.
    Install Other NectoApplication Server On the Application Server, specify where to look for the Necto Databases On the Application Server, specify where to look for the Necto In-Memory engine or an instance of SQL 2012 Tabular The Necto installation will check the information you added is correct, and prompt you if it is not.
  • 35.
  • 36.
  • 37.
    Extract Installation Files Double-clickto extract installation files
  • 38.
  • 39.
    Take a backupof the current Installation files
  • 40.
  • 41.
  • 42.
  • 43.
    IIS Post-Install Configuration In IIS, validate that Necto virtual directories and applications:  Are set to use ASP.NET 3.5  ASP.NET Impersonation is disabled  Make sure that “Windows Authentication” is installed and enabled
  • 44.
    SQL Post-Install Configuration SQL must be set to Mixed Authentication mode
  • 45.
    IE Security Configuration- for each Client Station  Disable IE Enhanced Security Configuration  Add Panorama Website to Trusted Sites Necto Server Web
  • 46.
    Validating Installation  OpenNecto Web UI  Connect to a Data source  Create your first Workboard (Check the data for validity)
  • 47.

Editor's Notes

  • #2 1
  • #8 Optional configuration – customers may prefer to use their own SQL server for ease of maintenance and backup
  • #9 Using UDC (Universal Data Connector) involves heavy calculations. It is therefore recommended that the Necto database and analytics be performed and stored on a separate server. You can host the Necto In-Memory Engine on the same server as the Necto DB’s or separate
  • #11 Microsoft Analysis Services 2005, 2008/2008R2 and 2012 SP1 are supported by Necto Analysis Services 2000 is not supported OLAP must be in same domain as Necto server.
  • #12 During the installation, Panorama creates 4 databases (their number depends on number of components installed) on the SQL server. SQL can be either on same machine with Panorama or a remote server. When the intended SQL is located on a remote server, make sure that the user that runs the installation has sufficient permissions to create the databases on remote SQL server. Starting from version 14, Panorama will only work with SQL 2012 SP1 or higher (as SQL repositories for the internal databases. This does not relate to the datasource, i.e., the OLAP cubes). Note: SQL Server AS 2000 will no longer work.
  • #13 NET Framework 3.5 Microsoft Core XML Services (MSXML) 6.0 or 4.0 Microsoft SQL Native Client Microsoft SQL Client Components When Analysis Services server is remote to the Panorama server, the relevant connectivity driver must be installed: Microsoft 2005 SQL/OLAP ADOMD.NET 9.0 for Analysis Services 2005 Microsoft 2008 SQL/OLAP ADOMD.NET 10.0 for Analysis Services 2008 Microsoft 2012 SQL/OLAP ADOMD.NET 11.0 for Analysis Services 2012
  • #14 You must be logged in as an administrator on the Necto Server when performing the installation. Panorama will require a user that is running the Necto services. Prior to the installation, please make sure that you have credentials of a single user which meet these demands: An administrator on the Necto machine (My Computer -> Manage -> Local User and Groups -> Groups -> Administrators; add the user to this group). An administrator on the SQL server (Verify this by going to SQL Server Management -> Security -> Server Roles -> examine the membership of the sysadmin role). An administrator on the OLAP server (Verify this by going to SQL Server Management -> Right-click on the server name -> Properties -> Security -> Add the user to the list of users).
  • #15 Ports that should be opened: Port 4444 - for Panorama website (this is default by installation, but can be changed, though not recommended). Make sure port 4444 is not blocked by firewall or third-party software; if you are unable to open this port, please consult Panorama Knowledgebase for information about changing the port. Port 2383 for connection to Analysis Services Ports 9985, 9999, 9961 for Panorama services. Port checking can be done using this link: http://www.wfu.edu/~borwicjh/howto/port-test.htm
  • #16 Arc GIS open access is required so that you can access the mapping information database, polygons and the maps themselves. This includes opening access through proxy gateways etc.
  • #18 Before you begin the installation, make sure you have: The archive containing the Necto installation files A license file provided by Panorama support.
  • #20 As with all files imported from the internet the files security level will be set to high, to reduce this, right click on the file and select properties, then click the ‘Unblock’ button and then ‘Ok’, this will allow you to run the program without security prompts.
  • #22 You may be asked to disable the Windows Update service, which you must do to continue the installation Make sure you agree to the license terms if not stop the installation.
  • #32 You should be running this installation on the Database machine and or Necto In-Memory machine at this point as this is a production installation we require that separate machines are used to split the workload.
  • #35 Point to the server instance you installed the Necto DB’s upon, alternatively you can install the Necto DB’s on the Application Server using SQL Express by marking the check box For the In-Memory engine point to the Server instance you installed the In-Memory engine upon or point to an SQL 2012 SP1 Tabular model instance. If you are not using the In-Memory modeling leave this item (Necto In-Memory Engine Server) blank.
  • #38 As with all files imported from the internet the files security level will be set to high, to reduce this, right click on the file and select properties, then click the ‘Unblock’ button and then ‘Ok’, this will allow you to run the program without security prompts.
  • #39 The installer knows where your current license file is if it’s ok then use that, but you need a new one to upgrade from Necto x.x to Necto 14.1, if so locate this in your machine
  • #40 We take a backup of the current files just incase you need to reference anything or recover later
  • #43 Do the actions described in this section after you have restarted the server.
  • #44 Make sure all Panorama virtual directories in the IIS are set to use ASP.NET 3.5 Disable the ASP impersonation a. Open IIS. b. On the Default Web Site, select “Authentication”: c. Disable the ASP impersonation: Make sure it is disabled for all Panorama Virtual Directories and Applications. Make sure the “Windows Authentication” is installed and enabled
  • #45 SQL must be set to Mixed Authentication mode
  • #48 47