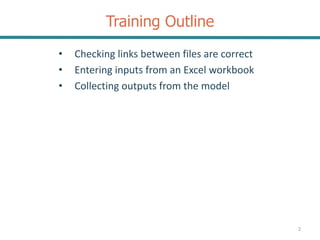
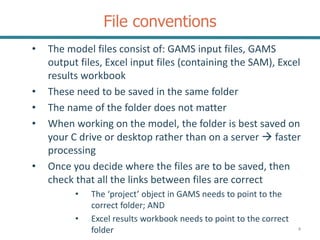
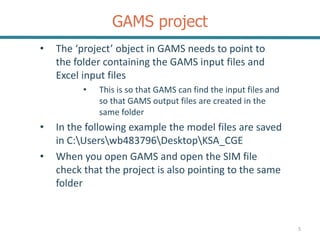
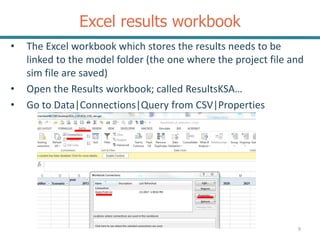
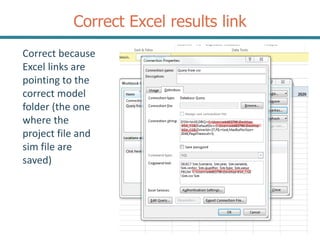
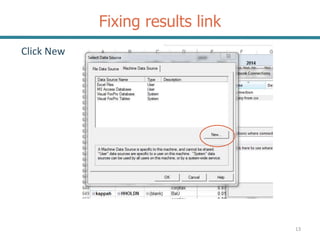
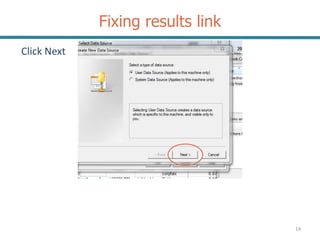
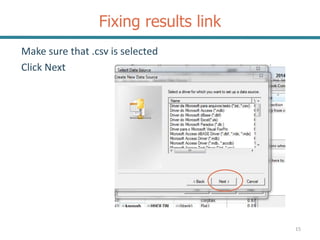
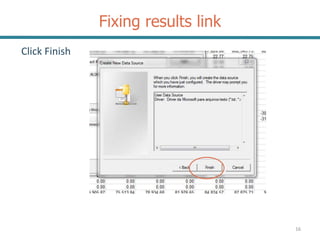
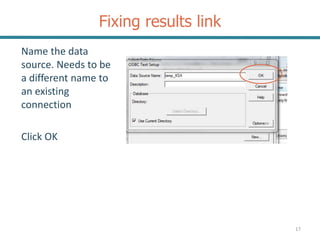
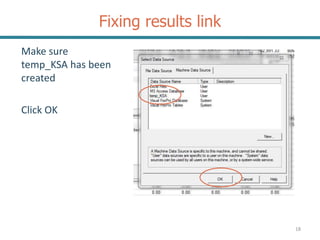
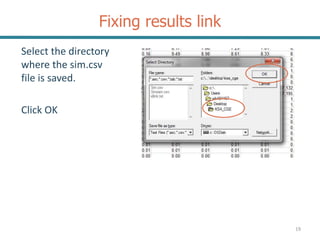
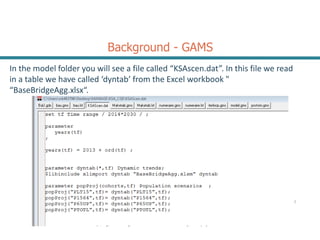
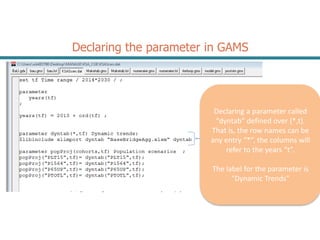
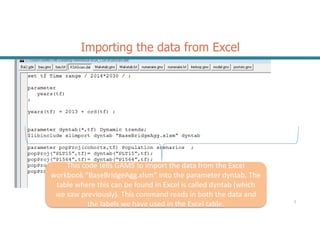
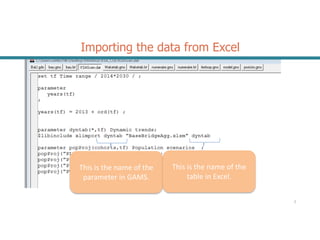
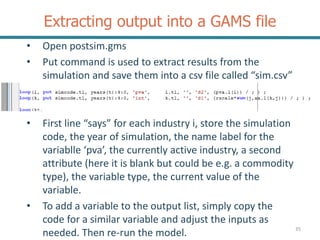
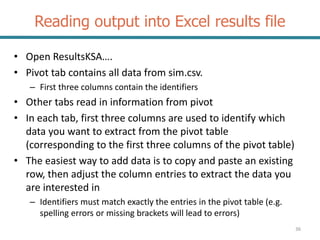
2: Recap of February training –
GAMS work
a
Training Outline
• Checking links between files are correct
• Entering inputs from an Excel workbook
• Collecting outputs from the model
2
Checking links between model
files
File conventions
• The model files consist of: GAMS input files, GAMS
output files, Excel input files (containing the SAM), Excel
results workbook
• These need to be saved in the same folder
• The name of the folder does not matter
• When working on the model, the folder is best saved on
your C drive or desktop rather than on a server  faster
processing
• Once you decide where the files are to be saved, then
check that all the links between files are correct
• The ‘project’ object in GAMS needs to point to the
correct folder; AND
• Excel results workbook needs to point to the correct
folder 4
GAMS project
• The ‘project’ object in GAMS needs to point to
the folder containing the GAMS input files and
Excel input files
• This is so that GAMS can find the input files and
so that GAMS output files are created in the
same folder
• In the following example the model files are saved
in C:Userswb483796DesktopKSA_CGE
• When you open GAMS and open the SIM file
check that the project is also pointing to the same
folder
5
Correct GAMS project setup
6
• Path of the project has to be the same as the
path of the SIM file
• This setup is correct because both SIM_train.gms
(sim file ) and KSA_CGE_Jan.gpr (project file) are
in the same folder
• You can freely name the .gpr file and the sim file
Fixing GAMS project setup
7
• If your setup is not correct, then you will need to choose
the correct project from a list of existing projects OR create
a new project
• To see the list of existing projects go to File|Project
• Then click on the project file which has the same path as
your sim file
Fixing GAMS project setup
8
• To create a new project go to File|Project|New Project
• Then create a new project file in the model folder (the
folder where your sim file is saved)
Excel results workbook
• The Excel workbook which stores the results needs to be
linked to the model folder (the one where the project file and
sim file are saved)
• Open the Results workbook; called ResultsKSA…
• Go to Data|Connections|Query from CSV|Properties
9
Correct Excel results link
10
Correct because
Excel links are
pointing to the
correct model
folder (the one
where the
project file and
sim file are
saved)
Fixing results link
11
If they are not
correct, then:
• go to windows
explorer, find
the model
folder
• Copy the path
• Paste into the
three
highlighted
spots (shown in
previous slide)
• Click OK
Fixing results link
12
Some of you may see the following error once you click
OK. If so, then follow the instructions in the following
slides
Fixing results link
13
Click New
Fixing results link
14
Click Next
Fixing results link
15
Make sure that .csv is selected
Click Next
Fixing results link
16
Click Finish
Fixing results link
17
Name the data
source. Needs to be
a different name to
an existing
connection
Click OK
Fixing results link
18
Make sure
temp_KSA has been
created
Click OK
Fixing results link
19
Select the directory
where the sim.csv
file is saved.
Click OK
Entering inputs from Excel
Overview
This set of slides gives a guide on how you can read in data from Excel into
GAMS. This is a good way of entering in the value of exogenous variables or
parameters which change from year to year.
In class we need to set values for the direct tax adjustment factor (DIRTXADJ),
to help us set up the corporate income tax shock correctly. We will use this as
an example for how to read in data into Excel
2
Background – Excel Workbook
In the model folder you will see an Excel workbook called
“BaseBridgeAgg.xlsx“. Go to the Dynamic tab.
2
Background
2
This table is read into GAMS.
2
I have named this table dyntab in Excel.
Background - GAMS
In the model folder you will see a file called “KSAscen.dat”. In this file we read
in a table we have called ‘dyntab’ from the Excel workbook "
“BaseBridgeAgg.xlsx“.
2
Declaring the parameter in GAMS
2
Declaring a parameter called
“dyntab” defined over (*,t).
That is, the row names can be
any entry “*”, the columns will
refer to the years “t”.
The label for the parameter is
“Dynamic Trends”
Importing the data from Excel
2
This code tells GAMS to import the data from the Excel
workbook “BaseBridgeAgg.xlsm” into the parameter dyntab. The
table where this can be found in Excel is called dyntab (which
we saw previously). This command reads in both the data and
the labels we have used in the Excel table.
2
This is the name of the
parameter in GAMS.
This is the name of the
table in Excel.
Importing the data from Excel
Using the data that has been read in
2
Now we can call the data by
using the “dyntab” parameter
and use it in the GAMS code.
Here we are calling the growth
population by calling the
entries for each cohort, for
each year t
Background
2
We are calling this row
Adding new variables
1. Go to “BaseBridgeAgg.xlsx“, in the dynamic tab
2. In the Dyntab table, insert a new row
3. Enter the name of the variable in column B, for this example we will name it
“DIRTXADJ_B” to refer to the direct tax adjustment factor in the baseline
4. Copy these values into the newly created row in dyntab
5. Save the “BaseBridgeAgg.xlsx“, workbook, so GAMS can read in the most recent
version of this workbook
2
2
We just created this row
Using the new series in the GAMS code
Now we can use the data series in our GAMS code
2
Using the newly added series in
our scenario
Extracting output from a
simulation
Extracting output into a GAMS file
• Open postsim.gms
• Put command is used to extract results from the
simulation and save them into a csv file called “sim.csv”
• First line “says” for each industry i, store the simulation
code, the year of simulation, the name label for the
variablle ‘pva’, the currently active industry, a second
attribute (here it is blank but could be e.g. a commodity
type), the variable type, the current value of the
variable.
• To add a variable to the output list, simply copy the
code for a similar variable and adjust the inputs as
needed. Then re-run the model. 35
Reading output into Excel results file
• Open ResultsKSA….
• Pivot tab contains all data from sim.csv.
– First three columns contain the identifiers
• Other tabs read in information from pivot
• In each tab, first three columns are used to identify which
data you want to extract from the pivot table
(corresponding to the first three columns of the pivot table)
• The easiest way to add data is to copy and paste an existing
row, then adjust the column entries to extract the data you
are interested in
– Identifiers must match exactly the entries in the pivot table (e.g.
spelling errors or missing brackets will lead to errors)
36
Pivot tab
37
Highlighted row
shows the average
wage (avgwage)
for unskilled
labour (UnSkLab)
in the levy
scenario
Other tabs
38
Identifiers must
match those used
in the pivot table

2. Recap - GAMS.pptx

  • 1.
    2: Recap ofFebruary training – GAMS work a
  • 2.
    Training Outline • Checkinglinks between files are correct • Entering inputs from an Excel workbook • Collecting outputs from the model 2
  • 3.
  • 4.
    File conventions • Themodel files consist of: GAMS input files, GAMS output files, Excel input files (containing the SAM), Excel results workbook • These need to be saved in the same folder • The name of the folder does not matter • When working on the model, the folder is best saved on your C drive or desktop rather than on a server  faster processing • Once you decide where the files are to be saved, then check that all the links between files are correct • The ‘project’ object in GAMS needs to point to the correct folder; AND • Excel results workbook needs to point to the correct folder 4
  • 5.
    GAMS project • The‘project’ object in GAMS needs to point to the folder containing the GAMS input files and Excel input files • This is so that GAMS can find the input files and so that GAMS output files are created in the same folder • In the following example the model files are saved in C:Userswb483796DesktopKSA_CGE • When you open GAMS and open the SIM file check that the project is also pointing to the same folder 5
  • 6.
    Correct GAMS projectsetup 6 • Path of the project has to be the same as the path of the SIM file • This setup is correct because both SIM_train.gms (sim file ) and KSA_CGE_Jan.gpr (project file) are in the same folder • You can freely name the .gpr file and the sim file
  • 7.
    Fixing GAMS projectsetup 7 • If your setup is not correct, then you will need to choose the correct project from a list of existing projects OR create a new project • To see the list of existing projects go to File|Project • Then click on the project file which has the same path as your sim file
  • 8.
    Fixing GAMS projectsetup 8 • To create a new project go to File|Project|New Project • Then create a new project file in the model folder (the folder where your sim file is saved)
  • 9.
    Excel results workbook •The Excel workbook which stores the results needs to be linked to the model folder (the one where the project file and sim file are saved) • Open the Results workbook; called ResultsKSA… • Go to Data|Connections|Query from CSV|Properties 9
  • 10.
    Correct Excel resultslink 10 Correct because Excel links are pointing to the correct model folder (the one where the project file and sim file are saved)
  • 11.
    Fixing results link 11 Ifthey are not correct, then: • go to windows explorer, find the model folder • Copy the path • Paste into the three highlighted spots (shown in previous slide) • Click OK
  • 12.
    Fixing results link 12 Someof you may see the following error once you click OK. If so, then follow the instructions in the following slides
  • 13.
  • 14.
  • 15.
    Fixing results link 15 Makesure that .csv is selected Click Next
  • 16.
  • 17.
    Fixing results link 17 Namethe data source. Needs to be a different name to an existing connection Click OK
  • 18.
    Fixing results link 18 Makesure temp_KSA has been created Click OK
  • 19.
    Fixing results link 19 Selectthe directory where the sim.csv file is saved. Click OK
  • 20.
  • 21.
    Overview This set ofslides gives a guide on how you can read in data from Excel into GAMS. This is a good way of entering in the value of exogenous variables or parameters which change from year to year. In class we need to set values for the direct tax adjustment factor (DIRTXADJ), to help us set up the corporate income tax shock correctly. We will use this as an example for how to read in data into Excel 2
  • 22.
    Background – ExcelWorkbook In the model folder you will see an Excel workbook called “BaseBridgeAgg.xlsx“. Go to the Dynamic tab. 2
  • 23.
  • 24.
    2 I have namedthis table dyntab in Excel.
  • 25.
    Background - GAMS Inthe model folder you will see a file called “KSAscen.dat”. In this file we read in a table we have called ‘dyntab’ from the Excel workbook " “BaseBridgeAgg.xlsx“. 2
  • 26.
    Declaring the parameterin GAMS 2 Declaring a parameter called “dyntab” defined over (*,t). That is, the row names can be any entry “*”, the columns will refer to the years “t”. The label for the parameter is “Dynamic Trends”
  • 27.
    Importing the datafrom Excel 2 This code tells GAMS to import the data from the Excel workbook “BaseBridgeAgg.xlsm” into the parameter dyntab. The table where this can be found in Excel is called dyntab (which we saw previously). This command reads in both the data and the labels we have used in the Excel table.
  • 28.
    2 This is thename of the parameter in GAMS. This is the name of the table in Excel. Importing the data from Excel
  • 29.
    Using the datathat has been read in 2 Now we can call the data by using the “dyntab” parameter and use it in the GAMS code. Here we are calling the growth population by calling the entries for each cohort, for each year t
  • 30.
  • 31.
    Adding new variables 1.Go to “BaseBridgeAgg.xlsx“, in the dynamic tab 2. In the Dyntab table, insert a new row 3. Enter the name of the variable in column B, for this example we will name it “DIRTXADJ_B” to refer to the direct tax adjustment factor in the baseline 4. Copy these values into the newly created row in dyntab 5. Save the “BaseBridgeAgg.xlsx“, workbook, so GAMS can read in the most recent version of this workbook 2
  • 32.
  • 33.
    Using the newseries in the GAMS code Now we can use the data series in our GAMS code 2 Using the newly added series in our scenario
  • 34.
  • 35.
    Extracting output intoa GAMS file • Open postsim.gms • Put command is used to extract results from the simulation and save them into a csv file called “sim.csv” • First line “says” for each industry i, store the simulation code, the year of simulation, the name label for the variablle ‘pva’, the currently active industry, a second attribute (here it is blank but could be e.g. a commodity type), the variable type, the current value of the variable. • To add a variable to the output list, simply copy the code for a similar variable and adjust the inputs as needed. Then re-run the model. 35
  • 36.
    Reading output intoExcel results file • Open ResultsKSA…. • Pivot tab contains all data from sim.csv. – First three columns contain the identifiers • Other tabs read in information from pivot • In each tab, first three columns are used to identify which data you want to extract from the pivot table (corresponding to the first three columns of the pivot table) • The easiest way to add data is to copy and paste an existing row, then adjust the column entries to extract the data you are interested in – Identifiers must match exactly the entries in the pivot table (e.g. spelling errors or missing brackets will lead to errors) 36
  • 37.
    Pivot tab 37 Highlighted row showsthe average wage (avgwage) for unskilled labour (UnSkLab) in the levy scenario
  • 38.
    Other tabs 38 Identifiers must matchthose used in the pivot table