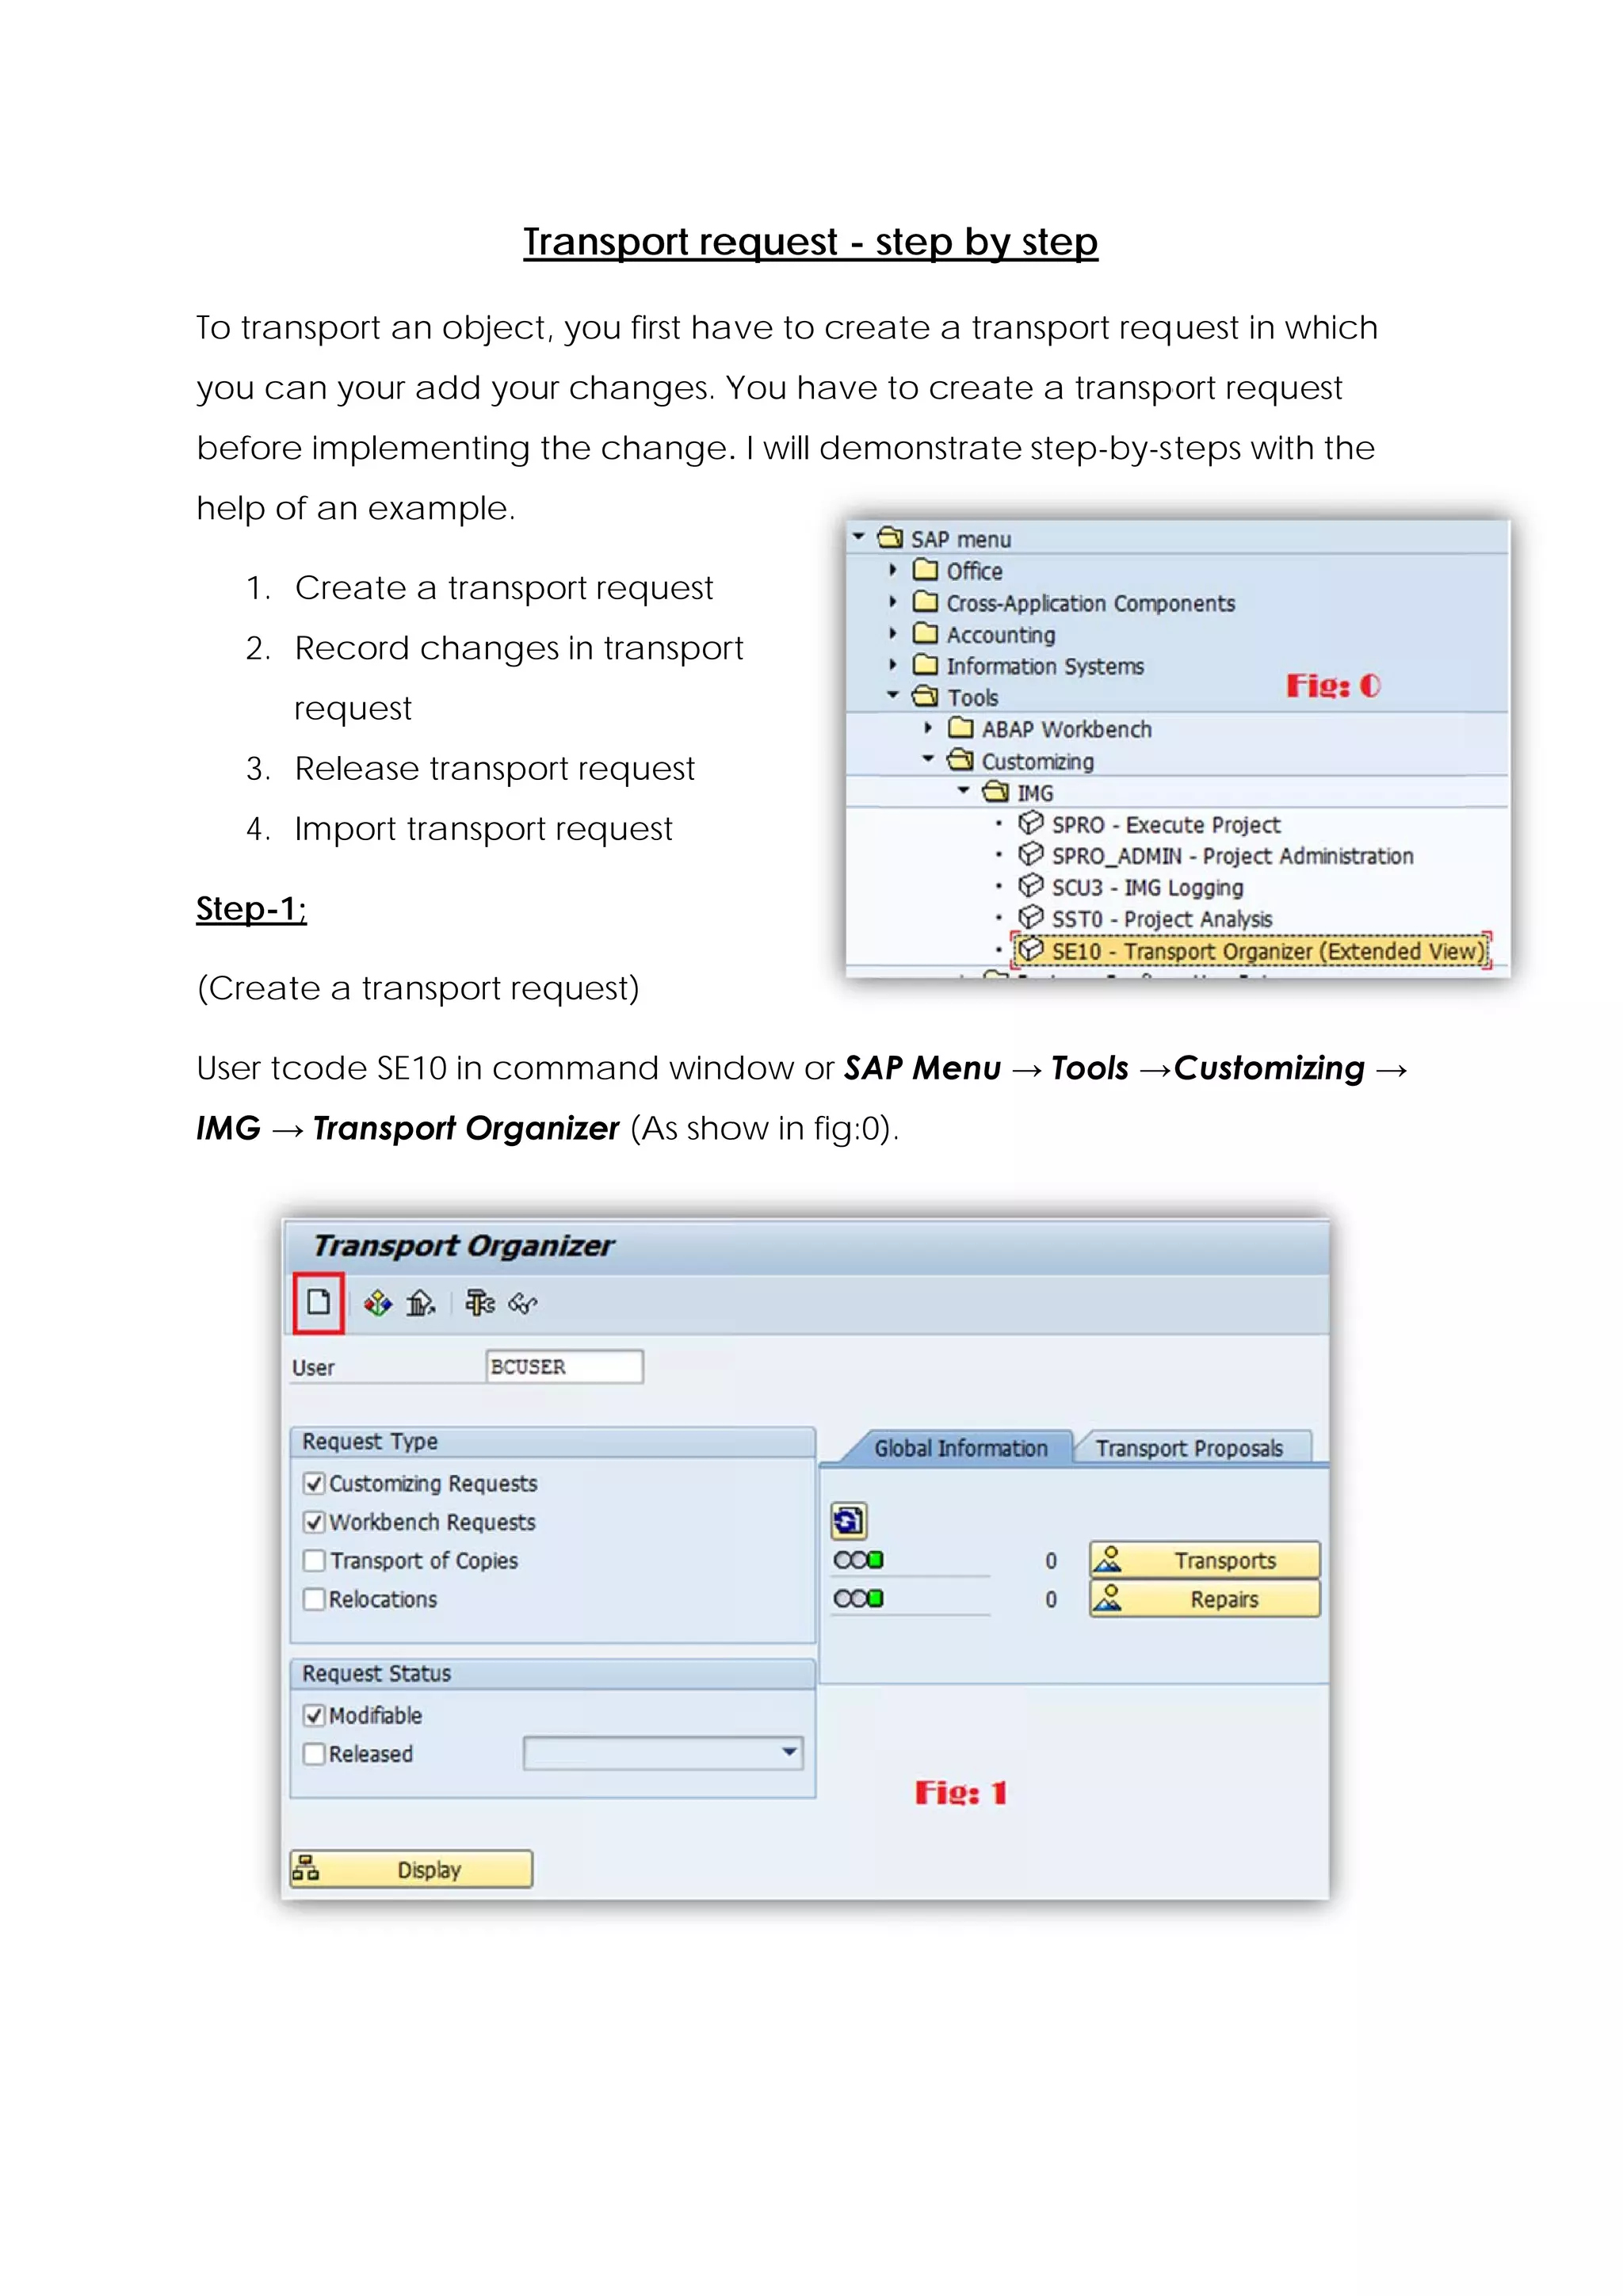
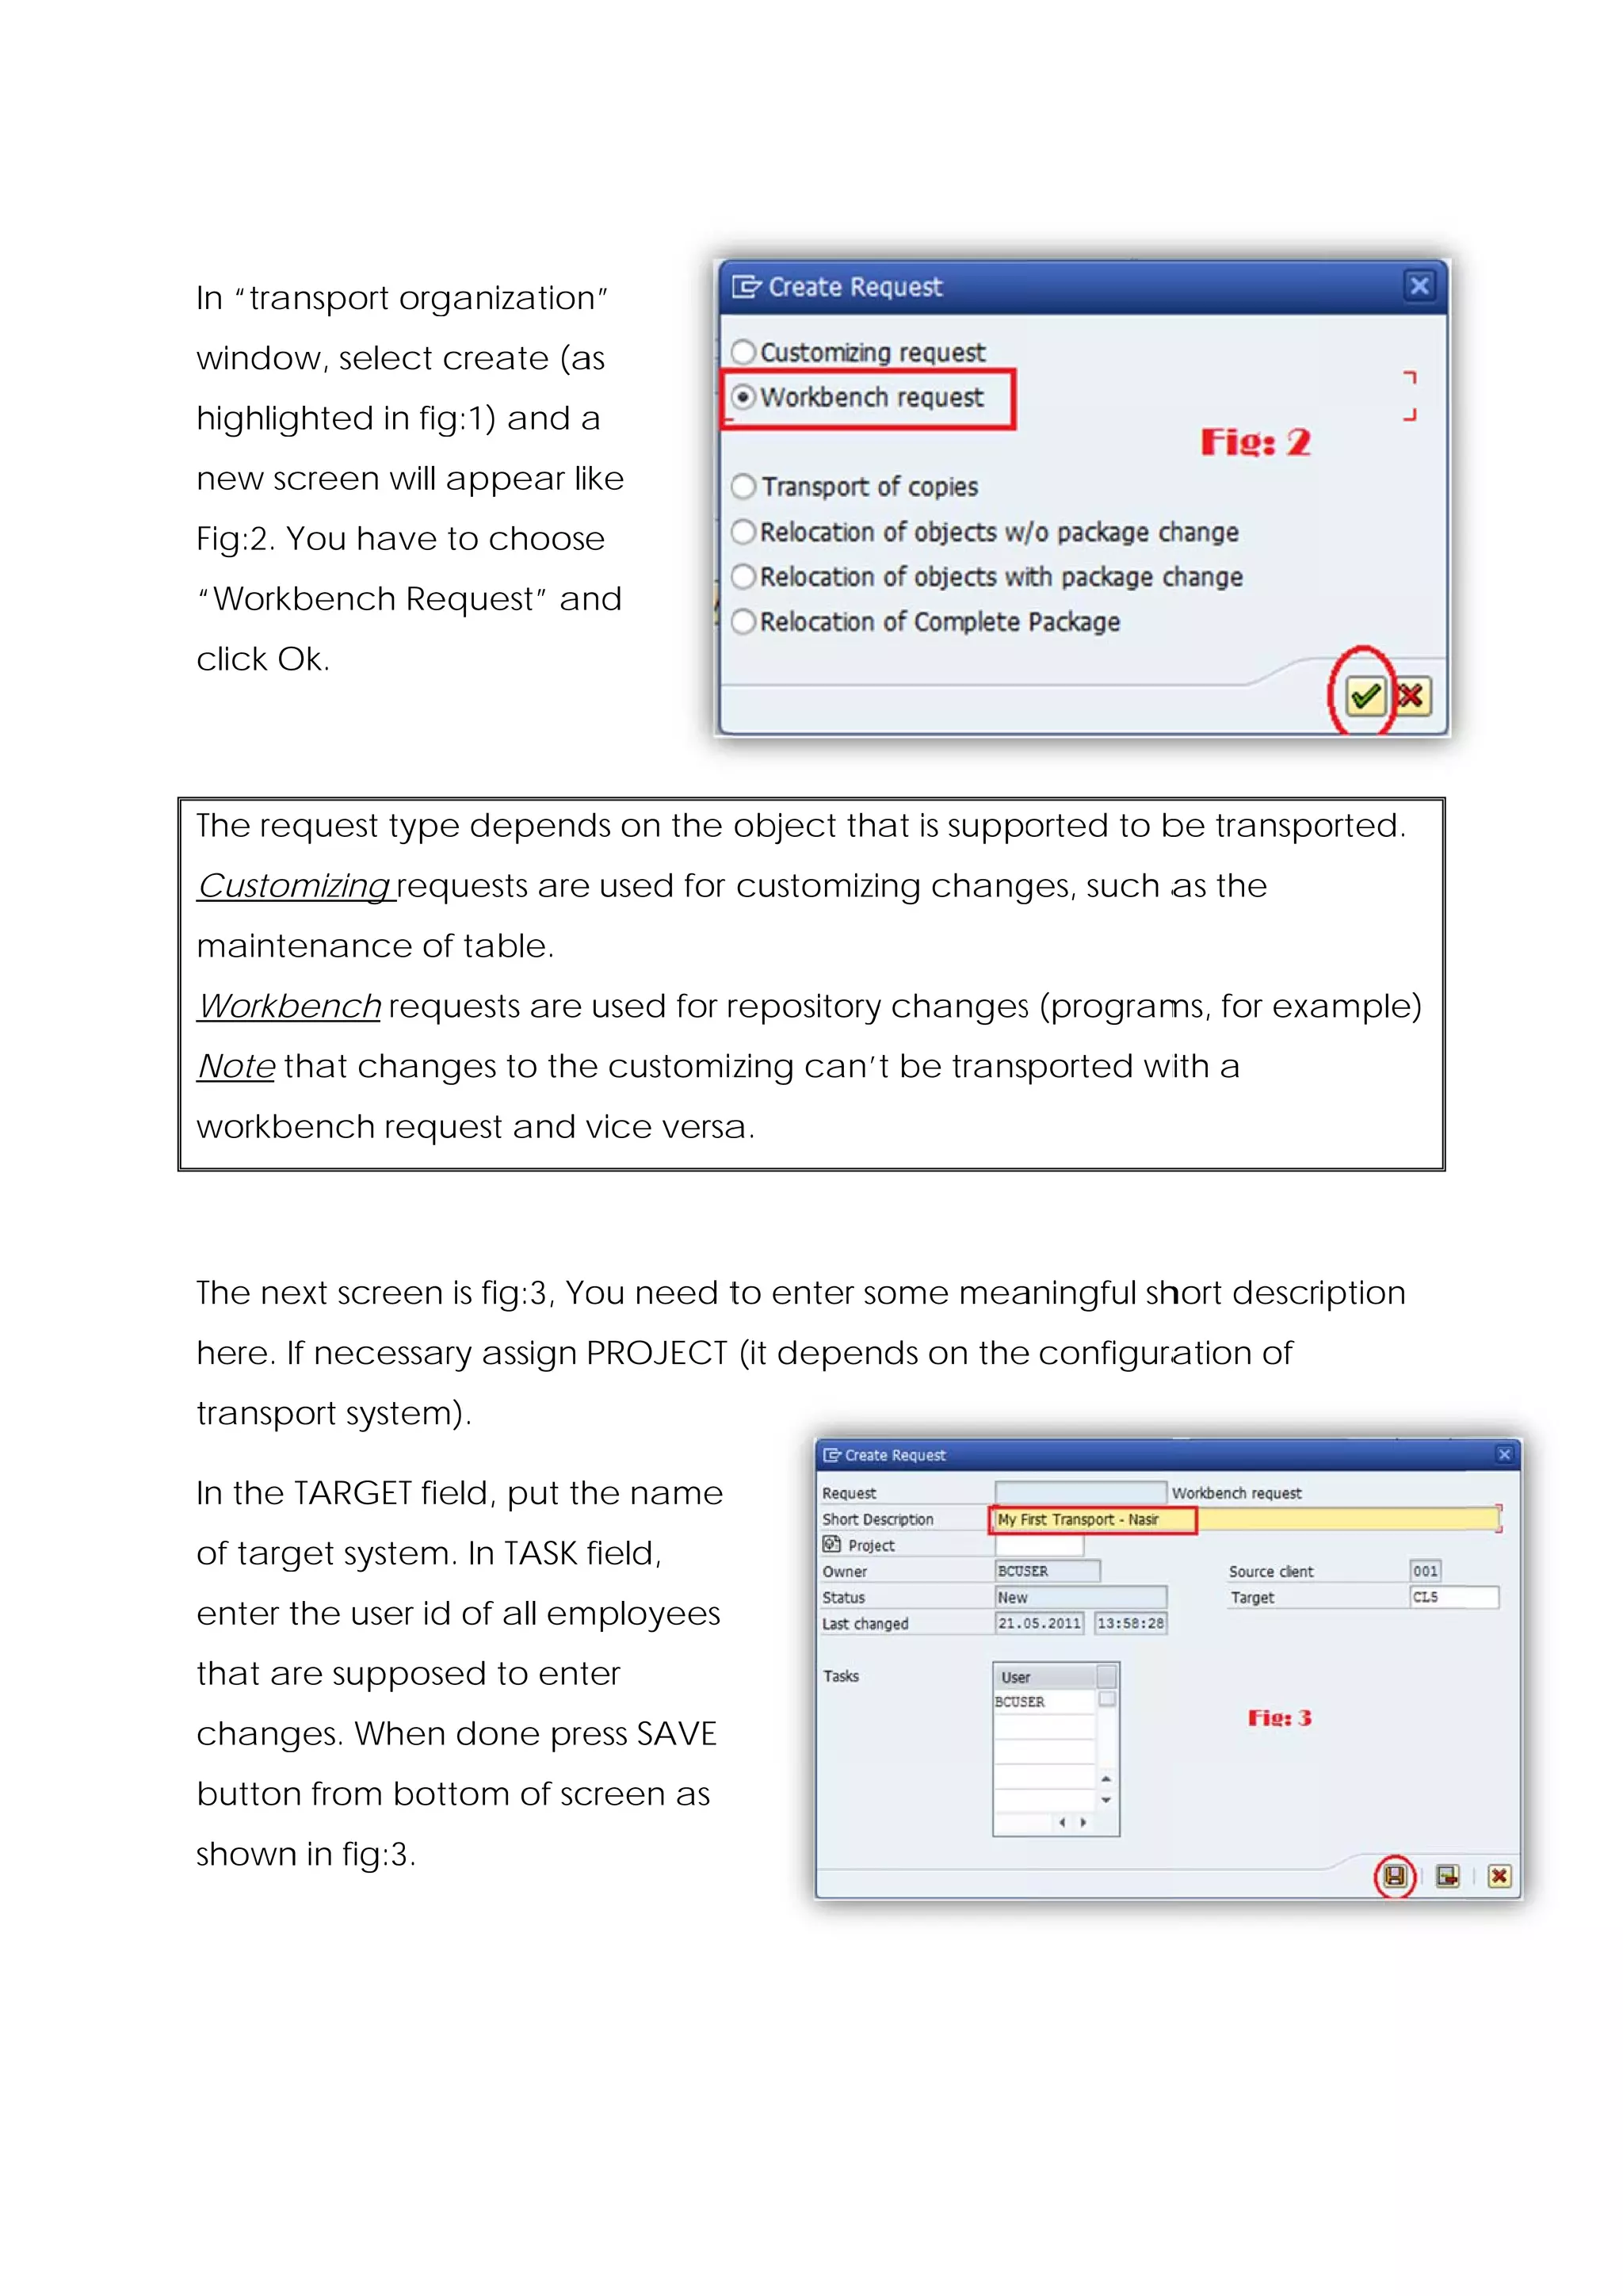
Tran
                        nsport re
                                equest - step by step
                                         s       s

To tran
      nsport an object, yo first ha ve to crea a tran
                         ou                  ate    nsport req uest in wh
                                                                        hich
you ca your ad your changes. Y
     an      dd     c        You have to create a transp
                                              e        port request
before impleme
     e       enting the change. I will dem
                      e       .          monstrate step-by-s teps with the
help o an exam
     of      mple.

   1. Create a transport request
                       t
   2. Record changes in transpor
                      n        rt
      request
   3. Release transport request
                        r
   4. Import tra
               ansport request

Step-1;

(Creat a transport reque
     te                est)

User tc
      code SE10 in comm
              0       mand wind
                              dow or SA Menu → Tools → Customizi
                                      AP                       ing →
IMG → Transpor Organiz (As sho in fig:0).
             rt      zer     ow
In “transport org
                ganization
                         n”
window, select create (a
                       as
highlig
      ghted in fig and a
                 g:1)
new sc
     creen will appear like
Fig:2. Y
       You have to choose
“Workbench Re
            equest” an
                     nd
click O
      Ok.


      quest type depend on the object tha is supported to b transpo
The req               ds                at                be      orted.
Custom
     mizing req
              quests are used for customizing chang
                       e                          ges, such a the
                                                            as
mainte
     enance o table.
            of
Workb
    bench req
            quests are used for r
                                repository changes (program for exa
                                         y       s        ms,     ample)
Note t
     that changes to the customiz
                       e        zing can’t be transported wiith a
workbench request and vice versa
                               a.


The ne screen is fig:3, You need t enter so
     ext    n                    to       ome mea
                                                aningful sh
                                                          hort description
here. If necessa assign PROJECT (it depen on the configura
               ary                      nds    e         ation of
transp
     port system
               m).

In the TARGET field, put th name
                          he
of targ system In TASK field,
      get    m.
enter t
      the user id of all em
                d         mployees
that are suppos
              sed to ent
                       ter
chang
    ges. When done pre SAVE
            n        ess
button from bot
     n        ttom of sc
                       creen as
shown in fig:3.
    n
On the compila
     e       ation of sa
                       ave
fig:4 w appear This is a
      will   r.
summa of cha
    ary    ange
reques System will
     st.    m
autom
    matically g
              generate a
numbe for this change
    er
reques The composition of
     st.             n
numbe is <Syste
    er        em-id>K9
                     9<number
                            r>
Now y
    you have s
             successfully create
                               ed
transp
     port request.


Step-2 (Record changes in transp
     2:      d       s         port reque
                                        est)

In this s
        step you w add changed o
                 will  c       objects (w
                                        which you want to t
                                                          transport) into
“chan       est”. I my case I will use SM30 to bring “Maintain Table vie
    nge reque          c                             “       n         ew” as
shown in fig:5
    n


                                                 Put table na
                                                   t        ame PRGN
                                                                   N_CUST
                                                 and press MA
                                                   d        AINTAIN button
                                                                    b
                                                 from the bot
                                                    m       ttom of sc
                                                                     creen
                                                 as shown in f
                                                    s        fig:5


A caution will appear, sim
                         mply
ackno
    owledge a
            and proce
                    eed to nex
                             xt
screen (Fig:6)
     n
Press N
      NEW ENTRIES button it will en
                       n,         nable the typing on same scr
                                                    n        reen (as shown
in fig:7 Type fie name CUA_PAR
       7).      eld          RAMETER_
                                    _CHECK and put va “I” as shown
                                                    ale      s
in fig:7
       7


When you done press SA butto n from top menu. This will tak you to next
            e,       AVE              p       T           ke
dialog as shown in fig:8, put
     g        n           p
your re
      equest number
NSPK900002 or b
              browse by
                      y
pressin given b
      ng      button.


In my c
      case I am browsing and it
              m        g
will tak you to next scree (fig:9)
       ke                en

Move your curso to desir
              or       re
chang request number (as show
    ge
in fig:9 and pre green tick. You
       9)      ess     t
will ba again to fig:8 as show in
      ack               s
fig:8A. Press gre
      .         een tick to
                          o
complete the SA
              AVE process. On
successful save message will
                      e
appea as show below.
    ar      wn
This is e
        end of ste
                 ep-2; this
means that you have
    s        u
added change into
    d      es
     port request.
transp


Step-3 (Release transpor request)
     3:       e        rt       )

This is t                  nsport req uest beca
        time to release tran                  ause you have add
                                                              ded/recor
                                                                      rded
our ch
     hanges in “change request”. Type SE10 in comm
                               .                 mand win
                                                        ndow and same
screen like fig:1 will appe but he I am gi
     n                    ear    ere     iving sequ
                                                  uence # 1 0 so it’s fig
                                                                        g:10.

Type u
     username, tick
reques status M
     st       MODIFIABL
                      LE
and press DISPLAY button
                       n
as illustrated in f
                  fig:10.


The ne screen is
     ext    n
fig:11. Move your
course on chan
     er      nge
object and pres
     t        ss
RELEAS
     SE      button from
the too bar as s
      ol       shown
in fig:11

.

Status bar will sh
                 how relea
                         ase
messa
    age
Refresh the scre
               een and move you cursor to change request nu
                       m                         r        umber
NSPK900002, ag
             gain press RELEASE b
                                button as shown in fig:12.


On the successf release you will r
     e        ful     e          receive re
                                          elease sum
                                                   mmary as show in fi
                                                                     ig:13.
This is e
        end of change req
                        quest relea proce (Note: fig: 13 an onward pics
                                  ase   ess.              nd     d
are no from my system so that’s w there will be dif
     ot      y                  why               fferent pa
                                                           arameter)
Possible return c
                code:
0 : Suc
      ccessfully c
                 complete
                        ed
4 : End
      ded with w
               warning
8 : End
      ded with e
               errors
12 or h
      higher: Tra
                ansport ha not bee execut
                         as      en     ted
Import
     tant:
Transp
     port reque consist of two file 1) control file an 2) data file
              est                 es,                nd      a
The loccation of control file is <path
                                     h>usrsap
                                              ptrans
                                                      cofiles an remem
                                                                nd    mber
this sta with K
       arts
The loc
      cation of data file <path>u
                          <      usrsaptransdata
                                                  a


REMEM
    MBER: You can also use SE01 for exten
            u        o                  nded view of Transp
                                                w         port Organizer


Step-4 (Import transport request)
     4:

After the release the targ system IMPOR QUEUE will be au
                e,       get    m’s   RT               utomatica
                                                               ally
updat
    ted. You h
             have to logon to ta rget syste and type STMS in comma
                                          em               n     and
window. Transport Management S
                             System’s (T
                                       TMS) main screen w appea as
                                               n        will  ar
shown in fig:14.
    n


Press the IMPOR VERVIEW
              RT      W
     ton as hig
  butt        ghlighted in
                        i
fig:14. This will ta you to
                   ake    o
the ne screen fig:15
     ext
Move your curso to target system and pres DISPLAY IMPORT Q
              or                        ss      Y        QUEUE bu
                                                                utton
as high
      hlighted in fig:15. (M system don’t ha any im
                n          My     m        ave    mport requ
                                                           uest that’s way
“Requ
    uest” colum is emp
              mn     pty)

By pre
     essing DISP
               PLAY IMPO QUEUE system will display a list of “import
                       ORT   E,
reques as show in Fig:16
     st”     wn


Move your curso to the
              or
desired request number and
      d                a
       MPORT RE
press IM      EQUEST
button as shown in fig:16.
     n        n
This will take you to the next
                 u
screen (fig:17); on this
     n
screen you can schedule
     n       n        e
the import request run tim
                         me
and ca chang target
     an    ge
client number. A
               After mak
                       king
desired change press gr
      d      es       reen
tick.
May b system ask you to put user
    be                o        rname an passwo again. Your nex
                                      nd     ord    .        xt
screen (fig:18) w show that transp
     n          will             port imports is starte (Status column is
                                                      ed.     s
showin truck).
     ng


The be
     elow given is last ste in impo of tran
              n           ep      ort     nsport requ
                                                    uest. Look into scre
                                                             k         een
(fig:19), status is ticked as green of some import and yellow dia
                            s        f                          amond fo
                                                                       or
some r
     requests.
The return codes are Green tick or green block – this means all good;
Yellow diamond means – warnings and
Red dot means – error
Note Few screen are collected from internet, just to demonstrate the process.


REFERENCES:


http://help.sap.com/saphelp_sm40/helpdata/en/b5/90cd3a21873650e10000
000a11402f/content.htm


http://basissap.blogspot.com/2008/05/how-many-types-of-transport-
requests.html


http://help.sap.com/saphelp_nw70/helpdata/en/46/01f7f945e27042e100000
00a155369/frameset.htm

SAP Transport System; Step-by-step guide from concept to practical

  • 1.
    Tran nsport re equest - step by step s s To tran nsport an object, yo first ha ve to crea a tran ou ate nsport req uest in wh hich you ca your ad your changes. Y an dd c You have to create a transp e port request before impleme e enting the change. I will dem e . monstrate step-by-s teps with the help o an exam of mple. 1. Create a transport request t 2. Record changes in transpor n rt request 3. Release transport request r 4. Import tra ansport request Step-1; (Creat a transport reque te est) User tc code SE10 in comm 0 mand wind dow or SA Menu → Tools → Customizi AP ing → IMG → Transpor Organiz (As sho in fig:0). rt zer ow
  • 2.
    In “transport org ganization n” window, select create (a as highlig ghted in fig and a g:1) new sc creen will appear like Fig:2. Y You have to choose “Workbench Re equest” an nd click O Ok. quest type depend on the object tha is supported to b transpo The req ds at be orted. Custom mizing req quests are used for customizing chang e ges, such a the as mainte enance o table. of Workb bench req quests are used for r repository changes (program for exa y s ms, ample) Note t that changes to the customiz e zing can’t be transported wiith a workbench request and vice versa a. The ne screen is fig:3, You need t enter so ext n to ome mea aningful sh hort description here. If necessa assign PROJECT (it depen on the configura ary nds e ation of transp port system m). In the TARGET field, put th name he of targ system In TASK field, get m. enter t the user id of all em d mployees that are suppos sed to ent ter chang ges. When done pre SAVE n ess button from bot n ttom of sc creen as shown in fig:3. n
  • 3.
    On the compila e ation of sa ave fig:4 w appear This is a will r. summa of cha ary ange reques System will st. m autom matically g generate a numbe for this change er reques The composition of st. n numbe is <Syste er em-id>K9 9<number r> Now y you have s successfully create ed transp port request. Step-2 (Record changes in transp 2: d s port reque est) In this s step you w add changed o will c objects (w which you want to t transport) into “chan est”. I my case I will use SM30 to bring “Maintain Table vie nge reque c “ n ew” as shown in fig:5 n Put table na t ame PRGN N_CUST and press MA d AINTAIN button b from the bot m ttom of sc creen as shown in f s fig:5 A caution will appear, sim mply ackno owledge a and proce eed to nex xt screen (Fig:6) n
  • 4.
    Press N NEW ENTRIES button it will en n, nable the typing on same scr n reen (as shown in fig:7 Type fie name CUA_PAR 7). eld RAMETER_ _CHECK and put va “I” as shown ale s in fig:7 7 When you done press SA butto n from top menu. This will tak you to next e, AVE p T ke dialog as shown in fig:8, put g n p your re equest number NSPK900002 or b browse by y pressin given b ng button. In my c case I am browsing and it m g will tak you to next scree (fig:9) ke en Move your curso to desir or re chang request number (as show ge in fig:9 and pre green tick. You 9) ess t will ba again to fig:8 as show in ack s fig:8A. Press gre . een tick to o complete the SA AVE process. On successful save message will e appea as show below. ar wn
  • 5.
    This is e end of ste ep-2; this means that you have s u added change into d es port request. transp Step-3 (Release transpor request) 3: e rt ) This is t nsport req uest beca time to release tran ause you have add ded/recor rded our ch hanges in “change request”. Type SE10 in comm . mand win ndow and same screen like fig:1 will appe but he I am gi n ear ere iving sequ uence # 1 0 so it’s fig g:10. Type u username, tick reques status M st MODIFIABL LE and press DISPLAY button n as illustrated in f fig:10. The ne screen is ext n fig:11. Move your course on chan er nge object and pres t ss RELEAS SE button from the too bar as s ol shown in fig:11 . Status bar will sh how relea ase messa age
  • 6.
    Refresh the scre een and move you cursor to change request nu m r umber NSPK900002, ag gain press RELEASE b button as shown in fig:12. On the successf release you will r e ful e receive re elease sum mmary as show in fi ig:13. This is e end of change req quest relea proce (Note: fig: 13 an onward pics ase ess. nd d are no from my system so that’s w there will be dif ot y why fferent pa arameter)
  • 7.
    Possible return c code: 0 : Suc ccessfully c complete ed 4 : End ded with w warning 8 : End ded with e errors 12 or h higher: Tra ansport ha not bee execut as en ted Import tant: Transp port reque consist of two file 1) control file an 2) data file est es, nd a The loccation of control file is <path h>usrsap ptrans cofiles an remem nd mber this sta with K arts The loc cation of data file <path>u < usrsaptransdata a REMEM MBER: You can also use SE01 for exten u o nded view of Transp w port Organizer Step-4 (Import transport request) 4: After the release the targ system IMPOR QUEUE will be au e, get m’s RT utomatica ally updat ted. You h have to logon to ta rget syste and type STMS in comma em n and window. Transport Management S System’s (T TMS) main screen w appea as n will ar shown in fig:14. n Press the IMPOR VERVIEW RT W ton as hig butt ghlighted in i fig:14. This will ta you to ake o the ne screen fig:15 ext
  • 8.
    Move your cursoto target system and pres DISPLAY IMPORT Q or ss Y QUEUE bu utton as high hlighted in fig:15. (M system don’t ha any im n My m ave mport requ uest that’s way “Requ uest” colum is emp mn pty) By pre essing DISP PLAY IMPO QUEUE system will display a list of “import ORT E, reques as show in Fig:16 st” wn Move your curso to the or desired request number and d a MPORT RE press IM EQUEST button as shown in fig:16. n n This will take you to the next u screen (fig:17); on this n screen you can schedule n n e the import request run tim me and ca chang target an ge client number. A After mak king desired change press gr d es reen tick.
  • 9.
    May b systemask you to put user be o rname an passwo again. Your nex nd ord . xt screen (fig:18) w show that transp n will port imports is starte (Status column is ed. s showin truck). ng The be elow given is last ste in impo of tran n ep ort nsport requ uest. Look into scre k een (fig:19), status is ticked as green of some import and yellow dia s f amond fo or some r requests.
  • 10.
    The return codesare Green tick or green block – this means all good; Yellow diamond means – warnings and Red dot means – error Note Few screen are collected from internet, just to demonstrate the process. REFERENCES: http://help.sap.com/saphelp_sm40/helpdata/en/b5/90cd3a21873650e10000 000a11402f/content.htm http://basissap.blogspot.com/2008/05/how-many-types-of-transport- requests.html http://help.sap.com/saphelp_nw70/helpdata/en/46/01f7f945e27042e100000 00a155369/frameset.htm