This document contains reviews and endorsements of the book "Hello, Android - Introducing Google's Mobile Development Platform, 2nd Edition" by Ed Burnette. The reviews praise the book for being well-written, easy to read, fun, and for explaining Android's quirks well. They note the book covers a lot of ground while retaining clarity. The material on 2D and 3D graphics alone is said to be worth including in any Android developer's library. One reviewer says the book would have made learning Android much less painful.

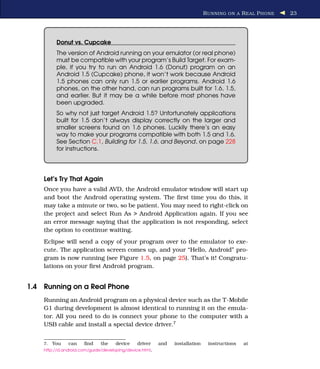

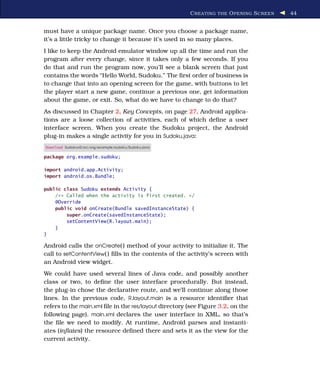
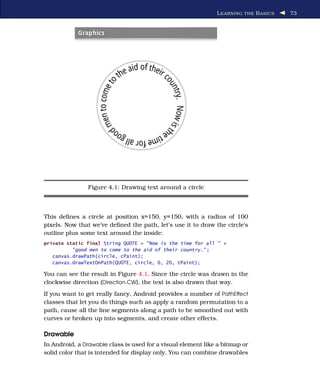
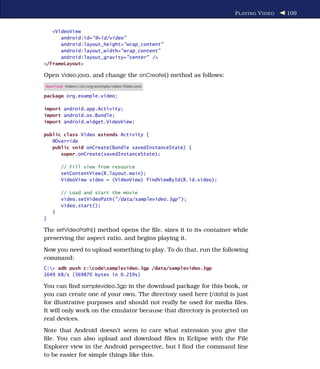
![F AST -F ORWARD >> 26
But before delving into that, you should take a few minutes to read
Chapter 2, Key Concepts, on the next page. Once you grasp the basic
concepts such as activities and life cycles, the rest will be much easier
to understand.
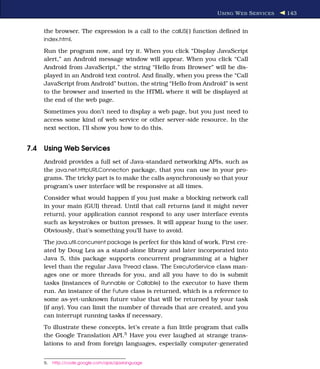
Although the use of Eclipse to develop Android programs is optional, I
highly recommend it. If you’ve never used Eclipse before, you may want
to invest in a quick reference such as the Eclipse IDE Pocket Guide
[Bur05].](https://image.slidesharecdn.com/helloandroid-introducinggooglesmobiledevelopmentplatform2ndeditionoct2009-100702080131-phpapp01/85/Hello-android-introducing-google-s-mobile-development-platform-2nd-edition-oct-2009-26-320.jpg)


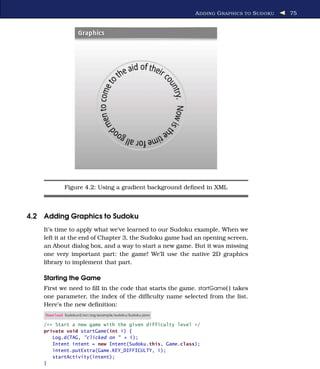
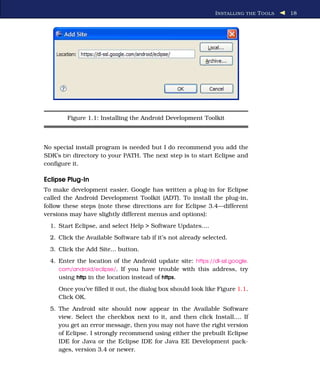
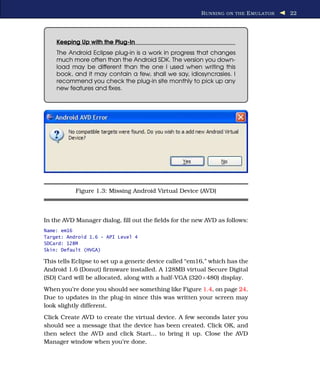
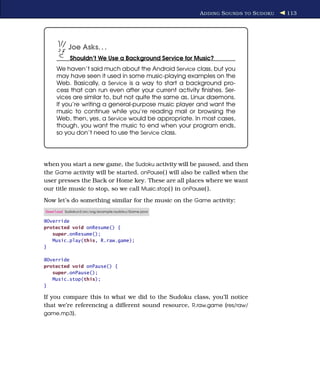
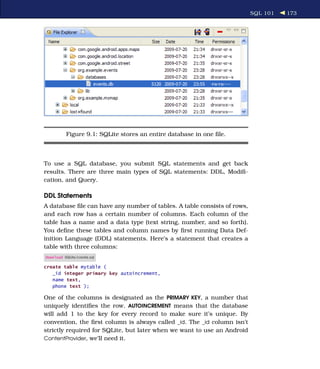
![A DDING G RAPHICS TO S UDOKU 76
Sudoku Trivia
A few years after it was published in the United States, Num-
ber Place was picked up by the Japanese publisher Nikoli, who
gave it the much cooler-sounding name Sudoku (which means
“single number” in Japanese). From there it was exported
around the world, and the rest is history. Sadly, Garns died in
1989 before getting a chance to see his creation become a
worldwide sensation.
The game part of Sudoku will be another activity called Game, so we
create a new intent to kick it off. We place the difficulty number in an
extraData area provided in the intent, and then we call the startActivity( )
method to launch the new activity.
The extraData area is a map of key/value pairs that will be passed along
to the intent. The keys are strings, and the values can be any prim-
itive type, array of primitives, Bundle, or a subclass of Serializable or
Parcelable.
Defining the Game Class
Here’s the outline of the Game activity:
Download Sudokuv2/src/org/example/sudoku/Game.java
package org.example.sudoku;
import android.app.Activity;
import android.app.Dialog;
import android.os.Bundle;
import android.util.Log;
import android.view.Gravity;
import android.widget.Toast;
public class Game extends Activity {
private static final String TAG = "Sudoku" ;
public static final String KEY_DIFFICULTY =
"org.example.sudoku.difficulty" ;
public static final int DIFFICULTY_EASY = 0;
public static final int DIFFICULTY_MEDIUM = 1;
public static final int DIFFICULTY_HARD = 2;
private int puzzle[] = new int[9 * 9];
private PuzzleView puzzleView;](https://image.slidesharecdn.com/helloandroid-introducinggooglesmobiledevelopmentplatform2ndeditionoct2009-100702080131-phpapp01/85/Hello-android-introducing-google-s-mobile-development-platform-2nd-edition-oct-2009-76-320.jpg)

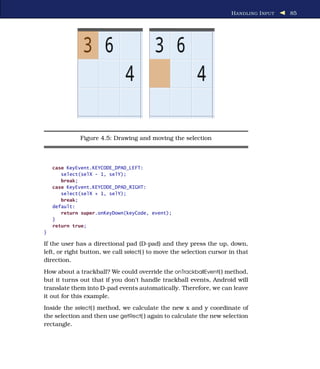
![H ANDLING I NPUT 88
Note the call to invalidate( ) with no parameters. That marks the whole
screen as dirty, which violates my own advice earlier! However, in this
case, it’s necessary because any new numbers added or removed might
change the hints that we are about to implement in the next section.
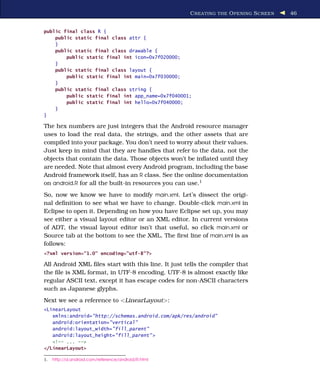
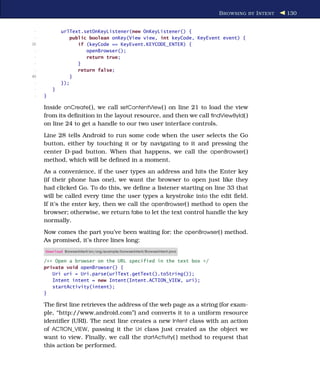
Adding Hints
How can we help the player out a little without solving the whole puzzle
for them? How about if we draw the background of each tile differently
depending on how many possible moves it has. Add this to onDraw( )
before drawing the selection:
Download Sudokuv2/src/org/example/sudoku/PuzzleView.java
// Draw the hints...
// Pick a hint color based on #moves left
Paint hint = new Paint();
int c[] = { getResources().getColor(R.color.puzzle_hint_0),
getResources().getColor(R.color.puzzle_hint_1),
getResources().getColor(R.color.puzzle_hint_2), };
Rect r = new Rect();
for (int i = 0; i < 9; i++) {
for (int j = 0; j < 9; j++) {
int movesleft = 9 - game.getUsedTiles(i, j).length;
if (movesleft < c.length) {
getRect(i, j, r);
hint.setColor(c[movesleft]);
canvas.drawRect(r, hint);
}
}
}
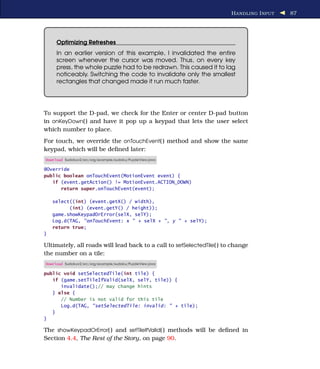
We use three states for zero, one, and two possible moves. If there
are zero moves, that means the player has done something wrong and
needs to backtrack.
The result will look like Figure 4.6, on the following page. Can you spot
the mistake(s) made by the player?2
Shaking Things Up
What if the user tries to enter an obviously invalid number, such as a
number that already appears in the three-by-three block? Just for fun,
let’s make the screen wiggle back and forth when they do that. First we
add a call to the invalid number case in setSelectedTile( ).
2. The two numbers on the bottom row, middle block, are wrong.](https://image.slidesharecdn.com/helloandroid-introducinggooglesmobiledevelopmentplatform2ndeditionoct2009-100702080131-phpapp01/85/Hello-android-introducing-google-s-mobile-development-platform-2nd-edition-oct-2009-88-320.jpg)
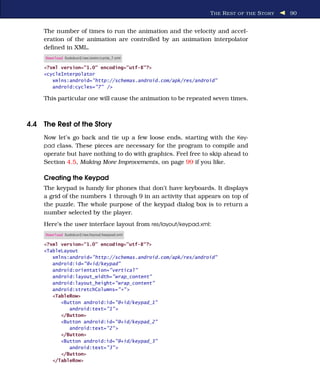
![T HE R EST OF THE S TORY 91
<TableRow>
<Button android:id="@+id/keypad_4"
android:text="4" >
</Button>
<Button android:id="@+id/keypad_5"
android:text="5" >
</Button>
<Button android:id="@+id/keypad_6"
android:text="6" >
</Button>
</TableRow>
<TableRow>
<Button android:id="@+id/keypad_7"
android:text="7" >
</Button>
<Button android:id="@+id/keypad_8"
android:text="8" >
</Button>
<Button android:id="@+id/keypad_9"
android:text="9" >
</Button>
</TableRow>
</TableLayout>
Next let’s define the Keypad class. Here’s the outline:
Download Sudokuv2/src/org/example/sudoku/Keypad.java
package org.example.sudoku;
import android.app.Dialog;
import android.content.Context;
import android.os.Bundle;
import android.view.KeyEvent;
import android.view.View;
public class Keypad extends Dialog {
protected static final String TAG = "Sudoku" ;
private final View keys[] = new View[9];
private View keypad;
private final int useds[];
private final PuzzleView puzzleView;
public Keypad(Context context, int useds[], PuzzleView puzzleView) {
super(context);
this.useds = useds;
this.puzzleView = puzzleView;
}](https://image.slidesharecdn.com/helloandroid-introducinggooglesmobiledevelopmentplatform2ndeditionoct2009-100702080131-phpapp01/85/Hello-android-introducing-google-s-mobile-development-platform-2nd-edition-oct-2009-91-320.jpg)
![T HE R EST OF THE S TORY 92
@Override
protected void onCreate(Bundle savedInstanceState) {
super.onCreate(savedInstanceState);
setTitle(R.string.keypad_title);
setContentView(R.layout.keypad);
findViews();
for (int element : useds) {
if (element != 0)
keys[element - 1].setVisibility(View.INVISIBLE);
}
setListeners();
}
// ...
}
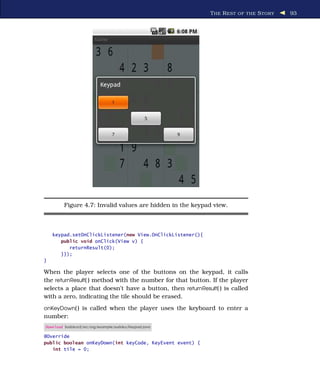
If a particular number is not valid (for example, the same number
already appears in that row), then we make the number invisible in
the grid so the player can’t select it (see Figure 4.7, on the following
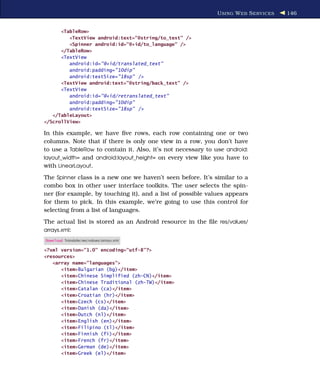
page). The findViews( ) method fetches and saves the views for all the
keypad keys and the main keypad window:
Download Sudokuv2/src/org/example/sudoku/Keypad.java
private void findViews() {
keypad = findViewById(R.id.keypad);
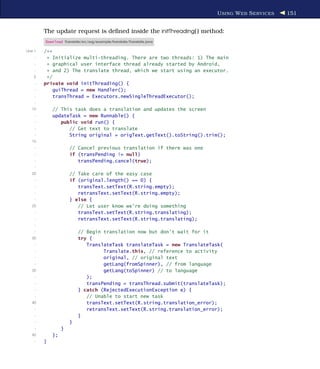
keys[0] = findViewById(R.id.keypad_1);
keys[1] = findViewById(R.id.keypad_2);
keys[2] = findViewById(R.id.keypad_3);
keys[3] = findViewById(R.id.keypad_4);
keys[4] = findViewById(R.id.keypad_5);
keys[5] = findViewById(R.id.keypad_6);
keys[6] = findViewById(R.id.keypad_7);
keys[7] = findViewById(R.id.keypad_8);
keys[8] = findViewById(R.id.keypad_9);
}
setListeners( ) loops through all the keypad keys and sets a listener for
each one. It also sets a listener for the main keypad window:
Download Sudokuv2/src/org/example/sudoku/Keypad.java
private void setListeners() {
for (int i = 0; i < keys.length; i++) {
final int t = i + 1;
keys[i].setOnClickListener(new View.OnClickListener(){
public void onClick(View v) {
returnResult(t);
}});
}](https://image.slidesharecdn.com/helloandroid-introducinggooglesmobiledevelopmentplatform2ndeditionoct2009-100702080131-phpapp01/85/Hello-android-introducing-google-s-mobile-development-platform-2nd-edition-oct-2009-92-320.jpg)
![T HE R EST OF THE S TORY 95
We call the PuzzleView.setSelectedTile() method to change the puzzle’s cur-
rent tile. The dismiss call terminates the Keypad dialog box.
Now that we have the activity, let’s call it in the Game class and retrieve
the result:
Download Sudokuv2/src/org/example/sudoku/Game.java
/** Open the keypad if there are any valid moves */
protected void showKeypadOrError(int x, int y) {
int tiles[] = getUsedTiles(x, y);
if (tiles.length == 9) {
Toast toast = Toast.makeText(this,
R.string.no_moves_label, Toast.LENGTH_SHORT);
toast.setGravity(Gravity.CENTER, 0, 0);
toast.show();
} else {
Log.d(TAG, "showKeypad: used=" + toPuzzleString(tiles));
Dialog v = new Keypad(this, tiles, puzzleView);
v.show();
}
}
To decide which numbers are possible, we pass the Keypad a string in
the extraData area containing all the numbers that have already been
used.
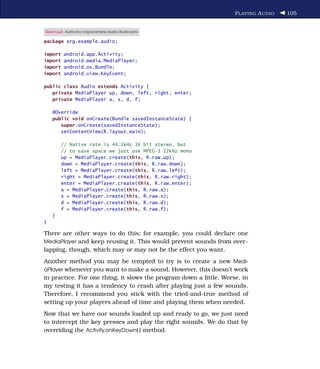
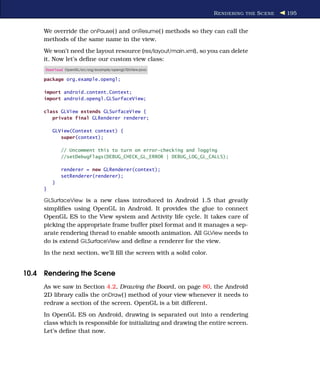
Implementing the Game Logic
The rest of the code in Game.java concerns itself with the logic of the
game, in particular with determining which are and aren’t valid moves
according to the rules. The setTileIfValid( ) method is a key part of that.
Given an x and y position and the new value of a tile, it changes the tile
only if the value provided is valid.
Download Sudokuv2/src/org/example/sudoku/Game.java
/** Change the tile only if it's a valid move */
protected boolean setTileIfValid(int x, int y, int value) {
int tiles[] = getUsedTiles(x, y);
if (value != 0) {
for (int tile : tiles) {
if (tile == value)
return false;
}
}
setTile(x, y, value);
calculateUsedTiles();
return true;
}](https://image.slidesharecdn.com/helloandroid-introducinggooglesmobiledevelopmentplatform2ndeditionoct2009-100702080131-phpapp01/85/Hello-android-introducing-google-s-mobile-development-platform-2nd-edition-oct-2009-95-320.jpg)
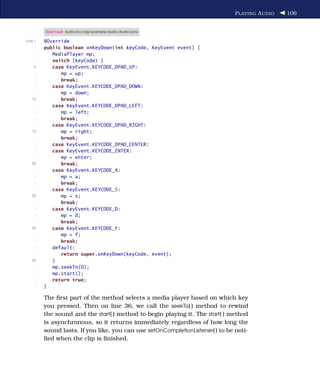
![T HE R EST OF THE S TORY 96
To detect valid moves, we create an array for every tile in the grid. For
each position, it keeps a list of filled-in tiles that are currently visible
from that position. If a number appears on the list, then it won’t be
valid for the current tile. The getUsedTiles( ) method retrieves that list for
a given tile position:
Download Sudokuv2/src/org/example/sudoku/Game.java
/** Cache of used tiles */
private final int used[][][] = new int[9][9][];
/** Return cached used tiles visible from the given coords */
protected int[] getUsedTiles(int x, int y) {
return used[x][y];
}
The array of used tiles is somewhat expensive to compute, so we cache
the array and recalculate it only when necessary by calling calculate-
UsedTiles( ):
Download Sudokuv2/src/org/example/sudoku/Game.java
/** Compute the two dimensional array of used tiles */
private void calculateUsedTiles() {
for (int x = 0; x < 9; x++) {
for (int y = 0; y < 9; y++) {
used[x][y] = calculateUsedTiles(x, y);
// Log.d(TAG, "used[" + x + "][" + y + "] = "
// + toPuzzleString(used[x][y]));
}
}
}
calculateUsedTiles( ) simply calls calculateUsedTiles(x, y) on every position
in the nine-by-nine grid:
Download Sudokuv2/src/org/example/sudoku/Game.java
Line 1 /** Compute the used tiles visible from this position */
- private int[] calculateUsedTiles(int x, int y) {
- int c[] = new int[9];
- // horizontal
5 for (int i = 0; i < 9; i++) {
- if (i == y)
- continue;
- int t = getTile(x, i);
- if (t != 0)
10 c[t - 1] = t;
- }
- // vertical
- for (int i = 0; i < 9; i++) {
- if (i == x)
15 continue;](https://image.slidesharecdn.com/helloandroid-introducinggooglesmobiledevelopmentplatform2ndeditionoct2009-100702080131-phpapp01/85/Hello-android-introducing-google-s-mobile-development-platform-2nd-edition-oct-2009-96-320.jpg)
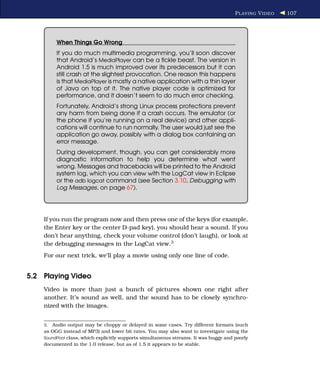
![T HE R EST OF THE S TORY 97
- int t = getTile(i, y);
- if (t != 0)
- c[t - 1] = t;
- }
20 // same cell block
- int startx = (x / 3) * 3;
- int starty = (y / 3) * 3;
- for (int i = startx; i < startx + 3; i++) {
- for (int j = starty; j < starty + 3; j++) {
25 if (i == x && j == y)
- continue;
- int t = getTile(i, j);
- if (t != 0)
- c[t - 1] = t;
30 }
- }
- // compress
- int nused = 0;
- for (int t : c) {
35 if (t != 0)
- nused++;
- }
- int c1[] = new int[nused];
- nused = 0;
40 for (int t : c) {
- if (t != 0)
- c1[nused++] = t;
- }
- return c1;
45 }
We start with an array of nine zeros. On line 5, we check all the tiles on
the same horizontal row as the current tile, and if a tile is occupied, we
stuff its number into the array:
On line 13, we do the same thing for all the tiles on the same vertical
column, and on line 21, we do the same for tiles in the three-by-three
block.
The last step, starting at line 33, is to compress the zeros out of the
array before we return it. We do this so that array.length can be used to
quickly tell how many used tiles are visible from the current position.
Miscellaneous
Here are a few other utility functions and variables that round out the
implementation. easyPuzzle, mediumPuzzle, and hardPuzzle are our hard-
coded Sudoku puzzles for easy, medium, and hard difficulty levels,
respectively.](https://image.slidesharecdn.com/helloandroid-introducinggooglesmobiledevelopmentplatform2ndeditionoct2009-100702080131-phpapp01/85/Hello-android-introducing-google-s-mobile-development-platform-2nd-edition-oct-2009-97-320.jpg)
![T HE R EST OF THE S TORY 98
Download Sudokuv2/src/org/example/sudoku/Game.java
private final String easyPuzzle =
"360000000004230800000004200" +
"070460003820000014500013020" +
"001900000007048300000000045" ;
private final String mediumPuzzle =
"650000070000506000014000005" +
"007009000002314700000700800" +
"500000630000201000030000097" ;
private final String hardPuzzle =
"009000000080605020501078000" +
"000000700706040102004000000" +
"000720903090301080000000600" ;
getPuzzle( ) simply takes a difficulty level and returns a puzzle:
Download Sudokuv2/src/org/example/sudoku/Game.java
/** Given a difficulty level, come up with a new puzzle */
private int[] getPuzzle(int diff) {
String puz;
// TODO: Continue last game
switch (diff) {
case DIFFICULTY_HARD:
puz = hardPuzzle;
break;
case DIFFICULTY_MEDIUM:
puz = mediumPuzzle;
break;
case DIFFICULTY_EASY:
default:
puz = easyPuzzle;
break;
}
return fromPuzzleString(puz);
}
Later we’ll change getPuzzle( ) to implement a continue function.
toPuzzleString( ) converts a puzzle from an array of integers to a string.
fromPuzzleString( ) does the opposite.
Download Sudokuv2/src/org/example/sudoku/Game.java
/** Convert an array into a puzzle string */
static private String toPuzzleString(int[] puz) {
StringBuilder buf = new StringBuilder();
for (int element : puz) {
buf.append(element);
}
return buf.toString();
}](https://image.slidesharecdn.com/helloandroid-introducinggooglesmobiledevelopmentplatform2ndeditionoct2009-100702080131-phpapp01/85/Hello-android-introducing-google-s-mobile-development-platform-2nd-edition-oct-2009-98-320.jpg)
![M AKING M ORE I MPROVEMENTS 99
/** Convert a puzzle string into an array */
static protected int[] fromPuzzleString(String string) {
int[] puz = new int[string.length()];
for (int i = 0; i < puz.length; i++) {
puz[i] = string.charAt(i) - '0' ;
}
return puz;
}
The getTile( ) method takes x and y positions and returns the number
currently occupying that tile. If it’s zero, that means the tile is blank.
Download Sudokuv2/src/org/example/sudoku/Game.java
/** Return the tile at the given coordinates */
private int getTile(int x, int y) {
return puzzle[y * 9 + x];
}
/** Change the tile at the given coordinates */
private void setTile(int x, int y, int value) {
puzzle[y * 9 + x] = value;
}
getTileString( ) is used when displaying a tile. It will return either a string
with the value of the tile or an empty string if the tile is blank.
Download Sudokuv2/src/org/example/sudoku/Game.java
/** Return a string for the tile at the given coordinates */
protected String getTileString(int x, int y) {
int v = getTile(x, y);
if (v == 0)
return "" ;
else
return String.valueOf(v);
}
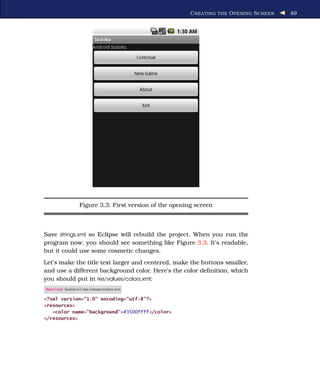
Once all these pieces are in place, you should have a playable Sudoku
game. Give it a try to verify it works. As with any code, though, there is
room for improvement.
4.5 Making More Improvements
Although the code presented in this chapter performs acceptably for
a Sudoku game, more complex programs will likely need to be more
carefully written in order to squeeze the last drop of performance out
of the device. In particular, the onDraw( ) method is a very performance-
critical piece of code, so it’s best to do as little as possible there.](https://image.slidesharecdn.com/helloandroid-introducinggooglesmobiledevelopmentplatform2ndeditionoct2009-100702080131-phpapp01/85/Hello-android-introducing-google-s-mobile-development-platform-2nd-edition-oct-2009-99-320.jpg)

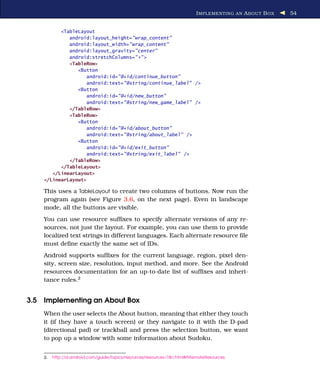
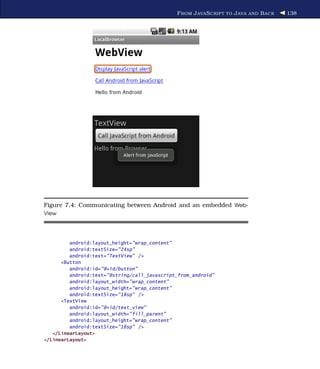
![C ONTINUING AN O LD G AME 119
Download Sudokuv4/src/org/example/sudoku/Game.java
private static final String PREF_PUZZLE = "puzzle" ;
protected static final int DIFFICULTY_CONTINUE = -1;
Next we need to save the current puzzle whenever the game is paused.
See Section 2.2, It’s Alive!, on page 32 for a description of onPause( ) and
the other life-cycle methods.
Download Sudokuv4/src/org/example/sudoku/Game.java
@Override
protected void onPause() {
super.onPause();
Log.d(TAG, "onPause" );
Music.stop(this);
// Save the current puzzle
getPreferences(MODE_PRIVATE).edit().putString(PREF_PUZZLE,
toPuzzleString(puzzle)).commit();
}
Now the puzzle is saved, but how do we read the saved data? Remember
that when the game is started, the getPuzzle( ) method is called, and the
difficulty level is passed in. We’ll use that for continuing as well.
Download Sudokuv4/src/org/example/sudoku/Game.java
/** Given a difficulty level, come up with a new puzzle */
private int[] getPuzzle(int diff) {
String puz;
switch (diff) {
case DIFFICULTY_CONTINUE:
puz = getPreferences(MODE_PRIVATE).getString(PREF_PUZZLE,
easyPuzzle);
break;
// ...
}
return fromPuzzleString(puz);
}
All we need to do is add a check for DIFFICULTY_CONTINUE. If that is set,
then instead of starting with a fresh puzzle, we read the one we stuffed
into the preferences.
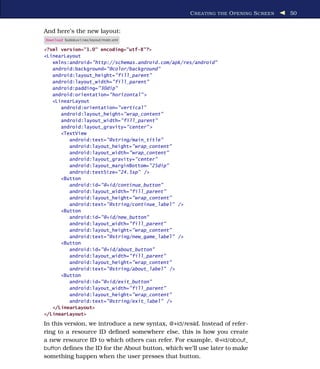
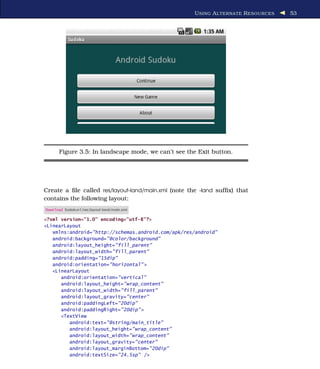
Next, we need to make the Continue button on the main screen (see
Figure 3.4, on page 51) actually do something. Here is where we set
that up.](https://image.slidesharecdn.com/helloandroid-introducinggooglesmobiledevelopmentplatform2ndeditionoct2009-100702080131-phpapp01/85/Hello-android-introducing-google-s-mobile-development-platform-2nd-edition-oct-2009-119-320.jpg)


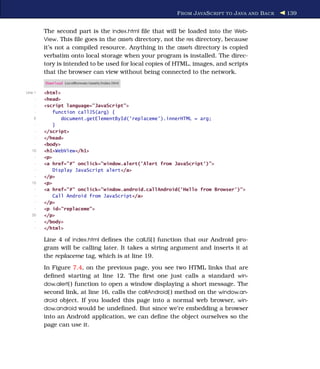
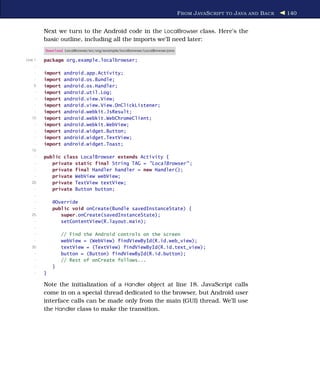
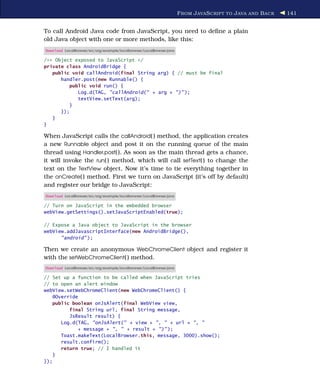

![F AST -F ORWARD >> 154
I’m not going to include the source to the TranslateTask class here because
it’s rather long and contains nothing Android specific except for a few
debugging messages. If you’d like to see a nice example of calling a
RESTful web service using HttpURLConnection, parsing results in Java-
Script Object Notation (JSON) format, and handling all sorts of net-
work errors and requests for interruptions, then you can download the
source from the book’s website.
7.5 Fast-Forward >>
In this chapter, we covered a lot of ground, from opening a simple web
page to using an asynchronous web service. HTML/JavaScript pro-
gramming is beyond the scope of this book, but there are several good
references available. If you’re going to do much concurrent program-
ming with classes such as ExecutorService, I recommend Java Concur-
rency in Practice [Goe06] by Brian Goetz.
The next chapter will explore a new level of interactivity through loca-
tion and sensor services. If you’re anxious to learn more about data
sources and data binding, you can skip ahead to Chapter 9, Putting
SQL to Work, on page 171.](https://image.slidesharecdn.com/helloandroid-introducinggooglesmobiledevelopmentplatform2ndeditionoct2009-100702080131-phpapp01/85/Hello-android-introducing-google-s-mobile-development-platform-2nd-edition-oct-2009-154-320.jpg)

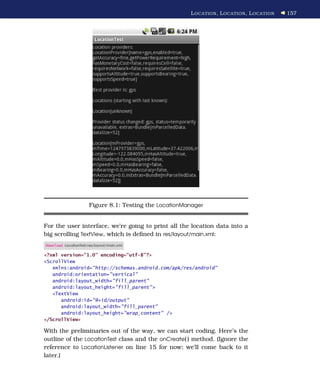
![L OCATION , L OCATION , L OCATION 160
Now you know why LocationTest implements LocationListener, so we could
just pass a reference to the activity instead of making a new listener
object. That will save us about 1KB of memory at runtime.
Here’s the definition of the four methods required by that interface:
Download LocationTest/src/org/example/locationtest/LocationTest.java
public void onLocationChanged(Location location) {
dumpLocation(location);
}
public void onProviderDisabled(String provider) {
log("nProvider disabled: " + provider);
}
public void onProviderEnabled(String provider) {
log("nProvider enabled: " + provider);
}
public void onStatusChanged(String provider, int status,
Bundle extras) {
log("nProvider status changed: " + provider + ", status="
+ S[status] + ", extras=" + extras);
}
The most important method in the bunch is onLocationChanged( ).
As the name suggests, it’s called every time the provider notices that
the device’s location has changed. The onProviderDisabled( ), onProviderEn-
abled( ), and onStatusChanged( ) methods can be used to switch to other
providers in case your first choice becomes unavailable.
The code for the remaining methods of LocationTest—log( ), dumpProvi-
ders( ), and dumpLocation( )—is not very interesting, so I won’t bore you
with it here. You can find it all in the downloadable samples on the
book’s website.
Emulation Notes
If you run the LocationTest example on a real device, it will show your
current position as you walk around. On the emulator, it uses a fake
GPS provider that always returns the same position unless you change
it. Let’s do that now.
In Eclipse you can change your simulated location using the Emulator
Control view (Window > Show View > Other... > Android > Emulator
Control). Scroll down to the bottom, and you’ll find a place to enter
the longitude and latitude manually. When you click the Send button,](https://image.slidesharecdn.com/helloandroid-introducinggooglesmobiledevelopmentplatform2ndeditionoct2009-100702080131-phpapp01/85/Hello-android-introducing-google-s-mobile-development-platform-2nd-edition-oct-2009-160-320.jpg)
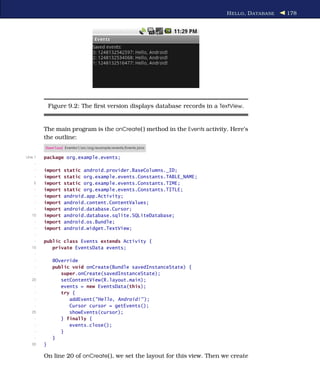
![H ELLO , D ATABASE 180
other exception. If you don’t handle it and there is an error, the program
will terminate, and a traceback will be dumped to the Android log.
By default, as soon as you do the insert, the database is updated. If you
need to batch up or delay modifications for some reason, consult the
SQLite website for more details.
Running a Query
The getEvents( ) method does the database query to get a list of events:
Download Eventsv1/src/org/example/events/Events.java
private static String[] FROM = { _ID, TIME, TITLE, };
private static String ORDER_BY = TIME + " DESC" ;
private Cursor getEvents() {
// Perform a managed query. The Activity will handle closing
// and re-querying the cursor when needed.
SQLiteDatabase db = events.getReadableDatabase();
Cursor cursor = db.query(TABLE_NAME, FROM, null, null, null,
null, ORDER_BY);
startManagingCursor(cursor);
return cursor;
}
We don’t need to modify the database for a query, so we call getRead-
ableDatabase( ) to get a read-only handle. Then we call query( ) to per-
form the actual SELECT SQL statement. FROM is an array of the columns
we want, and ORDER_BY tells SQLite to return the results in order from
newest to oldest.
Although we don’t use them in this example, the query( ) method has
parameters to specify a WHERE clause, a GROUP BY clause, and a HAVING
clause. Actually, query( ) is just a convenience for the programmer. If
you prefer, you could build up the SELECT statement yourself in a string
and use the rawQuery( ) method to execute it. Either way, the return
value is a Cursor object that represents the result set.
A Cursor is similar to a Java Iterator or a JDBC ResultSet. You call meth-
ods on it to get information about the current row, and then you call
another method to move to the next row. We’ll see how to use it when
we display the results in a moment.
The final step is to call startManagingCursor( ), which tells the activity to
take care of managing the cursor’s life cycle based on the activity’s life
cycle. For example, when the activity is paused, it will automatically
deactivate the cursor and then requery it when the activity is restarted.
When the activity terminates, all managed cursors will be closed.](https://image.slidesharecdn.com/helloandroid-introducinggooglesmobiledevelopmentplatform2ndeditionoct2009-100702080131-phpapp01/85/Hello-android-introducing-google-s-mobile-development-platform-2nd-edition-oct-2009-180-320.jpg)
![D ATA B INDING 182
What would happen if there were thousands or millions of events in
the list? The program would be very slow and might run out of memory
trying to build a string to hold them all. What if you wanted to let the
user select one event and do something with it? If everything is in a
string, you can’t do that. Luckily, Android provides a better way: data
binding.
9.4 Data Binding
Data binding allows you to connect your model (data) to your view with
just a few lines of code. To demonstrate data binding, we’ll modify the
Events example to use a ListView that is bound to the result of a database
query. First, we need to make the Events class extend ListActivity instead
of Activity:
Download Eventsv2/src/org/example/events/Events.java
import android.app.ListActivity;
// ...
public class Events extends ListActivity {
// ...
}
Next, we need to change how the events are displayed in the Events.
showEvents( ) method:
Download Eventsv2/src/org/example/events/Events.java
import android.widget.SimpleCursorAdapter;
// ...
private static int[] TO = { R.id.rowid, R.id.time, R.id.title, };
private void showEvents(Cursor cursor) {
// Set up data binding
SimpleCursorAdapter adapter = new SimpleCursorAdapter(this,
R.layout.item, cursor, FROM, TO);
setListAdapter(adapter);
}
Notice this code is much smaller than before (two lines vs. ten). The
first line creates a SimpleCursorAdapter for the Cursor, and the second
line tells the ListActivity to use the new adapter. The adapter acts as a
go-between, connecting the view with its data source.
If you recall, we first used an adapter in the Translate sample pro-
gram (see Translate.setAdapters( ) in Section 7.4, Using Web Services, on
page 143). In that example, we used an ArrayAdapter because the data
source was an array defined in XML. For this one, we use a SimpleCur-
sorAdapter because the data source is a Cursor object that came from a
database query.](https://image.slidesharecdn.com/helloandroid-introducinggooglesmobiledevelopmentplatform2ndeditionoct2009-100702080131-phpapp01/85/Hello-android-introducing-google-s-mobile-development-platform-2nd-edition-oct-2009-182-320.jpg)

![F AST -F ORWARD >> 189
/** The MIME type of a single event */
private static final String CONTENT_ITEM_TYPE
= "vnd.android.cursor.item/vnd.example.event" ;
private EventsData events;
private UriMatcher uriMatcher;
// ...
}
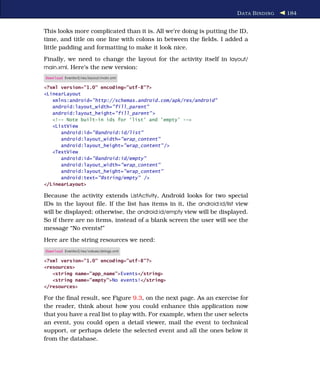
By convention we use vnd.example instead of org.example in the MIME
type.4 EventsProvider handles two types of data:
• EVENTS (MIME type CONTENT_TYPE): A directory or list of events
• EVENTS_ID (MIME type CONTENT_ITEM_TYPE): A single event
In terms of the URI, the difference is that the first type does not spec-
ify an ID, but the second type does. We use Android’s UriMatcher class
to parse the URI and tell us which one the client specified. And we
reuse the EventsData class from earlier in the chapter to manage the
real database inside the provider.
In the interest of space, I’m not going to show the rest of the class here,
but you can download the whole thing from the book website. All three
versions of the Events example can be found in the source code .zip file.
The final version of the Events sample looks exactly like the previous
version on the outside (see Figure 9.3, on page 185). On the inside,
however, you now have the framework for a event store that can be
used by other applications in the system, even ones written by other
developers.
9.7 Fast-Forward >>
In this chapter, we learned how to store data in an Android SQL data-
base. If you want to do more with SQL, you’ll need to learn about more
statements and expressions than the ones we covered here. A book
such as SQL Pocket Guide [Gen06] by Jonathan Gennick or The Defini-
tive Guide to SQLite [Owe06] by Mike Owens would be a good invest-
ment, but keep in mind that the SQL syntax and functions vary slightly
from database to database.
4. Multipurpose Internet Mail Extensions (MIME) is an Internet standard for describing
the type of any kind of content.](https://image.slidesharecdn.com/helloandroid-introducinggooglesmobiledevelopmentplatform2ndeditionoct2009-100702080131-phpapp01/85/Hello-android-introducing-google-s-mobile-development-platform-2nd-edition-oct-2009-189-320.jpg)

![B UILDING A M ODEL 200
10 import android.graphics.Bitmap;
- import android.graphics.BitmapFactory;
- import android.opengl.GLUtils;
-
- class GLCube {
15 private final IntBuffer mVertexBuffer;
- public GLCube() {
- int one = 65536;
- int half = one / 2;
- int vertices[] = {
20 // FRONT
- -half, -half, half, half, -half, half,
- -half, half, half, half, half, half,
- // BACK
- -half, -half, -half, -half, half, -half,
25 half, -half, -half, half, half, -half,
- // LEFT
- -half, -half, half, -half, half, half,
- -half, -half, -half, -half, half, -half,
- // RIGHT
30 half, -half, -half, half, half, -half,
- half, -half, half, half, half, half,
- // TOP
- -half, half, half, half, half, half,
- -half, half, -half, half, half, -half,
35 // BOTTOM
- -half, -half, half, -half, -half, -half,
- half, -half, half, half, -half, -half, };
-
- // Buffers to be passed to gl*Pointer() functions must be
40 // direct, i.e., they must be placed on the native heap
- // where the garbage collector cannot move them.
- //
- // Buffers with multi-byte data types (e.g., short, int,
- // float) must have their byte order set to native order
45 ByteBuffer vbb = ByteBuffer.allocateDirect(vertices.length * 4);
- vbb.order(ByteOrder.nativeOrder());
- mVertexBuffer = vbb.asIntBuffer();
- mVertexBuffer.put(vertices);
- mVertexBuffer.position(0);
50 }
-
- public void draw(GL10 gl) {
- gl.glVertexPointer(3, GL10.GL_FIXED, 0, mVertexBuffer);
-
55 gl.glColor4f(1, 1, 1, 1);
- gl.glNormal3f(0, 0, 1);
- gl.glDrawArrays(GL10.GL_TRIANGLE_STRIP, 0, 4);
- gl.glNormal3f(0, 0, -1);
- gl.glDrawArrays(GL10.GL_TRIANGLE_STRIP, 4, 4);
60](https://image.slidesharecdn.com/helloandroid-introducinggooglesmobiledevelopmentplatform2ndeditionoct2009-100702080131-phpapp01/85/Hello-android-introducing-google-s-mobile-development-platform-2nd-edition-oct-2009-200-320.jpg)

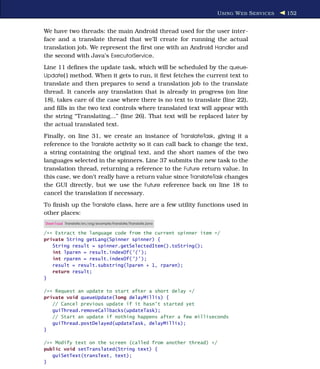
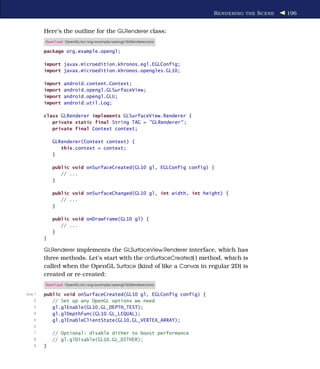
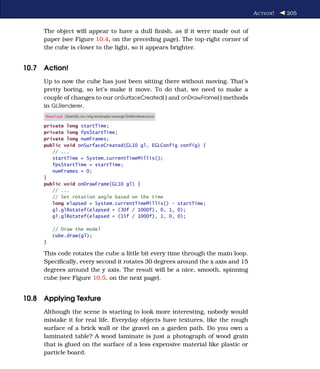
![L IGHTS , C AMERA , ... 203
Figure 10.3: Drawing an unshaded cube
A single light source can contribute all three types of light. These values
go into a lighting equation that determines the color and brightness of
each pixel on the screen.
The lighting is defined in the GLRenderer.onSurfaceCreated( ) method:
Download OpenGL/src/org/example/opengl/GLRenderer.java
// Define the lighting
float lightAmbient[] = new float[] { 0.2f, 0.2f, 0.2f, 1 };
float lightDiffuse[] = new float[] { 1, 1, 1, 1 };
float[] lightPos = new float[] { 1, 1, 1, 1 };
gl.glEnable(GL10.GL_LIGHTING);
gl.glEnable(GL10.GL_LIGHT0);
gl.glLightfv(GL10.GL_LIGHT0, GL10.GL_AMBIENT, lightAmbient, 0);
gl.glLightfv(GL10.GL_LIGHT0, GL10.GL_DIFFUSE, lightDiffuse, 0);
gl.glLightfv(GL10.GL_LIGHT0, GL10.GL_POSITION, lightPos, 0);](https://image.slidesharecdn.com/helloandroid-introducinggooglesmobiledevelopmentplatform2ndeditionoct2009-100702080131-phpapp01/85/Hello-android-introducing-google-s-mobile-development-platform-2nd-edition-oct-2009-203-320.jpg)
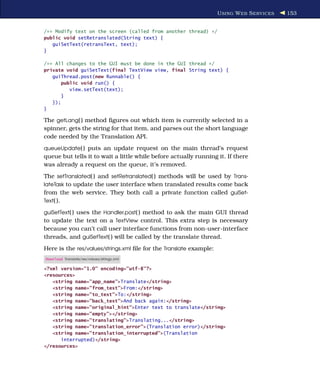
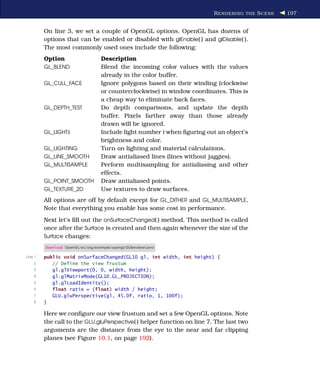
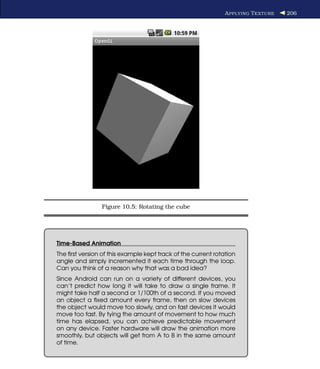
![L IGHTS , C AMERA , ... 204
Figure 10.4: Lighting the scene
In our code we define one light source at position (1, 1, 1). It’s a white
omnidirectional light that has a bright diffuse component and a dim
ambient component. In this example, we’re not using specular lighting.
Next, we need to tell OpenGL about the materials our cube is made of.
Light reflects differently off different materials, such as metal, plastic,
or paper. To simulate this in OpenGL, add this code in onSurfaceCre-
ated( ) to define how the material reacts with the three types of light:
ambient, diffuse, and specular:
Download OpenGL/src/org/example/opengl/GLRenderer.java
// What is the cube made of?
float matAmbient[] = new float[] { 1, 1, 1, 1 };
float matDiffuse[] = new float[] { 1, 1, 1, 1 };
gl.glMaterialfv(GL10.GL_FRONT_AND_BACK, GL10.GL_AMBIENT,
matAmbient, 0);
gl.glMaterialfv(GL10.GL_FRONT_AND_BACK, GL10.GL_DIFFUSE,
matDiffuse, 0);](https://image.slidesharecdn.com/helloandroid-introducinggooglesmobiledevelopmentplatform2ndeditionoct2009-100702080131-phpapp01/85/Hello-android-introducing-google-s-mobile-development-platform-2nd-edition-oct-2009-204-320.jpg)
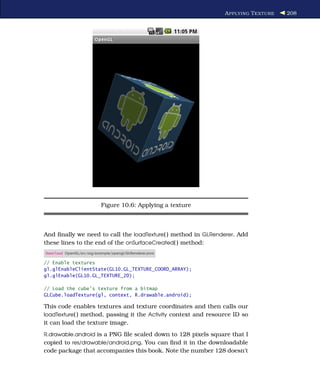
![A PPLYING T EXTURE 207
We’re going to do the same thing to our cube using a picture. Unfor-
tunately, the code to do this is fairly long. Don’t worry if you don’t
understand it all right away.
Download OpenGL/src/org/example/opengl/GLCube.java
private final IntBuffer mTextureBuffer;
public GLCube() {
int texCoords[] = {
// FRONT
0, one, one, one, 0, 0, one, 0,
// BACK
one, one, one, 0, 0, one, 0, 0,
// LEFT
one, one, one, 0, 0, one, 0, 0,
// RIGHT
one, one, one, 0, 0, one, 0, 0,
// TOP
one, 0, 0, 0, one, one, 0, one,
// BOTTOM
0, 0, 0, one, one, 0, one, one, };
// ...
ByteBuffer tbb = ByteBuffer.allocateDirect(texCoords.length * 4);
tbb.order(ByteOrder.nativeOrder());
mTextureBuffer = tbb.asIntBuffer();
mTextureBuffer.put(texCoords);
mTextureBuffer.position(0);
}
static void loadTexture(GL10 gl, Context context, int resource) {
Bitmap bmp = BitmapFactory.decodeResource(
context.getResources(), resource);
GLUtils.texImage2D(GL10.GL_TEXTURE_2D, 0, bmp, 0);
gl.glTexParameterx(GL10.GL_TEXTURE_2D,
GL10.GL_TEXTURE_MIN_FILTER, GL10.GL_LINEAR);
gl.glTexParameterx(GL10.GL_TEXTURE_2D,
GL10.GL_TEXTURE_MAG_FILTER, GL10.GL_LINEAR);
bmp.recycle();
}
}
Next we need to tell OpenGL to use the texture coordinates. Add this to
the beginning of the draw( ) method:
Download OpenGL/src/org/example/opengl/GLCube.java
gl.glEnable(GL10.GL_TEXTURE_2D); // workaround bug 3623
gl.glTexCoordPointer(2, GL10.GL_FIXED, 0, mTextureBuffer);](https://image.slidesharecdn.com/helloandroid-introducinggooglesmobiledevelopmentplatform2ndeditionoct2009-100702080131-phpapp01/85/Hello-android-introducing-google-s-mobile-development-platform-2nd-edition-oct-2009-207-320.jpg)


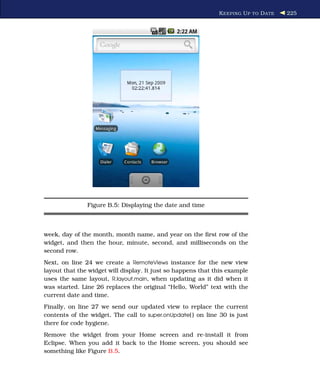
![K EEPING U P TO D ATE 224
B.6 Keeping Up to Date
In Android 1.5, widget hosts (programs like the Home screen that can
contain widgets) send a message to all their little widget kids whenever
the widgets should display something. The Android way to send a mes-
sage is to broadcast an intent. In this case, the intent is
android.appwidget.action.APPWIDGET_UPDATE.
Back when we set up the AndroidManifest.xml file, we told Android that
we could receive that intent and do something interesting with it. Now
it’s time to fill out the Widget class to do just that:
Download Widget/src/org/example/widget/Widget.java
Line 1 package org.example.widget;
-
- import java.text.SimpleDateFormat;
- import java.util.Date;
5
- import android.appwidget.AppWidgetManager;
- import android.appwidget.AppWidgetProvider;
- import android.content.Context;
- import android.widget.RemoteViews;
10
- public class Widget extends AppWidgetProvider {
- // ...
- // Define the format string for the date and time
- private SimpleDateFormat formatter = new SimpleDateFormat(
15 "EEE, d MMM yyyynHH:mm:ss.SSS" );
-
- @Override
- public void onUpdate(Context context,
- AppWidgetManager appWidgetManager, int[] appWidgetIds) {
20 // Retrieve and format the current date and time
- String now = formatter.format(new Date());
-
- // Change the text in the widget
- RemoteViews updateViews = new RemoteViews(
25 context.getPackageName(), R.layout.main);
- updateViews.setTextViewText(R.id.text, now);
- appWidgetManager.updateAppWidget(appWidgetIds, updateViews);
-
- // Not really necessary, just a habit
30 super.onUpdate(context, appWidgetManager, appWidgetIds);
- }
- }
Whenever the APPWIDGET_UPDATE intent comes in, Android will call our
onUpdate( ) method. On line 21, we format the current date using a
SimpleDateFormat created on line 14. This will show the day of the](https://image.slidesharecdn.com/helloandroid-introducinggooglesmobiledevelopmentplatform2ndeditionoct2009-100702080131-phpapp01/85/Hello-android-introducing-google-s-mobile-development-platform-2nd-edition-oct-2009-224-320.jpg)
![Appendix D
Bibliography
[Bur05] Ed Burnette. Eclipse IDE Pocket Guide. O’Reilly & Asso-
ciates, Inc, Sebastopol, CA, 2005.
[Gen06] Jonathan Gennick. SQL Pocket Guide. O’Reilly Media, Inc.,
Sebastopol, CA, second edition, 2006.
[Goe06] Brian Goetz. Java Concurrency in Practice. Addison-Wesley,
Reading, MA, 2006.
[Owe06] Mike Owens. The Definitive Guide to SQLite. Apress, Berke-
ley, CA, 2006.](https://image.slidesharecdn.com/helloandroid-introducinggooglesmobiledevelopmentplatform2ndeditionoct2009-100702080131-phpapp01/85/Hello-android-introducing-google-s-mobile-development-platform-2nd-edition-oct-2009-235-320.jpg)


![Android Cookbook 2nd [early release] Edition Ian F. Darwin](https://cdn.slidesharecdn.com/ss_thumbnails/28304-250515041521-e25534f6-thumbnail.jpg?width=640&height=640&fit=bounds)


