FULL ENJOY 🔝 8264348440 🔝 Call Girls in Diplomatic Enclave | Delhi
Diary
1. Heather Lomas
Video Diary
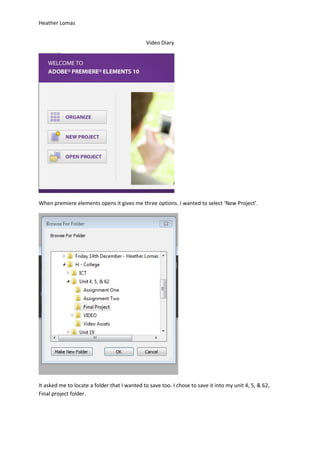
When premiere elements opens it gives me three options. I wanted to select ‘New Project’.
It asked me to locate a folder that I wanted to save too. I chose to save it into my unit 4, 5, & 62,
Final project folder.
2. Heather Lomas
I renamed my project with a suitable name for the video.
To import my pictures I went to file, get media from, and files and folders. Once on there I could find
the appropriate file my work was in.
6. Heather Lomas
I then went and imported my backing track to begin creating my video.
Here you can see my backing track on the timeline.
7. Heather Lomas
I changed the start of the video so it sets in quicker. I also added in an effect below where the video
fades in from the black screen.
I added in a ‘dip to black’ so when the video begins it fades into the screen.
8. Heather Lomas
I imported the main walk in from the gate knowing that I would have to change the speed.
Here you can see the video placed into my sceneline.
9. Heather Lomas
I changed the speed up to 500% that way instead of 00:02:26 it is now 00:00:25.
As you can see on my timeline now my video is already 30 seconds long.
10. Heather Lomas
I then added a title page just before my slideshows as I needed to introduce each image.
11. Heather Lomas
I knew that I wanted to put the college logo on every part of my video and have it running through.
This way I have imported the college logo and it is now up to me to change it.
I clicked no to this as I didn’t want my logo to merge with the video.
When putting the logo in at first it appeared very large. So I had to change the size of it.
12. Heather Lomas
I changed it so it fitted in better with the video and not blocking anything important.
Here I have placed my logo in the bottom right hand corner. It will appear here throughout the
video.
13. Heather Lomas
I wanted to have a slideshow effect in my video so I picked the images I wanted and then put them
into the video where it asked if I wanted them as a grouped slideshow. I clicked yes.
As the images were just based on the refectory I chose to show this with text in the bottom corner.
I repeated this process of making a slideshow for the next two groups of photos that I had. One lot
of photos were all around the college itself and the other group was of the quad.
14. Heather Lomas
I am now up to 01:06:15 worth of media video. I still need to put in my interview with a current
student and the closing page.
Now I have to import my student video clip to the stage and edit it correctly.
To do this I went onto ‘File’, ‘Get Media from’, and then ‘Files and Folders’. I was then produced with
this screen where I went into the correct folder and selected the file I needed.
15. Heather Lomas
The video is now in my Premiere Elements folder.
I’ve put my interview into my video now by dragging the clip onto the timeline. I didn’t cut it at all as
it wasn’t needed.
I then had to add in my final clip of walking out of the college.
The clip that I added of Lewis was not sufficient for the video as there was too much background
noise to hear what he is saying. I instead filmed another interview with Leeanne and imported it the
exact same way into my movie maker file.
16. Heather Lomas
In between this and the previous clip I added a flip over action. When filming the interview I asked
Leeanne to wait for 3 seconds at the beginning of the video. This meant that there would be no
speech when the video was coming onto screen and the speech would only start when the video had
fully loaded.
I then went to edit the video clip to make sur4e that I could have enough sound to project Leeannes
voice. I edited the clip the best I could by adding, DeNoiser, Volume, and Balance.
17. Heather Lomas
I also added these two different comments from the interview as they are key to highlight and for
everyone to read and take in.
18. Heather Lomas
I made this title slide so I could then put a video in of a student talking about creative media.
After creating this first video I saw that there wasn’t enough about the creative media course so I
decided to make another with another student.
I used the exact same audio effects on his clip as I did with the other.
19. Heather Lomas
I then went to add some comments in onto the video to highlight the key features of the interview.
20. Heather Lomas
Finally on my final slide I had all the college information displayed for the Cheadle Campus. This is so
that users can get in touch with the college after viewing the video.
This is my overall finished timeline. I have added in any music yet this is all basic video that I have
created.
Next I needed to add in my music for the video.
21. Heather Lomas
I grabbed the music file that I wanted from my video folders.
As you can see here the music is now imported into my files on Premiere Elements.
22. Heather Lomas
I dragged the music clip into my timeline and as you can see already there are small dots on it to
represent them fading out.
As you can see I have added many dots onto each volume clip. With this I can change the rate of the
music and how loud it is. I changed the music when it came on so that it would go quiet when the
interviews were playing. I also made the music fade out at the beginning and the end.
I then wanted to finally export my video so before I started I had to render my work area.
23. Heather Lomas
I selected to save my video to my computer work space so with this I named my file appropriately
and saved it in a folder where I could easily locate it.
24. Heather Lomas
As you can see my video is rendering so it can be saved.
My video has successfully been saved.