7. 10.
Theme or focus of image & reasons for choice
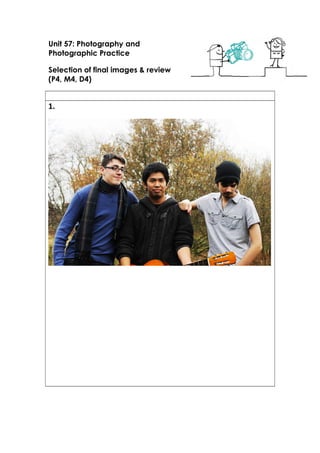
1. The theme for the first image was to simply display the band. It was to show
them together and the inclusion of the guitar establishes the fact that they are
a musical act. I wanted the three members to have different facial
expressions and body languages, in order to give them their own distinct
personalities. The member on the left is smiling off into the distance, while the
one in the middle looks directly into the camera. The man on the right looks
down in deadpan fashion; emotionlessly resting is arm on the man in the
middle. I wanted a unique setting for some of the photo shoot and I
8. subsequently chose The Three Sisters forest for some woodland background.
The trees and sky can be clearly seen in the background.
2. For this image, I decided that I wanted a close up of the band together. The
focus of the image is on the band but, also the individual looks and
expressions of each band members. I chose this image as I wanted to use
different angles in my photography series and I liked the look of this low-angle
shot. I also wanted to have photographs in my series that depicted each
member of the band looking directly into the camera. I saw this on many
music photographs during my research and thought that they looked good.
This style also helps the viewer engage with the photograph.
3. I had long wanted to experiment with a black and white effect even before I
had begun editing my images and I used the effect here. I wanted to have a
few solo shots of individual band members and I wanted them to be as eye-
catching as possible so, I subsequently edited the image in black and white
while the guitar remained in colour. The guitar is the focal point of the image
and helps ratify the fact that this is a music magazine. The image depicts the
band member playing the guitar and embodies a musical feel and
appearance. I wanted band members to use props during the shoot and I
thought none would work better than a guitar.
4. For the fourth photograph I wanted to create a similar image to the first,
where the three band members are together and expressing distinct
personalities. Like the first image, the man on the left is the ‘cold’ member of
the group and is looking in a different direction. The man in the middle is
looking off into a different direction while smiling while the last member is
smiling directly into the camera. The theme for this image was to generally
display the band together on a plain surfaced background in order to not
detract attention away from them.
5. For this image, I wanted a unique close up angle of the band members and
elected to do one from the side, with all of the members looking off into the
same distance. This creates a sense of unity within the band, as they had
been displaying different emotions and body language in previous images.
The image gets up close and personal with the band and gives a sense of
intimacy for the viewer. The focus on this image is technically on the band
member in the foreground as he is most prominent but, he is not in any way
more eye-catching than the others.
6. This image is the same as the previous one but, I wanted to get it from a
different angle and have all of the band members looking directly into the
camera. The theme of this image is a close-up facial portrait to capture the
band members together. By looking into the camera the band gain a
connection with the viewer and a sense of closeness. This image is in a style to
some professional music photographs I have seen and I based the style off of
9. them.
7. For this image, I once again used the theme of individuality in the band. I
originally had all three of the band members but, I thought it would work
better as a solo shot and so I cropped the others out. As the focus is on just
one person, I made sure the subject took up the majority of the photograph. I
also wanted to show the band members in different positions and the stance
of this member is unique: resting his hands on the guitar and looking off into
the distance. I also wanted more images with a greenery background and so
I selected this photograph
8. The theme of this image was one of seriousness as the two band members
look deadpan into the camera. I had previously focused on individual
members and the band as a whole but in this one I used just two of the
members. This was to create a different look and have a different
appearance and style to the other images in the photography series.
9. For this image, I wanted a theme of the band and their music. So, I took a
photograph of the three band members knelt down together, watching on
while one of them plays music on the guitar. This creates a sense of bonding
between the band members and shows them doing what they do- playing
music. An image of them playing music together is the sort of image that a
music magazine would use and a type that I saw during my research. I also
wanted a different angle to my previous images and so chose the high-
angled shot.
10. For the final image, I simply wanted a shot of the band playing around and
joking with each other. I wanted a theme of fun and to show that they are not
all serious and at the end of the day, simply want to have some fun and enjoy
themselves. The focus is on the three band members having a laugh and it is
supposed to be a lighter image in contrast to some of the more serious ones in
the series.
Techniques used
I used a low aperture for all of my mages, with the f/stop setting ranging from 3.5 to 5.
This resulted in a narrow depth of field. I think that this was a sensible choice as the
majority of my images were only meant to be focused on elements in the foreground
and therefore a higher aperture and wider depth of field was not required. This is
evident in almost every image. In the fifth image, the band members are against a
wall and the shot is from the side. The further away they get, the less sharper and
clearer they appear. I think I could have used a higher f/stop for this one individual
photograph. Apart from that, I think my aperture settings were appropriate and
helped me produce some good, quality images.
My shutter speeds were at a consistent 1/160 sec throughout the photo shoot as I
believe that it was a suitable speed that didn’t hinder the appearance of the images.
Apart from the eighth image, I kept the ISO at the same speed of 400. In the eight
10. image, I made the ISO 800. It was initially 400 throughout the shoot as the weather
and lighting generally remained the same. I changed the ISO very briefly when it
became slightly darker but, I changed it back once again a short while after.
I used the rule of thirds extensively when positioning the band members during the
photo shoot. This is evident in practically every image apart from the two solo shots
(images 3 and 7), even though in a way the rule appears in them. For the other
images, I arranged the band members to be equally close to each other. This helped
the images appear more aesthetically pleasing and easy to look at.
Strengths & suggested improvements
1. I like the positioning of the band members and the background they have. I
think all of the colours work well together, including the band members and
the various greenery. The band have unique poses and look like a professional
musical act. I think that the image is slightly too bright however, and there is
too much focus drawn to the subjects. It also looks slightly too manipulated,
though this isn’t a huge flaw.
2. I think this image is OK but, I think it doesn’t look as professional as it could do.
The idea of the low-down angle is good in my opinion but, the resulting
photograph looks a little forced. The plain background doesn’t help the
image and I think there should have been more changes made during the
editing phase.
3. The third image in the series is one of my personal favourites and it is also the
most unique. I think that the black and white effect is good but, the guitar
doesn’t seem to stand out as much as I would have liked it too. The rest of the
image also seems slightly bland and could have been given something extra
during the editing process to help it stand out more.
4. I think that the fourth image is my least favourite of the series, as I think that it
was over-edited and too patchy in places, where some of the colours seem
strange and out of place. It is an OK set-up- I think the positions of the band
members is good but, I think the editing phase let it down.
5. I think the fifth image is very good with the positions of the band members
being fine as well as the editing. I think the image appears bold and almost
gritty, while having the look of a photograph that would appear in a music
magazine. I think the style and technical quality is very good and I also think
that the various poses and emotions of the band members are great as well.
11. 6. I think that this image is good as it is a close up intimate shot with the band
and helps create a connection with the viewer, as they are looking directly
into the camera. I think that editing is also of a good quality and is neither
overdone nor underdone. I think that the framing of the image is very good
and makes for a good portrait. The only thing I think could make it better is if it
had something that could help it stand out, which could give it extra appeal.
7. I think that this image is a good individual shot of one of the band members
and stands out. I also think that the positioning and framing of the subject is
very good and helps increase the overall quality of the photograph. I think
that a flaw of this image is that it has been edited slightly too much and the
guitar stand out far too much than what I intended. Some of the colours like
the green of the trees and the blue of the jumper are also a little too out of
place.
8. I think that this image wasn’t too good as I think that it was too dark and the
high angle shot and positioning of the subjects was unprofessional. I also once
again think that the image was too heavily manipulated and made various
elements of the photograph look strange and out of place (jumper, guitar
faces).
9. The ninth image is a good one and I think the high angle shot works well here
unlike in the eighth image. I thought that the editing, positioning of subjects
and framing were very good in the photograph. However, I think that in
general, the image doesn’t look very professional and looks rather
amateurish. I think that if it had been a different location and I had edited it
better, the image may have come out stronger.
10. The final image is too light in my opinion and the band members are over-
exposed. The setting is OK as it is similar to the sixth image, but with different
poses from the band members. I think that the poses and positioning of the
band members is good but, the editing is not and I believe this is what brings
down the photo.
Overall, I am generally satisfied with my images and I think that on the whole they are
OK. The editing is good in places as are the themes and ideas for the images.
However, the editing is also bad in places and some of the photographs look
unprofessional. This effectively evens out my series.
Editing details
1. For my first photography image, I cropped out the top of the frame because it
was generally plain and drew attention away from the focal point of the
image- the three band members. By cropping the image I made it more
concise and made the three band members take up the majority of the
12. photo. I then increased the brightness and contrast, to make the image stand
out more and become more eye-catching. It helped brighten the three
subject's clothes, the guitar and the trees, which went from being dull and
grey to a rich green.
2. For this image’s edit I increased the contrast, as there was a large amount of
brightness in the background that made the photo too bright and drained the
image of colour. I also used the sharpness tool on the scarf on the left and the
jacket on the right, in order to make it stand out more.
3. I had previously used a black and white effect on two of my landscape
images and I decided to do so once again for this photograph. I used the
polygonal lasso tool to select all visible parts of the guitar and cut and pasted
them onto their own layer. I then made the original photo black and white. I
used a black and white effect because I wanted some unique photographs
in the series.
4. For this image I took the photograph on a plain wall background, in order to
not draw attention away from the band members. I then changed the
brightness and contrast along with the vibrancy, to bring out the colours on
each person's clothing more. I cropped out some of the top of the
photograph as it was plain and blank. By cropping I made the image more
concise. When I first increased the vibrancy the two band members who were
on the right had side had bright red lips, so I used the polygonal lasso tool to
select those individual body parts and bring down their brightness. Lastly, I
used the sharpening tool on the middle member's scarf and the right hand
side member's jumper.
5. For the sixth image, I cropped a slight amount of wall from the top and side of
the photograph. This was in order to make the image more compact and
concise, as the plain wall didn't offer much to the overall picture. Once I had
done that, I increased the brightness very slightly and the contrast much
more. This helped to create an eye-catching, clearer image. It also helped
enrich the colours in the image changing them from dull and flat to more
distinct and eye-popping. Lastly, I used the sharpening tool on the jumper of
the member on the right hand side.
6. I cropped the top of the photograph as the plain wall made the image seem
too large, with the newer version looking more compact. I did not need to
crop anything else as I had asked the three members to get close together.
Following the crop, I increased the contrast a lot and the brightness slightly,
like I had done with image 5. This brought out the colours in the image more
and made it clearer and perkier.
7. n this image I originally wanted all three of the band's members to appear
13. but, the large gap between the two on the left hand side was too great and I
didn't think it would work well the way it was. However, I thought that the
member on the far left could work well in a solo shot so, I cropped out the rest
of the image. I cropped it so he adequately fitted the frame. I did not want
him to be too close-up and wanted him to have surrounding room in the
photograph. Following the crop I greatly increased the vibrancy, which
brought out his blue jumper and the greenery in the background. I also then
used the sharpening tool on his guitar and glasses to make them stand out
more.
8. For this image, I cropped out a part of the left hand side of the image as well
as taking a bit off the top. This helped to create a more concise photograph,
which is a theme I have followed throughout this photography series.
Following this, I increased the contrast and brightness to make the image
stand out more and to enrich the bland colours.
9. I cropped out a lot of the sides of the images as I wanted a more compact
image that only focused on the band. As I have done with many of my other
photographs, I then increased the contrast and brightness to bring out the
colours in the image.
10. For this image edit, I cropped out a large amount of the wall above them so
they are the key focal point of the image. I then increased the brightness and
contrast to make the three members stand out more.
Capture Log
Setting Shutter Speed ISO Aperture
1.Manual
2.Manual
3.Manual
4.Manual
5.Manual
6.Manual
7.Manual
8.Manual
9.Manual
10.Manual
1/160 sec
1/160 sec
1/160 sec
1/160 sec
1/160 sec
1/160 sec
1/160 sec
1/160 sec
1/160 sec
1/160 sec
400
400
400
400
400
400
400
800
400
400
F/5
F/4
F/5
F/4
F/4.5
F/5
F/4
F/4.5
F/3.5
F/5