1. This is the start of the process designing my front cover for my magazine. As you can see it is a medium close
up of my front cover model as from my research I found out that this is the sort of image they wanted to
have. As well as my main image, I started to design my masthead. I decided to have it red with a black outline
to make it stand out more; I have done this by using the ‘stroke’ effect. I have also done it as that is what my
target audience wanted to see.
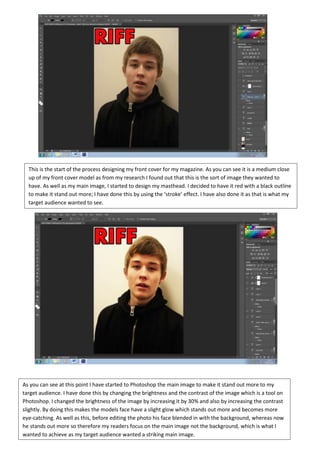
As you can see at this point I have started to Photoshop the main image to make it stand out more to my
target audience. I have done this by changing the brightness and the contrast of the image which is a tool on
Photoshop. I changed the brightness of the image by increasing it by 30% and also by increasing the contrast
slightly. By doing this makes the models face have a slight glow which stands out more and becomes more
eye-catching. As well as this, before editing the photo his face blended in with the background, whereas now
he stands out more so therefore my readers focus on the main image not the background, which is what I
wanted to achieve as my target audience wanted a striking main image.
2. Once I had sorted out my main image and masthead I then started to concentrate on the text and cover lines. As you
can see I went for the colour scheme of blue and red, as my magazine is aimed at young males and I feel they are the
colours that represent young males. I did the font colour by clicking the ‘swatches’ button in the top left hand corner.
From there I chose these colours. As you can see the different fonts are in particular places on the page. I did this by
clicking the ‘T’ tool on the left hand side of the Photoshop page. From there I then drew text boxes in particular places
where I wanted my text. You may also notice that some of the text has a black outside layer round the edges just like
the masthead. I did this by choosing the ‘stroke’ tool and then from there I could choose the thickness of the black
outline. I decided to do this as it makes it look for professional and also makes the font stand out more as that is what I
want my target audience to focus on.
3. After I had sorted all my text out, I then wanted to use a footer as it takes up room, makes the magazine
look professional as most music magazines have them and also I wanted to include more bands on this
footer. I made the footer by using the rectangle tool in the left hand tool bar; from there I was able to
draw the rectangle at the bottom of the page. After that I decided to fill it with the colour blue as it goes
with the colour scheme and also stands out. I filled in the rectangle by using the swatches tool and then
filling it in the text box, to get a bright blue bar across the bottom of my cover page.
After that I decided to include bands on this footer. I did this by using the ‘T’ tool and then highlighting where I
wanted the text. I then typed the bands into the text box that I wanted to include. After I had typed them out I
decided to use the colour font of white as it looks professional and stands out on the bright blue strip. After I had got
the text white I decided to use a black outline like most of my text to make it look professional. I did this by using the
stroke tool as usual.
After that I decided to use red bullet points in between the text as it fills the gap and makes it look more
professional. I have done this by using the tool that looks like a circle on the left hand side. From there I
carefully clicked to make the circle the right size and then copy and pasted it and placed it in the other
space. After that I used the fill tool to make the circle red as it fits in with my colour scheme and doesn’t
clash with the blue strip.
4. Finally, I decided to include a bar code on the front of my magazine, as it makes it look professional
and also shows that you can purchase this particular magazine. I did this by finding a barcode on the
internet, after I had found one I liked. I use the picture tool bar on the left hand side, drew out a
text box and pasted the barcode I to it. I did this by going into file then place. Once I had done that I
made it the right size and placed it in the appropriate position.