
Recommended
More Related Content
What's hot
What's hot (20)
Viewers also liked
Viewers also liked (18)
Similar to Image Evaluation: Stretcher Chest
Similar to Image Evaluation: Stretcher Chest (20)
Recently uploaded
Recently uploaded (20)
Image Evaluation: Stretcher Chest
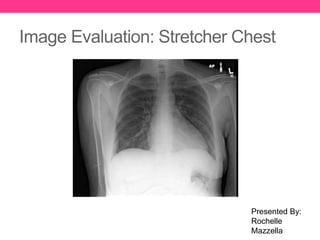
- 1. Image Evaluation: Stretcher Chest Presented By: Rochelle Mazzella
- 2. HIPAA Compliance • This image is HIPAA compliant. • Patient identification has been removed from this image • Any information that could lead to the institution where the image was take has been removed. • This image does not violate the privacy of the patient.
- 3. Markers and Patient ID • A correct anatomical side marker visible in the image. • The side marker is properly placed in this image. • The marker does not superimpose anatomy. • This image is displayed anatomically correct.
- 4. Markers and Patient ID • Additional markers are needed for this image • A position marker indicates if the patient was upright or supine • An up arrow marker is being used to show that the patient was positioned upright • An “AP” or “PA” marker needs to be used to show if the how the patient was positioned for the image • An “AP” marker is being used in this image to indicate that the patient was in an AP orientation • The image is correctly displayed based on marker placement.
- 5. Radiation Hygiene • Beam Restriction Rule: • A minimum of three sides of beam restriction must be visible on an image • There is only one side of collimation visible on this image. • This does not fit minimum standards • Beam restriction must be shown on the side closest to the gonads. • Which is shown in this image • Shielding rule: • Gonadal shielding must be provided if the gonads are within five centimeters of the primary beam. • No evidence of secondary shielding
- 6. Radiation Hygiene This image now shows acceptable collimation
- 7. Completeness of Position/Projection PA/AP Chest Lateral Chest
- 8. Completeness of Position/Projection • This Image does comply with routine position/projections • All anatomical parts are correctly visualized in this image.
- 9. Artifact Identification • There are not any preventable physical artifacts visible in the image. • There are not any body parts superimposed that should not be. • There are not any hospital paraphernalia present and/or visible in the image.
- 10. Artifact Identification • There are not any patient clothing/belongings visible in the image. • There are not any indwelling artifacts/foreign bodies visible in the image.
- 11. Artifact Identification • There is not excess fog degrading image quality. • There are no CR/DR artifacts.
- 12. Image Sharpness • There is not any “gross” voluntary motion visible in the image. • There is not any excessive quantum mottle (or image noise) visible in the image. • There is not any evidence of a pervious exposure.
- 13. Image Sharpness • There are not grid lines, grid artifact &/or grid cut- off visible in the image because a grid is not typically used for a stretcher chest. • Size distortion does not appear greater than expected. • Slight shape distortion is being caused by poor CR/IR/part alignment.
- 14. Accurate Part Positioning • The part is adequately aligned to the image media. • The part is not adequately centered to the image media. • The CR is not centered to within 1 cm of the anatomical part.
- 15. Accurate Part Positioning • The part is accurately aligned to the longitudinal axis of the image.
- 16. Accurate Part Positioning Optimal Alignment Acceptable Alignment
- 17. Accurate Part Positioning Because this image only has one side of collimation it does not fit optimal or acceptable alignment.
- 18. Accurate Part Positioning With the newly added collimation, this image would fit optimal alignment
- 19. Accurate Part Positioning • Clean x-ray machine before exiting patient room • Use appropriate personal coverings • Cover IR with plastic bag or pillow case • Appropriate technical date have been set • Record the required data
- 20. Accurate Part Positioning • Position the patient in an upright, seated AP projection • Center a 14x17 inch IR cassette or digital plat CW/LW beneath the chest to fit the body habitus • Align the IR and midcoronal plane parallel with the bed • Align the front face of the collimator parallel with the IR • Align the CR perpendicular to the IR • Elevate the chin out of the collimate field • Depress the shoulders
- 21. Accurate Part Positioning • Place the back of the hands on the hips and rotate the elbows and shoulders, anteriorly if possible • Center the CR to the MSP at a level 4 inches inferior to the jugular notch • Move the arms and any moveable lead wires outside the collimation field • Take the exposure after the second full suspended inspiration
- 22. Accurate Part Positioning: Evaluation Criteria • Evidence of proper collimation • Medial portion of the clavicles equidistant from the vertebral column • Trachea visible in the midline • Clavicles lying more horizontal and obscuring more of the apices than in the PA projection
- 23. Accurate Part Positioning: Evaluation Criteria • Equal distance from the vertebral column to the lateral border of the ribs on each side • Faint image of the ribs and thoracic vertebrae visible through the heart shadow • Entire lung fields, from the apices to the costophrenic angles • Pleural vascular markings visible from the hilar regions to the periphery of the lungs
- 24. Accurate Part Positioning: Evaluation Criteria
- 25. Judicious Exposure Technique • The most radiolucent structure seen in this image is the air in the lungs and trachea. The air is adequately seen in the image. • The most radiopaque structure in the image is the patient’s stomach.
- 26. Judicious Exposure Technique Assessment of Window Width • A image of the chest should display short scale contrast. • Short scale contrast is a minimum number of grays between black and whites on a radiograph. • I think this image displays adequate short scale contrast.
- 27. Judicious Exposure Technique Assessment of Window Level • This image appears to have acceptable brightness. • All structures are clearly seen. • I believe the EI value will be in acceptable range, but will in the lower range of the acceptable range.
- 28. Accept/Reject • This image does meet all evaluation criteria and does show all anatomy needed for the given radiograph. • I would accept this radiograph.
- 29. Accept/Reject • To make this a more diagnostic image: • Adjusting the collimation • Ensuring that there is at least 3 sides of collimation • Collimation should show only anatomy of interest • This could adjust the high brightness seen at the bottom of the image • Apply secondary shielding to the patient • Have patient depress shoulders more to have clavicles lay more horizontal
- 30. References • Fauber, T. L. (2013). Radiographic Image and Exposure (4th ed.) St. Louis, MO: Elsevier. • Frank, E. D., Long, B. W., Smith, B. J., Merrill, V., & Ballinger, P. W. (2007). Merrill’s Atlas of Radiographic Positioning & Procedures. St. Louis, MO: Mosby/Elsevier. Page 519 • McQuillen-Martensen, K. (2015). Radiographic Image Analysis. Vol. 4. St. Louis, MO: Elsevier. Page 99