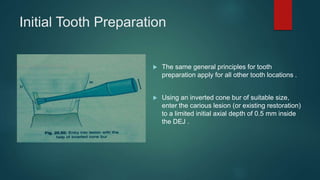
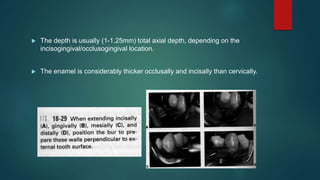
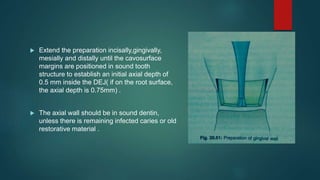
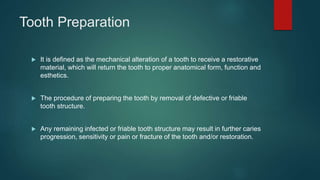
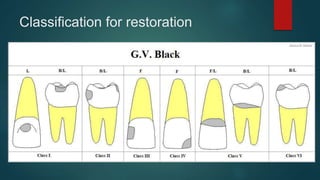
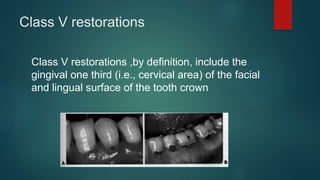
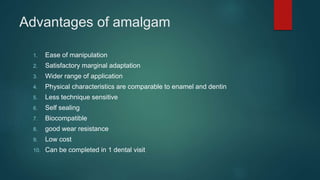
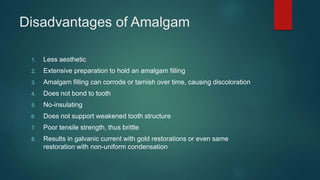
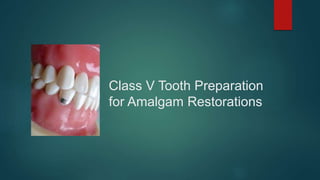
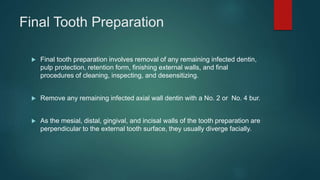
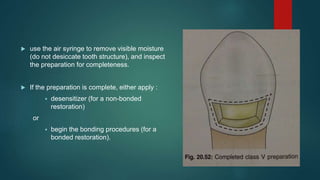
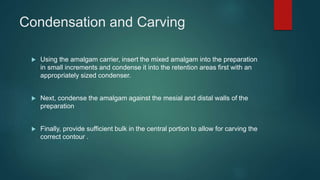
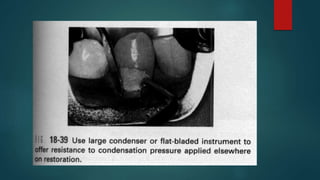
Class V Tooth
Preparation for Amalgam
Restorations
MARYAM ARBAB
Tooth Preparation
 It is defined as the mechanical alteration of a tooth to receive a restorative
material, which will return the tooth to proper anatomical form, function and
esthetics.
 The procedure of preparing the tooth by removal of defective or friable
tooth structure.
 Any remaining infected or friable tooth structure may result in further caries
progression, sensitivity or pain or fracture of the tooth and/or restoration.
Classification for restoration
Class V restorations
Class V restorations ,by definition, include the
gingival one third (i.e., cervical area) of the facial
and lingual surface of the tooth crown
Amalgam
 Amalgam is an alloy in which mercury occurs as a main component.
 Dental Amalgam is an alloy of mercury with silver, tin and varying amounts
of copper, zinc and other minor components.
Advantages of amalgam
1. Ease of manipulation
2. Satisfactory marginal adaptation
3. Wider range of application
4. Physical characteristics are comparable to enamel and dentin
5. Less technique sensitive
6. Self sealing
7. Biocompatible
8. good wear resistance
9. Low cost
10. Can be completed in 1 dental visit
Disadvantages of Amalgam
1. Less aesthetic
2. Extensive preparation to hold an amalgam filling
3. Amalgam filling can corrode or tarnish over time, causing discoloration
4. Does not bond to tooth
5. No-insulating
6. Does not support weakened tooth structure
7. Poor tensile strength, thus brittle
8. Results in galvanic current with gold restorations or even same
restoration with non-uniform condensation
Contraindications of Amalgam
 When aesthetics is the prime concern
 Small to moderate class I and II preparations
Class V Tooth Preparation
for Amalgam Restorations
Principles of tooth preparation
 There are 2 steps
 Initial tooth preparation
 Outline form
 Primary resistance form
 Primary retention form
 Convenience form
 Final tooth preparation
 Management of remaining caries
 Secondary resistance and retention form
 Pulp protection, if required
 Finishing of enamel margins
 Final inspection of preparation
Initial Tooth Preparation
 The same general principles for tooth
preparation apply for all other tooth locations .
 Using an inverted cone bur of suitable size,
enter the carious lesion (or existing restoration)
to a limited initial axial depth of 0.5 mm inside
the DEJ .
 The depth is usually (1-1.25mm) total axial depth, depending on the
incisogingival/occlusogingival location.
 The enamel is considerably thicker occlusally and incisally than cervically.
 Extend the preparation incisally,gingivally,
mesially and distally until the cavosurface
margins are positioned in sound tooth
structure to establish an initial axial depth of
0.5 mm inside the DEJ( if on the root surface,
the axial depth is 0.75mm) .
 The axial wall should be in sound dentin,
unless there is remaining infected caries or old
restorative material .
 Preparation of the axial wall depth 0.5 mm inside the DEJ results in a
uniform depth for the entire preparation .
 A depth of 0.5 mm inside the DEJ will permit placement of necessary
retention grooves without undermining the enamel .
Final Tooth Preparation
 Final tooth preparation involves removal of any remaining infected dentin,
pulp protection, retention form, finishing external walls, and final
procedures of cleaning, inspecting, and desensitizing.
 Remove any remaining infected axial wall dentin with a No. 2 or No. 4 bur.
 As the mesial, distal, gingival, and incisal walls of the tooth preparation are
perpendicular to the external tooth surface, they usually diverge facially.
 Consequently, this form provides no inherent retention, and retention form
must be provided .
 Use a No.1/4 bur to prepare two retention grooves, one along the incisoaxial
line angle and the other along the gingivoaxial line angle.
 The depth of the grooves should be approximately 0.25 mm, which is half the
diameter of the bur.
 Finally, clean the preparation using air-water spray and evacuation.
 use the air syringe to remove visible moisture
(do not desiccate tooth structure), and inspect
the preparation for completeness.
 If the preparation is complete, either apply :
 desensitizer (for a non-bonded
restoration)
or
 begin the bonding procedures (for a
bonded restoration).
Condensation and Carving
 Using the amalgam carrier, insert the mixed amalgam into the preparation
in small increments and condense it into the retention areas first with an
appropriately sized condenser.
 Next, condense the amalgam against the mesial and distal walls of the
preparation
 Finally, provide sufficient bulk in the central portion to allow for carving the
correct contour .
 Carving may begin immediately after insertion of the amalgam
 the side of the carving instrument should always rest on unprepared tooth
surface adjacent to the prepared cavosurface margin. This prevents
overcarving.
 Begin the carving procedure by removing excess amalgam to expose the
incisal (or occlusal) margin.
 Continue removing excess to expose the mesial and distal margins.
 Finally, carve away excess at the gingival margin
Finishing and Polishing
 If carving procedures were performed correctly, no finishing of the
restoration should be required.
 However ,additional finishing and polishing of amalgam restorations may
be necessary to correct a marginal discrepancy or improve the contour.
 Care is required when using stones or any rotating cutting instruments on
margins positioned below the cementoenamel junction (CEJ).
 This is because of the possibility of removing cementum or notching the tooth
structure gingival to the margin or both
References
• Art and Science of
Operative dentistry
• Textbook of Operative
Dentistry
• Internet
Questions
Thank You!

Classvcavitypreparationforamalgamrestorations-gate01

  • 1.
    Class V Tooth Preparationfor Amalgam Restorations MARYAM ARBAB
  • 2.
    Tooth Preparation  Itis defined as the mechanical alteration of a tooth to receive a restorative material, which will return the tooth to proper anatomical form, function and esthetics.  The procedure of preparing the tooth by removal of defective or friable tooth structure.  Any remaining infected or friable tooth structure may result in further caries progression, sensitivity or pain or fracture of the tooth and/or restoration.
  • 3.
  • 4.
    Class V restorations ClassV restorations ,by definition, include the gingival one third (i.e., cervical area) of the facial and lingual surface of the tooth crown
  • 5.
    Amalgam  Amalgam isan alloy in which mercury occurs as a main component.  Dental Amalgam is an alloy of mercury with silver, tin and varying amounts of copper, zinc and other minor components.
  • 6.
    Advantages of amalgam 1.Ease of manipulation 2. Satisfactory marginal adaptation 3. Wider range of application 4. Physical characteristics are comparable to enamel and dentin 5. Less technique sensitive 6. Self sealing 7. Biocompatible 8. good wear resistance 9. Low cost 10. Can be completed in 1 dental visit
  • 7.
    Disadvantages of Amalgam 1.Less aesthetic 2. Extensive preparation to hold an amalgam filling 3. Amalgam filling can corrode or tarnish over time, causing discoloration 4. Does not bond to tooth 5. No-insulating 6. Does not support weakened tooth structure 7. Poor tensile strength, thus brittle 8. Results in galvanic current with gold restorations or even same restoration with non-uniform condensation
  • 8.
    Contraindications of Amalgam When aesthetics is the prime concern  Small to moderate class I and II preparations
  • 9.
    Class V ToothPreparation for Amalgam Restorations
  • 10.
    Principles of toothpreparation  There are 2 steps  Initial tooth preparation  Outline form  Primary resistance form  Primary retention form  Convenience form  Final tooth preparation  Management of remaining caries  Secondary resistance and retention form  Pulp protection, if required  Finishing of enamel margins  Final inspection of preparation
  • 11.
    Initial Tooth Preparation The same general principles for tooth preparation apply for all other tooth locations .  Using an inverted cone bur of suitable size, enter the carious lesion (or existing restoration) to a limited initial axial depth of 0.5 mm inside the DEJ .
  • 12.
     The depthis usually (1-1.25mm) total axial depth, depending on the incisogingival/occlusogingival location.  The enamel is considerably thicker occlusally and incisally than cervically.
  • 13.
     Extend thepreparation incisally,gingivally, mesially and distally until the cavosurface margins are positioned in sound tooth structure to establish an initial axial depth of 0.5 mm inside the DEJ( if on the root surface, the axial depth is 0.75mm) .  The axial wall should be in sound dentin, unless there is remaining infected caries or old restorative material .
  • 14.
     Preparation ofthe axial wall depth 0.5 mm inside the DEJ results in a uniform depth for the entire preparation .  A depth of 0.5 mm inside the DEJ will permit placement of necessary retention grooves without undermining the enamel .
  • 15.
    Final Tooth Preparation Final tooth preparation involves removal of any remaining infected dentin, pulp protection, retention form, finishing external walls, and final procedures of cleaning, inspecting, and desensitizing.  Remove any remaining infected axial wall dentin with a No. 2 or No. 4 bur.  As the mesial, distal, gingival, and incisal walls of the tooth preparation are perpendicular to the external tooth surface, they usually diverge facially.
  • 16.
     Consequently, thisform provides no inherent retention, and retention form must be provided .  Use a No.1/4 bur to prepare two retention grooves, one along the incisoaxial line angle and the other along the gingivoaxial line angle.  The depth of the grooves should be approximately 0.25 mm, which is half the diameter of the bur.  Finally, clean the preparation using air-water spray and evacuation.
  • 17.
     use theair syringe to remove visible moisture (do not desiccate tooth structure), and inspect the preparation for completeness.  If the preparation is complete, either apply :  desensitizer (for a non-bonded restoration) or  begin the bonding procedures (for a bonded restoration).
  • 18.
    Condensation and Carving Using the amalgam carrier, insert the mixed amalgam into the preparation in small increments and condense it into the retention areas first with an appropriately sized condenser.  Next, condense the amalgam against the mesial and distal walls of the preparation  Finally, provide sufficient bulk in the central portion to allow for carving the correct contour .
  • 20.
     Carving maybegin immediately after insertion of the amalgam
  • 21.
     the sideof the carving instrument should always rest on unprepared tooth surface adjacent to the prepared cavosurface margin. This prevents overcarving.  Begin the carving procedure by removing excess amalgam to expose the incisal (or occlusal) margin.  Continue removing excess to expose the mesial and distal margins.
  • 22.
     Finally, carveaway excess at the gingival margin
  • 23.
    Finishing and Polishing If carving procedures were performed correctly, no finishing of the restoration should be required.  However ,additional finishing and polishing of amalgam restorations may be necessary to correct a marginal discrepancy or improve the contour.
  • 24.
     Care isrequired when using stones or any rotating cutting instruments on margins positioned below the cementoenamel junction (CEJ).  This is because of the possibility of removing cementum or notching the tooth structure gingival to the margin or both
  • 25.
    References • Art andScience of Operative dentistry • Textbook of Operative Dentistry • Internet
  • 26.
  • 27.