
Recommended
More Related Content
What's hot
What's hot (20)
Similar to Unity workflow
Similar to Unity workflow (20)
More from DarylBatesGames
More from DarylBatesGames (20)
Recently uploaded
Recently uploaded (20)
Unity workflow
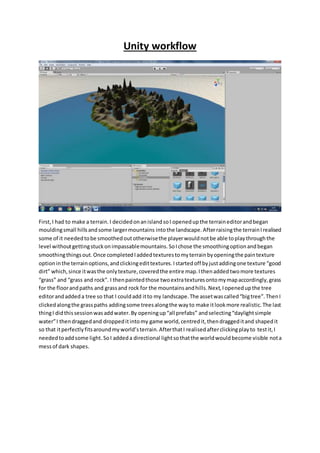
- 1. Unity workflow First, I had to make a terrain. I decided on an island so I opened up the terrain editor and began moulding small hills and some larger mountains into the landscape. After raising the terrain I realised some of it needed to be smoothed out otherwise the player would not be able to play through the level without getting stuck on impassable mountains. So I chose the smoothing option and began smoothing things out. Once completed I added textures to my terrain by opening the pain texture option in the terrain options, and clicking edit textures. I started off by just adding one texture “good dirt” which, since it was the only texture, covered the entire map. I then added two more textures “grass” and “grass and rock”. I then painted those two extra textures onto my map accordingly, grass for the floor and paths and grass and rock for the mountains and hills. Next, I opened up the tree editor and added a tree so that I could add it to my landscape. The asset was called “big tree”. Then I clicked along the grass paths adding some trees along the way to make it look more realistic. The last thing I did this session was add water. By opening up “all prefabs” and selecting “daylight simple water” I then dragged and dropped it into my game world, centred it, then dragged it and shaped it so that it perfectly fits around my world’s terrain. After that I realised after clicking play to test it, I needed to add some light. So I added a directional light so that the world would become visible not a mess of dark shapes.
- 2. I wanted to create my own texture for my world, so I decided that I wanted a desert landscape so I googled sand textures and found this 4MP image and then put it Photoshop so I could edit it to the specifics that unity requires (1024 by 1024 and 72 pixels per inch). Then I had to get rid of the company logo (I mean what, no copyright here ;)!) so I used the “clone stamp tool” to select a piece of the image and place it over the top of the text. By pressing “Alt” and clicking somewhere on the image you can choose which part you want to copy then make sure you’re using a soft brush and begin to colour over the text. After I had made my texture I saved i t as a .png file and dragged and dropped it into the terrain assets folder, then made a new texture with my texture and began painting my world in my texture. (Below is a picture of my texture painted onto my world)
- 3. I edited my terrain once again to an entirely new design. This layout is for easier placing of coins, the games core mechanic collecting coins.
- 4. I added some coins from the asset store; I gave them a collision so that you don’t just walk through them. I’m still working on a code so that it works… I added a third person controller (I acquired this 3D model and all of its assets and properties from unity’s asset store) and then I added the animation properties to it so it wouldn’t be a static image running the map.
- 5. I decided to make a wall jumping game, in which you jump from wall to wall in order to, make it to the end. I decided that the walls should have strange and funny textures to make the game just a little bit harder. There are also obstacles inside the run way that you must contend with and make your way around. If you hit the floor while inside the run way, you get teleported back to the start. Once you reach the end, you get sent to an invisible box in which you are trapped forever! (Unless you quit the game)
- 6. Bellow are some screen shots of the inside of my run way. All of the walls and obsticals inside where created using simply boxes and molding them into wall shapes and coy pasting them and lining them up.
- 7. Unfortunately, the final creation of this level was a bit rushed due to time. So, as you can see with the gaps in the map, there are some minor bugs. I like to think of those as a mental choice, escape the map and roam free! Or, take the gamble on if I was telling the truth about it being a trap. **SPOLIER** I was.