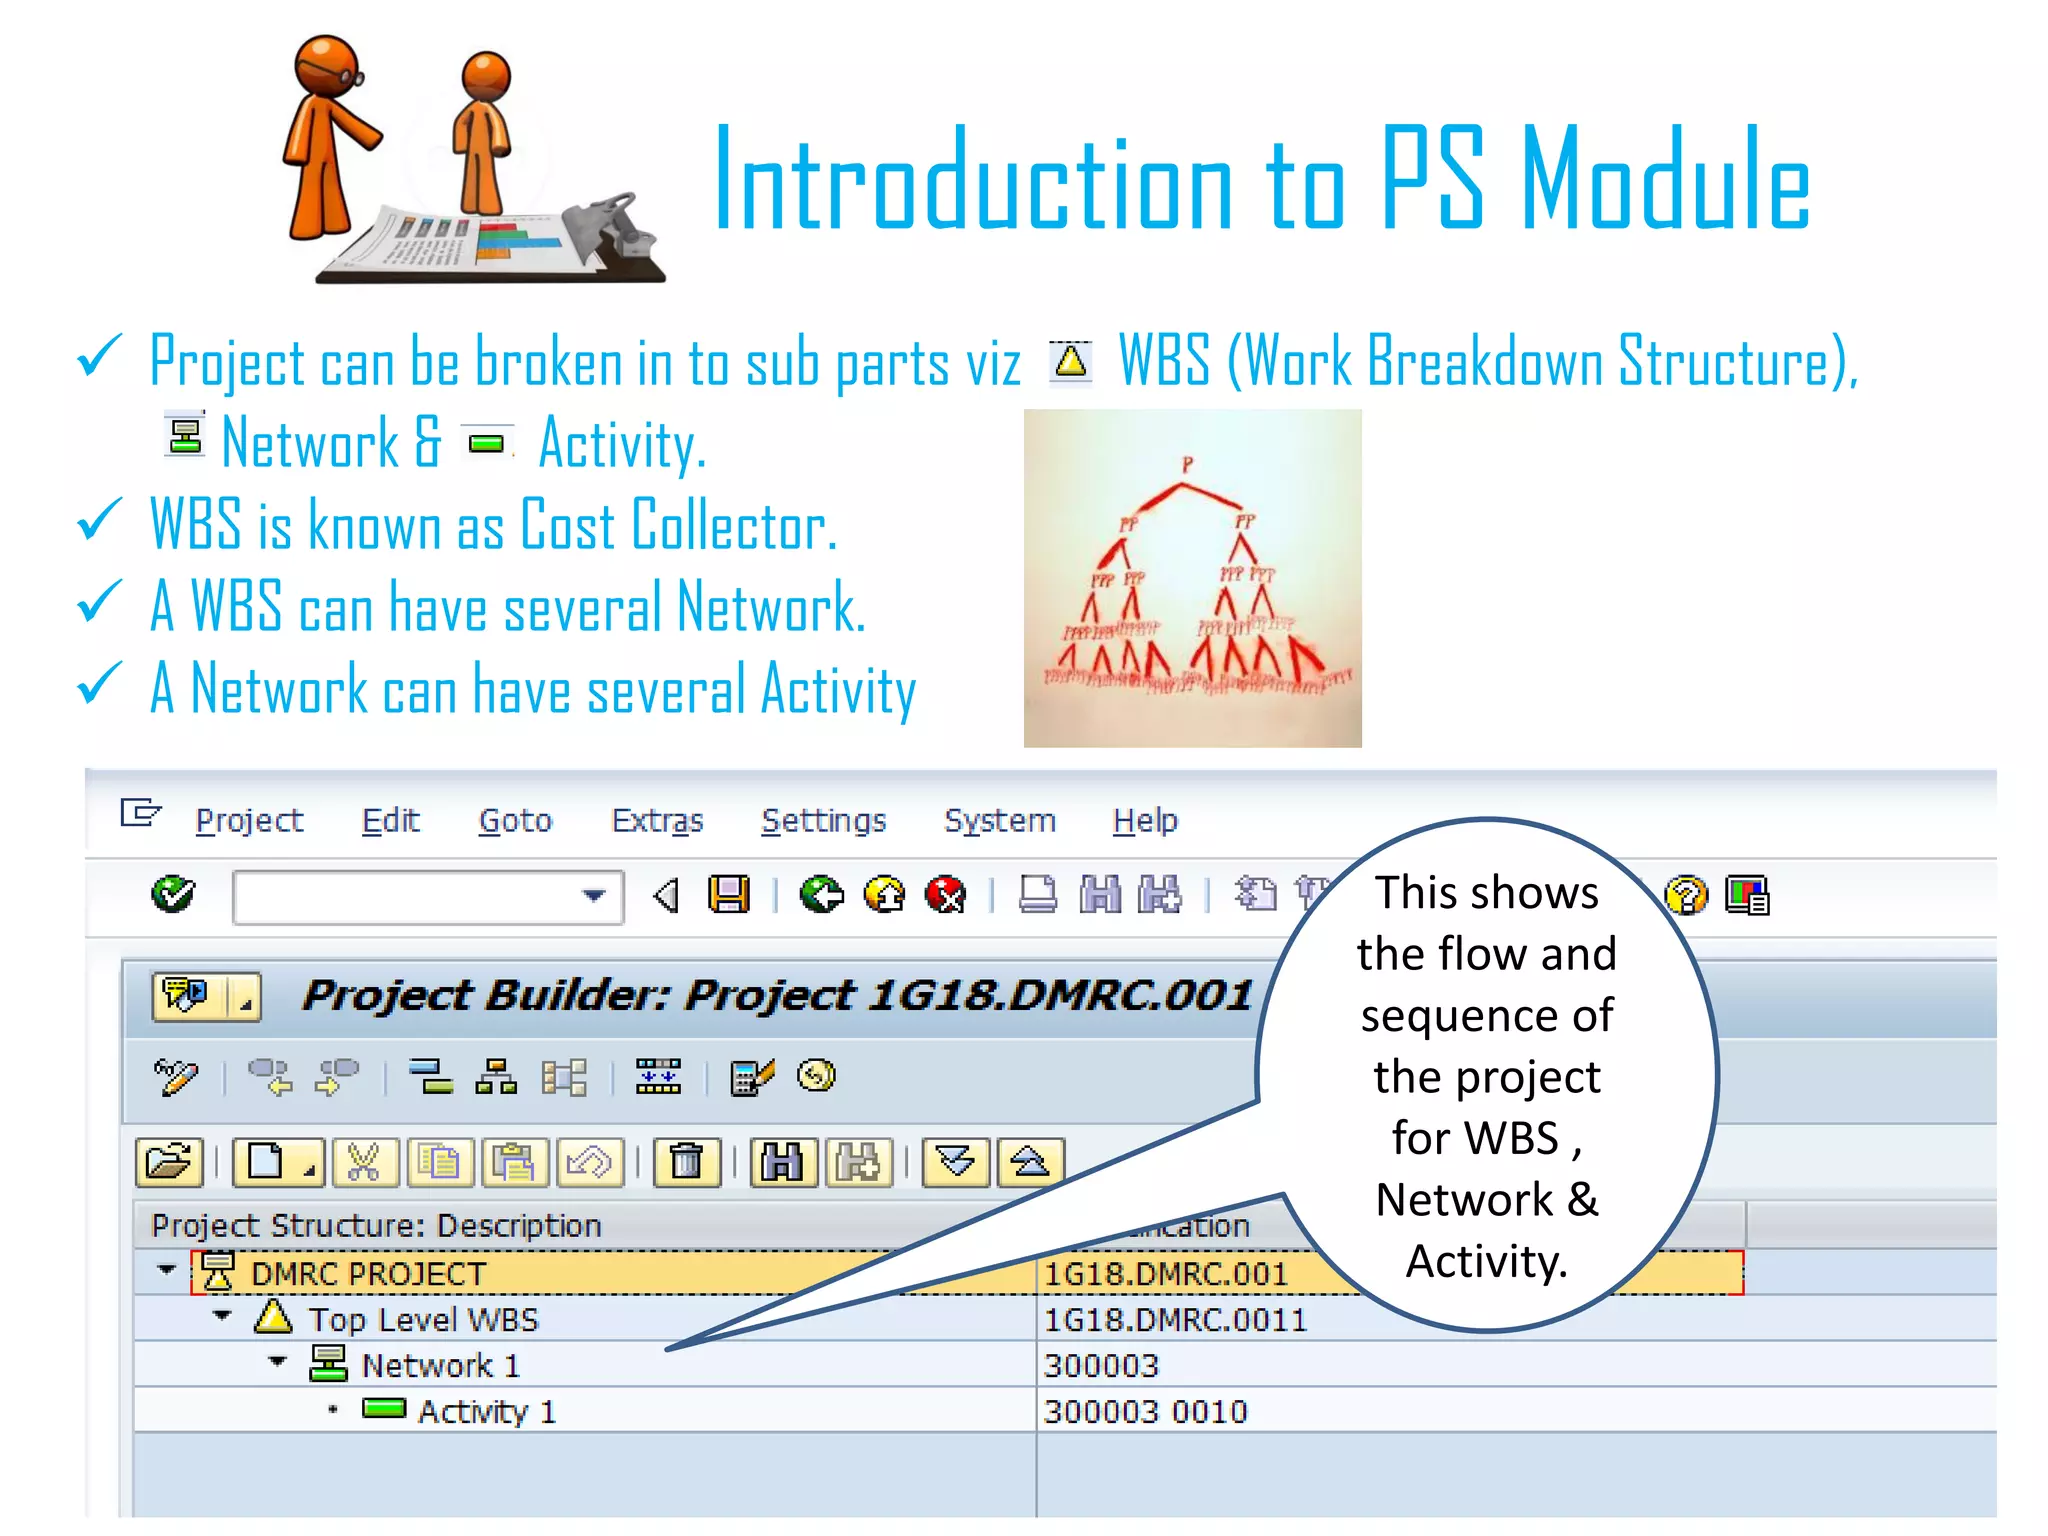
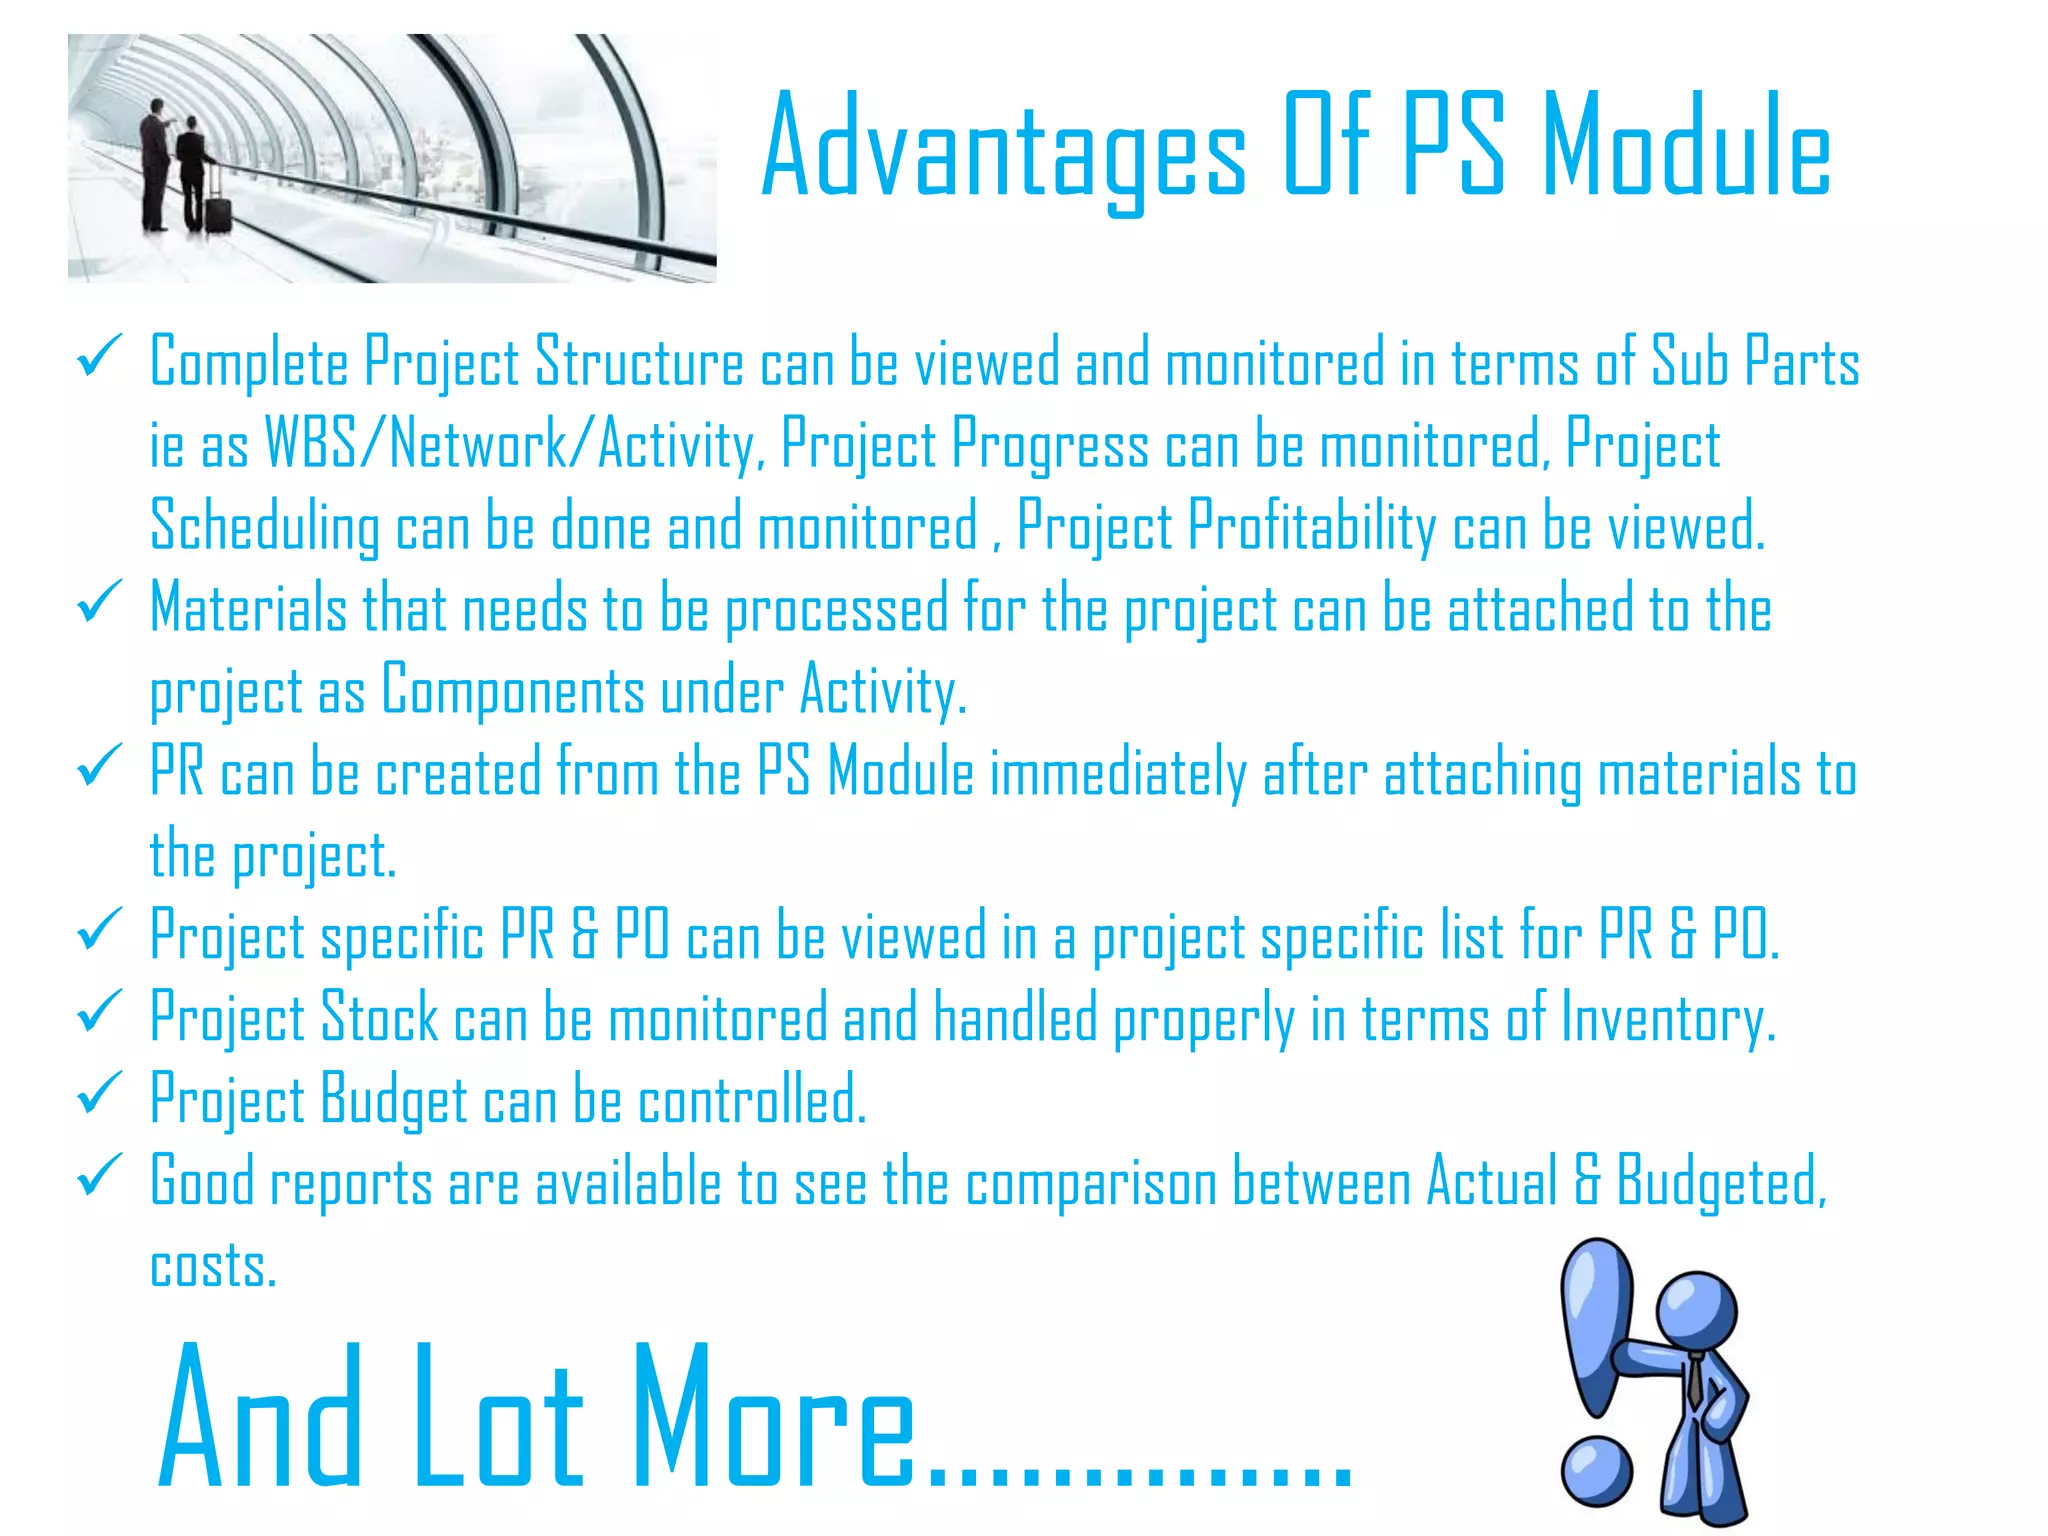
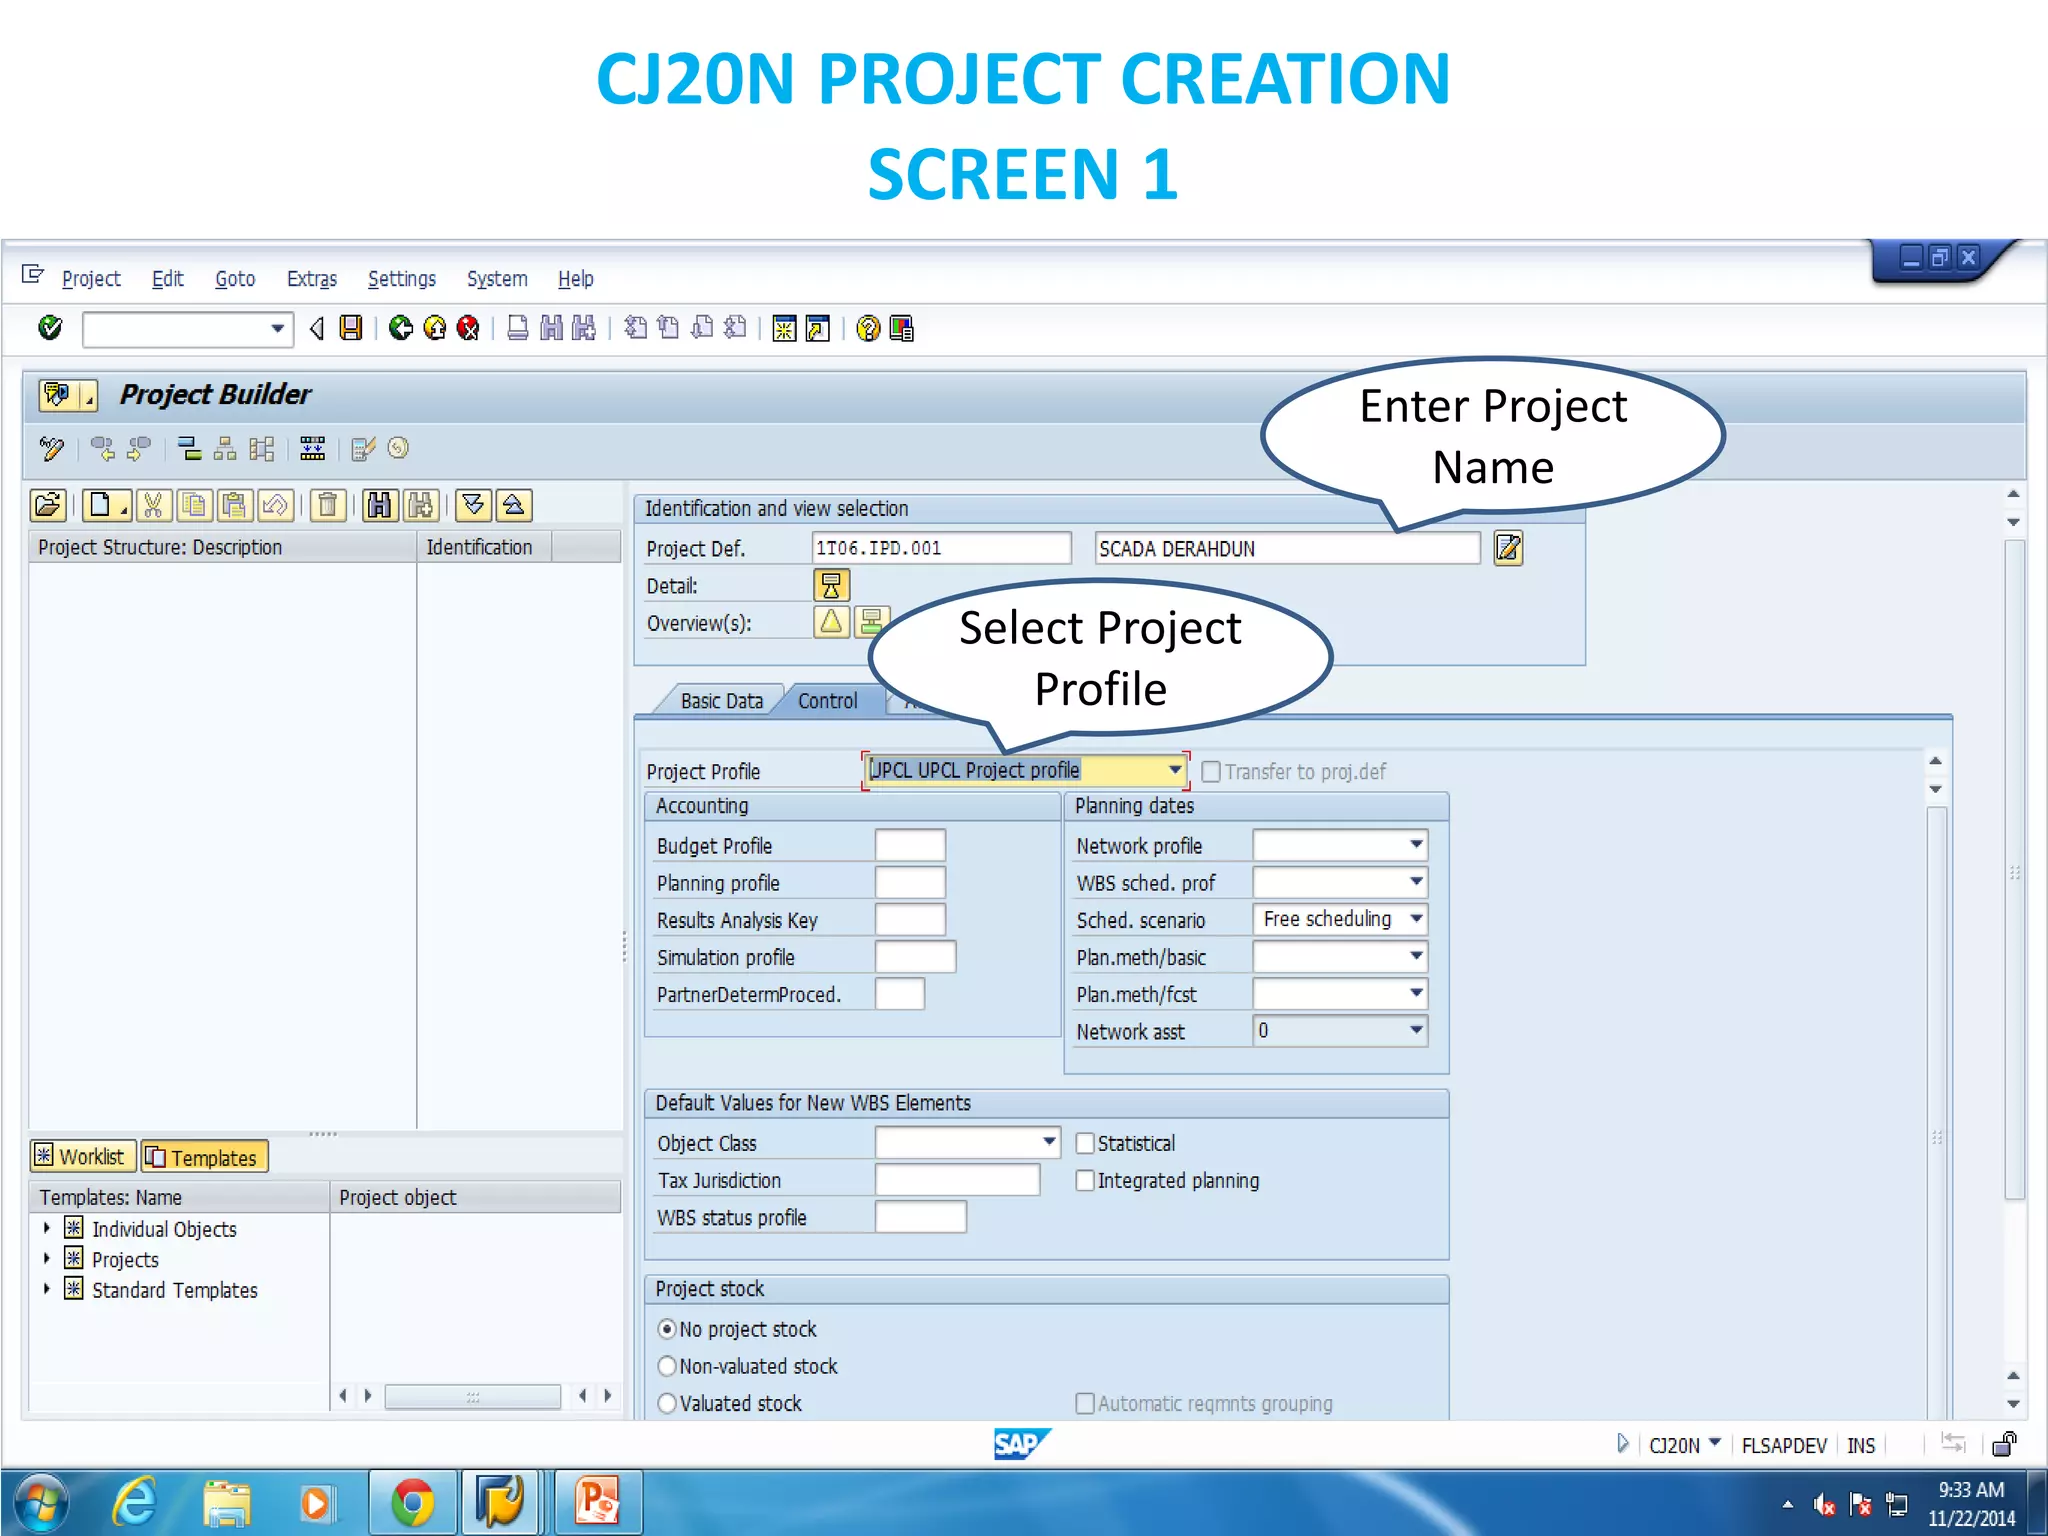
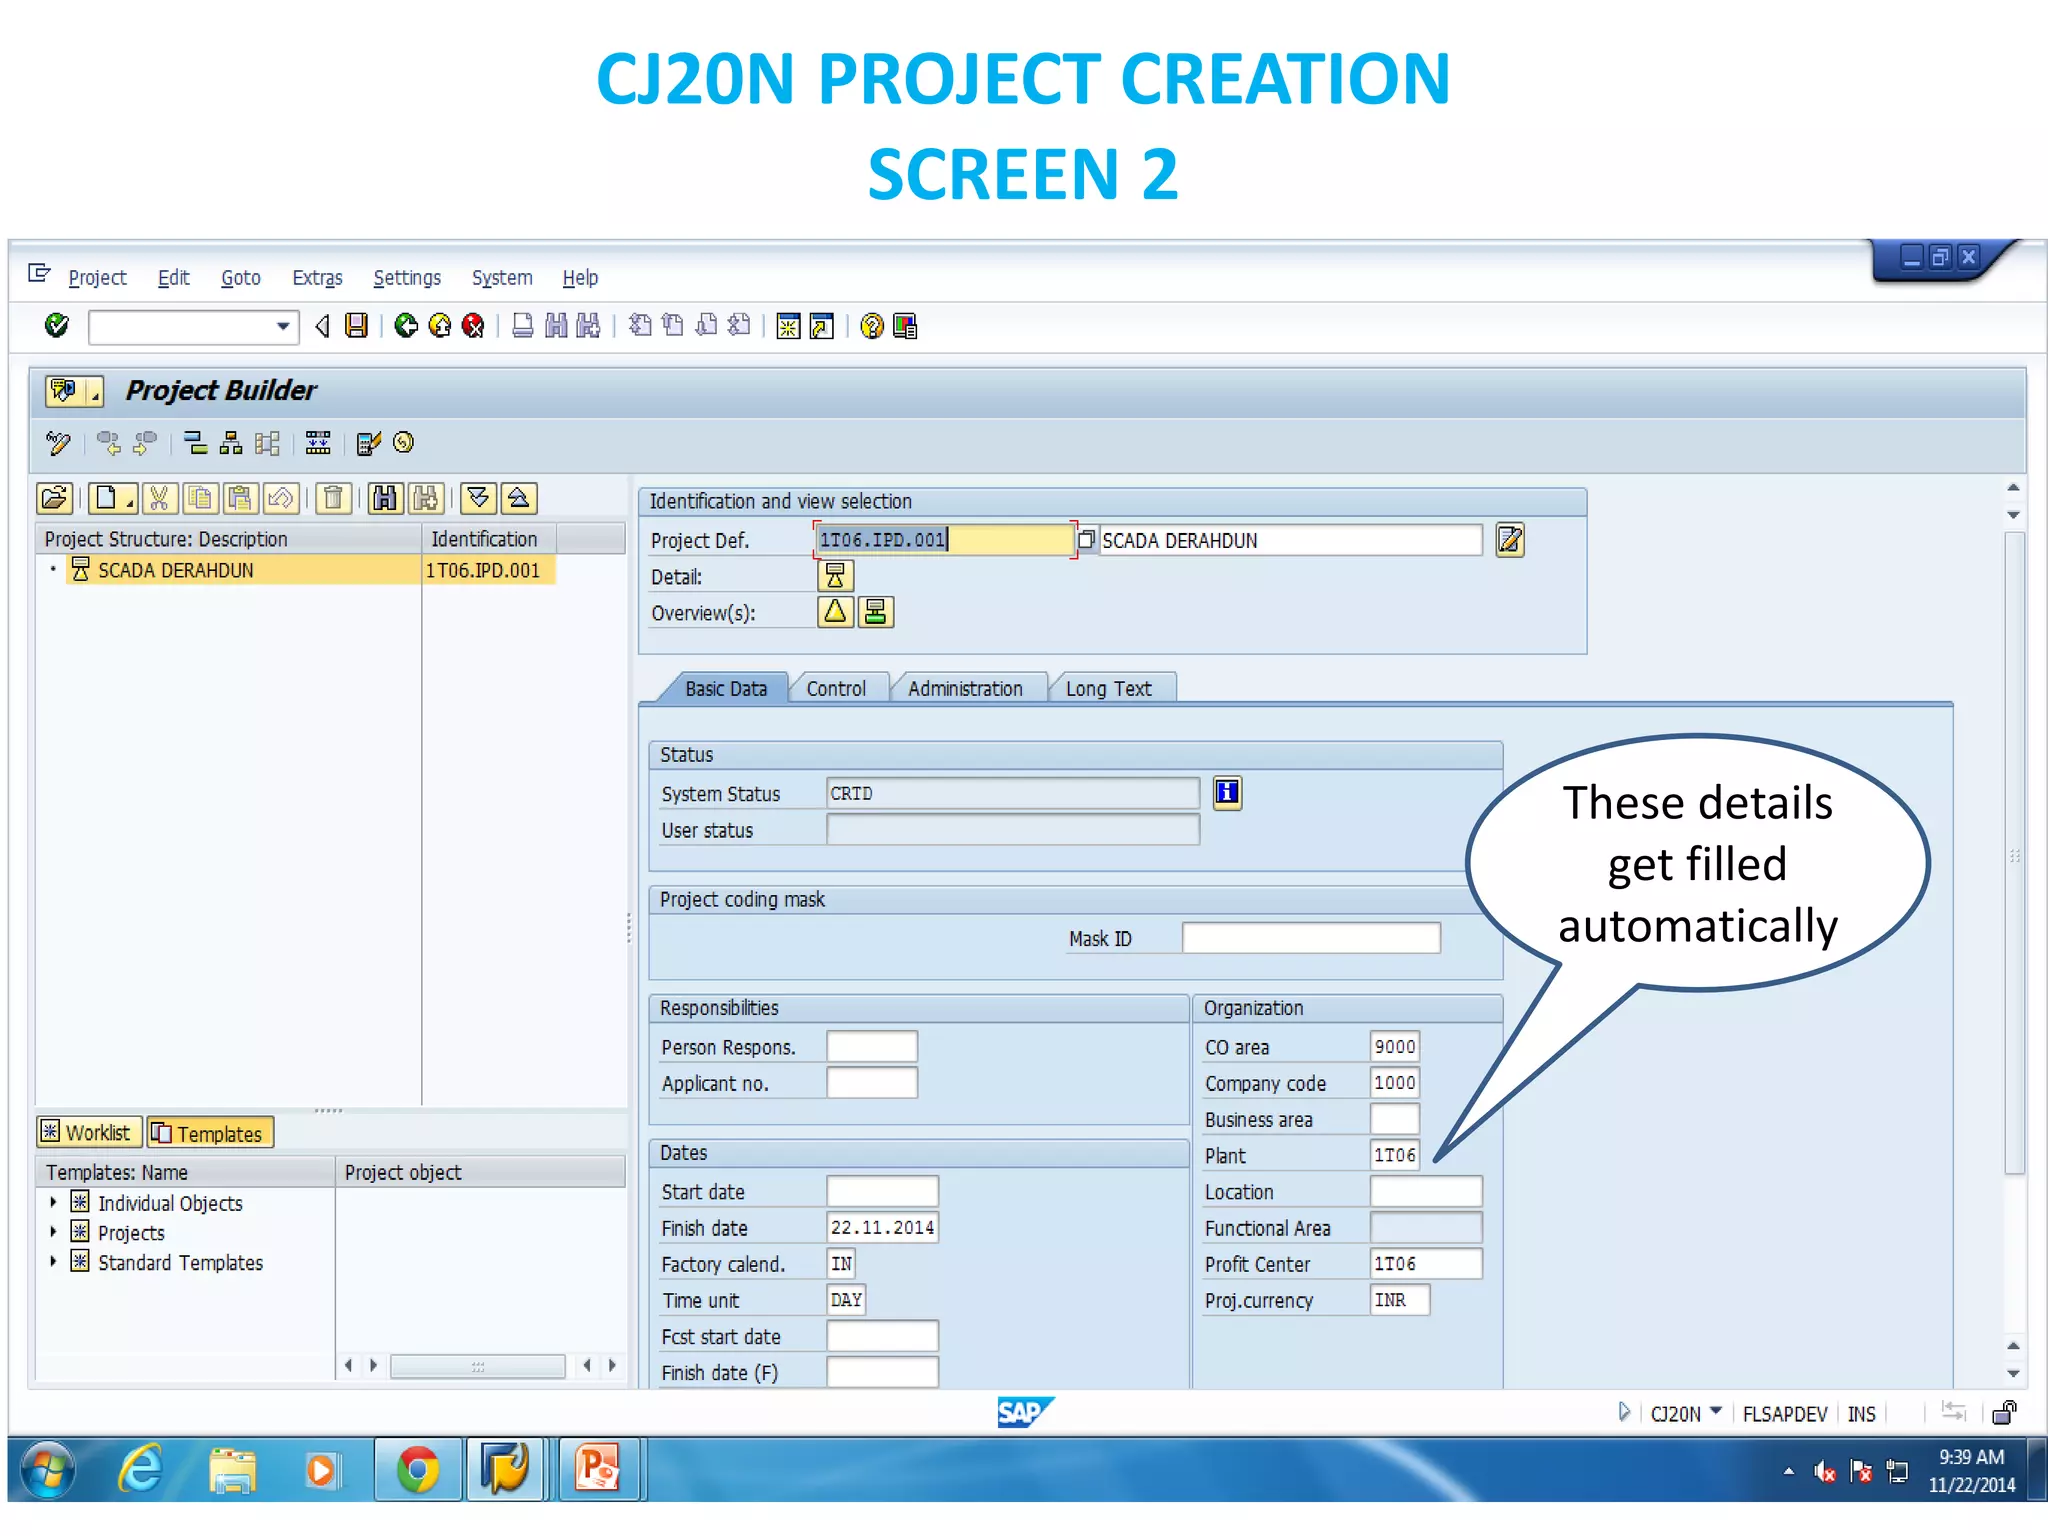
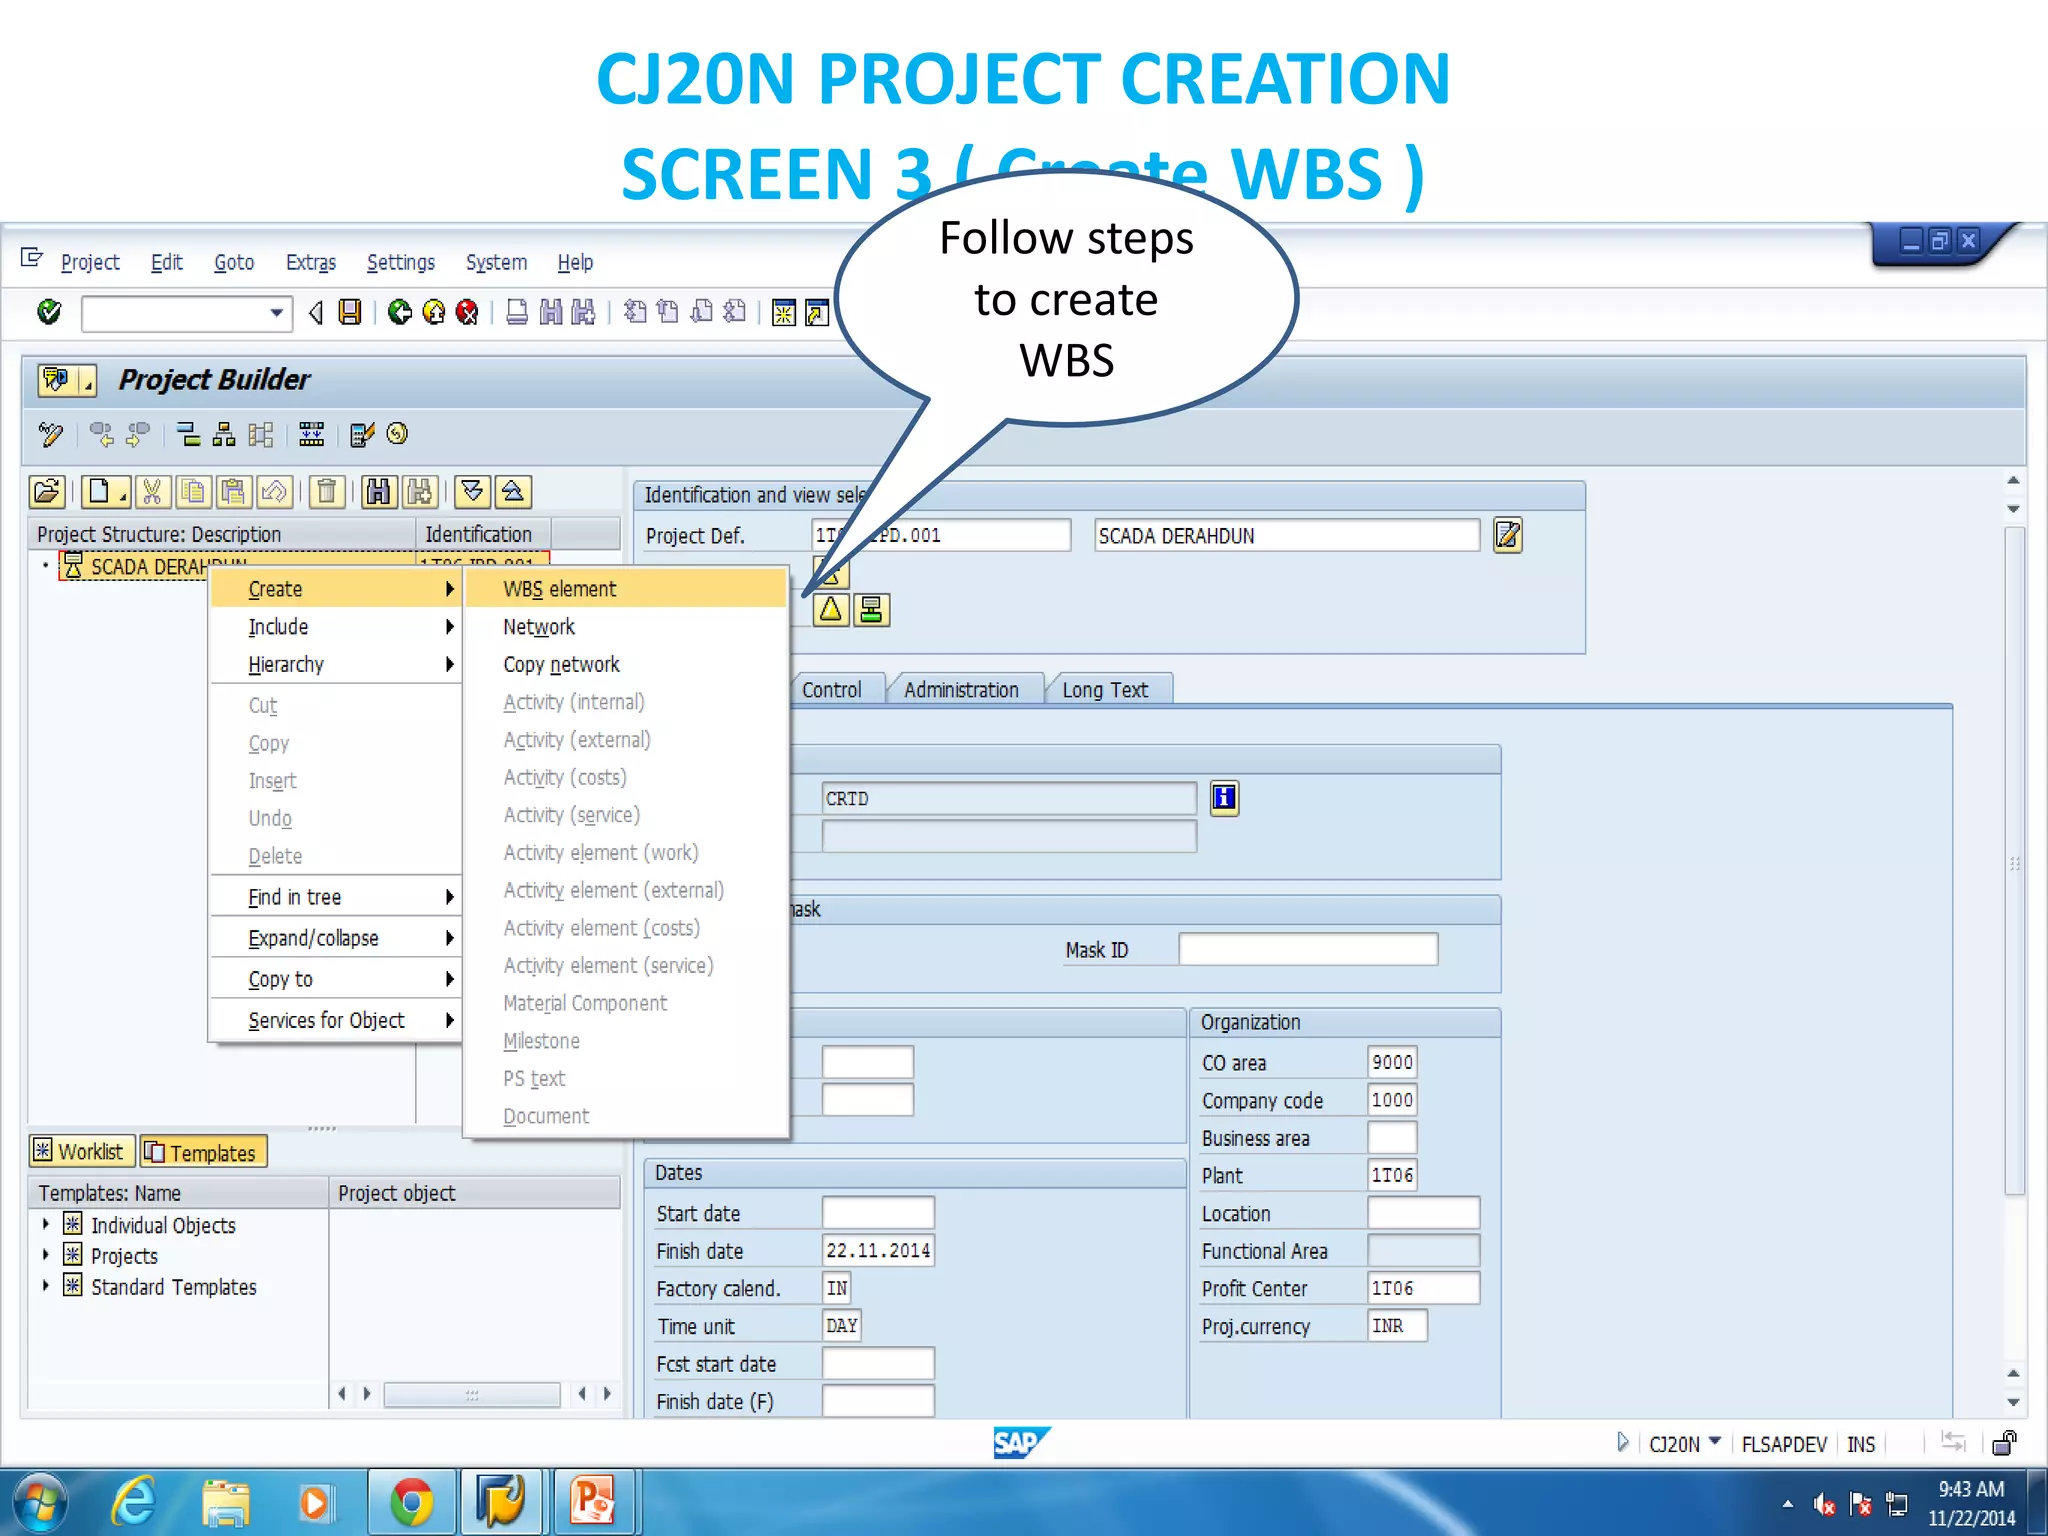
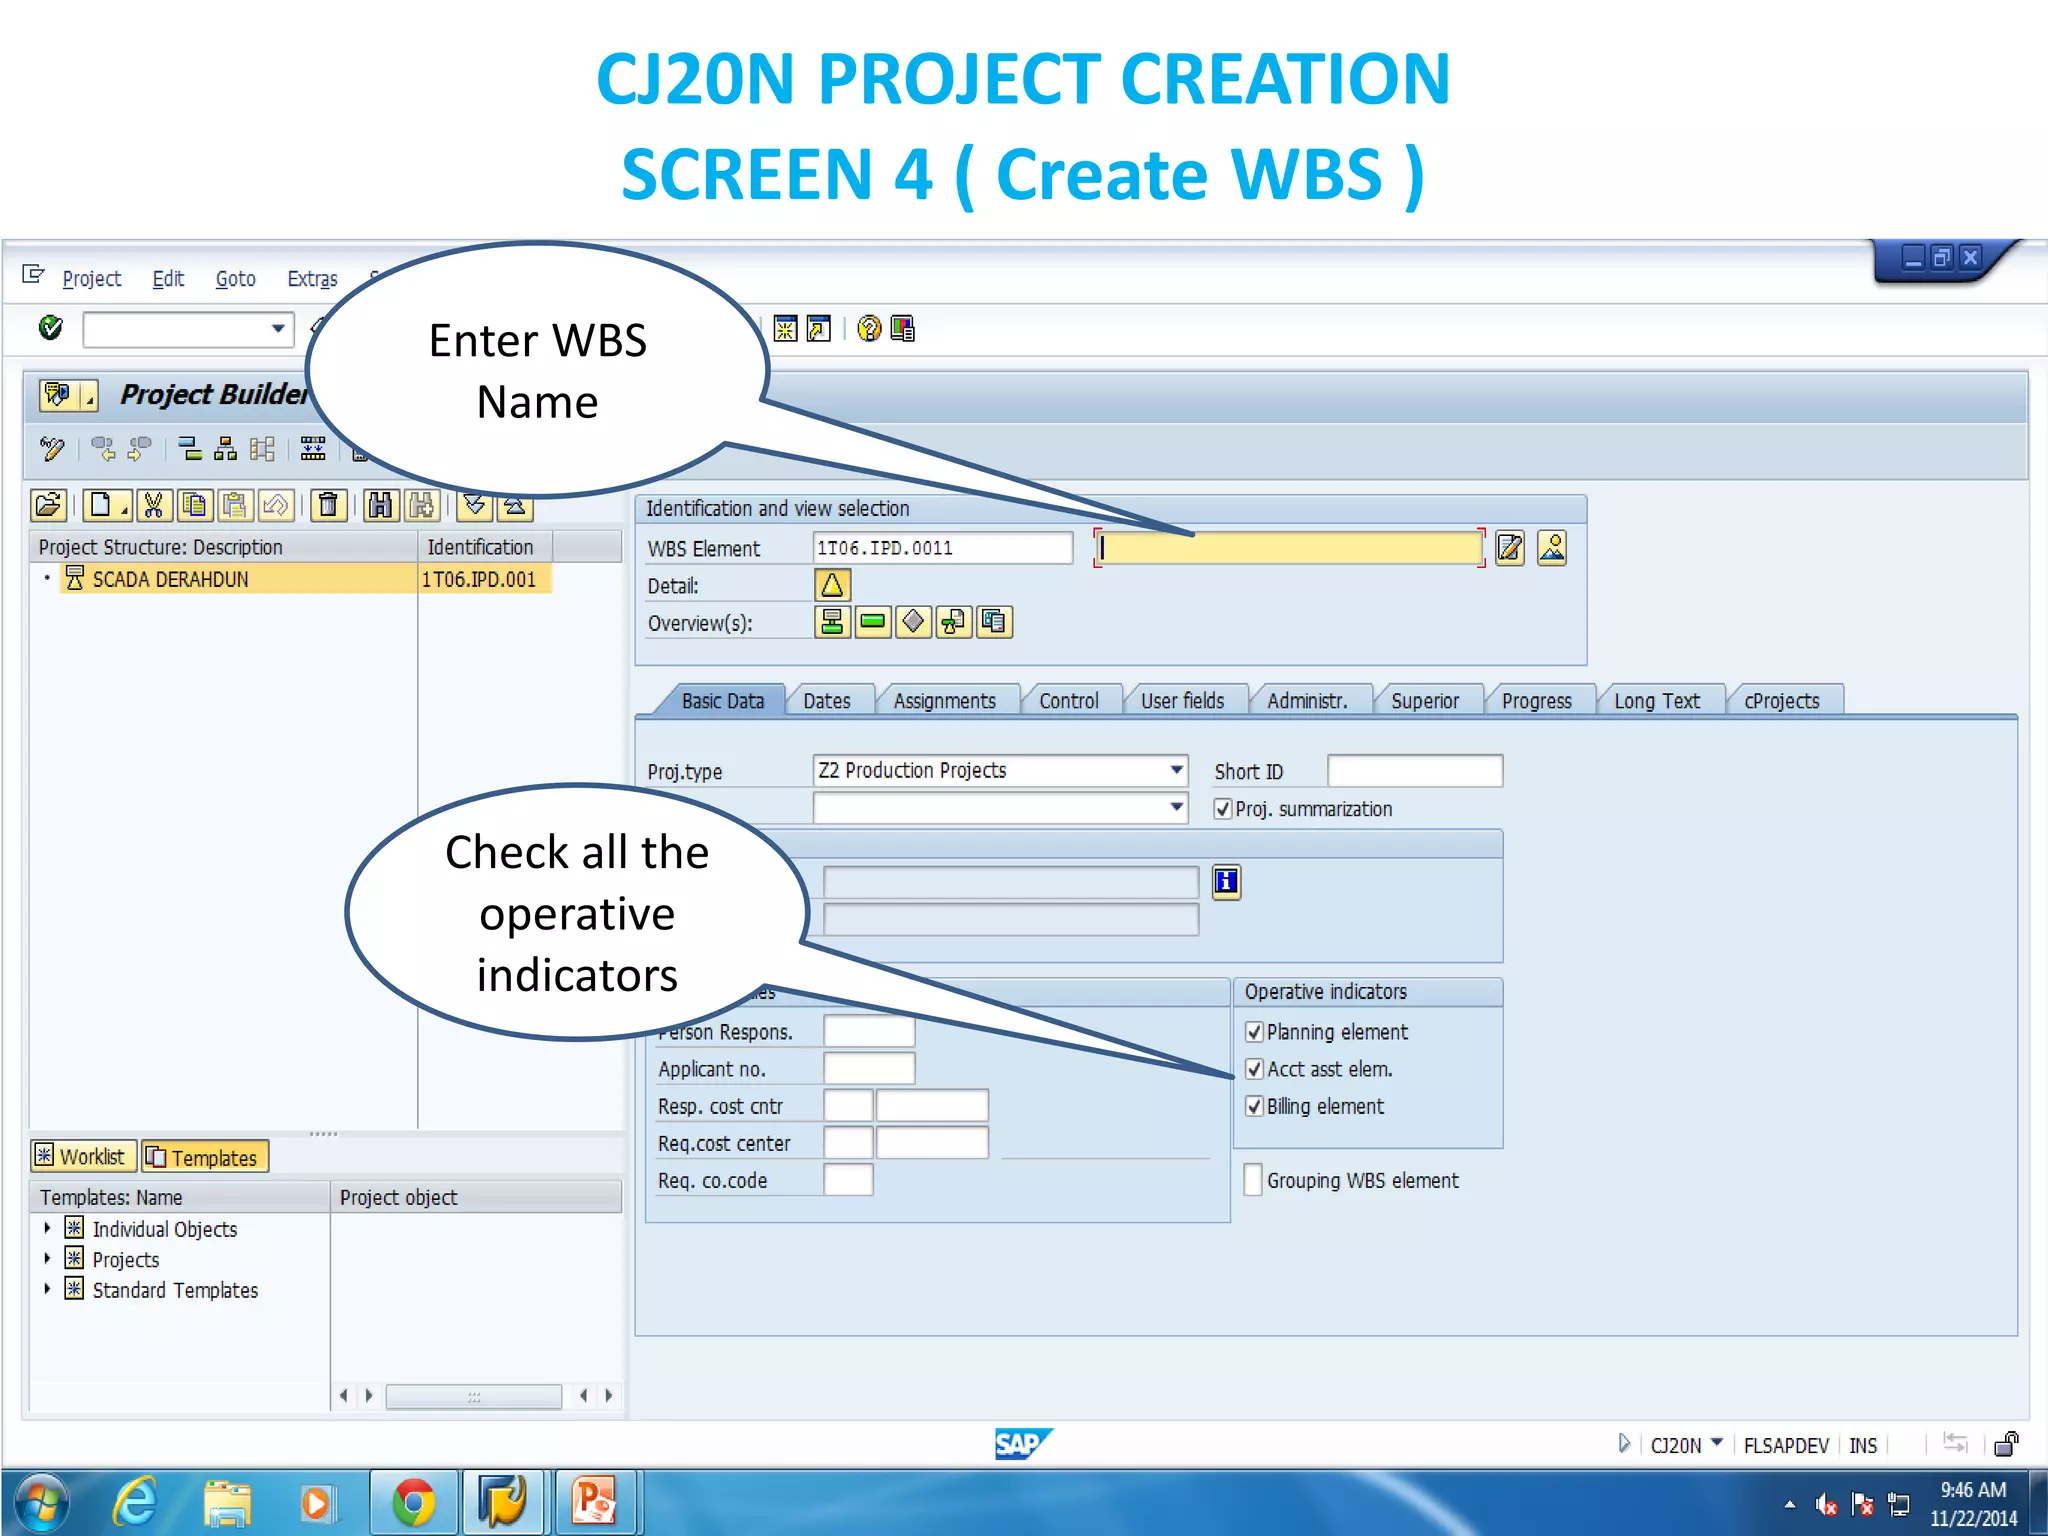
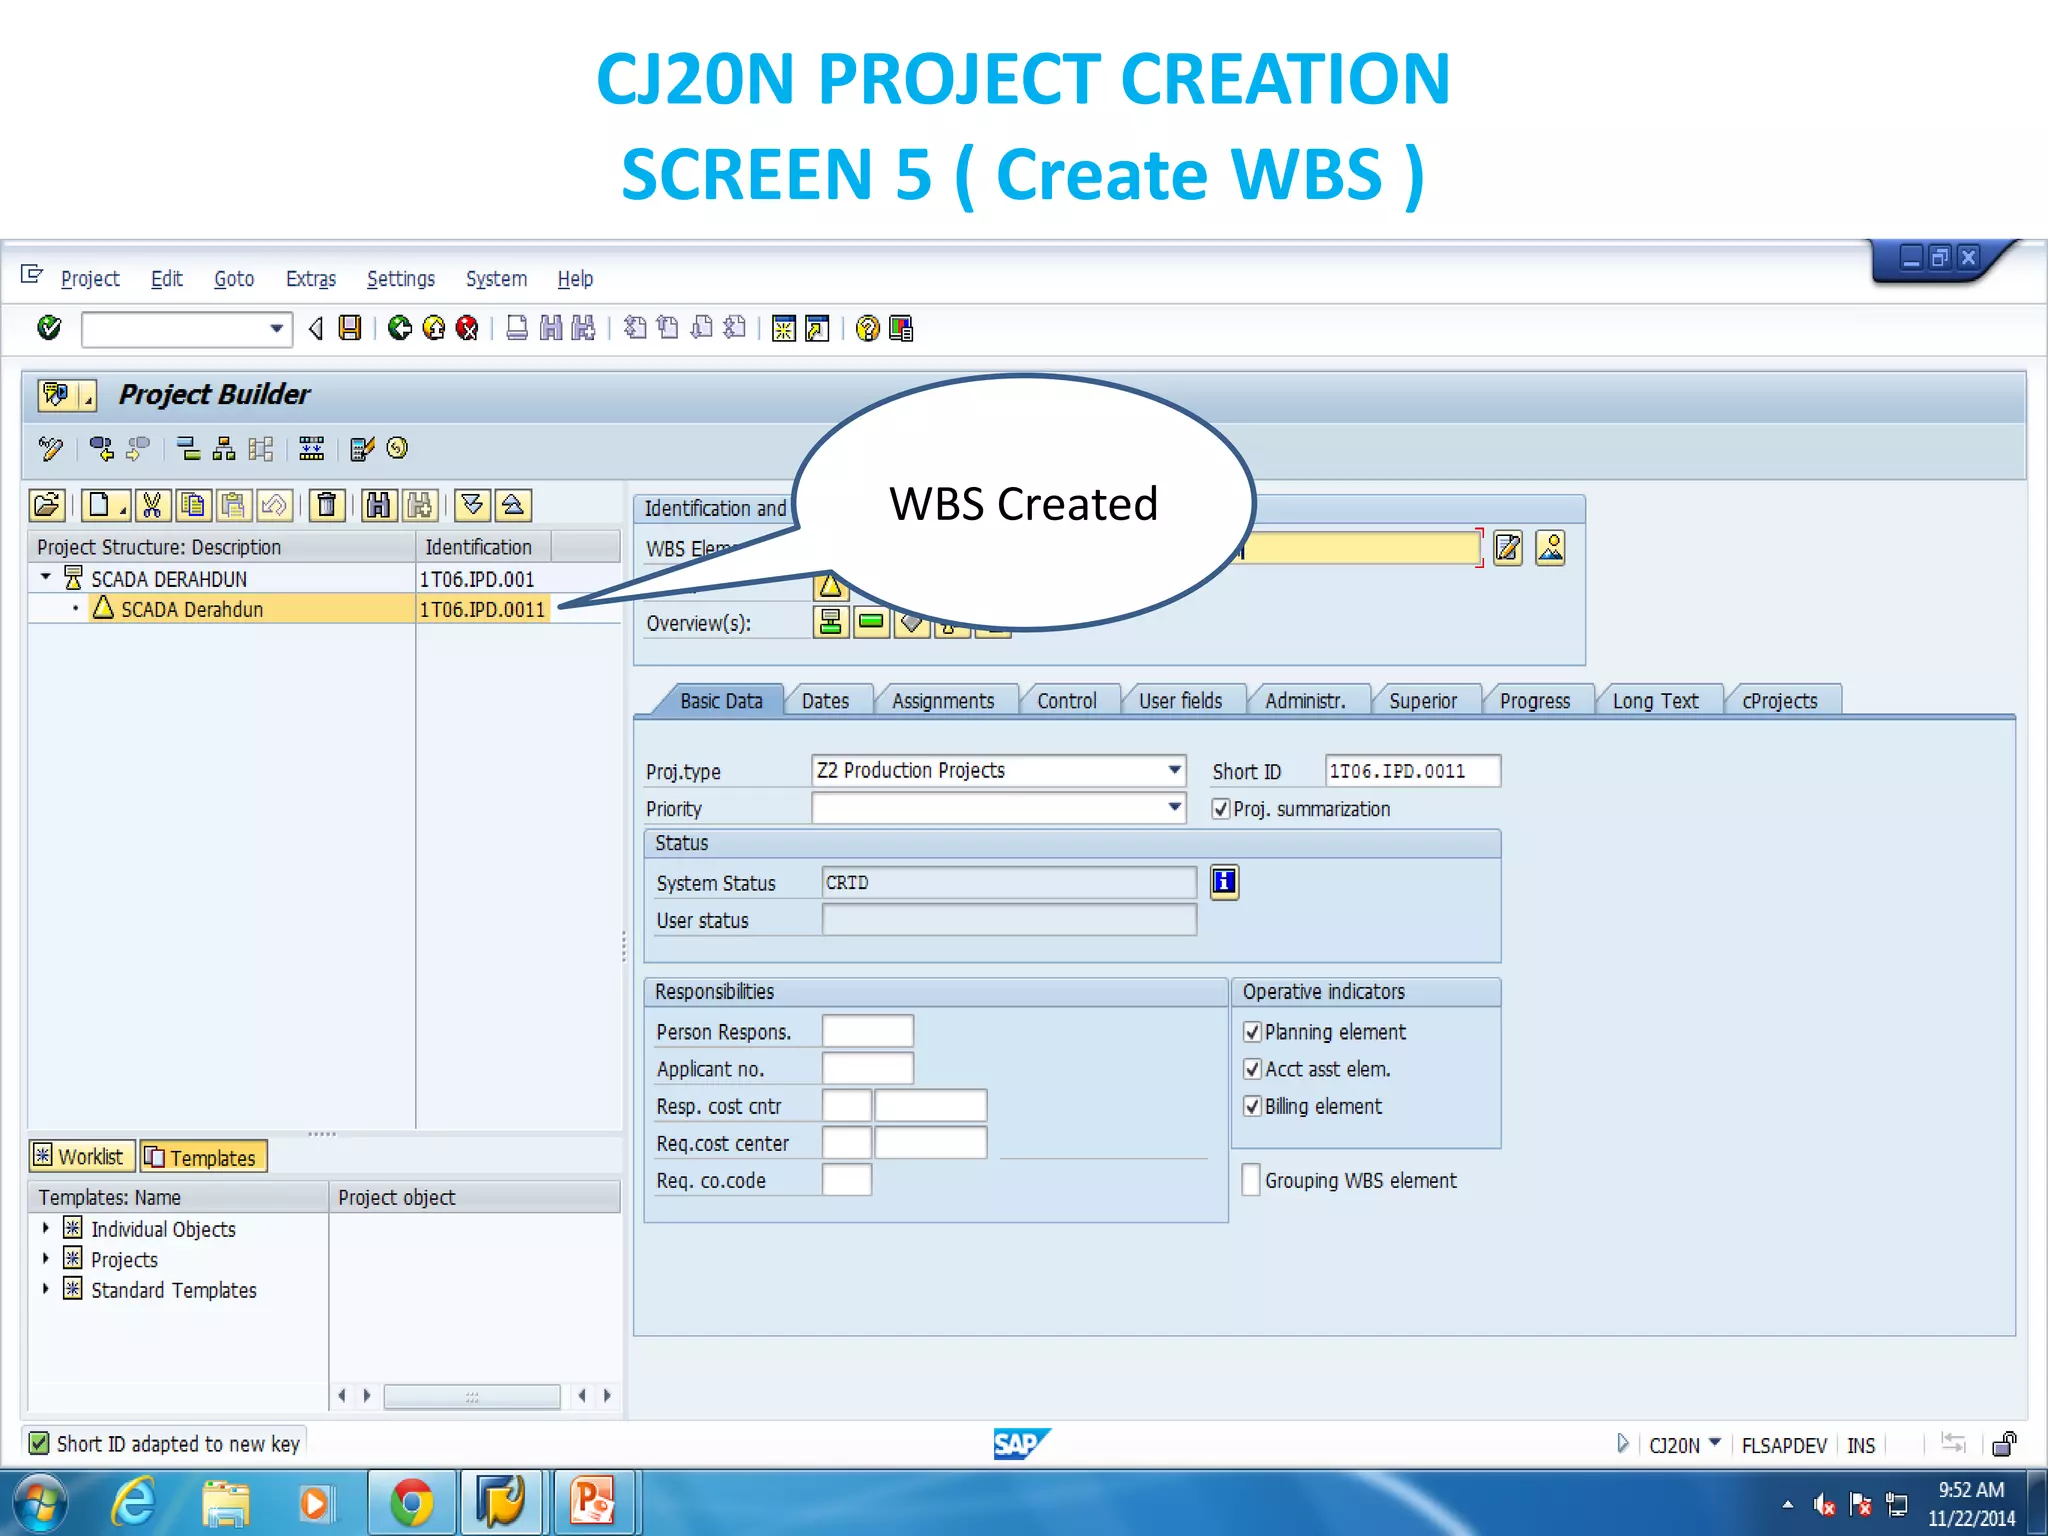
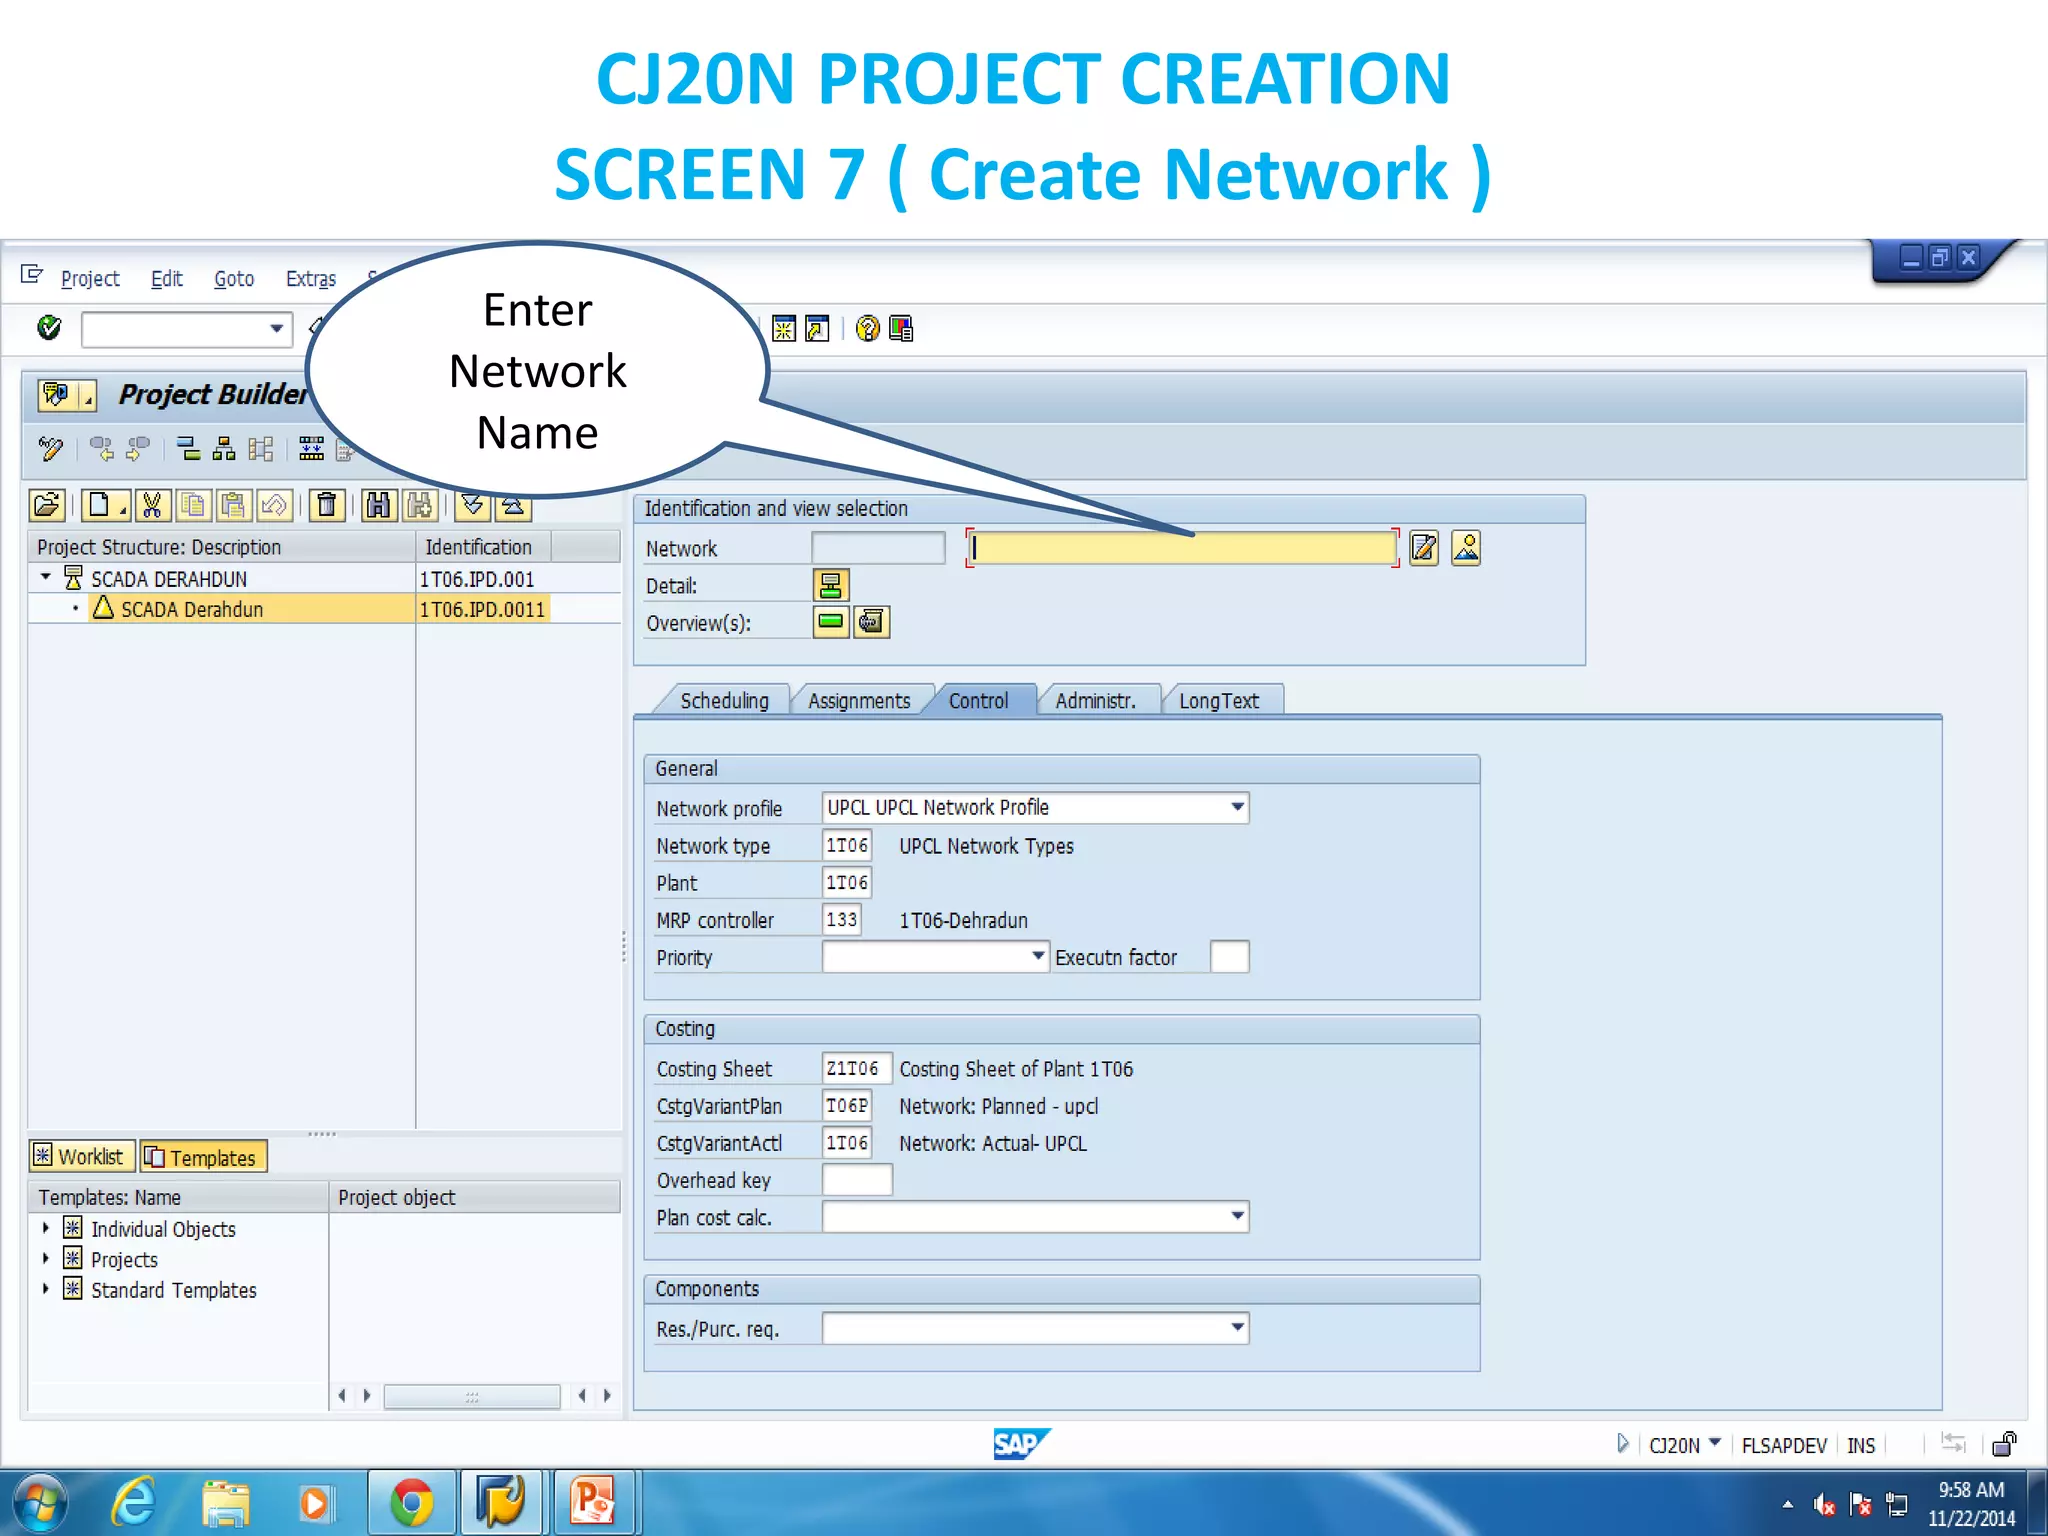
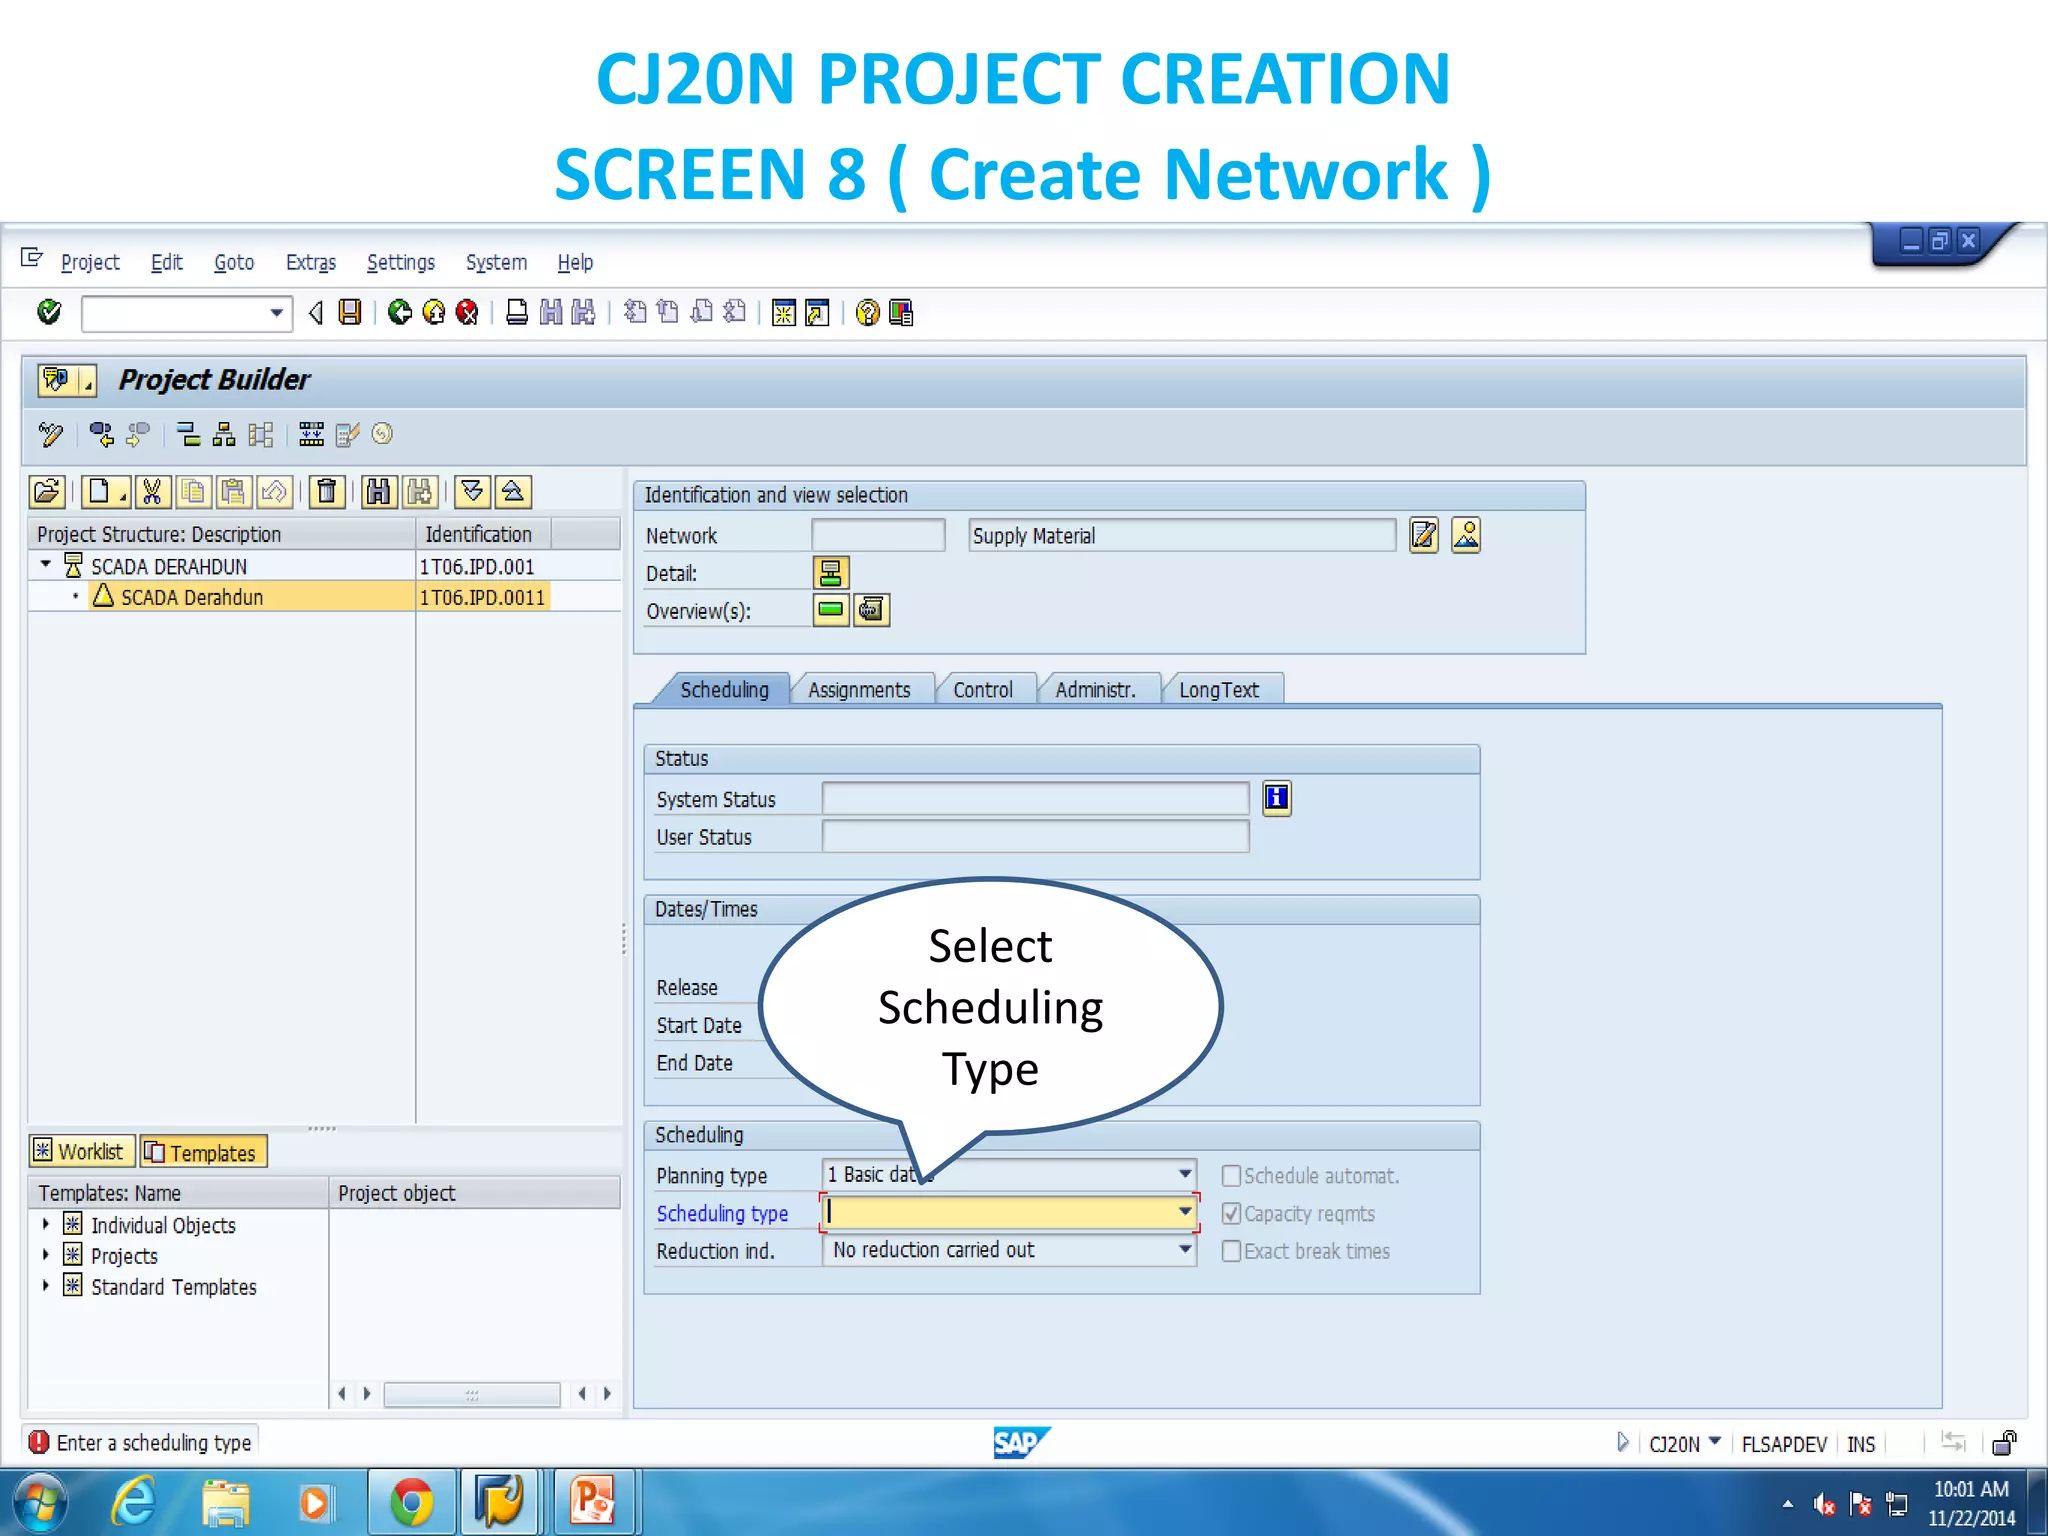
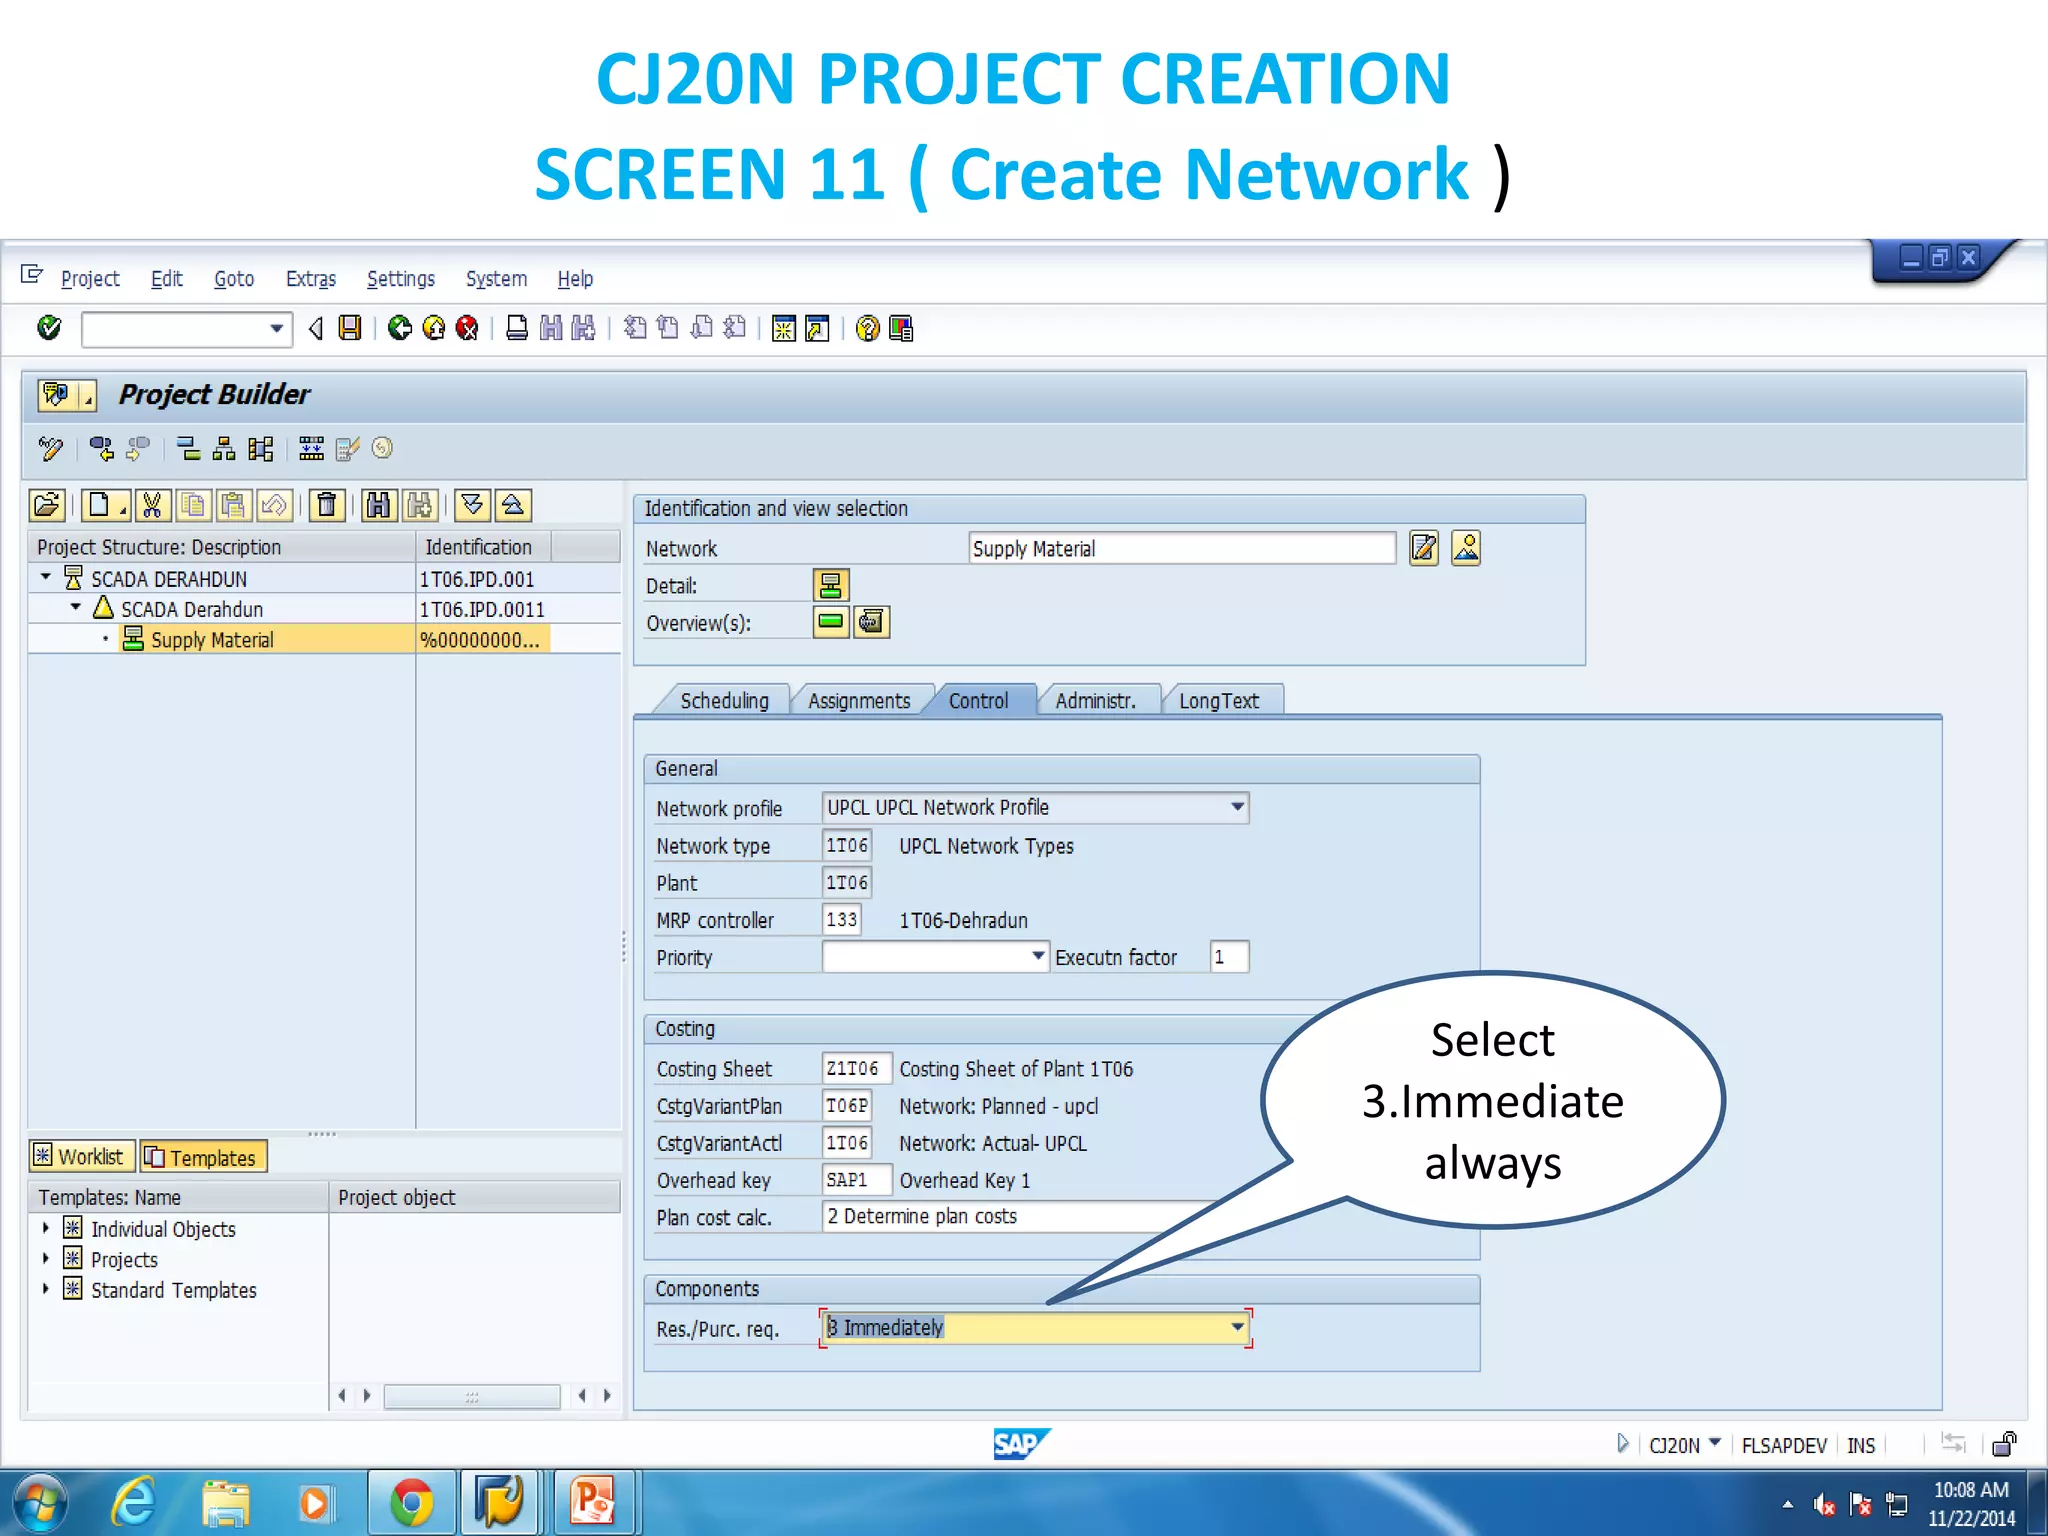
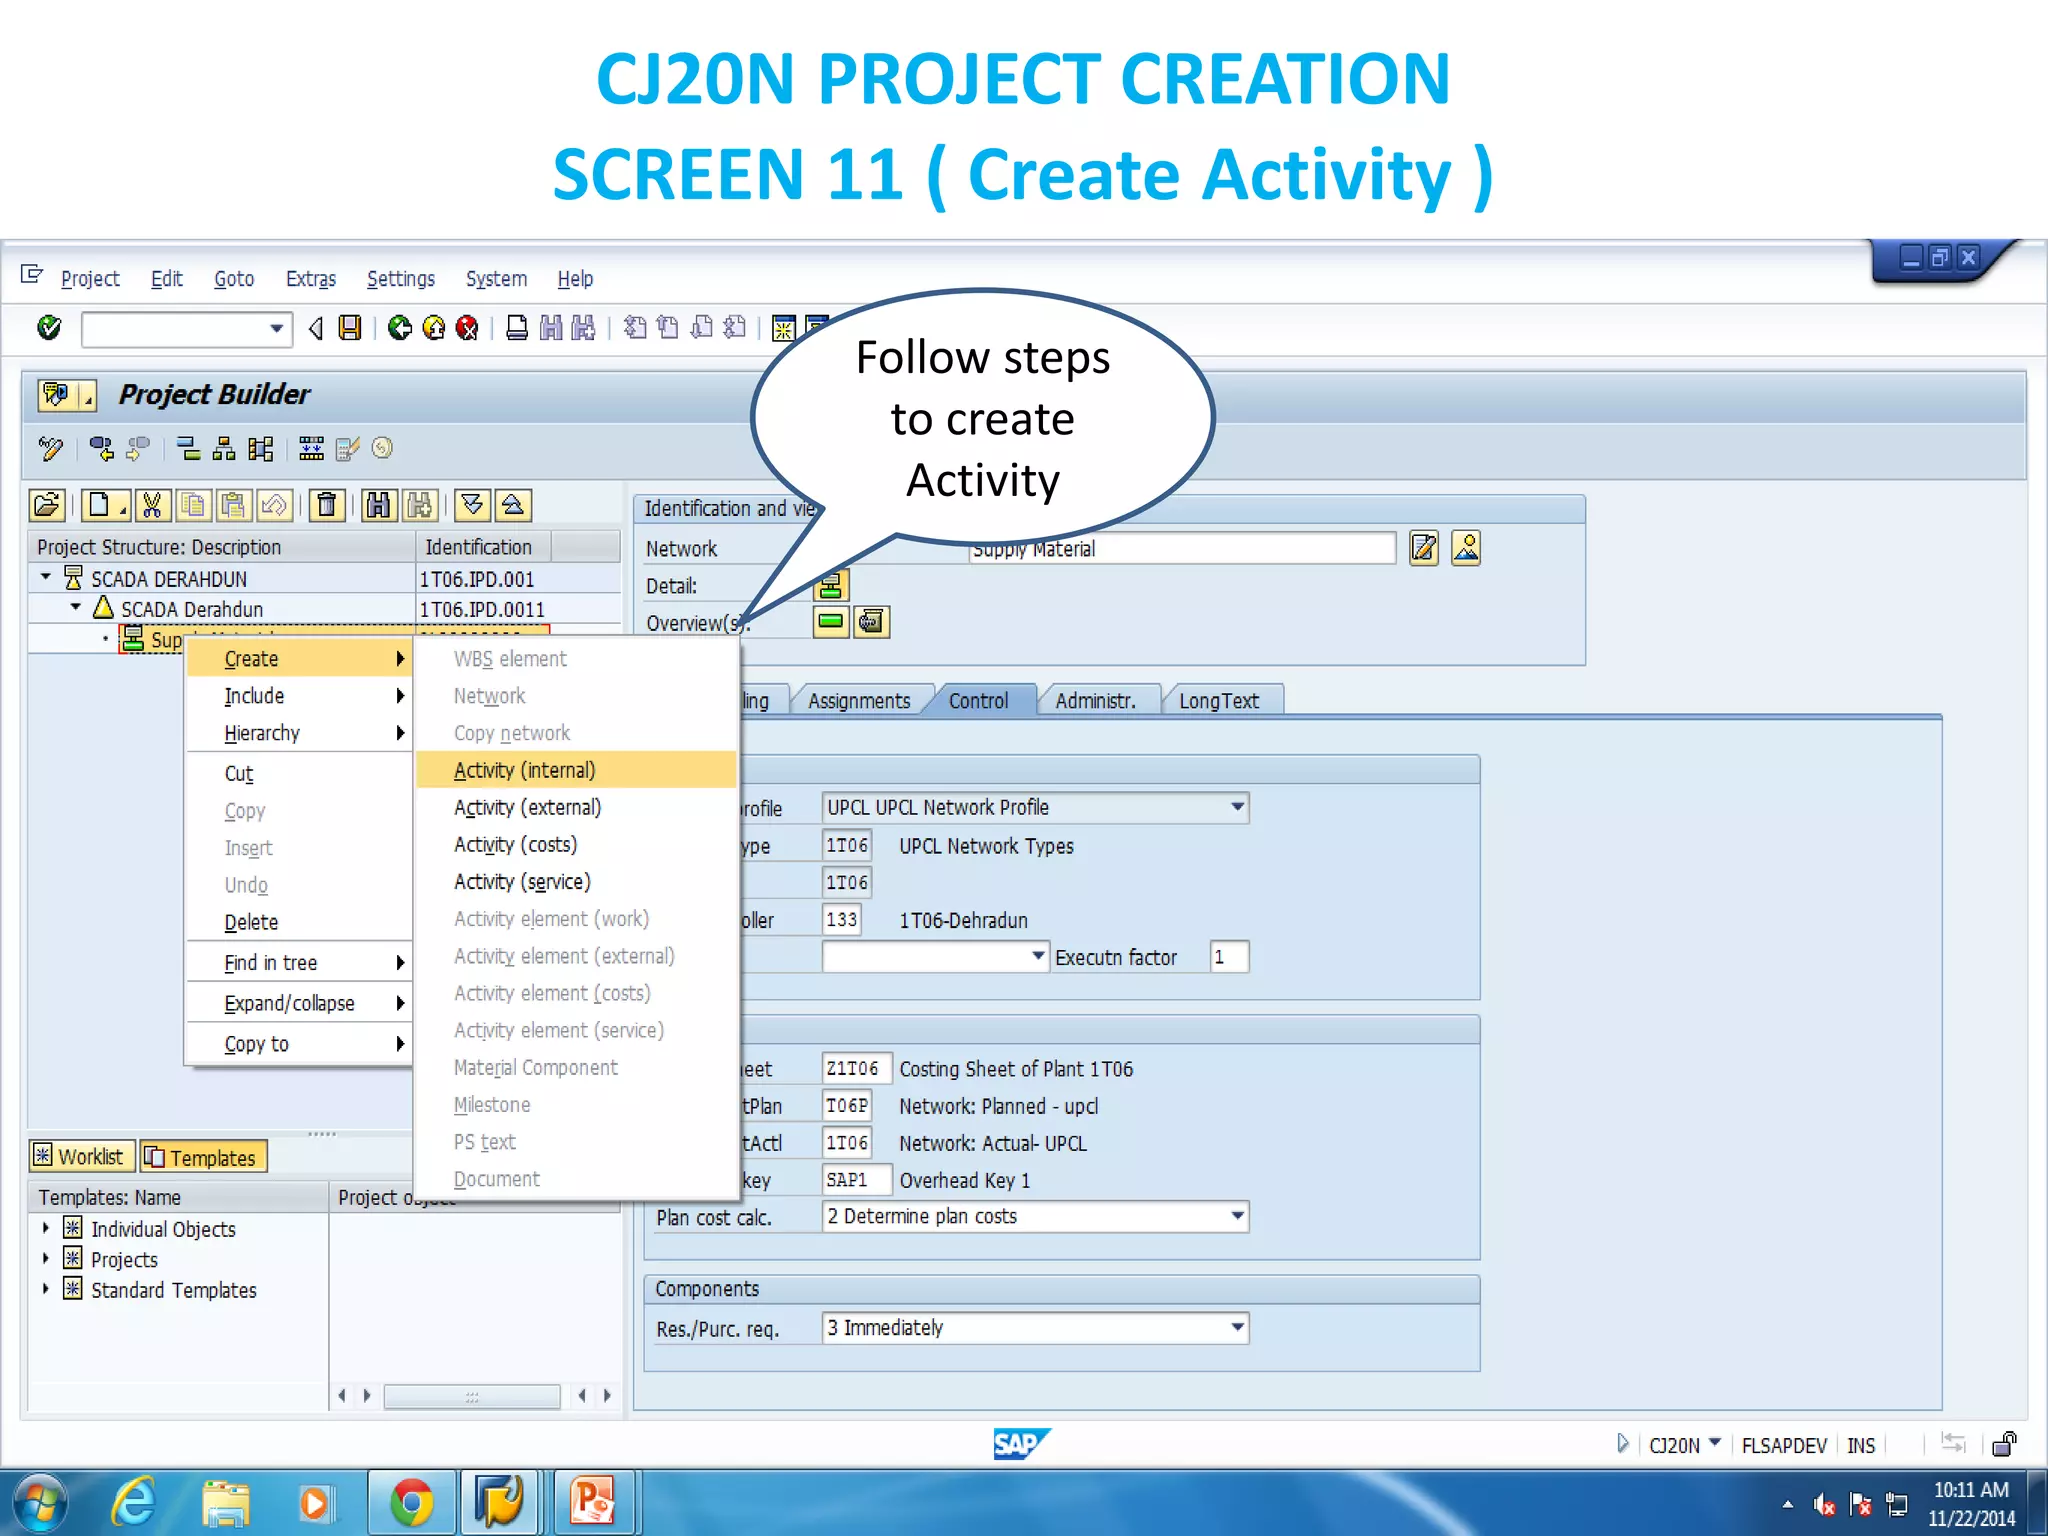
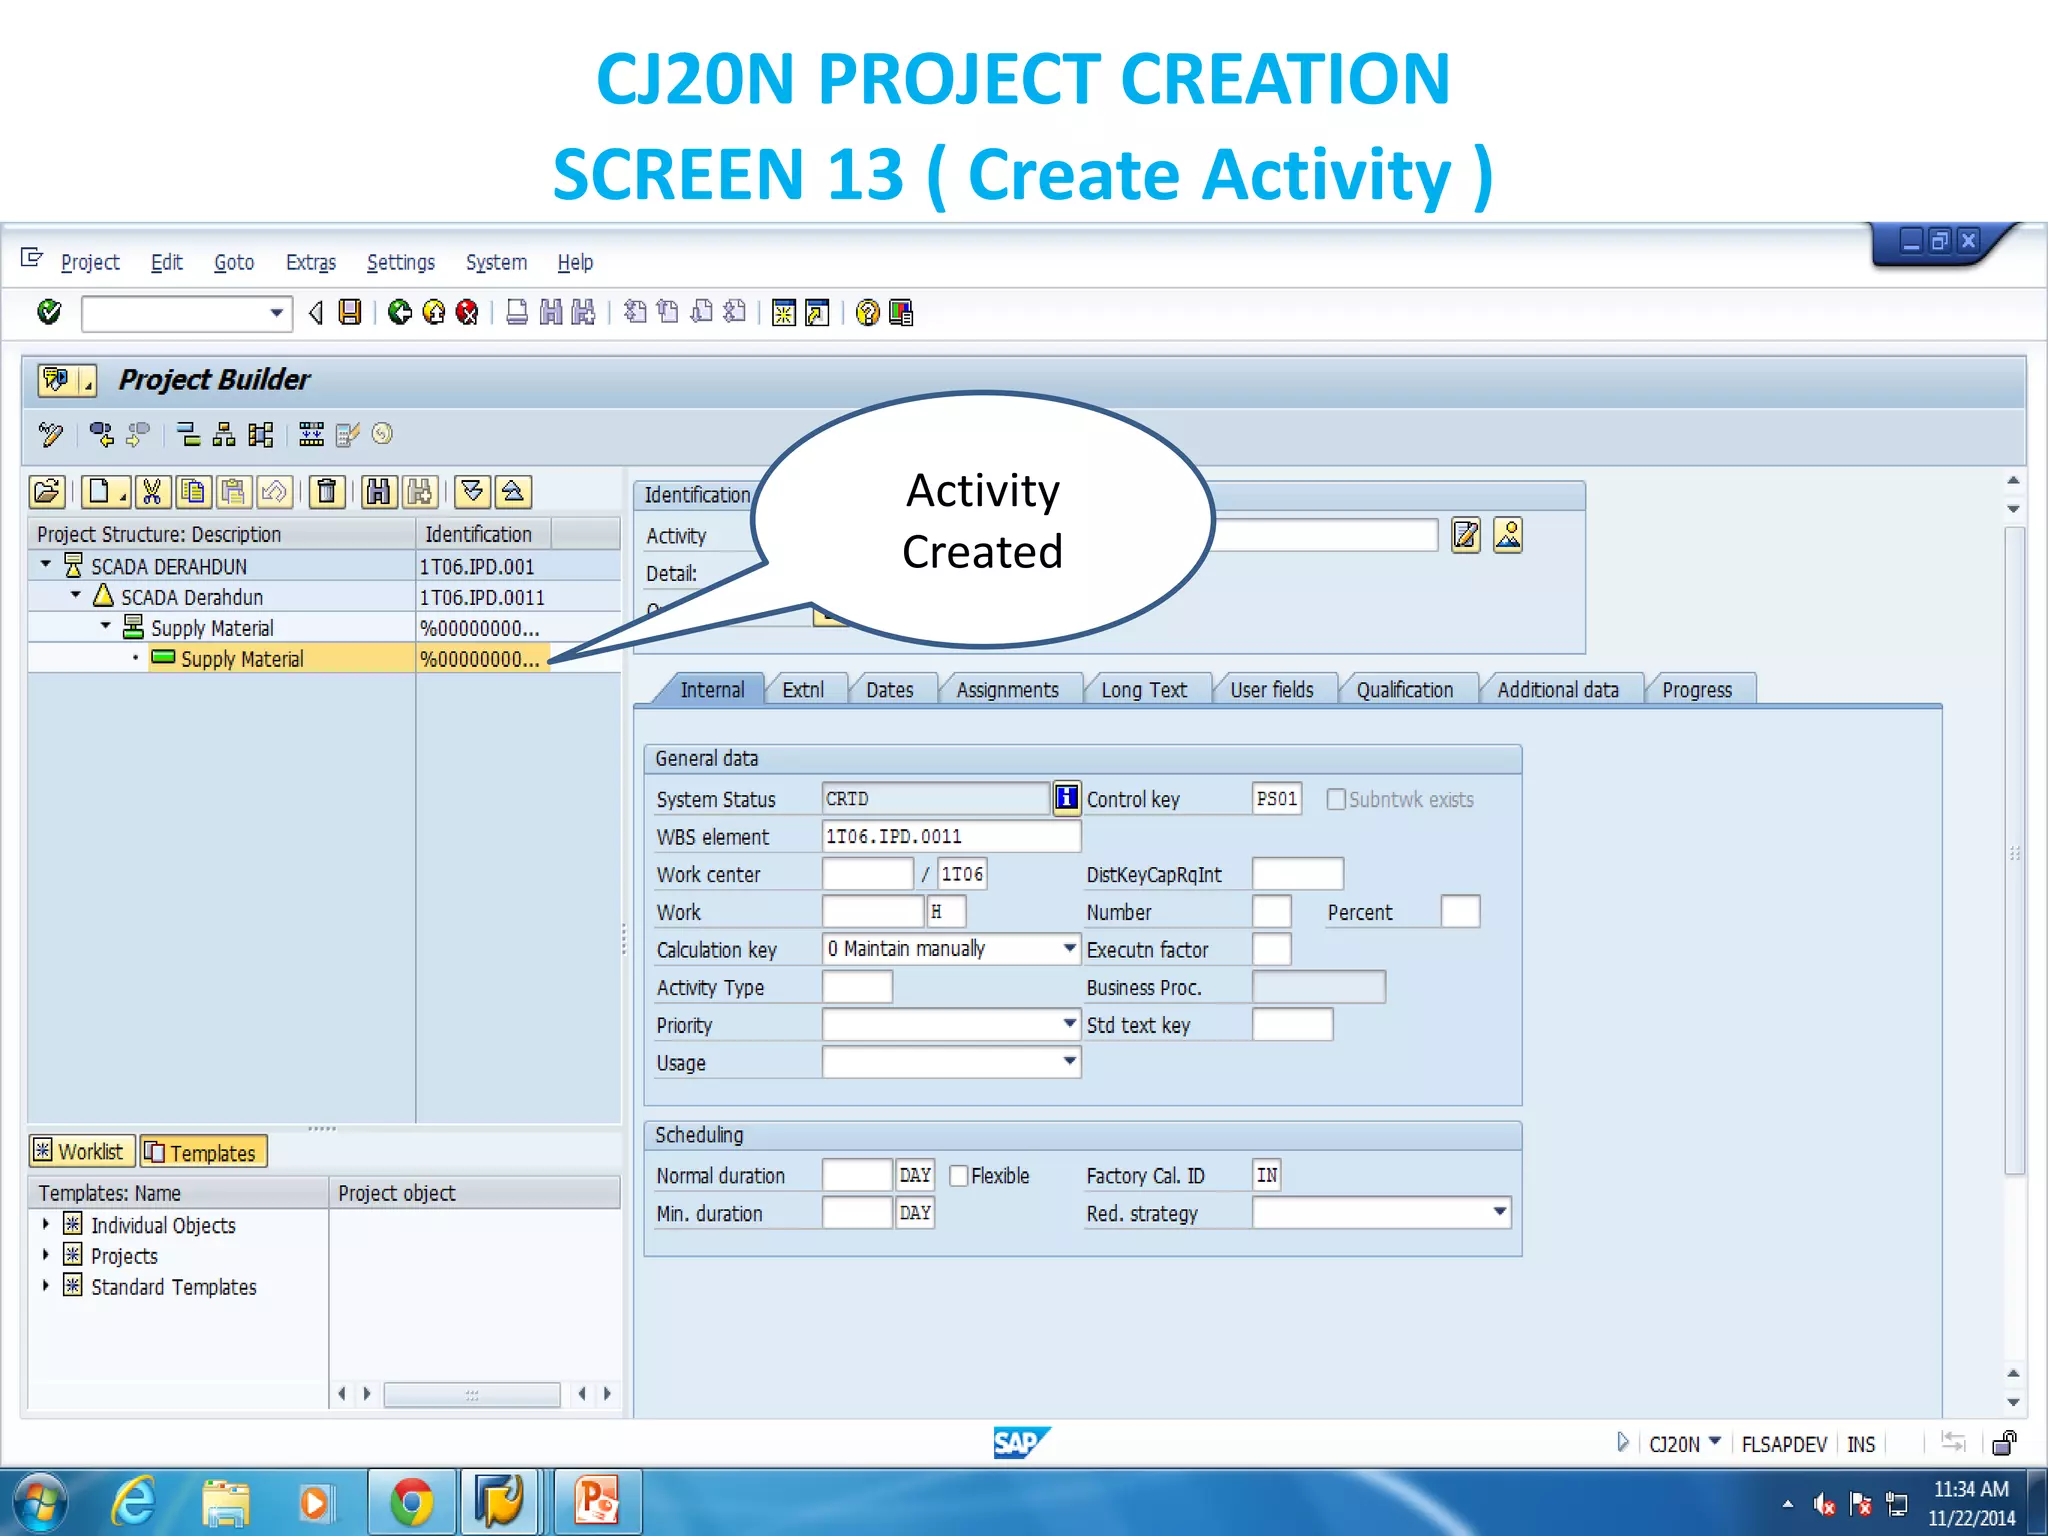
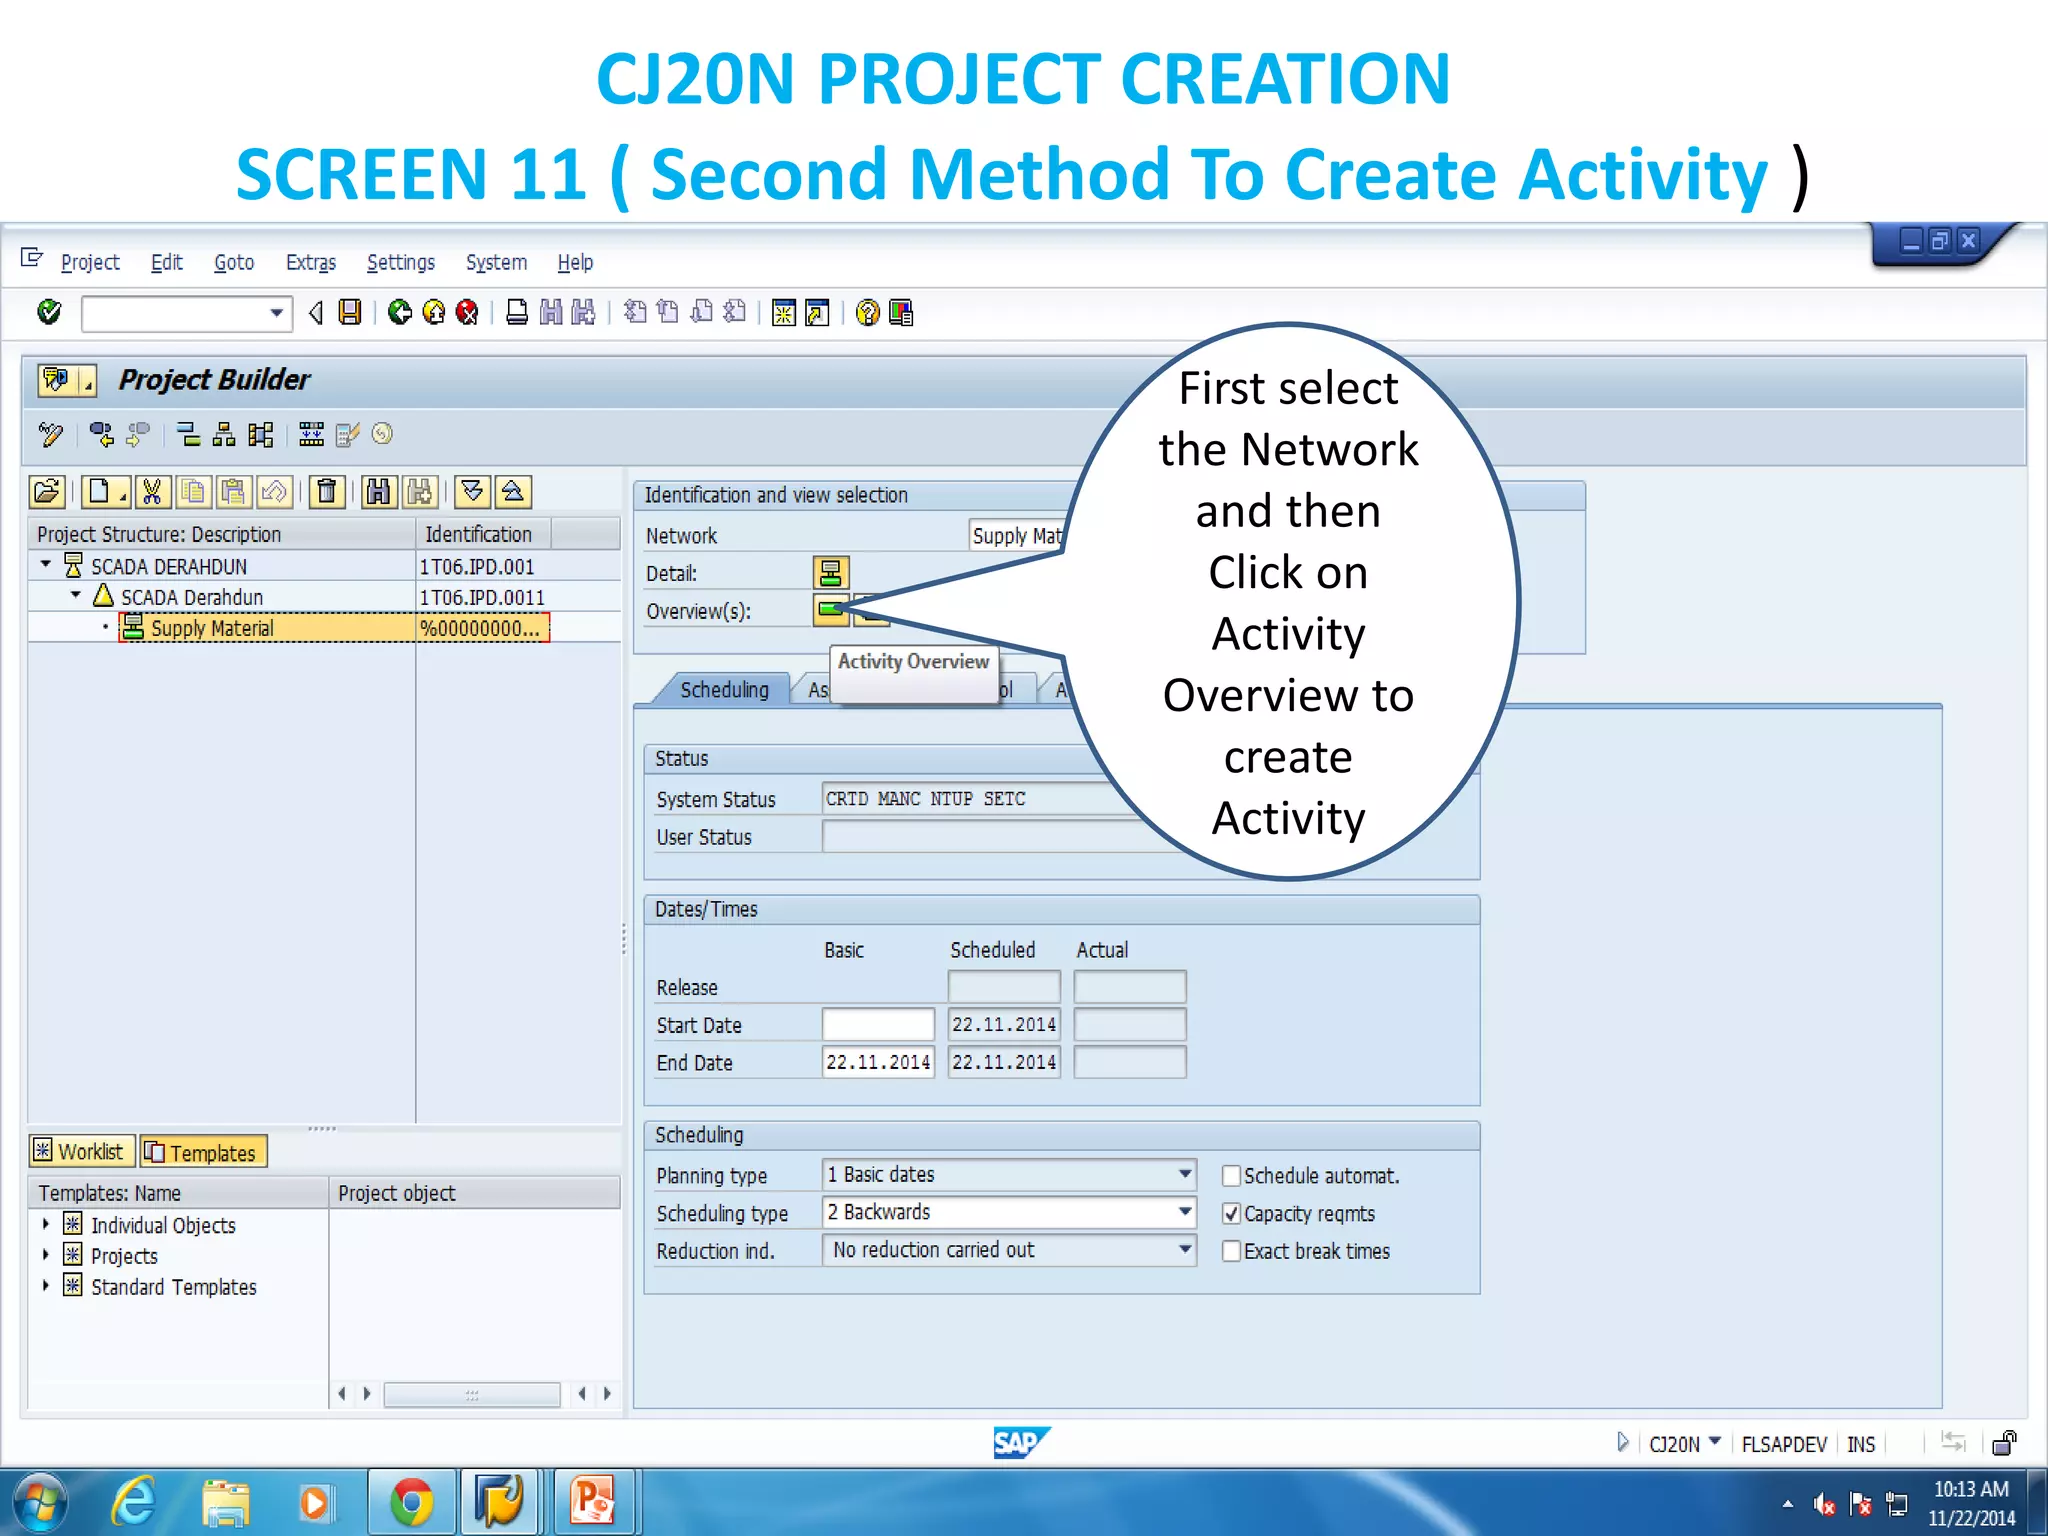
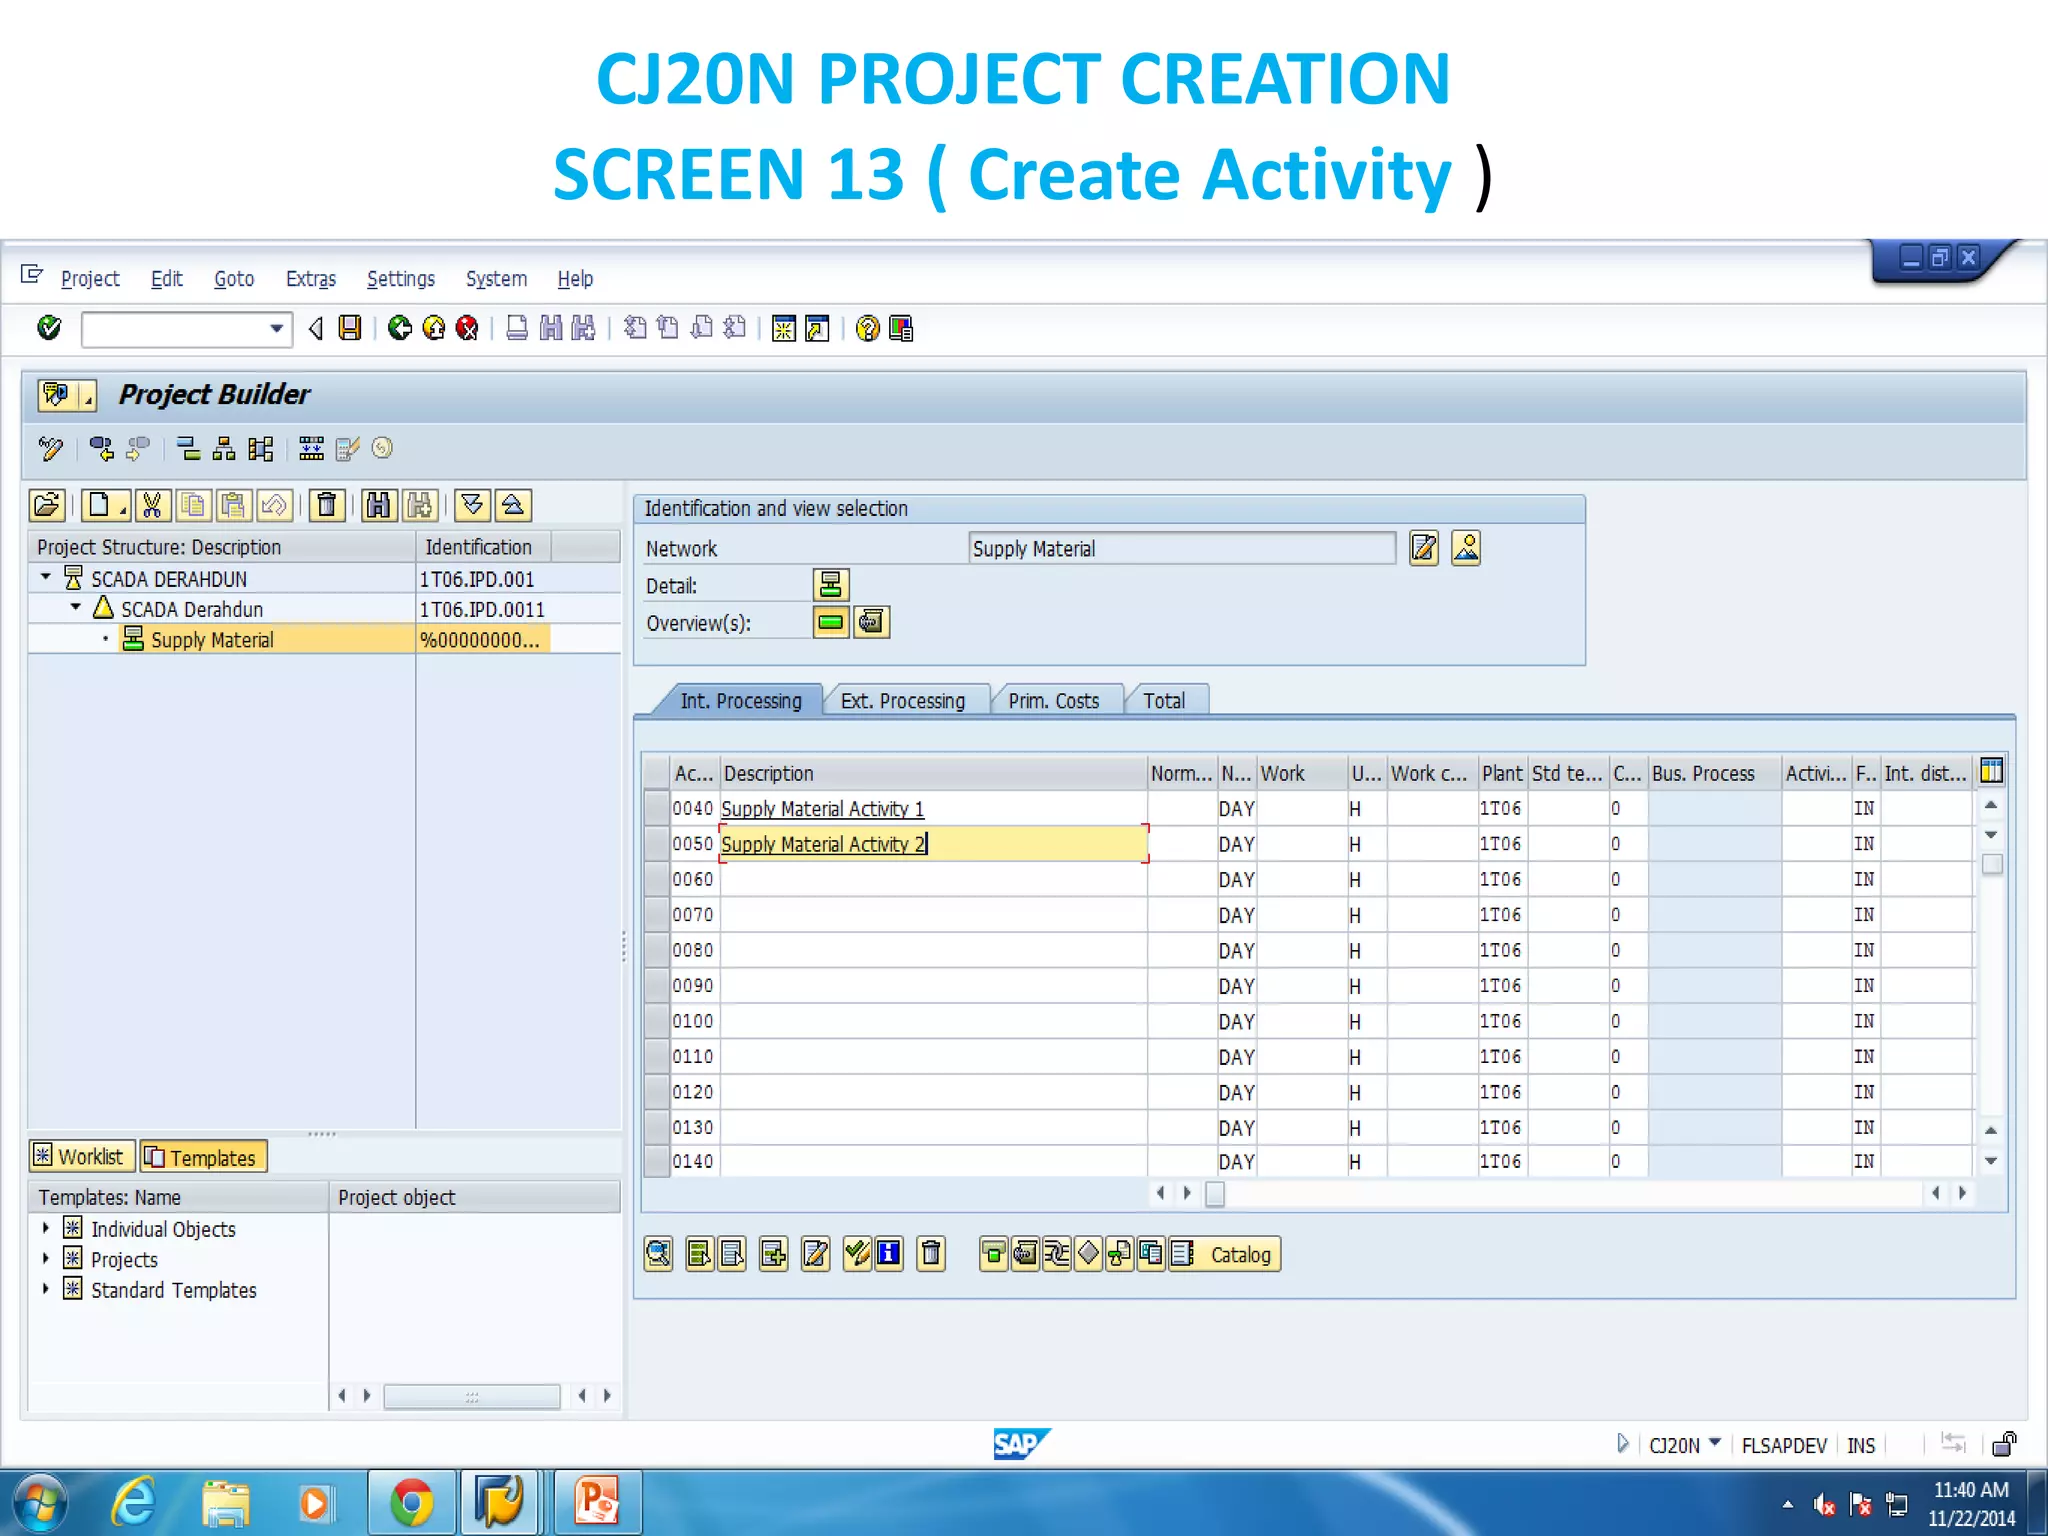
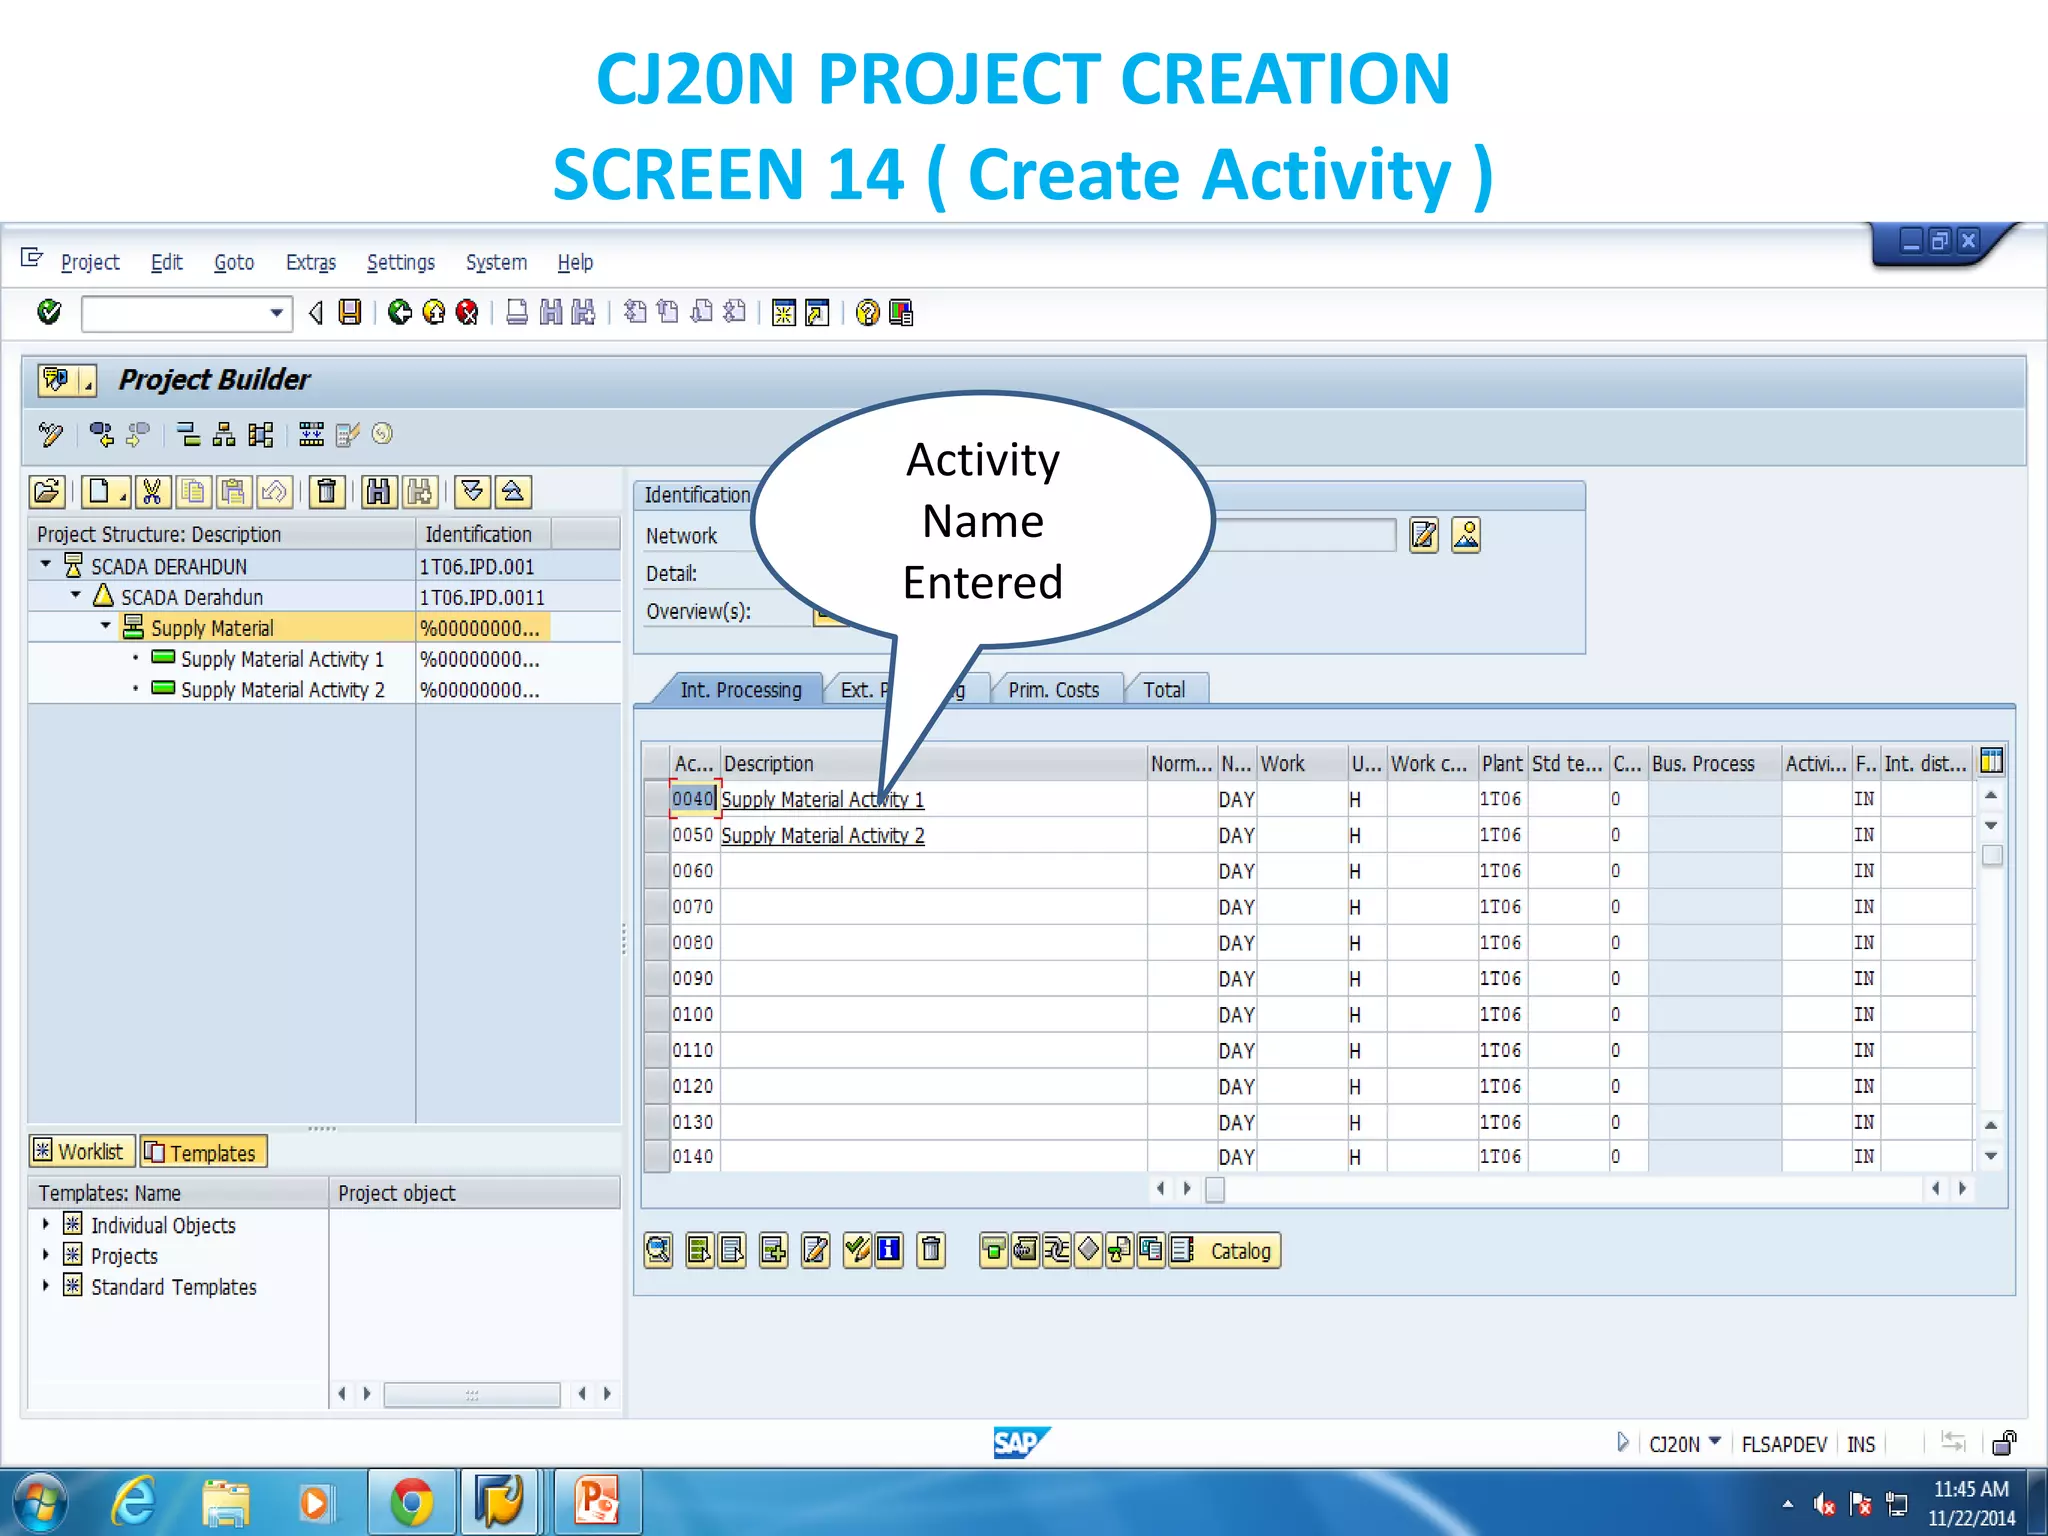
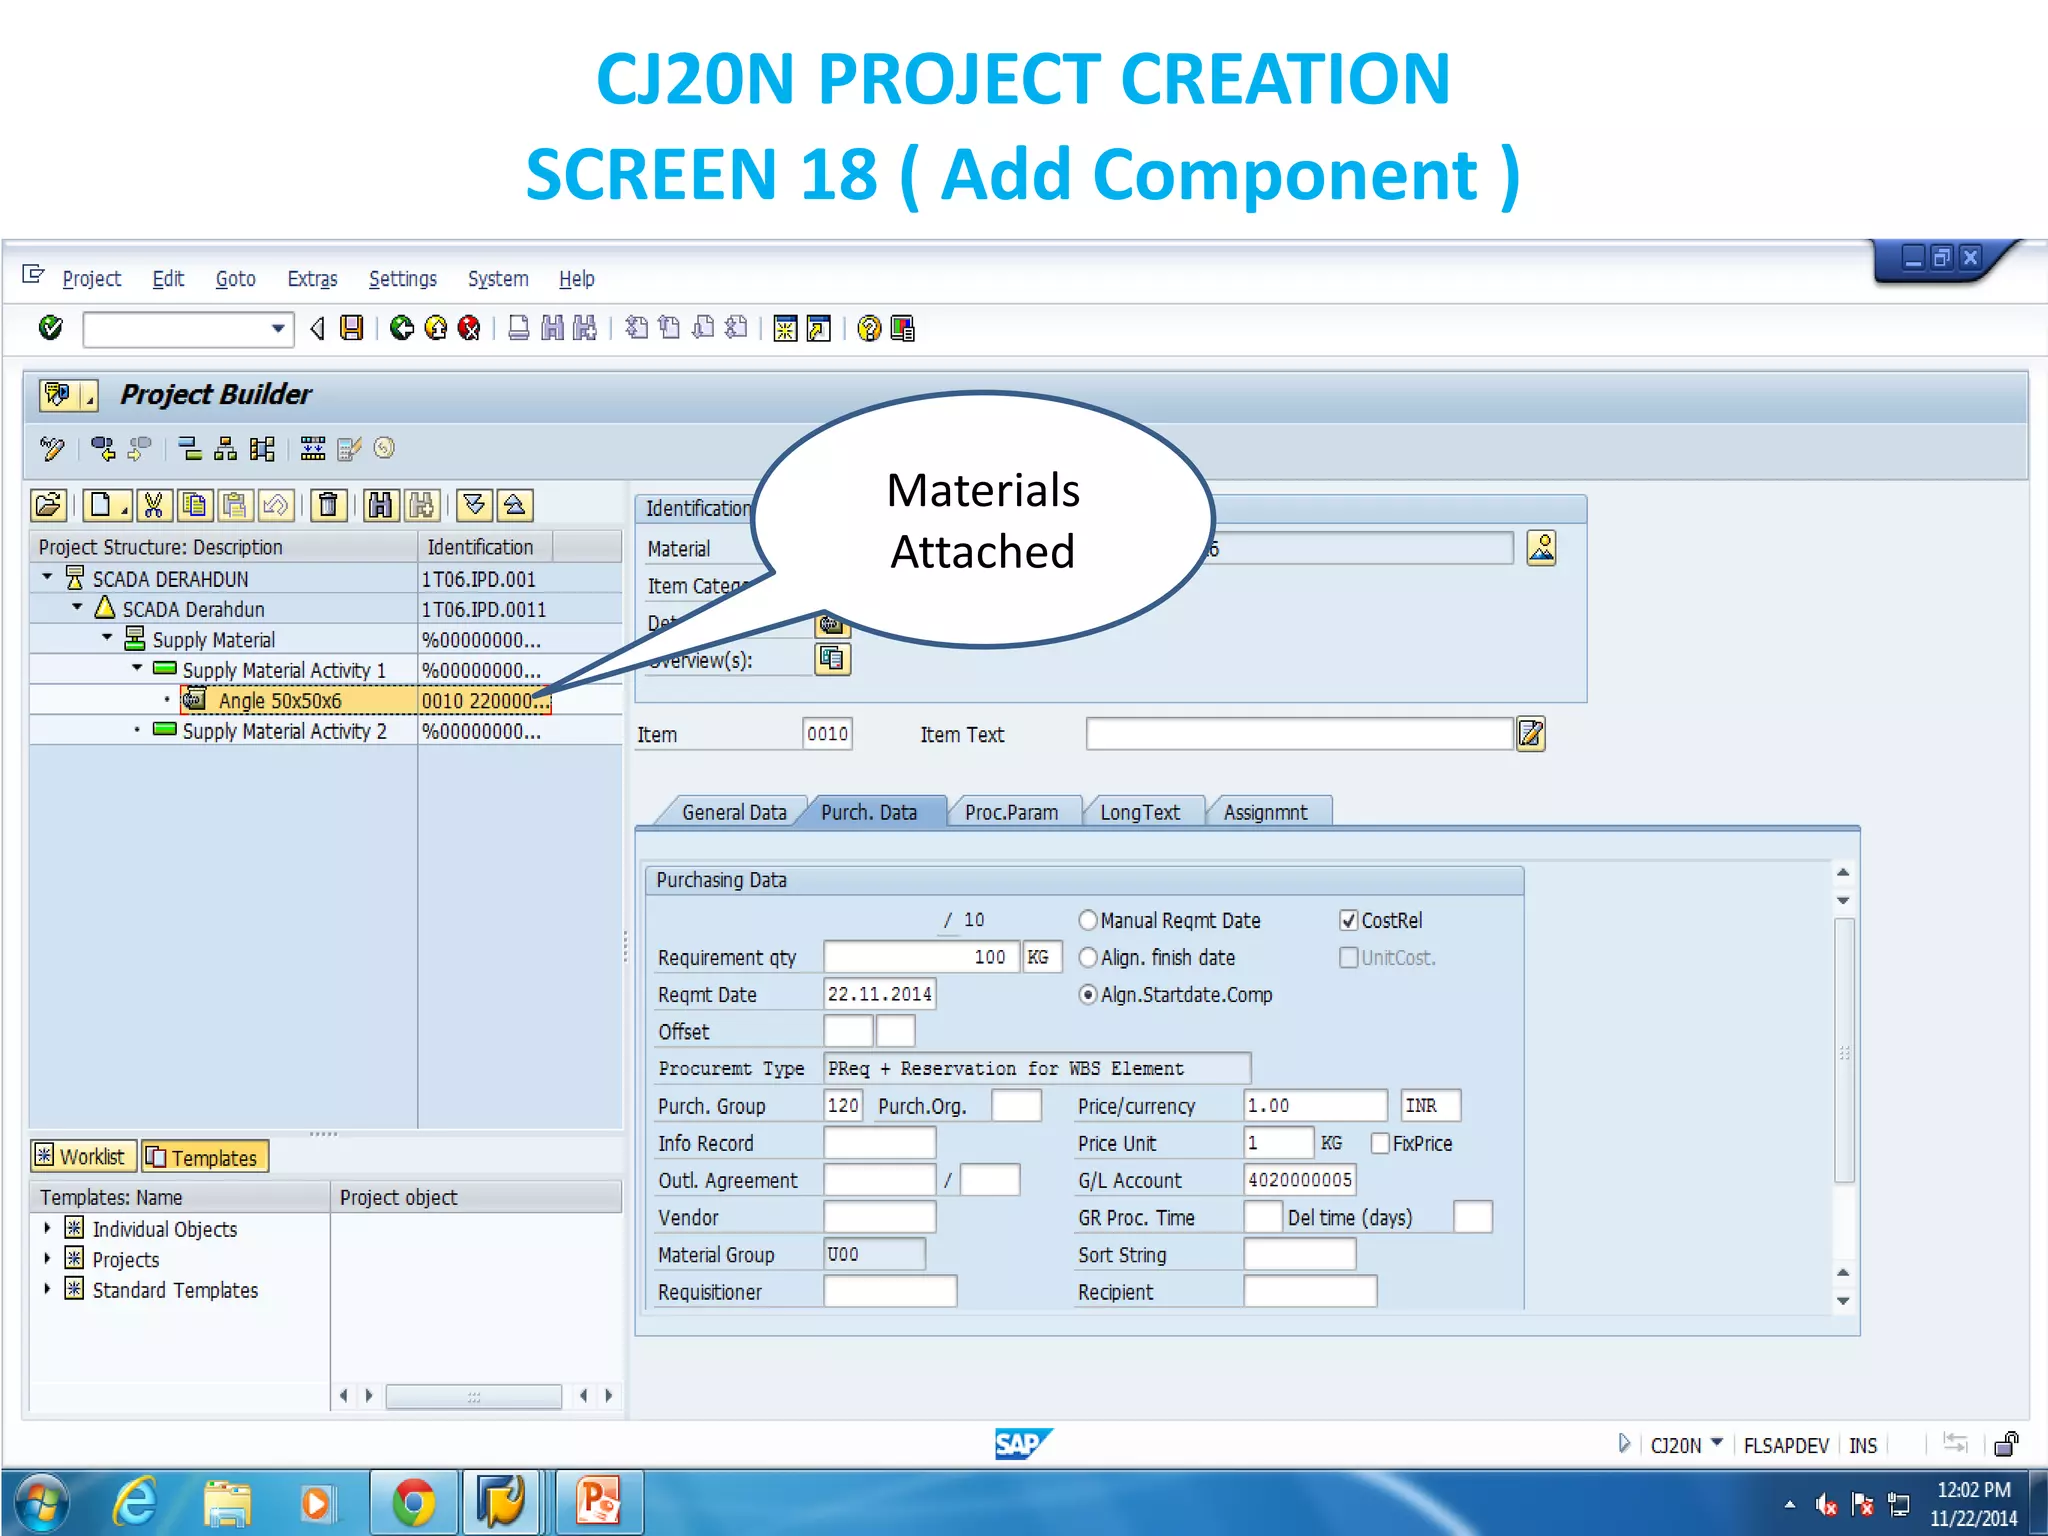
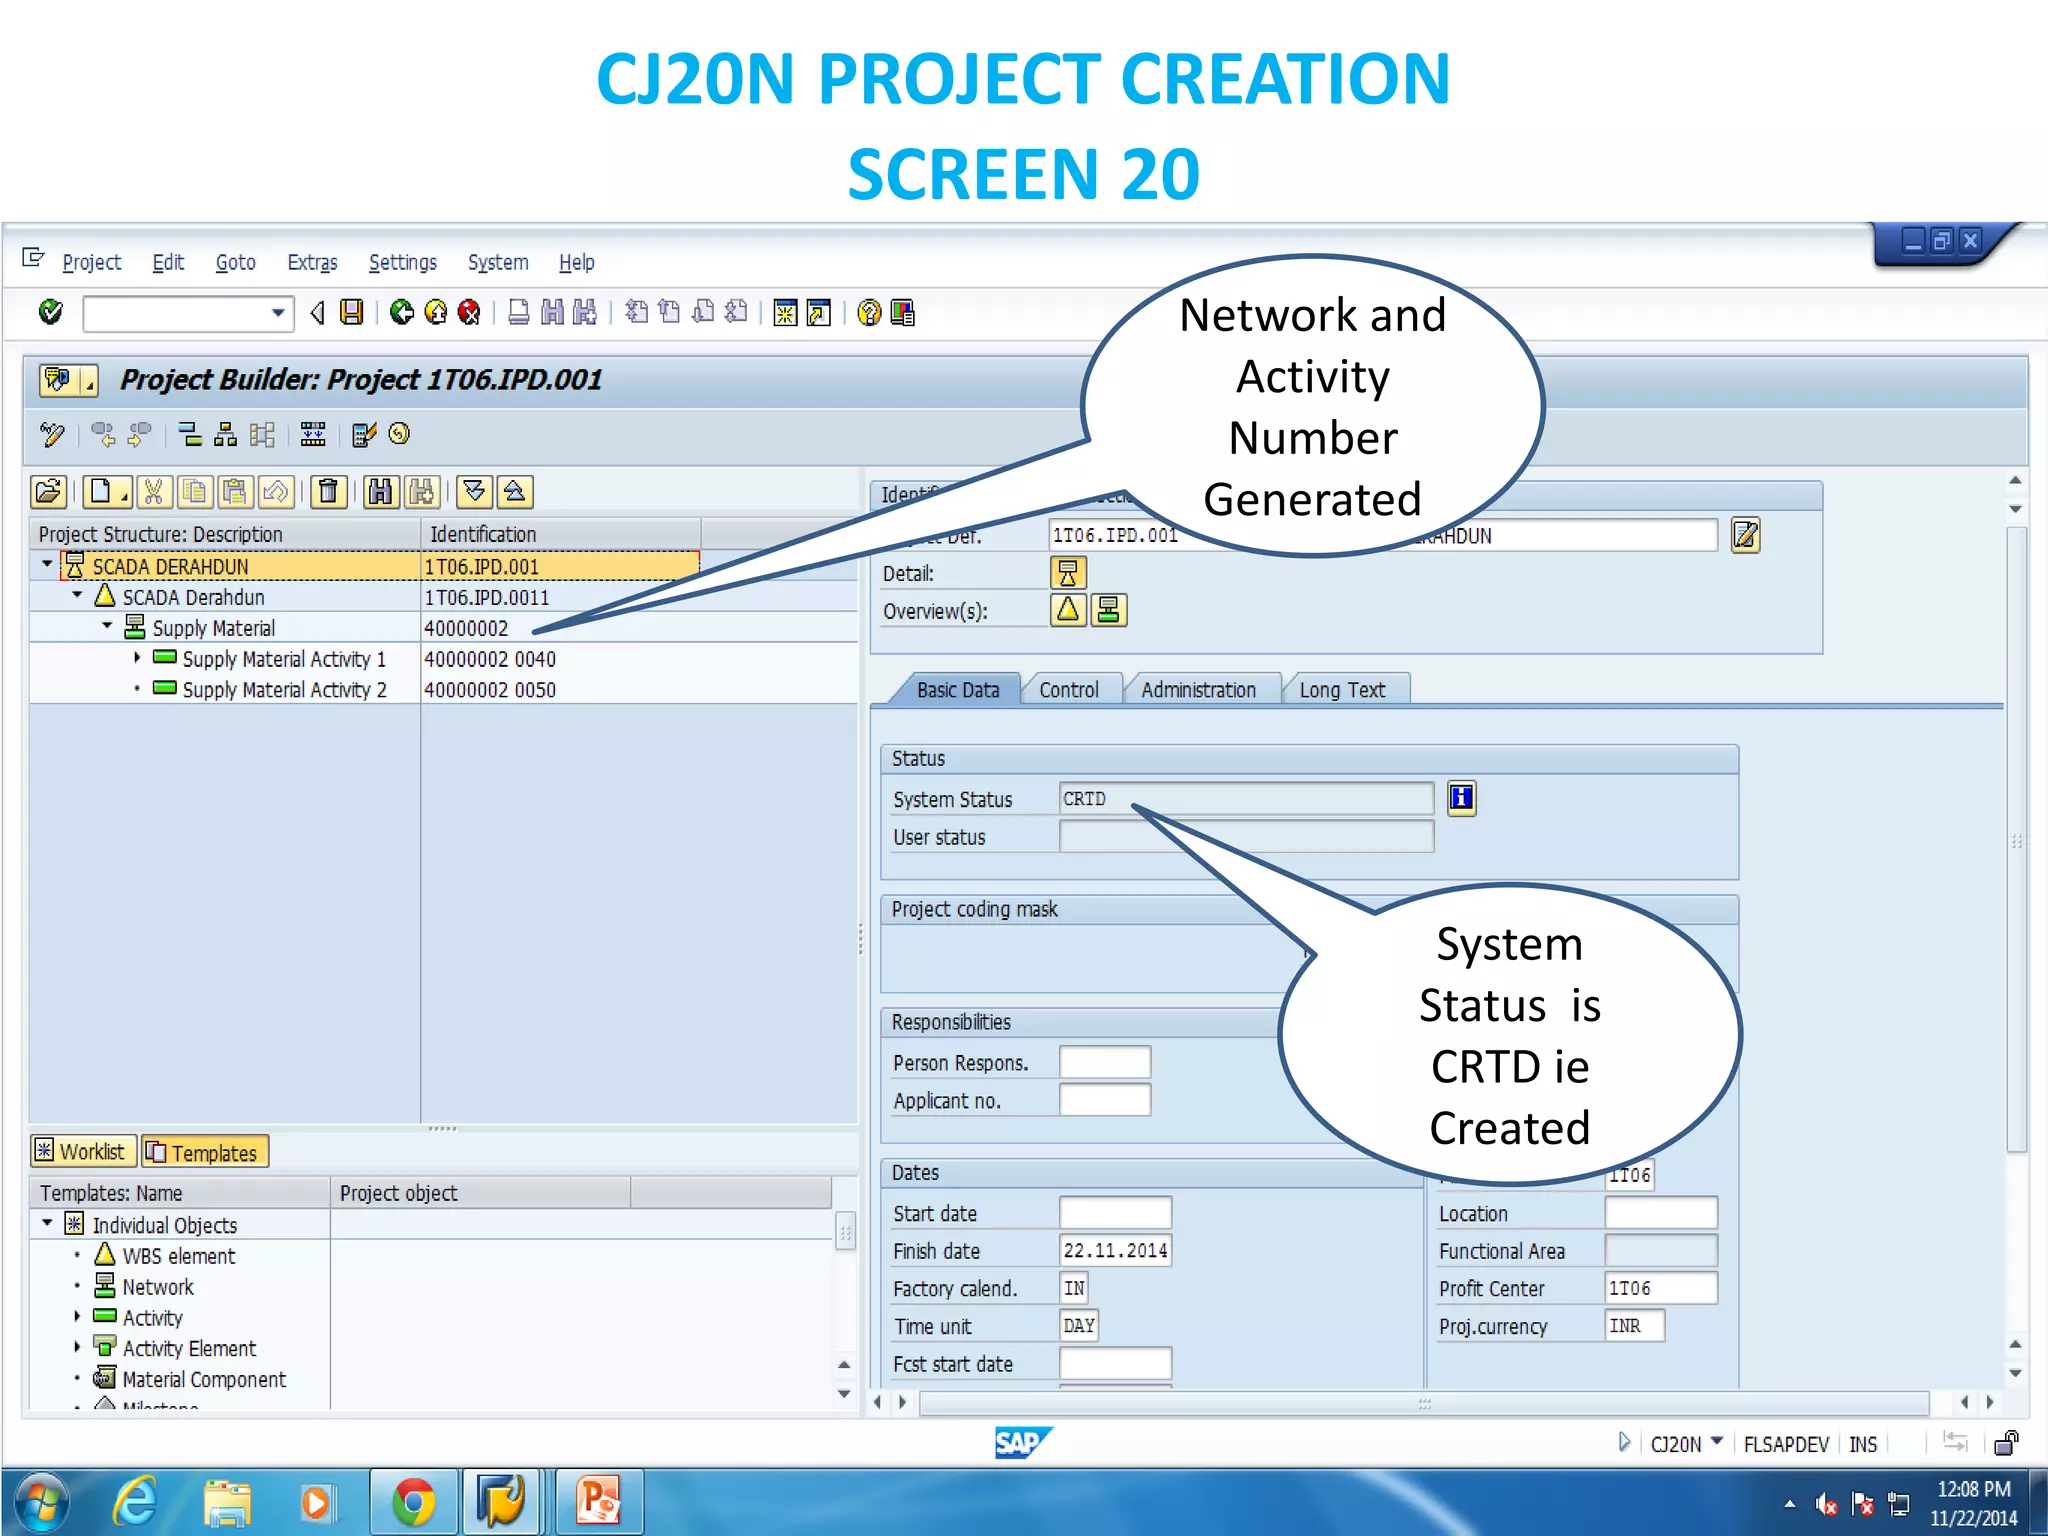
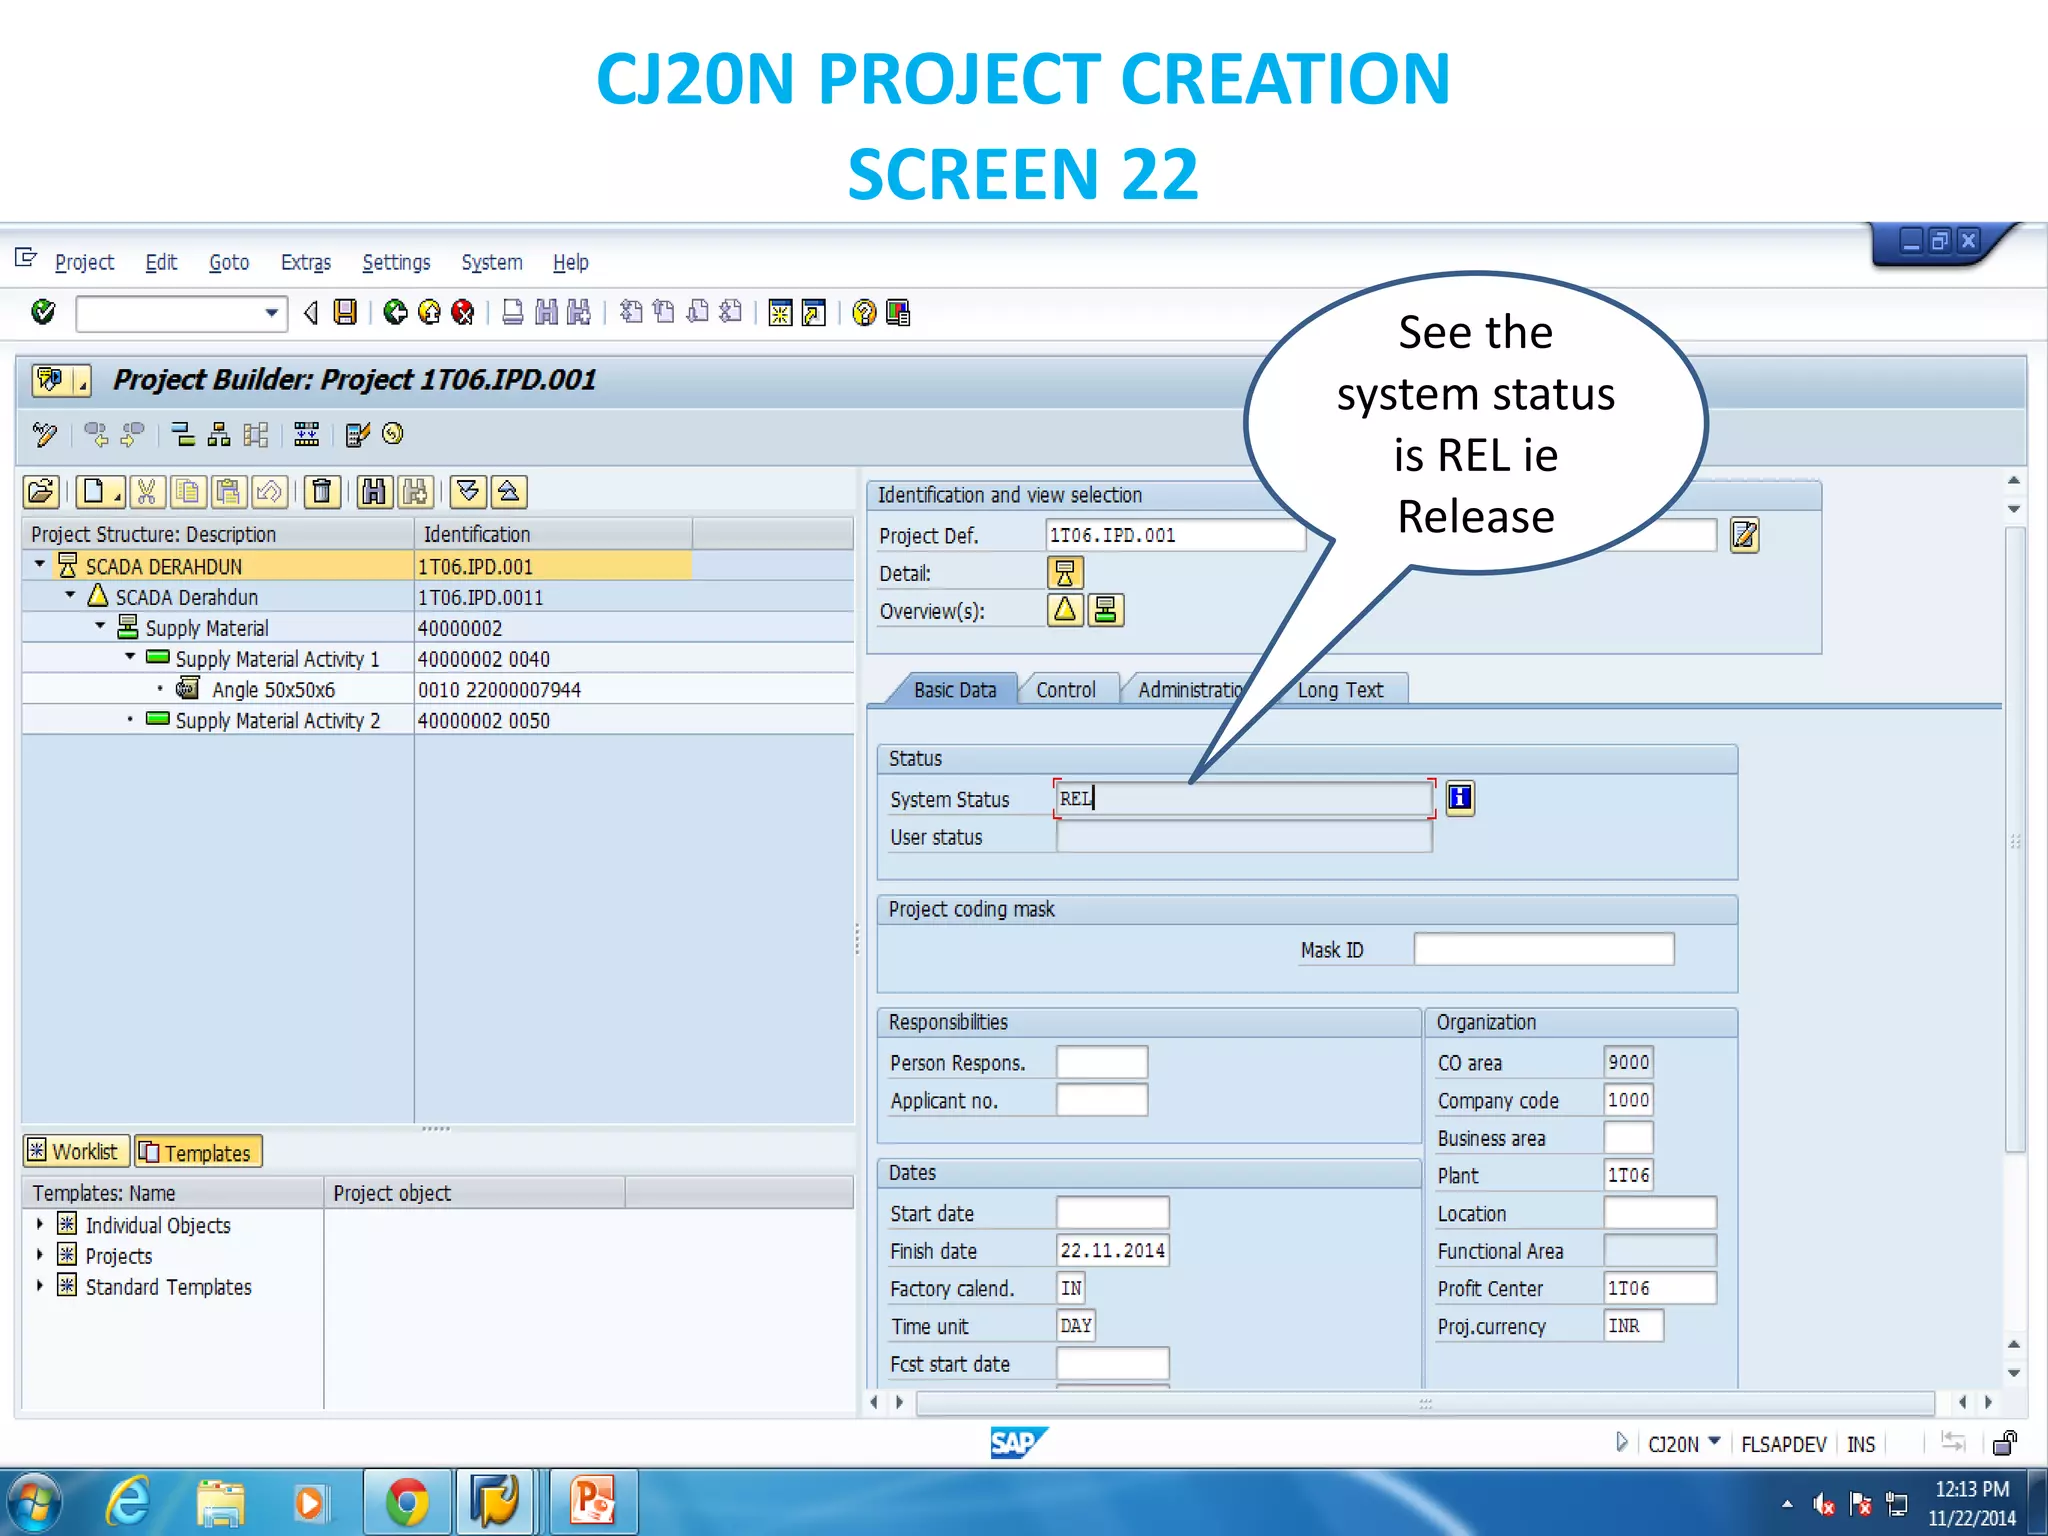
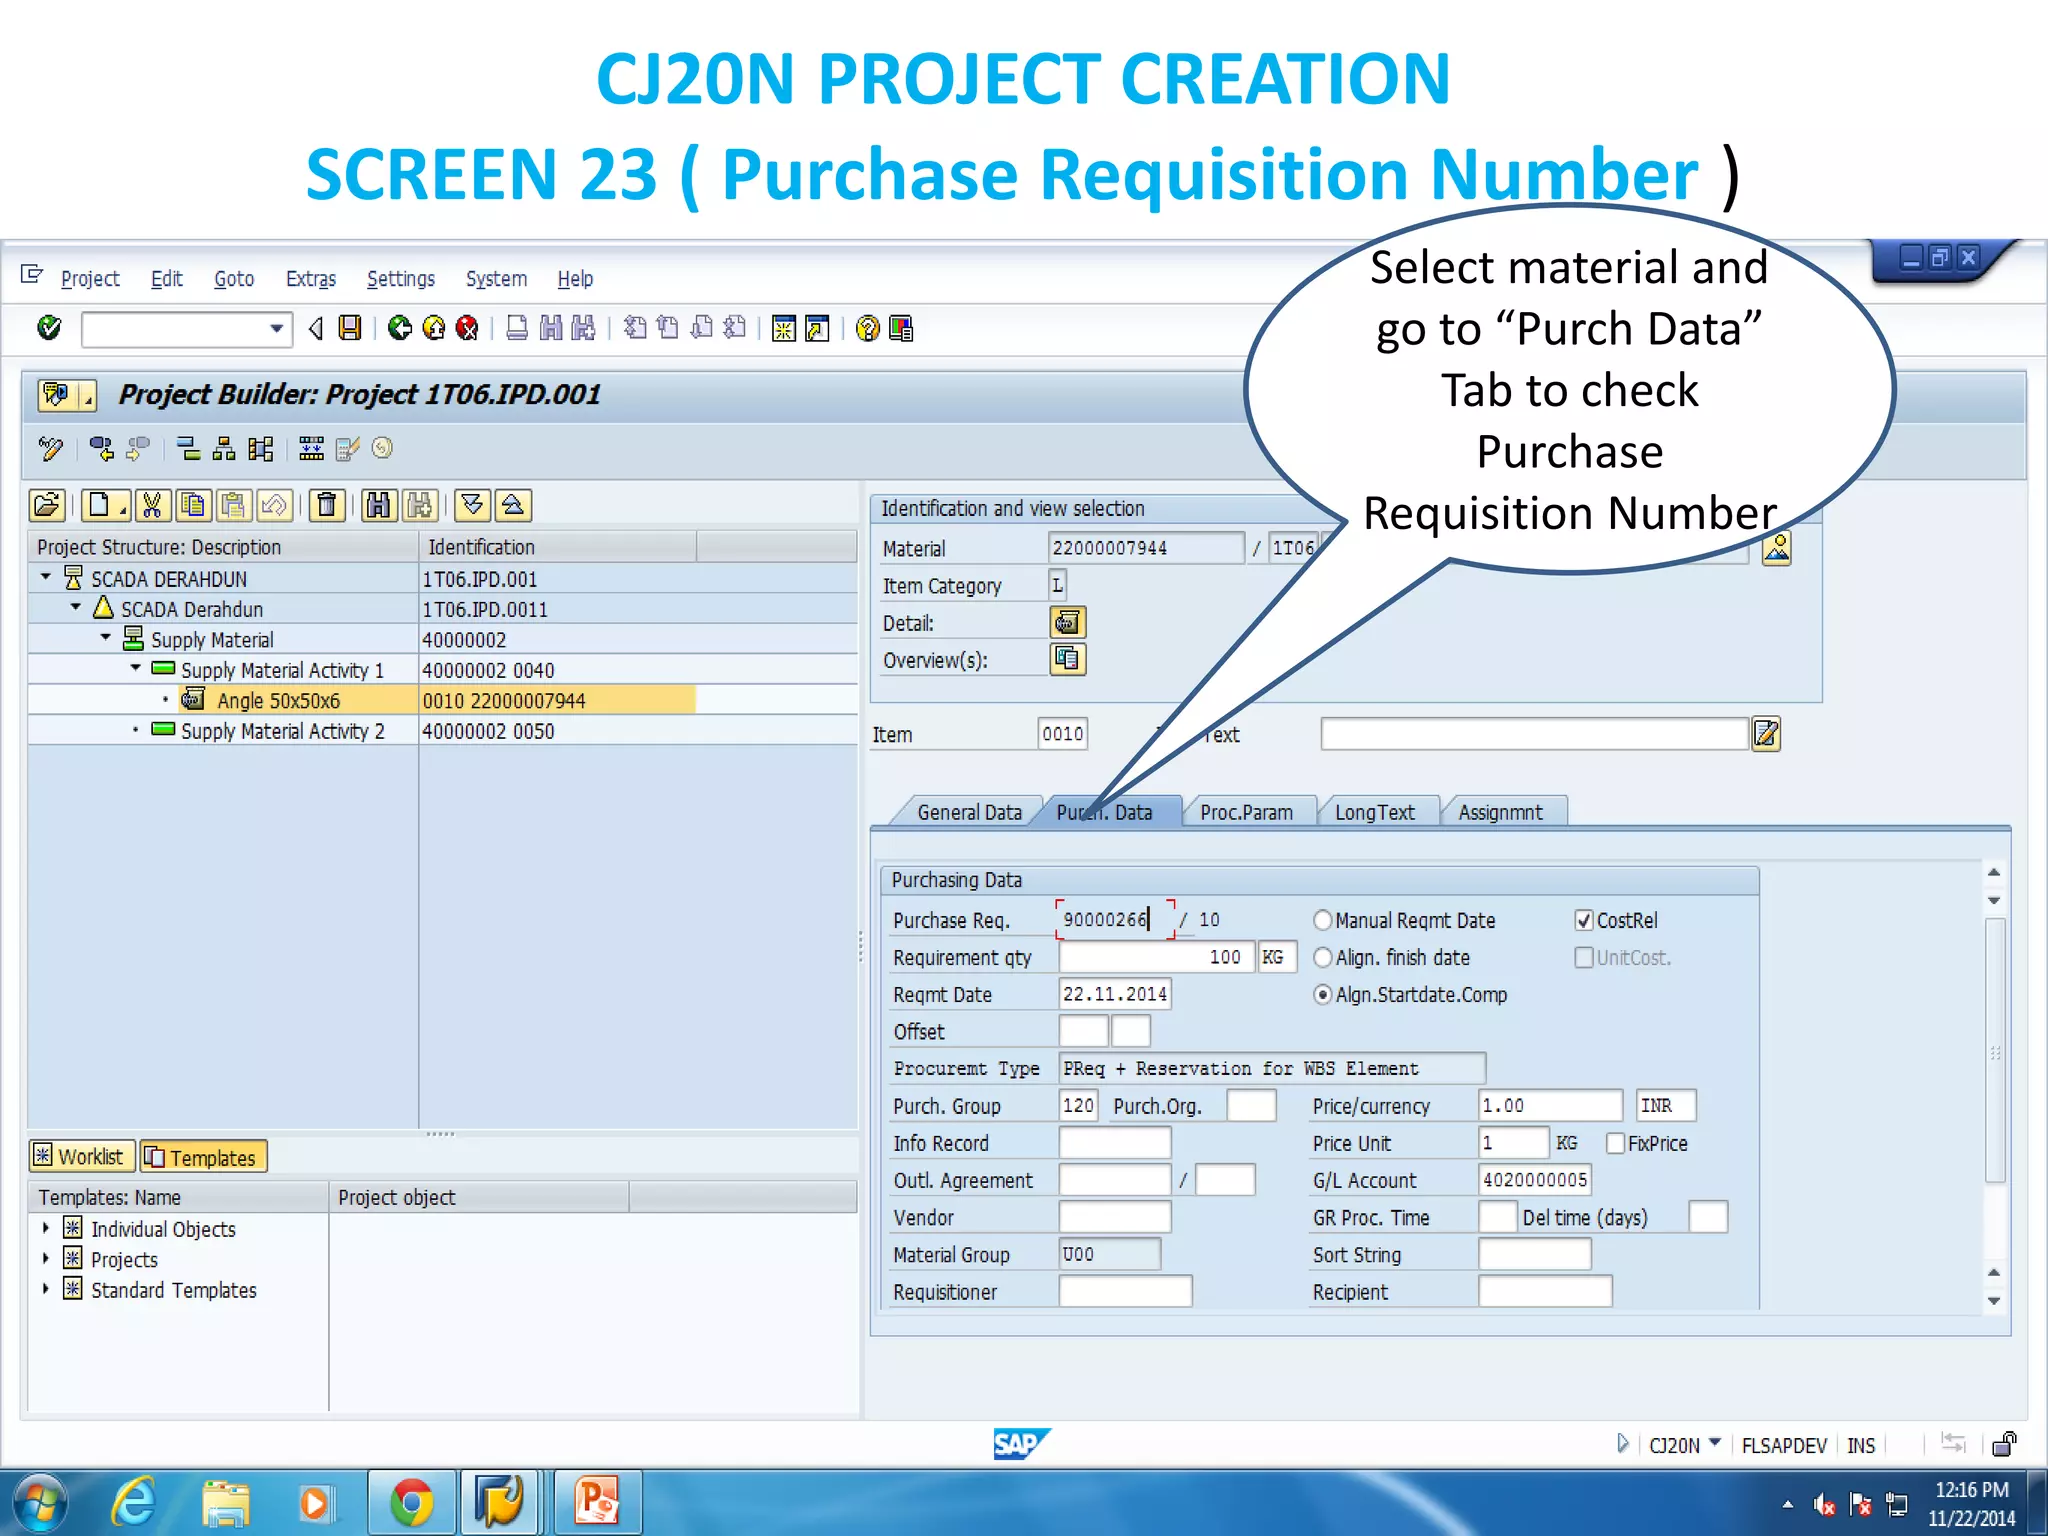
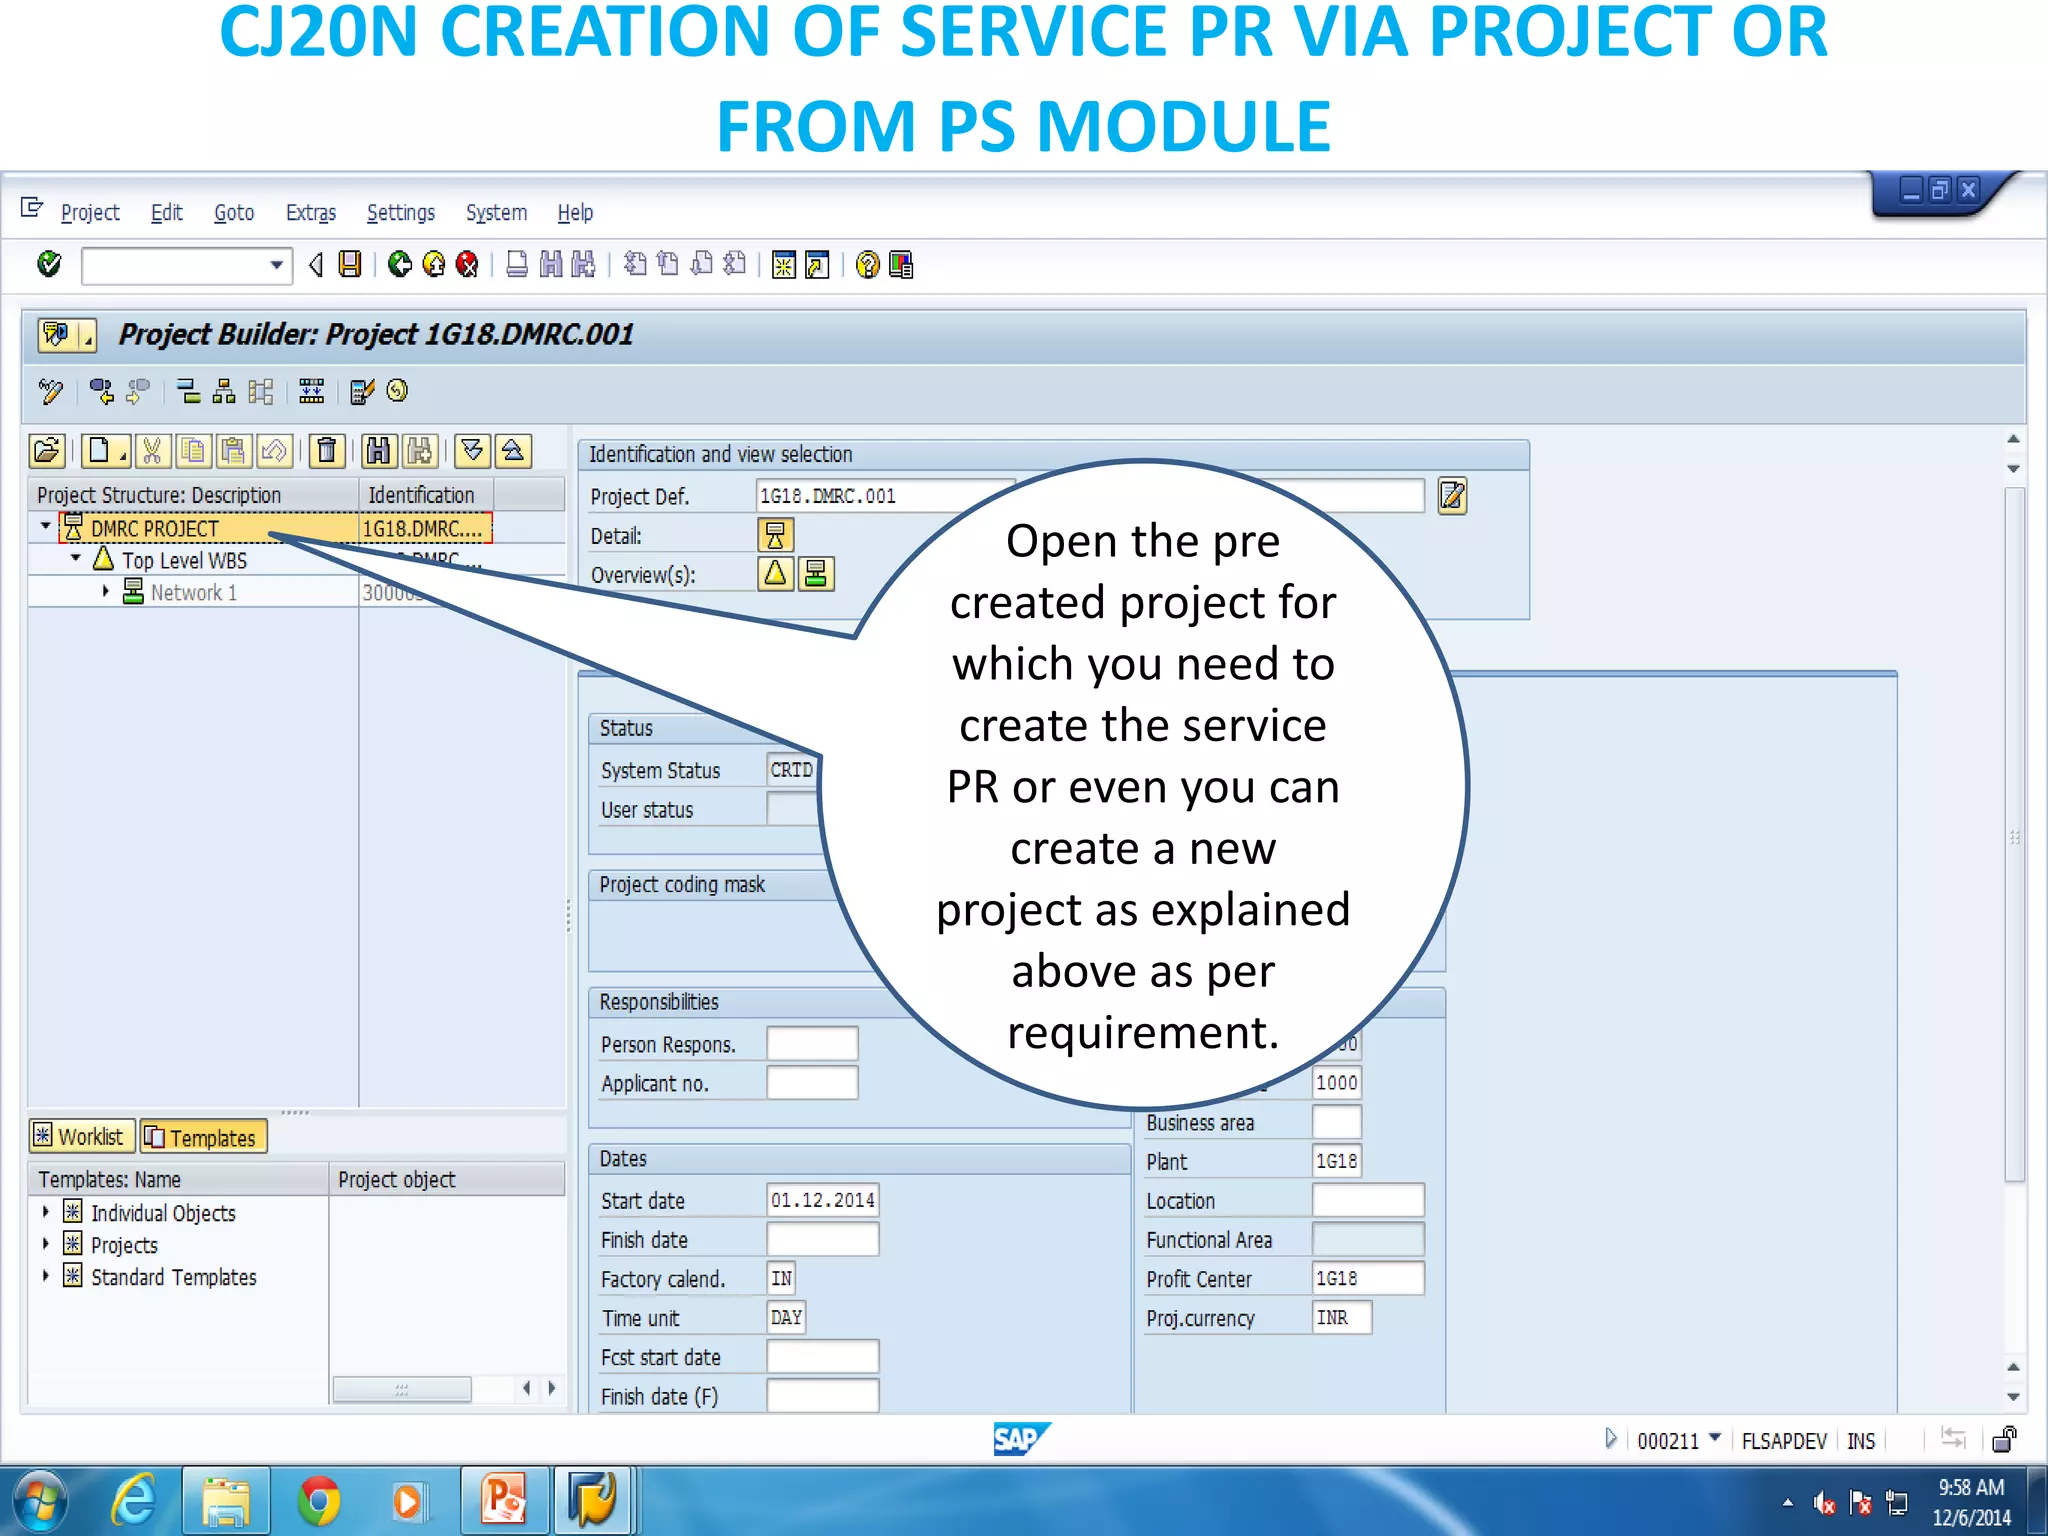
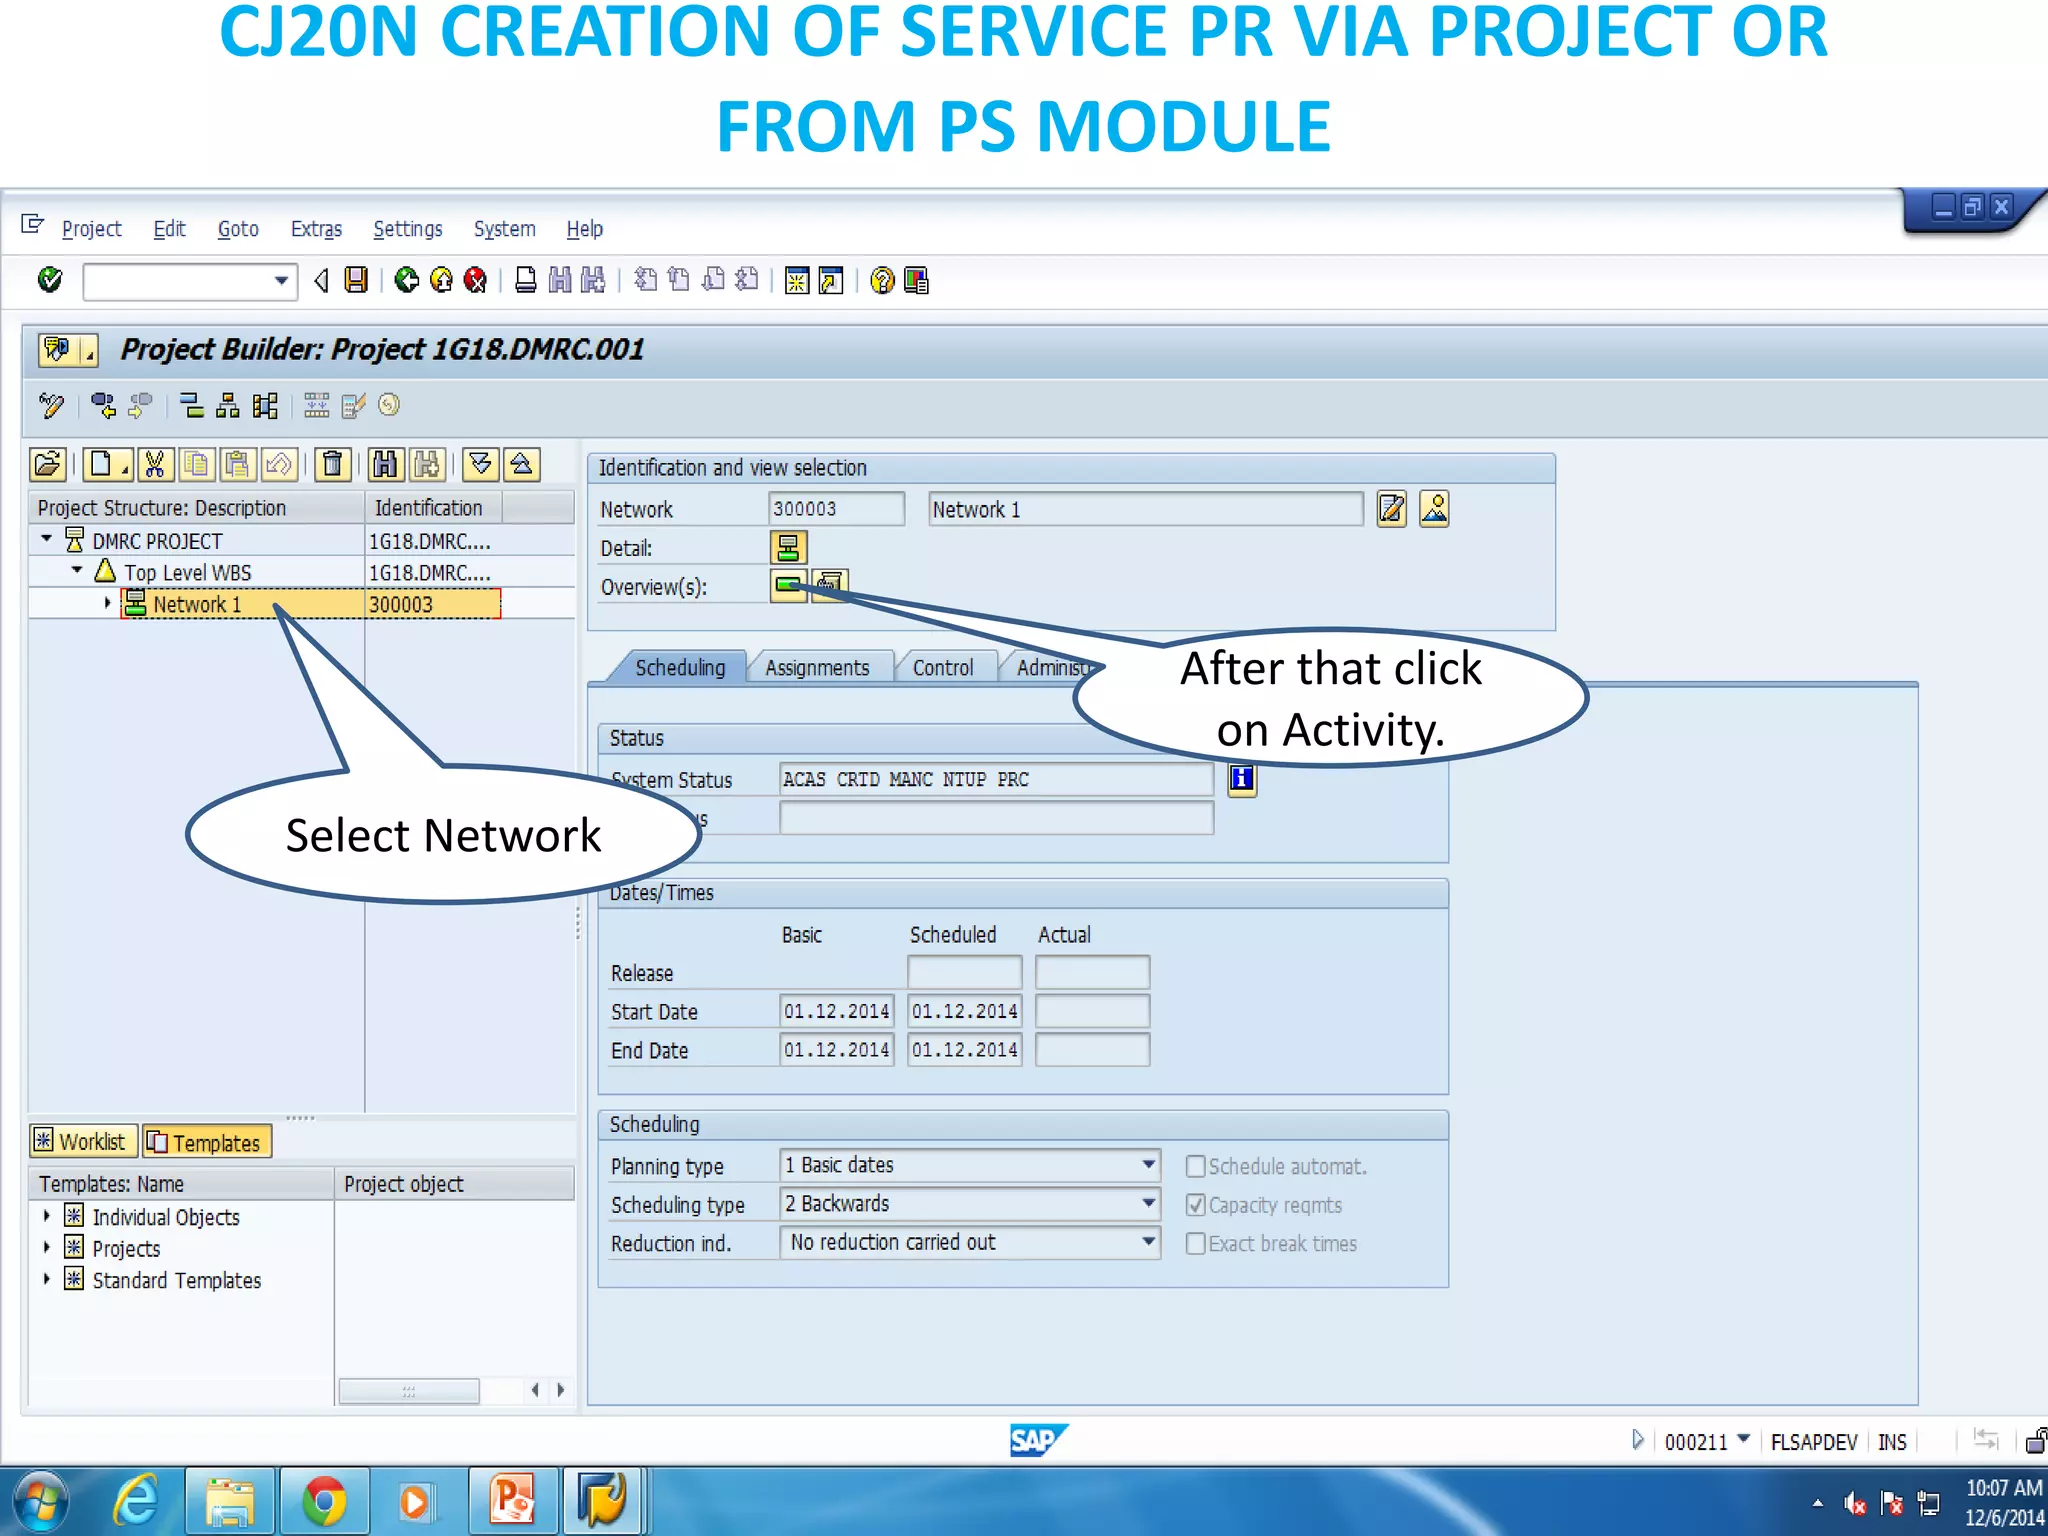
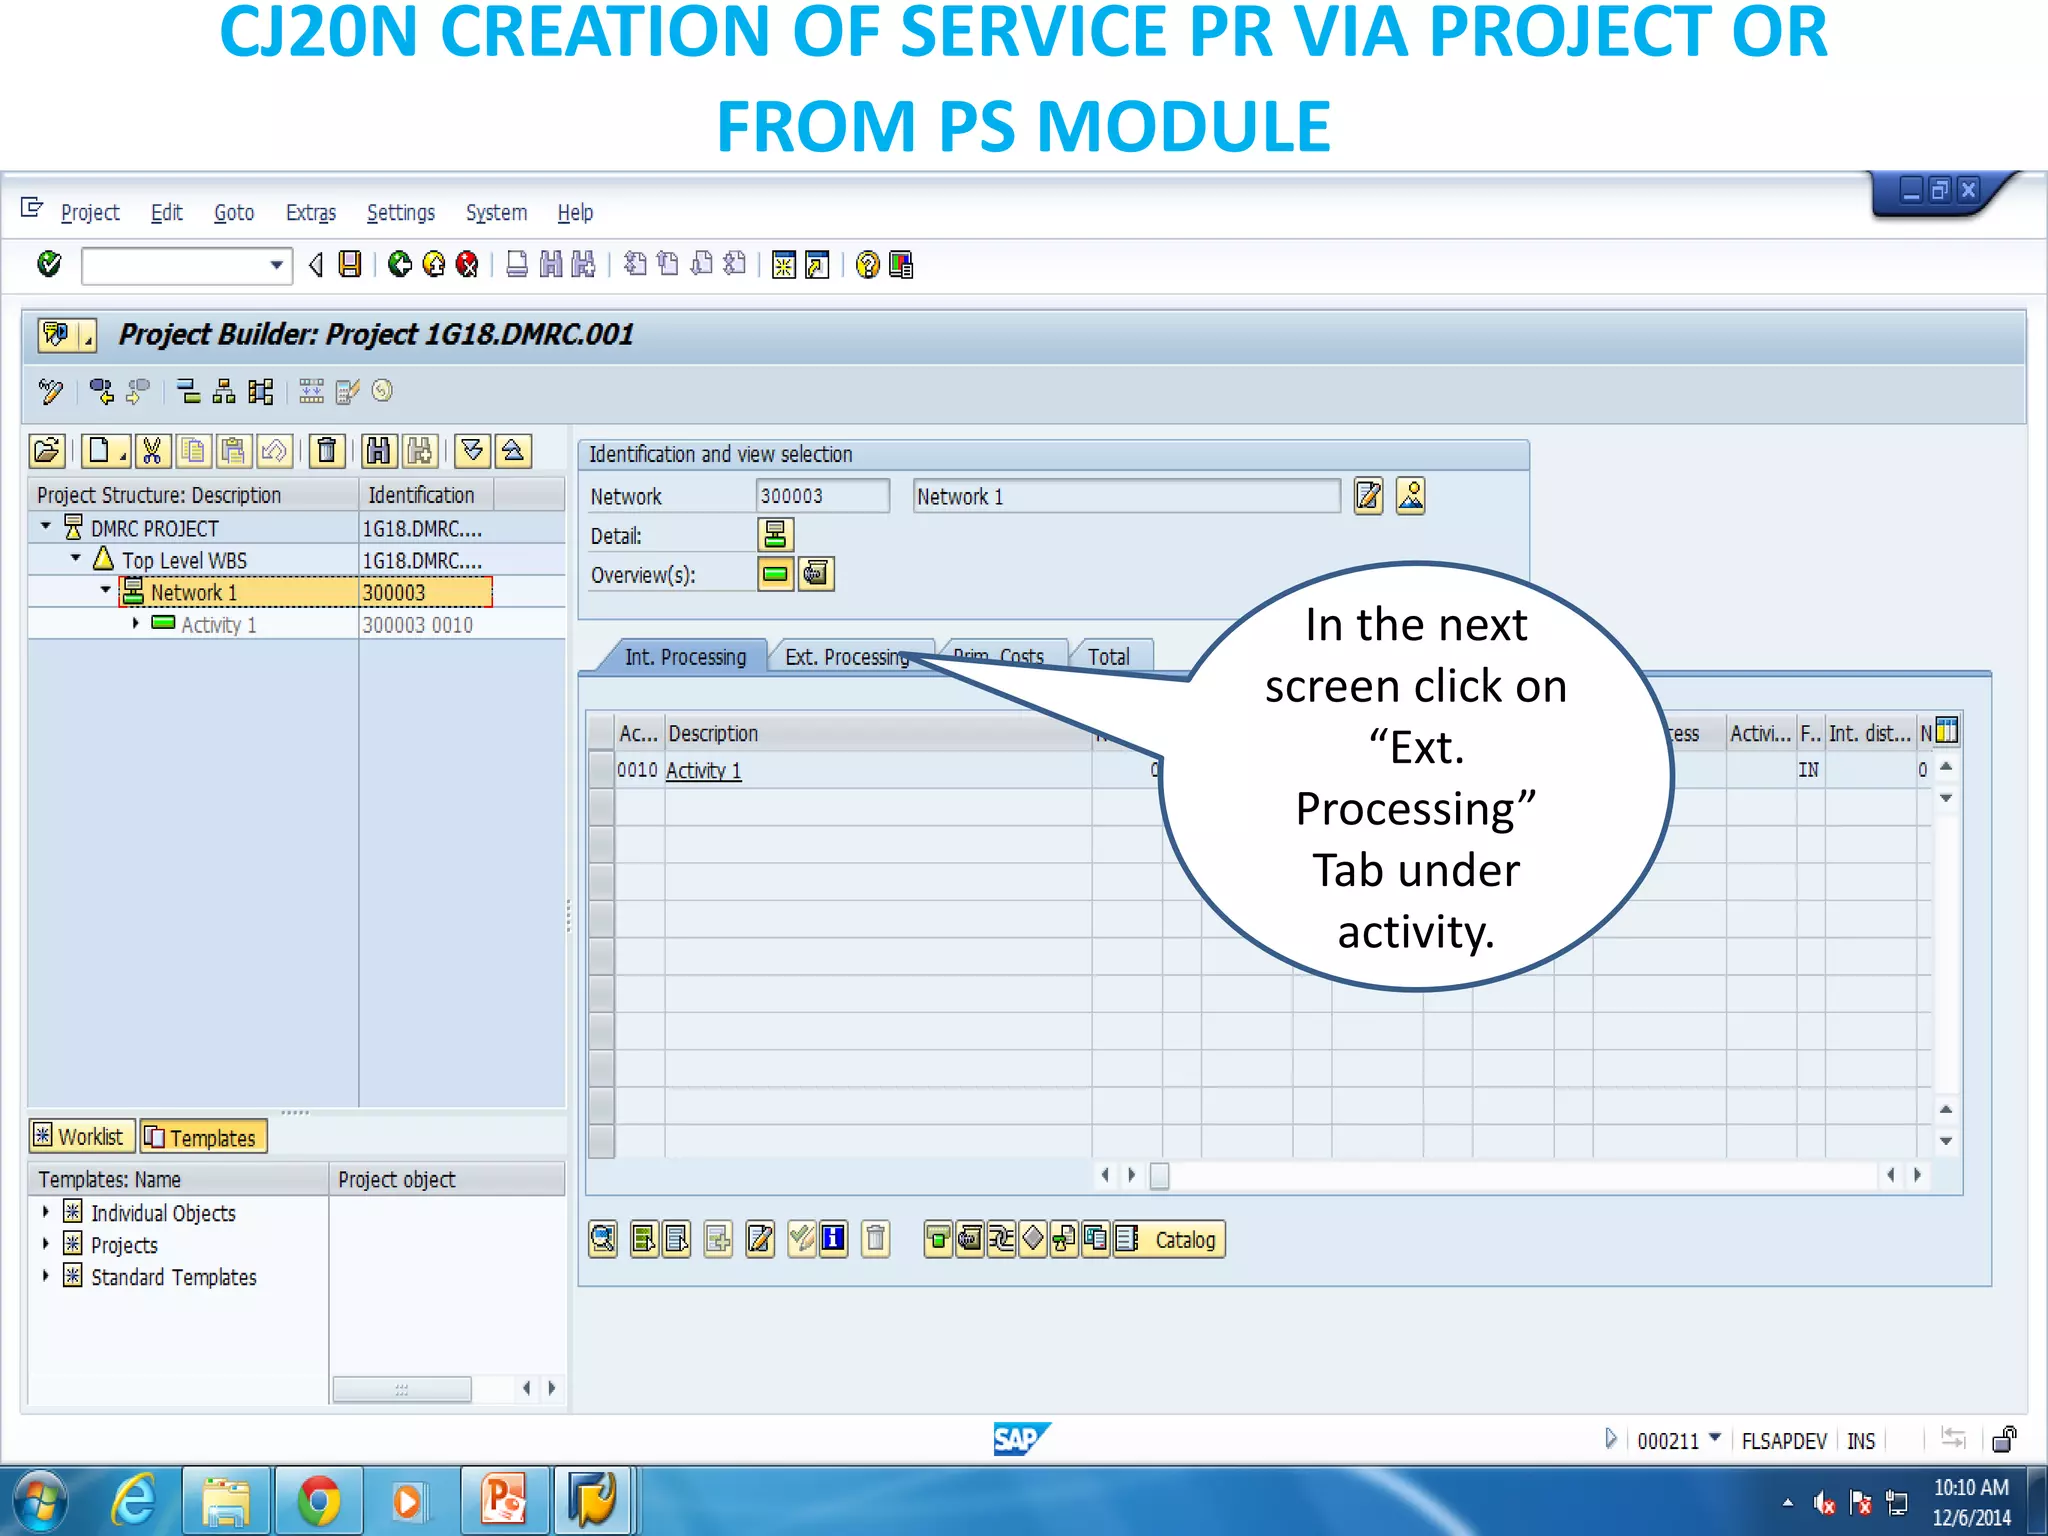
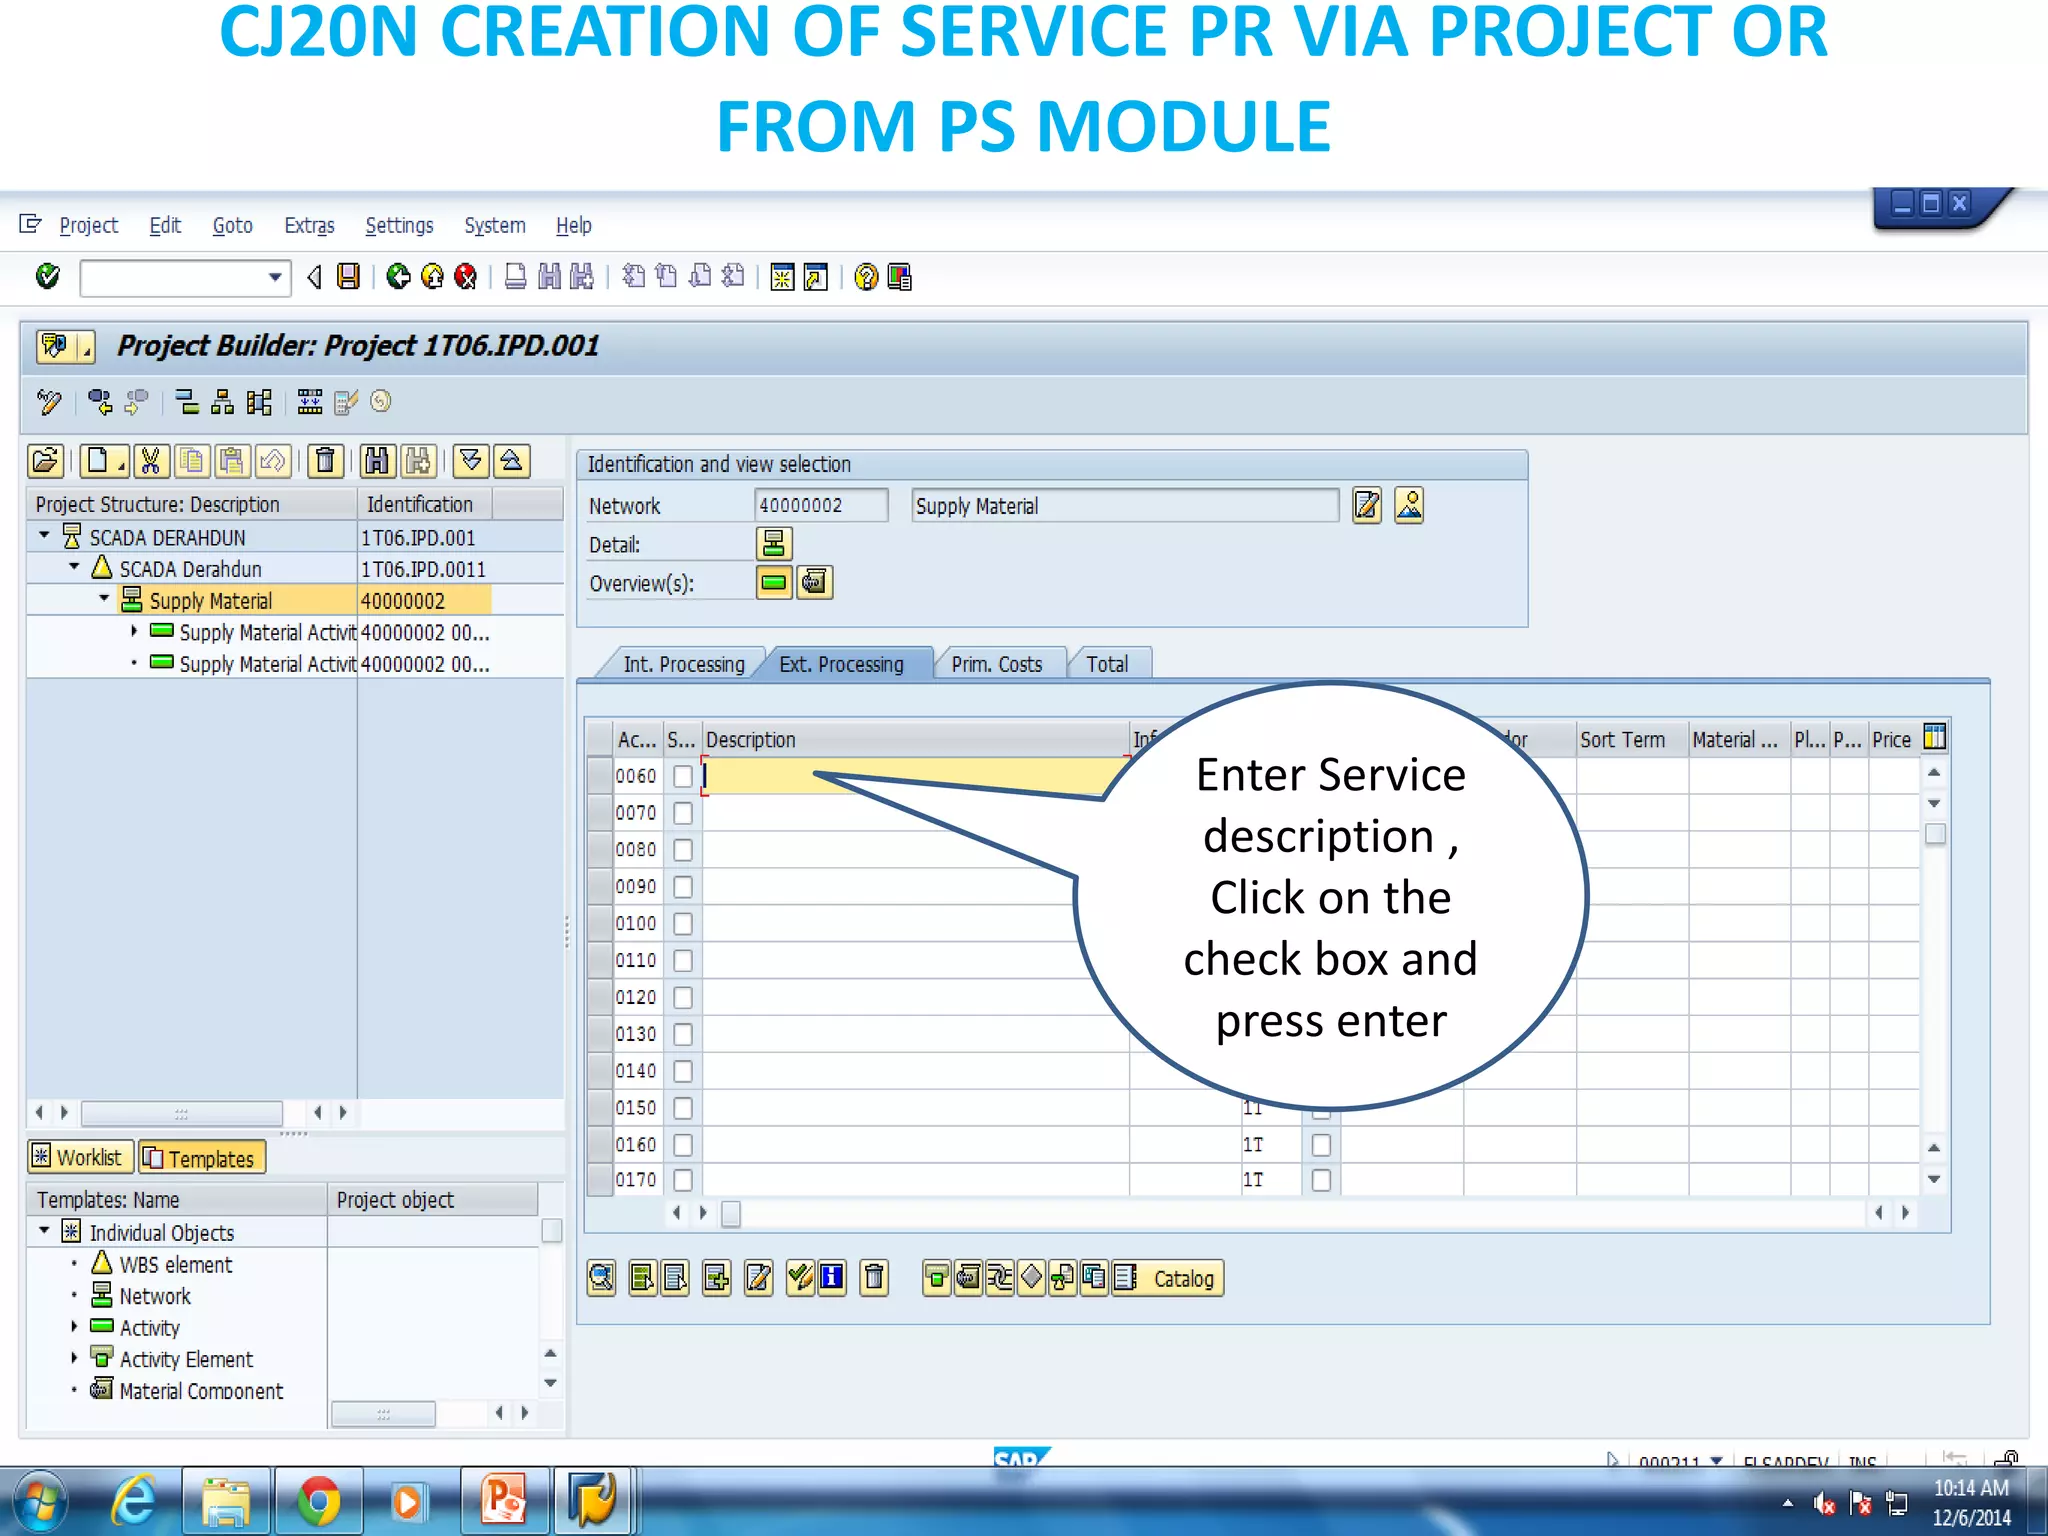
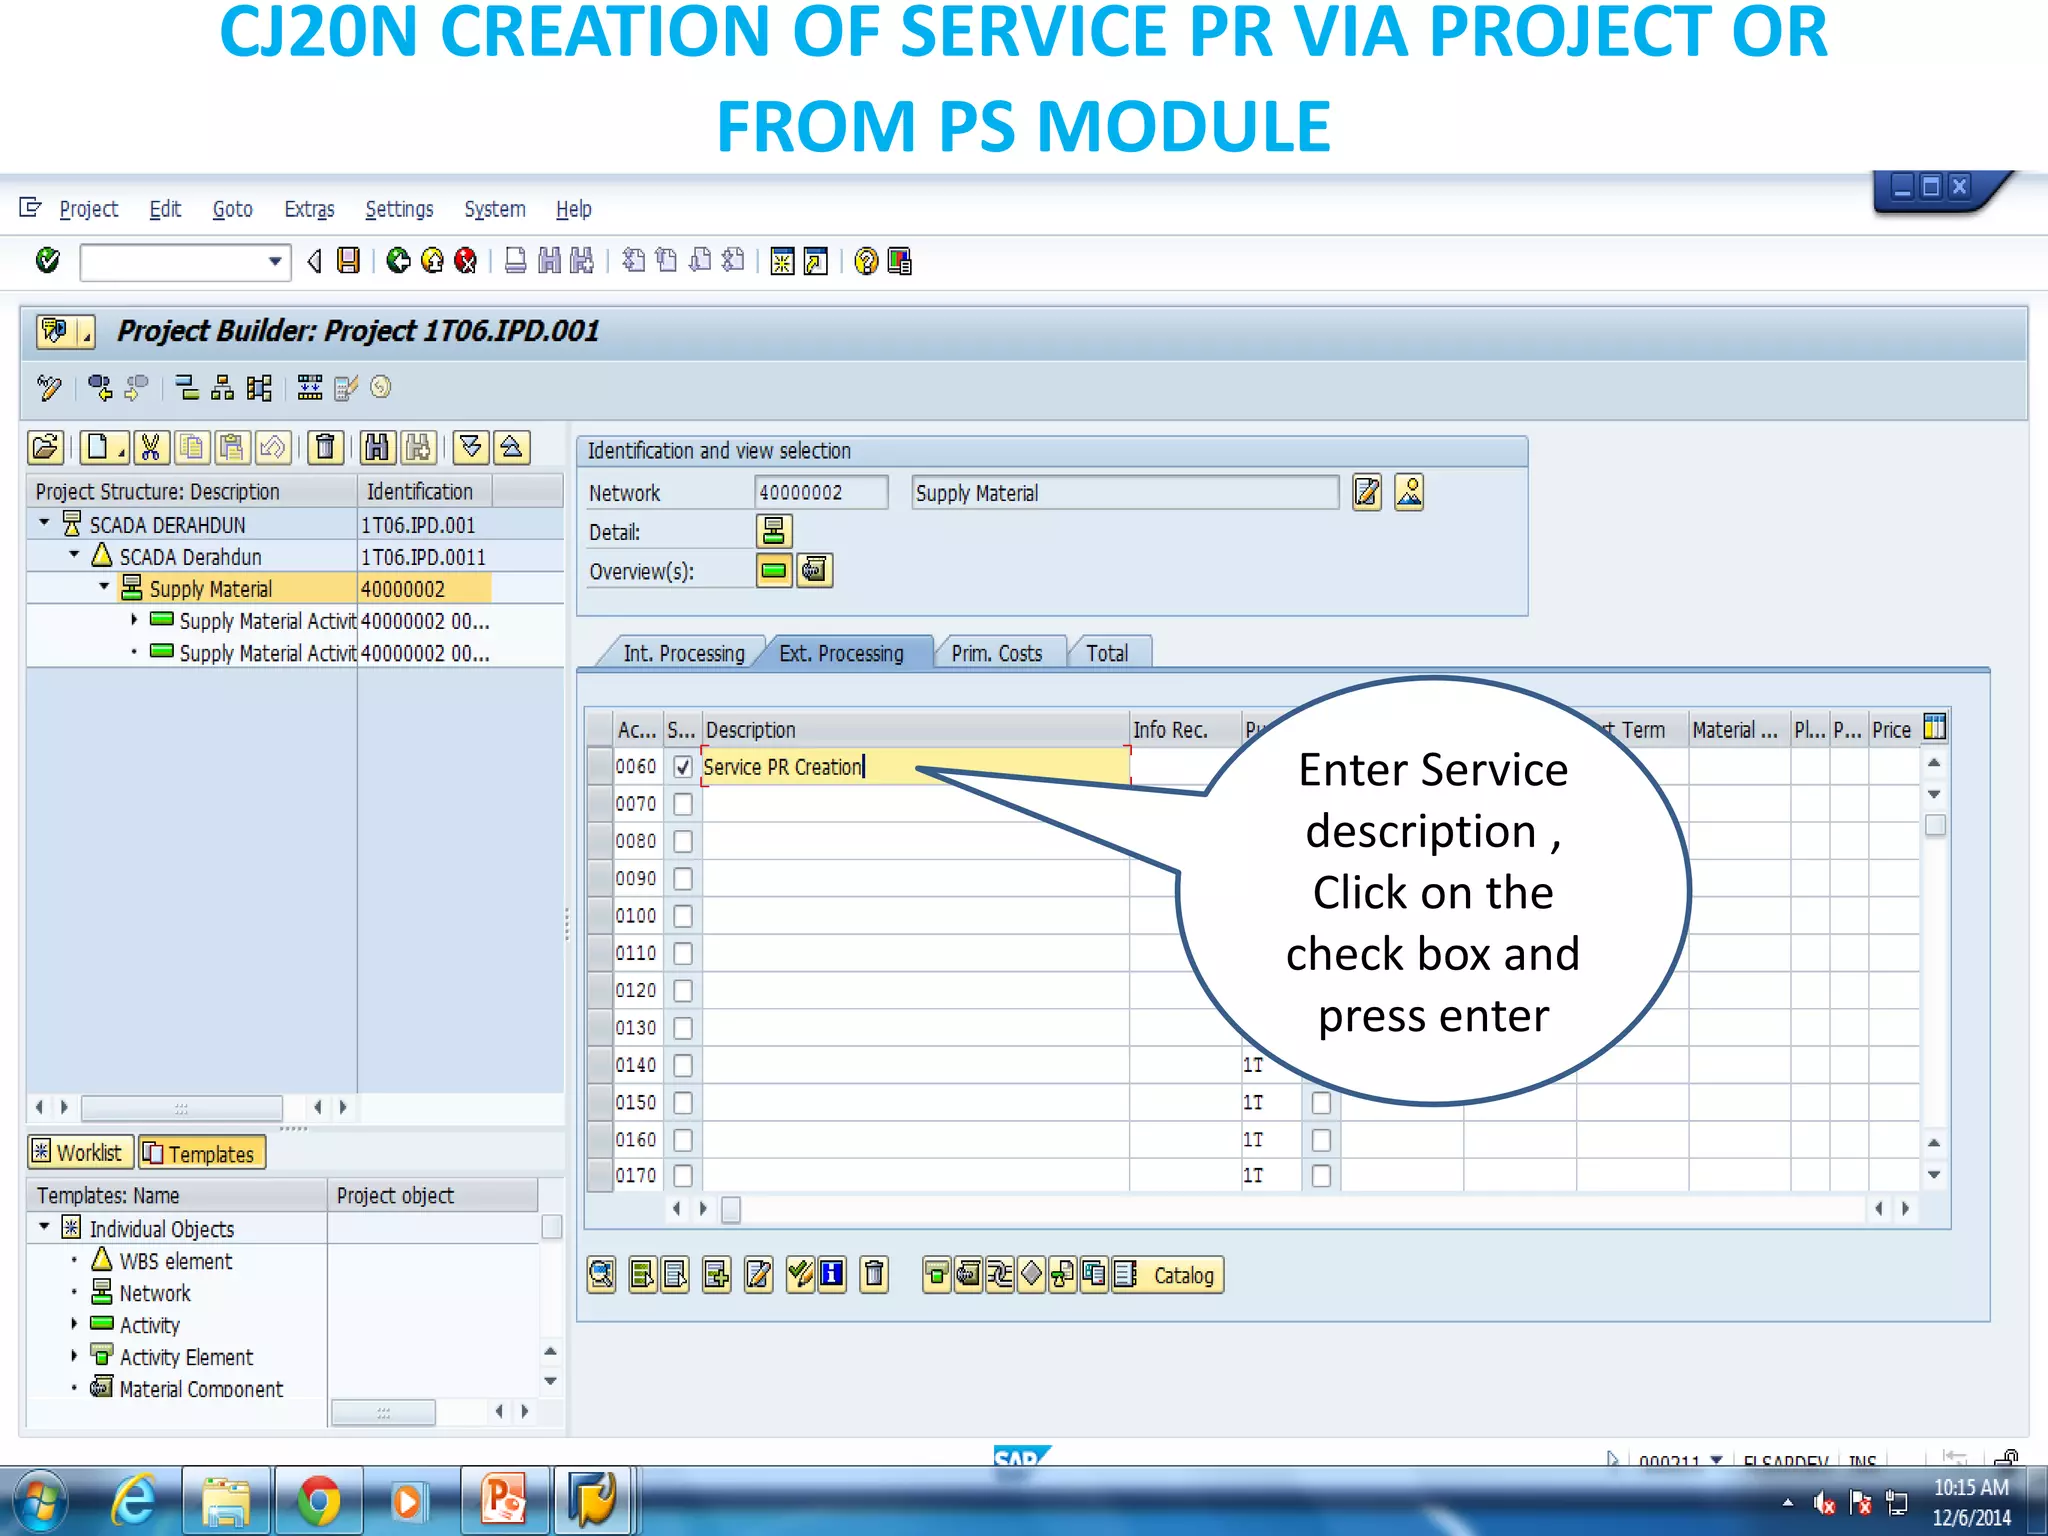
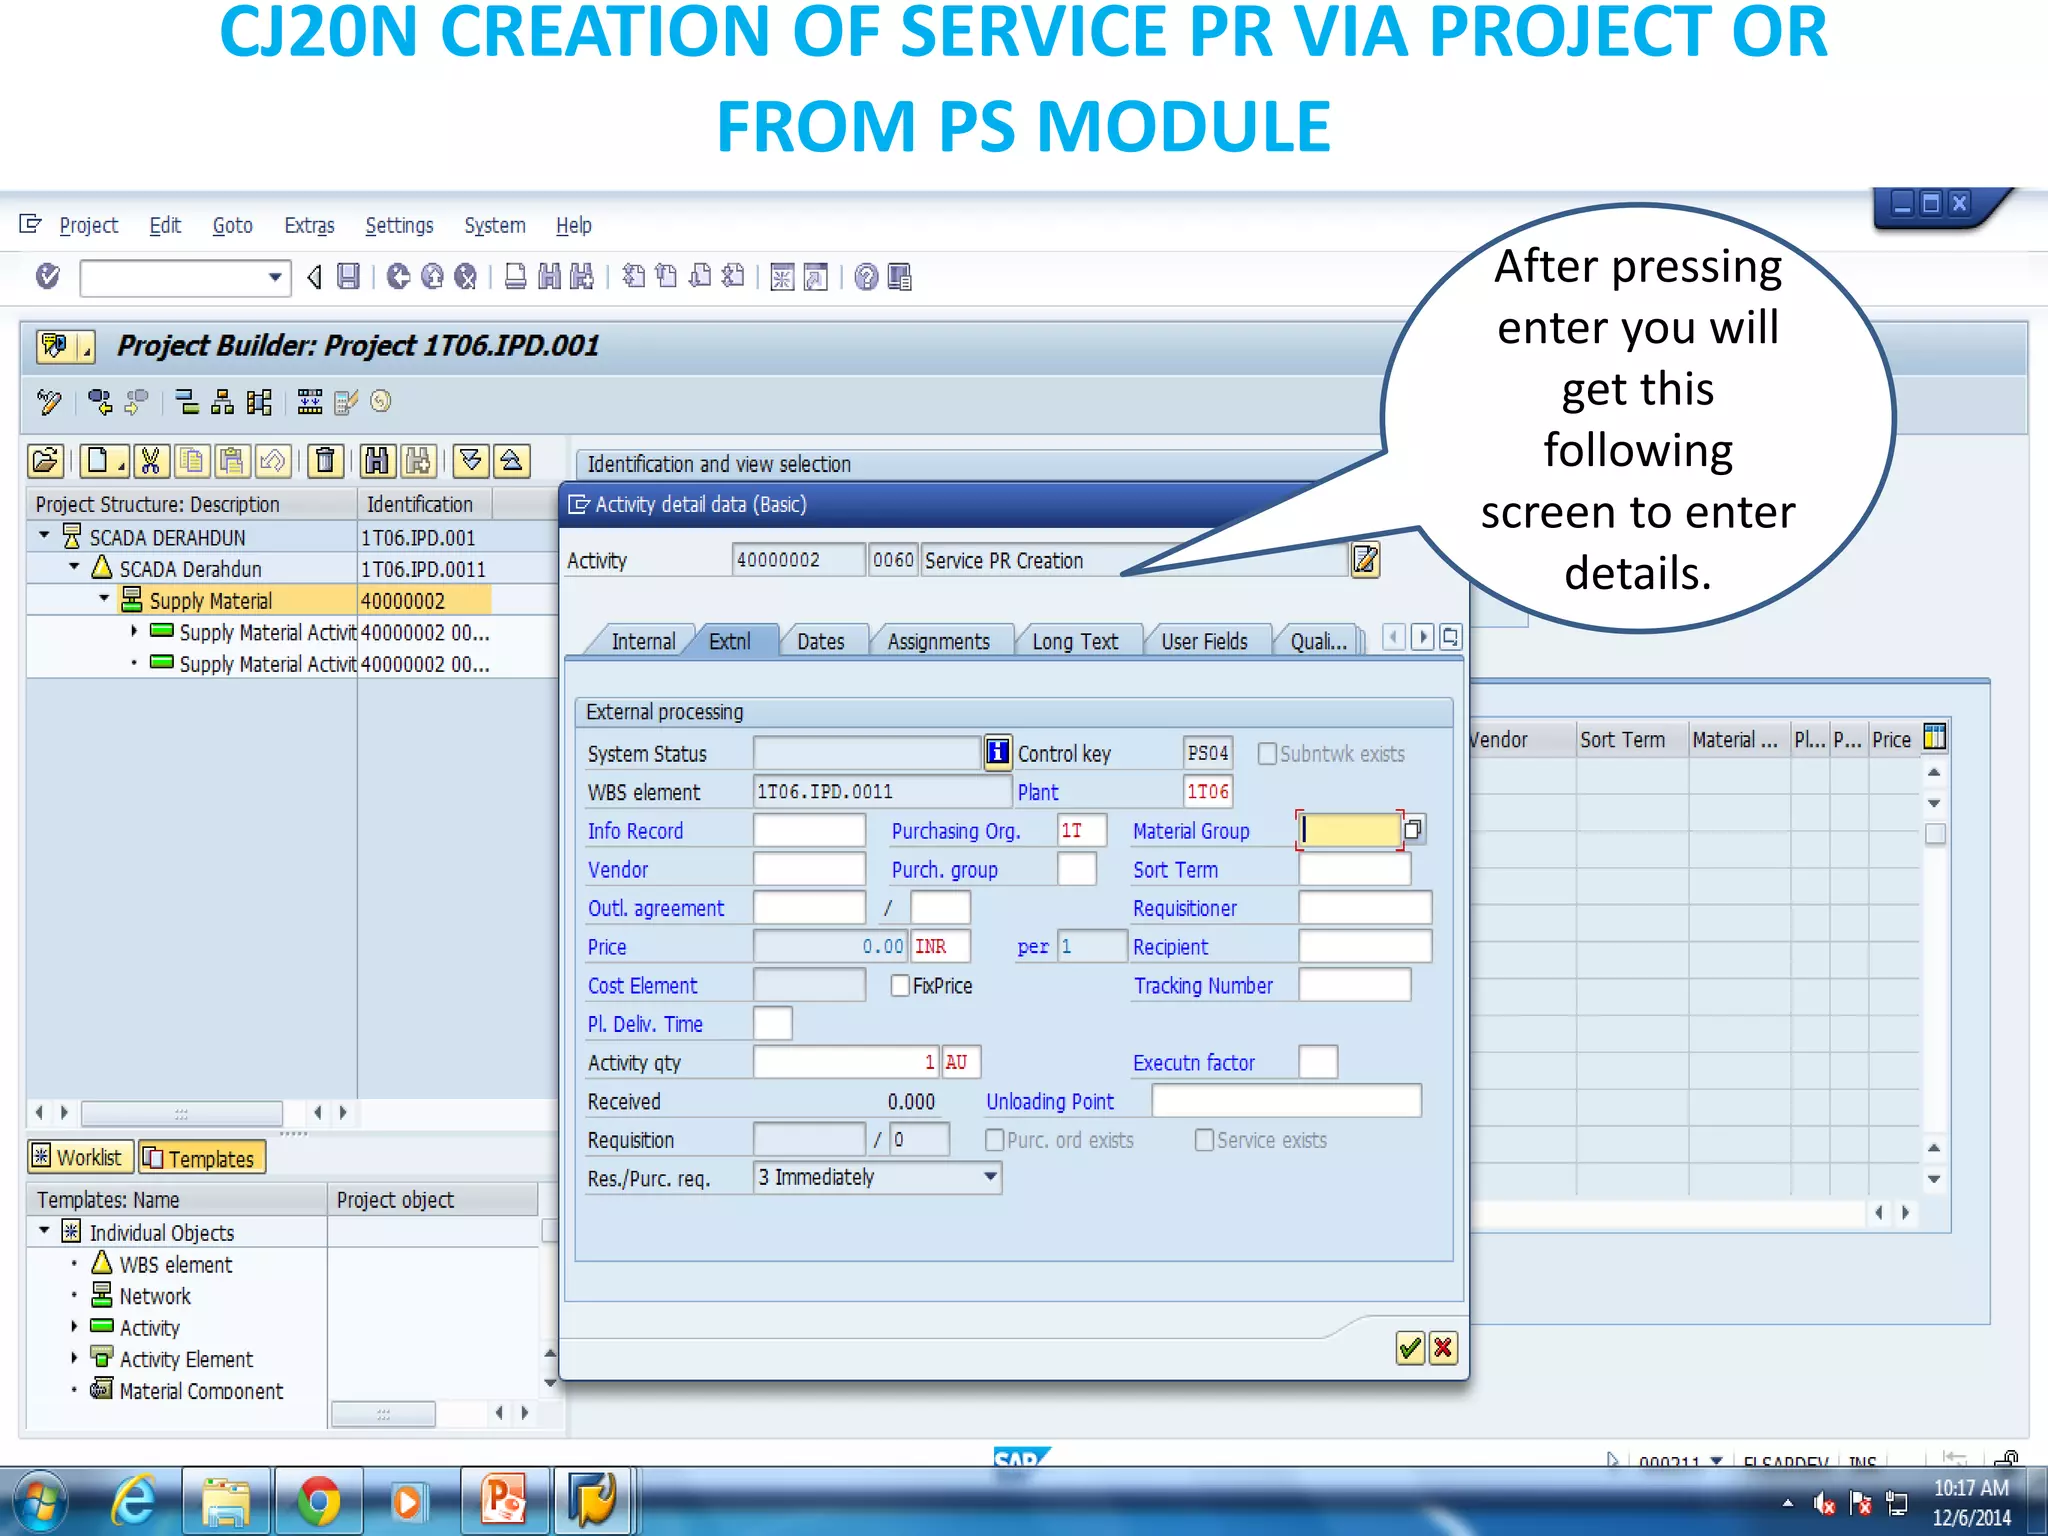
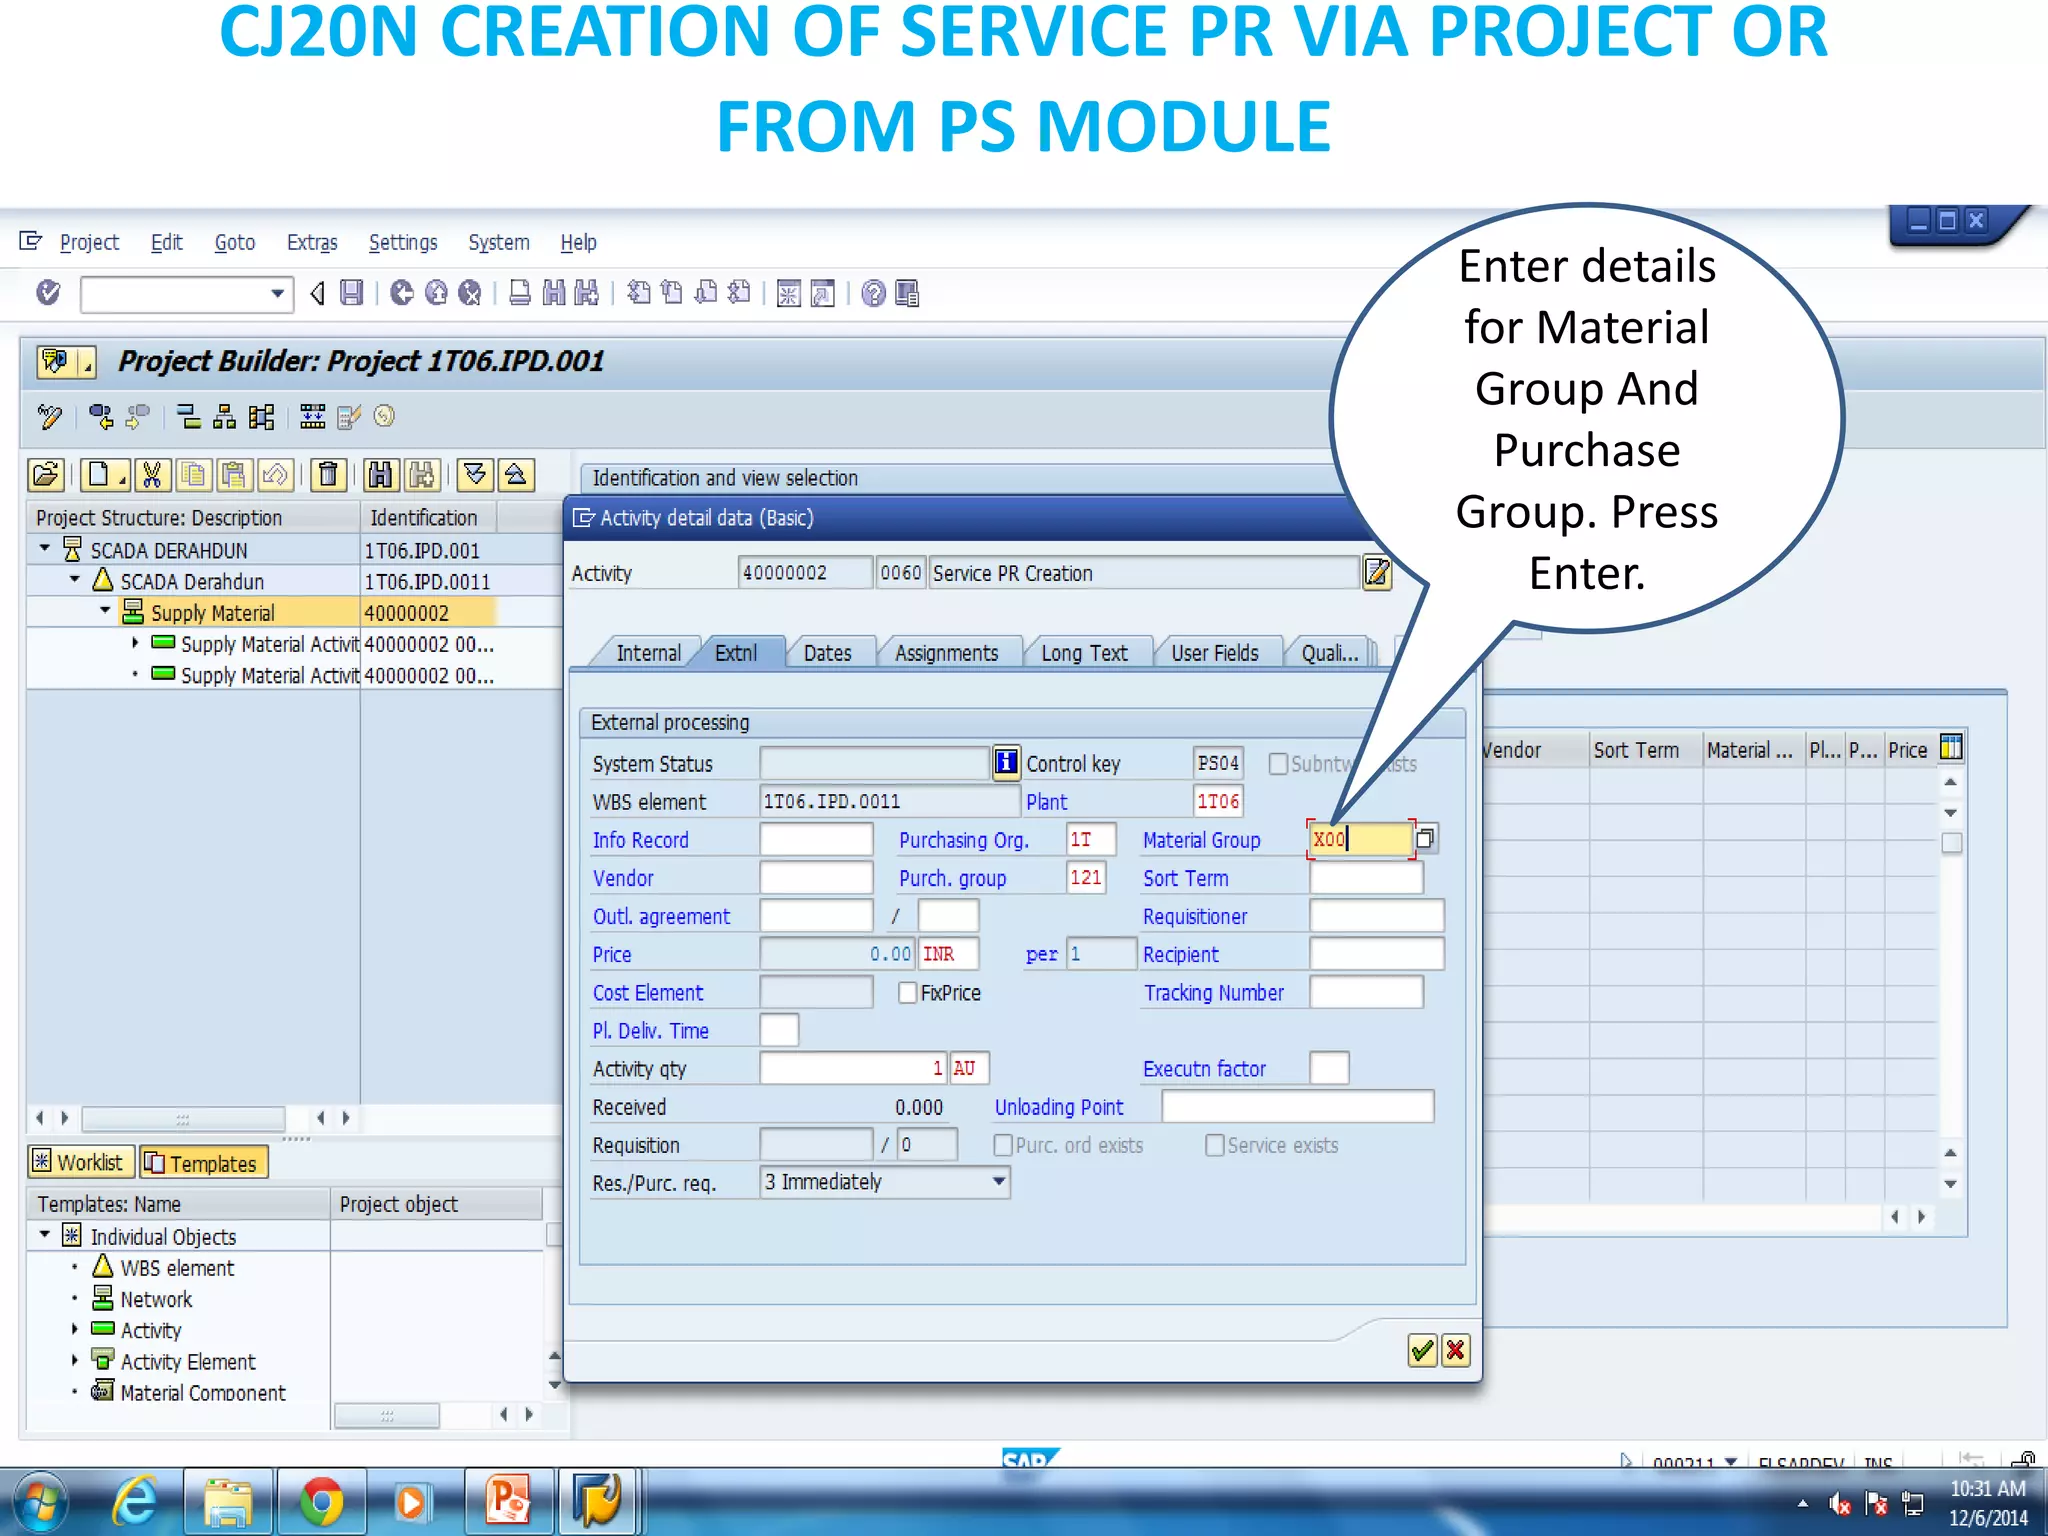
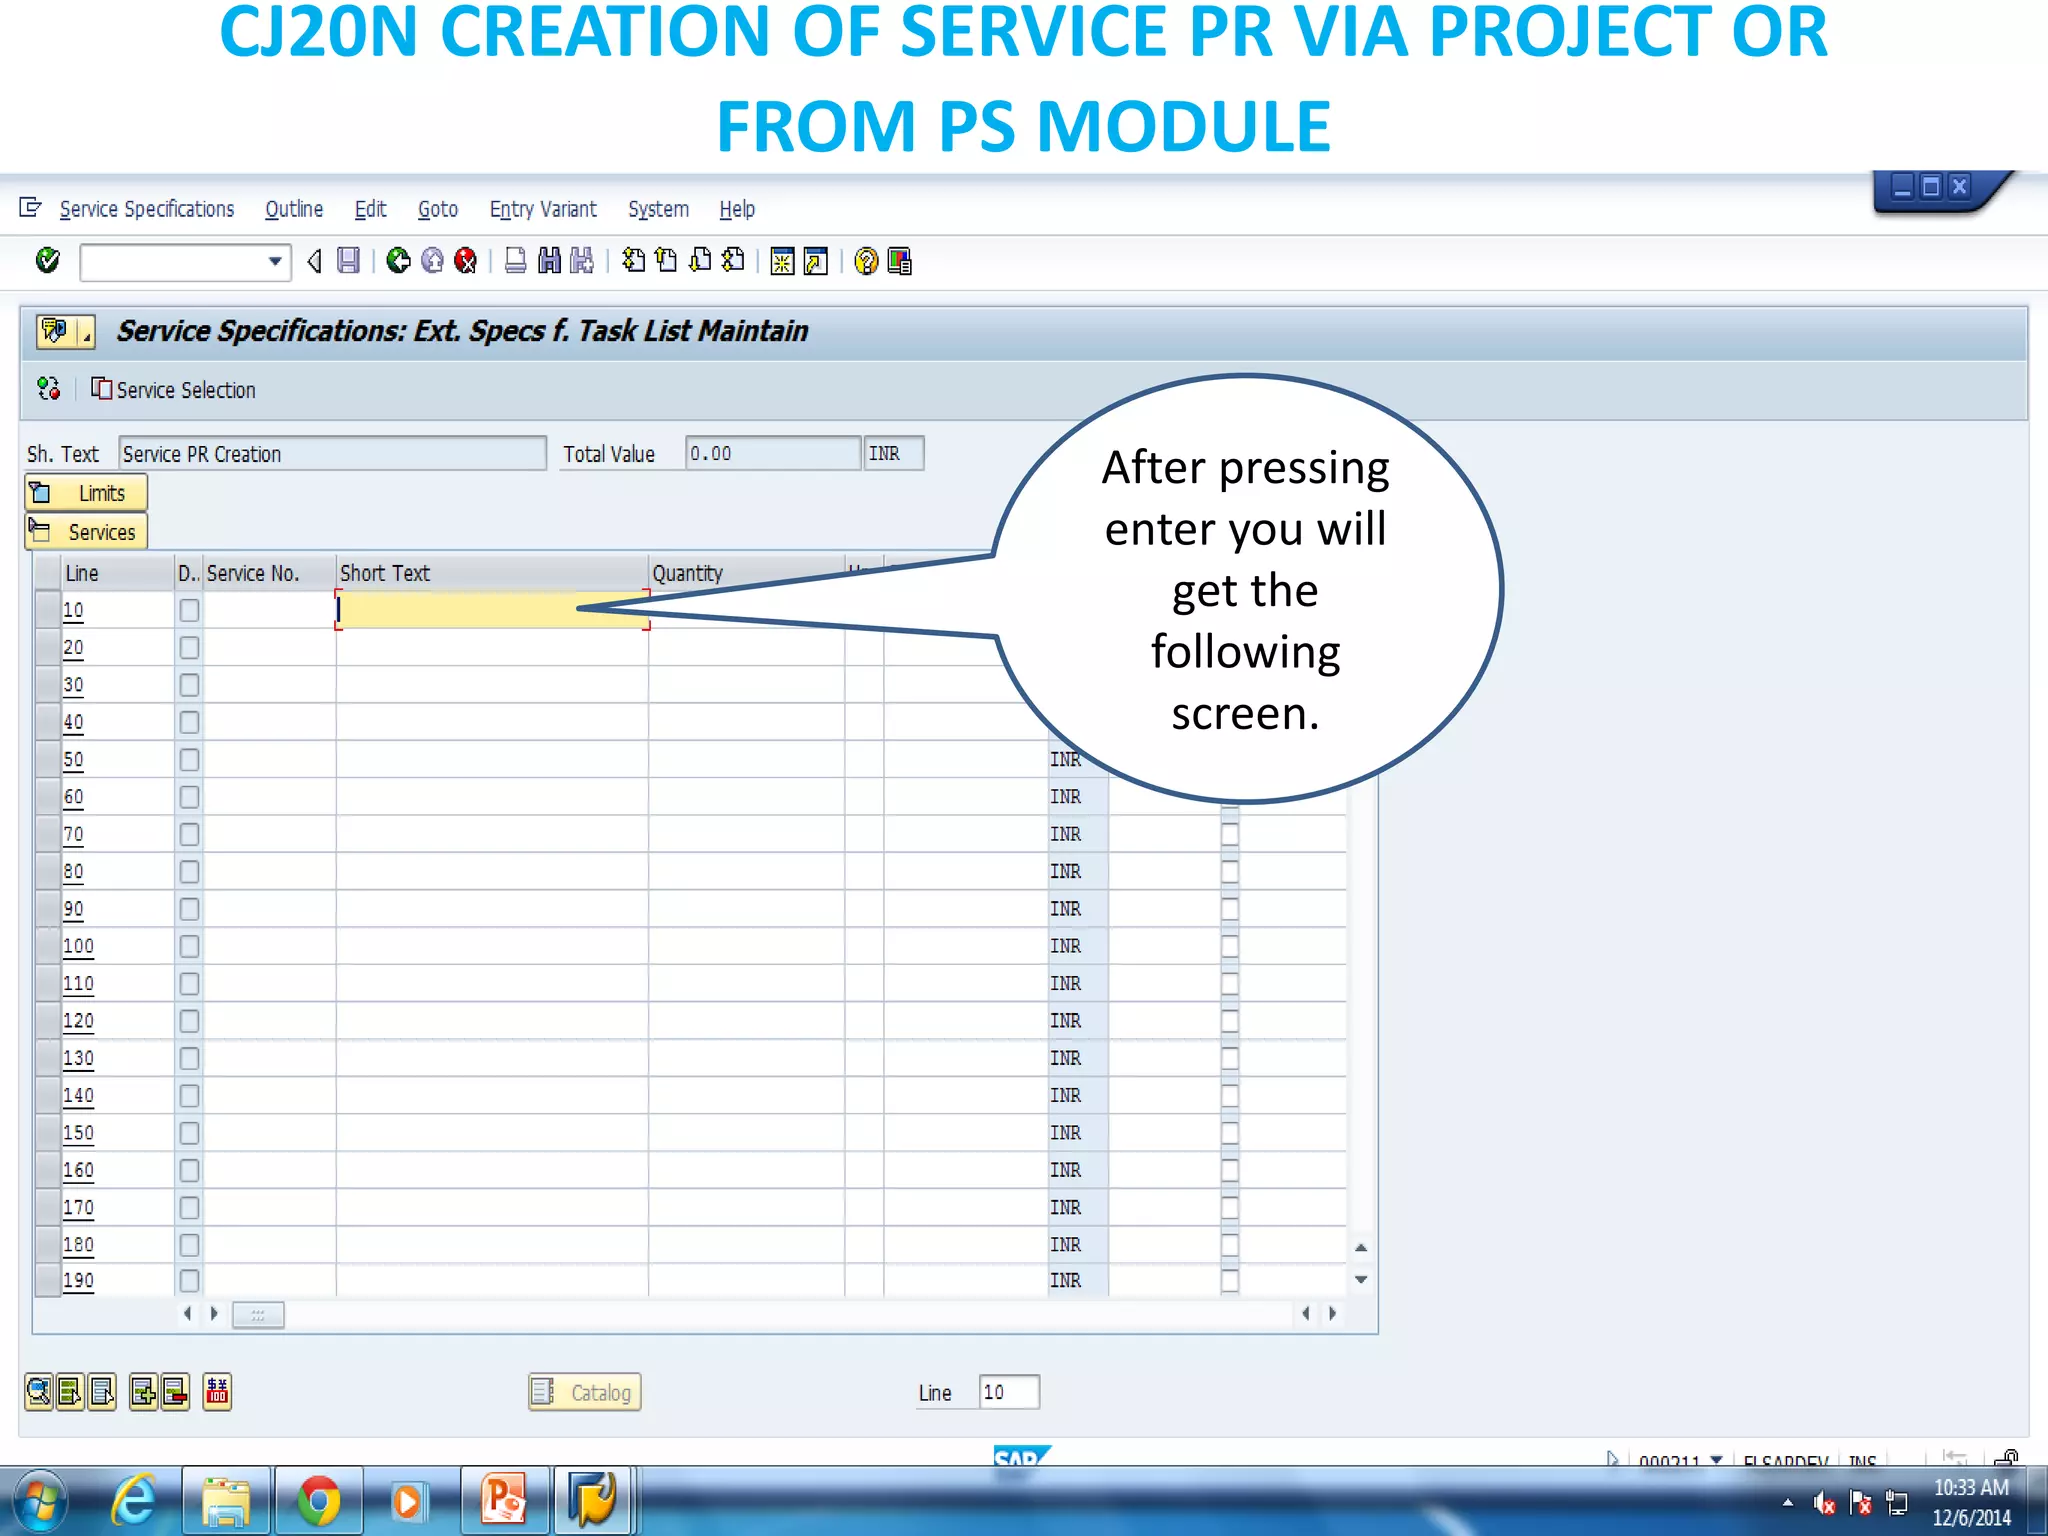
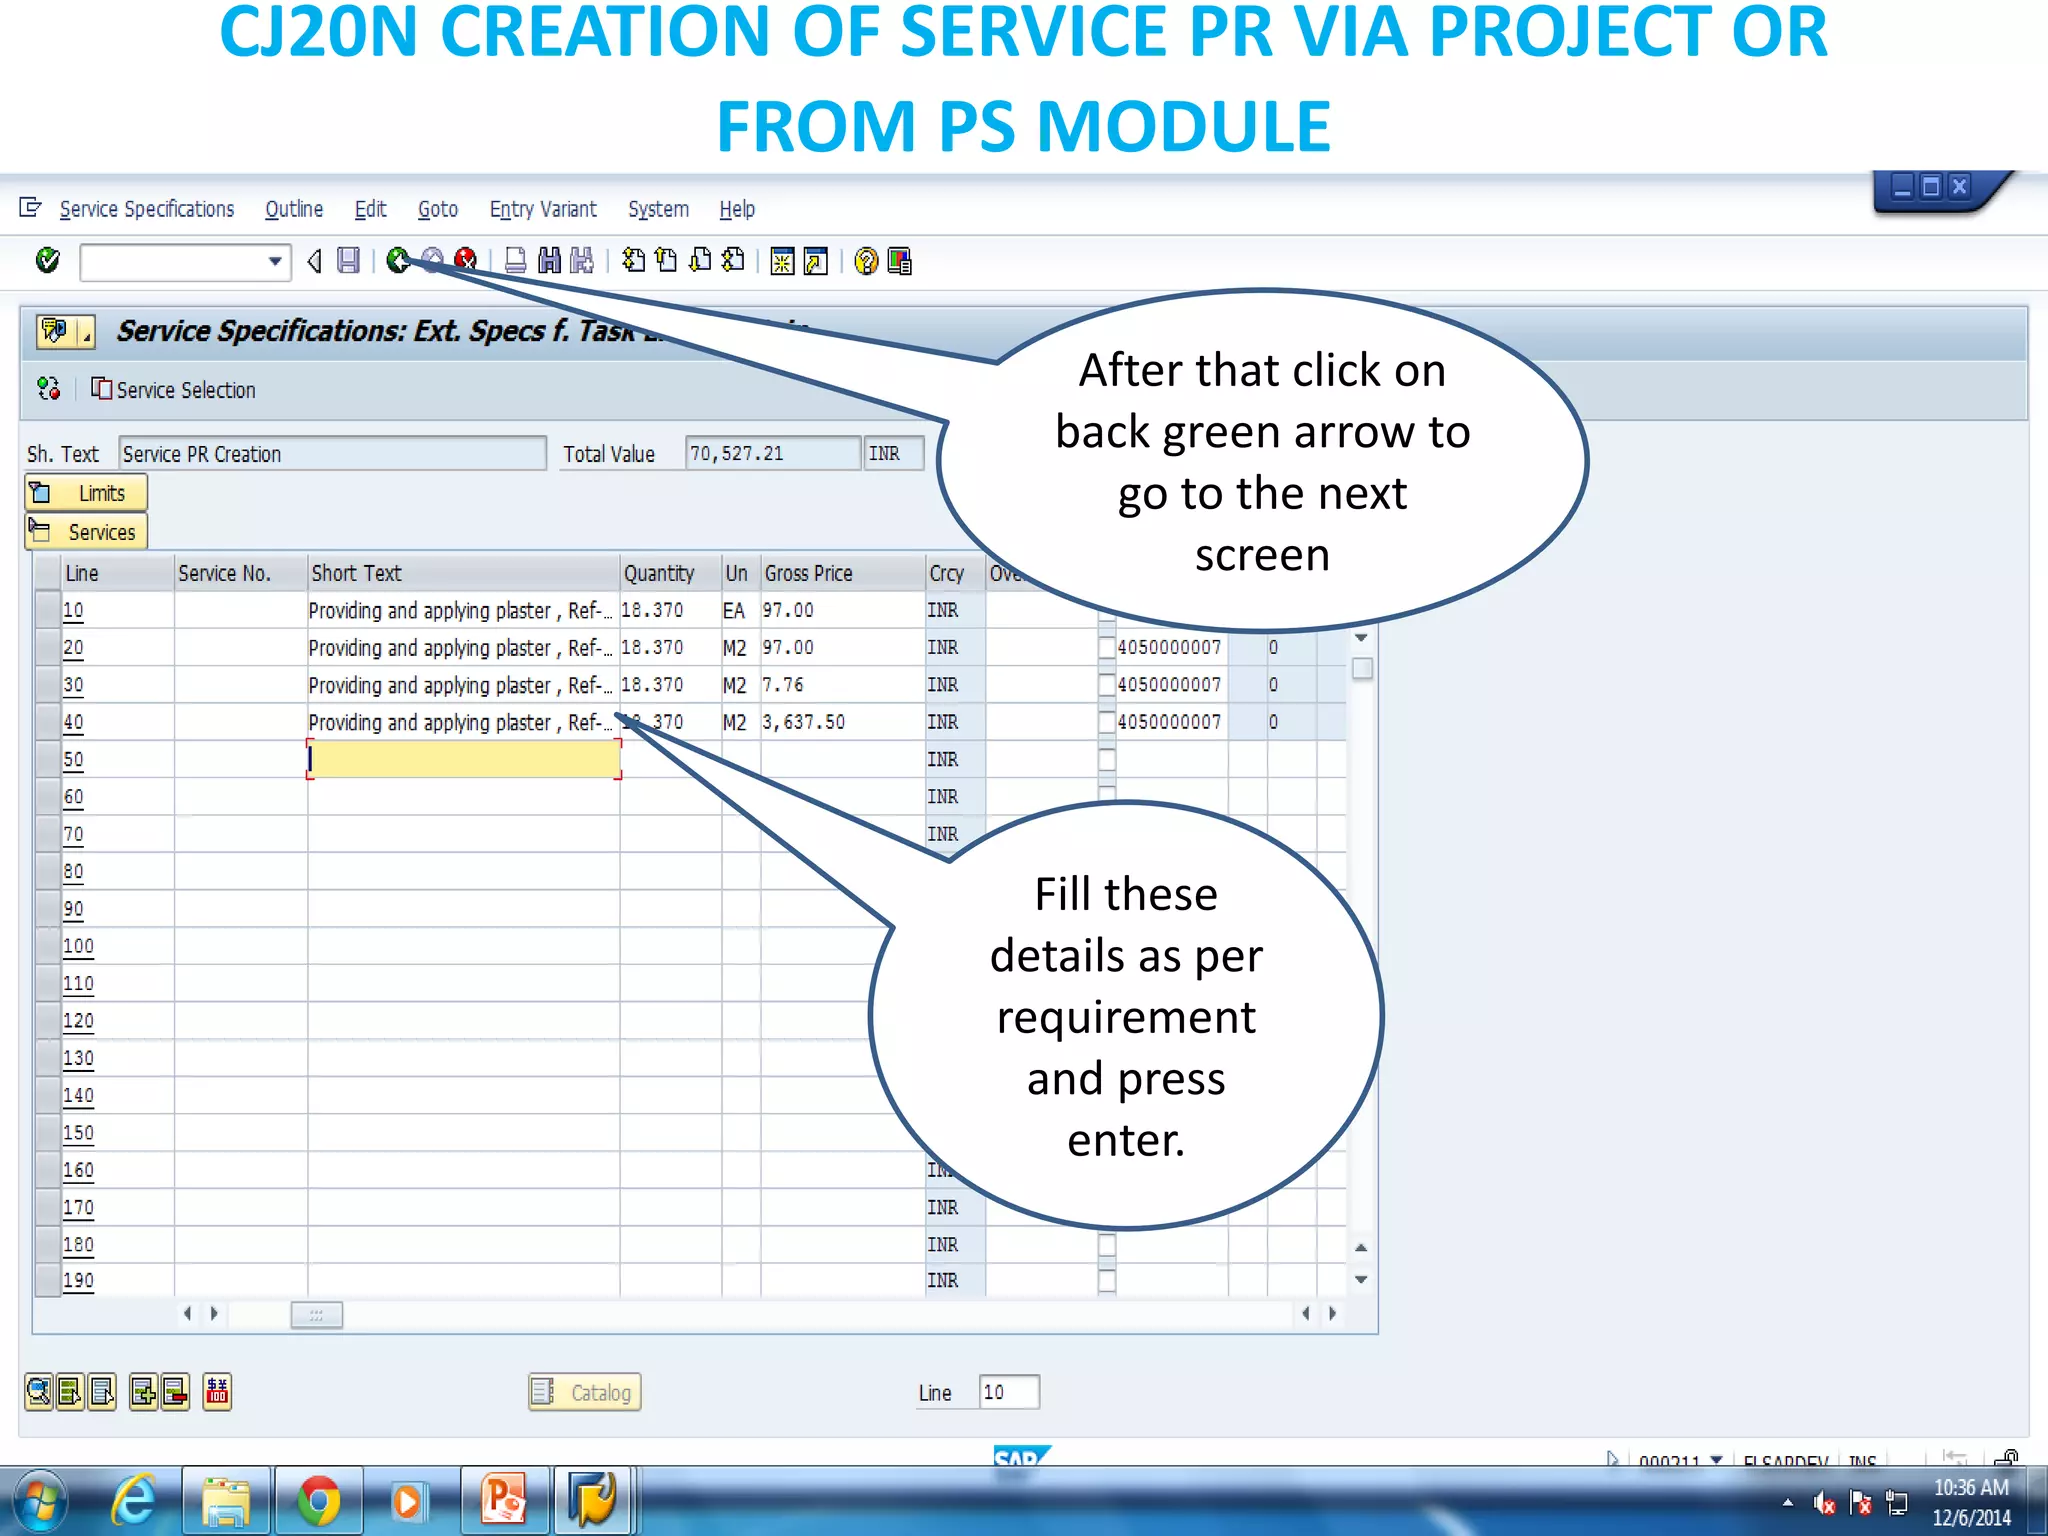
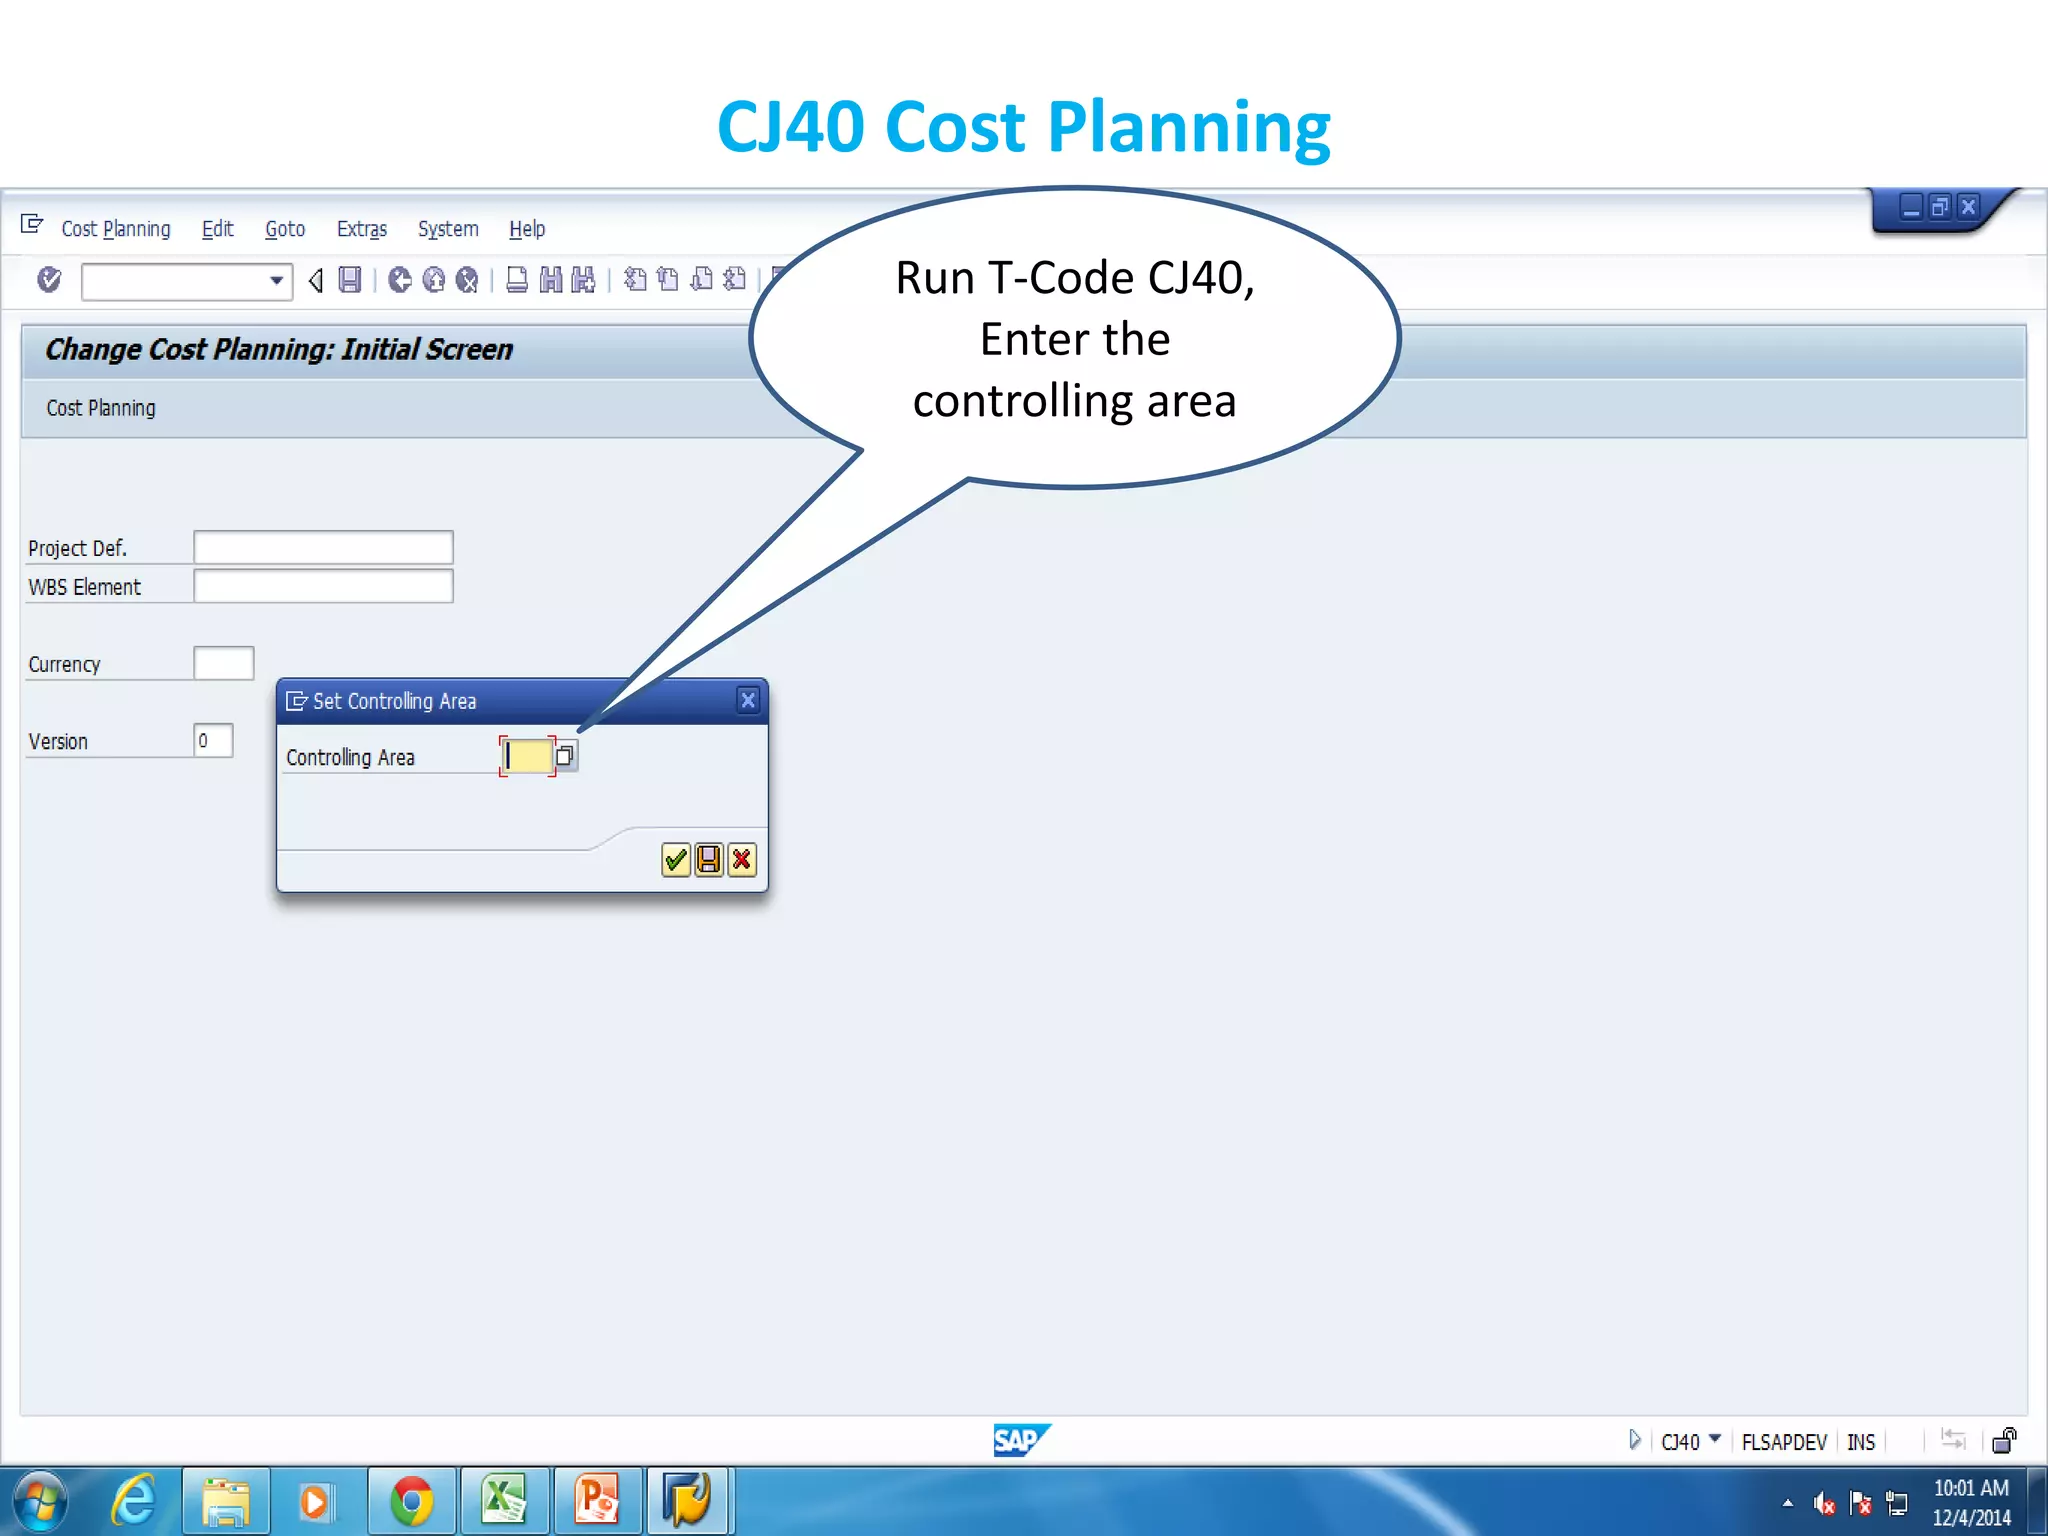
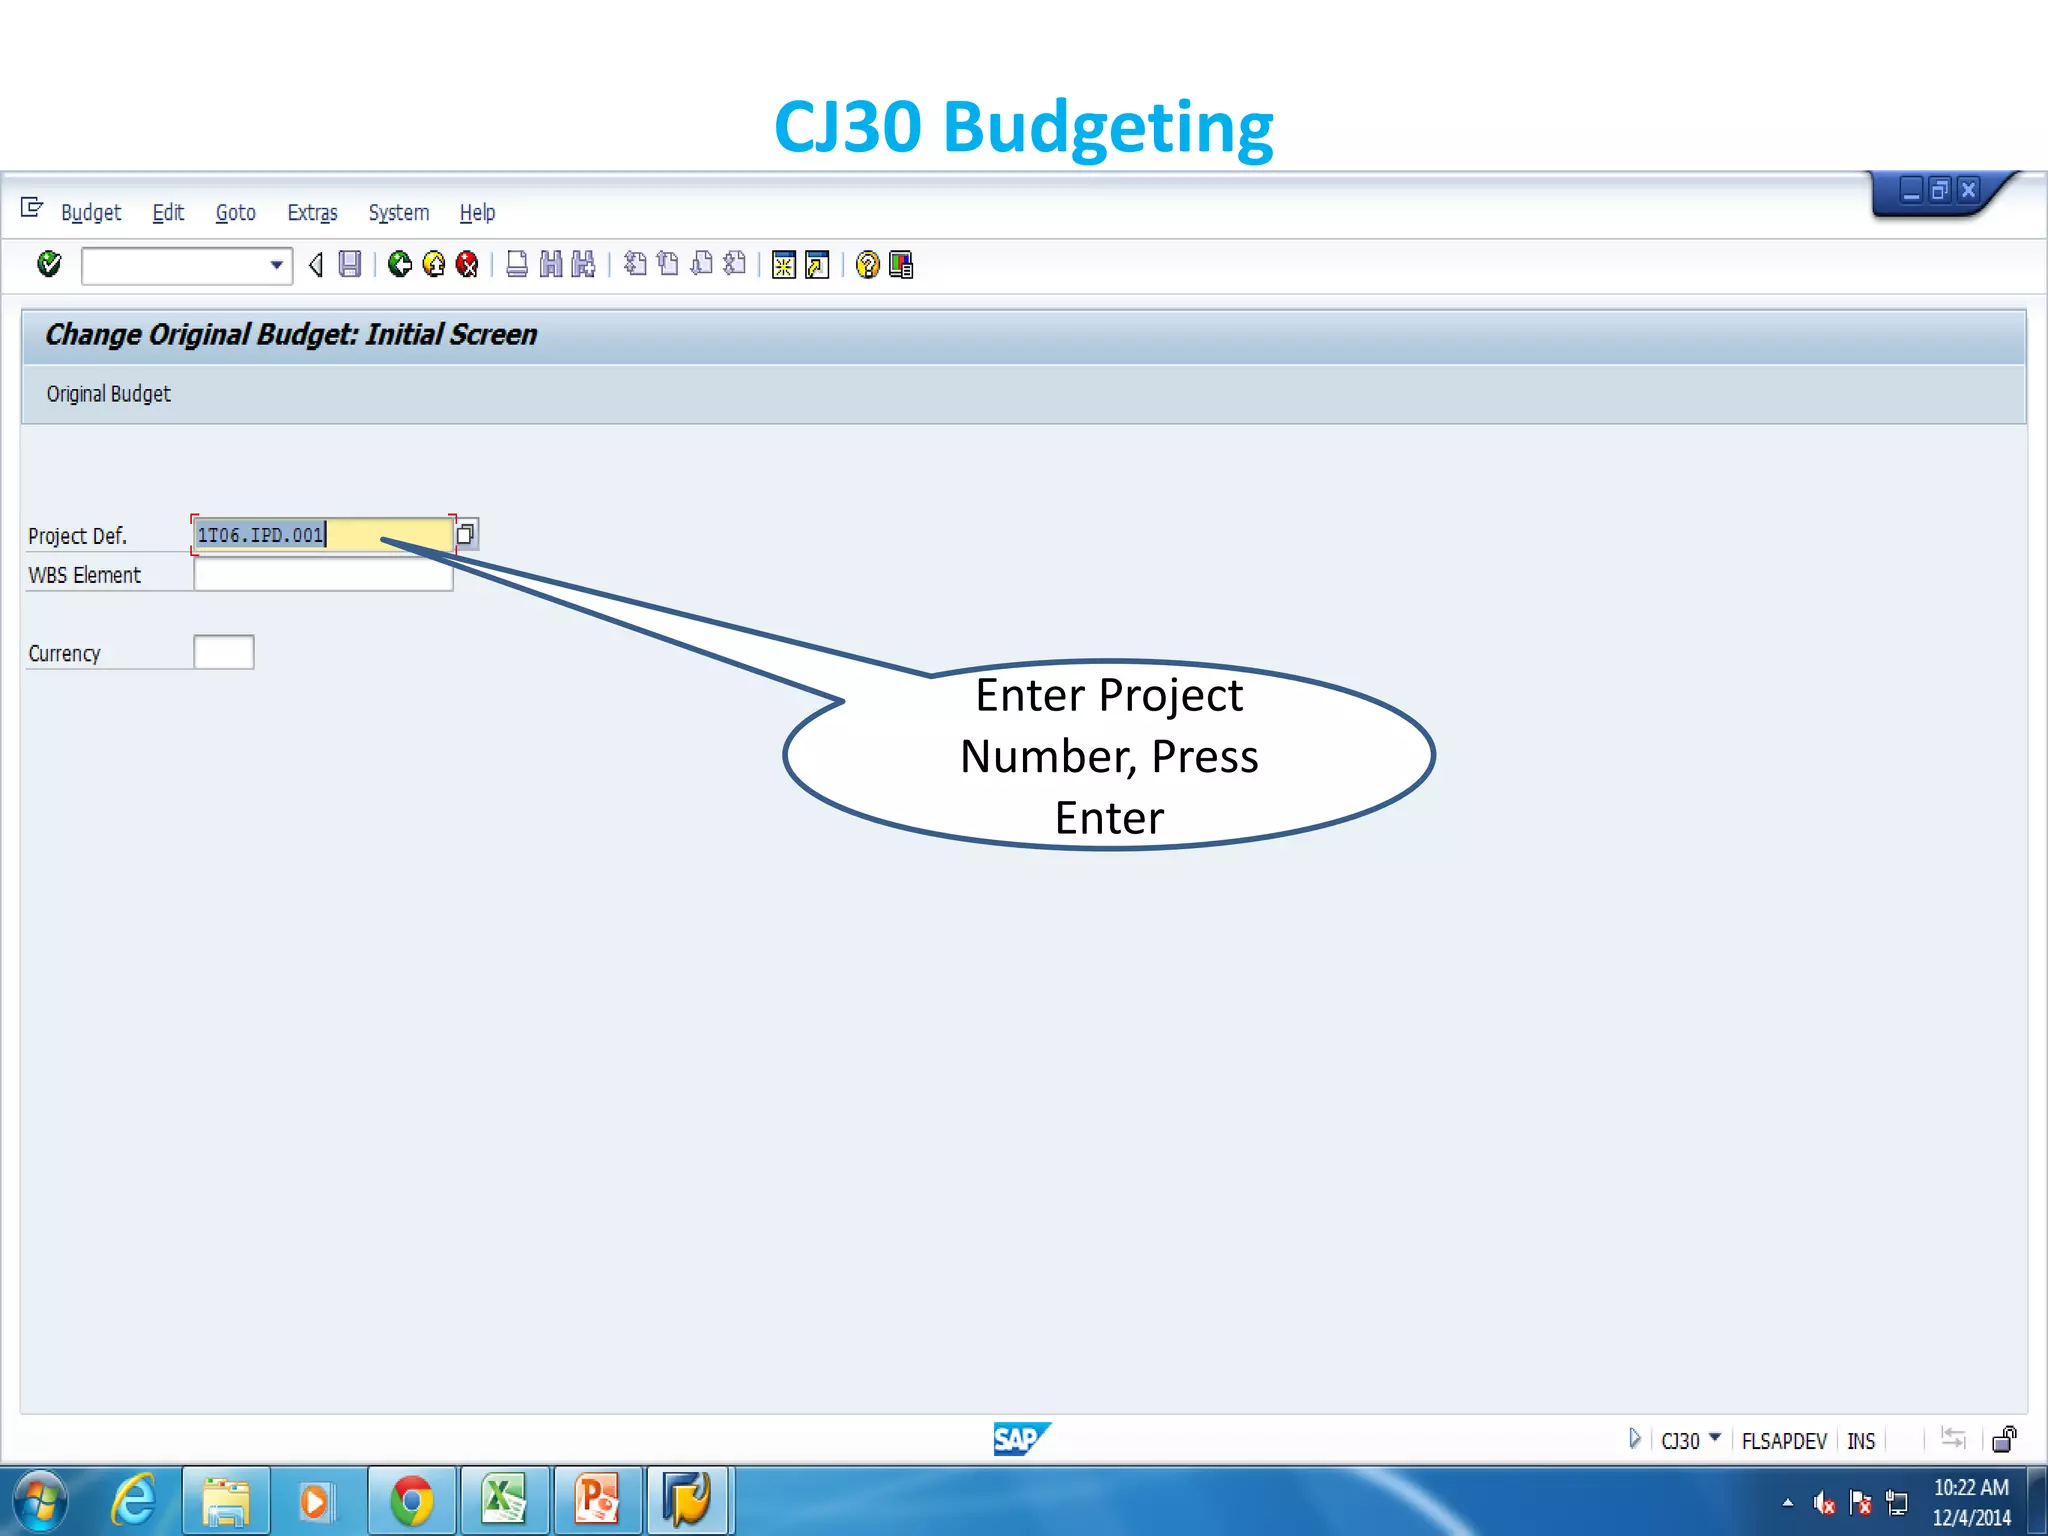
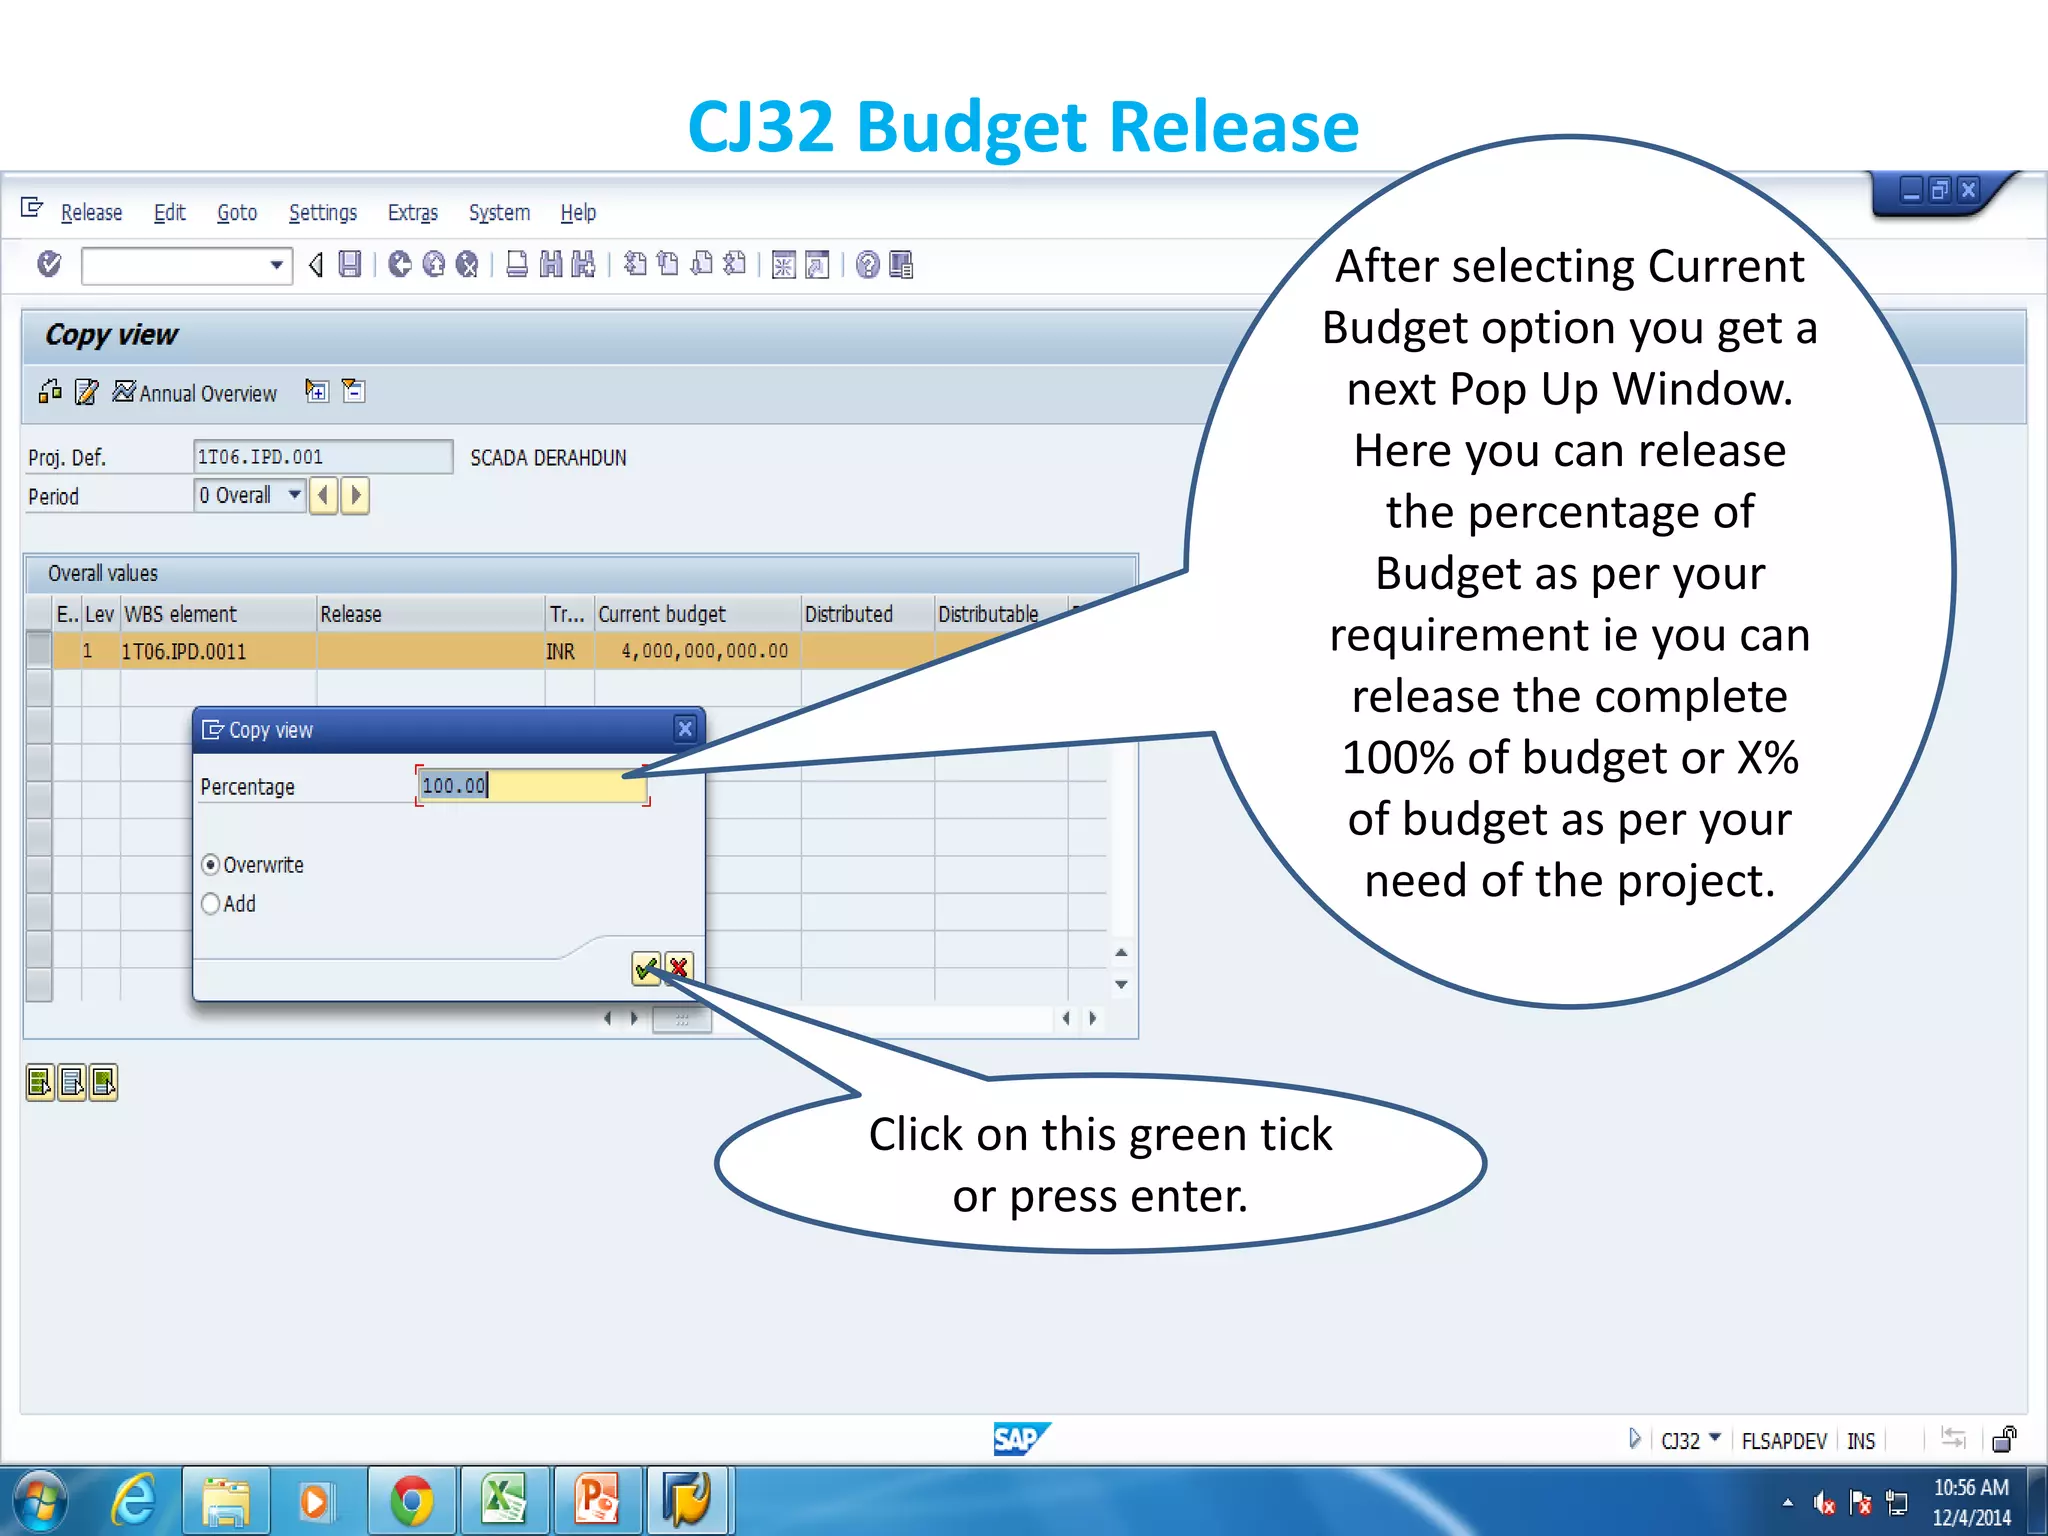
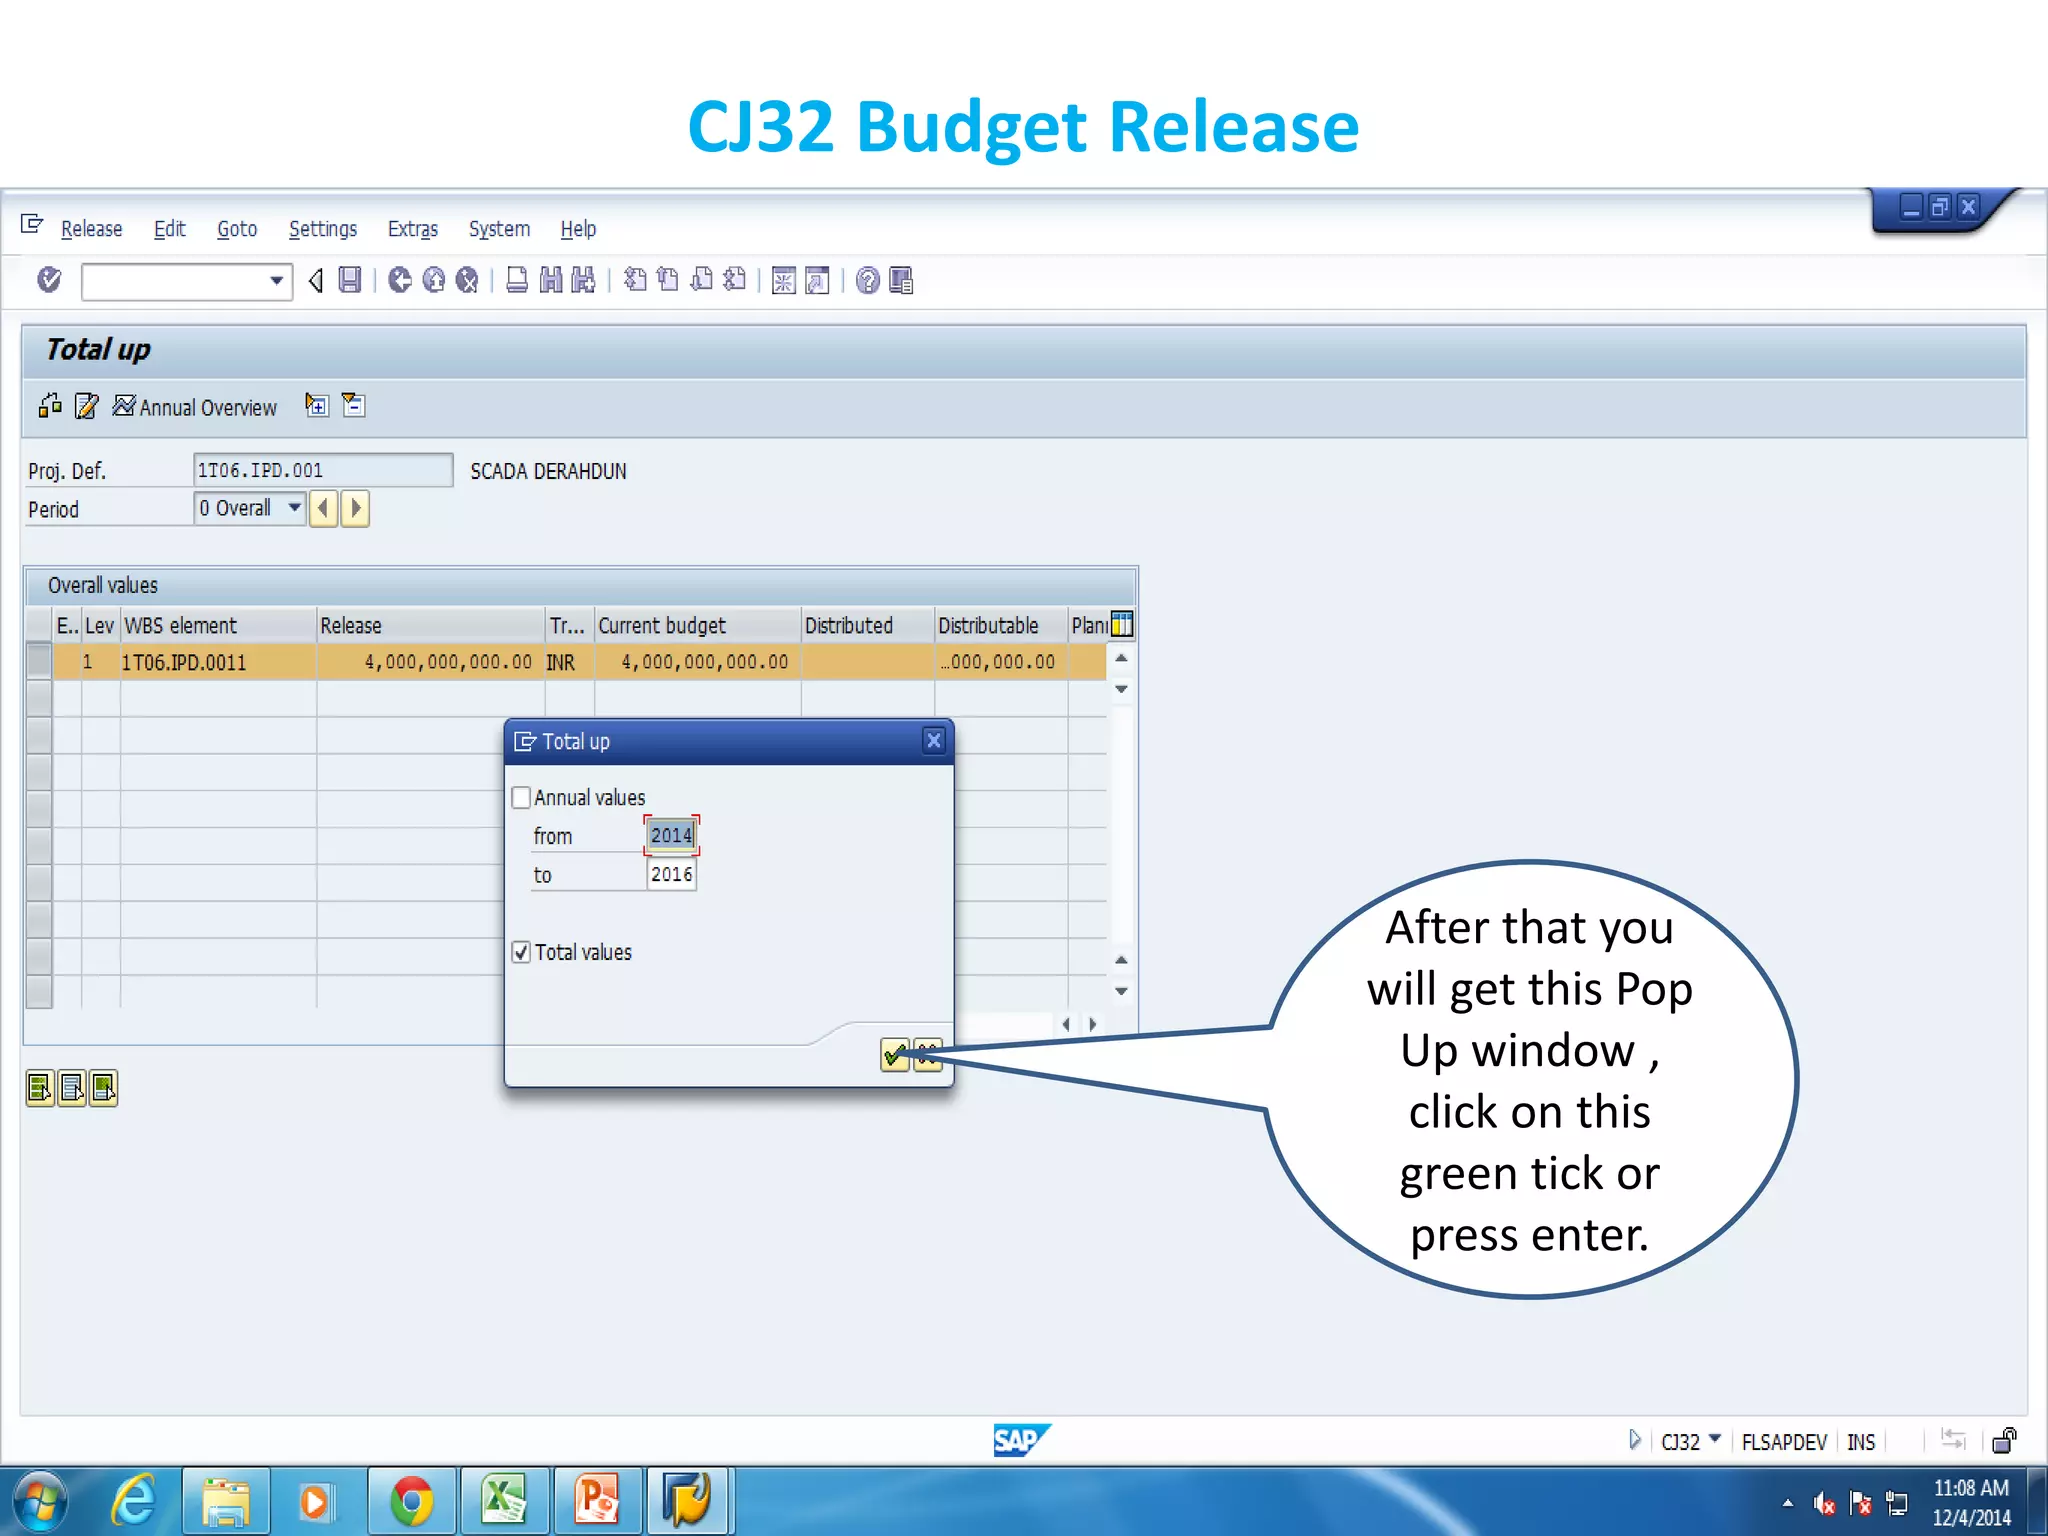
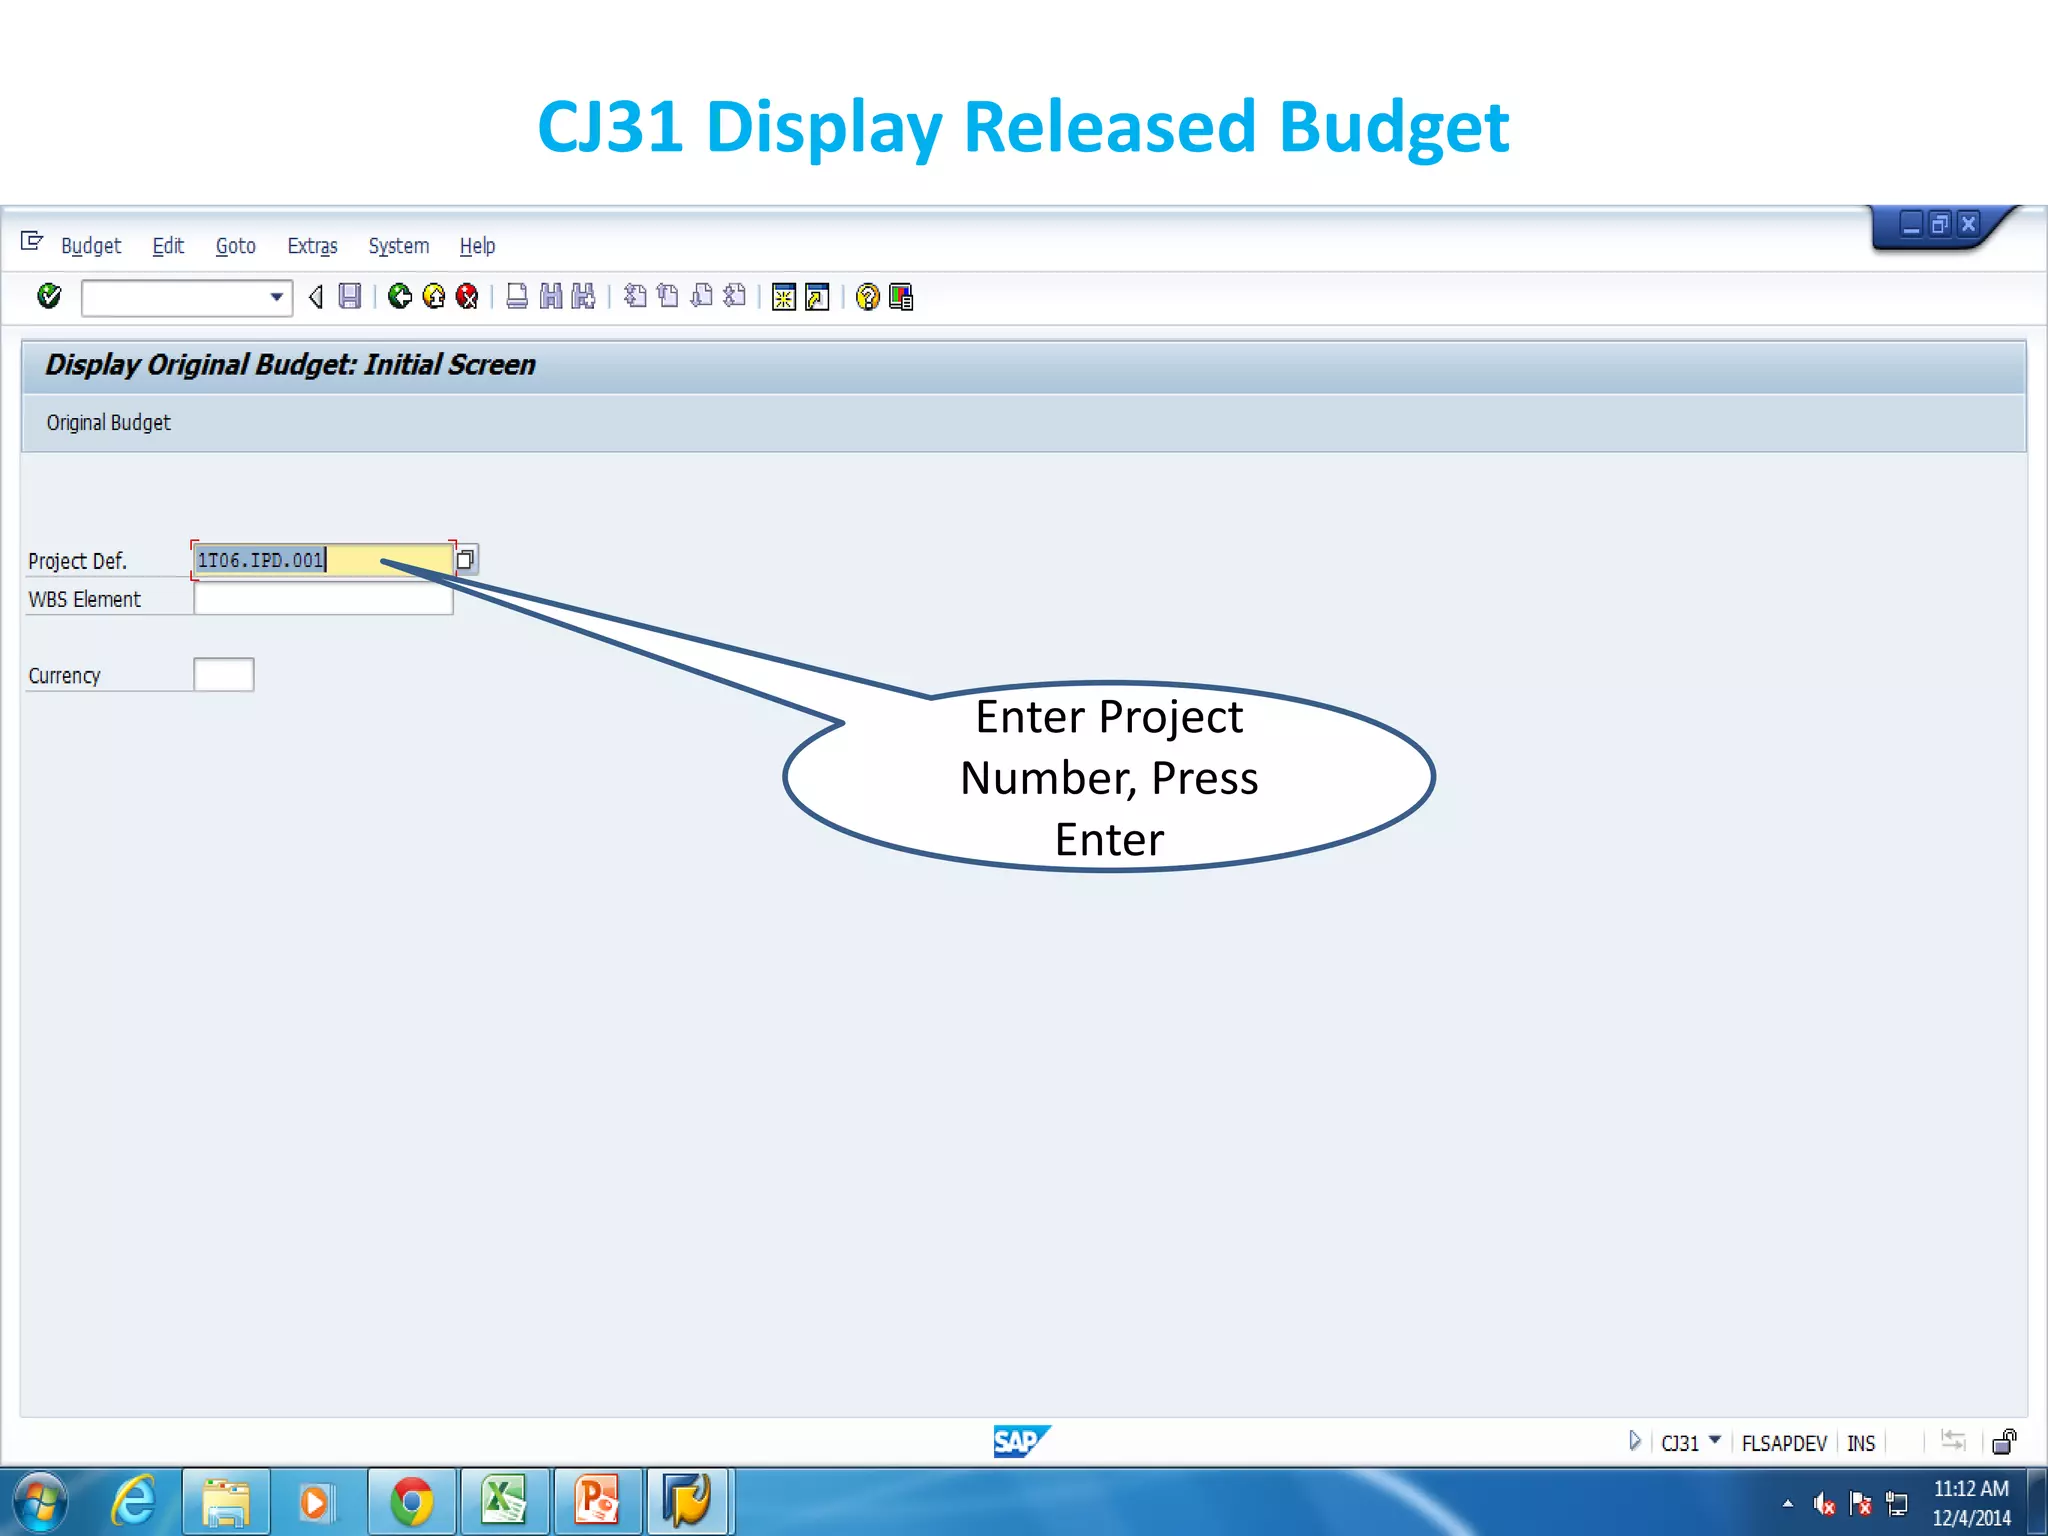
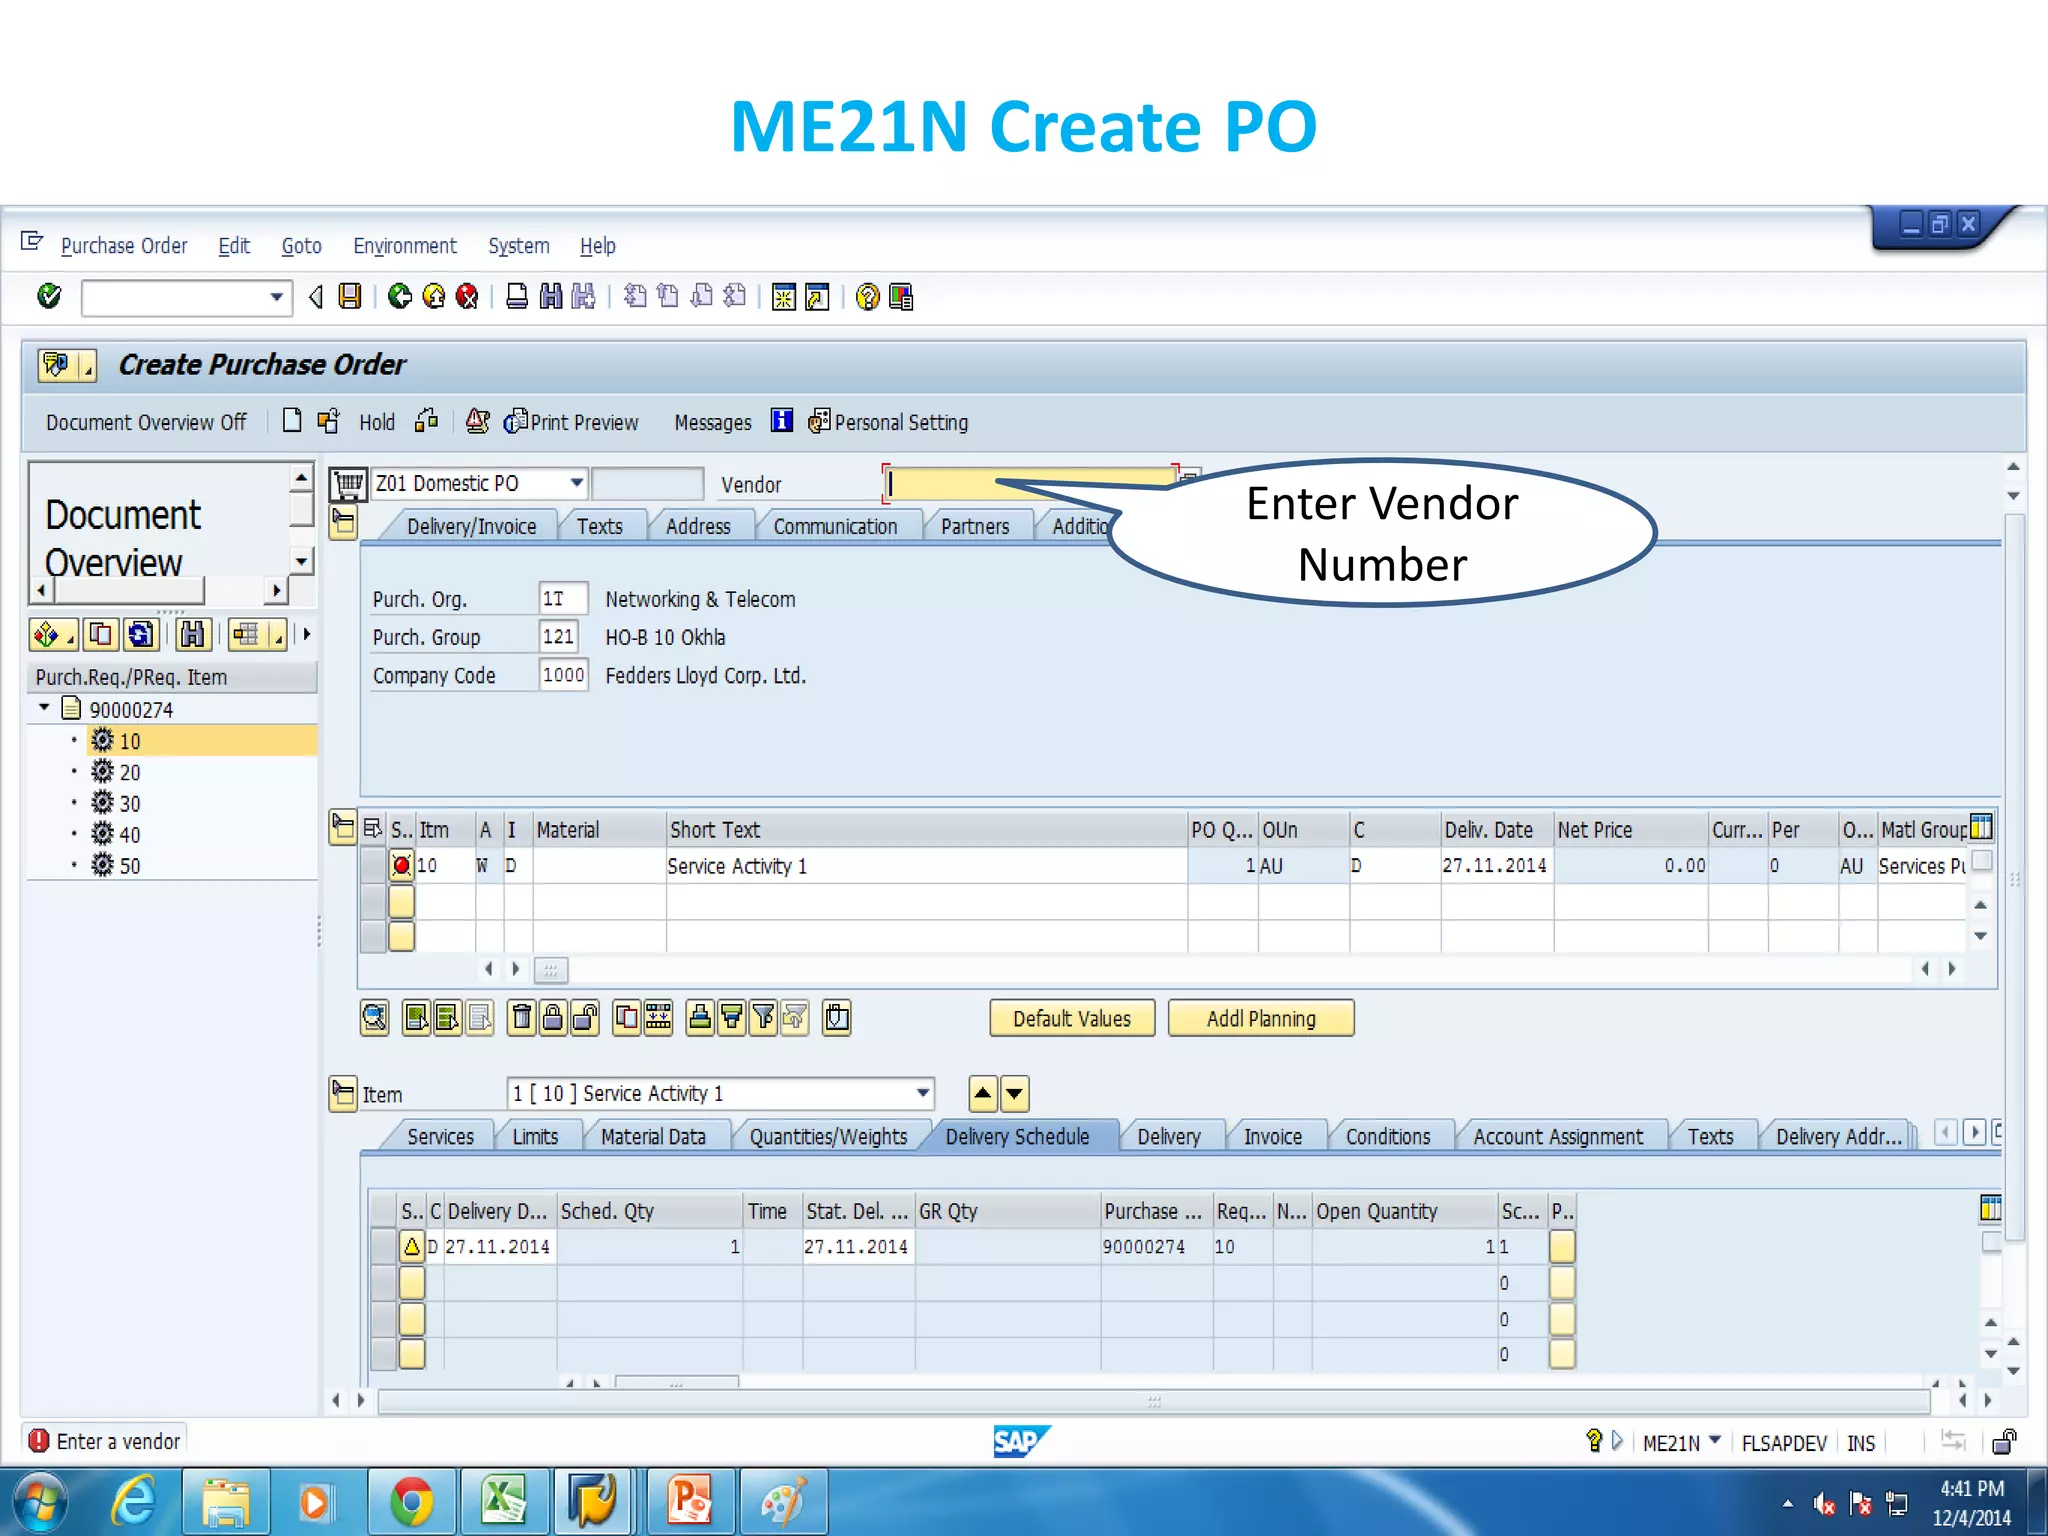
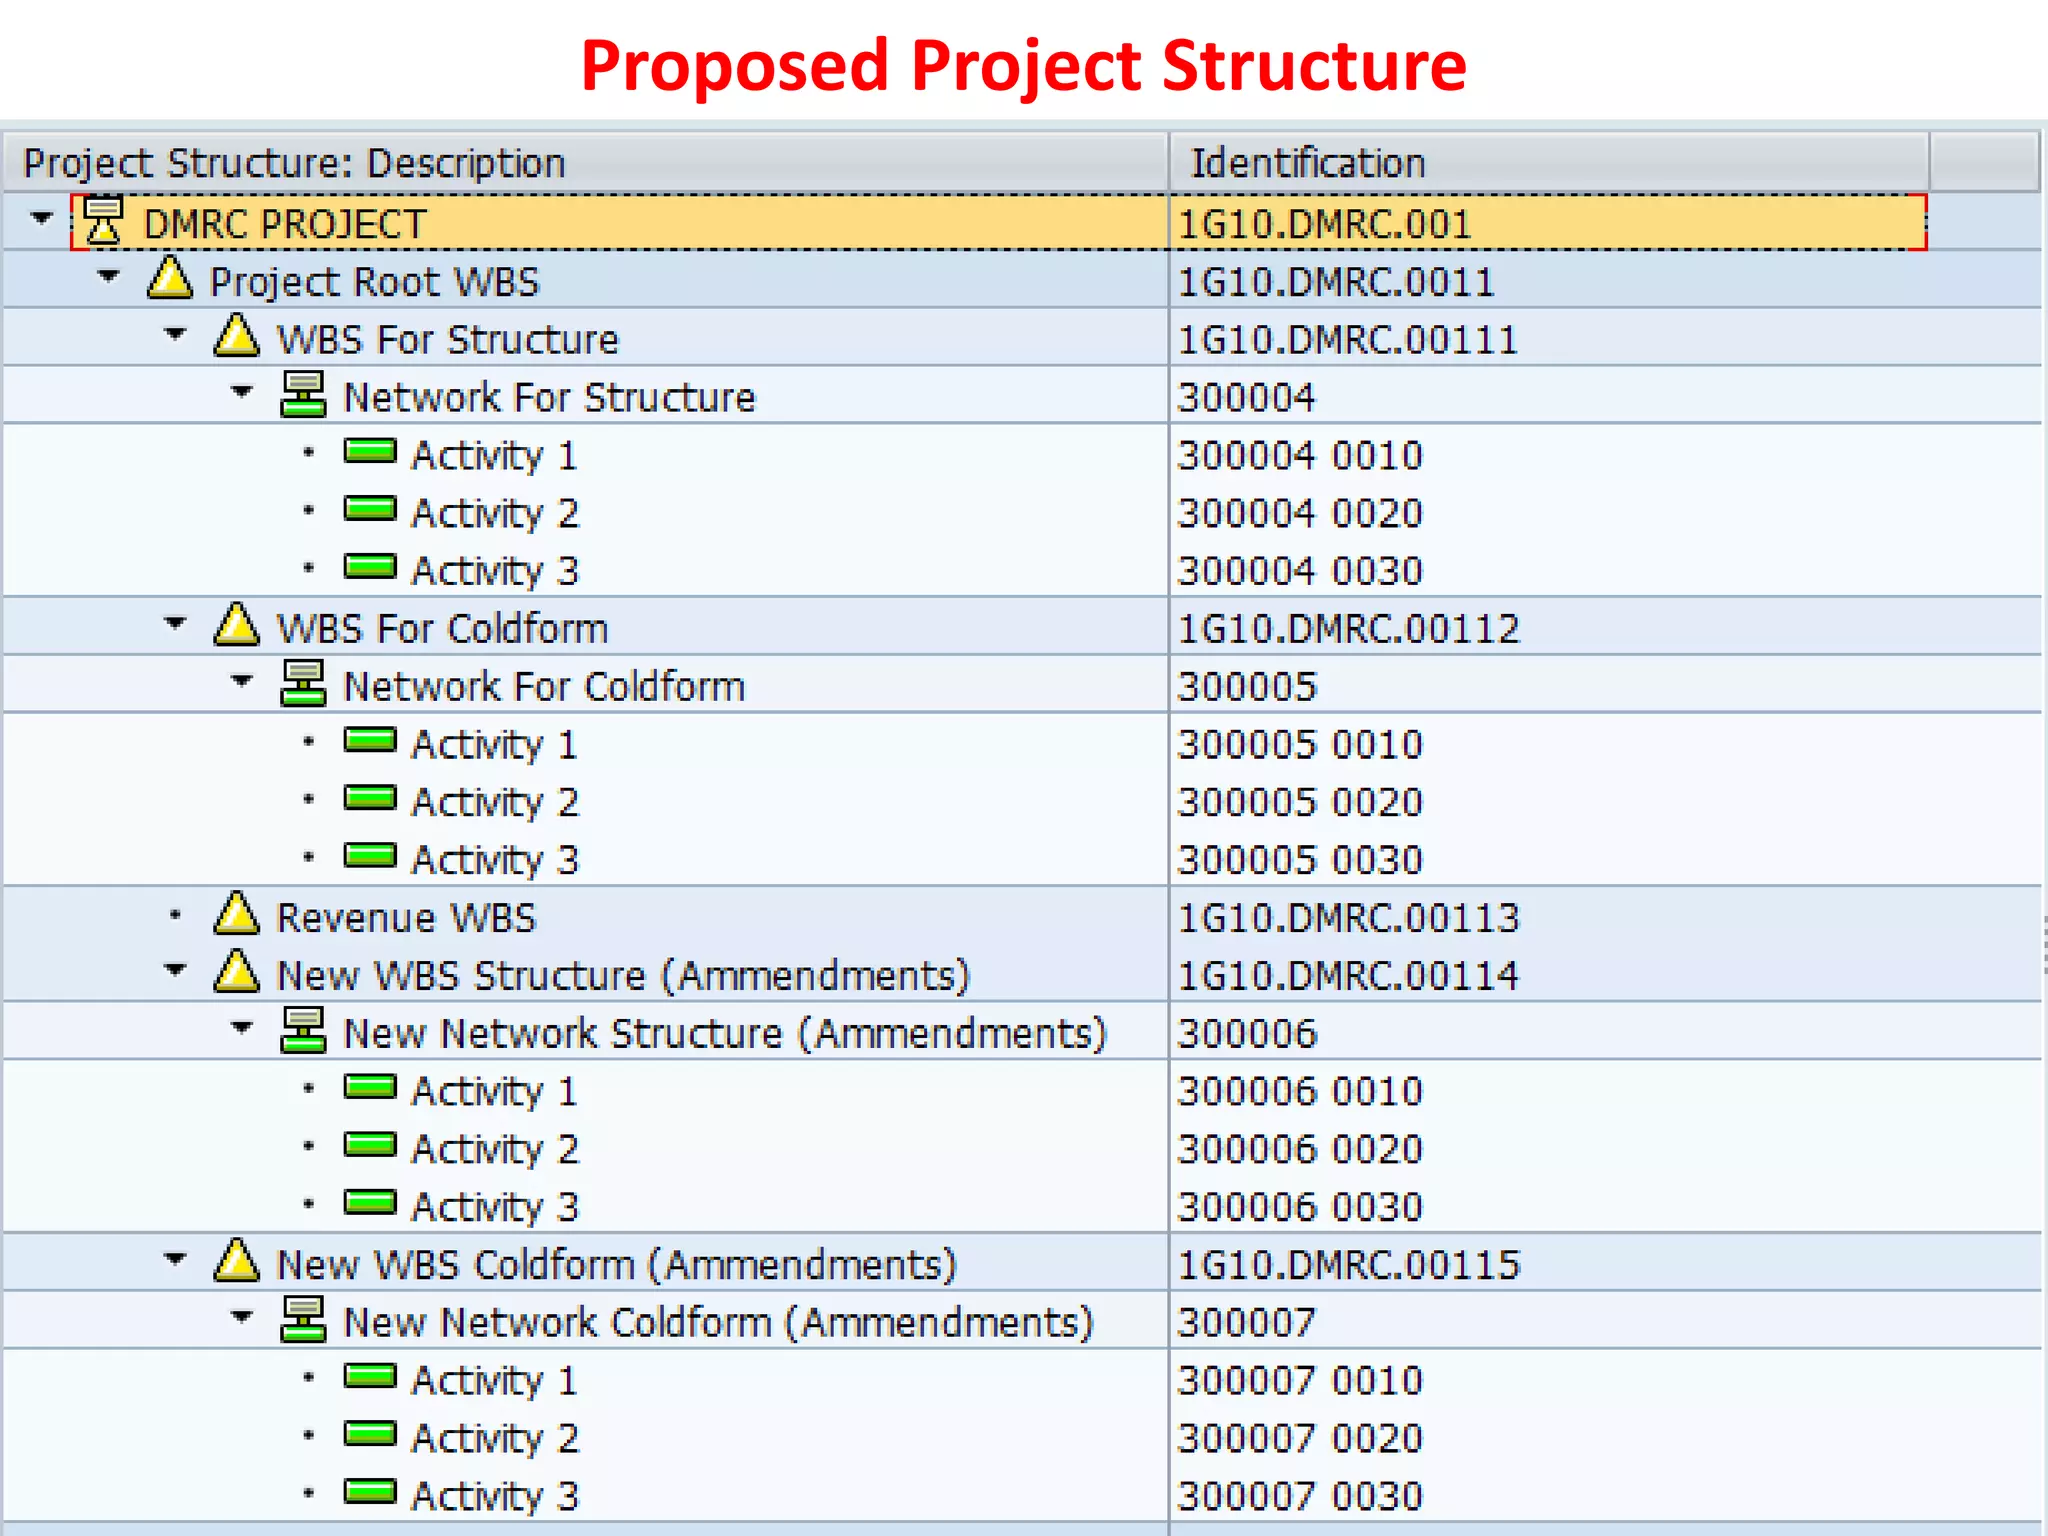
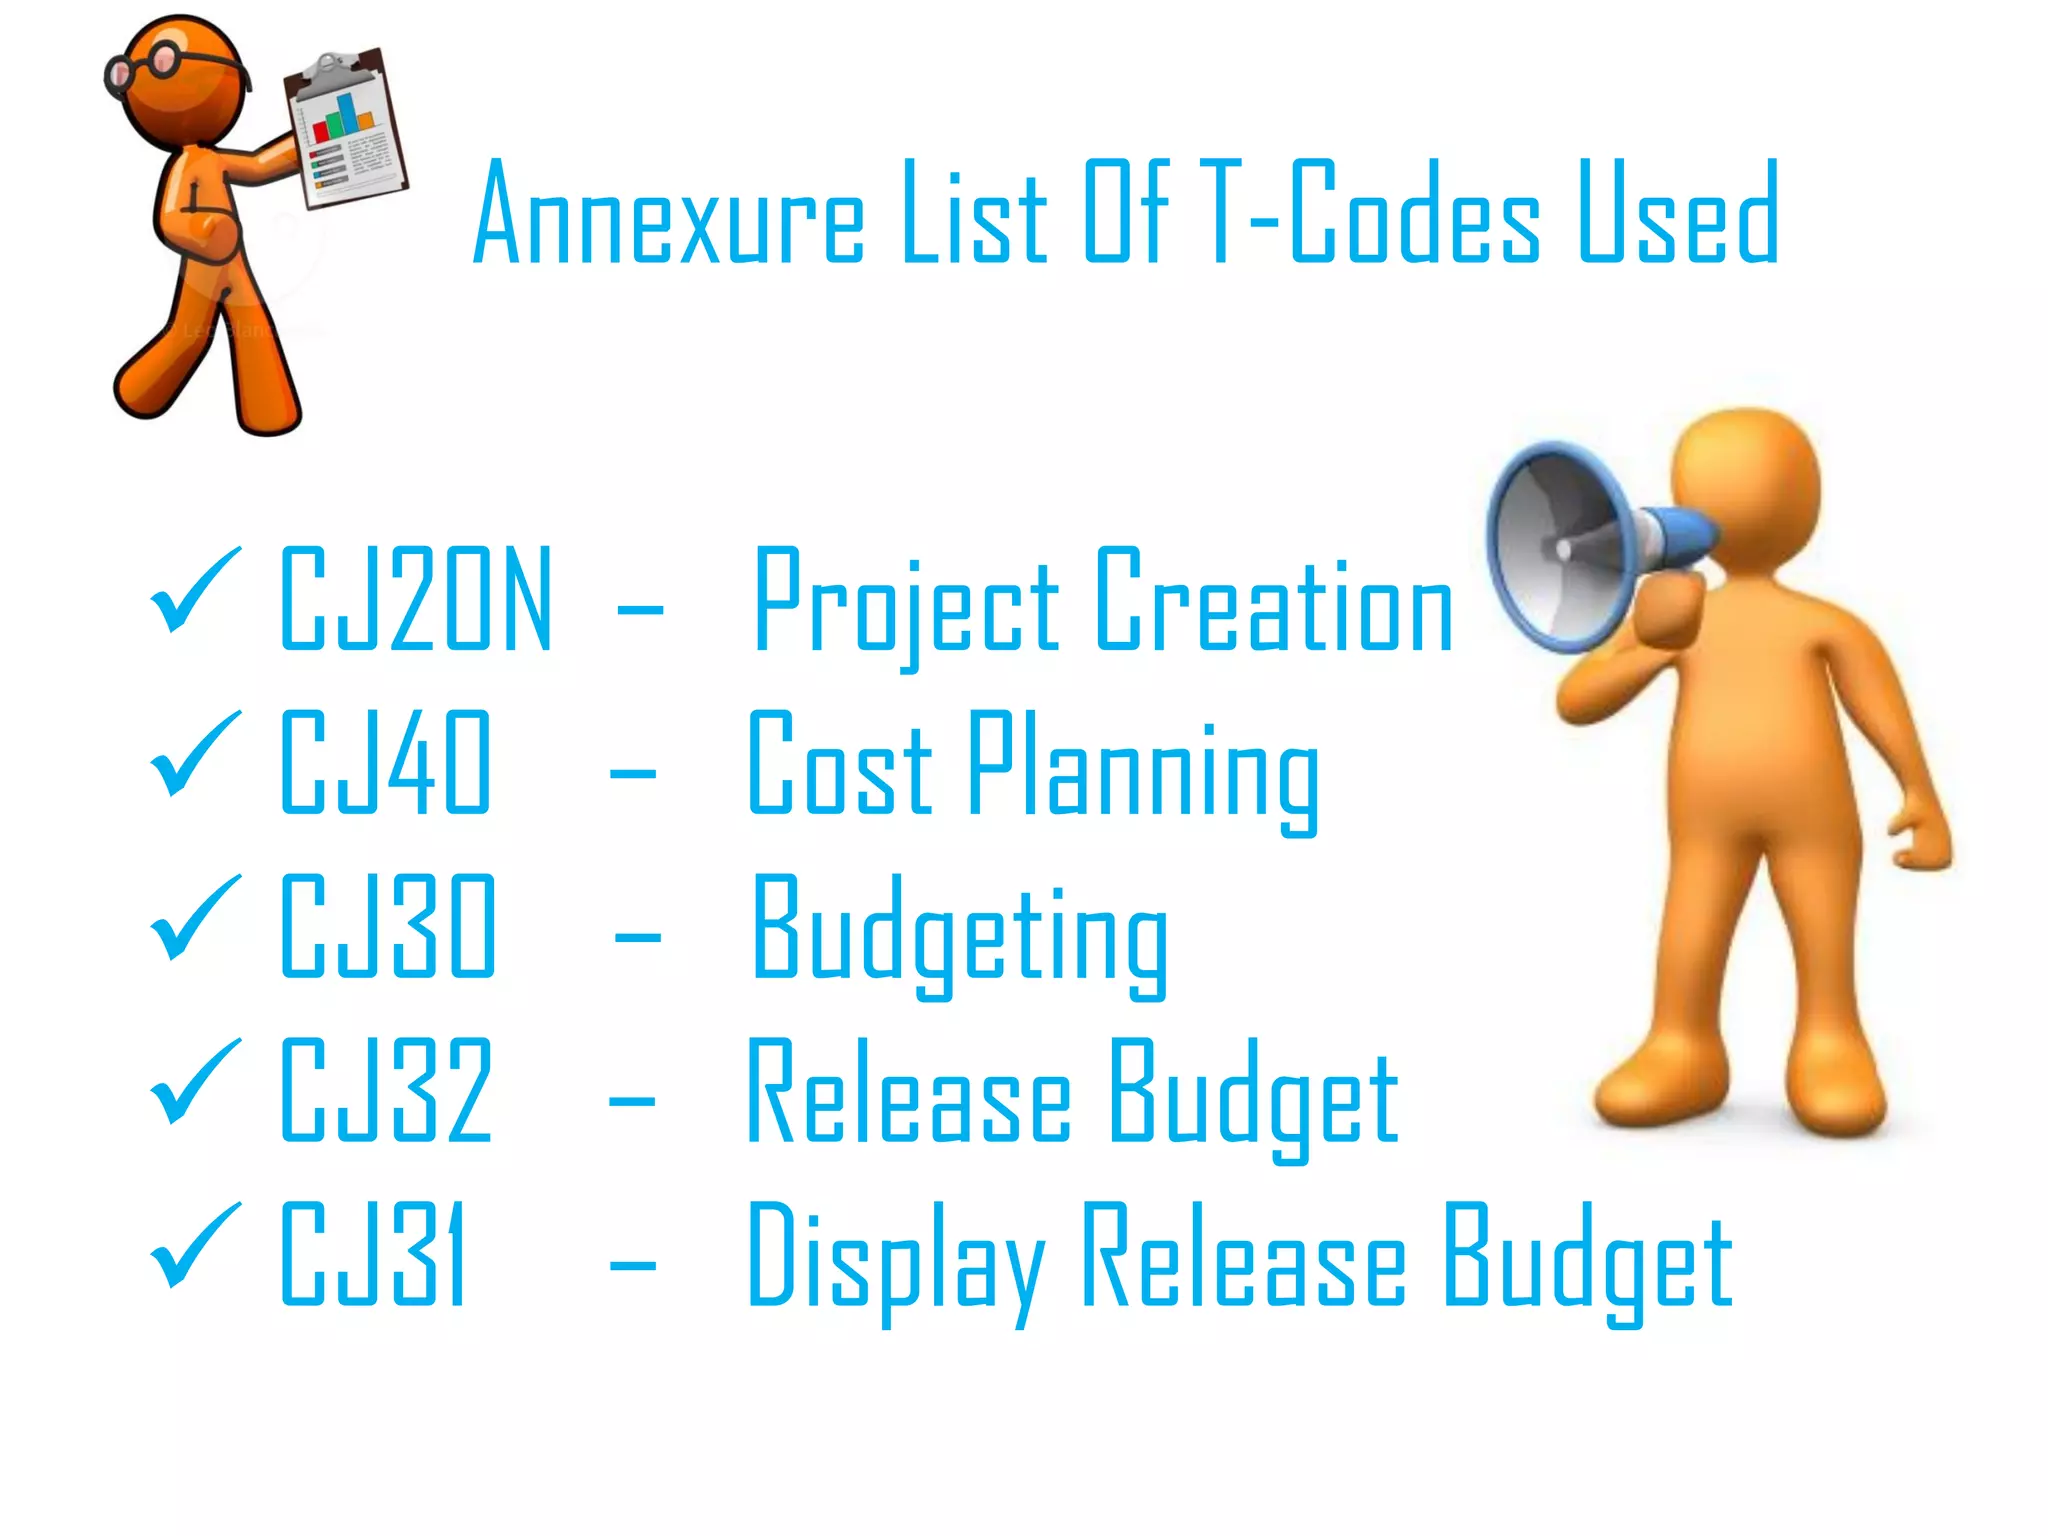
SAP PS Training
 Introduction & Advantages Of PS Module
 Project Creation
 Creation Of Service PR & Material PR Via PS
 Cost Planning
 Budgeting
 Release Budget
 Display Release Budget
 Make PO with reference to PR
Introduction to PS Module
 Project can be broken in to sub parts viz WBS (Work Breakdown Structure),
Network & Activity.
 WBS is known as Cost Collector.
 A WBS can have several Network.
 A Network can have several Activity
This shows
the flow and
sequence of
the project
for WBS ,
Network &
Activity.
Advantages Of PS Module
 Complete Project Structure can be viewed and monitored in terms of Sub Parts
ie as WBS/Network/Activity, Project Progress can be monitored, Project
Scheduling can be done and monitored , Project Profitability can be viewed.
 Materials that needs to be processed for the project can be attached to the
project as Components under Activity.
 PR can be created from the PS Module immediately after attaching materials to
the project.
 Project specific PR & PO can be viewed in a project specific list for PR & PO.
 Project Stock can be monitored and handled properly in terms of Inventory.
 Project Budget can be controlled.
 Good reports are available to see the comparison between Actual & Budgeted,
costs.
And Lot More…………..
Project Creation
( CJ20N)
CJ20N PROJECT CREATION
SCREEN 1
Enter Project
Name
Select Project
Profile
CJ20N PROJECT CREATION
SCREEN 2
These details
get filled
automatically
CJ20N PROJECT CREATION
SCREEN 3 ( Create WBS )
Follow steps
to create
WBS
CJ20N PROJECT CREATION
SCREEN 4 ( Create WBS )
Enter WBS
Name
Check all the
operative
indicators
CJ20N PROJECT CREATION
SCREEN 5 ( Create WBS )
WBS Created
CJ20N PROJECT CREATION
SCREEN 6 ( Create Network )
Follow steps
to create
Network
CJ20N PROJECT CREATION
SCREEN 7 ( Create Network )
Enter
Network
Name
CJ20N PROJECT CREATION
SCREEN 8 ( Create Network )
Select
Scheduling
Type
CJ20N PROJECT CREATION
SCREEN 9 ( Create Network )
Scheduling
Type
Selected
CJ20N PROJECT CREATION
SCREEN 10 ( Create Network )
Network
Created
CJ20N PROJECT CREATION
SCREEN 11 ( Create Network )
Select
3.Immediate
always
CJ20N PROJECT CREATION
SCREEN 11 ( Create Activity )
Follow steps
to create
Activity
CJ20N PROJECT CREATION
SCREEN 12 ( Create Activity )
Enter Activity
Name
CJ20N PROJECT CREATION
SCREEN 13 ( Create Activity )
Activity
Created
CJ20N PROJECT CREATION
SCREEN 11 ( Second Method To Create Activity )
First select
the Network
and then
Click on
Activity
Overview to
create
Activity
CJ20N PROJECT CREATION
SCREEN 12 ( Create Activity )
Enter Activity
Name
CJ20N PROJECT CREATION
SCREEN 13 ( Create Activity )
CJ20N PROJECT CREATION
SCREEN 14 ( Create Activity )
Activity
Name
Entered
CJ20N PROJECT CREATION
SCREEN 15 ( Add Component )
Activity
Created
CJ20N PROJECT CREATION
SCREEN 16 ( Add Component )
Select
Activity, Click
on
Component
Overview to
get this
following
screen to add
Materials to
Activity.
CJ20N PROJECT CREATION
SCREEN 17 ( Add Component )
Enter all details in following tabs ,
Material , Requirement Quantity ,
Procurement , Item Category ,
Res. / Pur. Req.
CJ20N PROJECT CREATION
SCREEN 18 ( Add Component )
Materials
Attached
CJ20N PROJECT CREATION
SCREEN 19
Save the
project
CJ20N PROJECT CREATION
SCREEN 20
Network and
Activity
Number
Generated
System
Status is
CRTD ie
Created
CJ20N PROJECT CREATION
SCREEN 21
Follow this
path to
release the
project
CJ20N PROJECT CREATION
SCREEN 22
See the
system status
is REL ie
Release
CJ20N PROJECT CREATION
SCREEN 23 ( Purchase Requisition Number )
Select material and
go to “Purch Data”
Tab to check
Purchase
Requisition Number
Create Service PR Via
Project
CJ20N CREATION OF SERVICE PR VIA PROJECT OR
FROM PS MODULE
Open the pre
created project for
which you need to
create the service
PR or even you can
create a new
project as explained
above as per
requirement.
CJ20N CREATION OF SERVICE PR VIA PROJECT OR
FROM PS MODULE
Select Network
After that click
on Activity.
CJ20N CREATION OF SERVICE PR VIA PROJECT OR
FROM PS MODULE
In the next
screen click on
“Ext.
Processing”
Tab under
activity.
CJ20N CREATION OF SERVICE PR VIA PROJECT OR
FROM PS MODULE
Enter Service
description ,
Click on the
check box and
press enter
CJ20N CREATION OF SERVICE PR VIA PROJECT OR
FROM PS MODULE
Enter Service
description ,
Click on the
check box and
press enter
CJ20N CREATION OF SERVICE PR VIA PROJECT OR
FROM PS MODULE
After pressing
enter you will
get this
following
screen to enter
details.
CJ20N CREATION OF SERVICE PR VIA PROJECT OR
FROM PS MODULE
Enter details
for Material
Group And
Purchase
Group. Press
Enter.
CJ20N CREATION OF SERVICE PR VIA PROJECT OR
FROM PS MODULE
After pressing
enter you will
get the
following
screen.
CJ20N CREATION OF SERVICE PR VIA PROJECT OR
FROM PS MODULE
Fill these
details as per
requirement
and press
enter.
After that click on
back green arrow to
go to the next
screen
CJ20N CREATION OF SERVICE PR VIA PROJECT OR
FROM PS MODULE
In this screen click
on the new created
service activity.
Click on “Extnl
Tab”
This is the Service PR
Number that has been
generated.
CJ20N CREATION OF SERVICE PR VIA PROJECT OR
FROM PS MODULE
Click on Save Button
to save the project.
Cost Planning
CJ40 Cost Planning
Run T-Code CJ40,
Enter the
controlling area
CJ40 Cost Planning
Enter the
controlling area
(9000) , Press Enter
CJ40 Cost Planning
Enter the Project
Number
CJ40 Cost Planning
Enter the Project
Number , Press
Enter
CJ40 Cost Planning
Click here for WBS
Element Overview
CJ40 Cost Planning
This is Planned
Total Value , this
value we are
getting from
Network Cost ie
from the materials
we are attaching to
the activity as
components.
CJ40 Cost Planning
Click here to save
the data.
Budgeting
CJ30 Budgeting
Enter Project
Number, Press
Enter
CJ30 Budgeting
Click here for WBS
Element Overview
CJ30 Budgeting
Enter Budgeted
Value
CJ30 Budgeting
Enter Budgeted
Value , Press Enter
CJ30 Budgeting
Check values of
Current Budget ,
Distributable
Column. It should
be equal to Budget
Column Value.
CJ30 Budgeting
Select the row by
clicking here
After selecting row
go to edit and click
on Total Up.
CJ30 Budgeting
Click on this green
tick or press enter
CJ30 Budgeting
Click on this to save
the entries
Budget Release
CJ32 Budget Release
Enter Project
Number, Press
Enter
CJ32 Budget Release
Click here for WBS
Element Overview
CJ32 Budget Release
Here you observe
the Current Budget
Value
CJ32 Budget Release
Click here to select
the row
After selecting row , Go
to edit and click on
Copy View
CJ32 Budget Release
This new Pop Up
Window comes up,
here select Current
Budget option
Before selecting an
option see if value
in current budget
column is there,
since you will be
releasing amount
from this current
budget for usage in
the project.
After selecting Current
Budget option click on
this green tick or press
enter.
CJ32 Budget Release
After selecting Current
Budget option you get a
next Pop Up Window.
Here you can release
the percentage of
Budget as per your
requirement ie you can
release the complete
100% of budget or X%
of budget as per your
need of the project.
Click on this green tick
or press enter.
CJ32 Budget Release
Check this value in
release column , it
should be equal to
your X% value of
your Current
Budget Column
Value.
CJ32 Budget Release
Click here to select
the complete row
After selecting row go
to Edit Option and
click on Total Up .
CJ32 Budget Release
After that you
will get this Pop
Up window ,
click on this
green tick or
press enter.
CJ32 Budget Release
Click here to
save the entries
and to
complete the
process.
Display Released
Budget
CJ31 Display Released Budget
Enter Project
Number, Press
Enter
CJ31 Display Released Budget
Check the values of two columns
Budget and Release. The values
should be as per your calculations.
Budget column should have value
that you have entered as budgeted
value and Release column should
have that X% value that you have
released in CJ32.
Create PO
ME21N Create PO
Select The Document
Type ( Z01 Domestic PO )
ME21N Create PO
Fill in all the three
required inputs ie
Purchase Organization ,
Purchase Group ,
Company Code
ME21N Create PO
Select Purchase
Requisition
Option
Click here to
get a drop
down list
ME21N Create PO
Enter PR
Number
After Entering PR
Number click on this
icon or press F8
ME21N Create PO
You will get the PR and
the list of elements in
the PR
ME21N Create PO
You will get the PR and
the list of elements in
the PR
ME21N Create PO
Click on line item ,
select it and drop it in
Shopping Kart as
shown
Shopping
Kart
ME21N Create PO
Enter Vendor
Number
ME21N Create PO
After pressing
enter , In this
screen enter
Validity start
date and validity
end date.
ME21N Create PO
Click on this PR
Item , Drag and
add it to the
Shopping Cart.
This is the Shopping
Cart.
ME21N Create PO
You will get all items list
this
ME21N Create PO
Click on this check icon
to verify that all details
have been filled
properly then save the
document and get PO
number.
Press this to save
the document.
Proposed Project Structure
Proposed Project Structure Explanation
 We can sub divide the complete project as below in PS :-
WBS For Structure
WBS For Coldform ,
Revenue WBS ( For capturing Invoice Value)
New WBS Structure (Amendments In Quantity & BOQ List)
New WBS Coldform (Amendments In Quantity & BOQ List)
 Click to see the Project Structure Hierarchy
Annexure List Of T-Codes Used
 CJ20N – Project Creation
 CJ40 – Cost Planning
 CJ30 – Budgeting
 CJ32 – Release Budget
 CJ31 – Display Release Budget
Additional List Of T-Codes
 S_ALR_87013558 – Budget/Actual/Commitment/Assigned Cost
 ME5J – List Of Project Related PR
 ME2J – List Of Project Related PO
 ME21N – Create PO
 ME29N – Release PO
 MIGO – Do GR
 ML81N – Service Entry Against PO
 MMBE – Stock Overview
 MM60 – Material List
Lets Work Out Together And Make Efforts To
Get PS Module Working And Active So That We
Can Cross Many Of Our Hurdles And
Challenges In Our Projects And Its Reports !!!!!
Somya De
Mob :- 9990275852
E-Mail :- soumya.de@fedderslloyd.com

Sap ps training material