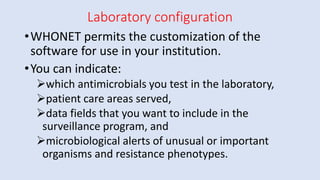
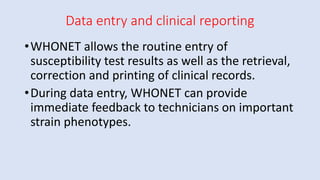
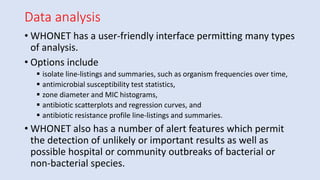
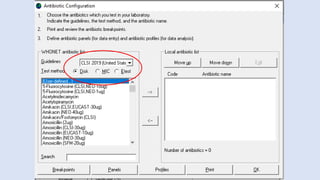
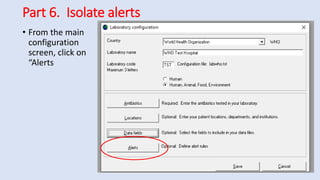
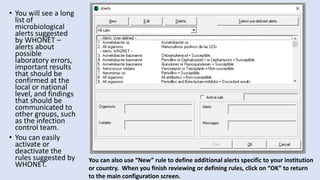
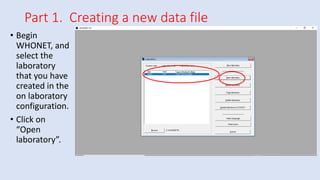
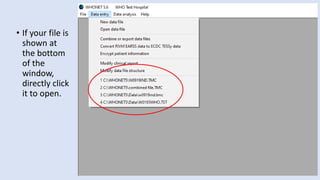
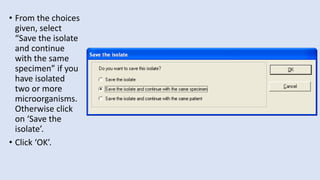
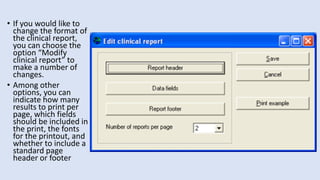
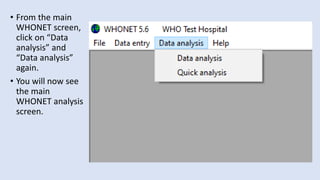
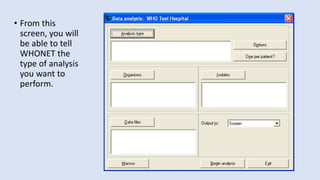
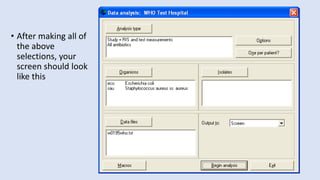
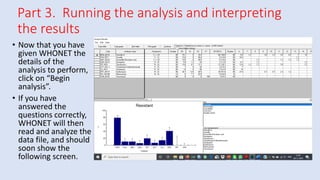
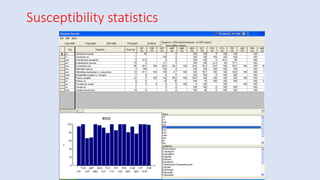
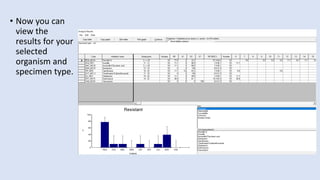
WHONET software
Made easy
What is WHONET?
•WHONET is a free software developed by
the WHO Collaborating Centre for
Surveillance of Antimicrobial Resistance for
laboratory-based surveillance of infectious
diseases and antimicrobial resistance.
WHONET – What for is used?
•The principal goals of the software are:
➢to enhance local use of laboratory data;
and
➢to promote national and international
collaboration through the exchange of
data.
WHONET - Applications
•WHONET analytical tools facilitate:
➢the understanding of the local epidemiology
of microbial populations;
➢the selection of antimicrobial agents;
➢the identification of hospital and community
outbreaks; and
➢the recognition of quality assurance problems
in laboratory testing.
WHONET – Application
•At present, WHONET can handle results
from the testing of bacteria, fungi, and
parasites.
•WHONET does not yet have virological tests
incorporated
What can WHONET do?
•WHONET has three main components:
➢Laboratory configuration
➢Data entry and clinical reporting
➢Data analysis
Laboratory configuration
•WHONET permits the customization of the
software for use in your institution.
•You can indicate:
➢which antimicrobials you test in the laboratory,
➢patient care areas served,
➢data fields that you want to include in the
surveillance program, and
➢microbiological alerts of unusual or important
organisms and resistance phenotypes.
Data entry and clinical reporting
•WHONET allows the routine entry of
susceptibility test results as well as the retrieval,
correction and printing of clinical records.
•During data entry, WHONET can provide
immediate feedback to technicians on important
strain phenotypes.
Data analysis
• WHONET has a user-friendly interface permitting many types
of analysis.
• Options include
▪ isolate line-listings and summaries, such as organism frequencies over time,
▪ antimicrobial susceptibility test statistics,
▪ zone diameter and MIC histograms,
▪ antibiotic scatterplots and regression curves, and
▪ antibiotic resistance profile line-listings and summaries.
• WHONET also has a number of alert features which permit
the detection of unlikely or important results as well as
possible hospital or community outbreaks of bacterial or
non-bacterial species.
WHONET window
WHONET
Laboratory configuration
Part 1. Describing your laboratory
• Double-click on the WHONET icon on your desktop to begin WHONET.
You will see a list of laboratory configurations currently defined on
your computer. Click on “New Laboratory” to begin.
• Click to select the country name. Let you select ‘India’ for this learning
• Let us type the ‘Laboratory name’ as ‘Whonet test hospital’
• Give a three letter code for your hospital or laboratory. In this case we
shall give ‘WTH’
• If your laboratory is the for human, then leave the box ‘Human’
checked. If your laboratory is engaged for Human, Animal, Food and
Environment, you can check the box ‘Human, Animal, Food,
Environment’
Part 2. Selecting your antibiotics
• To do this, click on “Antibiotics” to get the following screen
• You will see a long list of antibiotics to your left – this is the WHONET
list. On the right is the list of antibiotic tests used in your laboratory.
At the beginning this list is empty.
•To indicate the tests that you are using,
you should indicate three things:
1. the reference guidelines (for example
CLSI, SFM, DIN, etc.);
2. the test method (disk, MIC, or Etest);
and
3. the name of the antibiotic and, for disk
diffusion testing, the disk potency.
In this learning, indicate that the method is CLSI, and you will choose
following few drugs tested by disk diffusion:
• Disk diffusion, ampicillin 10ug
• Disk diffusion, cefoxitin 30ug
• Disk diffusion, ceftriaxone 30ug
• Disk diffusion, ciprofloxacin 5ug
• Disk diffusion, erythromycin 15ug
• Disk diffusion, gentamicin 10ug
• Disk diffusion, imipenem, 10ug
• Disk diffusion, penicillin G 10units
• Disk diffusion, trimethoprim/sulfamethoxazole 1.25ug/23.75ug
• Disk diffusion, vancomycin, 30ug
WHONET assigns a code to
each antibiotic test, for
example AMP_ND10
indicates a test of ampicillin
(“AMP”) by CLSI (“N”,
formerly NCCLS) methods by
disk diffusion (“D”) with a
10ug disk (“10”).
There are several ways of selecting the antibiotics and
transferring them right side box ie., list of antibiotics selected
for our laboratory.
➢Double click on the required antibiotic; or
➢Click on the required antibiotic once to highlight it, then
click the right arrow button between the two lists; or
➢Click on the required antibiotic once to highlight it, then
press the ‘Enter’ key
➢If you want to remove any antibiotic from the right side box,
you should follow the same procedure as you did to transfer
them from the left side box.
➢If you would like to change the sequence of antibiotics, you can use
the “Move up” and “Move down” options.
•After you complete the above steps, it is
possible for you to proceed directly with
data entry if you would like.
•There are, however, a number of
additional features described in in the
following slides which may be useful.
Configuring your antibiotics
Antibiotic breakpoints:
• When you select antibiotic tests, WHONET
automatically sets up the correct official breakpoints
according to the reference body that you indicate.
• In most cases, there will be no need for you to change
these yourself.
• However, if there are no official breakpoints for the
antibiotic that you selected or if you disagree with the
breakpoints used by WHONET, then you may wish to
make some manual modifications.
Click the tab ‘Breakpoints’
The antibiotic break point window will open.
•WHONET distinguishes between
“General” breakpoints used for
most bacterial species and “Species-
specific” breakpoints for species in
which the recommended
breakpoint is different.
Click ‘General’ tab under disk diffusion to go
to General breakpoint window
• In most cases, there
will be no need for
you to change these
yourself.
• However, if there are
no official
breakpoints for the
antibiotic that you
selected or if you
disagree with the
breakpoints used by
WHONET, then you
may make some
manual
modifications. After completion click ‘OK’
Click ‘Species-specific’ tab under disk diffusion to
go to Species-specific breakpoint window
Here you can configure the breakpoints for a particular
species for particular antibiotic manually. After you
finish, click ‘ok’ tab.
Antibiotic panel
• To facilitate data entry, you can set up antibiotic
panels that indicate the manner in which your
laboratory routinely test different microorganism
groups.
• It should be noted that it is possible to enter results
for any antibiotic, even if it is not included in the
panel. Further the antibiotic panel can be amended
at any time just by going into the option of ‘modify
laboratory’ in the home screen.
Antibiotic panels:
• From the
Antibiotic
configuration
screen, click on
“Panels”.
• You will see all of the
antibiotics that you
have selected in the
rows, and a list of
various organism
groupings in the
columns.
• Place a check mark to
indicate which drugs
are usually tested for
each organism.
• Click on ‘Antibiotic
sequence’ tab to
change the order
of antibiotics under
different
microorganisms as
the same order
may appear in your
laboratory report
• By default the
antibiotic list will
be arranged in
alphabetical order.
• Antibiotic order can
be changed with
the help of ‘Move
up’ and ‘Move
down’ tab.
• Just select the
antibiotic with left
click and use ‘Move
up’ and ‘Move
down’ tab to
change the order.
• After finishing the
changes, click ‘OK’
Antibiotic resistance profile
• This feature is used in the data analysis option called “Resistance
profiles”.
• In this analysis bacteria are classified according to their multi-
resistance phenotype.
• This is a very valuable analysis for infection control staff when
searching for outbreaks of multi-resistant organisms in the hospital
setting.
• Click ‘profiles’ tab
from antibiotic
configuration
screen.
• The ‘antibiotic
profiles’ screen
will open.
• First select the
organism for
which you want to
configurate the
resistant profile.
• Click ‘Edit’ tab
• In the ‘Edit
antibiotic
profile’
window you
can edit the
profile
antibiotics and
supplementary
antibiotics.
• After
completion
click ‘OK’
• Again click ‘OK’
to return to
‘Antibiotic
configuration
window.
• After confirming
that you have
completed
antibiotic
configurations,
Click ‘OK’ tab to
go ‘Laboratory
configuration
window’
Part 4. Patient locations
•WHONET allows you to specify patient locations
such as institution, department, ward and
patient type (e.g. Adult, paediatric, neonatal).
Although this is not required, it is recommended
for two reasons:
➢It facilitates the standardization of coding during
data entry; and
➢It may prove useful for the purpose of data analysis
• To do click
‘Location’
tab.
• It will open
the location
window
• In the ‘Location’
window you can add
new locations with a
three letter code.
• You can use the
“Edit” buttons to
change the list of
institutions and
departments to
match the needs of
your institution.
• When you finish the
configuration of your
locations, click on
“OK” to return to the
main configuration
screen.
Editing the institution name
Editing the department name
Part 5. Data fields
• Click ‘Data fields’ tab
to configure the data
entry sheet.
• Check the Data
fields that is
present in the
left side box.
• If you are
satisfied with
the categories
click ‘OK’ and
exit the window.
• If you want to
add or delete
click the ‘Modify
list’ tab.
• Under different
data categories
you can edit the
data fields
between the
‘Data fields’
(left side) and
‘Your
laboratory’ field
in the right side
• After
completion,
click ‘OK’
Appearance of the data entry screen and isolate
listings:
• You can use “Move
up” and “Move down”
to change the order of
the questions
appearing on the data
entry screen.
• You can indicate
whether a question
applies to humans,
animals, or food.
• You can also indicate
which “box” the
question appears in
during data entry, for
example “Location”,
“Microbiology”,
“Specimen”, etc.
• You can indicate that
a question is hidden
from the user by
selecting “Hidden”.
Part 6. Isolate alerts
• From the main
configuration
screen, click on
“Alerts
• You will see a long
list of
microbiological
alerts suggested
by WHONET –
alerts about
possible
laboratory errors,
important results
that should be
confirmed at the
local or national
level, and findings
that should be
communicated to
other groups, such
as the infection
control team.
• You can easily
activate or
deactivate the
rules suggested by
WHONET.
You can also use “New” rule to define additional alerts specific to your institution
or country. When you finish reviewing or defining rules, click on “OK” to return
to the main configuration screen.
• You have now
finished your
laboratory
configuration.
• Click on “Save” to
save all of the
laboratory details
into a “laboratory
configuration file.
• The name of the file
has the form
“labxxx.yyy” where
“xxx” refers to the
country code and
“yyy” refers to the
laboratory code.
Data entry
Part 1. Creating a new data file
• Begin
WHONET, and
select the
laboratory
that you have
created in the
on laboratory
configuration.
• Click on
“Open
laboratory”.
• At the top of the
screen, you will see
the main “Data
entry” menu.
• If you select this
menu, you will see
a number of
options.
• To begin a new data
file, select “New
data file”.
• If you would like to
continue working
with a data file that
already exists, click
on “Open data file”.
• Select “New data
file” for creating
new data file.
File location
•Every file on a computer needs: 1) a name; and 2) a
location.
•By default, the location of WHONET files is
c:whonet5data on your computer’s hard drive, but
you can put the file wherever is most convenient for
you, for example on a central server accessible to
many computers in the hospital.
• For the file name,
WHONET suggests a
name indicating the
year of the data, the
country code, and the
laboratory code, for
example w06who.wth.
For the tutorial,
change the option to
“Month/Year”, and
WHONET will suggest
a name such as
w0606who.wth for
June 2006.
• If the data are from a
different month,
indicate the correct
month. For this
tutorial, change the
file name to
w0106who.wth to
indicate that you will
enter data from
January 2006 from the
country “WHO” from
the “WTH” laboratory.
• Then click “OK”.
Part 2. Data entry
• Click ‘Open
data file’.
• Browse your
computer
for the
location
where the
file is stored.
• Click to
open it.
• If your file is
shown at
the bottom
of the
window,
directly click
it to open.
Data entry sheet
• Enter the data
in the spread
sheet.
• When you
finish, your
screen should
look like the
following. As
you put in the
antibiotic
measurements,
WHONET will
automatically
determine and
display the
interpretation.
• After you
enter all of
the results,
click on
“Save
isolate”.
• From the choices
given, select
“Save the isolate
and continue
with the same
specimen” if you
have isolated
two or more
microorganisms.
Otherwise click
on ‘Save the
isolate’.
• Click ‘OK’.
Part 3. Viewing the database
• Click
‘View
isolate’.
You will see the following window
• Sorting the results:
If you click on any
column heading,
WHONET will sort
the database by
that column.
• This can help you
to find results from
a certain patient or
with a certain
organism.
• It can also help
find errors in data
entry, for example
in the specimen
date column.
• Edit the isolate: If
there is a mistake
in the database
or if you have
additional
information to
add, click on “Edit
the isolate” to
edit the isolate
on the main data
entry screen.
• When you finish,
click on “Save
isolate”.
• Edit the table: You
can also edit the
table directly. Click
on “Edit the table”
and you can make
changes directly to
the table.
• Delete: Use this
button to delete a
record.
• Search: Use this
button to search for
records, for example
certain patients,
specimen numbers,
or organisms
Part 4. Clinical reports
• Some laboratories use
WHONET to report
laboratory results back
to clinicians.
• To print out clinical
reports or logbook
isolate listings, click on
“Print” from either the
main Data entry screen
or from the “View
database” screen.
• You have the choice
between printing isolate
listings (for example
fifty isolates per page)
or individual patient
reports (one to three
reports per page).
• You also have the option
of choosing to print only
the current isolate
selected or a number of
isolates with criteria
that you specific (date
of data entry, specimen
number, etc.).
•
• If you would like to
change the format of
the clinical report,
you can choose the
option “Modify
clinical report” to
make a number of
changes.
• Among other
options, you can
indicate how many
results to print per
page, which fields
should be included in
the print, the fonts
for the printout, and
whether to include a
standard page
header or footer
Data analysis
• From the main
WHONET screen,
click on “Data
analysis” and
“Data analysis”
again.
• You will now see
the main
WHONET analysis
screen.
• From this
screen, you will
be able to tell
WHONET the
type of analysis
you want to
perform.
Part 2. Setting up an analysis
• In the main
analysis screen,
there are three
sections on the left
that you must
answer: Analysis
type, Organisms,
and Data files.
• On the right, there
are some
additional options
that may be useful
to you.
• Analysis type: First,
you must indicate
the kind of analysis
that you want
WHONET to
perform.
• To do this, click on
“Analysis type”. You
will see several
analysis options.
• For this first
analysis, select the
option “%RIS and
test
measurements”.
• Click “OK” to return
to the main analysis
screen.
• Organisms: Click
on Organisms.
On this screen,
as in many of the
WHONET
screens, you will
see the options
available to you
on the left side
of the screen.
• On the right side
of the screen,
you will put your
selections.
• There are some other useful options on this screen as well.
• Extended list: Initially, WHONET shows you the list of relatively
common organisms. To see the complete list, click on “Extended list”.
You can use the “Search” box to quickly find an organism.
• Organism groups: If you click on “Organism groups”, you will see
that WHONET permits you to analyze groups of microorganisms such
as “All organisms”, “All Enterobacteriaceae”, and “All Salmonella”.
• Analyze as one organism: WHONET generally will analyze each
organism selected separately. If you would like WHONET to average
results together from multiple organisms (for example “Klebsiella
pneumoniae”, “Klebsiella oxytoca” and “Klebsiella sp.”), then click on
the option “Analyze as one organism”.
• When you finish looking at the available options, click “OK” to return
to the main analysis screen.
• Data files: Click on
“Data files” from main
analysis screen to select
the data files to include
in the analysis.
• You can do this by
double-clicking on the
file or by single-clicking
and using the right-
arrow button “–>”.
• After selecting the file,
click on “OK” to return
to the main analysis
screen.
• After making all of
the above
selections, your
screen should look
like this
Part 3. Running the analysis and interpreting
the results
• Now that you have
given WHONET the
details of the
analysis to perform,
click on “Begin
analysis”.
• If you have
answered the
questions correctly,
WHONET will then
read and analyze the
data file, and should
soon show the
following screen.
Interpretation of results
• On the top of the screen shot, you see a table with the
antimicrobial susceptibility test statistics for each of
the antimicrobials tested.
• If you want to sort the table alphabetically or
numerically, click on the heading for the column on
which you want to sort.
Interpretation of results
• The lower part of the screen shows some of the same data presented
in the table, but in graphical format. For example, click on the
options for “Number tested” and “%Resistant”.
You can see the following results
• You have
many options
like Copy
table, Copy
graph, Print
table, Print
graph which
can be used
for your
convenience.
Part 5. %Susceptible Summary
• Click on
“Analysis type”.
• In the middle of
the screen, you
will see two
options: 1.
%RIS and test
measurements,
and 2.
Summary.
• For the columns, the default
selection is %Susceptible
(which is often preferred by
clinicians and pharmacists).
• You can change this to
%Resistant or %Non-
susceptible (which is often
preferred by microbiologists
and epidemiologists).
• For the rows, the default
selection is “Organism”. In
other words, the results from
each species will be
summarized in a separate
row in the output.
• Click on “OK” to select the
options.
• Click on “Begin analysis”, and
you should get the
susceptibility statistics
Susceptibility statistics
Study of resistance pattern of a
microorganism from a particular specimen
• In ‘Data
analysis’
window click
‘Analysis type’.
Study of resistance pattern of a
microorganism from a particular specimen
• In ‘Analysis
selection’ window
select the ‘%RIS
and test
measurement’.
• Click ‘OK’
• Now click
‘Organisms’
from ‘Data
analysis’
window.
• From the list
select the
organism you
want to study
and transfer to
the right side
box.
• For example let
us select
Staphylococcus
aureus.
• Click ‘OK’
• Now select the
data file from
which you want to
analyse the
resistant pattern by
clicking ‘Data files’
from ‘Data analyse’
window.
• In ‘Data
analysis’
window click
‘Isolates’.
• From ‘Isolates’
window select
‘Specimen type’
and click ‘Define
criteria’
• From the
specimen type we
can select the
specimen for
which you want to
analyse the result.
• Here, let us select
‘pus’ and transfer
to the right side
box.
• Click ‘OK’
• Now check all
the criteria set.
• Click ‘Begin
analysis’.
• Now you can
view the
results for your
selected
organism and
specimen type.
WHONET – why we need to install in
diagnostic microbiology lab?
• WHONET is an effective computerized microbiology
laboratory data management and analysis program
that can
• It provide guidance for empiric therapy of infections,
alert clinicians of trends of antimicrobial resistance,
guide drug-policy decisions and preventive measures.

WHONET for antibiotic policy-Its installation and usage guide

  • 1.
  • 2.
    What is WHONET? •WHONETis a free software developed by the WHO Collaborating Centre for Surveillance of Antimicrobial Resistance for laboratory-based surveillance of infectious diseases and antimicrobial resistance.
  • 3.
    WHONET – Whatfor is used? •The principal goals of the software are: ➢to enhance local use of laboratory data; and ➢to promote national and international collaboration through the exchange of data.
  • 4.
    WHONET - Applications •WHONETanalytical tools facilitate: ➢the understanding of the local epidemiology of microbial populations; ➢the selection of antimicrobial agents; ➢the identification of hospital and community outbreaks; and ➢the recognition of quality assurance problems in laboratory testing.
  • 5.
    WHONET – Application •Atpresent, WHONET can handle results from the testing of bacteria, fungi, and parasites. •WHONET does not yet have virological tests incorporated
  • 6.
    What can WHONETdo? •WHONET has three main components: ➢Laboratory configuration ➢Data entry and clinical reporting ➢Data analysis
  • 7.
    Laboratory configuration •WHONET permitsthe customization of the software for use in your institution. •You can indicate: ➢which antimicrobials you test in the laboratory, ➢patient care areas served, ➢data fields that you want to include in the surveillance program, and ➢microbiological alerts of unusual or important organisms and resistance phenotypes.
  • 8.
    Data entry andclinical reporting •WHONET allows the routine entry of susceptibility test results as well as the retrieval, correction and printing of clinical records. •During data entry, WHONET can provide immediate feedback to technicians on important strain phenotypes.
  • 9.
    Data analysis • WHONEThas a user-friendly interface permitting many types of analysis. • Options include ▪ isolate line-listings and summaries, such as organism frequencies over time, ▪ antimicrobial susceptibility test statistics, ▪ zone diameter and MIC histograms, ▪ antibiotic scatterplots and regression curves, and ▪ antibiotic resistance profile line-listings and summaries. • WHONET also has a number of alert features which permit the detection of unlikely or important results as well as possible hospital or community outbreaks of bacterial or non-bacterial species.
  • 10.
  • 11.
  • 12.
    Part 1. Describingyour laboratory • Double-click on the WHONET icon on your desktop to begin WHONET. You will see a list of laboratory configurations currently defined on your computer. Click on “New Laboratory” to begin.
  • 13.
    • Click toselect the country name. Let you select ‘India’ for this learning
  • 14.
    • Let ustype the ‘Laboratory name’ as ‘Whonet test hospital’ • Give a three letter code for your hospital or laboratory. In this case we shall give ‘WTH’
  • 15.
    • If yourlaboratory is the for human, then leave the box ‘Human’ checked. If your laboratory is engaged for Human, Animal, Food and Environment, you can check the box ‘Human, Animal, Food, Environment’
  • 16.
    Part 2. Selectingyour antibiotics • To do this, click on “Antibiotics” to get the following screen
  • 17.
    • You willsee a long list of antibiotics to your left – this is the WHONET list. On the right is the list of antibiotic tests used in your laboratory. At the beginning this list is empty.
  • 18.
    •To indicate thetests that you are using, you should indicate three things: 1. the reference guidelines (for example CLSI, SFM, DIN, etc.); 2. the test method (disk, MIC, or Etest); and 3. the name of the antibiotic and, for disk diffusion testing, the disk potency.
  • 19.
    In this learning,indicate that the method is CLSI, and you will choose following few drugs tested by disk diffusion: • Disk diffusion, ampicillin 10ug • Disk diffusion, cefoxitin 30ug • Disk diffusion, ceftriaxone 30ug • Disk diffusion, ciprofloxacin 5ug • Disk diffusion, erythromycin 15ug • Disk diffusion, gentamicin 10ug • Disk diffusion, imipenem, 10ug • Disk diffusion, penicillin G 10units • Disk diffusion, trimethoprim/sulfamethoxazole 1.25ug/23.75ug • Disk diffusion, vancomycin, 30ug WHONET assigns a code to each antibiotic test, for example AMP_ND10 indicates a test of ampicillin (“AMP”) by CLSI (“N”, formerly NCCLS) methods by disk diffusion (“D”) with a 10ug disk (“10”).
  • 21.
    There are severalways of selecting the antibiotics and transferring them right side box ie., list of antibiotics selected for our laboratory. ➢Double click on the required antibiotic; or ➢Click on the required antibiotic once to highlight it, then click the right arrow button between the two lists; or ➢Click on the required antibiotic once to highlight it, then press the ‘Enter’ key ➢If you want to remove any antibiotic from the right side box, you should follow the same procedure as you did to transfer them from the left side box. ➢If you would like to change the sequence of antibiotics, you can use the “Move up” and “Move down” options.
  • 22.
    •After you completethe above steps, it is possible for you to proceed directly with data entry if you would like. •There are, however, a number of additional features described in in the following slides which may be useful.
  • 23.
    Configuring your antibiotics Antibioticbreakpoints: • When you select antibiotic tests, WHONET automatically sets up the correct official breakpoints according to the reference body that you indicate. • In most cases, there will be no need for you to change these yourself. • However, if there are no official breakpoints for the antibiotic that you selected or if you disagree with the breakpoints used by WHONET, then you may wish to make some manual modifications.
  • 24.
    Click the tab‘Breakpoints’
  • 25.
    The antibiotic breakpoint window will open.
  • 26.
    •WHONET distinguishes between “General”breakpoints used for most bacterial species and “Species- specific” breakpoints for species in which the recommended breakpoint is different.
  • 27.
    Click ‘General’ tabunder disk diffusion to go to General breakpoint window
  • 28.
    • In mostcases, there will be no need for you to change these yourself. • However, if there are no official breakpoints for the antibiotic that you selected or if you disagree with the breakpoints used by WHONET, then you may make some manual modifications. After completion click ‘OK’
  • 29.
    Click ‘Species-specific’ tabunder disk diffusion to go to Species-specific breakpoint window
  • 30.
    Here you canconfigure the breakpoints for a particular species for particular antibiotic manually. After you finish, click ‘ok’ tab.
  • 31.
    Antibiotic panel • Tofacilitate data entry, you can set up antibiotic panels that indicate the manner in which your laboratory routinely test different microorganism groups. • It should be noted that it is possible to enter results for any antibiotic, even if it is not included in the panel. Further the antibiotic panel can be amended at any time just by going into the option of ‘modify laboratory’ in the home screen.
  • 32.
    Antibiotic panels: • Fromthe Antibiotic configuration screen, click on “Panels”.
  • 33.
    • You willsee all of the antibiotics that you have selected in the rows, and a list of various organism groupings in the columns. • Place a check mark to indicate which drugs are usually tested for each organism.
  • 34.
    • Click on‘Antibiotic sequence’ tab to change the order of antibiotics under different microorganisms as the same order may appear in your laboratory report • By default the antibiotic list will be arranged in alphabetical order.
  • 35.
    • Antibiotic ordercan be changed with the help of ‘Move up’ and ‘Move down’ tab. • Just select the antibiotic with left click and use ‘Move up’ and ‘Move down’ tab to change the order. • After finishing the changes, click ‘OK’
  • 36.
    Antibiotic resistance profile •This feature is used in the data analysis option called “Resistance profiles”. • In this analysis bacteria are classified according to their multi- resistance phenotype. • This is a very valuable analysis for infection control staff when searching for outbreaks of multi-resistant organisms in the hospital setting.
  • 37.
    • Click ‘profiles’tab from antibiotic configuration screen. • The ‘antibiotic profiles’ screen will open.
  • 38.
    • First selectthe organism for which you want to configurate the resistant profile. • Click ‘Edit’ tab
  • 39.
    • In the‘Edit antibiotic profile’ window you can edit the profile antibiotics and supplementary antibiotics. • After completion click ‘OK’ • Again click ‘OK’ to return to ‘Antibiotic configuration window.
  • 40.
    • After confirming thatyou have completed antibiotic configurations, Click ‘OK’ tab to go ‘Laboratory configuration window’
  • 41.
    Part 4. Patientlocations •WHONET allows you to specify patient locations such as institution, department, ward and patient type (e.g. Adult, paediatric, neonatal). Although this is not required, it is recommended for two reasons: ➢It facilitates the standardization of coding during data entry; and ➢It may prove useful for the purpose of data analysis
  • 42.
    • To doclick ‘Location’ tab. • It will open the location window
  • 43.
    • In the‘Location’ window you can add new locations with a three letter code. • You can use the “Edit” buttons to change the list of institutions and departments to match the needs of your institution. • When you finish the configuration of your locations, click on “OK” to return to the main configuration screen.
  • 44.
  • 45.
  • 46.
    Part 5. Datafields • Click ‘Data fields’ tab to configure the data entry sheet.
  • 47.
    • Check theData fields that is present in the left side box. • If you are satisfied with the categories click ‘OK’ and exit the window. • If you want to add or delete click the ‘Modify list’ tab.
  • 48.
    • Under different datacategories you can edit the data fields between the ‘Data fields’ (left side) and ‘Your laboratory’ field in the right side • After completion, click ‘OK’
  • 49.
    Appearance of thedata entry screen and isolate listings: • You can use “Move up” and “Move down” to change the order of the questions appearing on the data entry screen. • You can indicate whether a question applies to humans, animals, or food. • You can also indicate which “box” the question appears in during data entry, for example “Location”, “Microbiology”, “Specimen”, etc.
  • 50.
    • You canindicate that a question is hidden from the user by selecting “Hidden”.
  • 51.
    Part 6. Isolatealerts • From the main configuration screen, click on “Alerts
  • 52.
    • You willsee a long list of microbiological alerts suggested by WHONET – alerts about possible laboratory errors, important results that should be confirmed at the local or national level, and findings that should be communicated to other groups, such as the infection control team. • You can easily activate or deactivate the rules suggested by WHONET. You can also use “New” rule to define additional alerts specific to your institution or country. When you finish reviewing or defining rules, click on “OK” to return to the main configuration screen.
  • 53.
    • You havenow finished your laboratory configuration. • Click on “Save” to save all of the laboratory details into a “laboratory configuration file. • The name of the file has the form “labxxx.yyy” where “xxx” refers to the country code and “yyy” refers to the laboratory code.
  • 54.
  • 55.
    Part 1. Creatinga new data file • Begin WHONET, and select the laboratory that you have created in the on laboratory configuration. • Click on “Open laboratory”.
  • 56.
    • At thetop of the screen, you will see the main “Data entry” menu. • If you select this menu, you will see a number of options. • To begin a new data file, select “New data file”. • If you would like to continue working with a data file that already exists, click on “Open data file”. • Select “New data file” for creating new data file.
  • 57.
    File location •Every fileon a computer needs: 1) a name; and 2) a location. •By default, the location of WHONET files is c:whonet5data on your computer’s hard drive, but you can put the file wherever is most convenient for you, for example on a central server accessible to many computers in the hospital.
  • 58.
    • For thefile name, WHONET suggests a name indicating the year of the data, the country code, and the laboratory code, for example w06who.wth. For the tutorial, change the option to “Month/Year”, and WHONET will suggest a name such as w0606who.wth for June 2006. • If the data are from a different month, indicate the correct month. For this tutorial, change the file name to w0106who.wth to indicate that you will enter data from January 2006 from the country “WHO” from the “WTH” laboratory. • Then click “OK”.
  • 59.
    Part 2. Dataentry • Click ‘Open data file’. • Browse your computer for the location where the file is stored. • Click to open it.
  • 60.
    • If yourfile is shown at the bottom of the window, directly click it to open.
  • 61.
  • 62.
    • Enter thedata in the spread sheet. • When you finish, your screen should look like the following. As you put in the antibiotic measurements, WHONET will automatically determine and display the interpretation.
  • 63.
    • After you enterall of the results, click on “Save isolate”.
  • 64.
    • From thechoices given, select “Save the isolate and continue with the same specimen” if you have isolated two or more microorganisms. Otherwise click on ‘Save the isolate’. • Click ‘OK’.
  • 65.
    Part 3. Viewingthe database • Click ‘View isolate’.
  • 66.
    You will seethe following window
  • 67.
    • Sorting theresults: If you click on any column heading, WHONET will sort the database by that column. • This can help you to find results from a certain patient or with a certain organism. • It can also help find errors in data entry, for example in the specimen date column.
  • 68.
    • Edit theisolate: If there is a mistake in the database or if you have additional information to add, click on “Edit the isolate” to edit the isolate on the main data entry screen. • When you finish, click on “Save isolate”.
  • 69.
    • Edit thetable: You can also edit the table directly. Click on “Edit the table” and you can make changes directly to the table. • Delete: Use this button to delete a record. • Search: Use this button to search for records, for example certain patients, specimen numbers, or organisms
  • 70.
    Part 4. Clinicalreports • Some laboratories use WHONET to report laboratory results back to clinicians. • To print out clinical reports or logbook isolate listings, click on “Print” from either the main Data entry screen or from the “View database” screen.
  • 71.
    • You havethe choice between printing isolate listings (for example fifty isolates per page) or individual patient reports (one to three reports per page). • You also have the option of choosing to print only the current isolate selected or a number of isolates with criteria that you specific (date of data entry, specimen number, etc.). •
  • 72.
    • If youwould like to change the format of the clinical report, you can choose the option “Modify clinical report” to make a number of changes. • Among other options, you can indicate how many results to print per page, which fields should be included in the print, the fonts for the printout, and whether to include a standard page header or footer
  • 73.
  • 74.
    • From themain WHONET screen, click on “Data analysis” and “Data analysis” again. • You will now see the main WHONET analysis screen.
  • 75.
    • From this screen,you will be able to tell WHONET the type of analysis you want to perform.
  • 76.
    Part 2. Settingup an analysis • In the main analysis screen, there are three sections on the left that you must answer: Analysis type, Organisms, and Data files. • On the right, there are some additional options that may be useful to you.
  • 77.
    • Analysis type:First, you must indicate the kind of analysis that you want WHONET to perform. • To do this, click on “Analysis type”. You will see several analysis options. • For this first analysis, select the option “%RIS and test measurements”. • Click “OK” to return to the main analysis screen.
  • 78.
    • Organisms: Click onOrganisms. On this screen, as in many of the WHONET screens, you will see the options available to you on the left side of the screen. • On the right side of the screen, you will put your selections.
  • 79.
    • There aresome other useful options on this screen as well. • Extended list: Initially, WHONET shows you the list of relatively common organisms. To see the complete list, click on “Extended list”. You can use the “Search” box to quickly find an organism. • Organism groups: If you click on “Organism groups”, you will see that WHONET permits you to analyze groups of microorganisms such as “All organisms”, “All Enterobacteriaceae”, and “All Salmonella”. • Analyze as one organism: WHONET generally will analyze each organism selected separately. If you would like WHONET to average results together from multiple organisms (for example “Klebsiella pneumoniae”, “Klebsiella oxytoca” and “Klebsiella sp.”), then click on the option “Analyze as one organism”. • When you finish looking at the available options, click “OK” to return to the main analysis screen.
  • 80.
    • Data files:Click on “Data files” from main analysis screen to select the data files to include in the analysis. • You can do this by double-clicking on the file or by single-clicking and using the right- arrow button “–>”. • After selecting the file, click on “OK” to return to the main analysis screen.
  • 81.
    • After makingall of the above selections, your screen should look like this
  • 82.
    Part 3. Runningthe analysis and interpreting the results • Now that you have given WHONET the details of the analysis to perform, click on “Begin analysis”. • If you have answered the questions correctly, WHONET will then read and analyze the data file, and should soon show the following screen.
  • 83.
    Interpretation of results •On the top of the screen shot, you see a table with the antimicrobial susceptibility test statistics for each of the antimicrobials tested. • If you want to sort the table alphabetically or numerically, click on the heading for the column on which you want to sort.
  • 84.
    Interpretation of results •The lower part of the screen shows some of the same data presented in the table, but in graphical format. For example, click on the options for “Number tested” and “%Resistant”.
  • 85.
    You can seethe following results
  • 86.
    • You have manyoptions like Copy table, Copy graph, Print table, Print graph which can be used for your convenience.
  • 87.
    Part 5. %SusceptibleSummary • Click on “Analysis type”. • In the middle of the screen, you will see two options: 1. %RIS and test measurements, and 2. Summary.
  • 88.
    • For thecolumns, the default selection is %Susceptible (which is often preferred by clinicians and pharmacists). • You can change this to %Resistant or %Non- susceptible (which is often preferred by microbiologists and epidemiologists). • For the rows, the default selection is “Organism”. In other words, the results from each species will be summarized in a separate row in the output. • Click on “OK” to select the options. • Click on “Begin analysis”, and you should get the susceptibility statistics
  • 89.
  • 90.
    Study of resistancepattern of a microorganism from a particular specimen • In ‘Data analysis’ window click ‘Analysis type’.
  • 91.
    Study of resistancepattern of a microorganism from a particular specimen • In ‘Analysis selection’ window select the ‘%RIS and test measurement’. • Click ‘OK’
  • 92.
    • Now click ‘Organisms’ from‘Data analysis’ window.
  • 93.
    • From thelist select the organism you want to study and transfer to the right side box. • For example let us select Staphylococcus aureus. • Click ‘OK’
  • 94.
    • Now selectthe data file from which you want to analyse the resistant pattern by clicking ‘Data files’ from ‘Data analyse’ window.
  • 95.
    • In ‘Data analysis’ windowclick ‘Isolates’.
  • 96.
    • From ‘Isolates’ windowselect ‘Specimen type’ and click ‘Define criteria’
  • 97.
    • From the specimentype we can select the specimen for which you want to analyse the result. • Here, let us select ‘pus’ and transfer to the right side box. • Click ‘OK’
  • 98.
    • Now checkall the criteria set. • Click ‘Begin analysis’.
  • 99.
    • Now youcan view the results for your selected organism and specimen type.
  • 100.
    WHONET – whywe need to install in diagnostic microbiology lab? • WHONET is an effective computerized microbiology laboratory data management and analysis program that can • It provide guidance for empiric therapy of infections, alert clinicians of trends of antimicrobial resistance, guide drug-policy decisions and preventive measures.