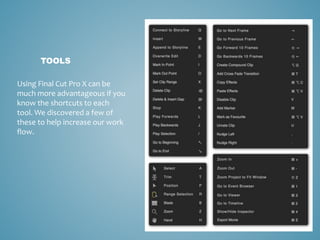
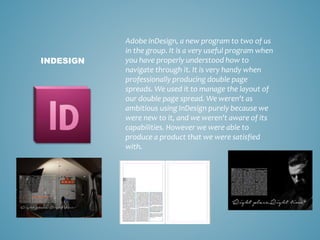
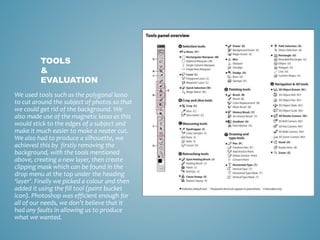
PRESENTATION
SOFTWARE
Gianluca, Olivia & Jake
Prezi, is a unique way of presenting information in a
fun and interesting way. We used it during AS and so
we were able to use it with ease. We like using Prezi
because it has character and you can make your
presentations individual to you and the information
you present. Prezi, as well as being an improved way
of presentation, but also a way of reflecting the
amount of desperate voices in the independent music
industry, as we are trying to show our creativity in a
different way to be noticed.
PREZI
Slide share is an easy way of uploading PowerPoint
presentations online and being able to make them
compatible with our blog, Word press. PowerPoint's
are the easiest way of getting straight to the point
with basic layouts and texts to simply read and obtain
information. We used PowerPoint presentations to
show a lot of in-depth information.
SLIDE SHARE
Emaze is new software to us, that we found when in
search for new creative methods of presenting.
Emaze is similar to Prezi however it has its own style
which makes it different and appropriate choice for
expanding our choices of presentation. The easy to
use interface allows for you to create animated
pages that add an interesting factor to your work.
EMAZE
• Final Cut Pro X, the editing software that
allowed for us to create our documentary.
• Software that gives a range of different editing
capabilities.
• We wanted to explore animation, however
Final Cut Pro X doesn’t have the functions to
produce animation. Therefore we had to look
into Adobe After Effects to help us out.
FINAL CUT
PRO X
TOOLS
Using Final Cut Pro X can be
much more advantageous if you
know the shortcuts to each
tool. We discovered a few of
these to help increase our work
flow.
Adobe InDesign, a new program to two of us
in the group. It is a very useful program when
you have properly understood how to
navigate through it. It is very handy when
professionally producing double page
spreads. We used it to manage the layout of
our double page spread. We weren't as
ambitious using InDesign purely because we
were new to it, and we weren't aware of its
capabilities. However we were able to
produce a product that we were satisfied
with.
INDESIGN
TOOLS
We used a 3 page layout and
then set text boxes in a
conventional form (2 columns)
we then added text that we
had written up on Microsoft
word. We used drop caps to
make the first word bigger and
then we set the colour to
white, to contrast the black
background. We also used size
11 Cambria font as this was
conventional for an academic
magazine.
An editing software that we utilised for our
poster and images in general. We all had previous
experience with Photoshop and so it was quite
easy to get what we wanted. We used many
different tools to achieve what we wanted.
ADOBE
PHOTOSHOP
We used tools such as the polygonal lasso
to cut around the subject of photos so that
we could get rid of the background. We
also made use of the magnetic lasso as this
would stick to the edges of a subject and
make it much easier to make a neater cut.
We also had to produce a silhouette, we
achieved this by firstly removing the
background, with the tools mentioned
above, creating a new layer, then create
clipping mask which can be found in the
drop menu at the top under the heading
‘layer’. Finally we picked a colour and then
added it using the fill tool (paint bucket
icon). Photoshop was efficient enough for
all of our needs, we don’t believe that it
had any faults in allowing us to produce
what we wanted.
TOOLS
&
EVALUATION
ADOBE
AFTER
EFFECTS
We used Adobe After Effects to
produce the animations that can be
seen in our documentary. The first logo
animation was very simple and easy to
produce, however the Rubik cube was
much harder and a lot of time and
effort was put into it.
Overall After effects was relatively hard to use as it was
new to us, we had to research into it in order to get
what we wanted. We watched many tutorials in order
to improve our skill. The end product was well worth the
amount of time and effort put in. These animations gave
our production a unique difference and helped to
increase the level of professionalism to our work.
EVALUATION

Software

  • 1.
  • 2.
    Prezi, is aunique way of presenting information in a fun and interesting way. We used it during AS and so we were able to use it with ease. We like using Prezi because it has character and you can make your presentations individual to you and the information you present. Prezi, as well as being an improved way of presentation, but also a way of reflecting the amount of desperate voices in the independent music industry, as we are trying to show our creativity in a different way to be noticed. PREZI
  • 3.
    Slide share isan easy way of uploading PowerPoint presentations online and being able to make them compatible with our blog, Word press. PowerPoint's are the easiest way of getting straight to the point with basic layouts and texts to simply read and obtain information. We used PowerPoint presentations to show a lot of in-depth information. SLIDE SHARE
  • 4.
    Emaze is newsoftware to us, that we found when in search for new creative methods of presenting. Emaze is similar to Prezi however it has its own style which makes it different and appropriate choice for expanding our choices of presentation. The easy to use interface allows for you to create animated pages that add an interesting factor to your work. EMAZE
  • 5.
    • Final CutPro X, the editing software that allowed for us to create our documentary. • Software that gives a range of different editing capabilities. • We wanted to explore animation, however Final Cut Pro X doesn’t have the functions to produce animation. Therefore we had to look into Adobe After Effects to help us out. FINAL CUT PRO X
  • 6.
    TOOLS Using Final CutPro X can be much more advantageous if you know the shortcuts to each tool. We discovered a few of these to help increase our work flow.
  • 7.
    Adobe InDesign, anew program to two of us in the group. It is a very useful program when you have properly understood how to navigate through it. It is very handy when professionally producing double page spreads. We used it to manage the layout of our double page spread. We weren't as ambitious using InDesign purely because we were new to it, and we weren't aware of its capabilities. However we were able to produce a product that we were satisfied with. INDESIGN
  • 8.
    TOOLS We used a3 page layout and then set text boxes in a conventional form (2 columns) we then added text that we had written up on Microsoft word. We used drop caps to make the first word bigger and then we set the colour to white, to contrast the black background. We also used size 11 Cambria font as this was conventional for an academic magazine.
  • 9.
    An editing softwarethat we utilised for our poster and images in general. We all had previous experience with Photoshop and so it was quite easy to get what we wanted. We used many different tools to achieve what we wanted. ADOBE PHOTOSHOP
  • 10.
    We used toolssuch as the polygonal lasso to cut around the subject of photos so that we could get rid of the background. We also made use of the magnetic lasso as this would stick to the edges of a subject and make it much easier to make a neater cut. We also had to produce a silhouette, we achieved this by firstly removing the background, with the tools mentioned above, creating a new layer, then create clipping mask which can be found in the drop menu at the top under the heading ‘layer’. Finally we picked a colour and then added it using the fill tool (paint bucket icon). Photoshop was efficient enough for all of our needs, we don’t believe that it had any faults in allowing us to produce what we wanted. TOOLS & EVALUATION
  • 11.
    ADOBE AFTER EFFECTS We used AdobeAfter Effects to produce the animations that can be seen in our documentary. The first logo animation was very simple and easy to produce, however the Rubik cube was much harder and a lot of time and effort was put into it.
  • 12.
    Overall After effectswas relatively hard to use as it was new to us, we had to research into it in order to get what we wanted. We watched many tutorials in order to improve our skill. The end product was well worth the amount of time and effort put in. These animations gave our production a unique difference and helped to increase the level of professionalism to our work. EVALUATION