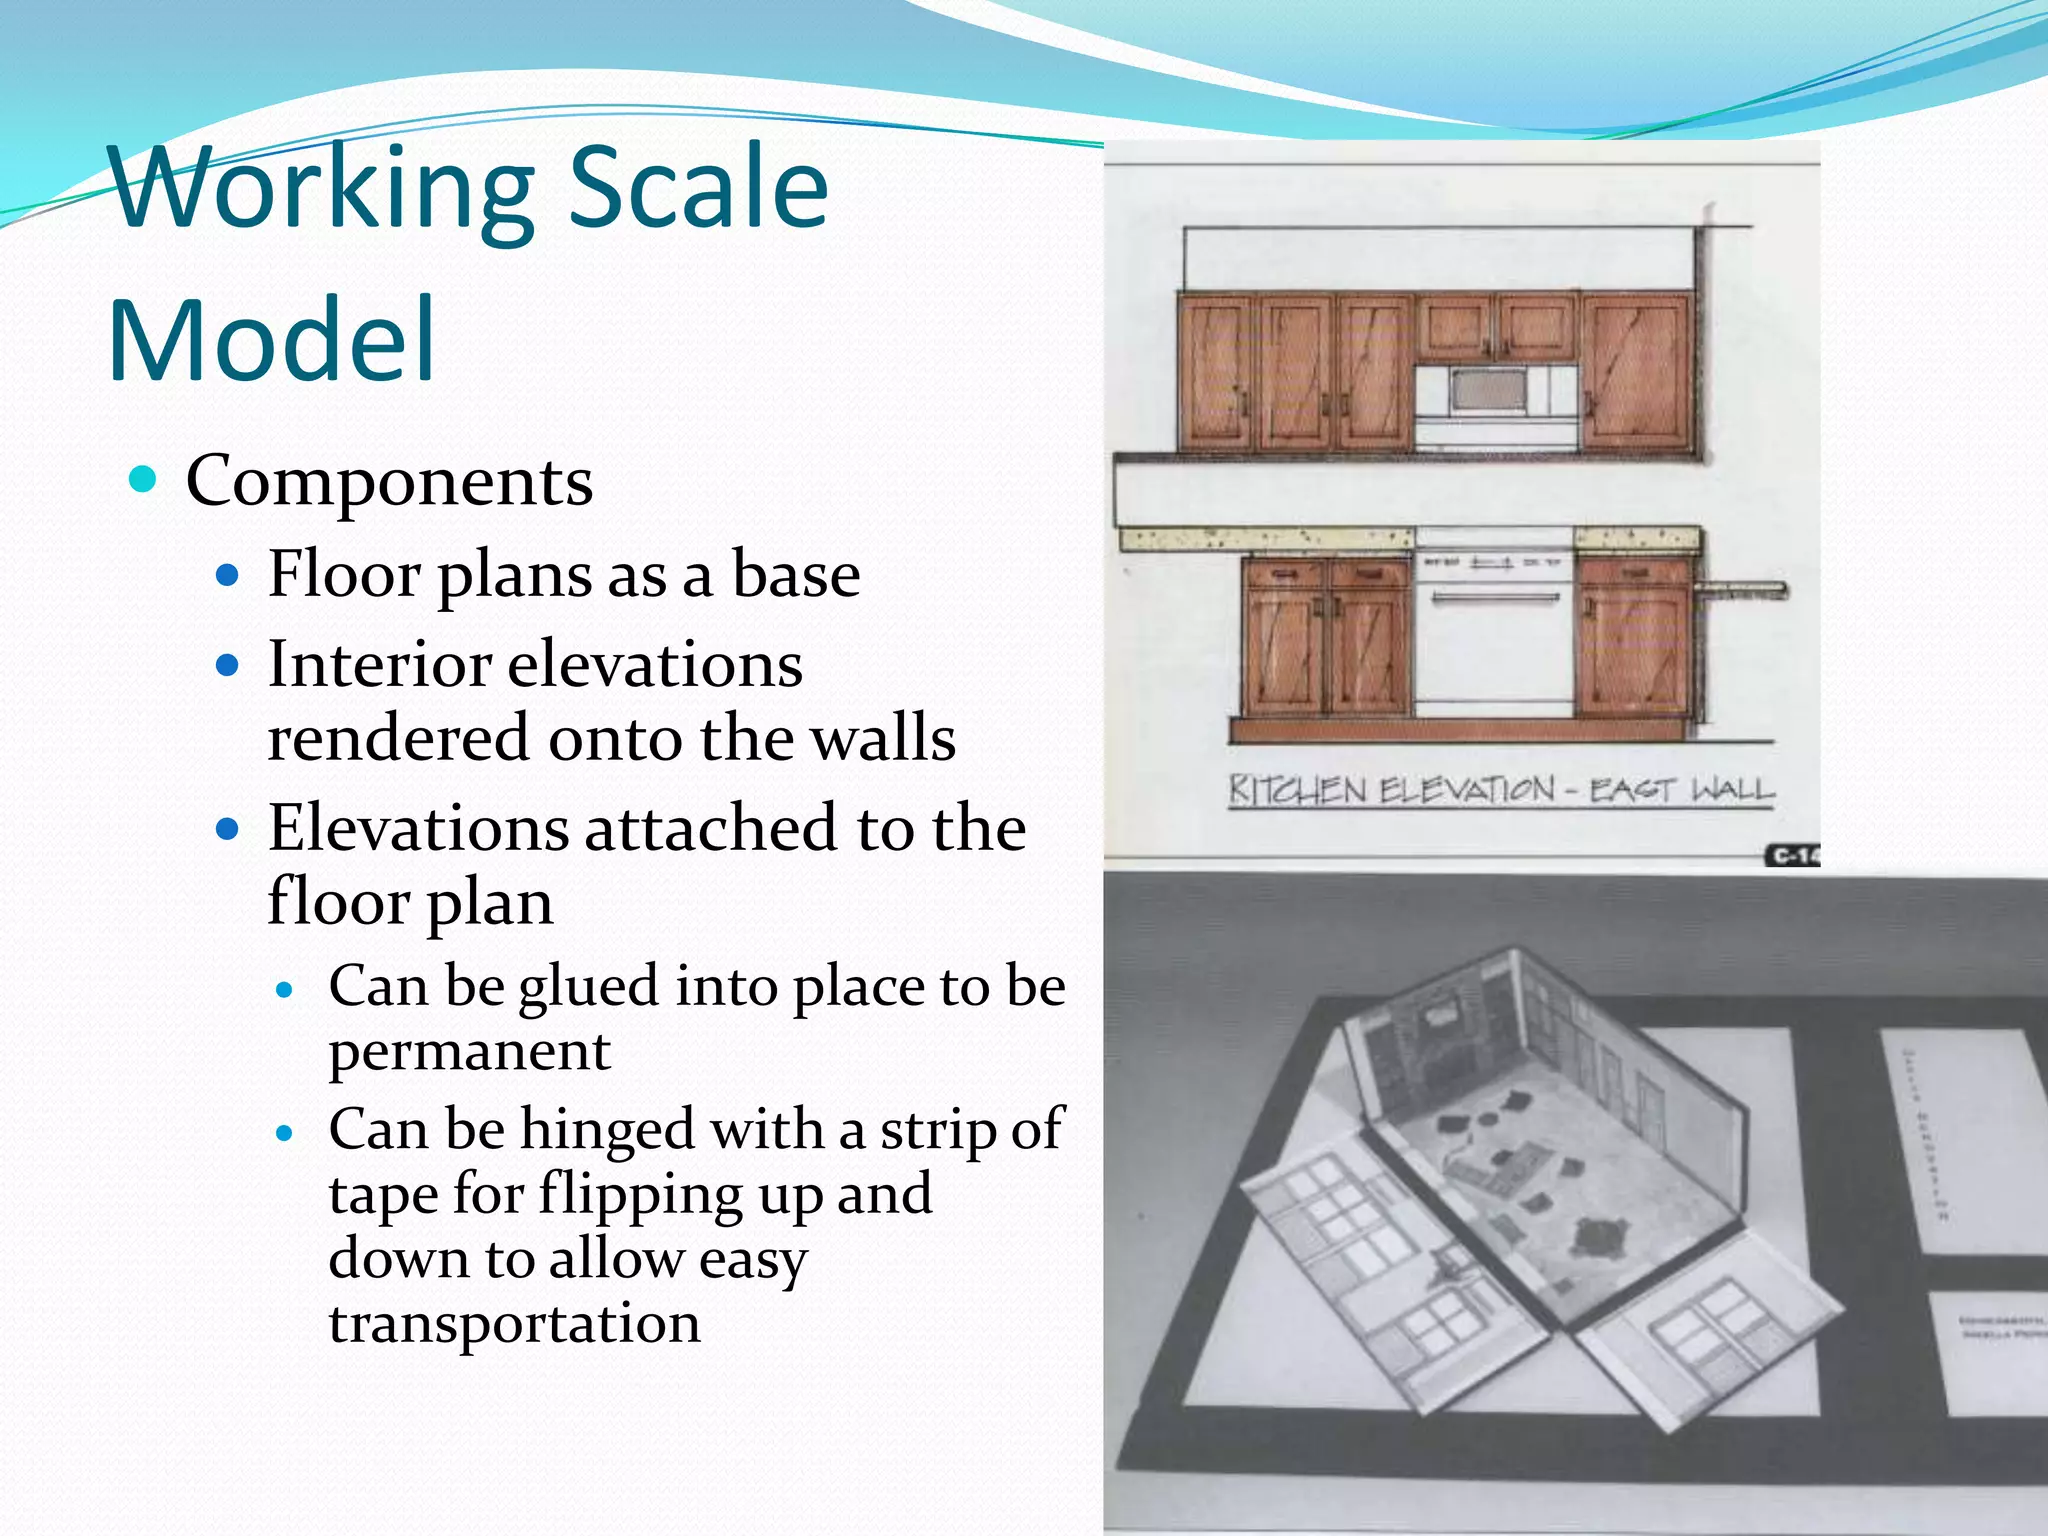
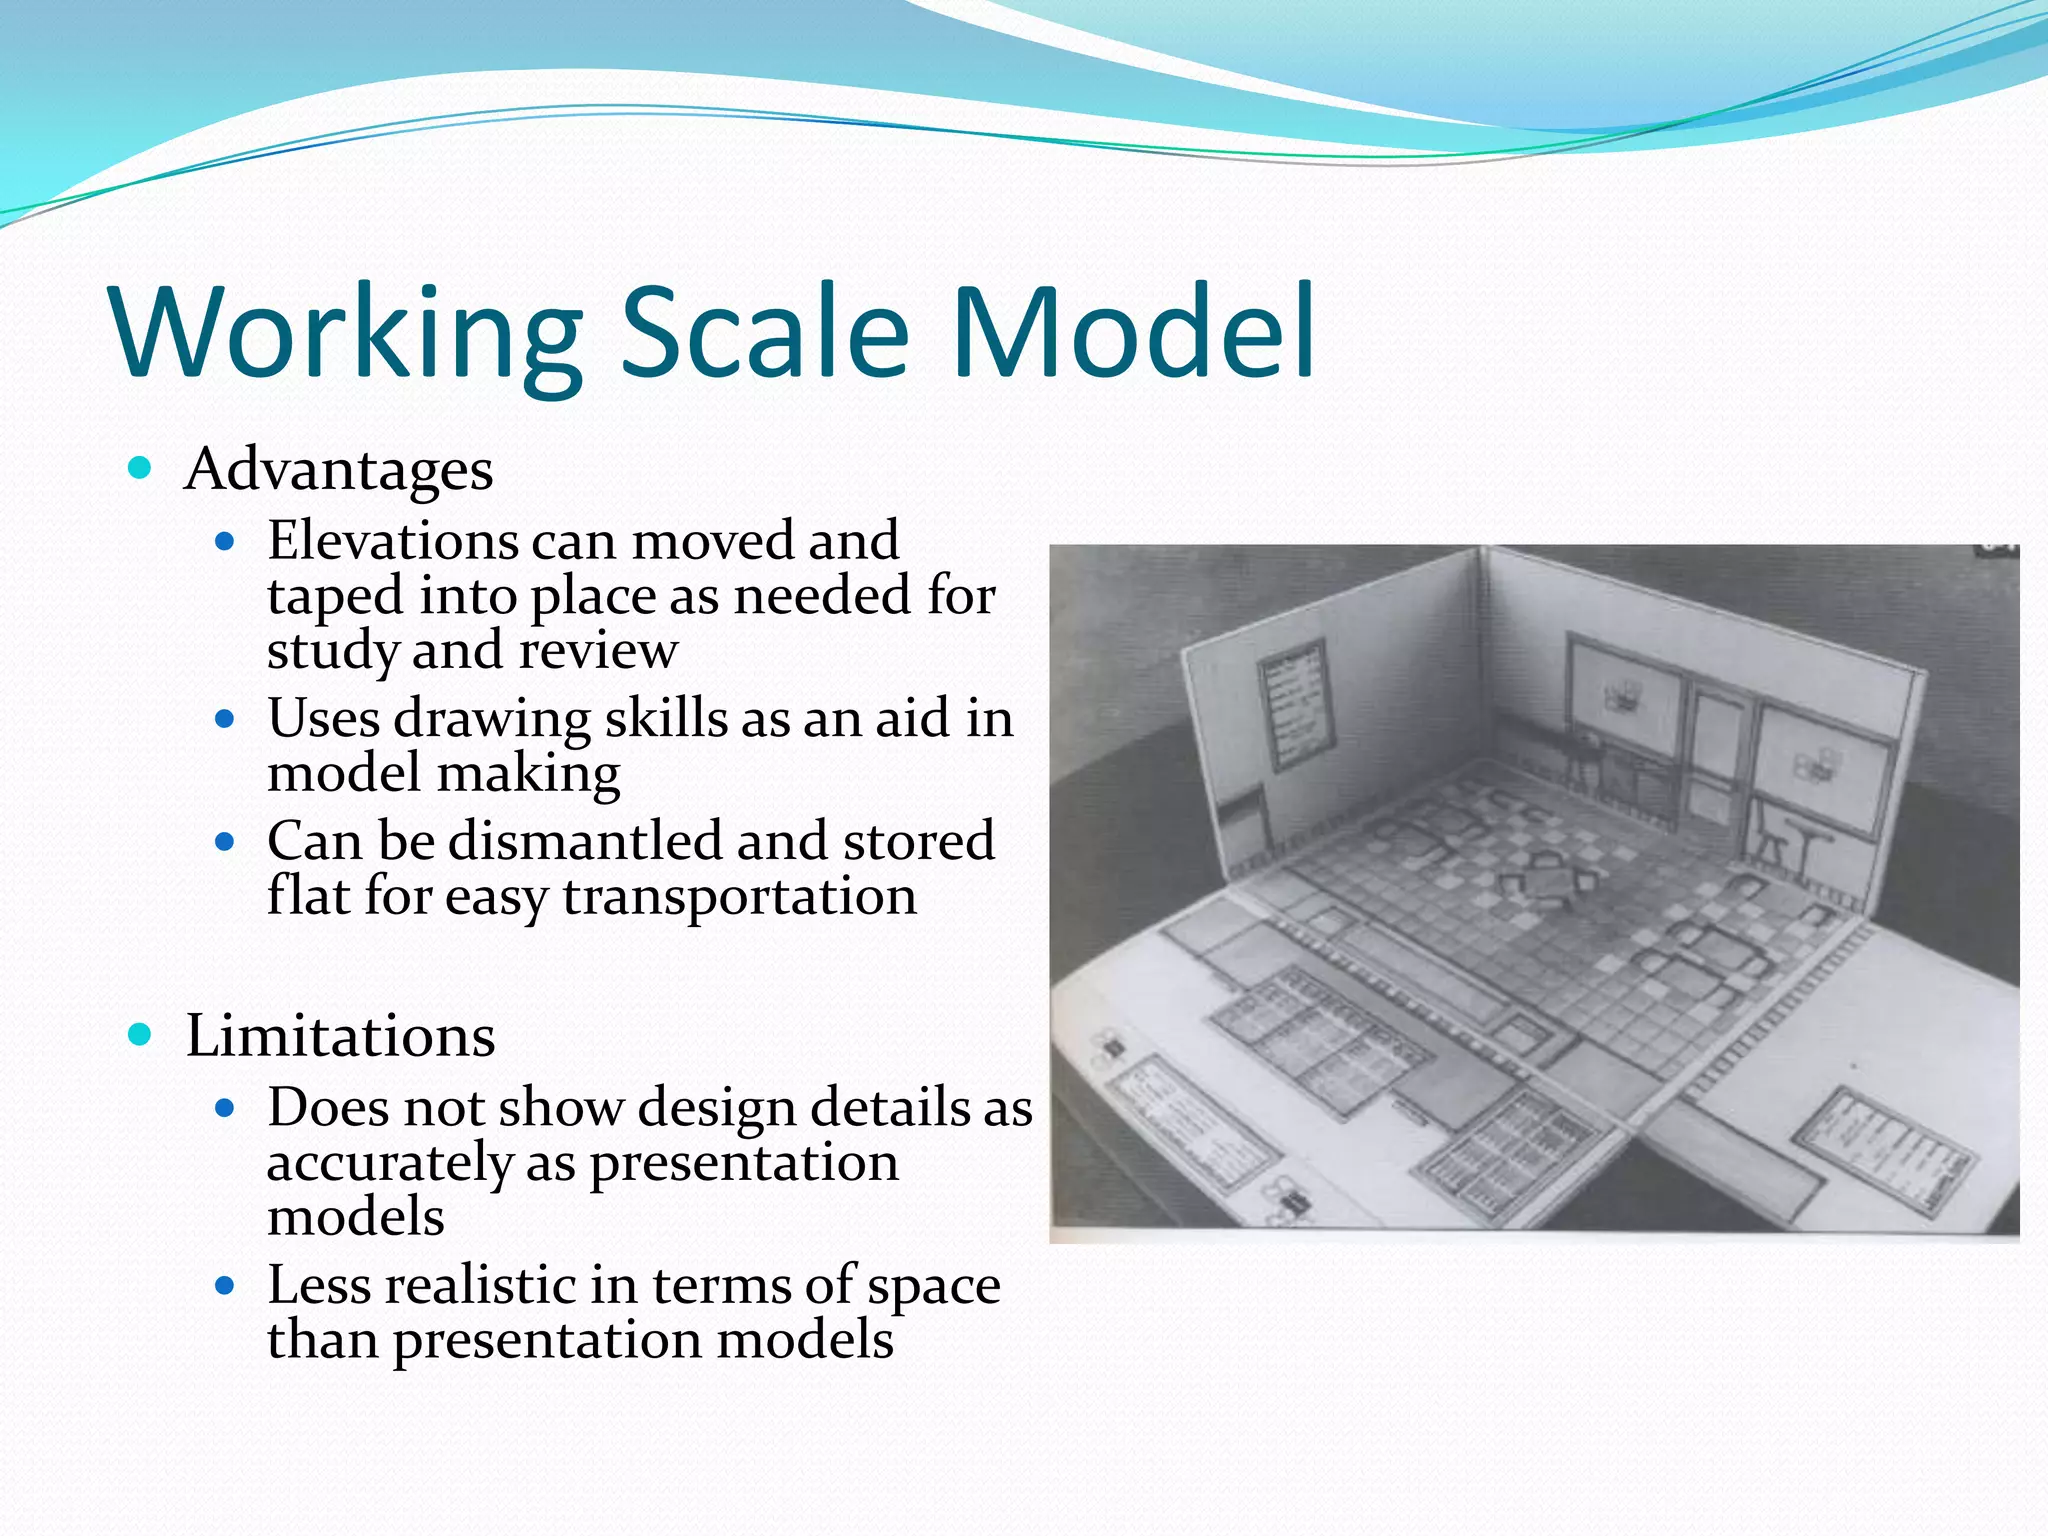
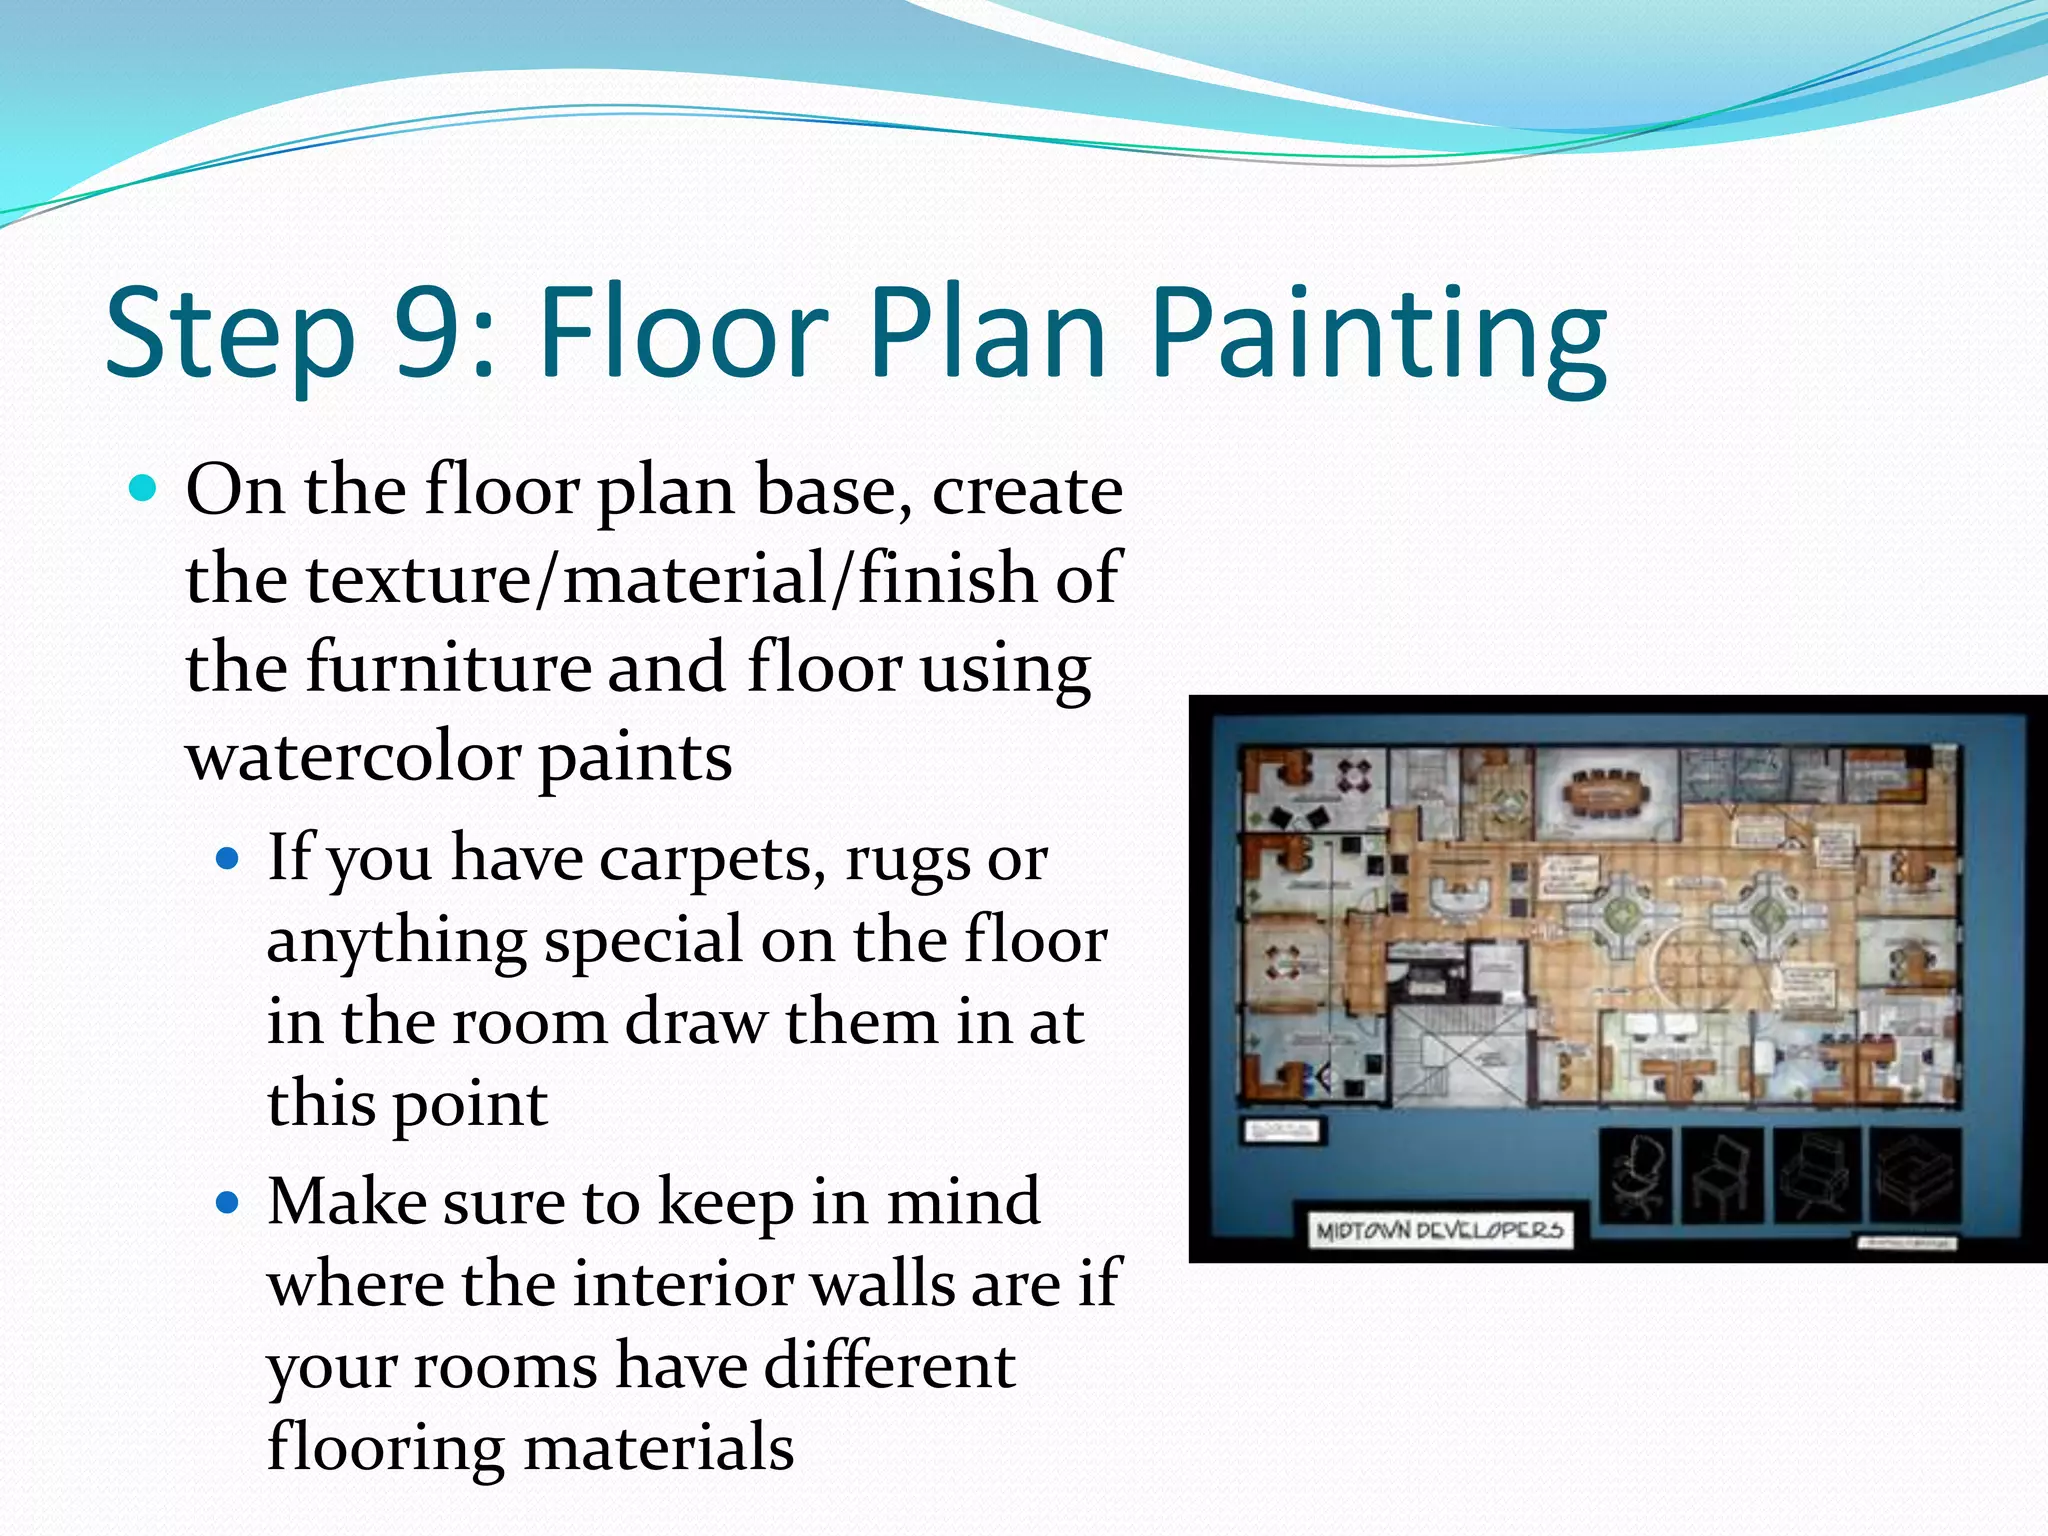
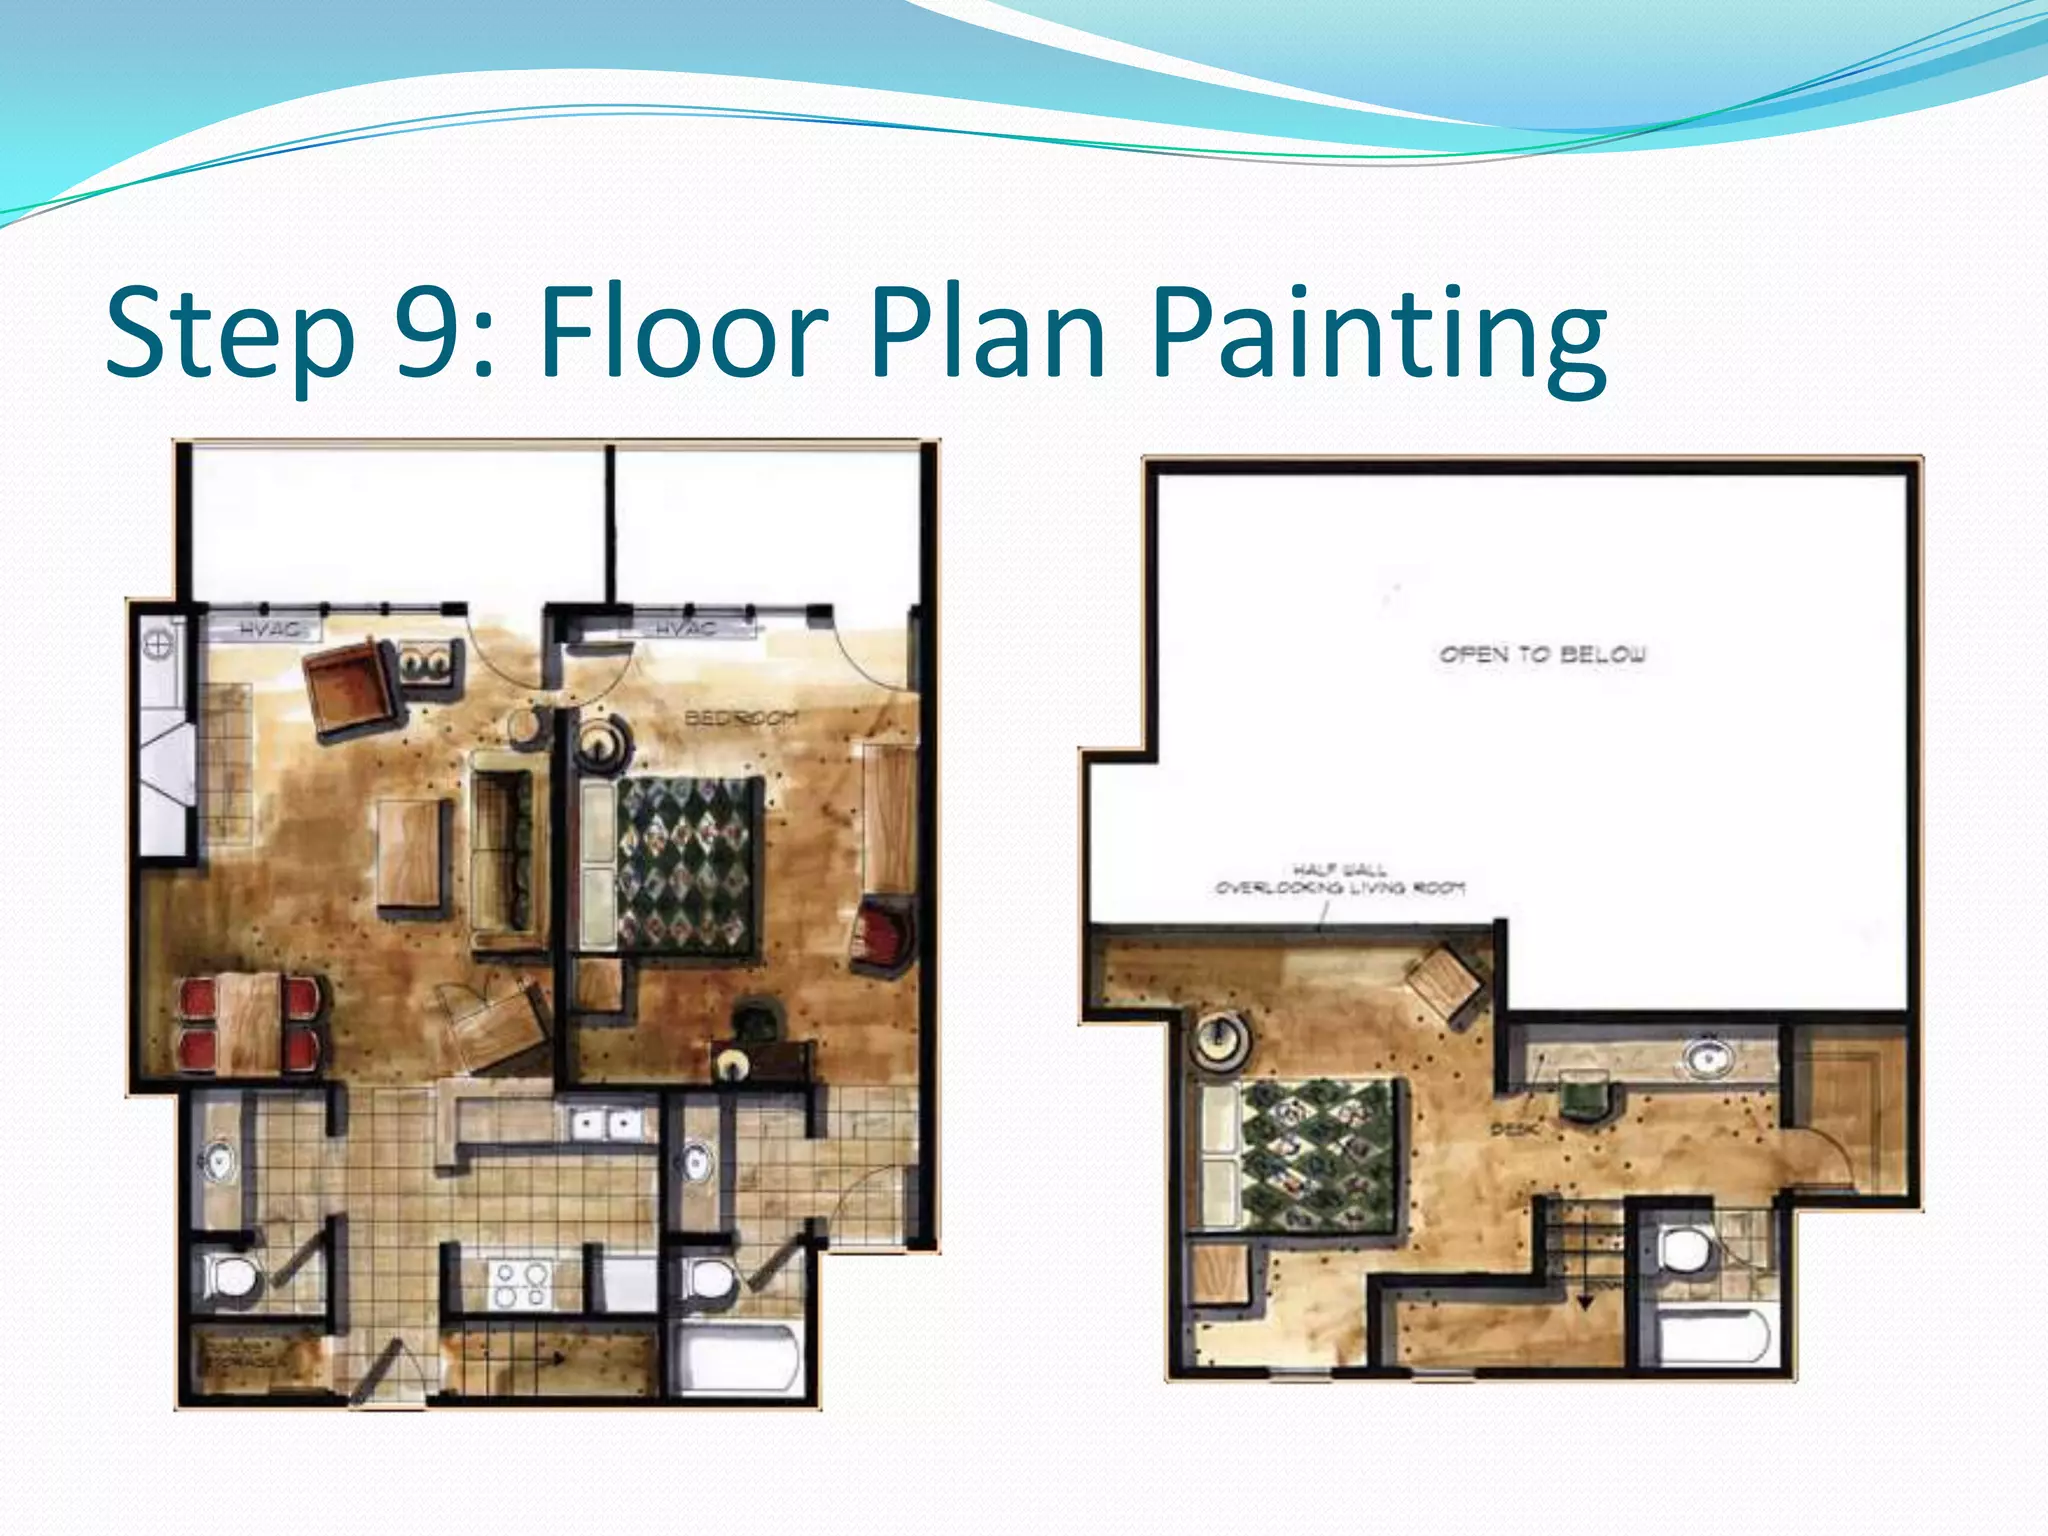
AgendaTurn in completed concept board with rubric and reflection filled out by the end of the day todayScale Model Notes and Blog QuestionsBegin working scale modelWorktimeNext Class: More scale modelsHomework: Posting Homework Assignment and Scale Model questions due next class!
Unit 3: Professional Practices and Client CommunicationSCALE MODELING
Scale ModelsDefinition: a representation or copy of an object that is larger or smaller than the actual size of the object Most often the scale model is smaller than the original and used as a guide to making the object in full size
PurposeAllows designers to study the volume of a given spaceModels reveal the 3-d qualities of a formProvide designers opportunities to study and review the elements of a design
Scale Model: Visual InformationFinishesMaterialsColorsTexturesAll information presented in accurate scale
Model MakersWorking models are often created by the interior designer or architectPresentation models are often created by full-time model markers on staff or professional model making companiesProfessionals have a wider variety of materials to build with including molds; saws and laser cutters
Types of Scale ModelsStudy Model/Working Models: quickly constructed to reflect the preliminary nature of the designPresentation/Finished Models: present a finalized, fully developed design with a great deal of detail and high levels of craftsmanship
Working Scale ModelComponentsFloor plans as a baseInterior elevations rendered onto the wallsElevations attached to the floor planCan be glued into place to be permanentCan be hinged with a strip of tape for flipping up and down to allow easy transportation
Working Scale ModelAdvantages Elevations can moved and taped into place as needed for study and reviewUses drawing skills as an aid in model makingCan be dismantled and stored flat for easy transportationLimitationsDoes not show design details as accurately as presentation modelsLess realistic in terms of space  than presentation models
Presentation Scale ModelComponentsAccurate representation of walls; flooring; ceilings and furniture:TexturesMaterialsFinishesColors
Presentation Scale ModelAdvantagesShows design details such as finishes; colors; materials; texturesGives a highly accurate representation of the spaceLimitationsCostly to createTime intensiveRequires expensive toolsMost often created by model making teams of professionals
Choosing Your Model – Working ModelDecide on its purposeFor study and refinement of an in-progress design – create a study modelTo communicate the function of a space – create a study model so that details don’t become the focus of the model
Choosing Your Model – Presentation ModelsDecide on its purposeTo present a fully developed design to a client – create a presentation modelPublicly funded projects require presentation models to gain public approval or funding from investors – must consider the audience carefully and model must work to carefully communicate the design
Our Scale ModelsYou will be making 2 scale models of a section of your apartmentOne working model of your entire apartmentOne presentation model of 2 to 3 rooms of your apartment
Step 1: Floor Plan BaseUsing a pencil and a ruler, lightly trace the floor plan of your apartment  - both interior and exterior walls and furniture onto Bristol Board.Trace over the doors and windows but don’t worry about coloring them or adding in the swing of the doorsYou do not need to trace the graph paper linesYou do not need to label anythingCut out your exterior walls using a ruler and X-acto knife – make sure to cut atop something else – not just the desk!
Starting Your Working Model – Step 2: Wall NumberingAssign a number, in pencil, next to each wall of your apartmentAssign the same number, very lightly in pencil, next to the same walls of your floor planThis will help make assembly easier
Step 3: Exterior Walls Determine the width and height of the exterior walls you’ll need for each part of the roomUse ¼”: 1’ scaleWidth should be exactly the same as what’s on your floor plan base plus an extra ¼”  of width to the walls on one side (right or left) to allow for tabs for assemblyAdd an extra ¼” of height on the bottom of the walls to allow for assemblyHeight varies with design. Average residential ceiling height is 8’. Cut the walls from Bristol Board using a ruler and X-acto knifeLightly score the extra ¼”  on the side and bottom to allow for easy foldingNOTE: if you have angled walls or some small walls, create them by marking and scoring the fold mark, disregarding the extra ¼” on the side
Step 4: Interior WallsDetermine the width and height of the interior walls you’ll need for each part of the roomUse ¼”: 1’ scaleWidth should be exactly the same as what’s on your floor plan base plus an extra ¼” on one side (either the right or the left) to allow for tabs for assembly Add on an extra ¼”  to the height on the bottom of the walls to allow for assemblyHeight varies with design. Average residential ceiling height is 8’. Cut the walls from Bristol Board using a ruler and X-acto knifeScore the extra ¼”  on the bottom and side for easy foldingNote: If you have any half walls, make sure to reflect this by cutting away the appropriate amount of wallNOTE: if you have angled walls or some small walls, create them by marking and scoring the fold mark, disregarding the extra ¼” on the side
Step 5: Creating NotchesCut a small notch on the vertical axis of where the extra ¼” side and extra ¼” bottom meetThis will help these two to fold together to form a corner which the other walls can rest into
Step 6: Temporary AssemblyTemporarily assemble your working model to see how the pieces fit togetherFold the extra ¼”  left at the bottoms of the walls and sides of the walls as tabs to allow for taping to your floor plan base and to other walls.Tape everything into place using masking tape Remove some of the tackiness from your tape by using it on your clothing before applying to the Bristol board
Step 7:Marking in Doors, Windows and Built-InsDetermine the location; width and height of the doors, windows and built-ins including bookcases; fireplaces and shelves on your interior and exterior walls of your floor planUse ¼”: 1’ scaleRefer to your floor plan for reference Average door height ranges from 6’8” to 9’Average window height varies depending on how high you want your windows to beRefer to reference packet for more door and window sizesKeep in mind what is on interior walls as well as exterior walls
Step 8: Drawing in Doors; Windows and Built-InsDisassemble your scale modelUse a ruler and pencil to draw in your doors, windows and built insAdd in all details including hinges; doorknobs; window panes; views outside of windows; books and objects in bookcases and shelves; etc.Draw lightly in pencil. We will be adding color and value with materials later on
Step 9: Floor Plan PaintingOn the floor plan base, create the texture/material/finish of the furniture and floor using watercolor paintsIf you have carpets, rugs or anything special on the floor in the room draw them in at this pointMake sure to keep in mind where the interior walls are if your rooms have different flooring materials
Step 9: Floor Plan Painting
Step 10: Wall PaintingOn the walls, create the texture/material/finish of the walls as well as anything that is hanging on them-Paint in the texture and materials of doors and windows at this time
Step 11: AssemblyRe-assemble your working model when all pieces are dryTemporarily hold pieces in place with masking tape (making sure to remove the tackiness before applying to the paper)When everything is arranged as you want it to be, permanently glue the pieces together with a glue stick or tacky glue, making sure to avoid messy glue marks and globs
Step 12: Rubric and ReflectionFill out your rubric by making a comment in a complete sentence in at least one box and circle a number for each categoryAnswer the reflection questions on the back of your rubric in complete sentences, using the language of art1. What was successful about your working model2. What did you struggle with while creating your working model?3. What have your learned from creating your working model that will help you create your professional model?

Scale models

  • 1.
    AgendaTurn in completedconcept board with rubric and reflection filled out by the end of the day todayScale Model Notes and Blog QuestionsBegin working scale modelWorktimeNext Class: More scale modelsHomework: Posting Homework Assignment and Scale Model questions due next class!
  • 2.
    Unit 3: ProfessionalPractices and Client CommunicationSCALE MODELING
  • 3.
    Scale ModelsDefinition: arepresentation or copy of an object that is larger or smaller than the actual size of the object Most often the scale model is smaller than the original and used as a guide to making the object in full size
  • 4.
    PurposeAllows designers tostudy the volume of a given spaceModels reveal the 3-d qualities of a formProvide designers opportunities to study and review the elements of a design
  • 5.
    Scale Model: VisualInformationFinishesMaterialsColorsTexturesAll information presented in accurate scale
  • 6.
    Model MakersWorking modelsare often created by the interior designer or architectPresentation models are often created by full-time model markers on staff or professional model making companiesProfessionals have a wider variety of materials to build with including molds; saws and laser cutters
  • 7.
    Types of ScaleModelsStudy Model/Working Models: quickly constructed to reflect the preliminary nature of the designPresentation/Finished Models: present a finalized, fully developed design with a great deal of detail and high levels of craftsmanship
  • 8.
    Working Scale ModelComponentsFloorplans as a baseInterior elevations rendered onto the wallsElevations attached to the floor planCan be glued into place to be permanentCan be hinged with a strip of tape for flipping up and down to allow easy transportation
  • 9.
    Working Scale ModelAdvantagesElevations can moved and taped into place as needed for study and reviewUses drawing skills as an aid in model makingCan be dismantled and stored flat for easy transportationLimitationsDoes not show design details as accurately as presentation modelsLess realistic in terms of space than presentation models
  • 10.
    Presentation Scale ModelComponentsAccuraterepresentation of walls; flooring; ceilings and furniture:TexturesMaterialsFinishesColors
  • 11.
    Presentation Scale ModelAdvantagesShowsdesign details such as finishes; colors; materials; texturesGives a highly accurate representation of the spaceLimitationsCostly to createTime intensiveRequires expensive toolsMost often created by model making teams of professionals
  • 12.
    Choosing Your Model– Working ModelDecide on its purposeFor study and refinement of an in-progress design – create a study modelTo communicate the function of a space – create a study model so that details don’t become the focus of the model
  • 13.
    Choosing Your Model– Presentation ModelsDecide on its purposeTo present a fully developed design to a client – create a presentation modelPublicly funded projects require presentation models to gain public approval or funding from investors – must consider the audience carefully and model must work to carefully communicate the design
  • 14.
    Our Scale ModelsYouwill be making 2 scale models of a section of your apartmentOne working model of your entire apartmentOne presentation model of 2 to 3 rooms of your apartment
  • 15.
    Step 1: FloorPlan BaseUsing a pencil and a ruler, lightly trace the floor plan of your apartment - both interior and exterior walls and furniture onto Bristol Board.Trace over the doors and windows but don’t worry about coloring them or adding in the swing of the doorsYou do not need to trace the graph paper linesYou do not need to label anythingCut out your exterior walls using a ruler and X-acto knife – make sure to cut atop something else – not just the desk!
  • 16.
    Starting Your WorkingModel – Step 2: Wall NumberingAssign a number, in pencil, next to each wall of your apartmentAssign the same number, very lightly in pencil, next to the same walls of your floor planThis will help make assembly easier
  • 17.
    Step 3: ExteriorWalls Determine the width and height of the exterior walls you’ll need for each part of the roomUse ¼”: 1’ scaleWidth should be exactly the same as what’s on your floor plan base plus an extra ¼” of width to the walls on one side (right or left) to allow for tabs for assemblyAdd an extra ¼” of height on the bottom of the walls to allow for assemblyHeight varies with design. Average residential ceiling height is 8’. Cut the walls from Bristol Board using a ruler and X-acto knifeLightly score the extra ¼” on the side and bottom to allow for easy foldingNOTE: if you have angled walls or some small walls, create them by marking and scoring the fold mark, disregarding the extra ¼” on the side
  • 18.
    Step 4: InteriorWallsDetermine the width and height of the interior walls you’ll need for each part of the roomUse ¼”: 1’ scaleWidth should be exactly the same as what’s on your floor plan base plus an extra ¼” on one side (either the right or the left) to allow for tabs for assembly Add on an extra ¼” to the height on the bottom of the walls to allow for assemblyHeight varies with design. Average residential ceiling height is 8’. Cut the walls from Bristol Board using a ruler and X-acto knifeScore the extra ¼” on the bottom and side for easy foldingNote: If you have any half walls, make sure to reflect this by cutting away the appropriate amount of wallNOTE: if you have angled walls or some small walls, create them by marking and scoring the fold mark, disregarding the extra ¼” on the side
  • 19.
    Step 5: CreatingNotchesCut a small notch on the vertical axis of where the extra ¼” side and extra ¼” bottom meetThis will help these two to fold together to form a corner which the other walls can rest into
  • 20.
    Step 6: TemporaryAssemblyTemporarily assemble your working model to see how the pieces fit togetherFold the extra ¼” left at the bottoms of the walls and sides of the walls as tabs to allow for taping to your floor plan base and to other walls.Tape everything into place using masking tape Remove some of the tackiness from your tape by using it on your clothing before applying to the Bristol board
  • 21.
    Step 7:Marking inDoors, Windows and Built-InsDetermine the location; width and height of the doors, windows and built-ins including bookcases; fireplaces and shelves on your interior and exterior walls of your floor planUse ¼”: 1’ scaleRefer to your floor plan for reference Average door height ranges from 6’8” to 9’Average window height varies depending on how high you want your windows to beRefer to reference packet for more door and window sizesKeep in mind what is on interior walls as well as exterior walls
  • 22.
    Step 8: Drawingin Doors; Windows and Built-InsDisassemble your scale modelUse a ruler and pencil to draw in your doors, windows and built insAdd in all details including hinges; doorknobs; window panes; views outside of windows; books and objects in bookcases and shelves; etc.Draw lightly in pencil. We will be adding color and value with materials later on
  • 23.
    Step 9: FloorPlan PaintingOn the floor plan base, create the texture/material/finish of the furniture and floor using watercolor paintsIf you have carpets, rugs or anything special on the floor in the room draw them in at this pointMake sure to keep in mind where the interior walls are if your rooms have different flooring materials
  • 24.
    Step 9: FloorPlan Painting
  • 25.
    Step 9: FloorPlan Painting
  • 26.
    Step 10: WallPaintingOn the walls, create the texture/material/finish of the walls as well as anything that is hanging on them-Paint in the texture and materials of doors and windows at this time
  • 27.
    Step 11: AssemblyRe-assembleyour working model when all pieces are dryTemporarily hold pieces in place with masking tape (making sure to remove the tackiness before applying to the paper)When everything is arranged as you want it to be, permanently glue the pieces together with a glue stick or tacky glue, making sure to avoid messy glue marks and globs
  • 28.
    Step 12: Rubricand ReflectionFill out your rubric by making a comment in a complete sentence in at least one box and circle a number for each categoryAnswer the reflection questions on the back of your rubric in complete sentences, using the language of art1. What was successful about your working model2. What did you struggle with while creating your working model?3. What have your learned from creating your working model that will help you create your professional model?