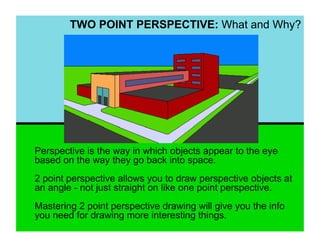
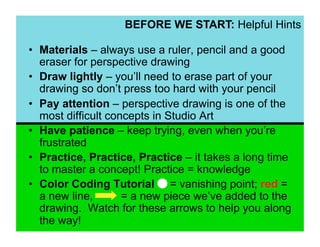
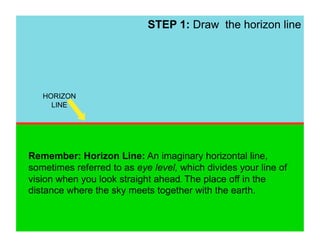
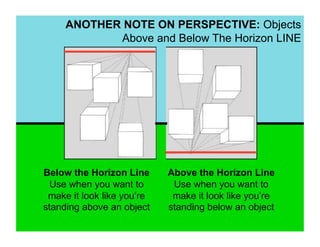
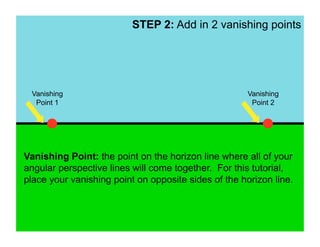
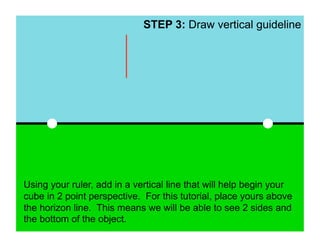
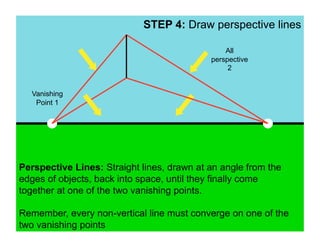
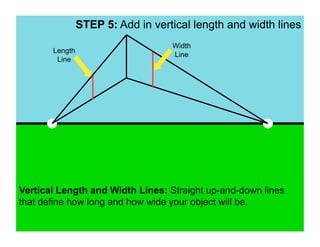
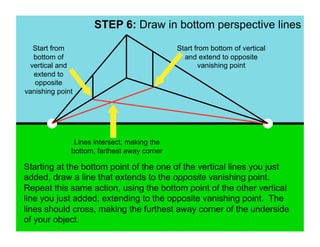
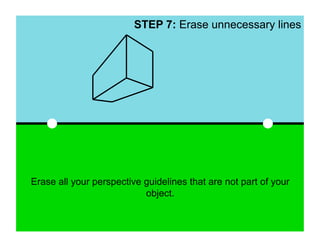
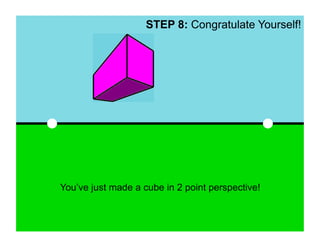
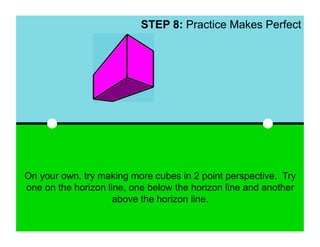
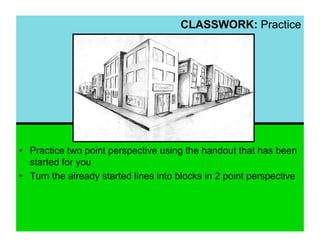
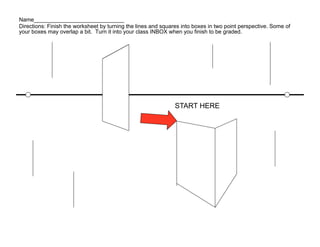
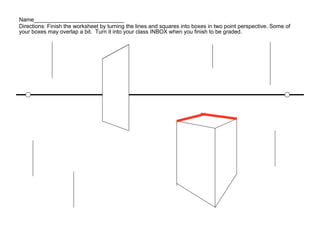
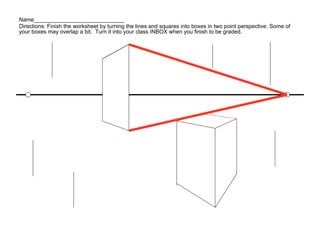
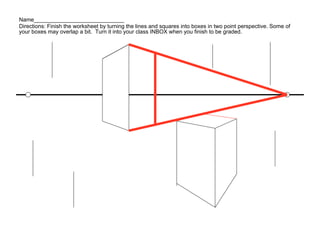
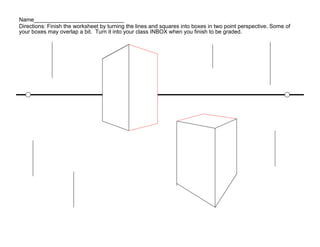
TWO POINT
PERSPECTIVE
TWO POINT PERSPECTIVE: What and Why?


Perspective is the way in which objects appear to the eye
based on the way they go back into space.
2 point perspective allows you to draw perspective objects at
an angle - not just straight on like one point perspective.
Mastering 2 point perspective drawing will give you the info
you need for drawing more interesting things.
BEFORE WE START: Helpful Hints

•  Materials – always use a ruler, pencil and a good
   eraser for perspective drawing
•  Draw lightly – you’ll need to erase part of your
   drawing so don’t press too hard with your pencil
•  Pay attention – perspective drawing is one of the
   most difficult concepts in Studio Art
•  Have patience – keep trying, even when you’re
   frustrated
•  Practice, Practice, Practice – it takes a long time
   to master a concept! Practice = knowledge
•  Color Coding Tutorial = vanishing point; red =
   a new line,       = a new piece we’ve added to the
   drawing. Watch for these arrows to help you along
   the way!
Skills Workshop: 2 Point Perspective

•  Steps
•  Example
STEP 1: Draw the horizon line


   HORIZON
     LINE


Remember: Horizon Line: An imaginary horizontal line,
sometimes referred to as eye level, which divides your line of
vision when you look straight ahead. The place off in the
distance where the sky meets together with the earth.
ANOTHER NOTE ON PERSPECTIVE: Objects
            Above and Below The Horizon LINE


Below the Horizon Line      Above the Horizon Line
  Use when you want to       Use when you want to
 make it look like you’re    make it look like you’re
standing above an object    standing below an object
STEP 2: Add in 2 vanishing points


 Vanishing                                            Vanishing
  Point 1                                              Point 2


Vanishing Point: the point on the horizon line where all of your
angular perspective lines will come together. For this tutorial,
place your vanishing point on opposite sides of the horizon line.
STEP 3: Draw vertical guideline


Using your ruler, add in a vertical line that will help begin your
cube in 2 point perspective. For this tutorial, place yours above
the horizon line. This means we will be able to see 2 sides and
the bottom of the object.
STEP 4: Draw perspective lines

                                                All
                                            perspective
                                                 2


  Vanishing
   Point 1


Perspective Lines: Straight lines, drawn at an angle from the
edges of objects, back into space, until they finally come
together at one of the two vanishing points.

Remember, every non-vertical line must converge on one of the
two vanishing points
STEP 5: Add in vertical length and width lines
                                   Width
       Length
                                   Line
        Line


Vertical Length and Width Lines: Straight up-and-down lines
that define how long and how wide your object will be.
STEP 6: Draw in bottom perspective lines

   Start from                                Start from bottom of vertical
   bottom of                                   and extend to opposite
  vertical and                                      vanishing point
   extend to
   opposite
vanishing point


               Lines intersect, making the
              bottom, farthest away corner

Starting at the bottom point of the one of the vertical lines you just
added, draw a line that extends to the opposite vanishing point.
Repeat this same action, using the bottom point of the other vertical
line you just added, extending to the opposite vanishing point. The
lines should cross, making the furthest away corner of the underside
of your object.
STEP 7: Erase unnecessary lines


Erase all your perspective guidelines that are not part of your
                           object.
STEP 8: Congratulate Yourself!


You’ve just made a cube in 2 point perspective!
STEP 8: Practice Makes Perfect


On your own, try making more cubes in 2 point perspective. Try
one on the horizon line, one below the horizon line and another
                     above the horizon line.
Now that you know the basics of two point perspective, use your
knowledge in many combinations to create objects that look like
                  they go back into space.
CLASSWORK: Practice


•  Practice two point perspective using the handout that has been
   started for you
•  Turn the already started lines into blocks in 2 point perspective
Name_____________________________
Directions: Finish the worksheet by turning the lines and squares into boxes in two point perspective. Some of
your boxes may overlap a bit. Turn it into your class INBOX when you finish to be graded.


                                                               START HERE
Name_____________________________
Directions: Finish the worksheet by turning the lines and squares into boxes in two point perspective. Some of
your boxes may overlap a bit. Turn it into your class INBOX when you finish to be graded.
Name_____________________________
Directions: Finish the worksheet by turning the lines and squares into boxes in two point perspective. Some of
your boxes may overlap a bit. Turn it into your class INBOX when you finish to be graded.
Name_____________________________
Directions: Finish the worksheet by turning the lines and squares into boxes in two point perspective. Some of
your boxes may overlap a bit. Turn it into your class INBOX when you finish to be graded.
Name_____________________________
Directions: Finish the worksheet by turning the lines and squares into boxes in two point perspective. Some of
your boxes may overlap a bit. Turn it into your class INBOX when you finish to be graded.
Name_____________________________
Directions: Finish the worksheet by turning the lines and squares into boxes in two point perspective. Some of
your boxes may overlap a bit. Turn it into your class INBOX when you finish to be graded.

2 point perspective

  • 1.
  • 2.
    TWO POINT PERSPECTIVE:What and Why? Perspective is the way in which objects appear to the eye based on the way they go back into space. 2 point perspective allows you to draw perspective objects at an angle - not just straight on like one point perspective. Mastering 2 point perspective drawing will give you the info you need for drawing more interesting things.
  • 3.
    BEFORE WE START:Helpful Hints •  Materials – always use a ruler, pencil and a good eraser for perspective drawing •  Draw lightly – you’ll need to erase part of your drawing so don’t press too hard with your pencil •  Pay attention – perspective drawing is one of the most difficult concepts in Studio Art •  Have patience – keep trying, even when you’re frustrated •  Practice, Practice, Practice – it takes a long time to master a concept! Practice = knowledge •  Color Coding Tutorial = vanishing point; red = a new line, = a new piece we’ve added to the drawing. Watch for these arrows to help you along the way!
  • 4.
    Skills Workshop: 2Point Perspective •  Steps •  Example
  • 5.
    STEP 1: Drawthe horizon line HORIZON LINE Remember: Horizon Line: An imaginary horizontal line, sometimes referred to as eye level, which divides your line of vision when you look straight ahead. The place off in the distance where the sky meets together with the earth.
  • 6.
    ANOTHER NOTE ONPERSPECTIVE: Objects Above and Below The Horizon LINE Below the Horizon Line Above the Horizon Line Use when you want to Use when you want to make it look like you’re make it look like you’re standing above an object standing below an object
  • 7.
    STEP 2: Addin 2 vanishing points Vanishing Vanishing Point 1 Point 2 Vanishing Point: the point on the horizon line where all of your angular perspective lines will come together. For this tutorial, place your vanishing point on opposite sides of the horizon line.
  • 8.
    STEP 3: Drawvertical guideline Using your ruler, add in a vertical line that will help begin your cube in 2 point perspective. For this tutorial, place yours above the horizon line. This means we will be able to see 2 sides and the bottom of the object.
  • 9.
    STEP 4: Drawperspective lines All perspective 2 Vanishing Point 1 Perspective Lines: Straight lines, drawn at an angle from the edges of objects, back into space, until they finally come together at one of the two vanishing points. Remember, every non-vertical line must converge on one of the two vanishing points
  • 10.
    STEP 5: Addin vertical length and width lines Width Length Line Line Vertical Length and Width Lines: Straight up-and-down lines that define how long and how wide your object will be.
  • 11.
    STEP 6: Drawin bottom perspective lines Start from Start from bottom of vertical bottom of and extend to opposite vertical and vanishing point extend to opposite vanishing point Lines intersect, making the bottom, farthest away corner Starting at the bottom point of the one of the vertical lines you just added, draw a line that extends to the opposite vanishing point. Repeat this same action, using the bottom point of the other vertical line you just added, extending to the opposite vanishing point. The lines should cross, making the furthest away corner of the underside of your object.
  • 12.
    STEP 7: Eraseunnecessary lines Erase all your perspective guidelines that are not part of your object.
  • 13.
    STEP 8: CongratulateYourself! You’ve just made a cube in 2 point perspective!
  • 14.
    STEP 8: PracticeMakes Perfect On your own, try making more cubes in 2 point perspective. Try one on the horizon line, one below the horizon line and another above the horizon line.
  • 15.
    Now that youknow the basics of two point perspective, use your knowledge in many combinations to create objects that look like they go back into space.
  • 16.
    CLASSWORK: Practice •  Practicetwo point perspective using the handout that has been started for you •  Turn the already started lines into blocks in 2 point perspective
  • 17.
    Name_____________________________ Directions: Finish theworksheet by turning the lines and squares into boxes in two point perspective. Some of your boxes may overlap a bit. Turn it into your class INBOX when you finish to be graded. START HERE
  • 18.
    Name_____________________________ Directions: Finish theworksheet by turning the lines and squares into boxes in two point perspective. Some of your boxes may overlap a bit. Turn it into your class INBOX when you finish to be graded.
  • 19.
    Name_____________________________ Directions: Finish theworksheet by turning the lines and squares into boxes in two point perspective. Some of your boxes may overlap a bit. Turn it into your class INBOX when you finish to be graded.
  • 20.
    Name_____________________________ Directions: Finish theworksheet by turning the lines and squares into boxes in two point perspective. Some of your boxes may overlap a bit. Turn it into your class INBOX when you finish to be graded.
  • 21.
    Name_____________________________ Directions: Finish theworksheet by turning the lines and squares into boxes in two point perspective. Some of your boxes may overlap a bit. Turn it into your class INBOX when you finish to be graded.
  • 22.
    Name_____________________________ Directions: Finish theworksheet by turning the lines and squares into boxes in two point perspective. Some of your boxes may overlap a bit. Turn it into your class INBOX when you finish to be graded.