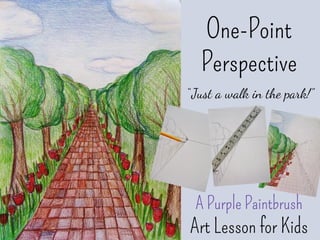
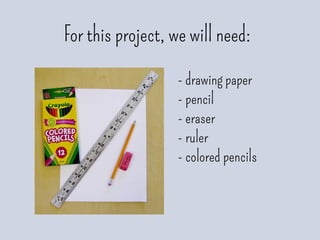
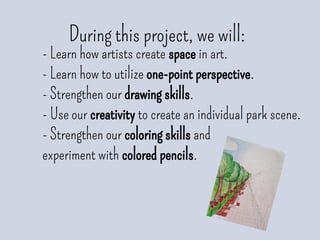
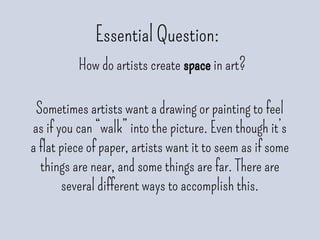
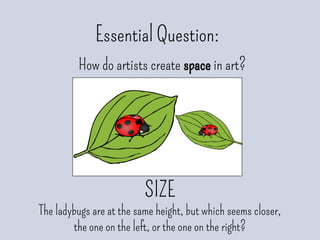
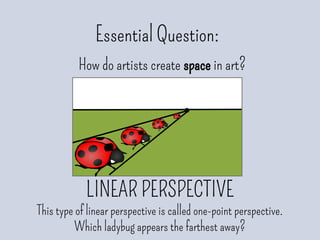
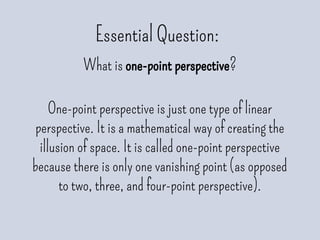
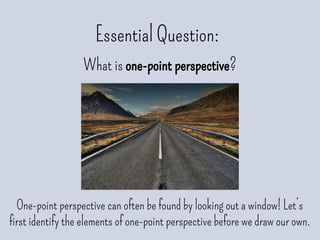
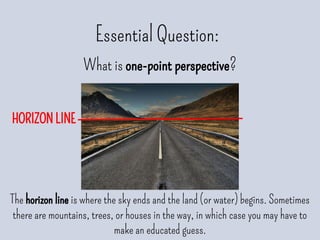
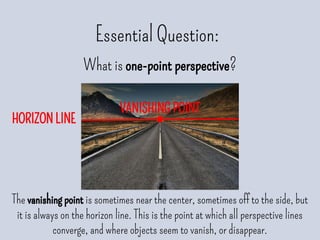
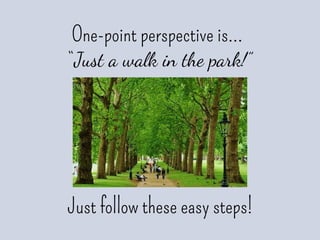
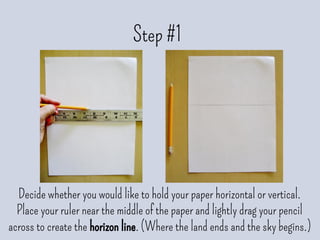
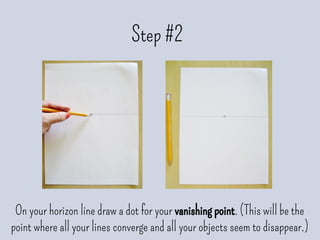
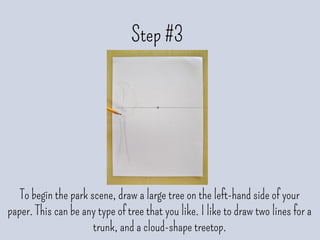
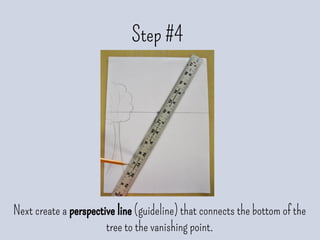
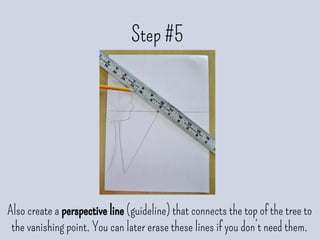
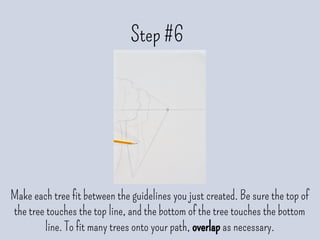
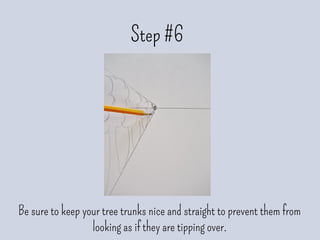
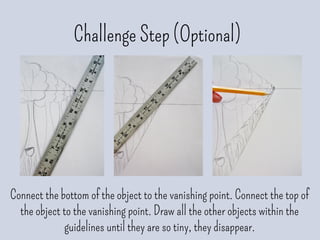
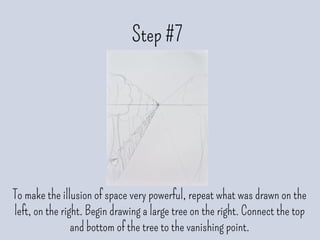
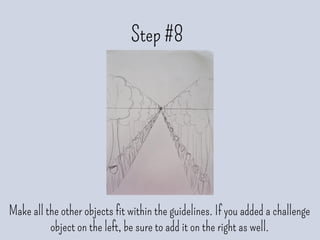
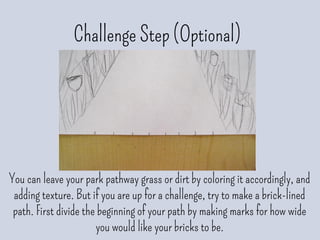
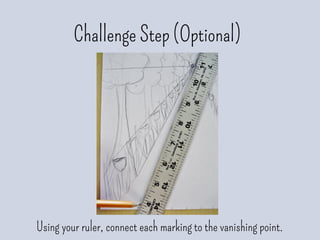
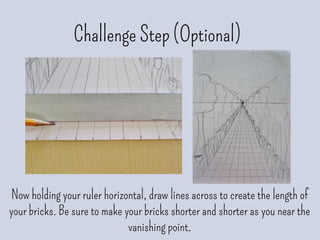
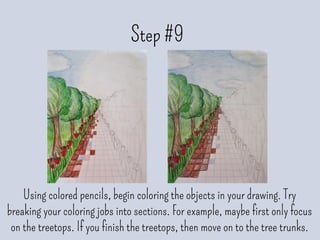
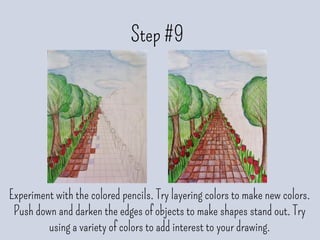
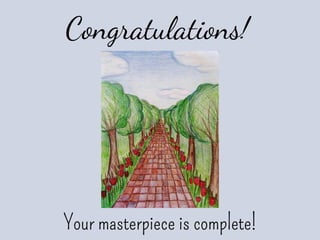
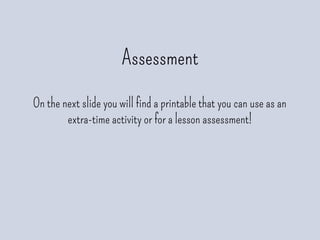
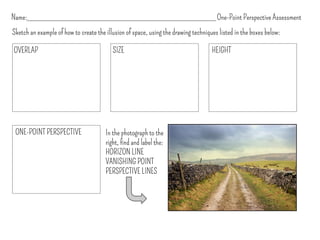
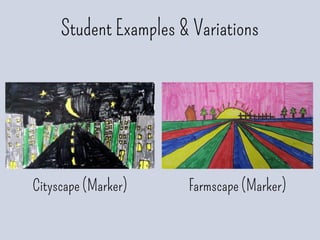
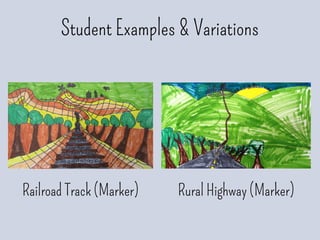
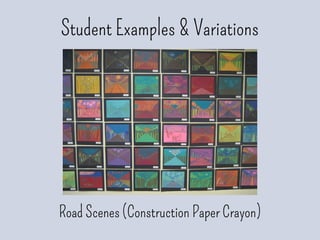
This document provides instructions for creating a one-point perspective park scene drawing. It begins by listing the necessary supplies. It then explains key concepts of one-point perspective like the horizon line, vanishing point, and perspective lines. Students are guided through a step-by-step process to draw trees receding into the distance using one-point perspective techniques. Optional challenge steps add additional objects and textures like a brick path. Assessment questions test understanding of one-point perspective elements. Examples of completed student drawings in different styles and subjects are also provided.
Simple and hassle-free. This is an art book with 100+ of the best personal project ideas you'll find on the market. today. This is an art book with 100+ of the best personal project ideas you'll find on the market today.
All the prompts are easy to follow and can be done by anyone, no matter how much experience you have with art.
Includes one monthly delivery of a painting idea for the novice painter.
2. For this project, we will need:
- drawing paper
- pencil
- eraser
- ruler
- colored pencils
3. During this project, we will:
- Learn how artists create space in art.
- Learn how to utilize one-point perspective.
- Strengthen our drawing skills.
- Use our creativity to create an individual park scene.
- Strengthen our coloring skills and
experiment with colored pencils.
5. Essential Question:
How do artists create space in art?
Sometimes artists want a drawing or painting to feel
as if you can “walk” into the picture. Even though it’s
a flat piece of paper, artists want it to seem as if some
things are near, and some things are far. There are
several different ways to accomplish this.
6. Essential Question:
How do artists create space in art?
OVERLAP
Let the drawing of one object go over the top of another.
Which appears closer, the ladybug or the leaf?
7. Essential Question:
How do artists create space in art?
HEIGHT
Each ladybug is the same size. Which appears the farthest away,
the one near the bottom, middle, or top of the picture?
8. Essential Question:
How do artists create space in art?
SIZE
The ladybugs are at the same height, but which seems closer,
the one on the left, or the one on the right?
9. Essential Question:
How do artists create space in art?
LINEAR PERSPECTIVE
This type of linear perspective is called one-point perspective.
Which ladybug appears the farthest away?
11. Essential Question:
What is one-point perspective?
One-point perspective is just one type of linear
perspective. It is a mathematical way of creating the
illusion of space. It is called one-point perspective
because there is only one vanishing point (as opposed
to two, three, and four-point perspective).
12. Essential Question:
What is one-point perspective?
One-point perspective can often be found by looking out a window! Let’s
first identify the elements of one-point perspective before we draw our own.
13. Essential Question:
What is one-point perspective?
The horizon line is where the sky ends and the land (or water) begins. Sometimes
there are mountains, trees, or houses in the way, in which case you may have to
make an educated guess.
HORIZON LINE
14. HORIZON LINE
Essential Question:
What is one-point perspective?
The vanishing point is sometimes near the center, sometimes off to the side, but
it is always on the horizon line. This is the point at which all perspective lines
converge, and where objects seem to vanish, or disappear.
VANISHING POINT
15. HORIZON LINE
Essential Question:
What is one-point perspective?
Perspective lines are straight lines that connect to the vanishing point. These are
also used as guidelines to tell the artist how big or how small to draw objects that
are near or far.
VANISHING POINT
PERSPECTIVE LINES
16. A famous example of early one-point perspective is Delivery of the
Keys, painted in 1481-1482 by Italian artist, Pietro Perugino.
17. Can you find the horizon line, vanishing point, and perspective lines?
22. Step #1
Decide whether you would like to hold your paper horizontal or vertical.
Place your ruler near the middle of the paper and lightly drag your pencil
across to create the horizon line. (Where the land ends and the sky begins.)
23. Step #2
On your horizon line draw a dot for your vanishing point. (This will be the
point where all your lines converge and all your objects seem to disappear.)
24. Step #3
To begin the park scene, draw a large tree on the left-hand side of your
paper. This can be any type of tree that you like. I like to draw two lines for a
trunk, and a cloud-shape treetop.
25. Step #4
Next create a perspective line (guideline) that connects the bottom of the
tree to the vanishing point.
26. Step #5
Also create a perspective line (guideline) that connects the top of the tree to
the vanishing point. You can later erase these lines if you don’t need them.
27. Step #6
Make each tree fit between the guidelines you just created. Be sure the top of
the tree touches the top line, and the bottom of the tree touches the bottom
line. To fit many trees onto your path, overlap as necessary.
28. Step #6
Be sure to keep your tree trunks nice and straight to prevent them from
looking as if they are tipping over.
29. One-point perspective can be as
basic as this. Notice how you
created an illusion of space; it
seems as if the trees are getting
farther and farther away.
One-point perspective can also be
very detailed and intricate if you
continue adding objects, as you’ll
see on the next page.
30. Challenge Step (Optional)
For added interest, you can add more objects to your scene. For example,
flowers, grass, sidewalk, people, etc. The same rule applies to these objects
as the tree. Start the first object on the far left.
31. Challenge Step (Optional)
Connect the bottom of the object to the vanishing point. Connect the top of
the object to the vanishing point. Draw all the other objects within the
guidelines until they are so tiny, they disappear.
32. Step #7
To make the illusion of space very powerful, repeat what was drawn on the
left, on the right. Begin drawing a large tree on the right. Connect the top
and bottom of the tree to the vanishing point.
33. Step #8
Make all the other objects fit within the guidelines. If you added a challenge
object on the left, be sure to add it on the right as well.
34. Challenge Step (Optional)
You can leave your park pathway grass or dirt by coloring it accordingly, and
adding texture. But if you are up for a challenge, try to make a brick-lined
path. First divide the beginning of your path by making marks for how wide
you would like your bricks to be.
36. Challenge Step (Optional)
Now holding your ruler horizontal, draw lines across to create the length of
your bricks. Be sure to make your bricks shorter and shorter as you near the
vanishing point.
37. Step #9
Using colored pencils, begin coloring the objects in your drawing. Try
breaking your coloring jobs into sections. For example, maybe first only focus
on the treetops. If you finish the treetops, then move on to the tree trunks.
38. Step #9
Experiment with the colored pencils. Try layering colors to make new colors.
Push down and darken the edges of objects to make shapes stand out. Try
using a variety of colors to add interest to your drawing.
40. Assessment
On the next slide you will find a printable that you can use as an
extra-time activity or for a lesson assessment!
41. Name:____________________________________________ One-Point Perspective Assessment
Sketch an example of how to create the illusion of space, using the drawing techniques listed in the boxes below:
HEIGHTSIZEOVERLAP
In the photograph to the
right, find and label the:
HORIZON LINE
VANISHING POINT
PERSPECTIVE LINES
ONE-POINT PERSPECTIVE
45. Thank you!
Thank you for purchasing a Purple Paintbrush presentation! Please visit my TpT
store for feedback, questions, or to find more fun, engaging, elementary art
lessons.
If you would like an editable version of this presentation, please contact me via my
Purple Paintbrush TpT store with your email address, and I will gladly send you a
link to a Google doc version, that you can change as you wish.
Happy Art-Making!
Amanda Bengle
Elementary Art Teacher
46. References
“Elements and Principles of Art.” The J. Paul Getty Museum. 11 August 2013. [Online].
http://www.getty.edu/education/teachers/building_lessons/formal_analysis.html
“Pietro Perugino.” Wikipedia. 11 August 2013. [Online]. http://en.wikipedia.org/wiki/Pietro_Perugino.
All other images are owned by author, Amanda Bengle, or found on Advanced Google Image Search as “free to
use or share, even commercially”.