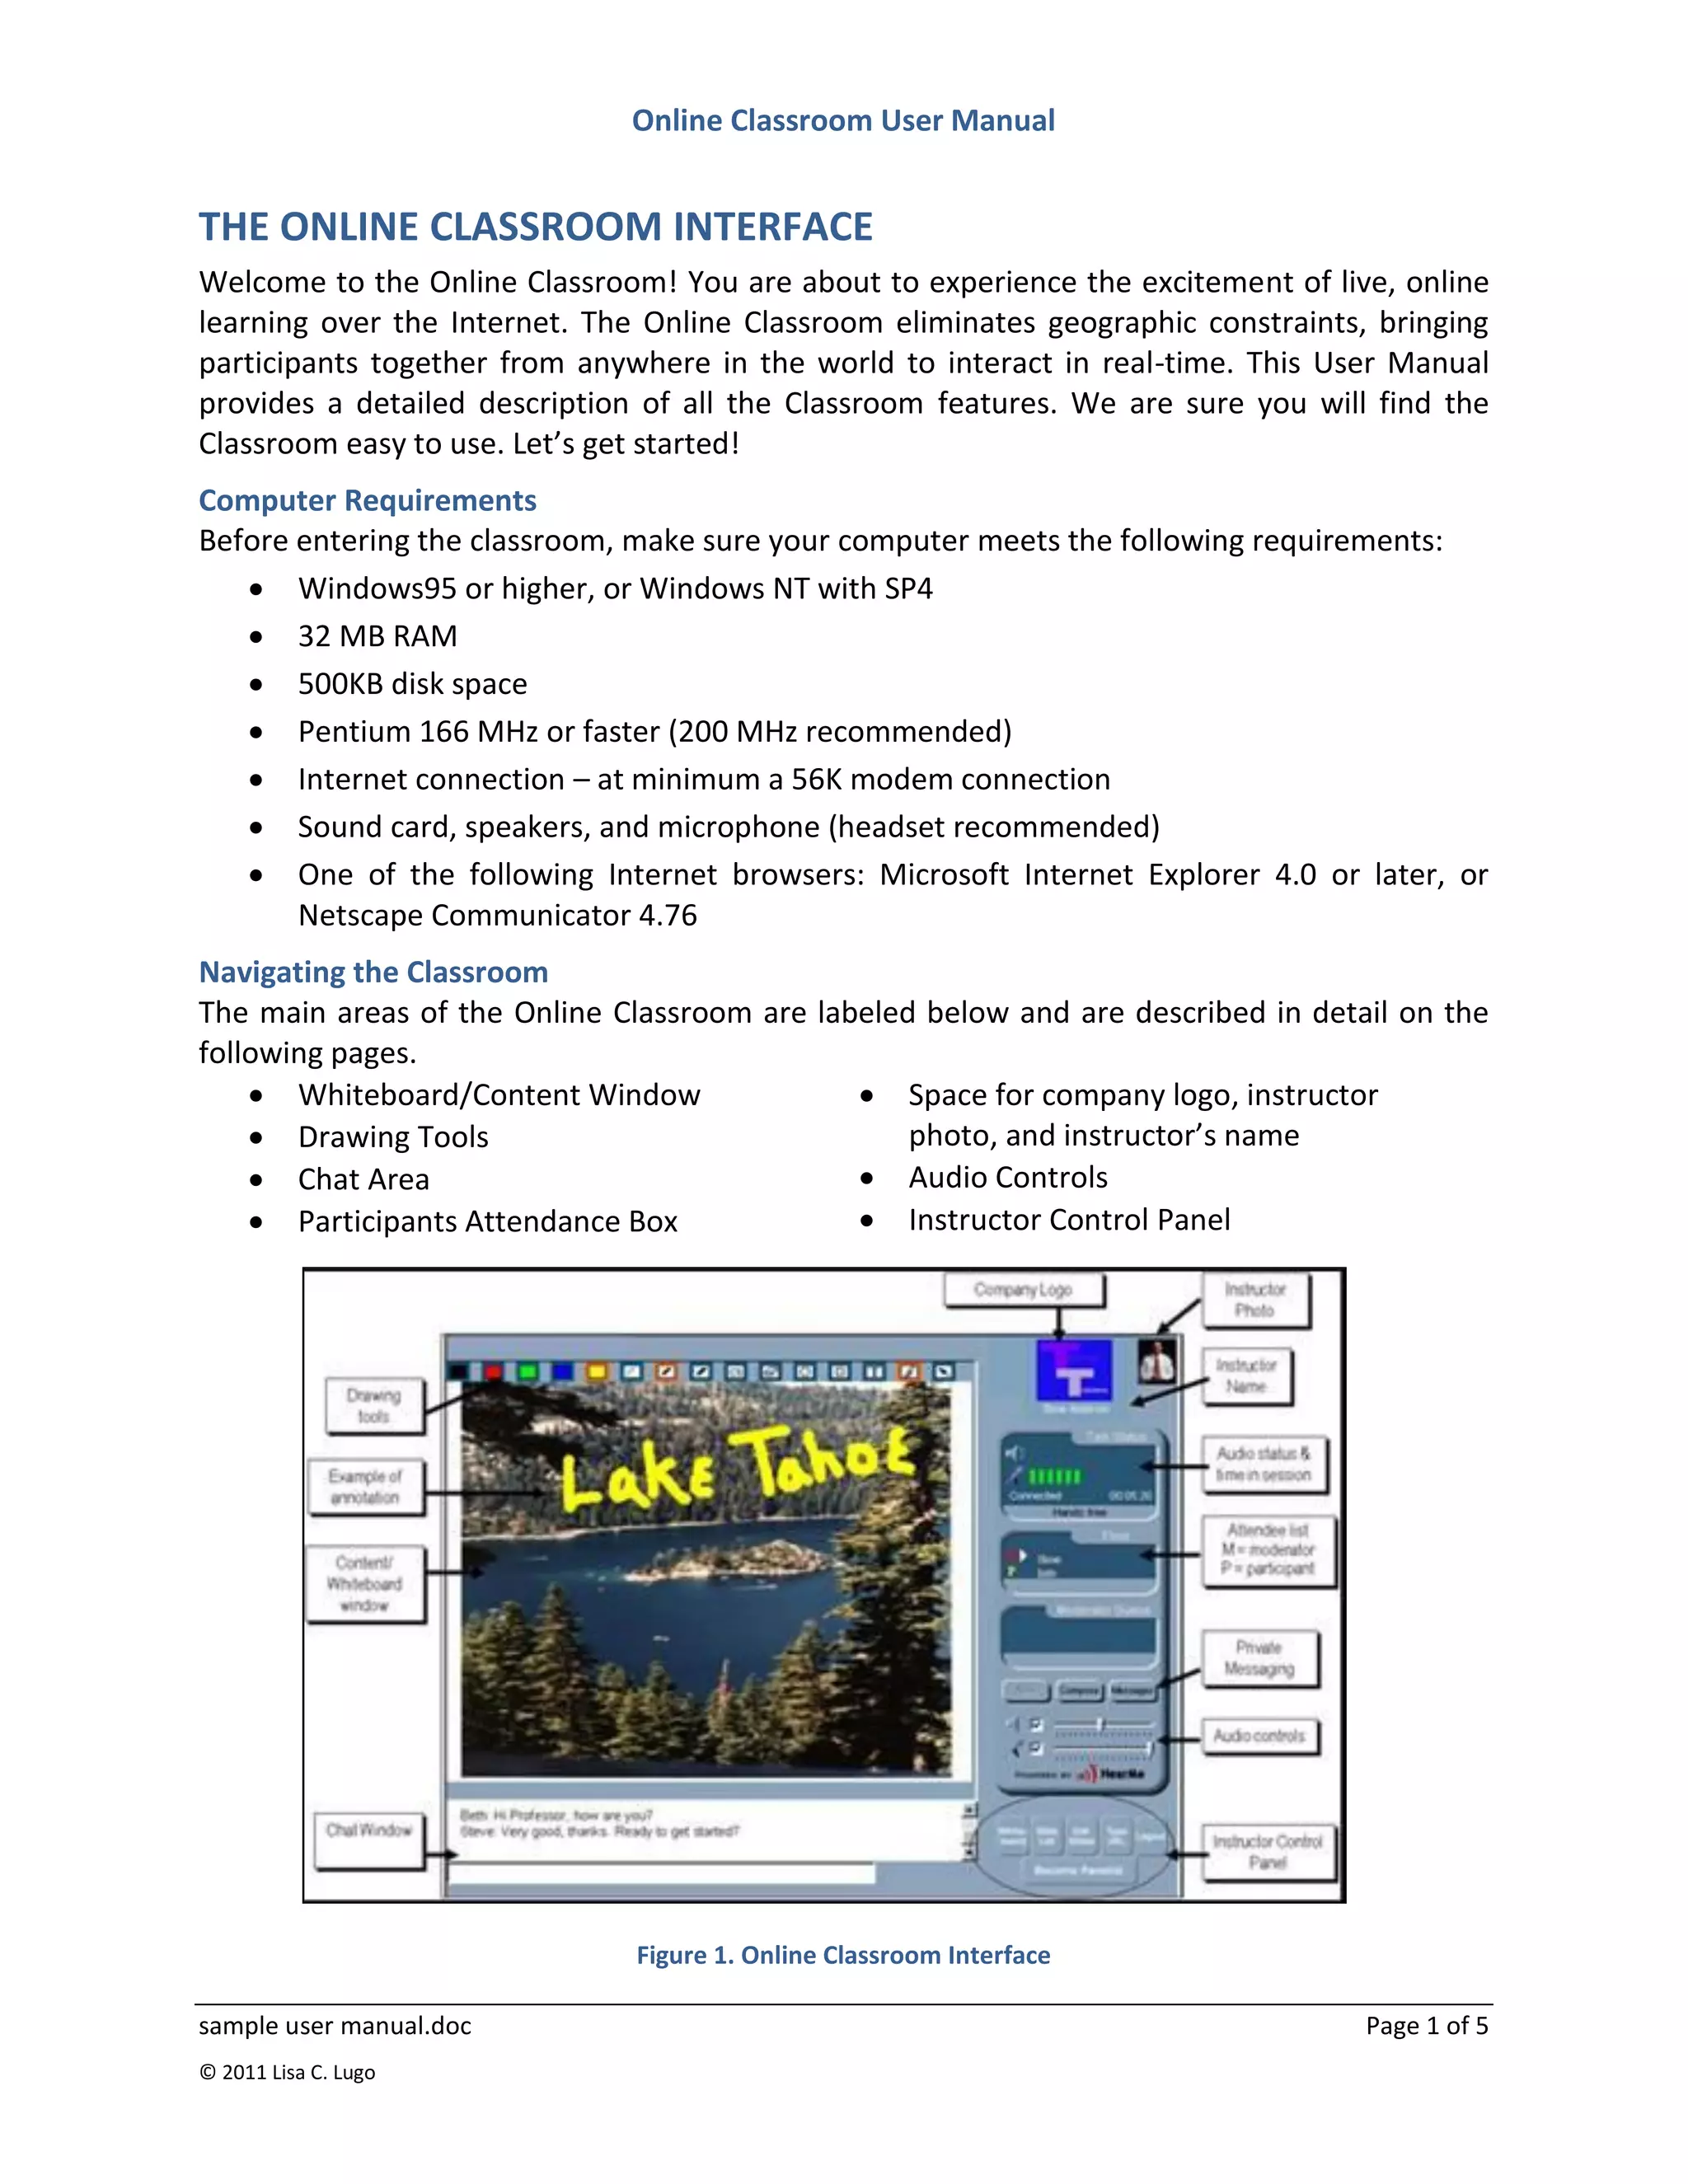
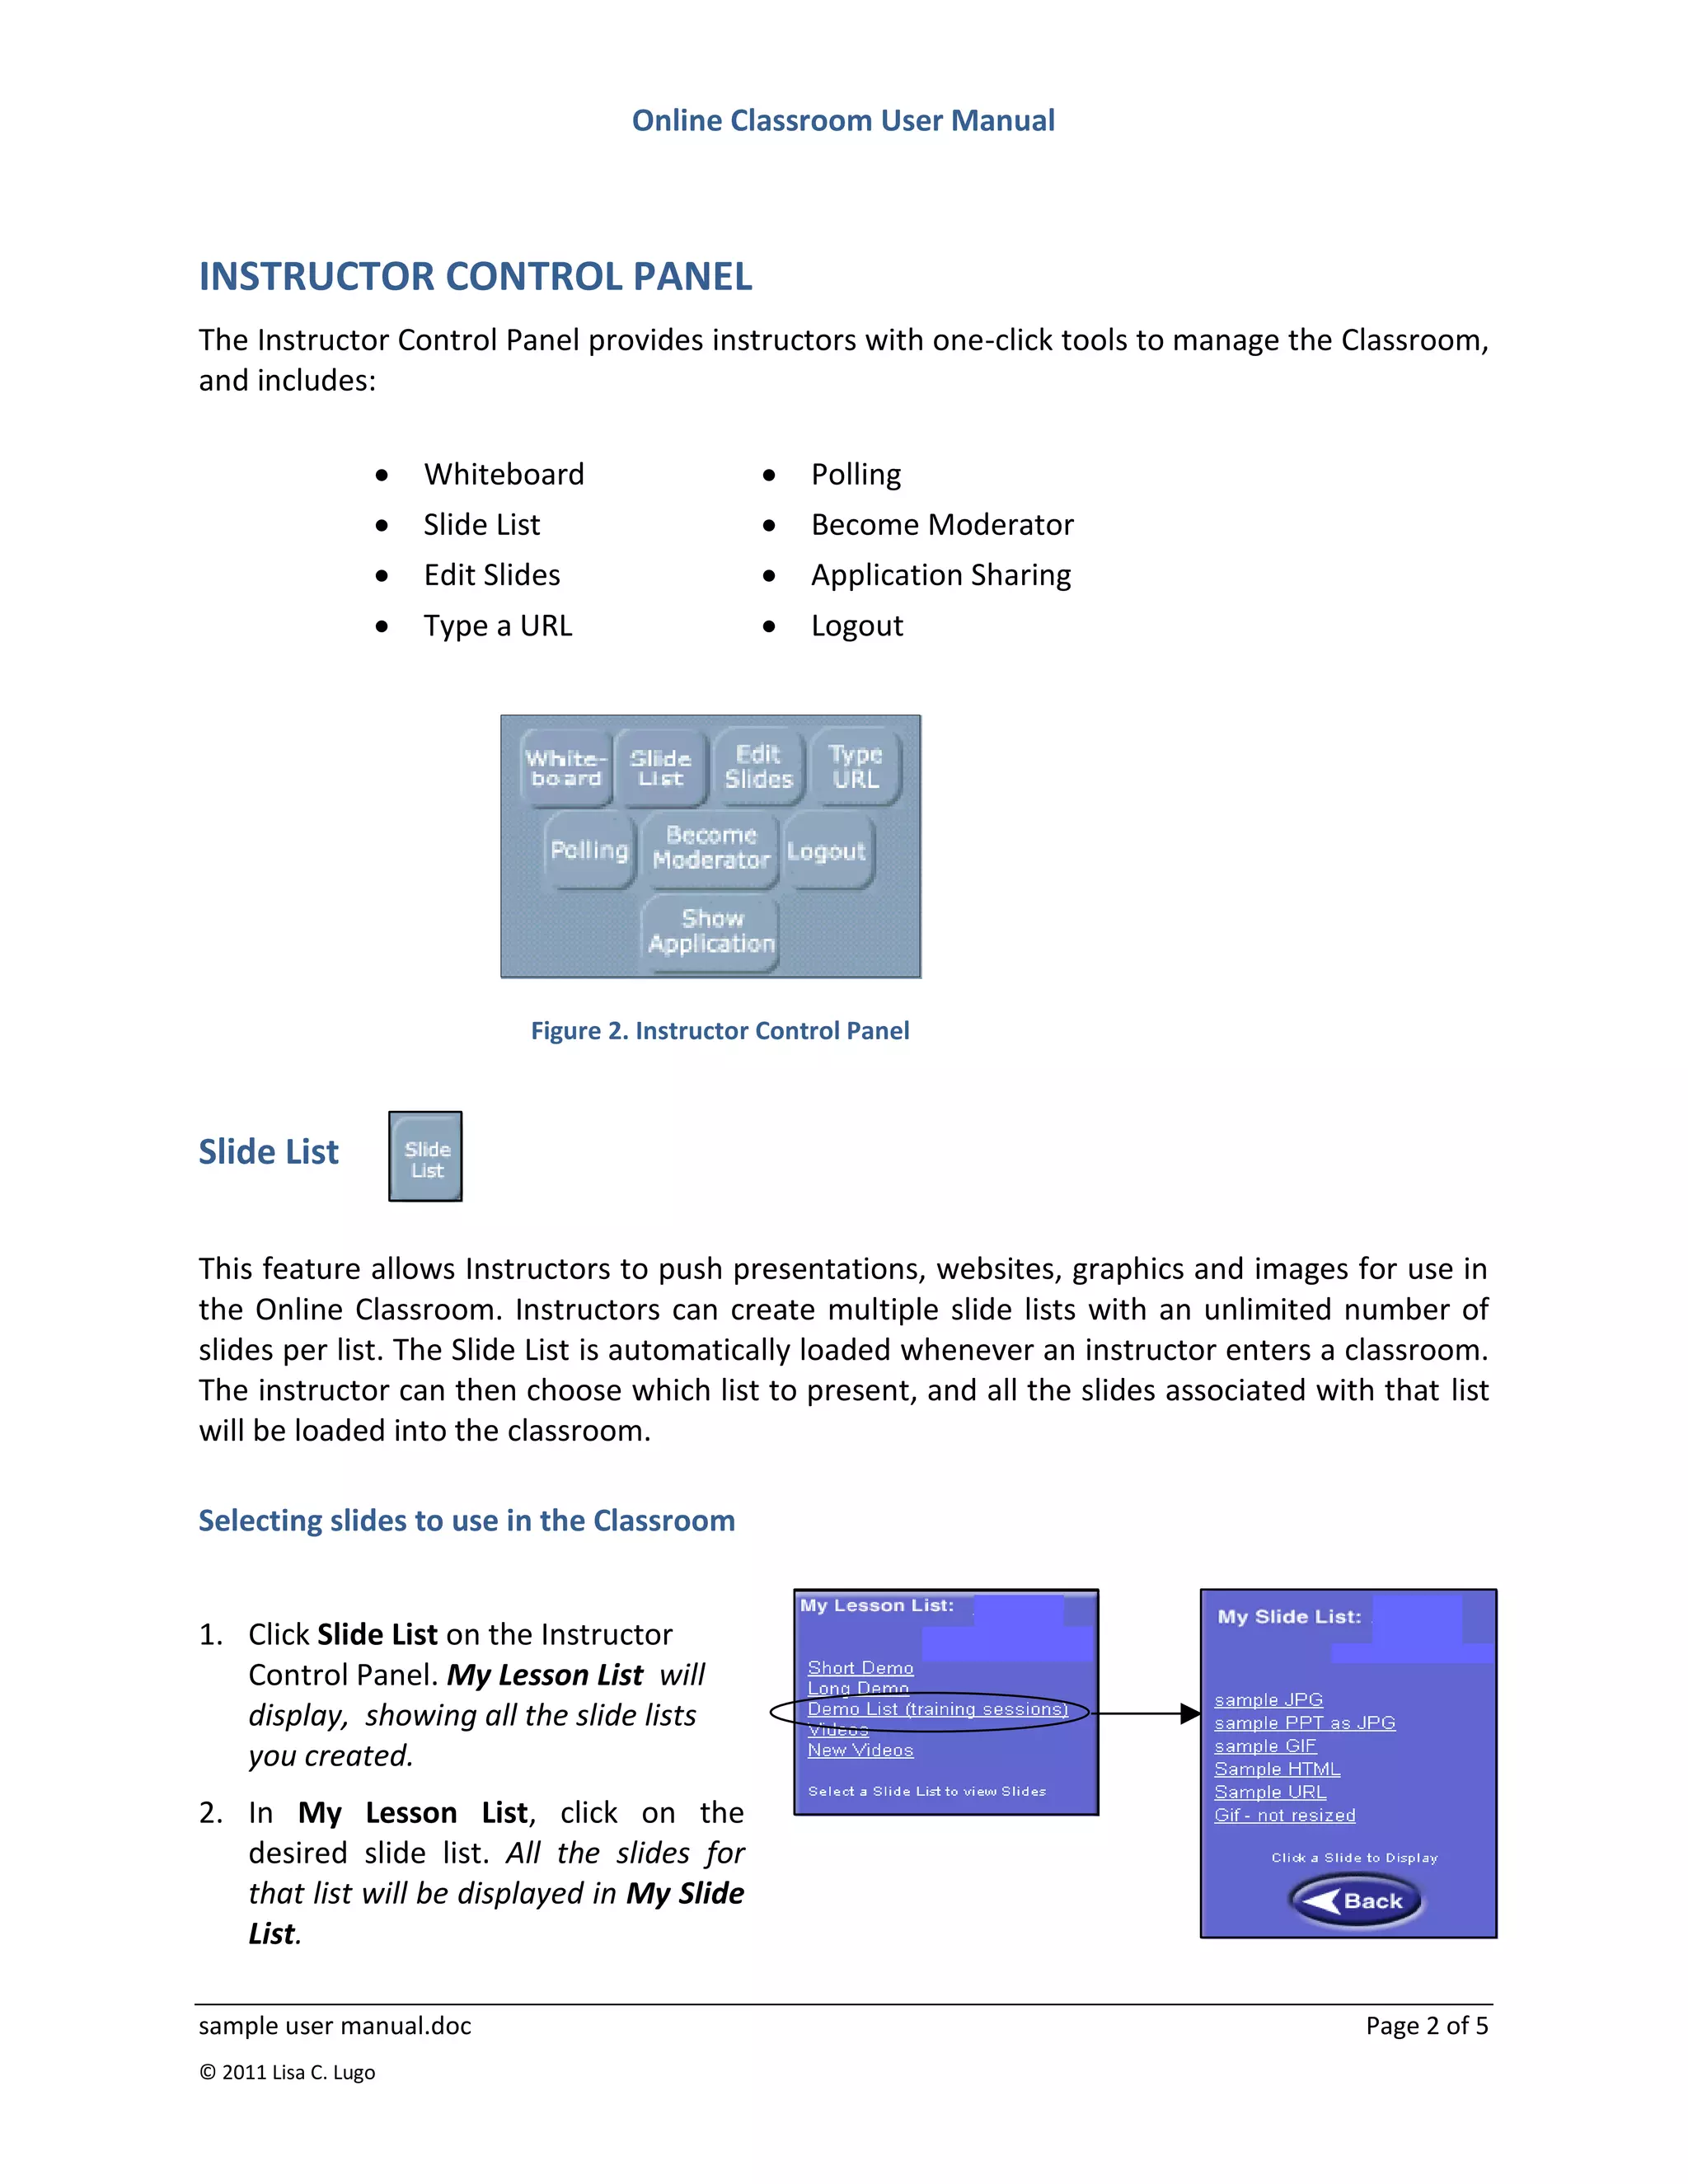
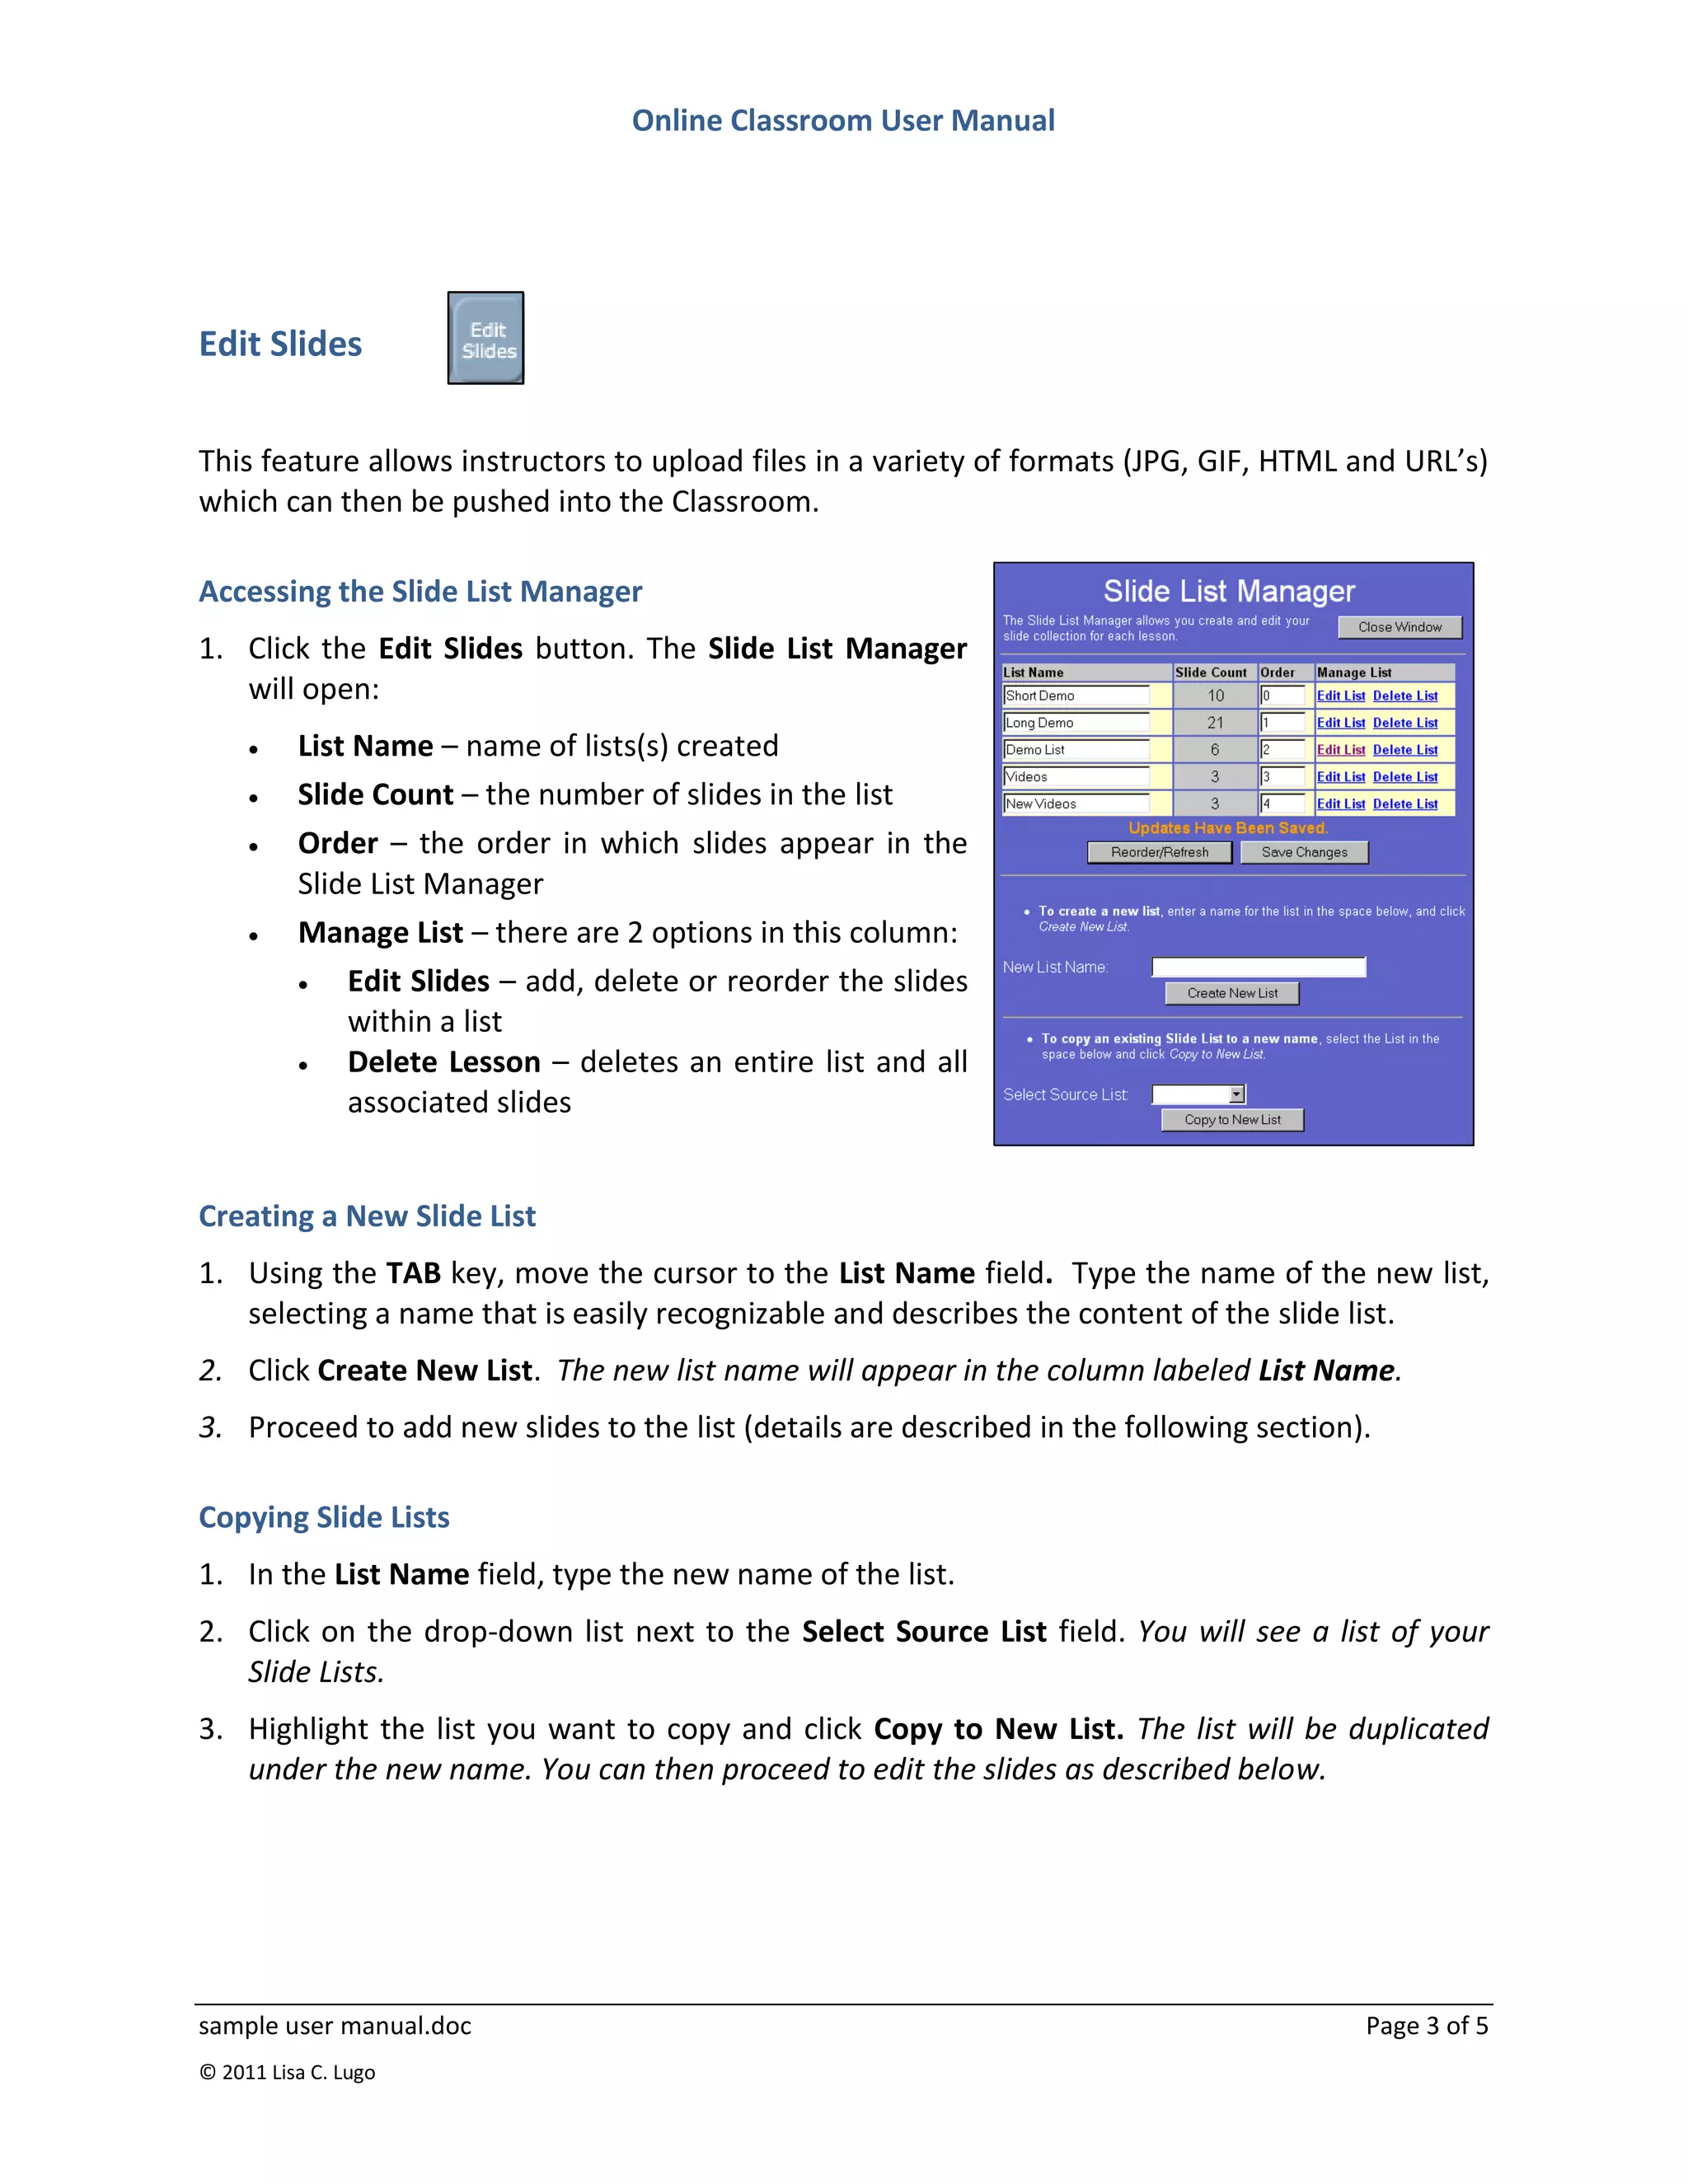
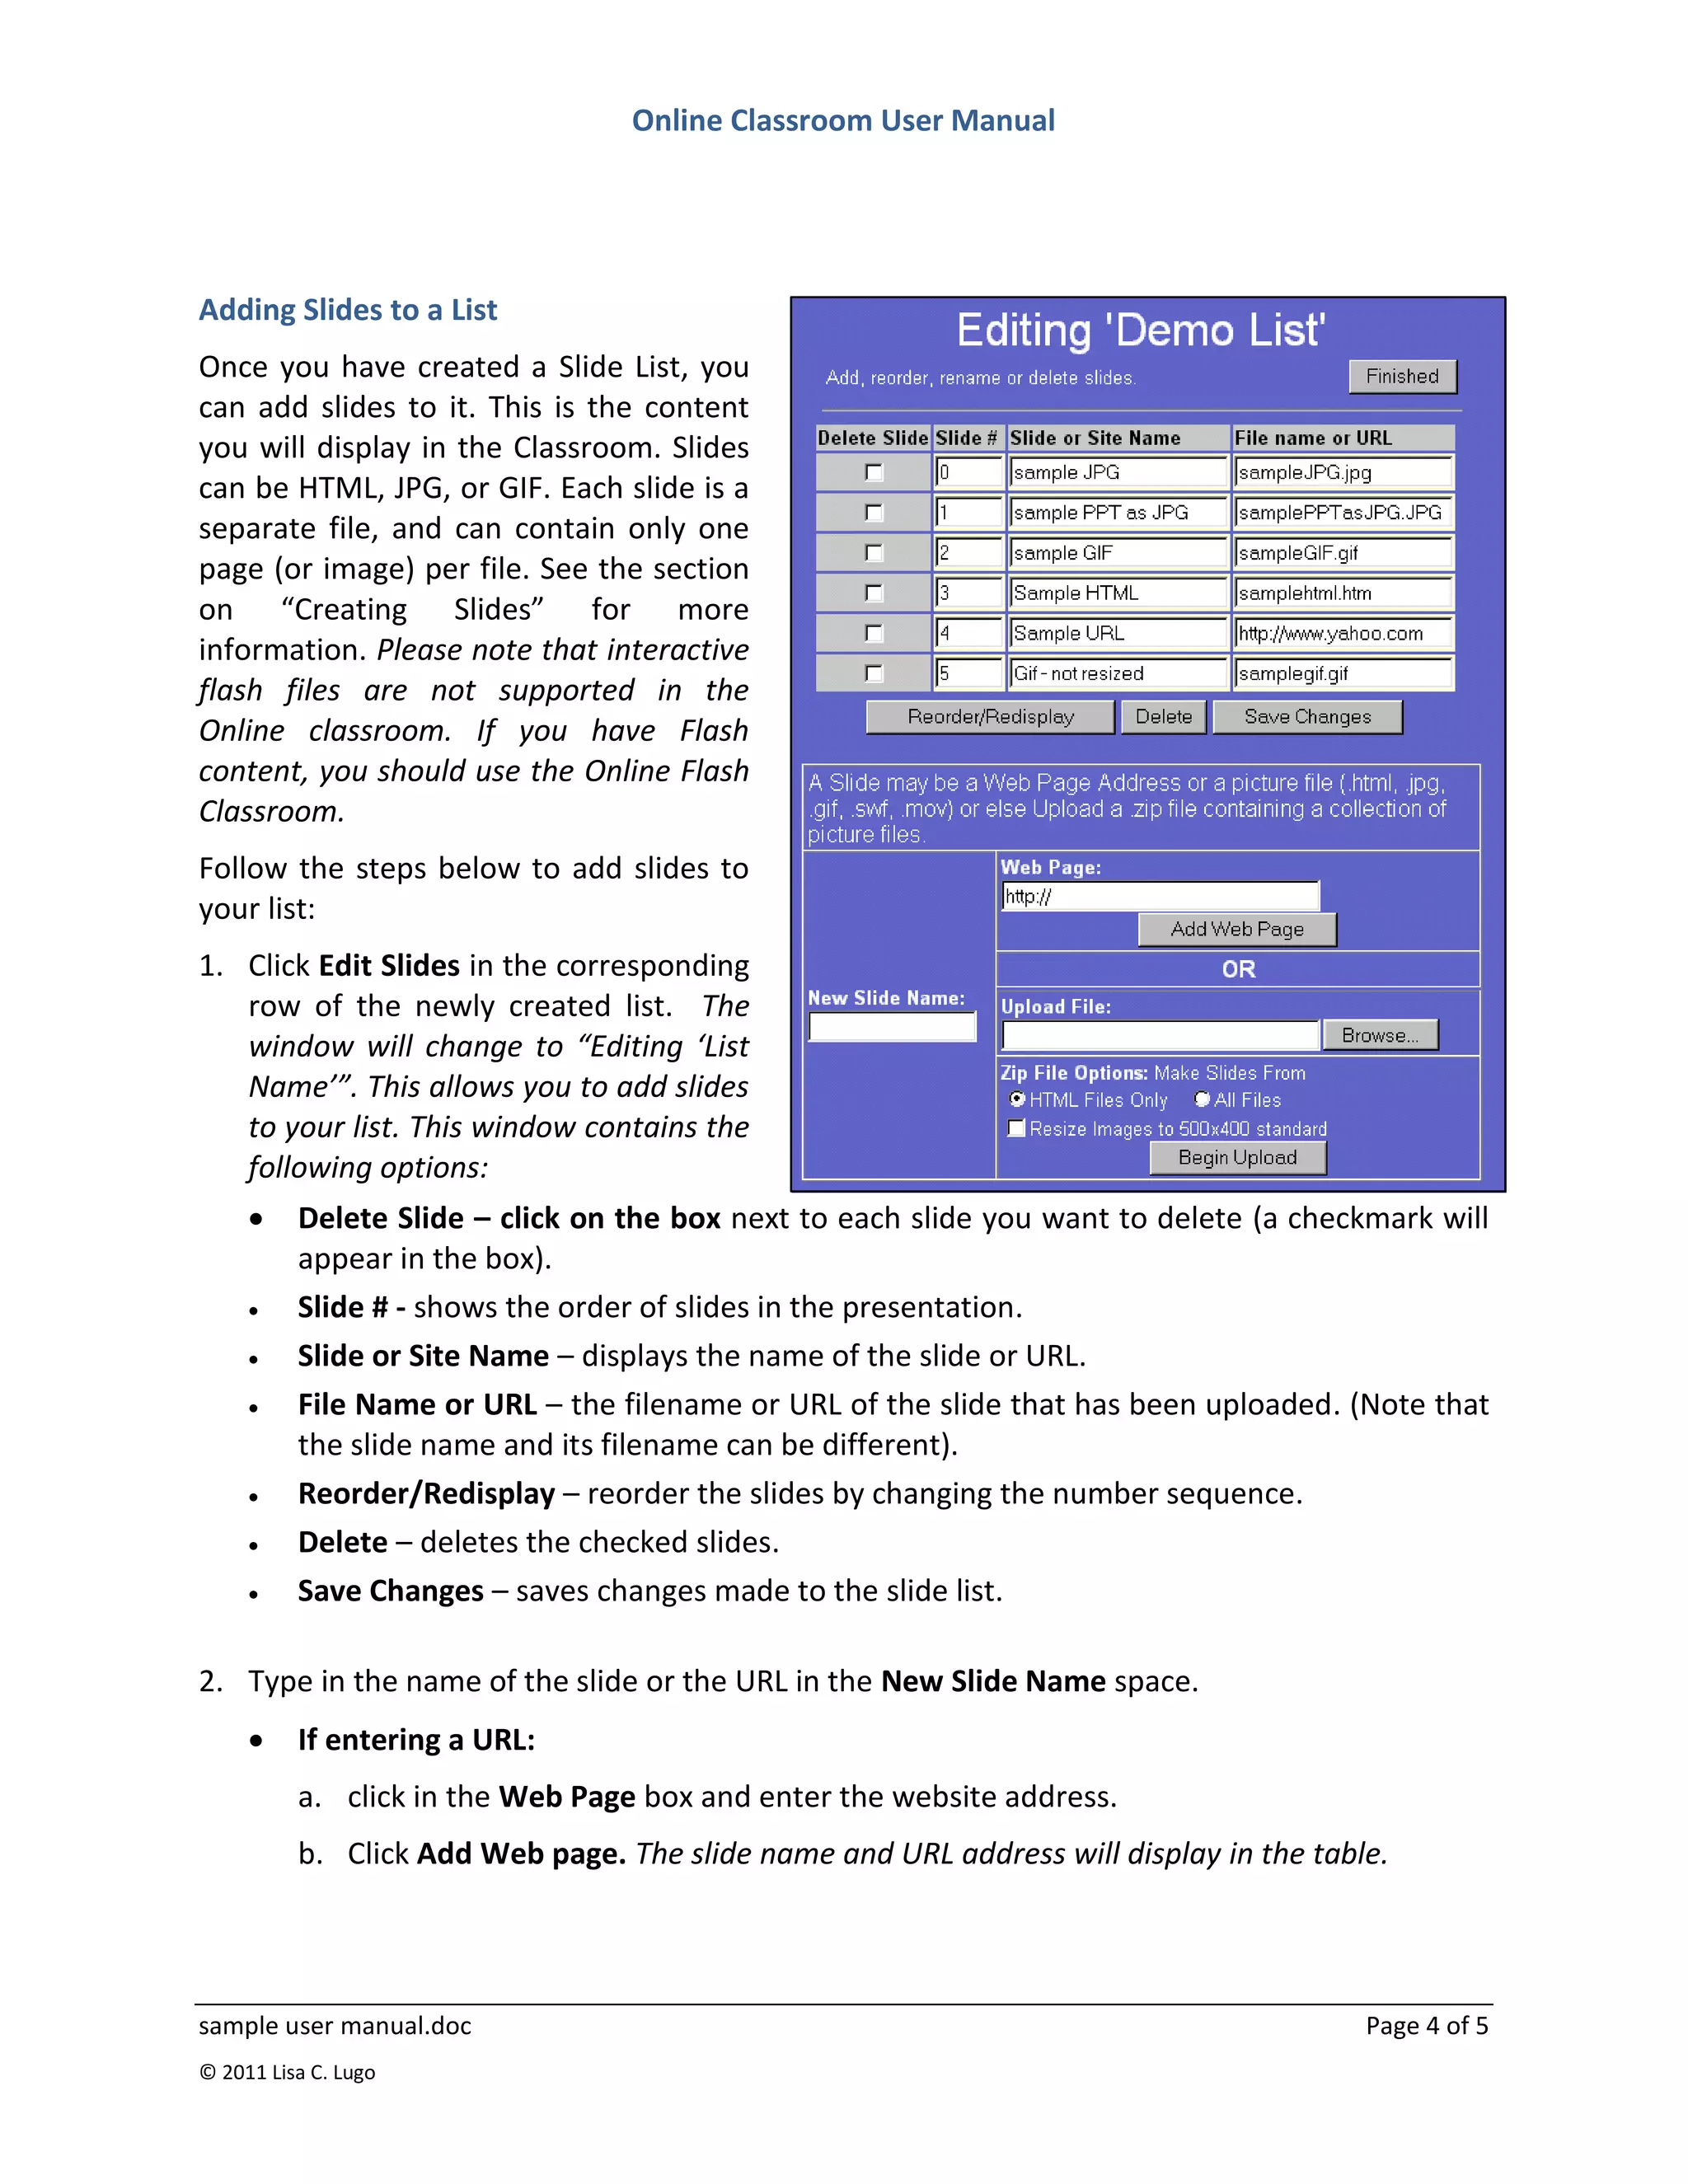
Introduction to this sample document
This document is an example of a user-manual for an Online Classroom. The audience for the
document includes both instructors and students. The assumption was that the users are not
very technically savvy, so both the application and the user manual had to be intuitive and easy
to use.
I have included the original Table of Contents to illustrate how much detail the manual
provided. Following that is one section of the manual, so the reader understands my writing
style. All references to any proprietary information has been removed.


sample user manual.doc                                                           © 2011 Lisa C. Lugo
Online Classroom User Manual


                                                             Table of Contents

Below is the complete table of contents for the manual:

Getting Started .................................................................................................................................. 1
   First-time Access to the Classroom ........................................................................................................ 1
   Login to the Online Classroom ............................................................................................................... 2
   Logout ..................................................................................................................................................... 2
The Online Classroom Interface .......................................................................................................... 3
   System Requirements............................................................................................................................. 3
   Navigating the Classroom....................................................................................................................... 3
   Drawing Tools ......................................................................................................................................... 4
       Colors ............................................................................................................................................... 4
       Size ................................................................................................................................................... 4
       Tools ................................................................................................................................................. 4
   Attendee List .......................................................................................................................................... 5
   Audio Controls ........................................................................................................................................ 5
   Chat Window .......................................................................................................................................... 5
   Private Messages .................................................................................................................................... 6
   Request for floor .................................................................................................................................... 6
Instructor Control Panel ..................................................................................................................... 7
    Whiteboard ............................................................................................................................................ 7
    Type a URL .............................................................................................................................................. 7
    Polling ..................................................................................................................................................... 9
    Application Sharing............................................................................................................................... 10
         Show Application ........................................................................................................................... 10
         Share Application ........................................................................................................................... 11
         Stop Sharing the Application ......................................................................................................... 12
         Stop Showing Application .............................................................................................................. 12
    Moderator Function ............................................................................................................................. 13
Uploading and Managing content ..................................................................................................... 14
   Slide List ................................................................................................................................................ 14
       Selecting slides to use in the Classroom ........................................................................................ 14
   Edit Slides ............................................................................................................................................. 14
       Creating a New Slide List................................................................................................................ 15
       Copying Slide Lists .......................................................................................................................... 15
       Adding Slides to a Slide List............................................................................................................ 15
       Adding Multiple Slides at Once ...................................................................................................... 16
   Creating Slides ...................................................................................................................................... 17
       PowerPoint Slides .......................................................................................................................... 17
       HTML Files ...................................................................................................................................... 18


The following pages are two detailed sections from the manual.


sample user manual.doc                                                                                                                   © 2011 Lisa C. Lugo
Online Classroom User Manual


THE ONLINE CLASSROOM INTERFACE
Welcome to the Online Classroom! You are about to experience the excitement of live, online
learning over the Internet. The Online Classroom eliminates geographic constraints, bringing
participants together from anywhere in the world to interact in real-time. This User Manual
provides a detailed description of all the Classroom features. We are sure you will find the
Classroom easy to use. Let’s get started!
Computer Requirements
Before entering the classroom, make sure your computer meets the following requirements:
    Windows95 or higher, or Windows NT with SP4
    32 MB RAM
    500KB disk space
    Pentium 166 MHz or faster (200 MHz recommended)
    Internet connection – at minimum a 56K modem connection
    Sound card, speakers, and microphone (headset recommended)
    One of the following Internet browsers: Microsoft Internet Explorer 4.0 or later, or
       Netscape Communicator 4.76
Navigating the Classroom
The main areas of the Online Classroom are labeled below and are described in detail on the
following pages.
     Whiteboard/Content Window                Space for company logo, instructor
     Drawing Tools                               photo, and instructor’s name
     Chat Area                                Audio Controls
     Participants Attendance Box              Instructor Control Panel


                               Figure 1. Online Classroom Interface

sample user manual.doc                                                             Page 1 of 5
© 2011 Lisa C. Lugo
Online Classroom User Manual


INSTRUCTOR CONTROL PANEL
The Instructor Control Panel provides instructors with one-click tools to manage the Classroom,
and includes:

                     Whiteboard                       Polling
                     Slide List                       Become Moderator
                     Edit Slides                      Application Sharing
                     Type a URL                       Logout


                               Figure 2. Instructor Control Panel


Slide List

This feature allows Instructors to push presentations, websites, graphics and images for use in
the Online Classroom. Instructors can create multiple slide lists with an unlimited number of
slides per list. The Slide List is automatically loaded whenever an instructor enters a classroom.
The instructor can then choose which list to present, and all the slides associated with that list
will be loaded into the classroom.

Selecting slides to use in the Classroom


1. Click Slide List on the Instructor
   Control Panel. My Lesson List will
   display, showing all the slide lists
   you created.
2. In My Lesson List, click on the
   desired slide list. All the slides for
   that list will be displayed in My Slide
   List.

sample user manual.doc                                                                  Page 2 of 5
© 2011 Lisa C. Lugo
Online Classroom User Manual


Edit Slides

This feature allows instructors to upload files in a variety of formats (JPG, GIF, HTML and URL’s)
which can then be pushed into the Classroom.

Accessing the Slide List Manager
1. Click the Edit Slides button. The Slide List Manager
   will open:
         List Name – name of lists(s) created
         Slide Count – the number of slides in the list
         Order – the order in which slides appear in the
          Slide List Manager
         Manage List – there are 2 options in this column:
             Edit Slides – add, delete or reorder the slides
              within a list
             Delete Lesson – deletes an entire list and all
              associated slides


Creating a New Slide List
1. Using the TAB key, move the cursor to the List Name field. Type the name of the new list,
   selecting a name that is easily recognizable and describes the content of the slide list.
2. Click Create New List. The new list name will appear in the column labeled List Name.
3. Proceed to add new slides to the list (details are described in the following section).

Copying Slide Lists
1. In the List Name field, type the new name of the list.
2. Click on the drop-down list next to the Select Source List field. You will see a list of your
   Slide Lists.
3. Highlight the list you want to copy and click Copy to New List. The list will be duplicated
   under the new name. You can then proceed to edit the slides as described below.


sample user manual.doc                                                                   Page 3 of 5
© 2011 Lisa C. Lugo
Online Classroom User Manual


Adding Slides to a List
Once you have created a Slide List, you
can add slides to it. This is the content
you will display in the Classroom. Slides
can be HTML, JPG, or GIF. Each slide is a
separate file, and can contain only one
page (or image) per file. See the section
on “Creating Slides” for more
information. Please note that interactive
flash files are not supported in the
Online classroom. If you have Flash
content, you should use the Online Flash
Classroom.
Follow the steps below to add slides to
your list:
1. Click Edit Slides in the corresponding
   row of the newly created list. The
   window will change to “Editing ‘List
   Name’”. This allows you to add slides
   to your list. This window contains the
   following options:
         Delete Slide – click on the box next to each slide you want to delete (a checkmark will
          appear in the box).
         Slide # - shows the order of slides in the presentation.
         Slide or Site Name – displays the name of the slide or URL.
         File Name or URL – the filename or URL of the slide that has been uploaded. (Note that
          the slide name and its filename can be different).
         Reorder/Redisplay – reorder the slides by changing the number sequence.
         Delete – deletes the checked slides.
         Save Changes – saves changes made to the slide list.

2. Type in the name of the slide or the URL in the New Slide Name space.
         If entering a URL:
          a. click in the Web Page box and enter the website address.
          b. Click Add Web page. The slide name and URL address will display in the table.


sample user manual.doc                                                                  Page 4 of 5
© 2011 Lisa C. Lugo
Online Classroom User Manual


         If entering a file:
          a. Click Browse to locate the file to be loaded from your hard disk.
          b. Highlight the file to be added and click Open.
          c. If loading a ZIP file containing multiple slides: click All Files and the entire ZIP file will
             be loaded (see “adding multiple slides” below).
          d. If desired, check Resize Images to 400x500 Standard to automatically size the files
             so they fit in the content window.
          e. Click Begin Upload. You will see a message display as the file is loaded into your list.
             When complete, you’ll see the new slide name and its filename listed in the table.
3. Repeat this process as necessary to add files to the Slide List.
4. If desired, you can re-order how the slides are listed by changing the Slide number and then
   clicking Reorder/Redisplay. Note that the numbers start at “zero”.
5. Finished – takes you back to Slide List Manager and will reflect the changes you’ve made to
   each list.

Adding Multiple Slides at Once
You can add several slides at one time by using a utility (such as WinZip) to compress the files
into a single file and then uploading the compressed file to the slide list.
1. Type in a name for the slide in the Slide Name space. This name will not be used in the final
   list, but if it is omitted, the compressed file will not upload.
2. Click Browse to locate the compressed file on your hard disk.
3. Click Open. The filename will appear in the “Upload File” field.
4. Check either HTML files or All Files (for all formats other than HTML).
         If desired, check the box marked Resize Images to 500x400 standard. This ensures the
          file fits well in the Classroom content window.
5. Click Begin Upload. All the files from the compressed file will be uploaded. Each slide will
   have the same name as the compressed file.
6. If desired, rename and/or reorder the slides.


sample user manual.doc                                                                          Page 5 of 5
© 2011 Lisa C. Lugo

Sample User Manual

  • 1.
    Introduction to thissample document This document is an example of a user-manual for an Online Classroom. The audience for the document includes both instructors and students. The assumption was that the users are not very technically savvy, so both the application and the user manual had to be intuitive and easy to use. I have included the original Table of Contents to illustrate how much detail the manual provided. Following that is one section of the manual, so the reader understands my writing style. All references to any proprietary information has been removed. sample user manual.doc © 2011 Lisa C. Lugo
  • 2.
    Online Classroom UserManual Table of Contents Below is the complete table of contents for the manual: Getting Started .................................................................................................................................. 1 First-time Access to the Classroom ........................................................................................................ 1 Login to the Online Classroom ............................................................................................................... 2 Logout ..................................................................................................................................................... 2 The Online Classroom Interface .......................................................................................................... 3 System Requirements............................................................................................................................. 3 Navigating the Classroom....................................................................................................................... 3 Drawing Tools ......................................................................................................................................... 4 Colors ............................................................................................................................................... 4 Size ................................................................................................................................................... 4 Tools ................................................................................................................................................. 4 Attendee List .......................................................................................................................................... 5 Audio Controls ........................................................................................................................................ 5 Chat Window .......................................................................................................................................... 5 Private Messages .................................................................................................................................... 6 Request for floor .................................................................................................................................... 6 Instructor Control Panel ..................................................................................................................... 7 Whiteboard ............................................................................................................................................ 7 Type a URL .............................................................................................................................................. 7 Polling ..................................................................................................................................................... 9 Application Sharing............................................................................................................................... 10 Show Application ........................................................................................................................... 10 Share Application ........................................................................................................................... 11 Stop Sharing the Application ......................................................................................................... 12 Stop Showing Application .............................................................................................................. 12 Moderator Function ............................................................................................................................. 13 Uploading and Managing content ..................................................................................................... 14 Slide List ................................................................................................................................................ 14 Selecting slides to use in the Classroom ........................................................................................ 14 Edit Slides ............................................................................................................................................. 14 Creating a New Slide List................................................................................................................ 15 Copying Slide Lists .......................................................................................................................... 15 Adding Slides to a Slide List............................................................................................................ 15 Adding Multiple Slides at Once ...................................................................................................... 16 Creating Slides ...................................................................................................................................... 17 PowerPoint Slides .......................................................................................................................... 17 HTML Files ...................................................................................................................................... 18 The following pages are two detailed sections from the manual. sample user manual.doc © 2011 Lisa C. Lugo
  • 3.
    Online Classroom UserManual THE ONLINE CLASSROOM INTERFACE Welcome to the Online Classroom! You are about to experience the excitement of live, online learning over the Internet. The Online Classroom eliminates geographic constraints, bringing participants together from anywhere in the world to interact in real-time. This User Manual provides a detailed description of all the Classroom features. We are sure you will find the Classroom easy to use. Let’s get started! Computer Requirements Before entering the classroom, make sure your computer meets the following requirements:  Windows95 or higher, or Windows NT with SP4  32 MB RAM  500KB disk space  Pentium 166 MHz or faster (200 MHz recommended)  Internet connection – at minimum a 56K modem connection  Sound card, speakers, and microphone (headset recommended)  One of the following Internet browsers: Microsoft Internet Explorer 4.0 or later, or Netscape Communicator 4.76 Navigating the Classroom The main areas of the Online Classroom are labeled below and are described in detail on the following pages.  Whiteboard/Content Window  Space for company logo, instructor  Drawing Tools photo, and instructor’s name  Chat Area  Audio Controls  Participants Attendance Box  Instructor Control Panel Figure 1. Online Classroom Interface sample user manual.doc Page 1 of 5 © 2011 Lisa C. Lugo
  • 4.
    Online Classroom UserManual INSTRUCTOR CONTROL PANEL The Instructor Control Panel provides instructors with one-click tools to manage the Classroom, and includes:  Whiteboard  Polling  Slide List  Become Moderator  Edit Slides  Application Sharing  Type a URL  Logout Figure 2. Instructor Control Panel Slide List This feature allows Instructors to push presentations, websites, graphics and images for use in the Online Classroom. Instructors can create multiple slide lists with an unlimited number of slides per list. The Slide List is automatically loaded whenever an instructor enters a classroom. The instructor can then choose which list to present, and all the slides associated with that list will be loaded into the classroom. Selecting slides to use in the Classroom 1. Click Slide List on the Instructor Control Panel. My Lesson List will display, showing all the slide lists you created. 2. In My Lesson List, click on the desired slide list. All the slides for that list will be displayed in My Slide List. sample user manual.doc Page 2 of 5 © 2011 Lisa C. Lugo
  • 5.
    Online Classroom UserManual Edit Slides This feature allows instructors to upload files in a variety of formats (JPG, GIF, HTML and URL’s) which can then be pushed into the Classroom. Accessing the Slide List Manager 1. Click the Edit Slides button. The Slide List Manager will open:  List Name – name of lists(s) created  Slide Count – the number of slides in the list  Order – the order in which slides appear in the Slide List Manager  Manage List – there are 2 options in this column:  Edit Slides – add, delete or reorder the slides within a list  Delete Lesson – deletes an entire list and all associated slides Creating a New Slide List 1. Using the TAB key, move the cursor to the List Name field. Type the name of the new list, selecting a name that is easily recognizable and describes the content of the slide list. 2. Click Create New List. The new list name will appear in the column labeled List Name. 3. Proceed to add new slides to the list (details are described in the following section). Copying Slide Lists 1. In the List Name field, type the new name of the list. 2. Click on the drop-down list next to the Select Source List field. You will see a list of your Slide Lists. 3. Highlight the list you want to copy and click Copy to New List. The list will be duplicated under the new name. You can then proceed to edit the slides as described below. sample user manual.doc Page 3 of 5 © 2011 Lisa C. Lugo
  • 6.
    Online Classroom UserManual Adding Slides to a List Once you have created a Slide List, you can add slides to it. This is the content you will display in the Classroom. Slides can be HTML, JPG, or GIF. Each slide is a separate file, and can contain only one page (or image) per file. See the section on “Creating Slides” for more information. Please note that interactive flash files are not supported in the Online classroom. If you have Flash content, you should use the Online Flash Classroom. Follow the steps below to add slides to your list: 1. Click Edit Slides in the corresponding row of the newly created list. The window will change to “Editing ‘List Name’”. This allows you to add slides to your list. This window contains the following options:  Delete Slide – click on the box next to each slide you want to delete (a checkmark will appear in the box).  Slide # - shows the order of slides in the presentation.  Slide or Site Name – displays the name of the slide or URL.  File Name or URL – the filename or URL of the slide that has been uploaded. (Note that the slide name and its filename can be different).  Reorder/Redisplay – reorder the slides by changing the number sequence.  Delete – deletes the checked slides.  Save Changes – saves changes made to the slide list. 2. Type in the name of the slide or the URL in the New Slide Name space.  If entering a URL: a. click in the Web Page box and enter the website address. b. Click Add Web page. The slide name and URL address will display in the table. sample user manual.doc Page 4 of 5 © 2011 Lisa C. Lugo
  • 7.
    Online Classroom UserManual  If entering a file: a. Click Browse to locate the file to be loaded from your hard disk. b. Highlight the file to be added and click Open. c. If loading a ZIP file containing multiple slides: click All Files and the entire ZIP file will be loaded (see “adding multiple slides” below). d. If desired, check Resize Images to 400x500 Standard to automatically size the files so they fit in the content window. e. Click Begin Upload. You will see a message display as the file is loaded into your list. When complete, you’ll see the new slide name and its filename listed in the table. 3. Repeat this process as necessary to add files to the Slide List. 4. If desired, you can re-order how the slides are listed by changing the Slide number and then clicking Reorder/Redisplay. Note that the numbers start at “zero”. 5. Finished – takes you back to Slide List Manager and will reflect the changes you’ve made to each list. Adding Multiple Slides at Once You can add several slides at one time by using a utility (such as WinZip) to compress the files into a single file and then uploading the compressed file to the slide list. 1. Type in a name for the slide in the Slide Name space. This name will not be used in the final list, but if it is omitted, the compressed file will not upload. 2. Click Browse to locate the compressed file on your hard disk. 3. Click Open. The filename will appear in the “Upload File” field. 4. Check either HTML files or All Files (for all formats other than HTML).  If desired, check the box marked Resize Images to 500x400 standard. This ensures the file fits well in the Classroom content window. 5. Click Begin Upload. All the files from the compressed file will be uploaded. Each slide will have the same name as the compressed file. 6. If desired, rename and/or reorder the slides. sample user manual.doc Page 5 of 5 © 2011 Lisa C. Lugo