Downloaded 543 times

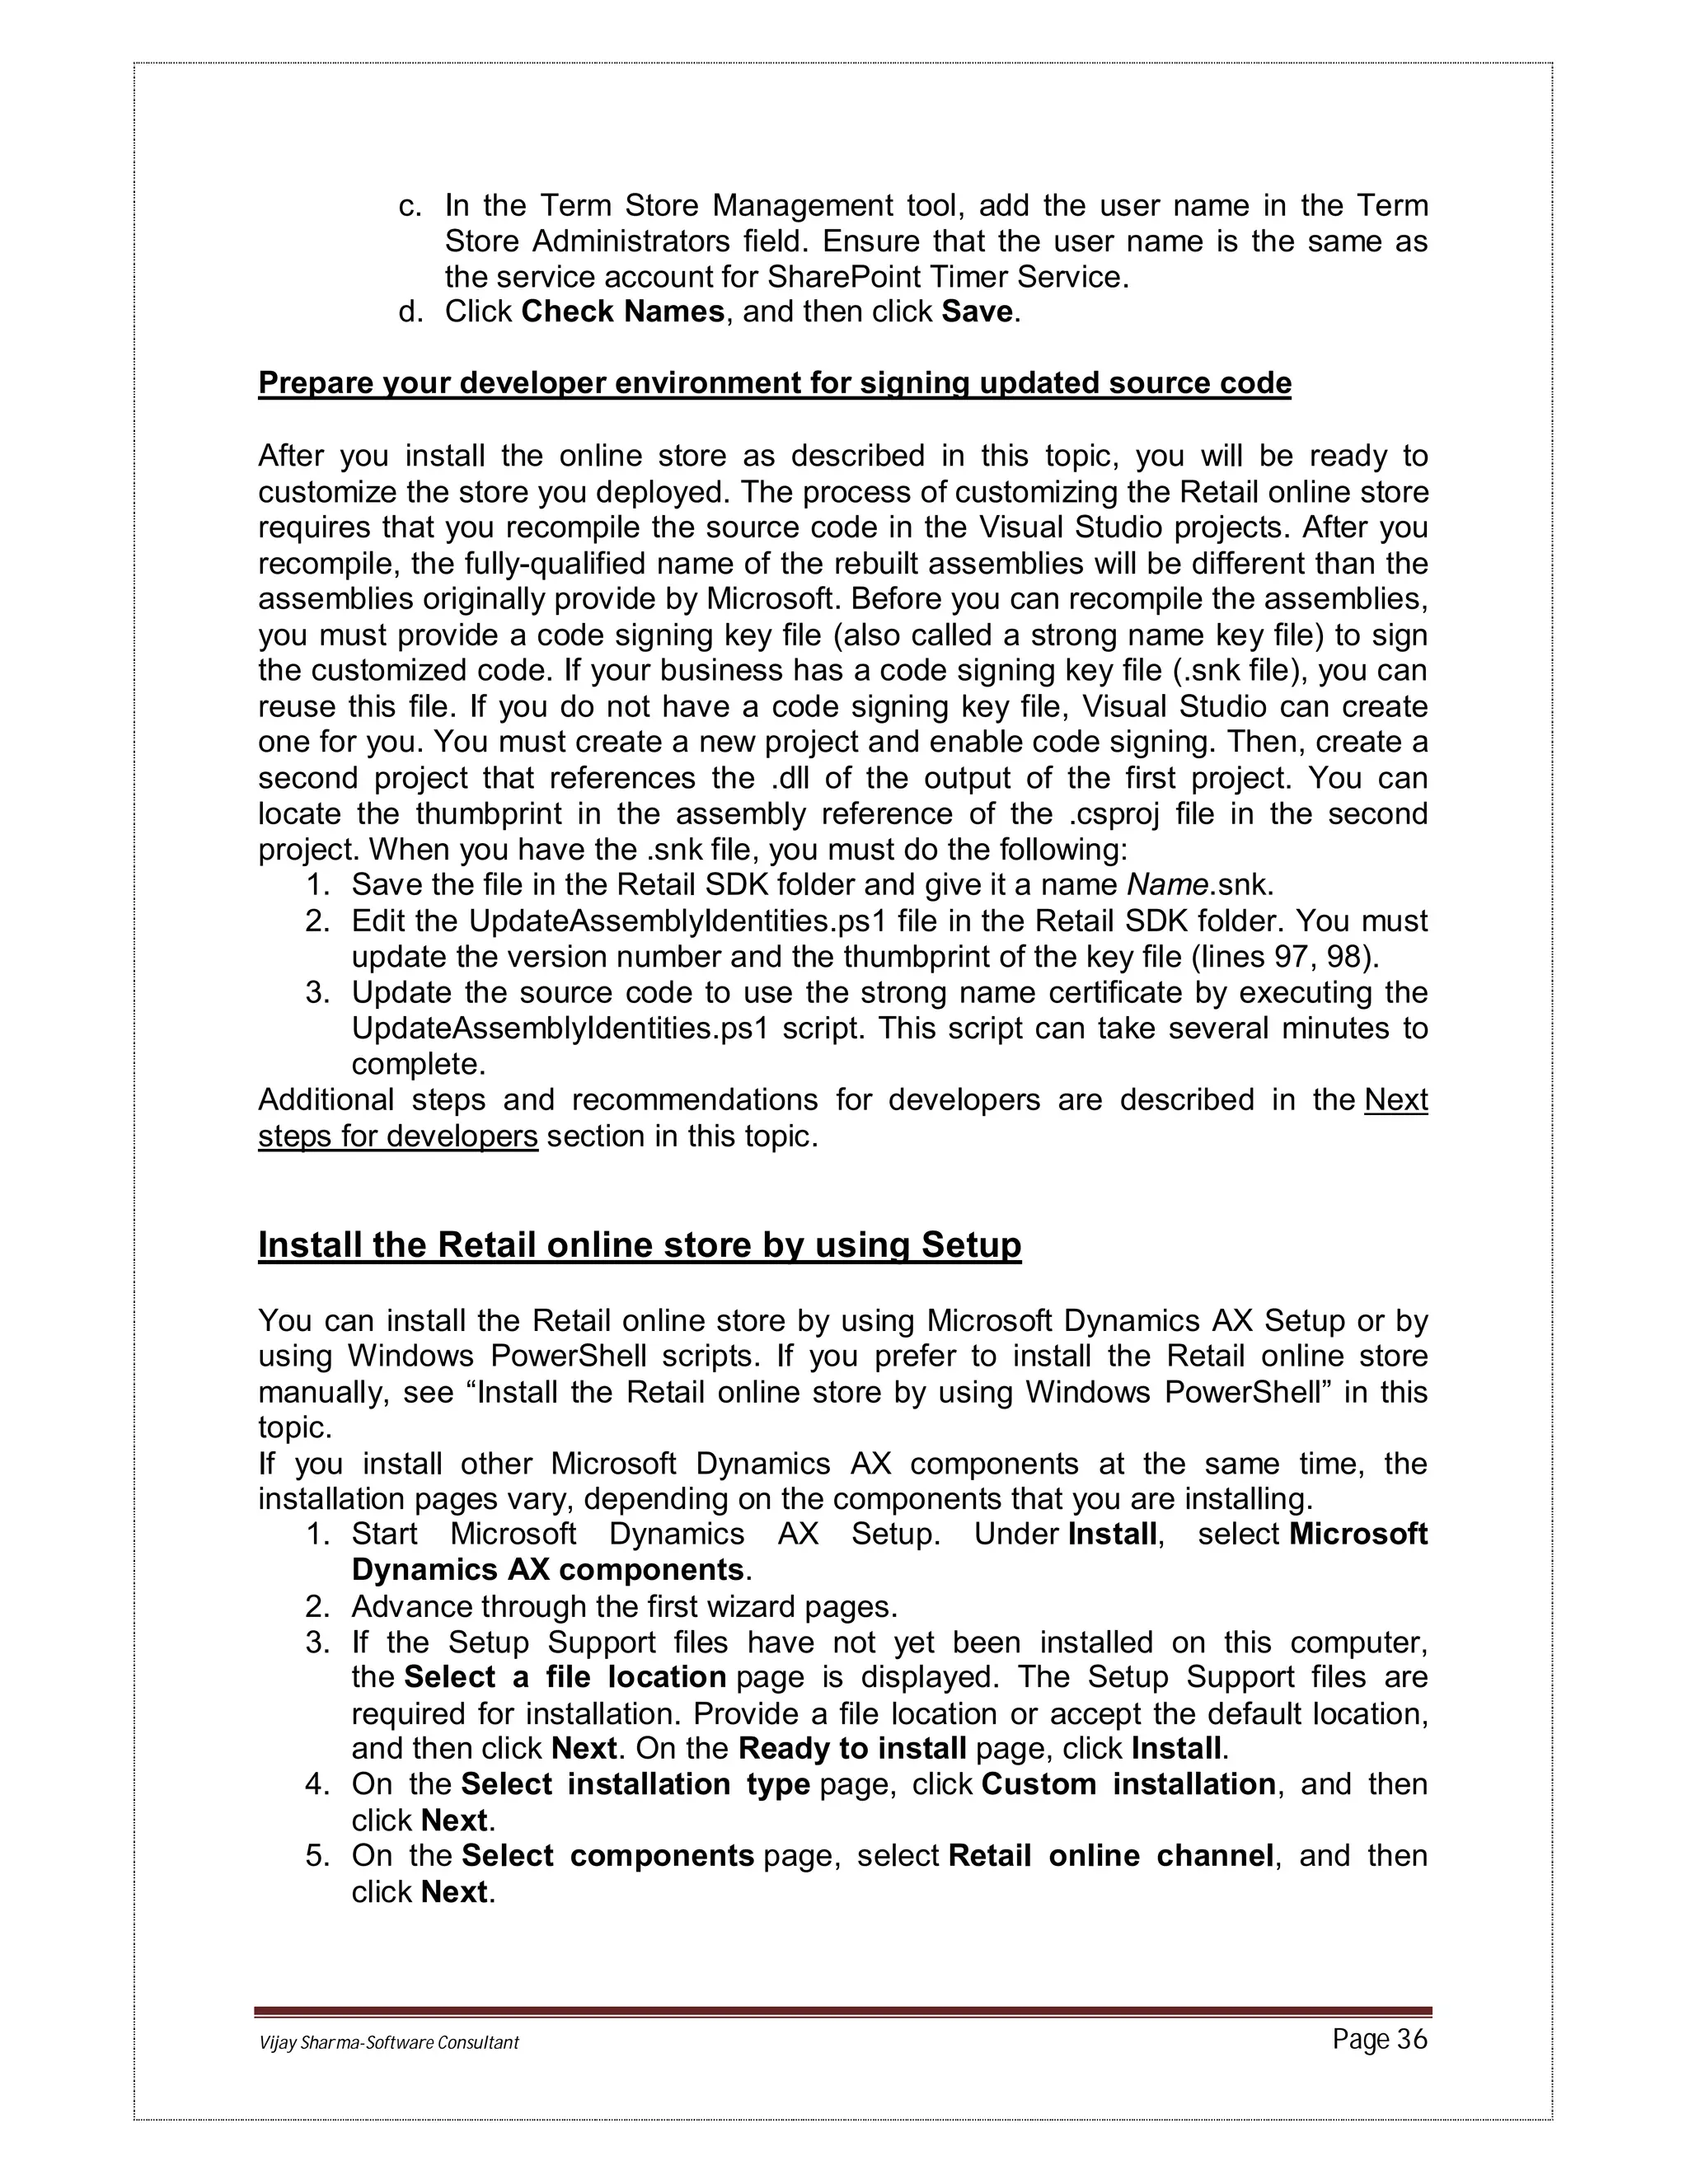
![Vijay Sharma-Software Consultant Page 20
5. On the Select installation type page, click Custom installation, and then
click Next.
6. On the Select components page, select Retail POS, and then click Next.
7. On the Prerequisite validation results page, resolve any errors. For more
information about how to resolve prerequisite errors, see Check prerequisites.
When no errors remain, click Next.
8. On the Ready to install page, click Install.
9. After the installation is completed, click Finish to close the wizard.
After you install Retail POS
1. If an offline database is required, create and configure the offline database for
each POS register by using the Retail Channel Configuration Utility. For more
information, see Create a channel database or an offline database (AX 2012
R3) or Create a store database or an offline database (AX 2012 R2 and AX
2012 Feature Pack).
2. Configure Retail POS database connections by using the Retail Channel
Configuration Utility. For more information, see Configure database
connections for a POS register by using the Retail Channel Configuration
Utility.
3. Configure Retail POS for your business. For more information, see Point of
Sale.
Configure database connections for a POS register by
using the Retail Channel Configuration Utility [AX 2012]
The Retail Channel Configuration Utility (formerly named Retail Store Database
Utility) can be used to configure database connections for a point of sale (POS) or
Retail Modern POS register. This utility can also be used to install both a channel
database and a POS register on the same computer, so that the database and
register can be used in a development environment.
You must install the Retail Channel Configuration Utility on each computer where
you want to use it. Use the Setup wizard for Microsoft Dynamics AX to install the
utility. For more information, see Install the Retail Channel Configuration Utility
(Retail Store Database Utility).
The procedures in this topic assume that you have installed a supported version of
Microsoft SQL Server on the computer where you plan to run the Retail Channel
Configuration Utility. For a list of operating systems and SQL Server versions that
are supported, see the Microsoft Dynamics AX system requirements.
The Retail Channel Configuration Utility can also be used to install a channel
database on a shared database server or an offline database on a POS computer.
For more information, see Create a channel database or an offline database (AX
2012 R3) or Create a store database or an offline database (AX 2012 R2 and AX
2012 Feature Pack).
Configure a database connection for a POS register (AX 2012 R3)
Complete the following procedure to configure the channel database connection for
a POS register. To log on to Microsoft Dynamics AX for Retail POS, the register
must have access to the channel database.
For information about additional parameters for POS registers, see Set up registers.
1. On a POS computer, start the Retail Channel Configuration Utility.
2. Click Configure Retail POS and Retail Offline Sync Service.](https://image.slidesharecdn.com/retaildeploymentbookvijaysharma-150413054227-conversion-gate01/75/Dynamics-Ax-Retail-Installation-Vijay-Sharma-21-2048.jpg)

![Vijay Sharma-Software Consultant Page 39
prompted during deployment. This password cannot contain
any restricted XML characters such as the following:
exclamation point (!), greater than sign (<), less than sign (>),
ampersand (&), apostrophe (‘), or a quotation mark (“).
FacebookSigningCertifi
cateThumbprint
The thumbprint for your Secure Sockets Layer (SSL)
encryption certificate. You must obtain a valid, registered
certificate from a provider.
Because this component uses Secure Sockets Layer (SSL)
encryption, you must install a server certificate that was
issued by a trusted certification authority. (For test
environments, you can create a self-signed certificate in IIS.)
You will need to paste the thumbprint for the certificate into
the settings file. To view the thumbprint in IIS Manager,
double-click the certificate and click the Details tab. We
recommend that you paste the thumbprint into a text file and
remove all spaces before you paste it into the settings file.
Caution
A thumbprint can
contain hidden
characters at the
beginning of the
thumbprint value. You
must delete these
extra characters
before you paste the
thumbprint into the
settings file.
FacebookSignInUrl The page that will contact Facebook to authenticate users.
For example:
http://www.[StoreFront_Name].com:[StoreFrontUrlPort_Public
][PublishingPortalRelativePath]/pages/Login.aspx
FacebookSslCertificate
AuthorityCerFileName
Enter the file name.
FacebookSslCertificate
AuthorityThumbprint
Enter the thumbprint. Remove all spaces.](https://image.slidesharecdn.com/retaildeploymentbookvijaysharma-150413054227-conversion-gate01/75/Dynamics-Ax-Retail-Installation-Vijay-Sharma-40-2048.jpg)


This document provides instructions for installing retail components in Microsoft Dynamics AX 2012 R3. It outlines the recommended order for installing components such as Retail Headquarters, Commerce Data Exchange services, and POS applications. It also provides details on installing Retail essentials and configuring individual components like Retail Headquarters and Real-time Service.


