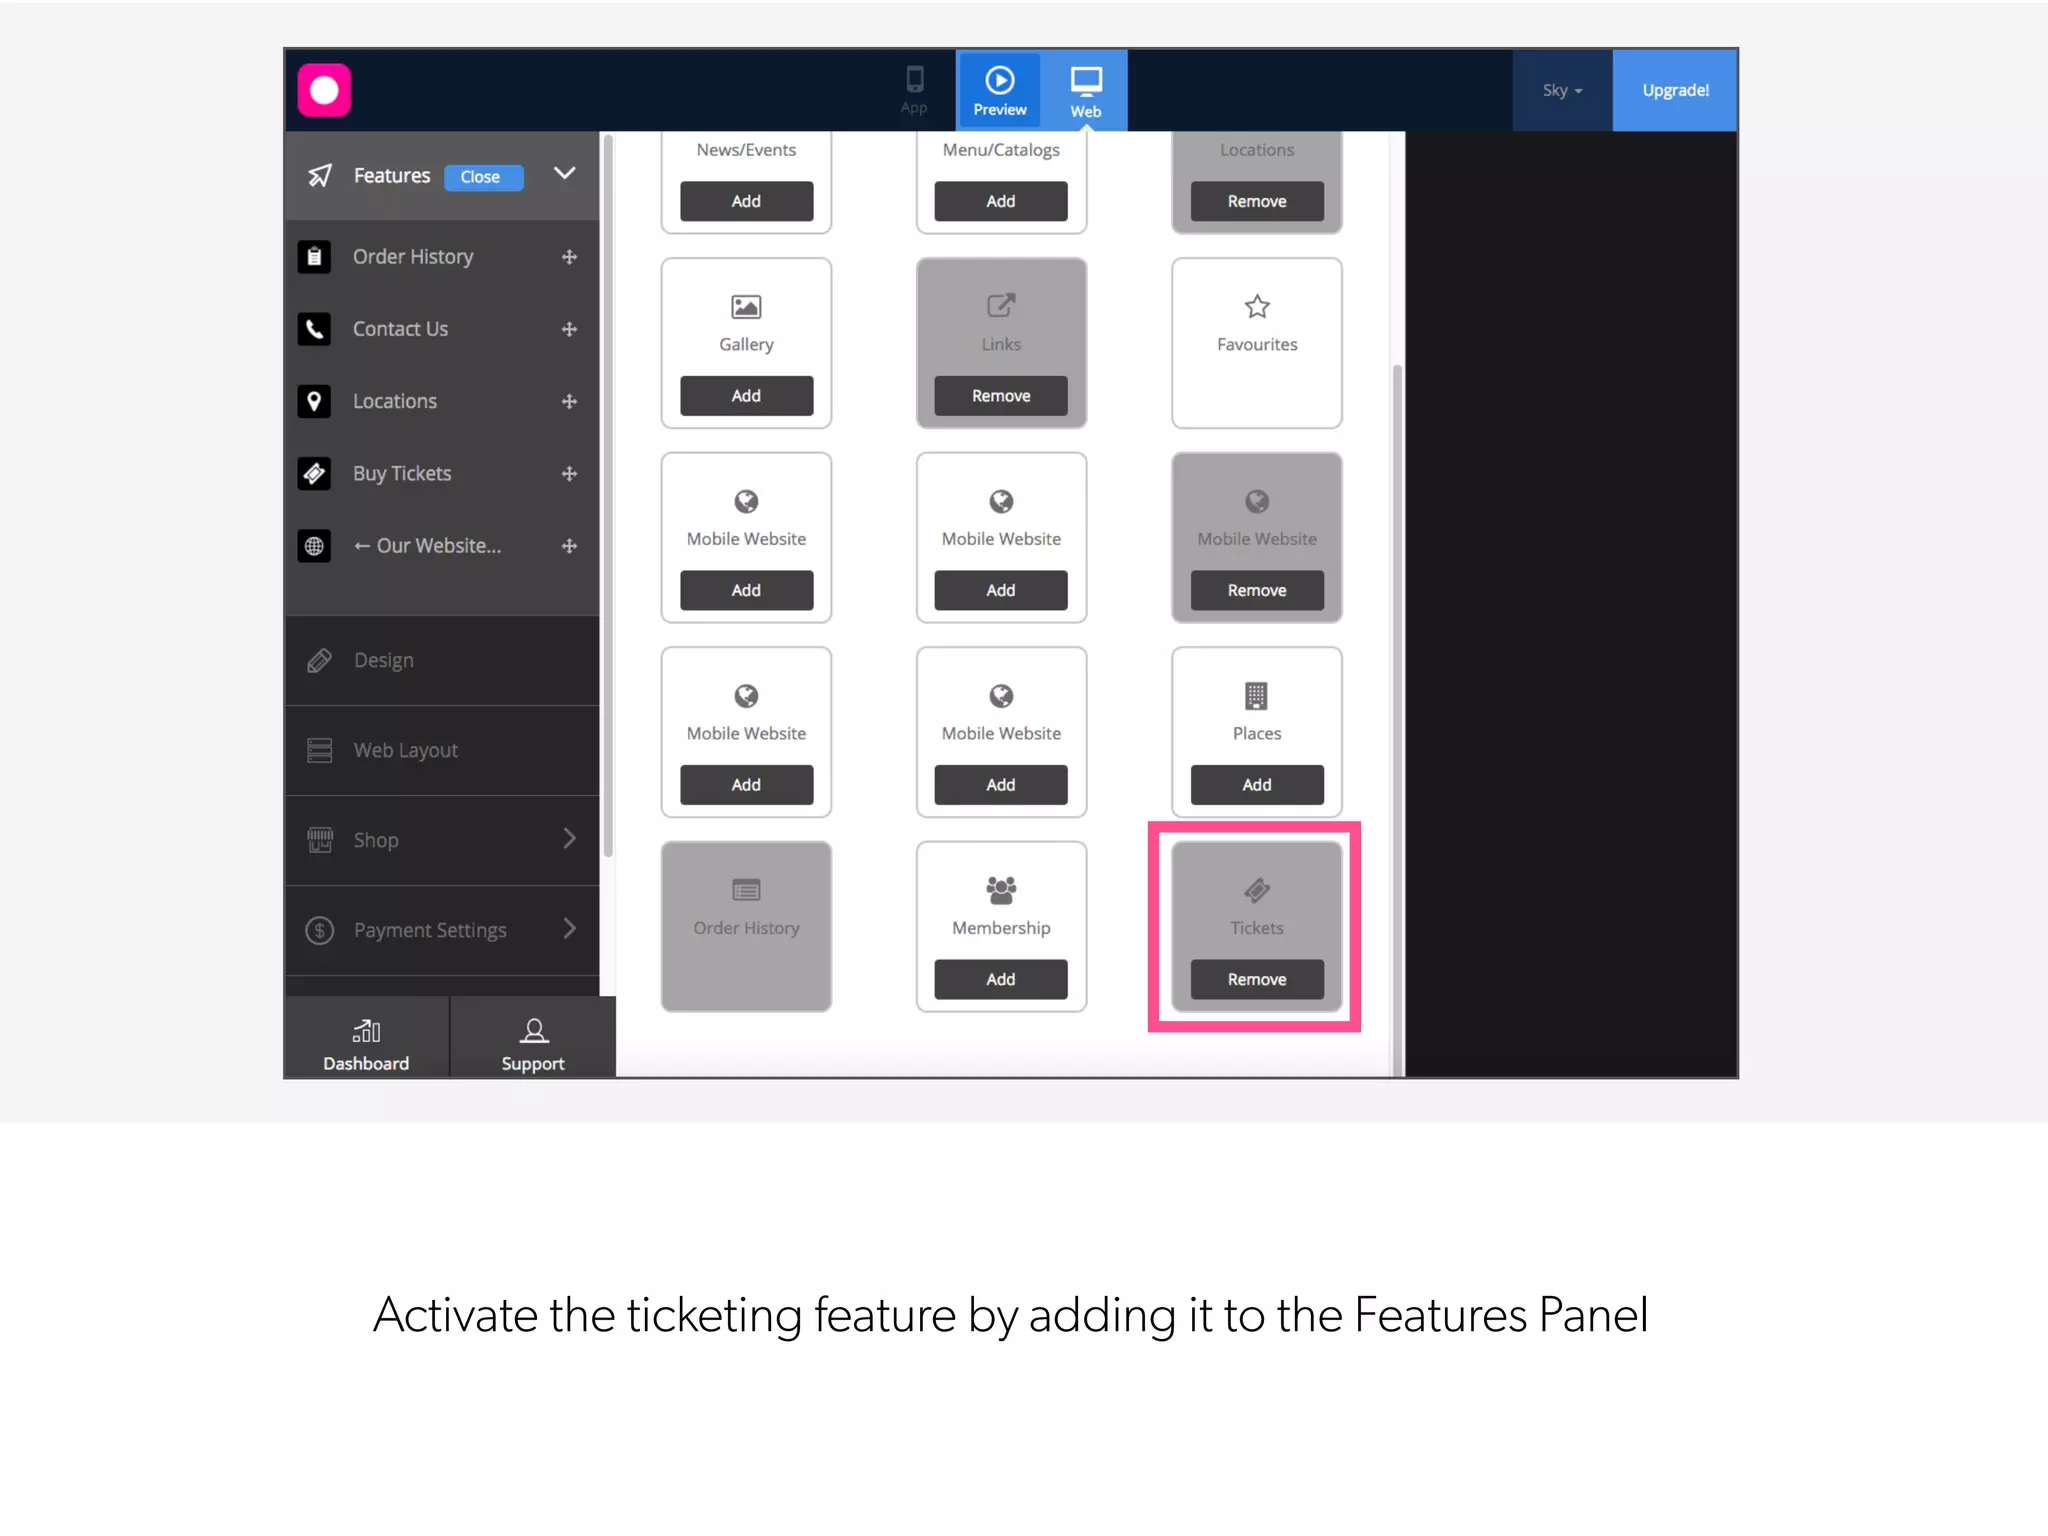
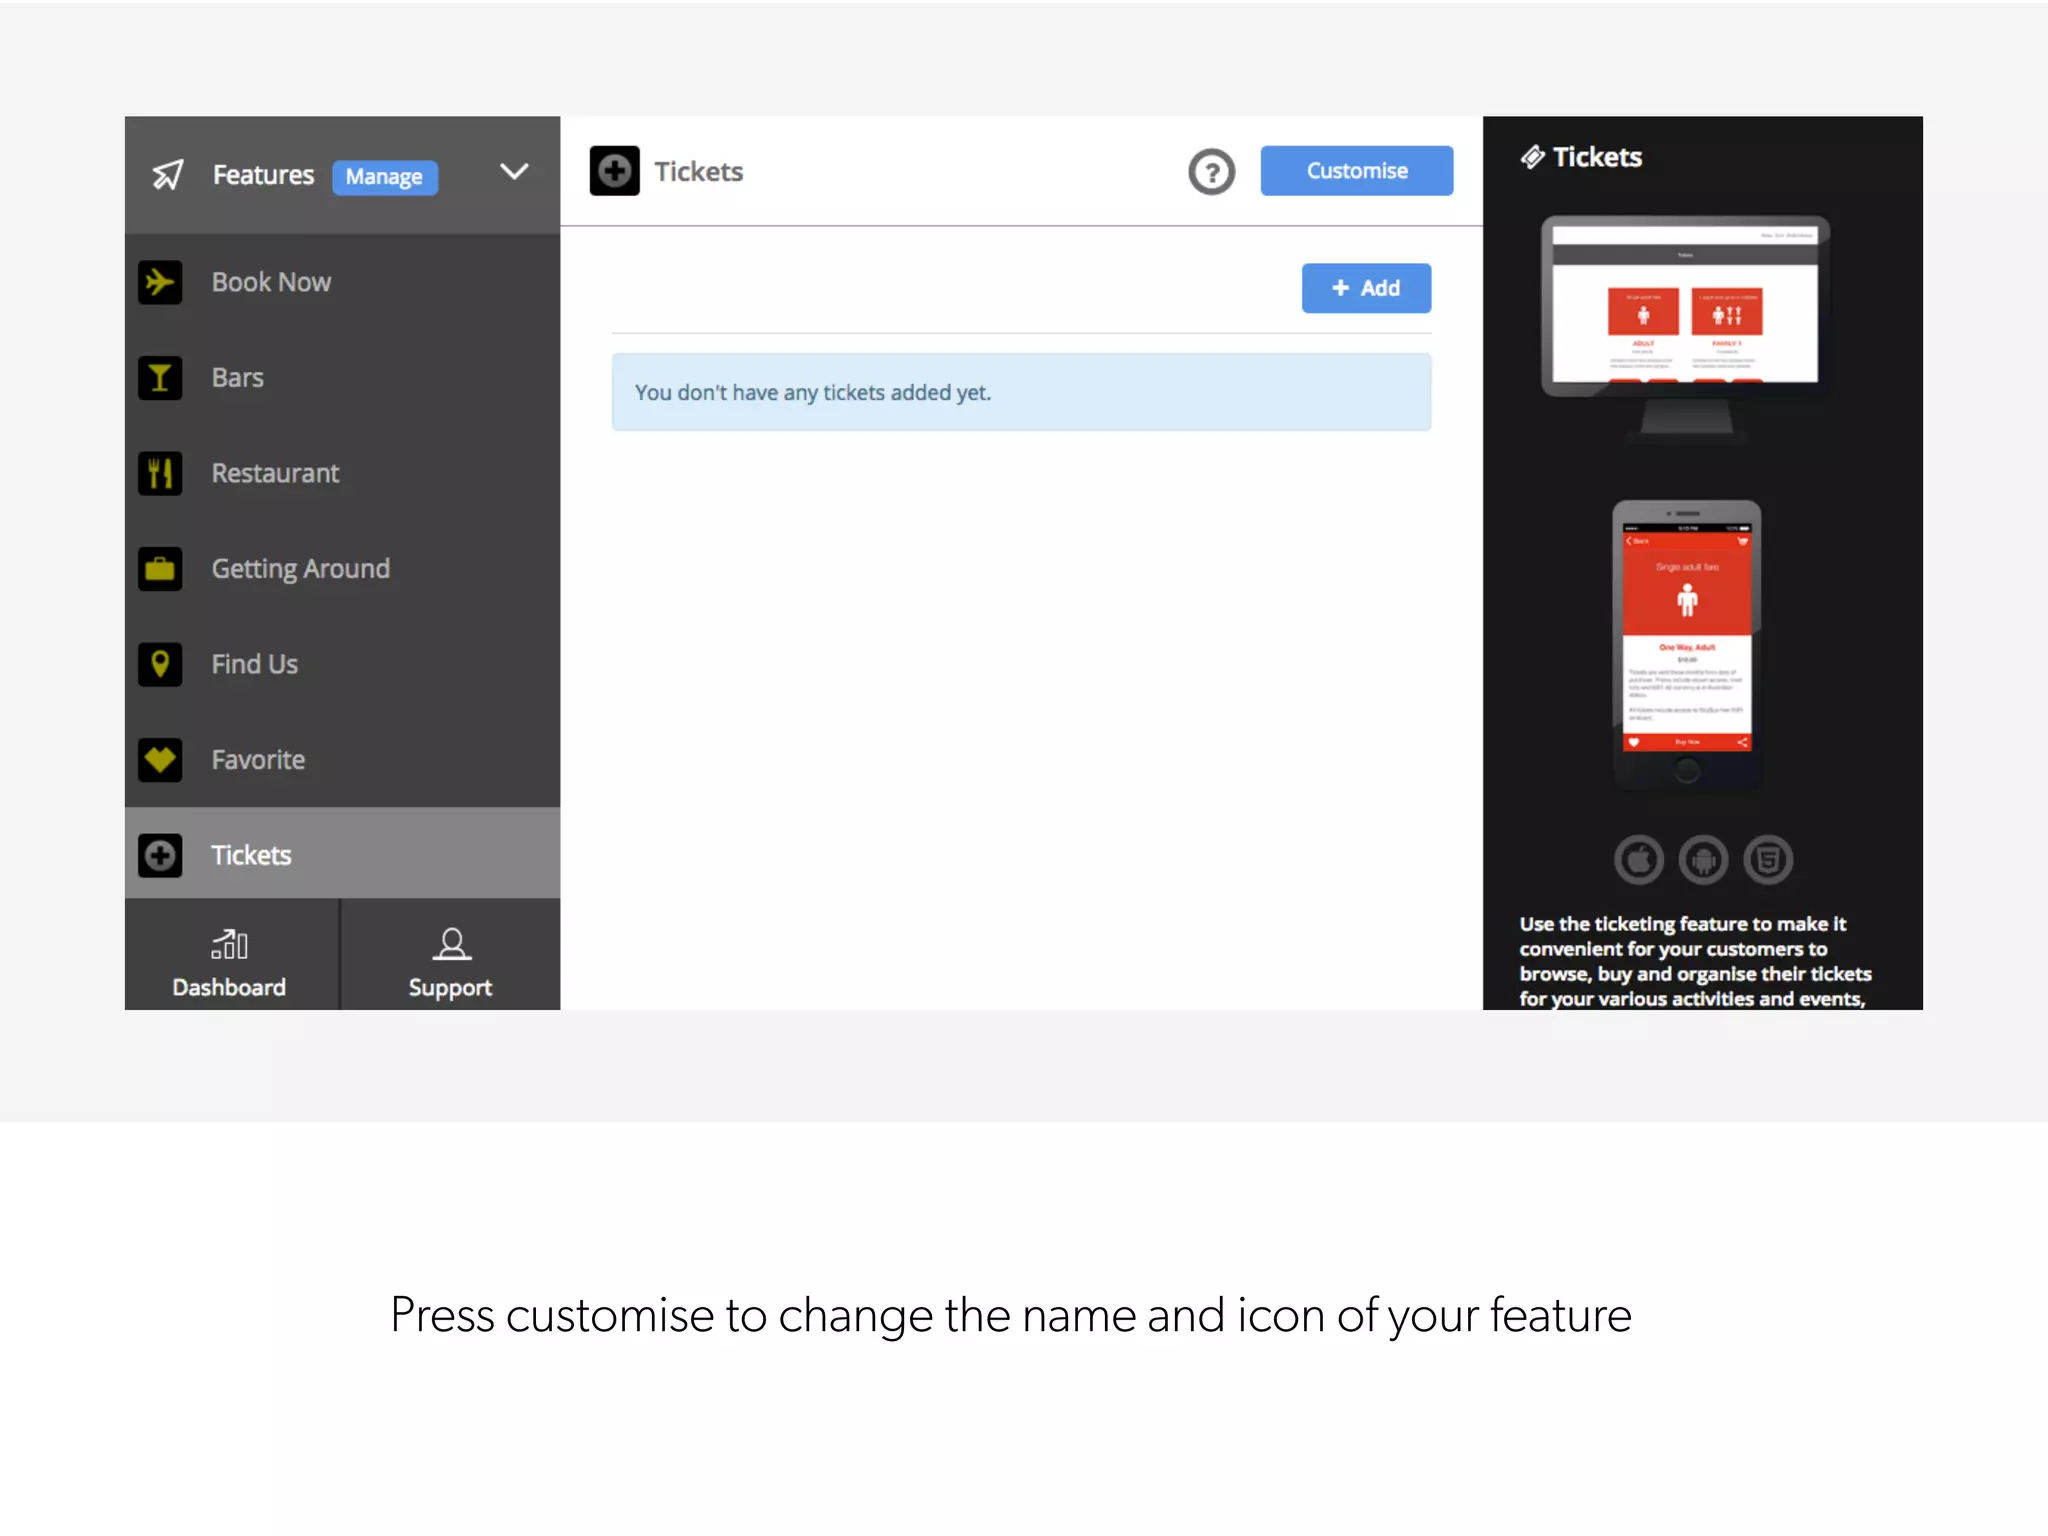
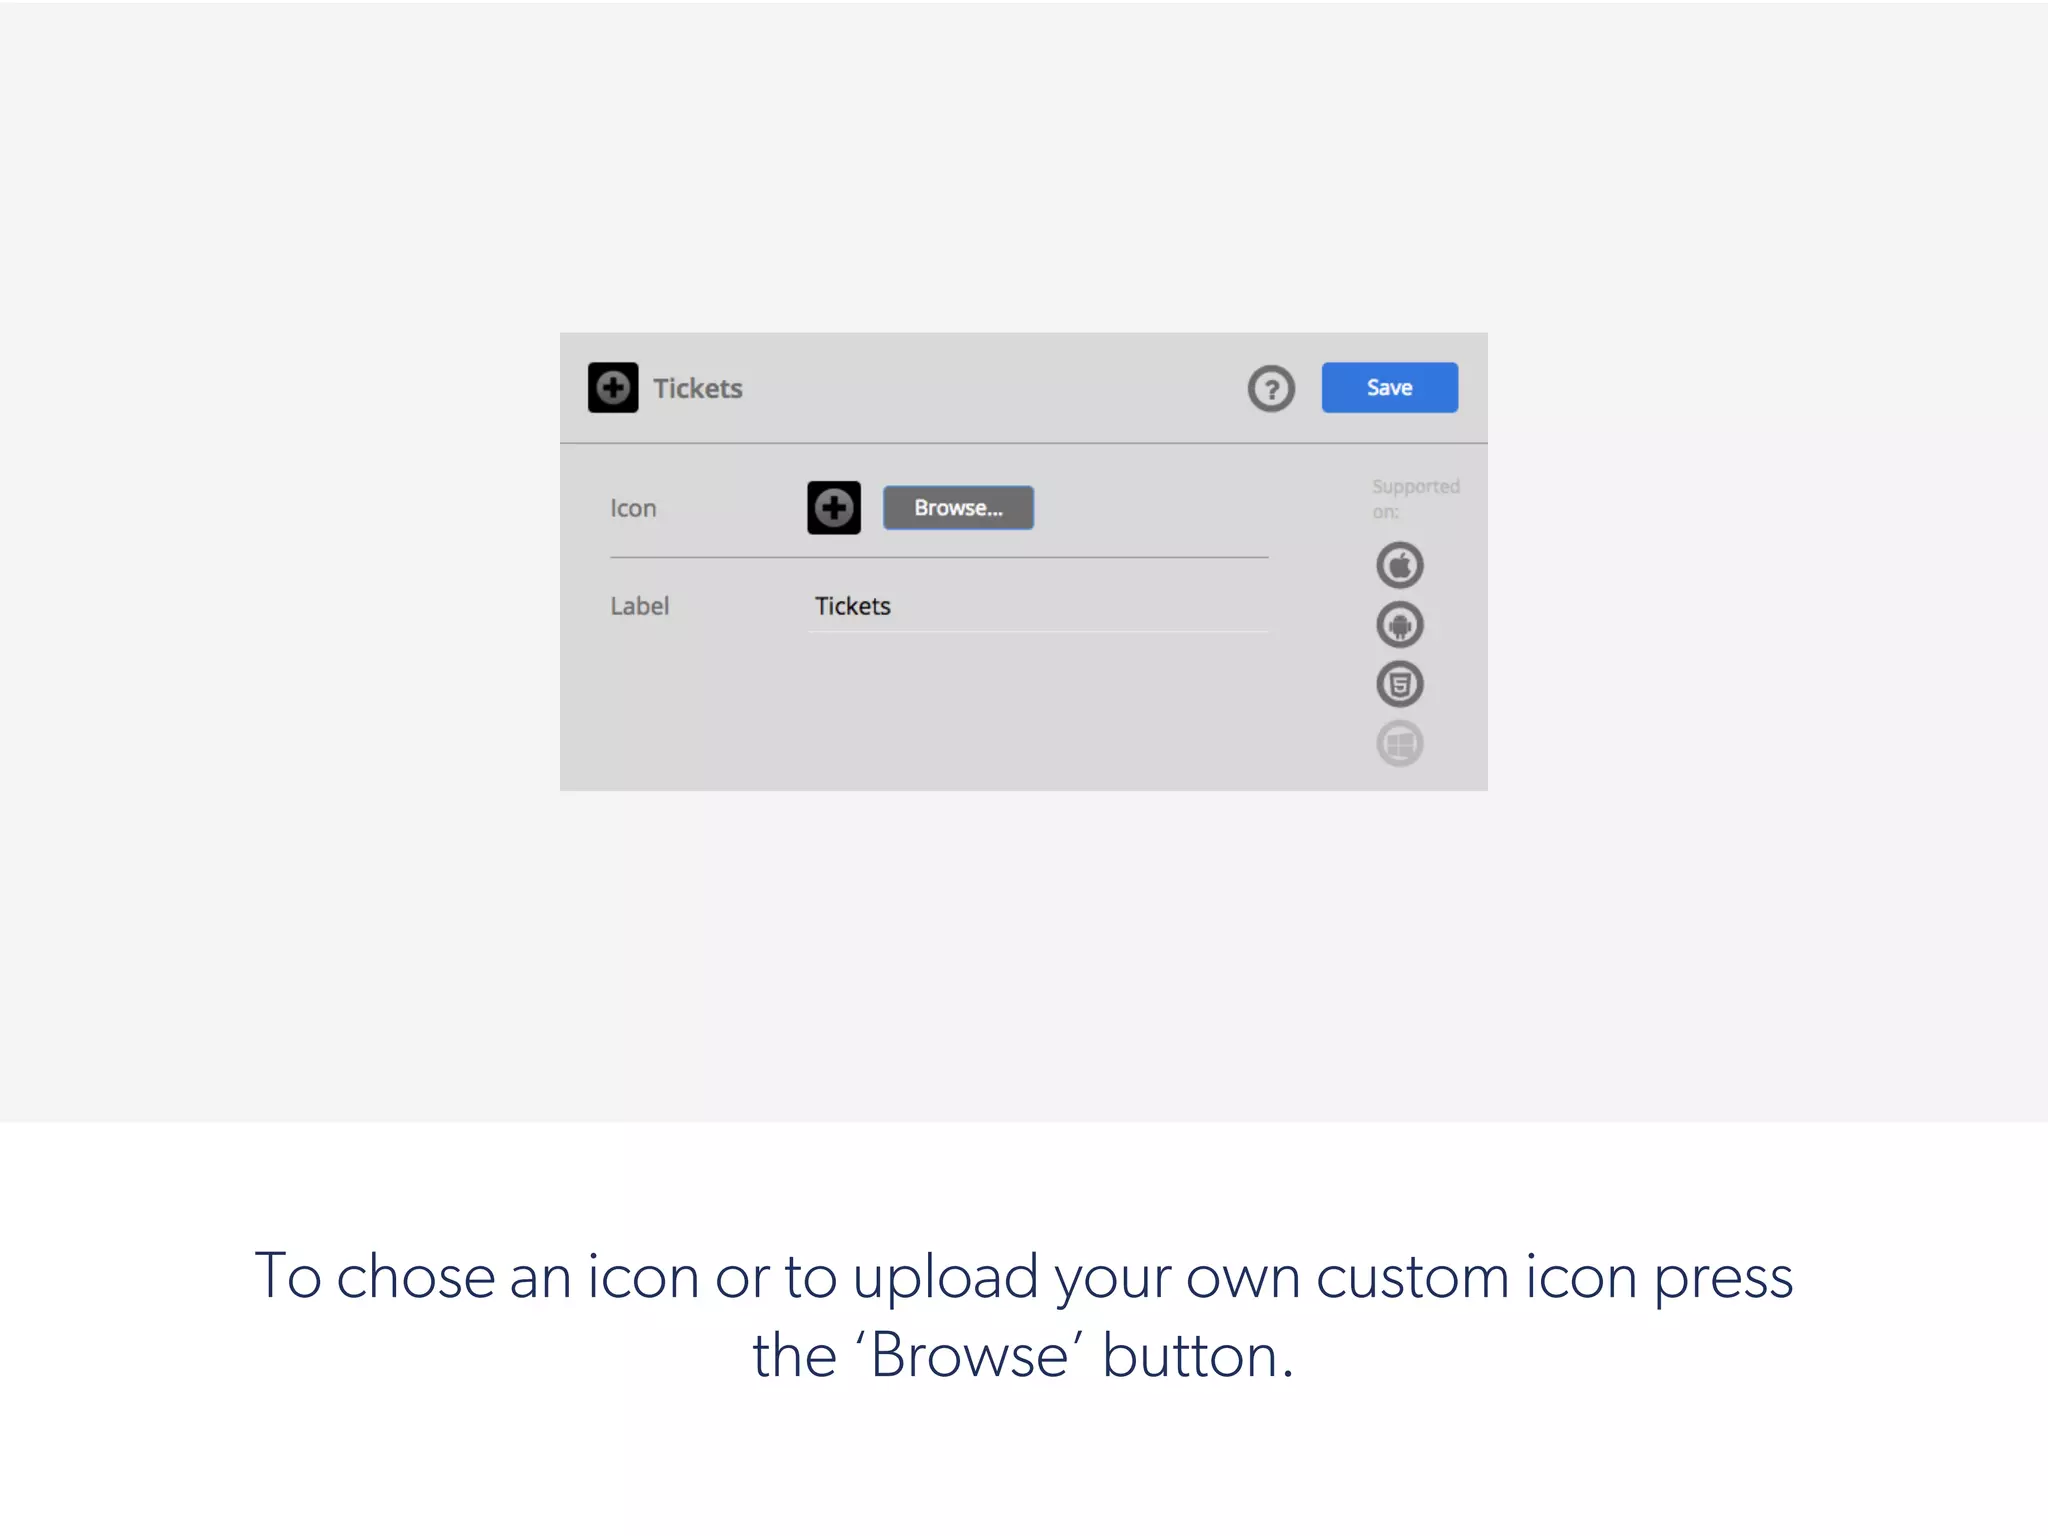
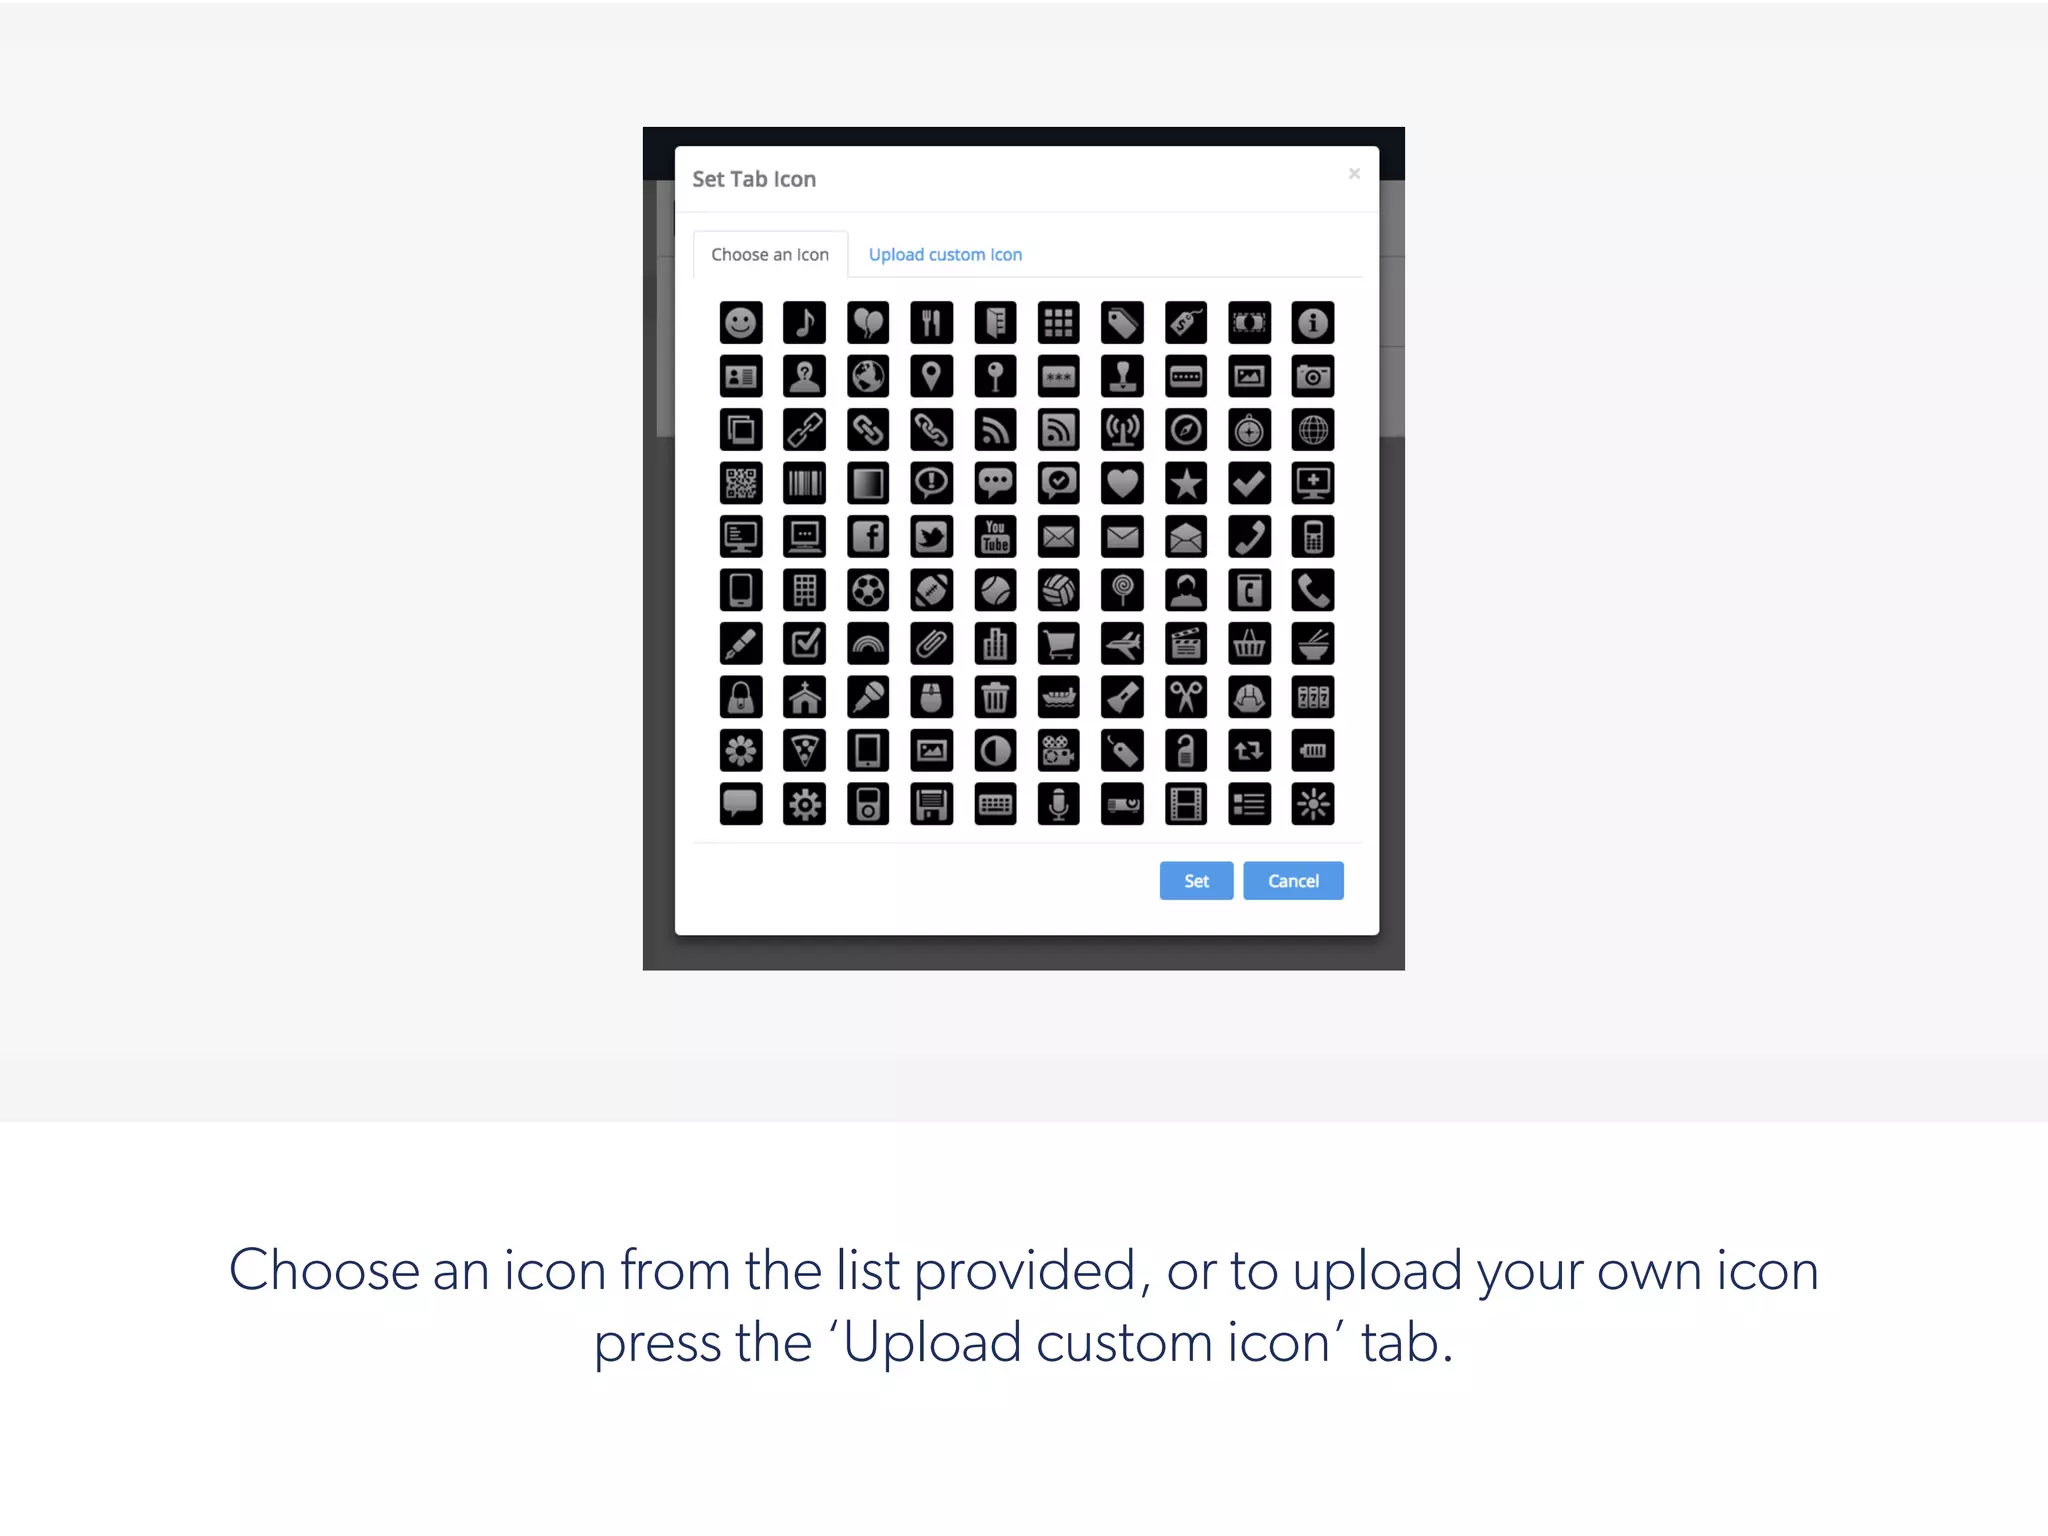
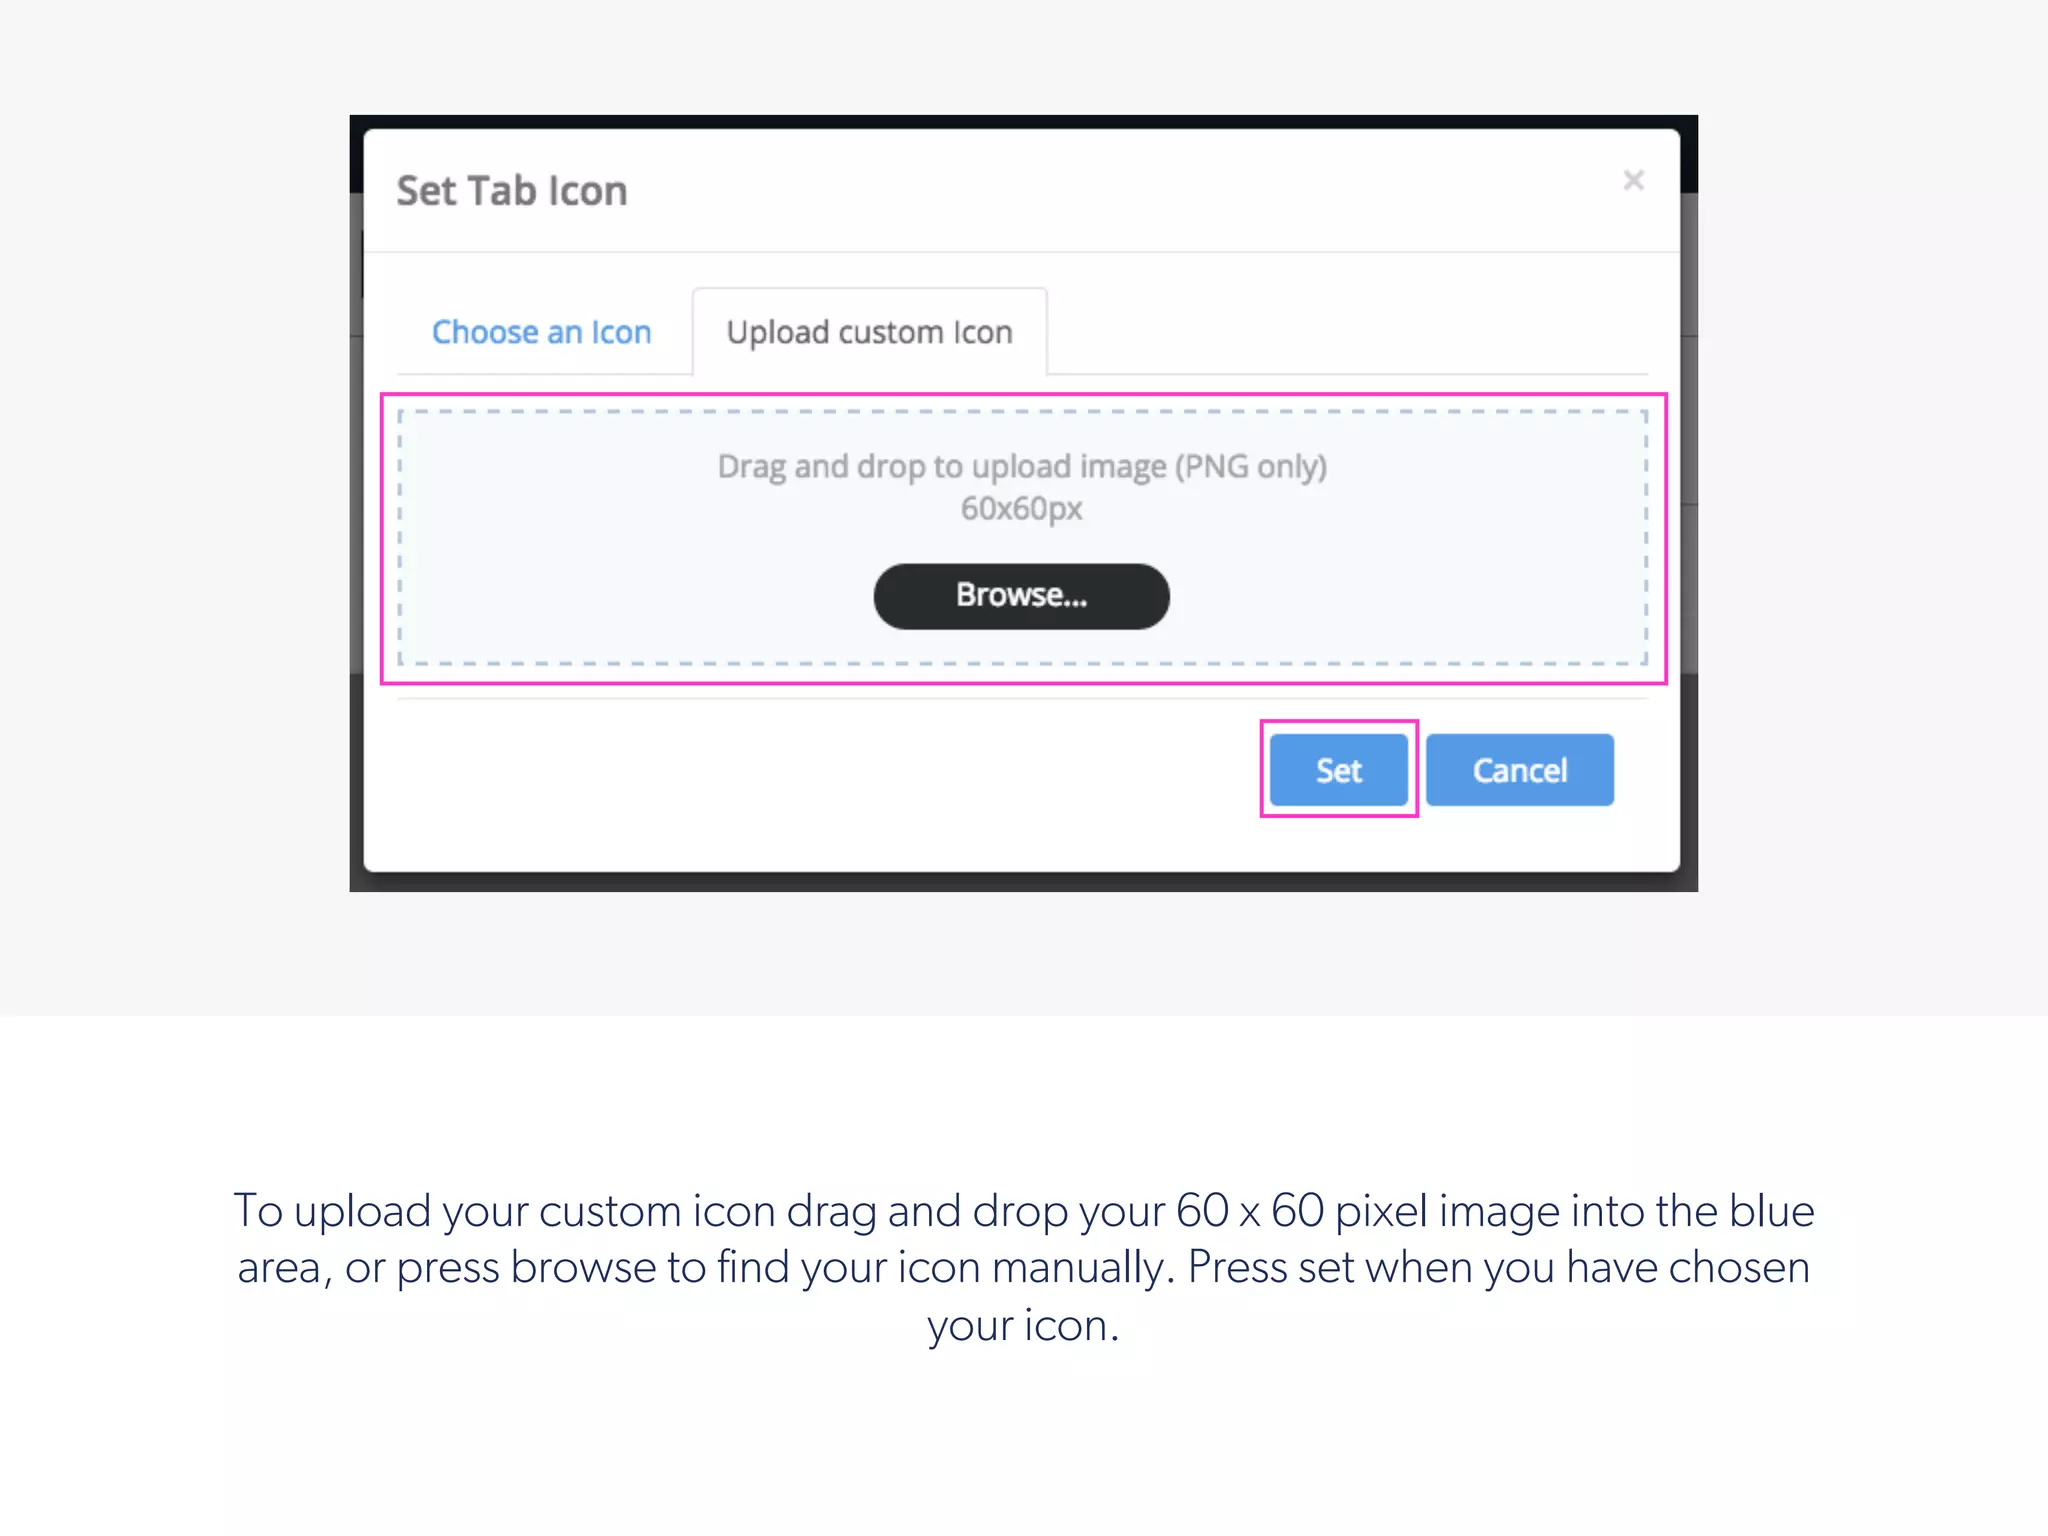
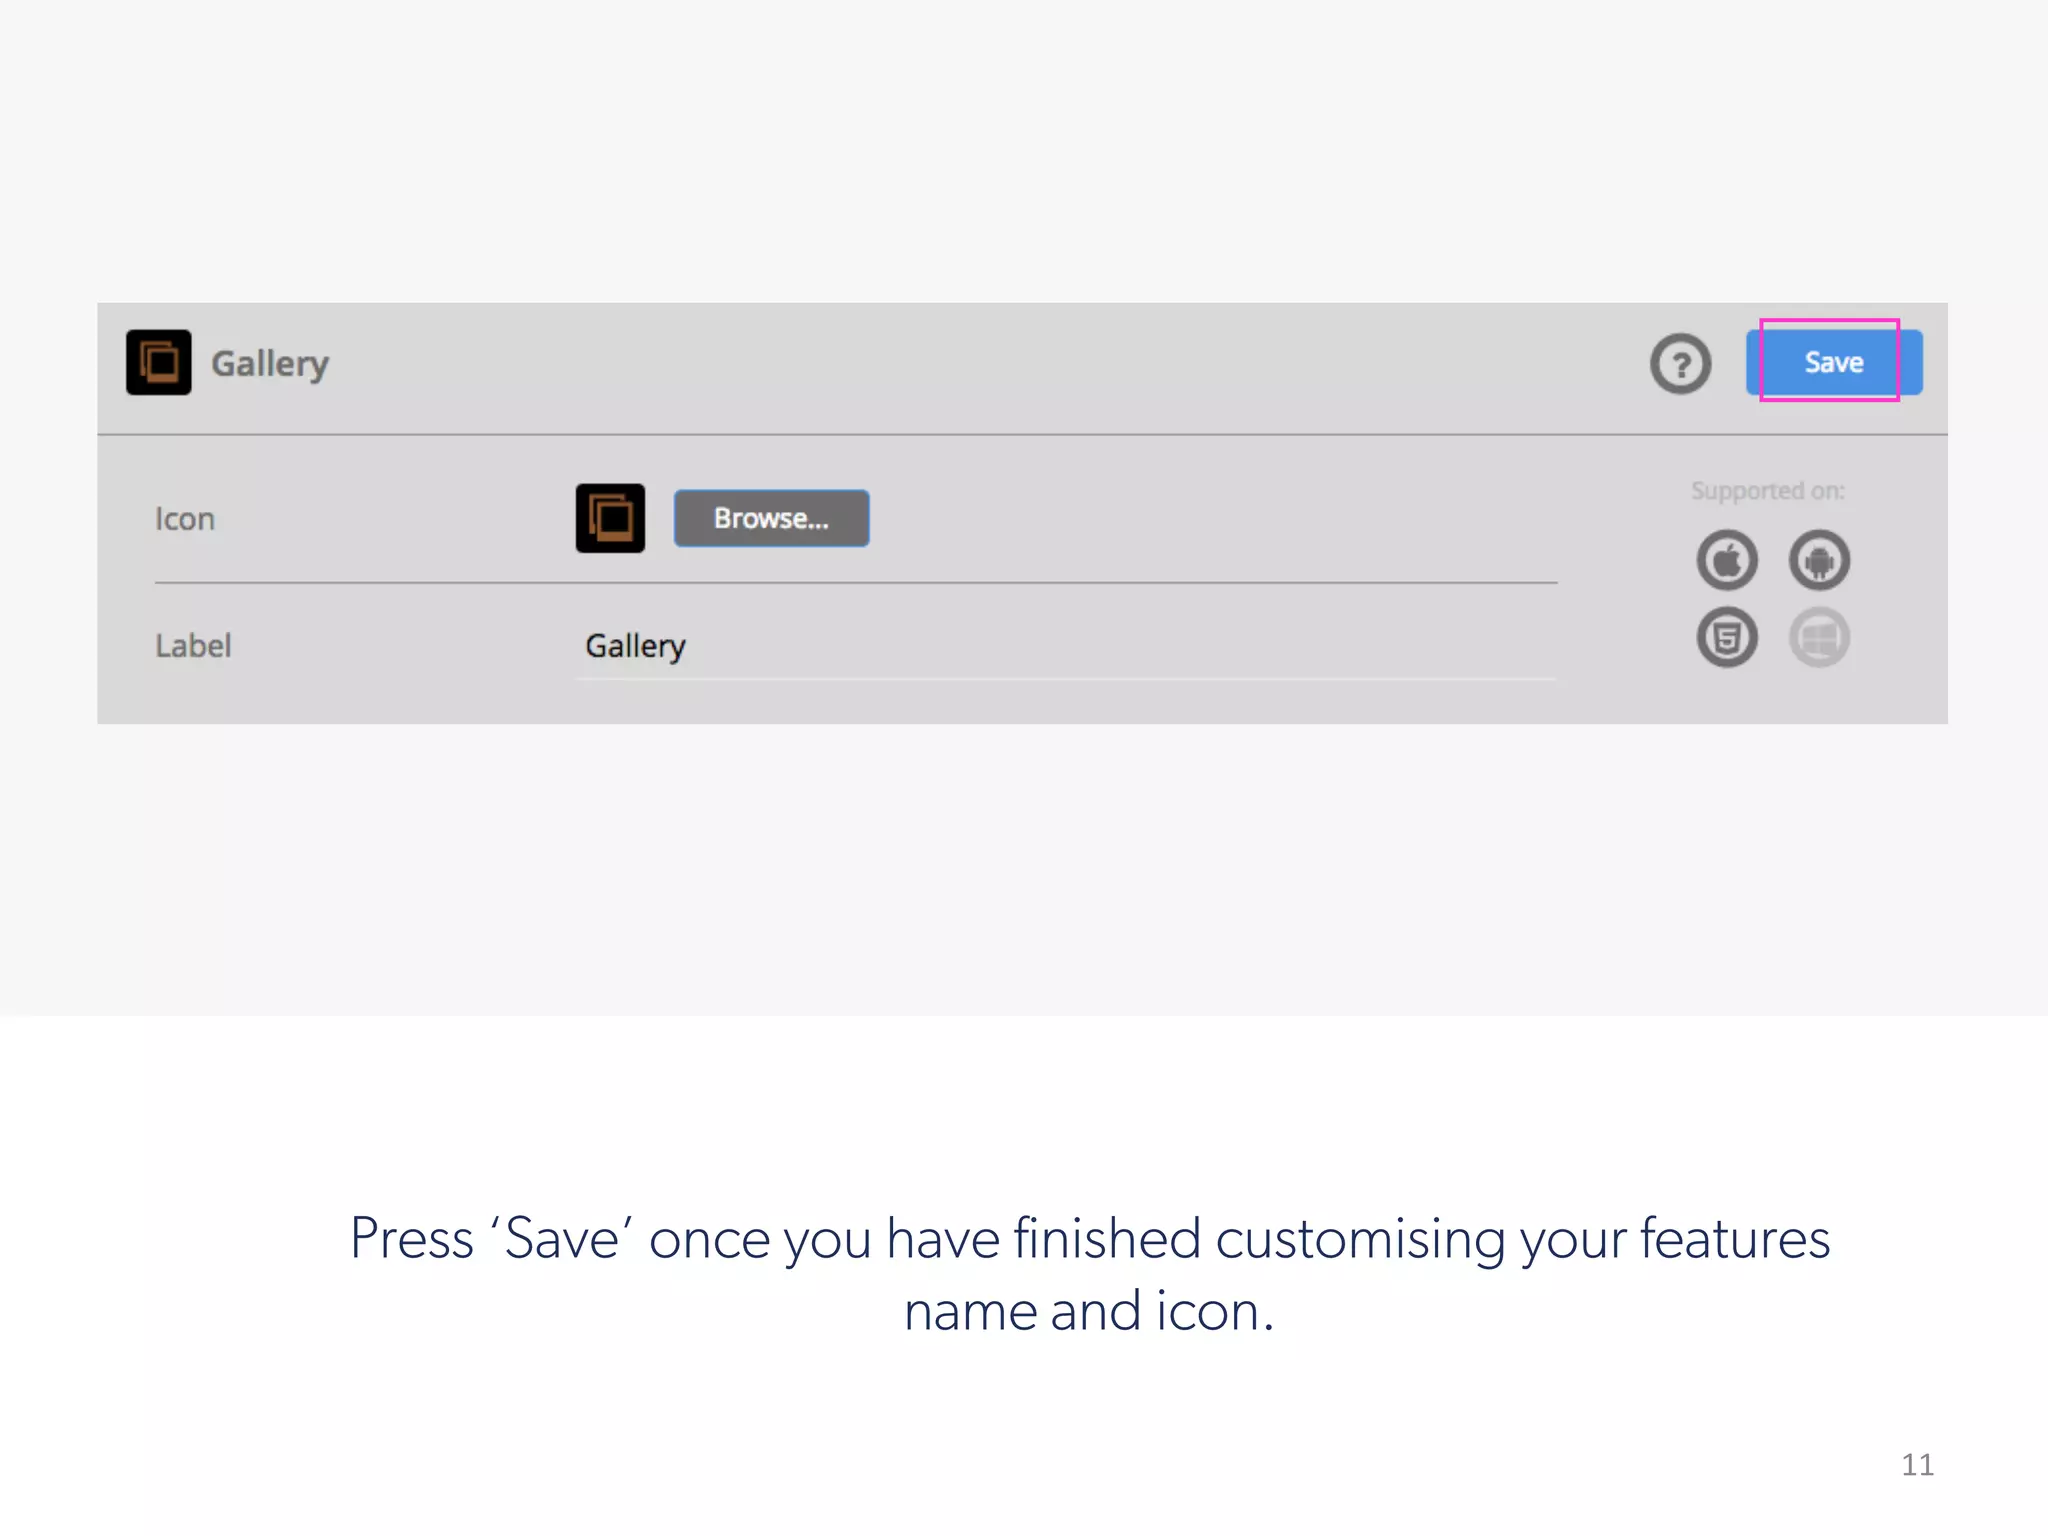
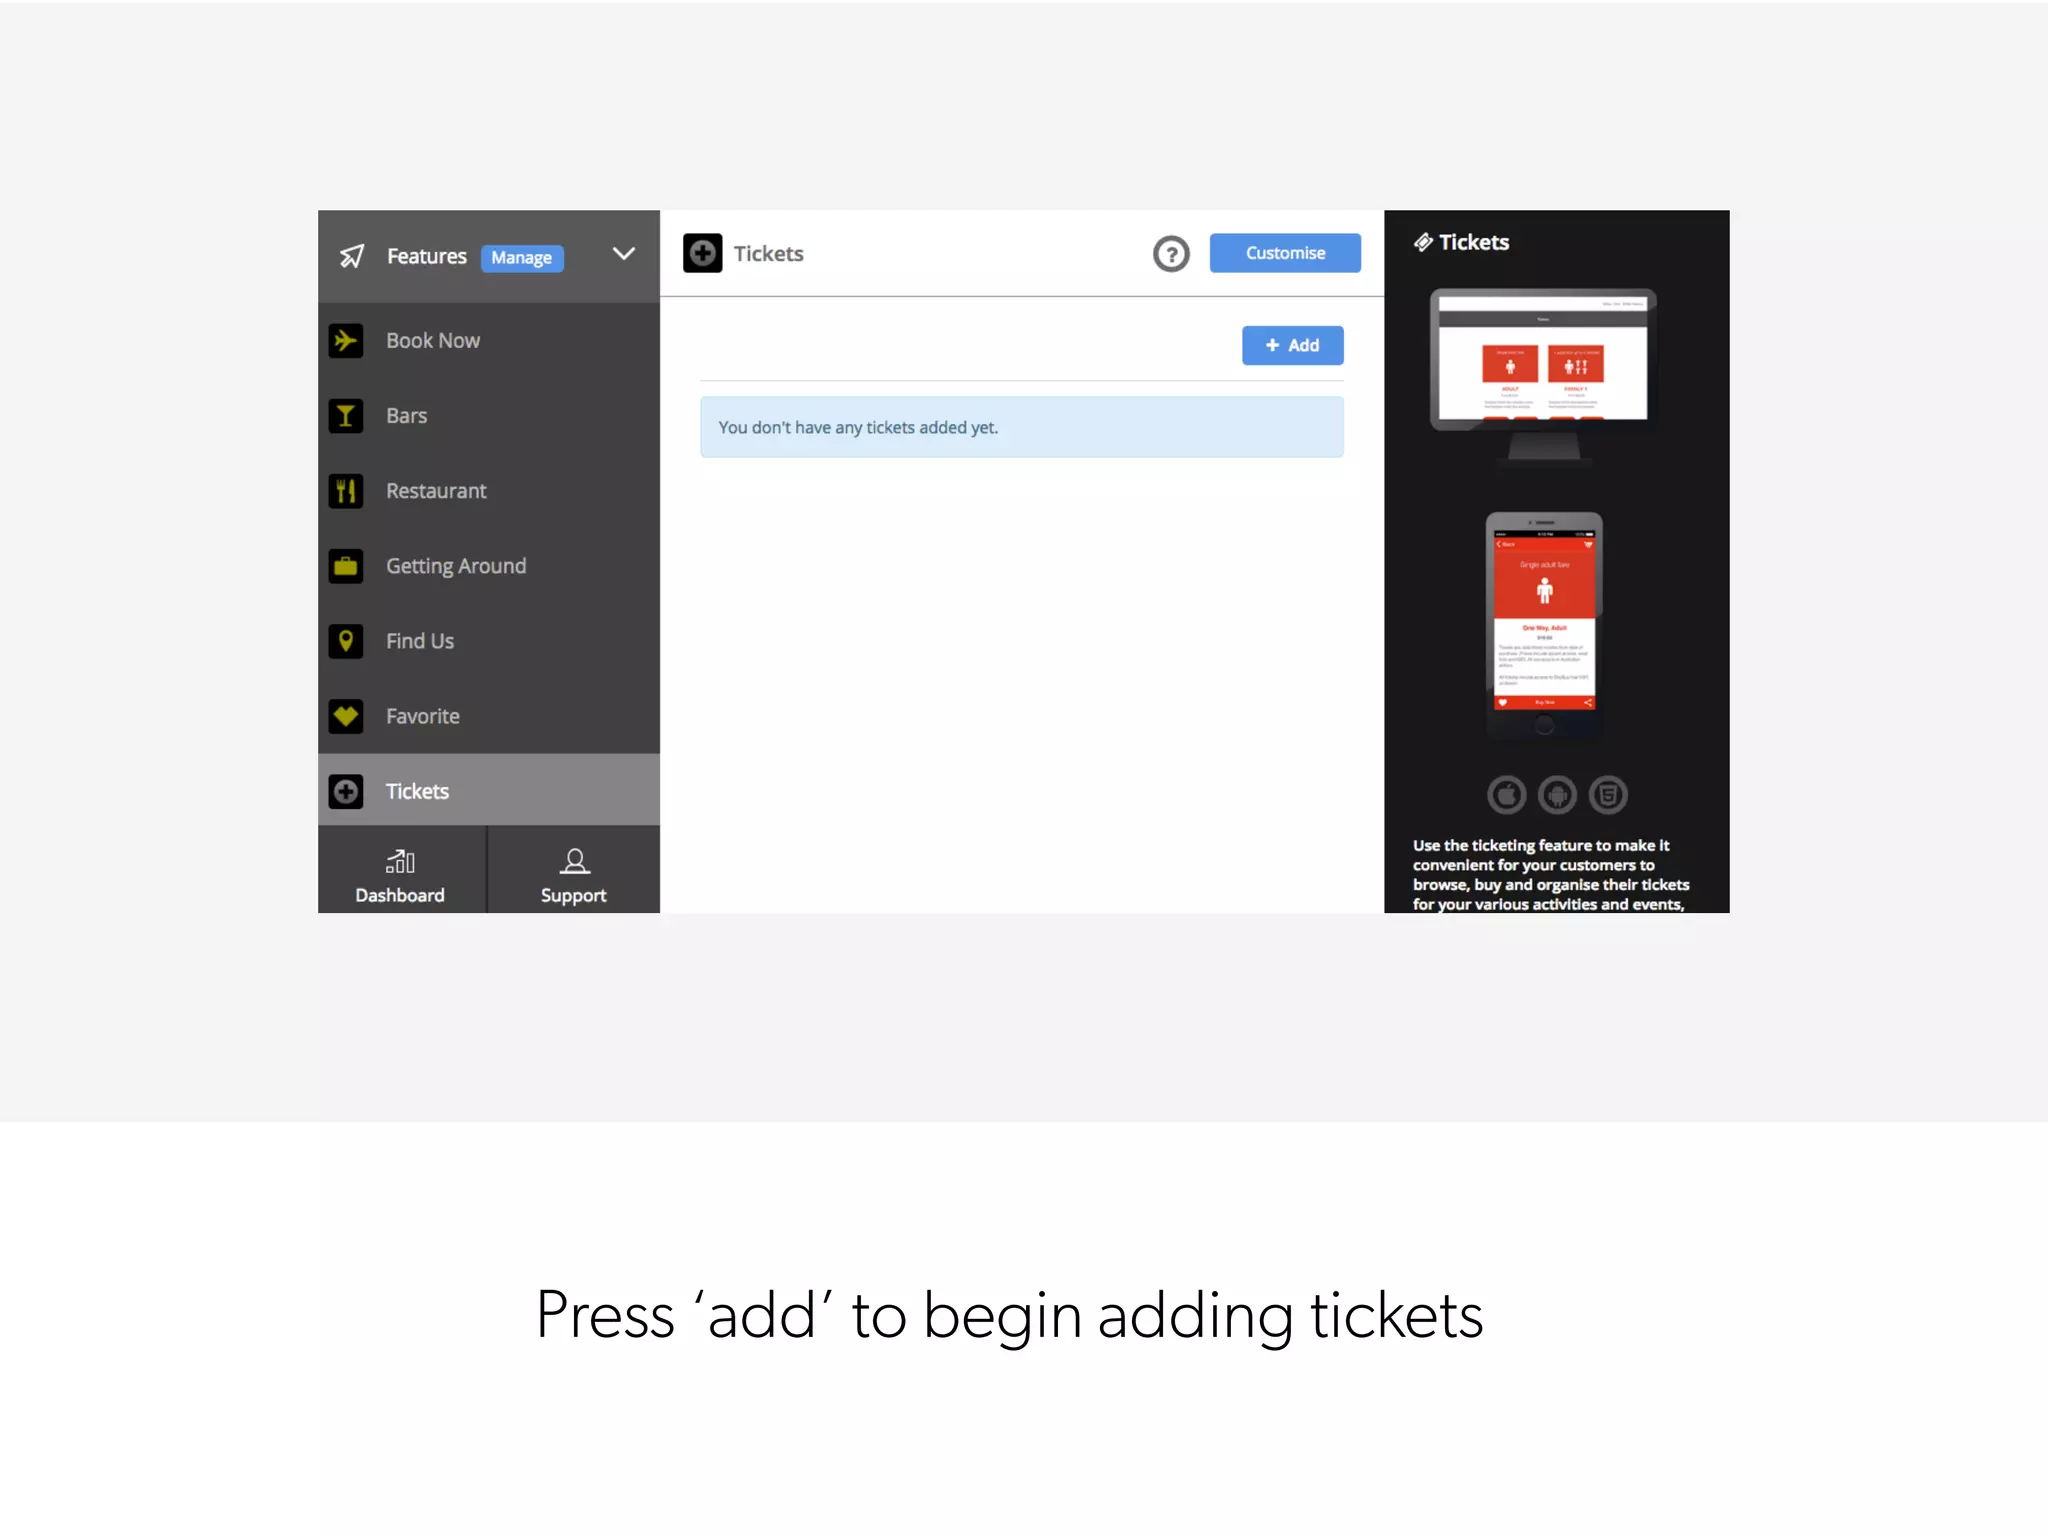
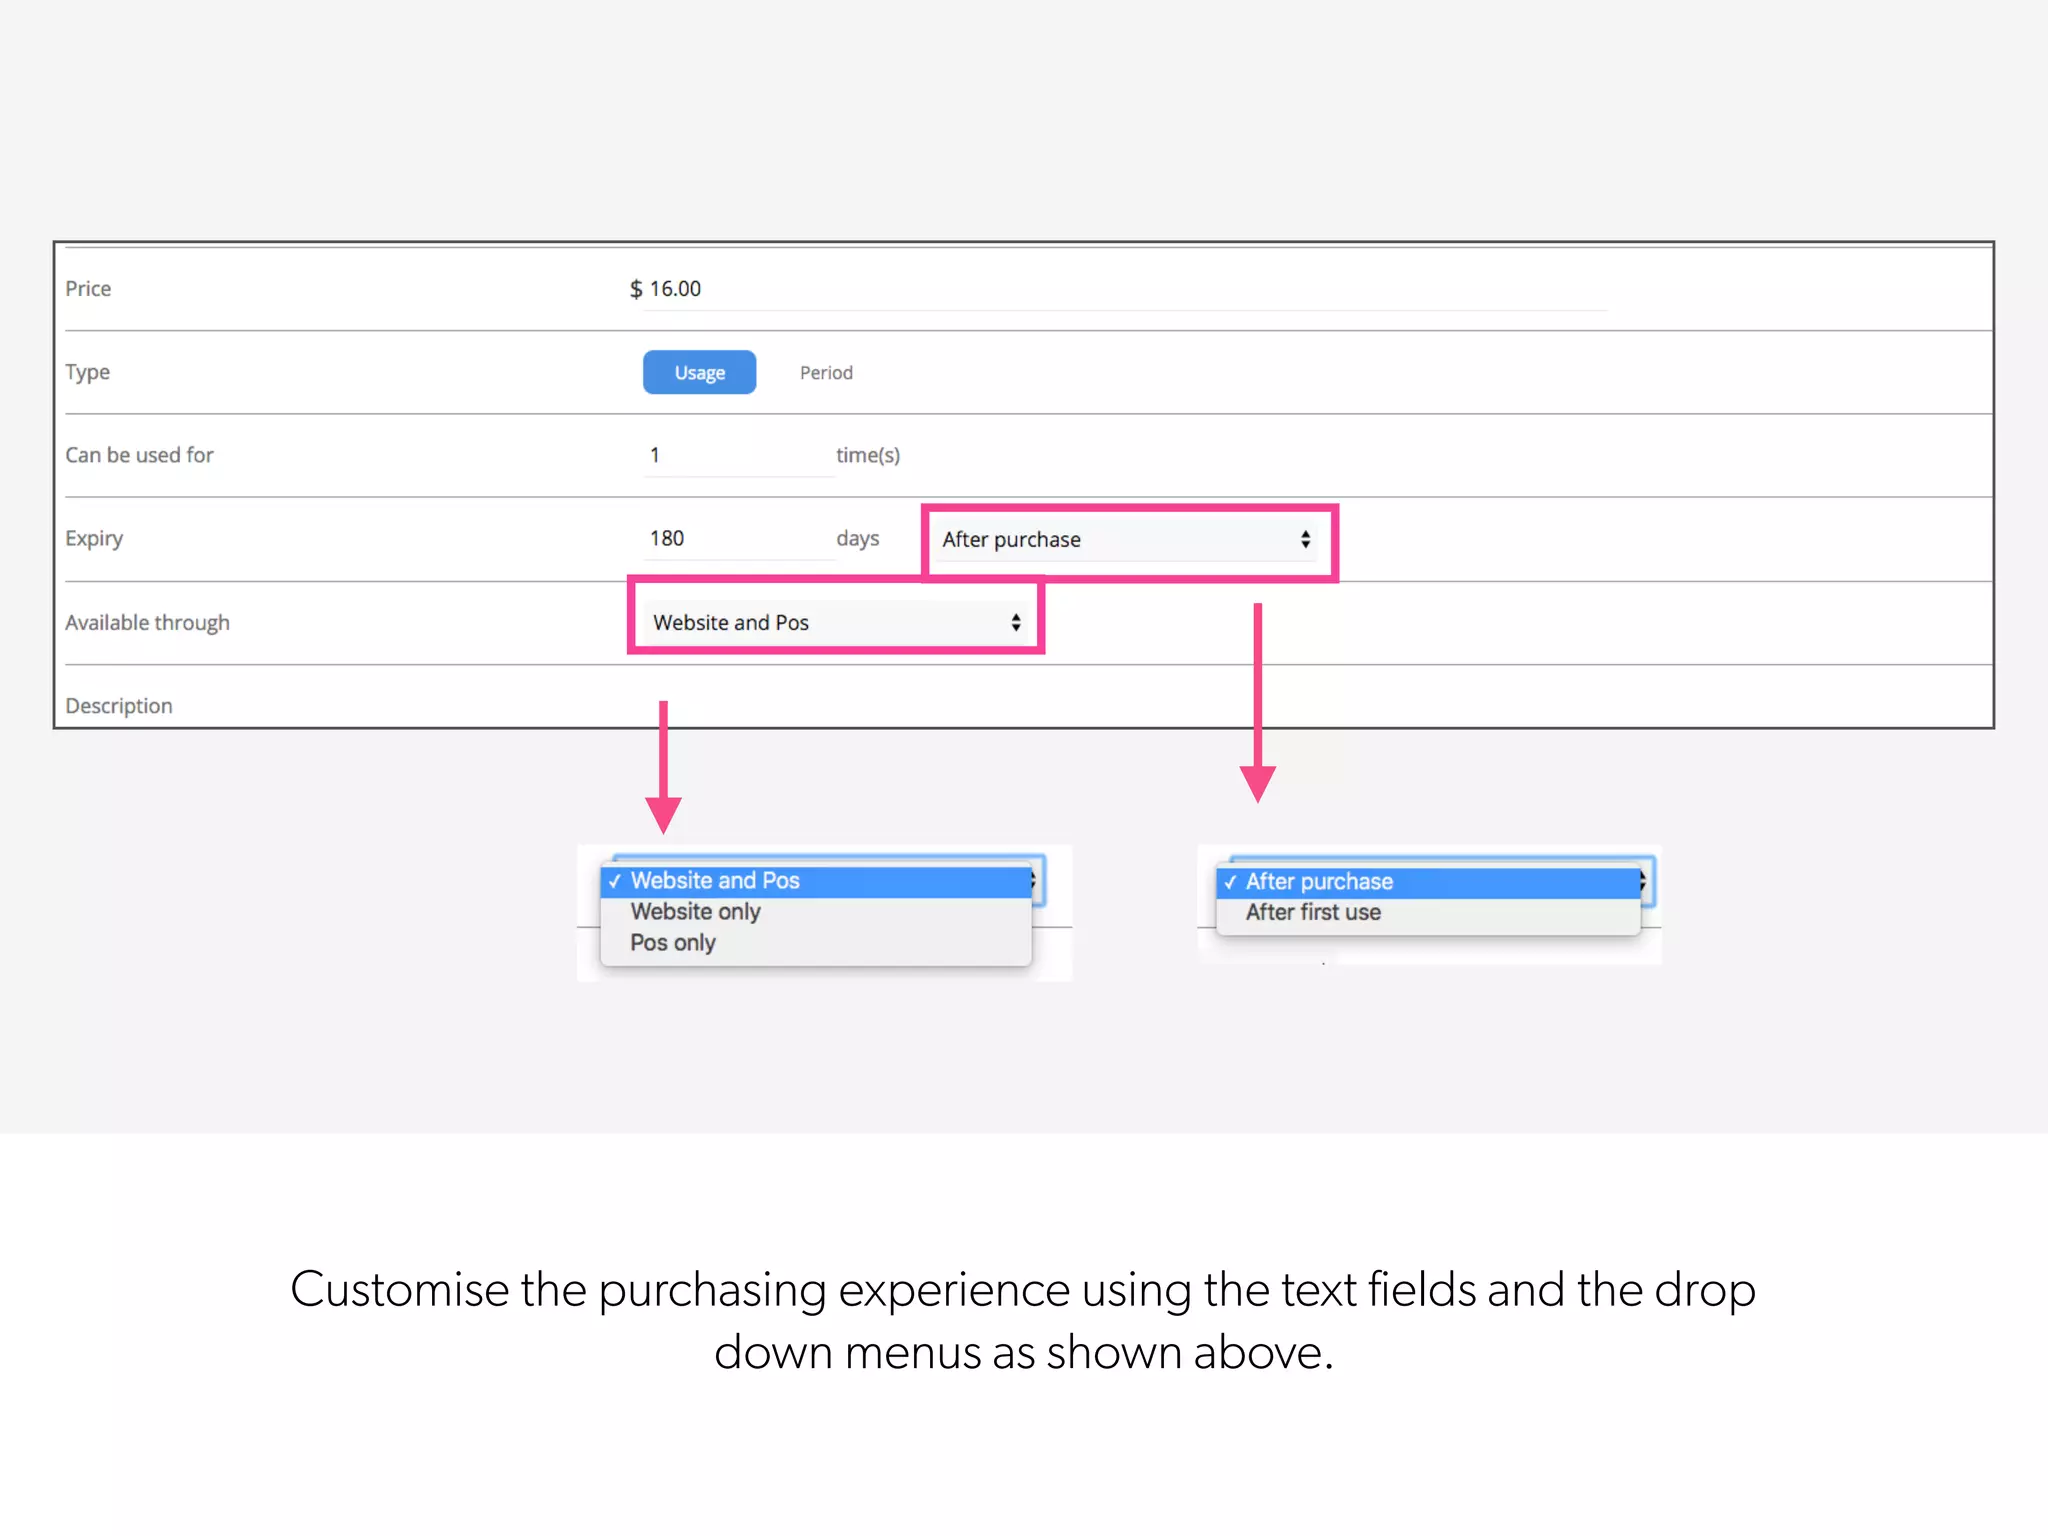
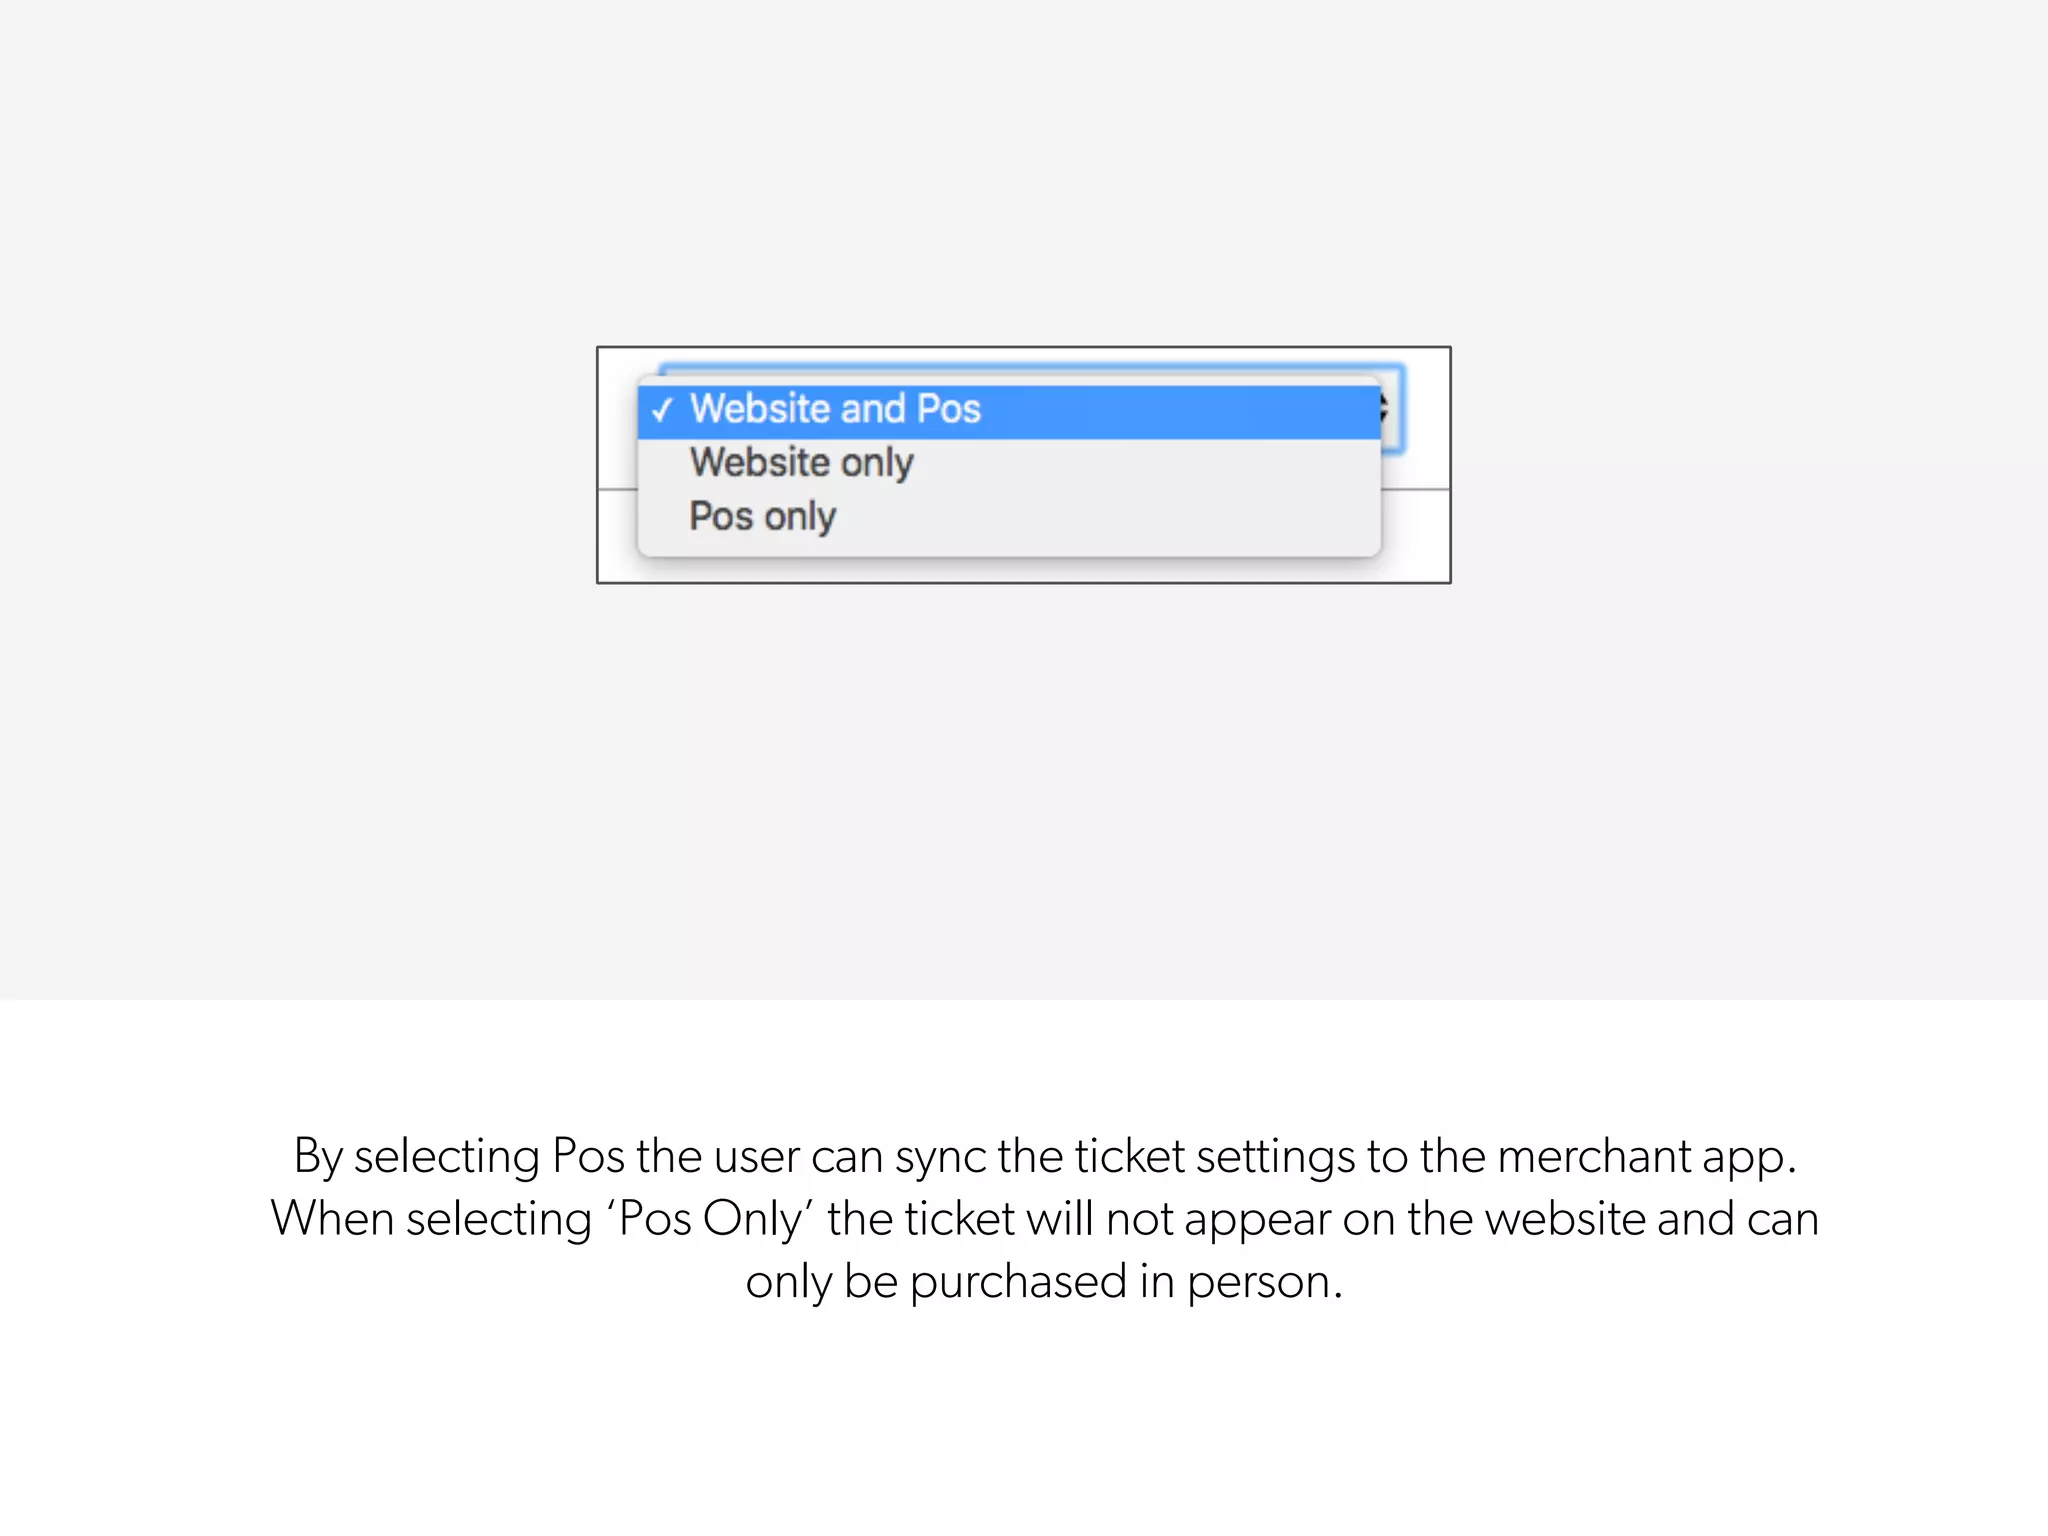
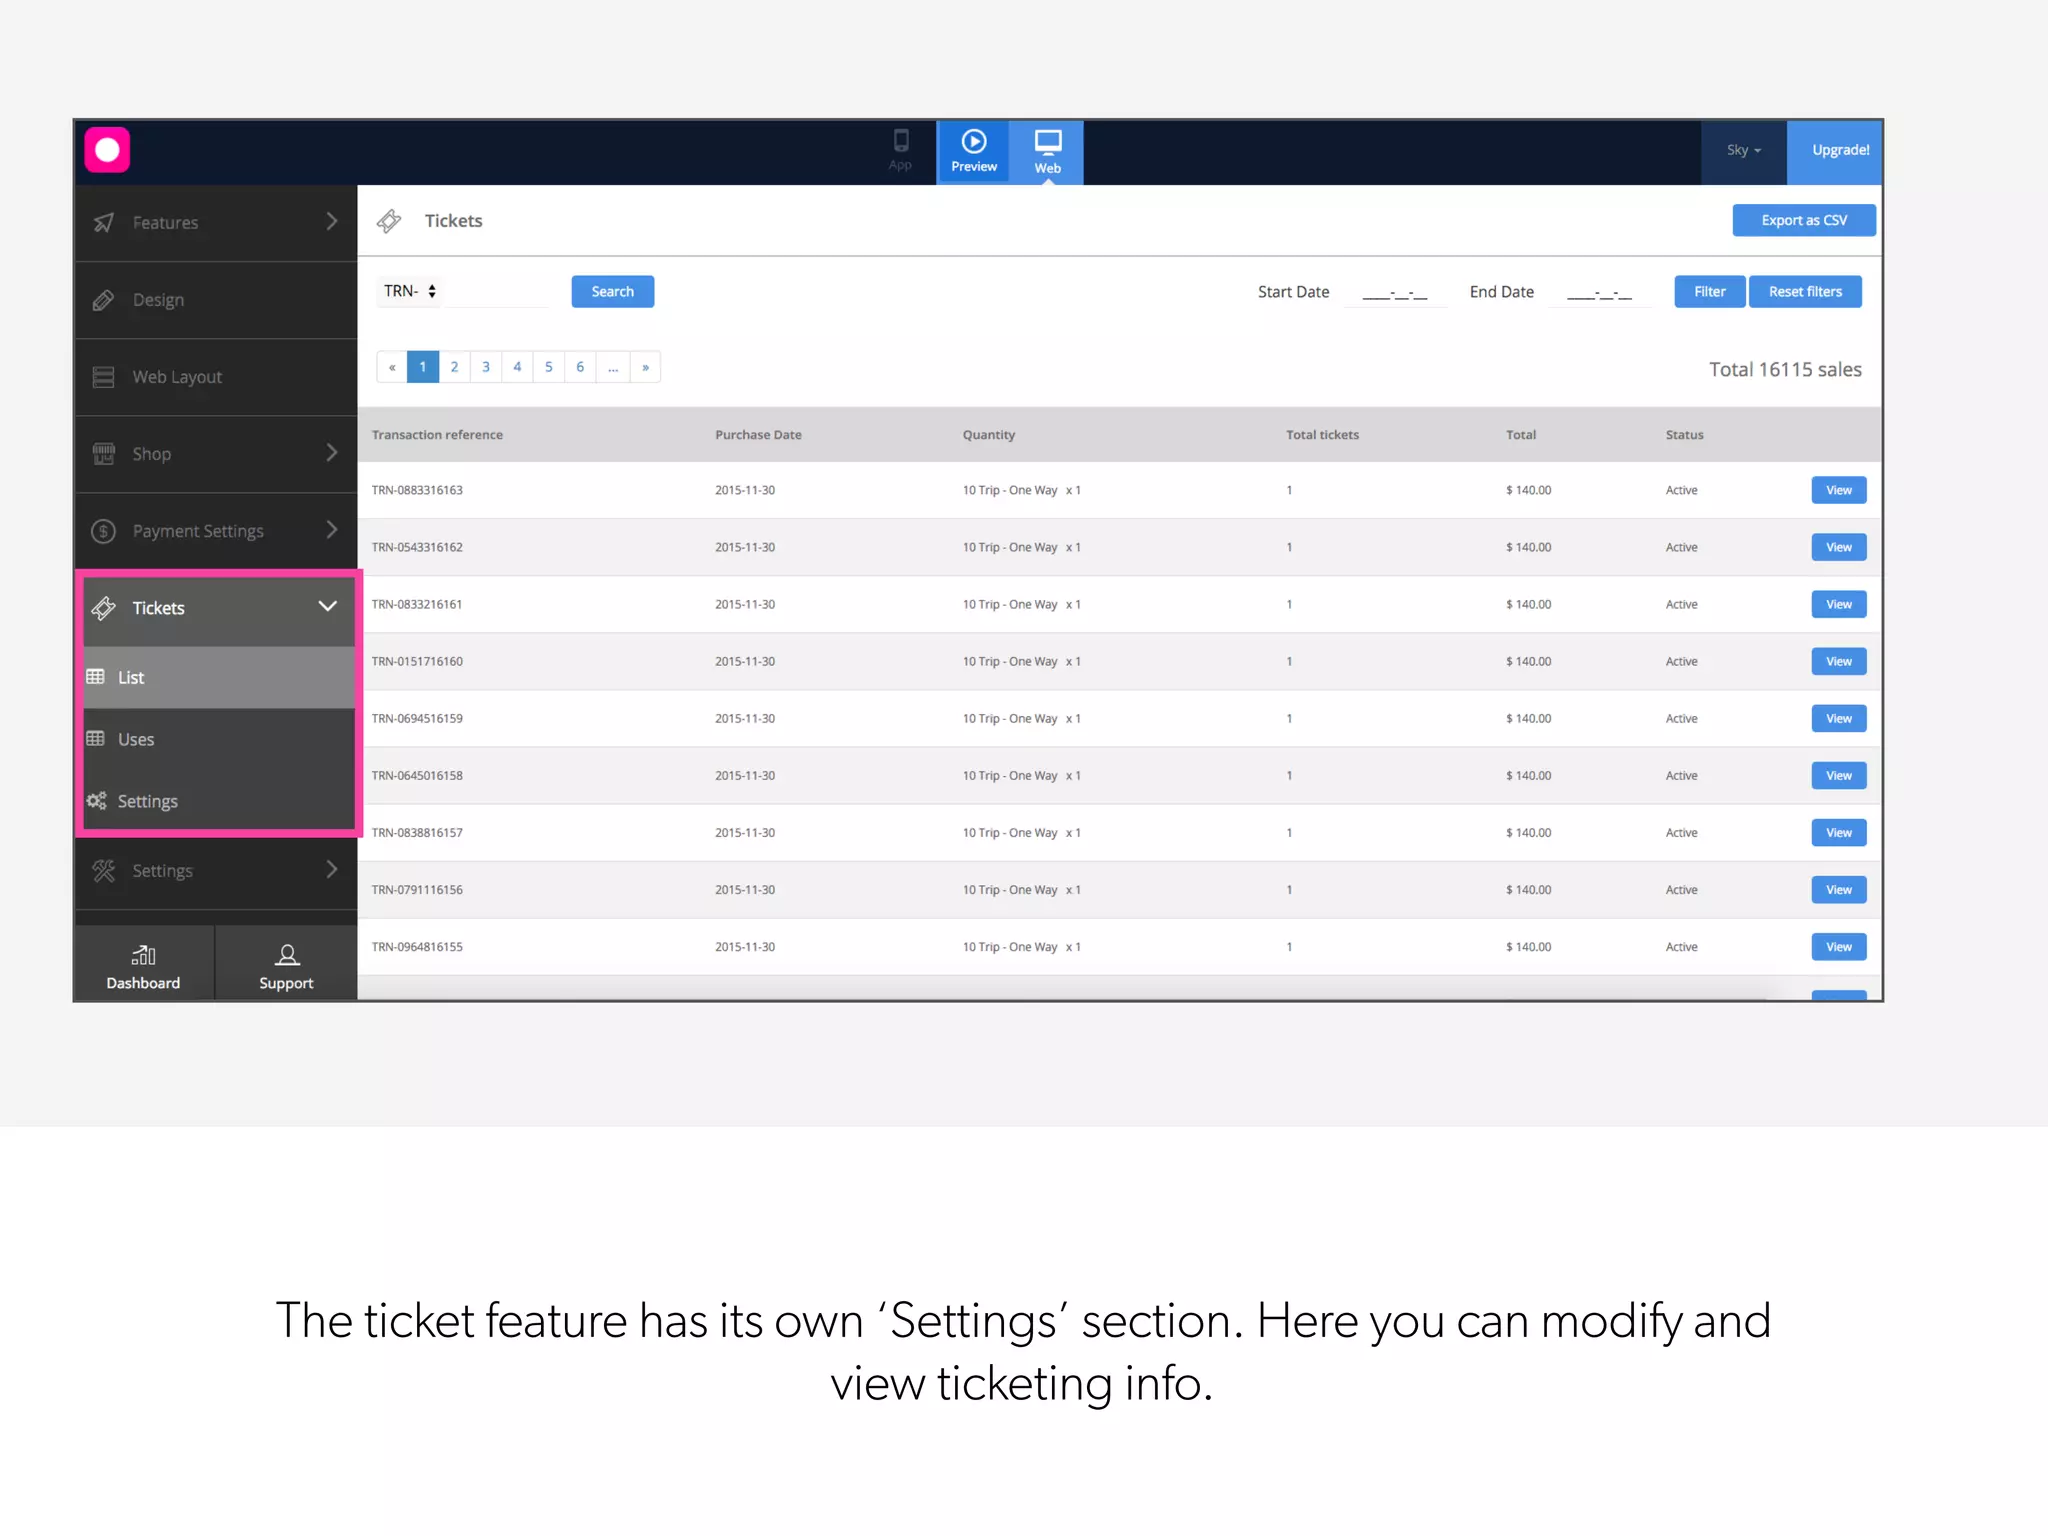
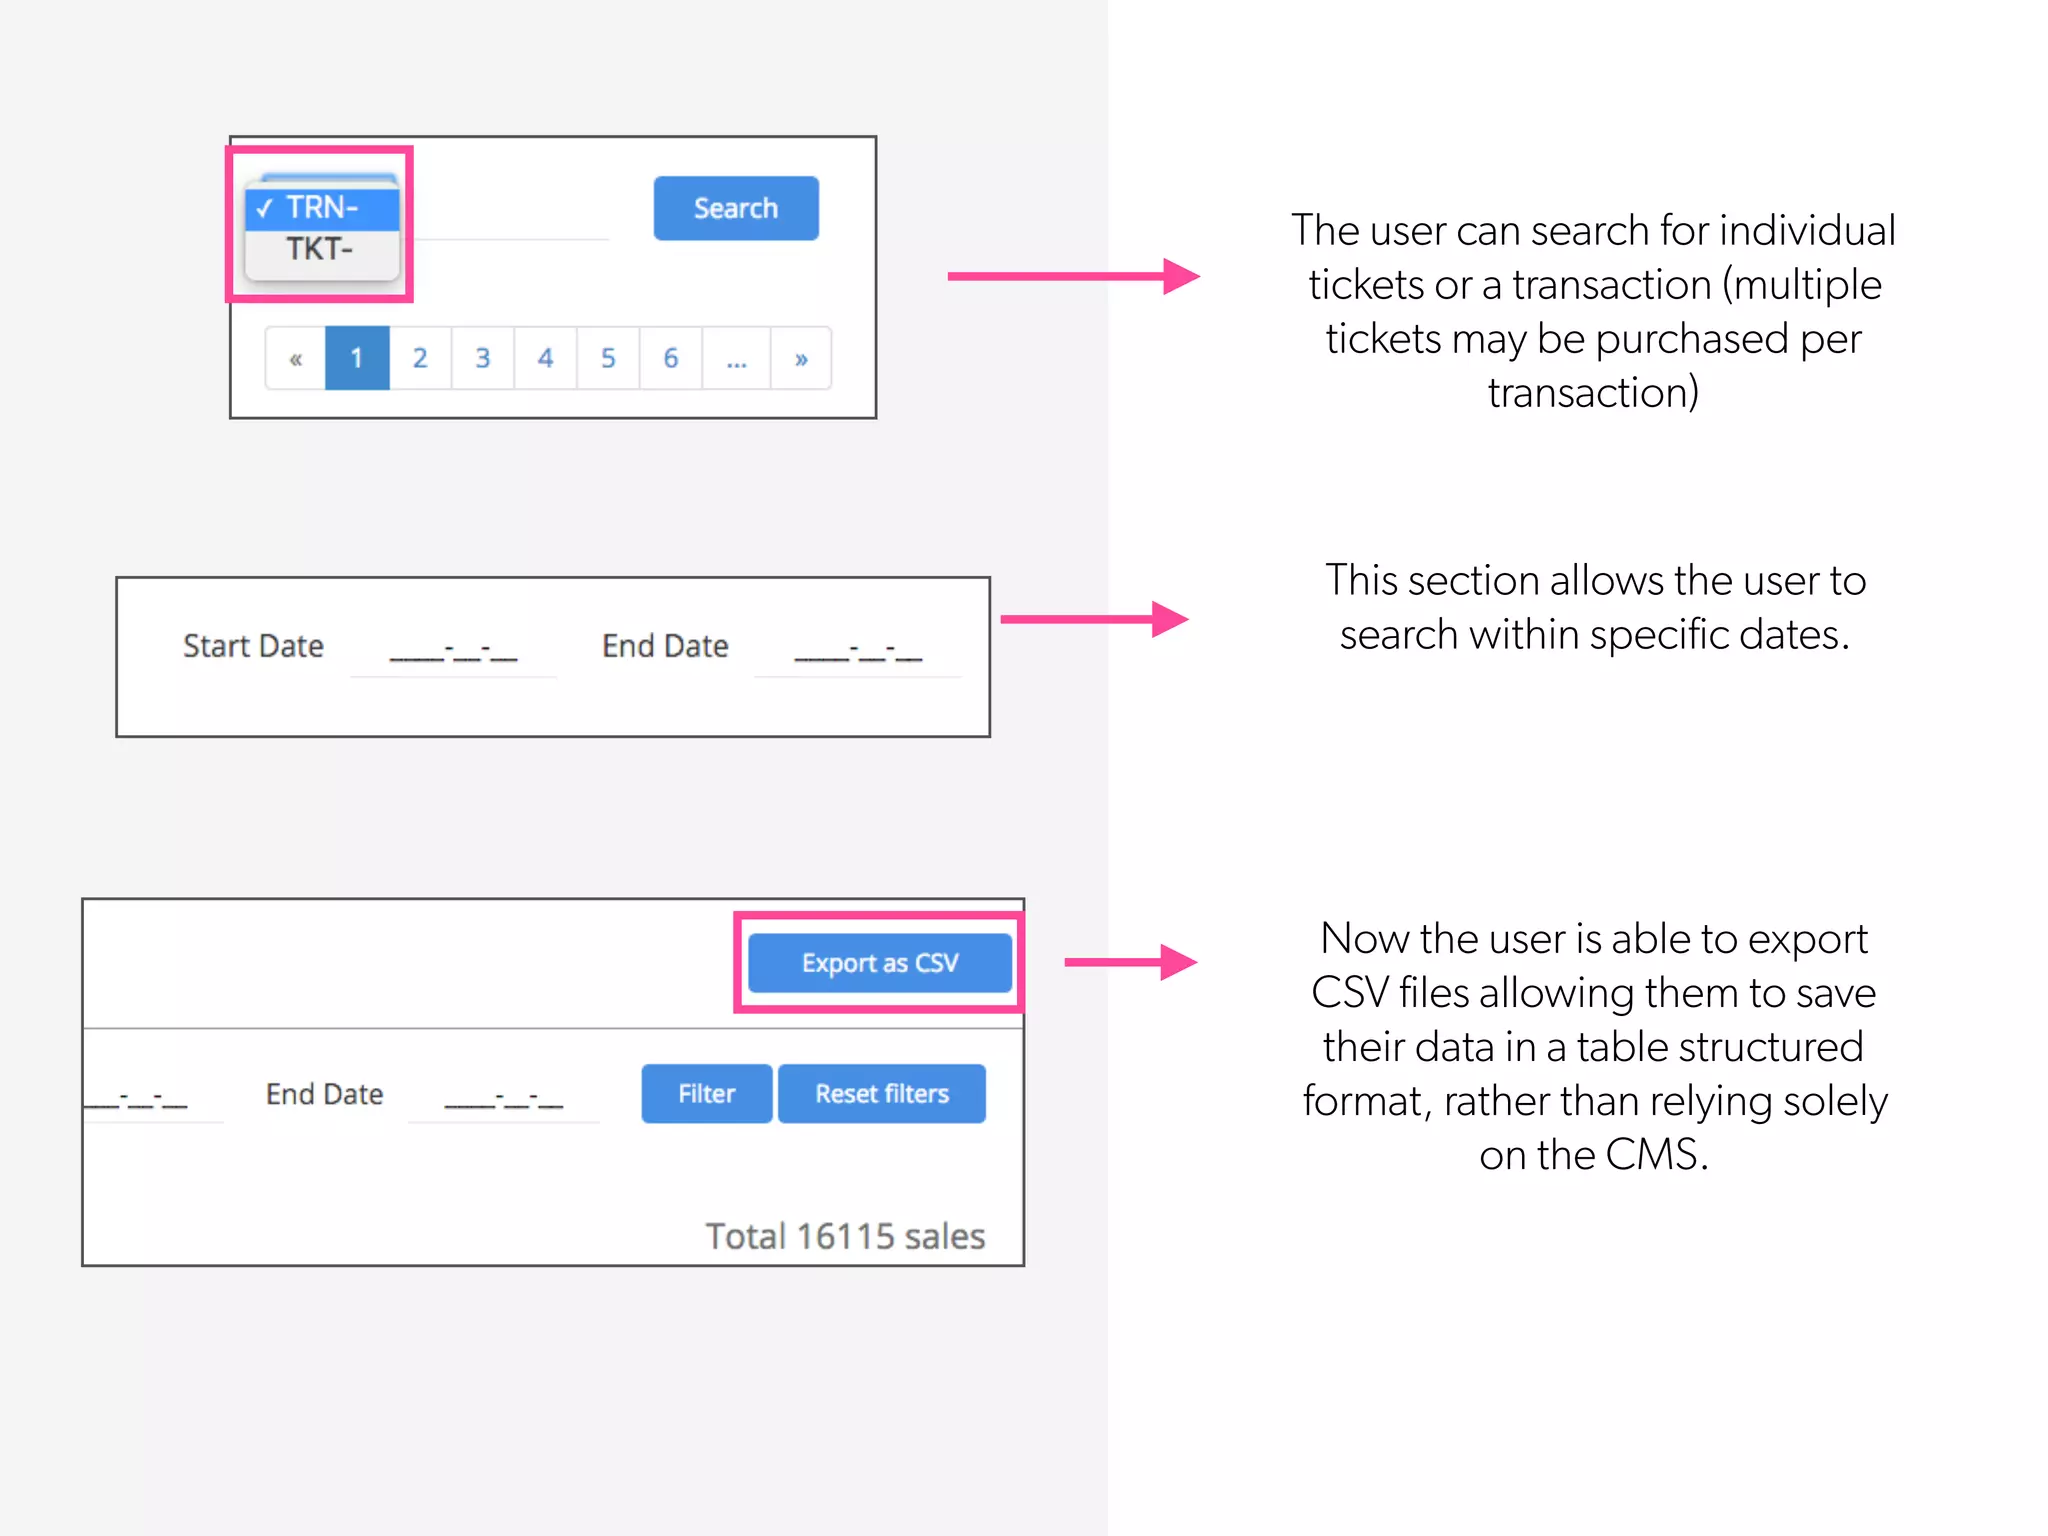
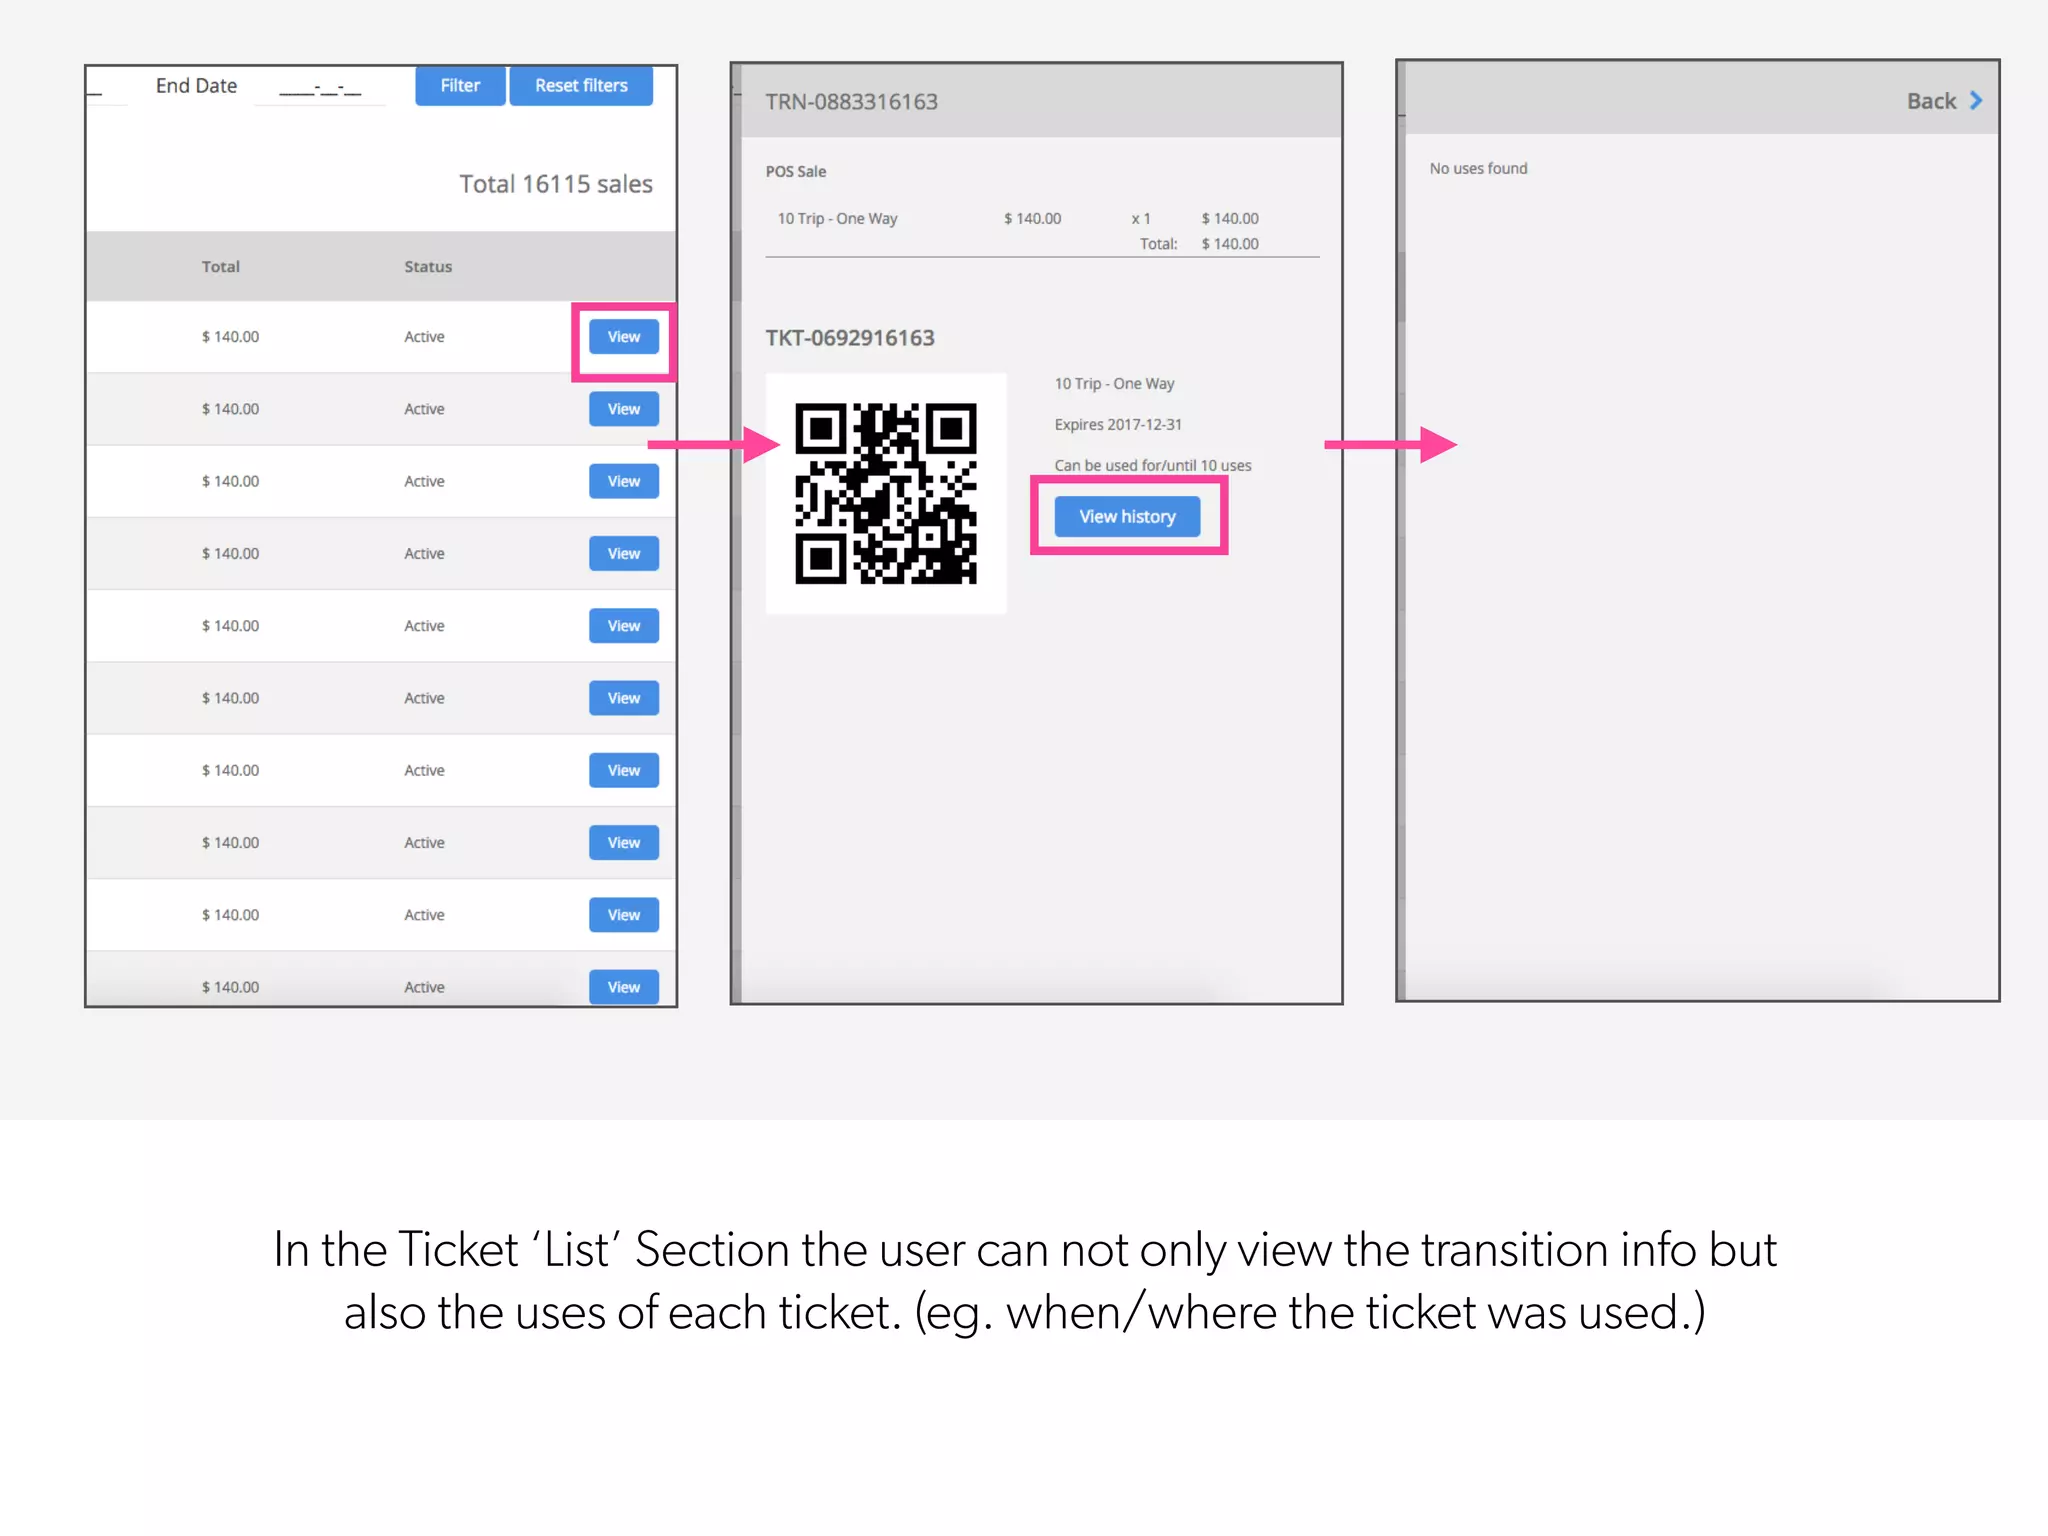
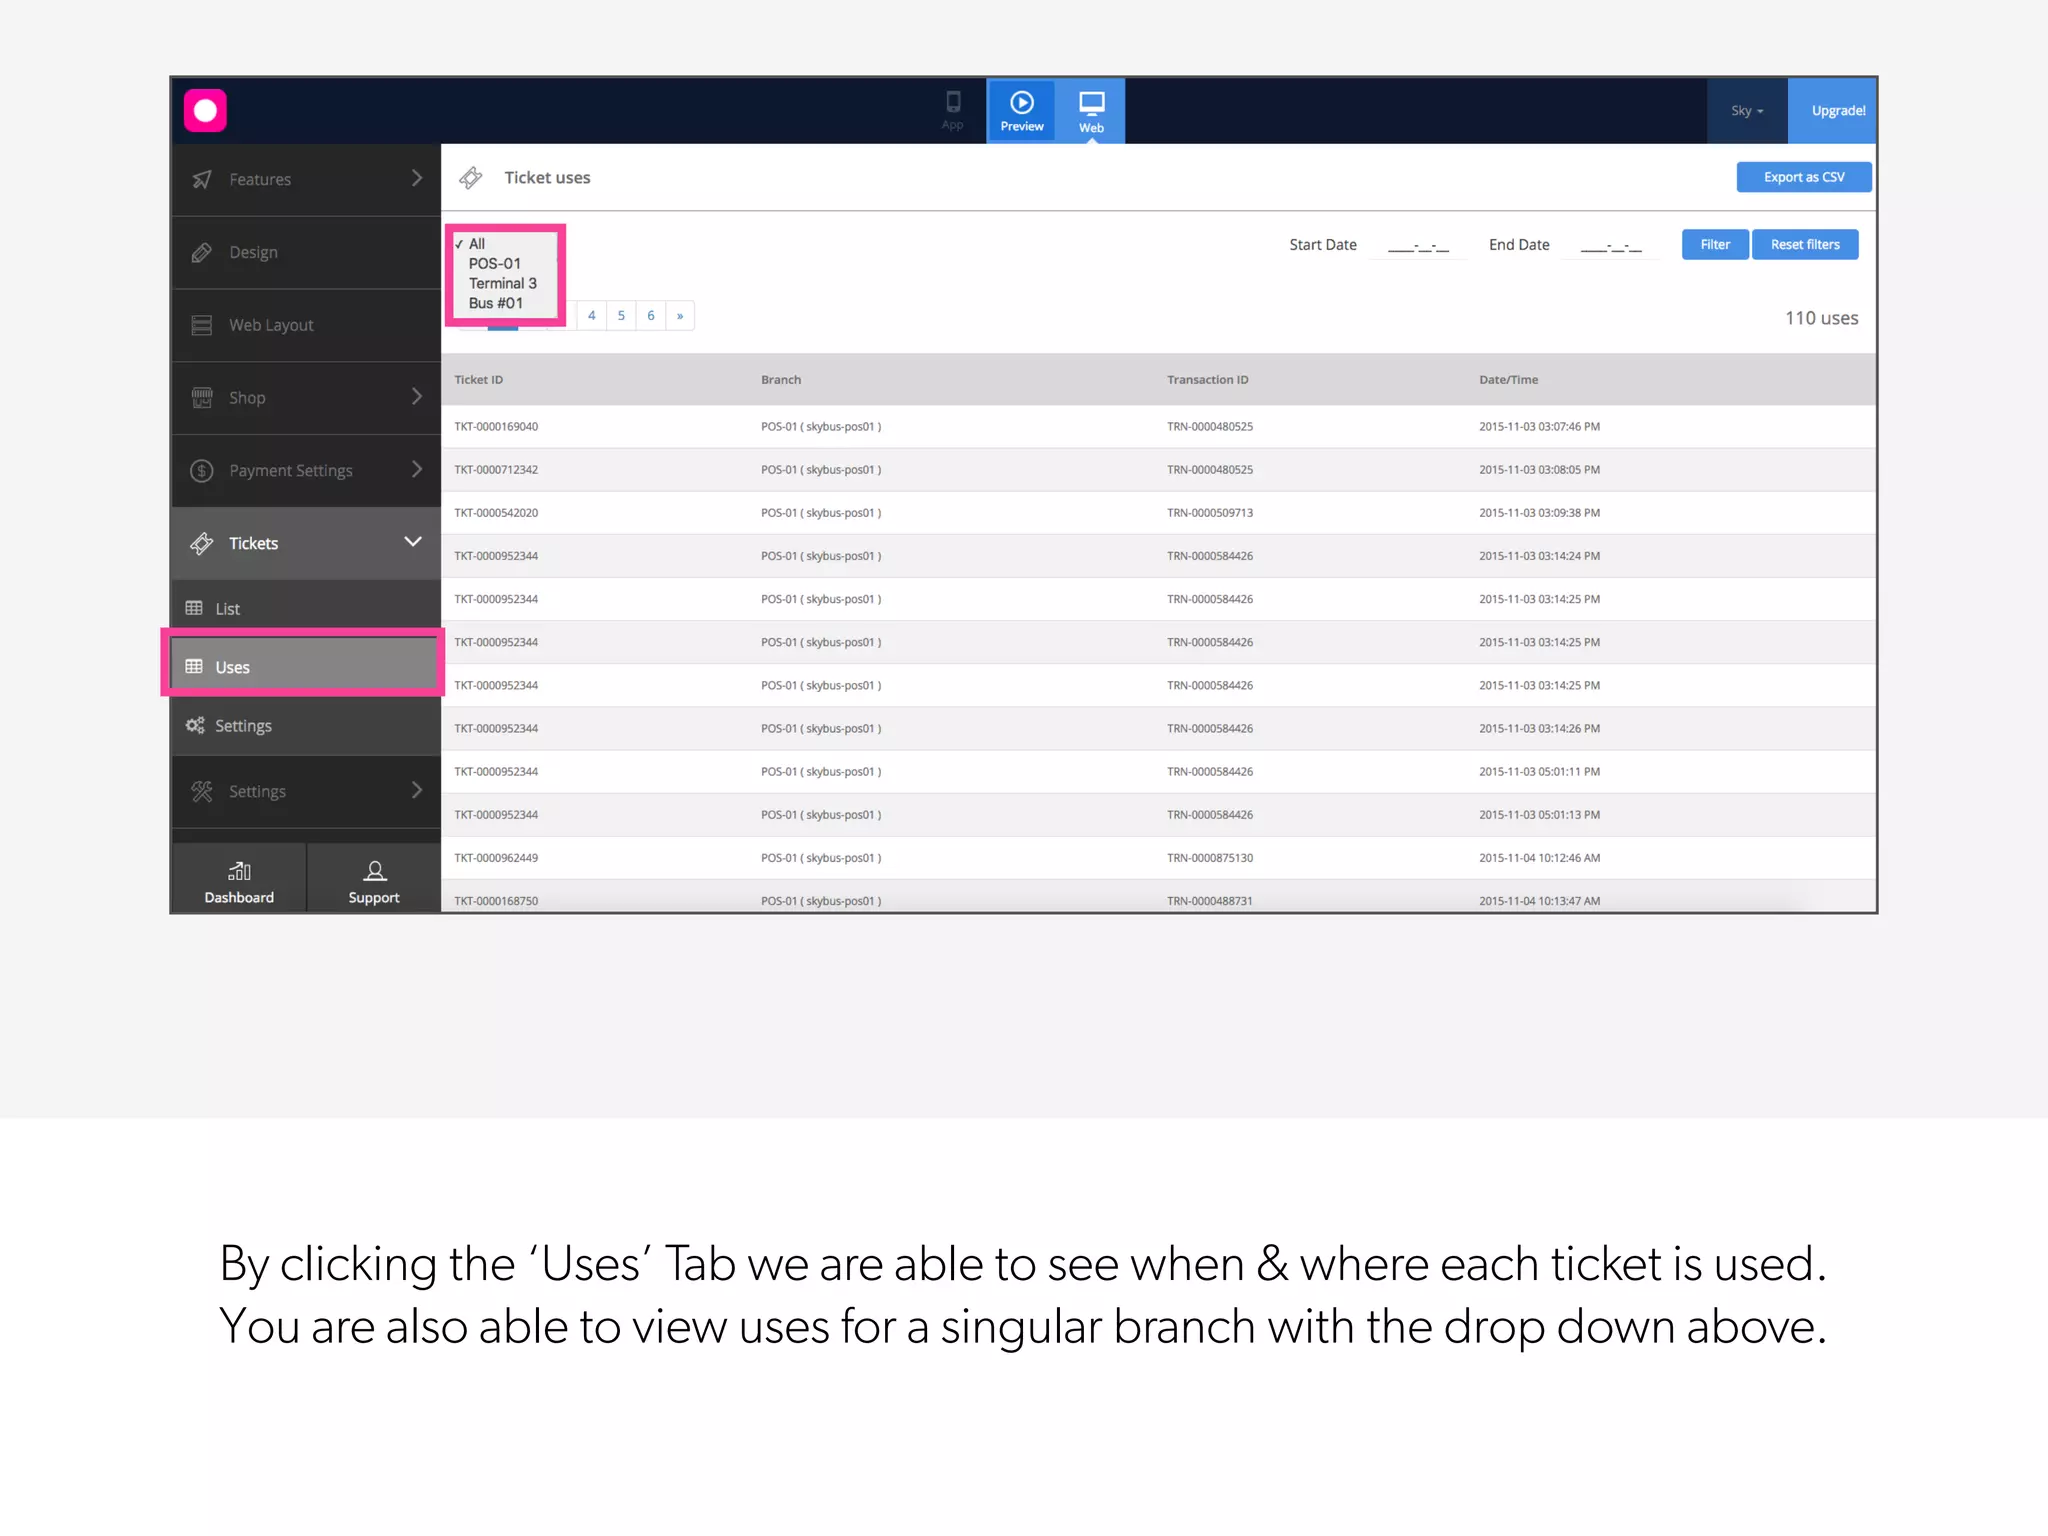
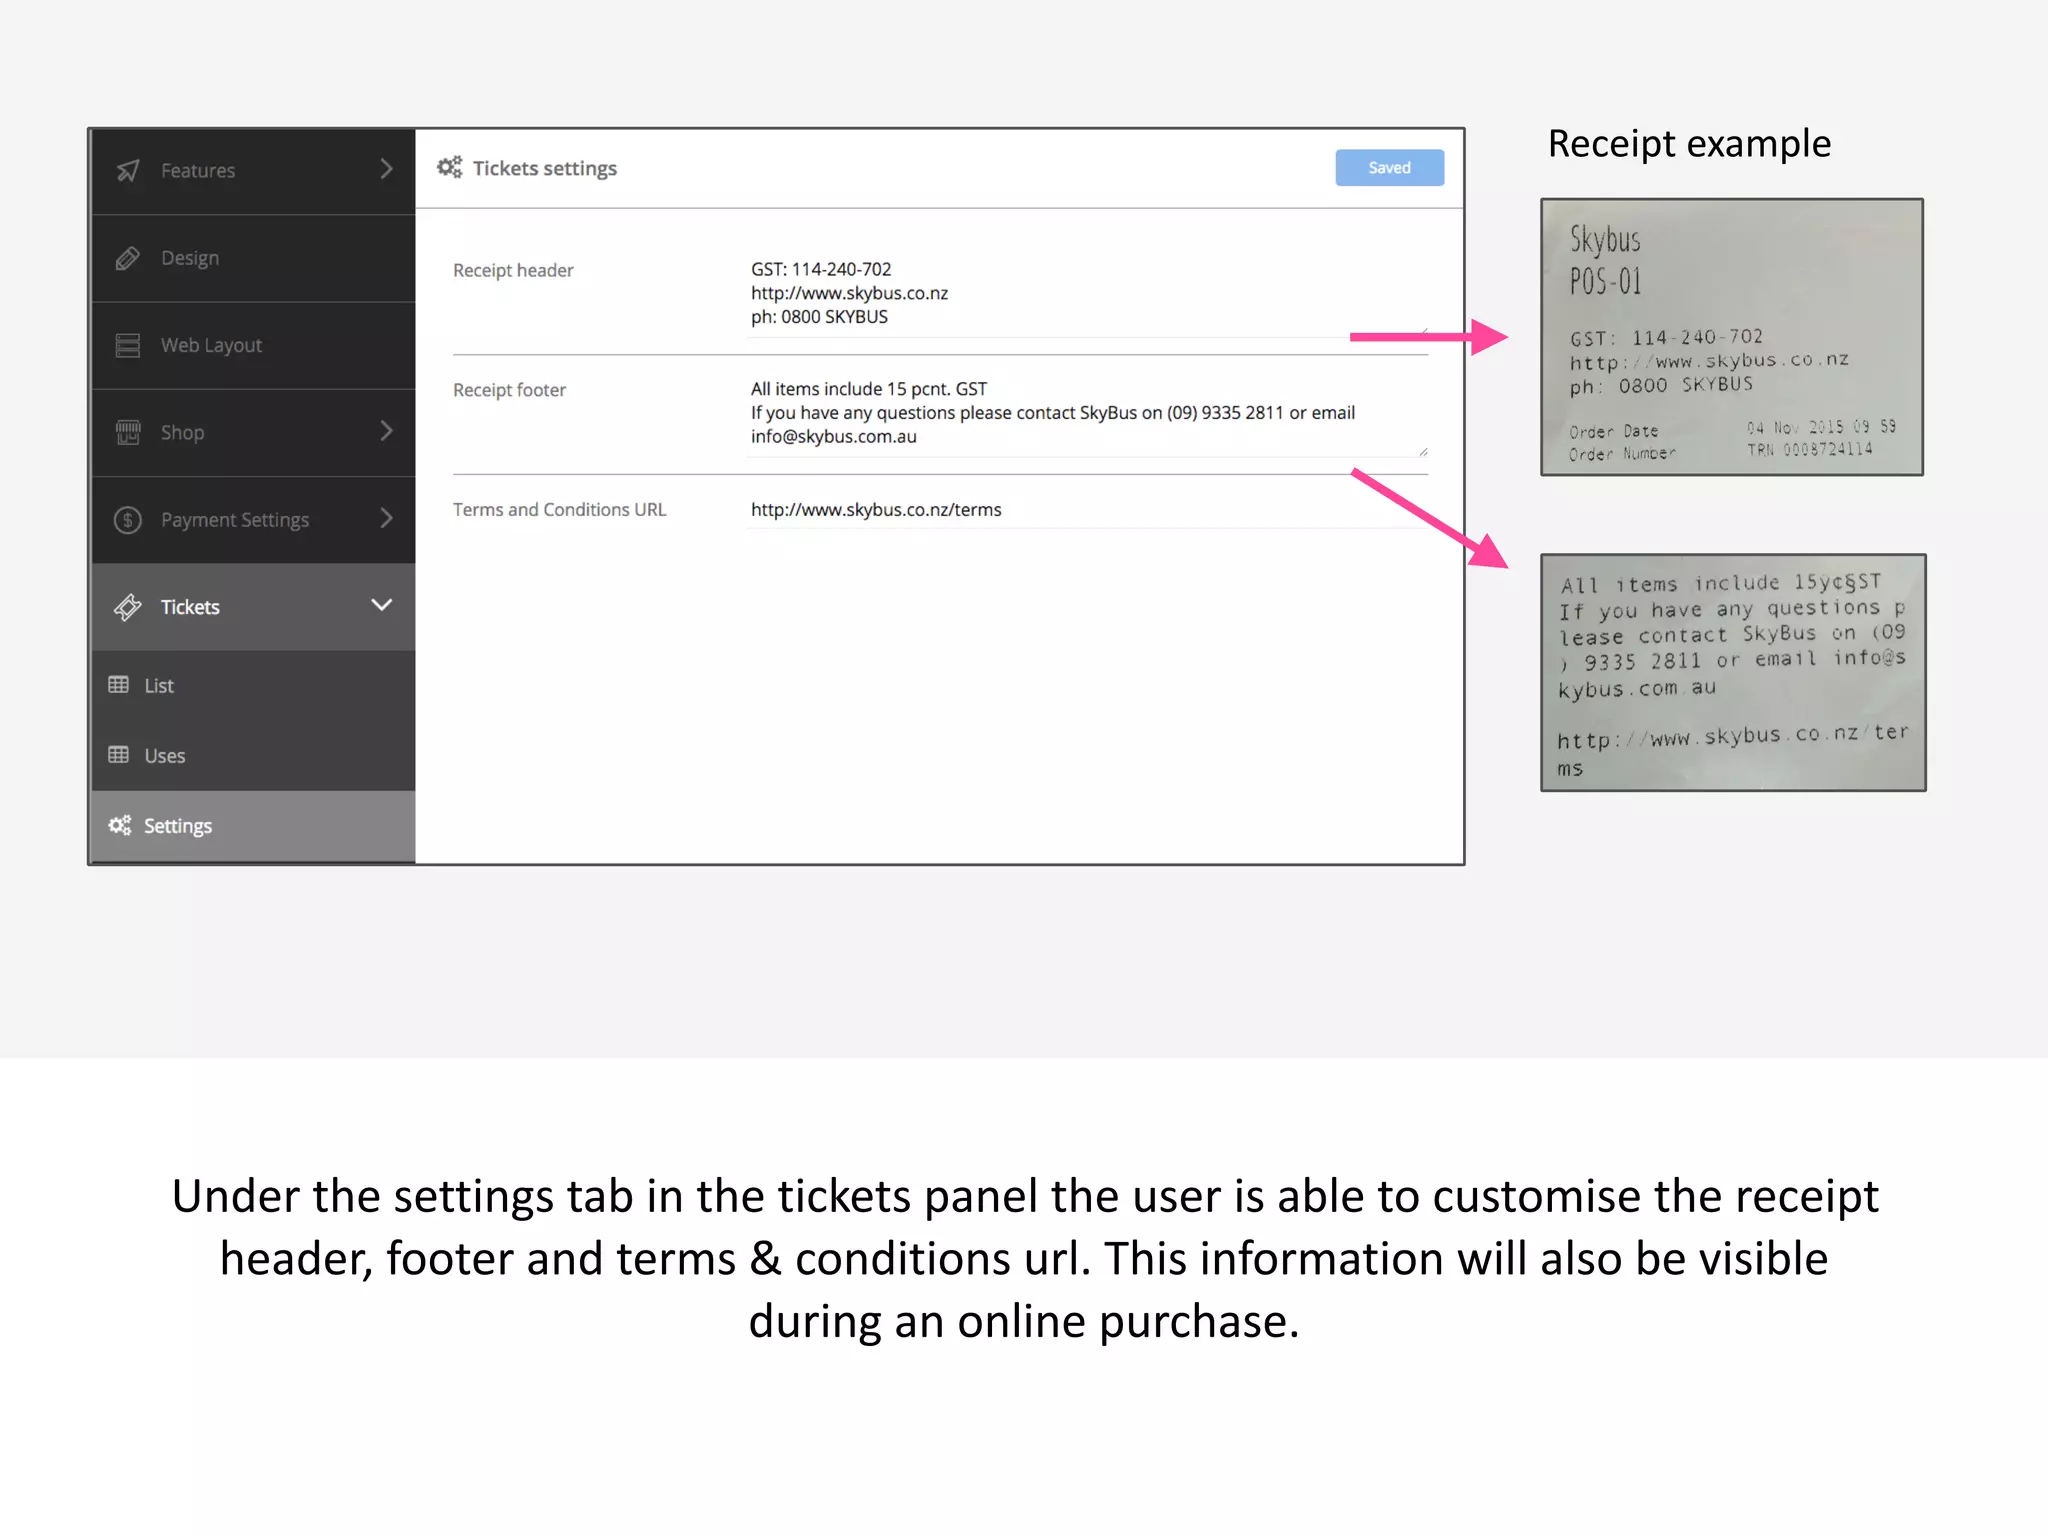
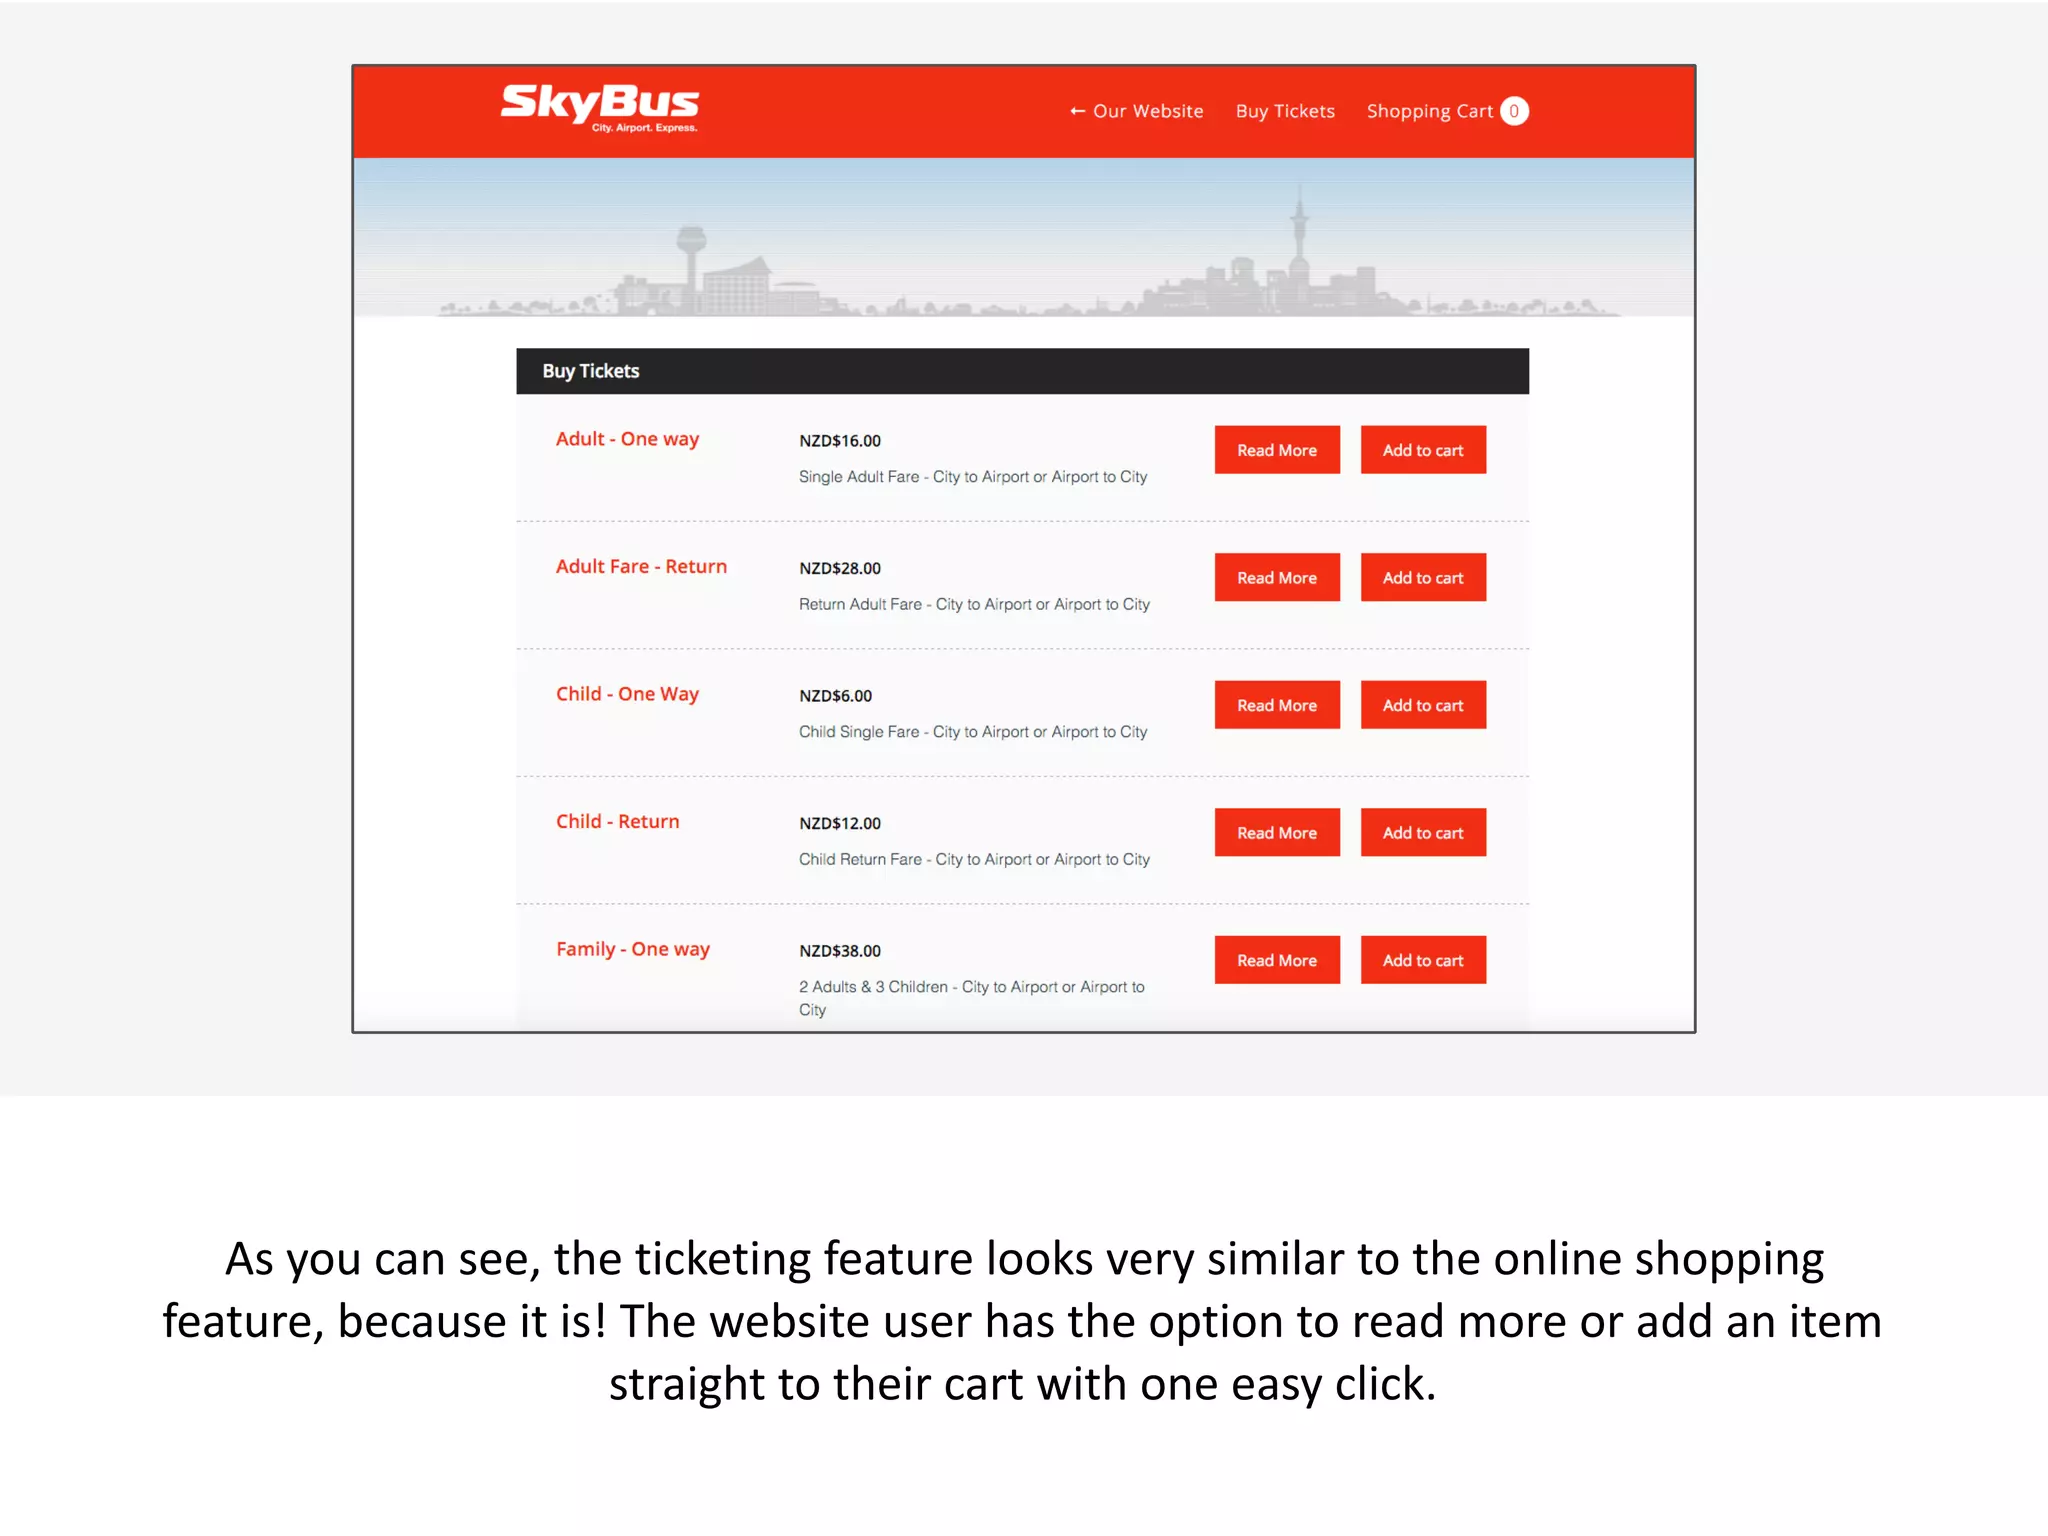
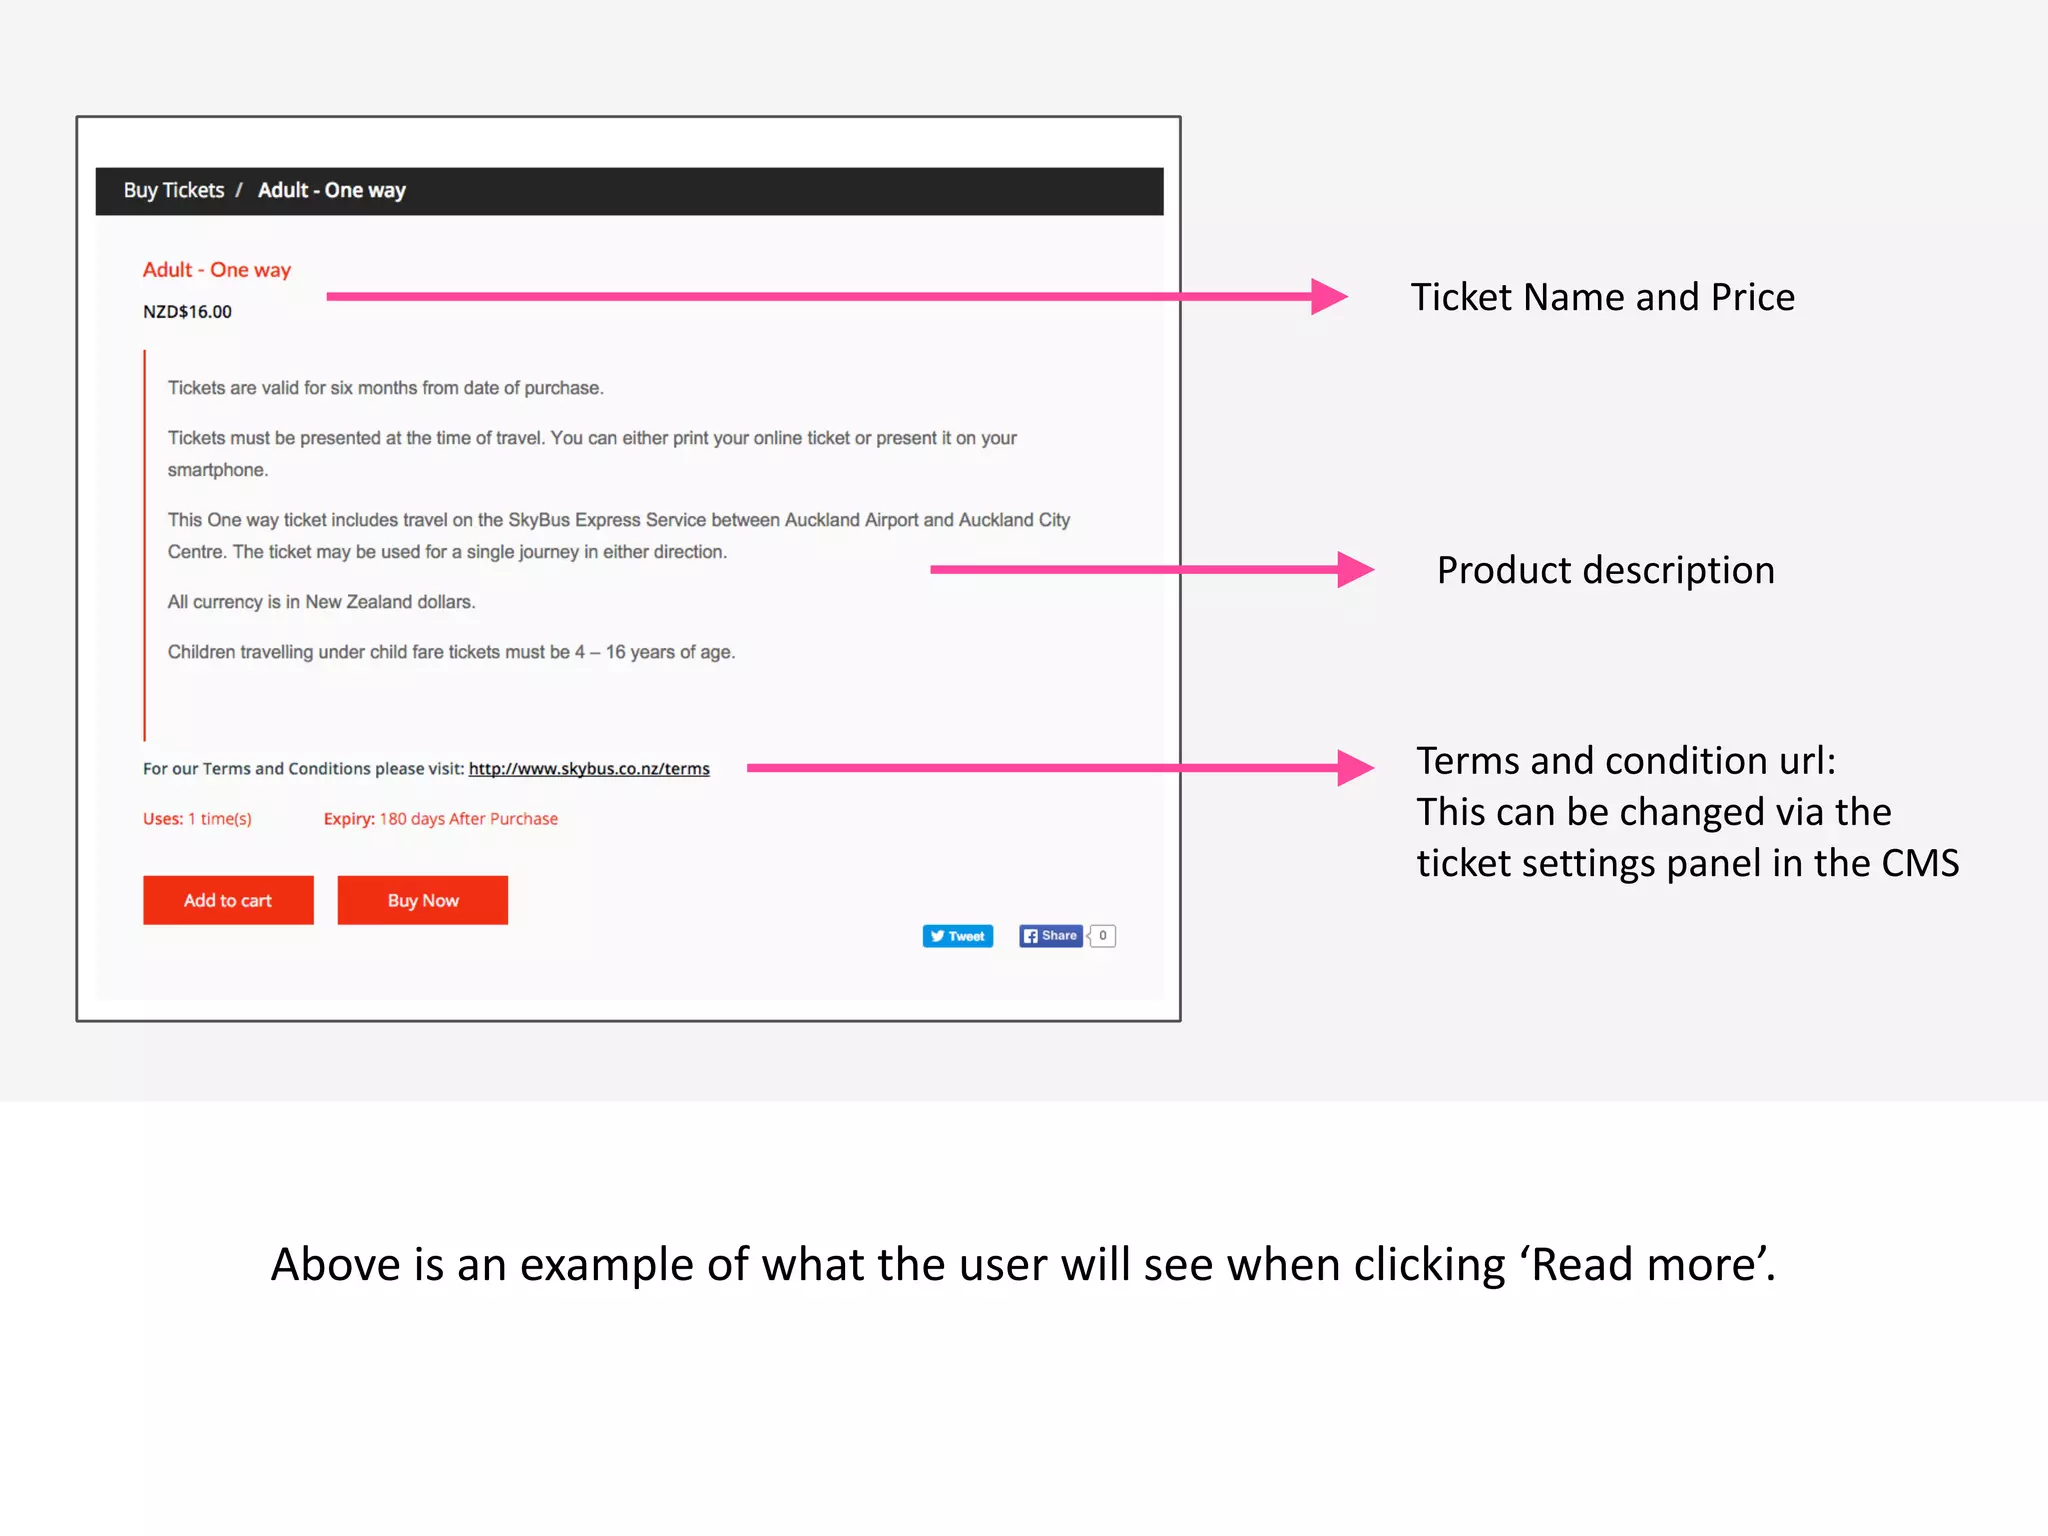
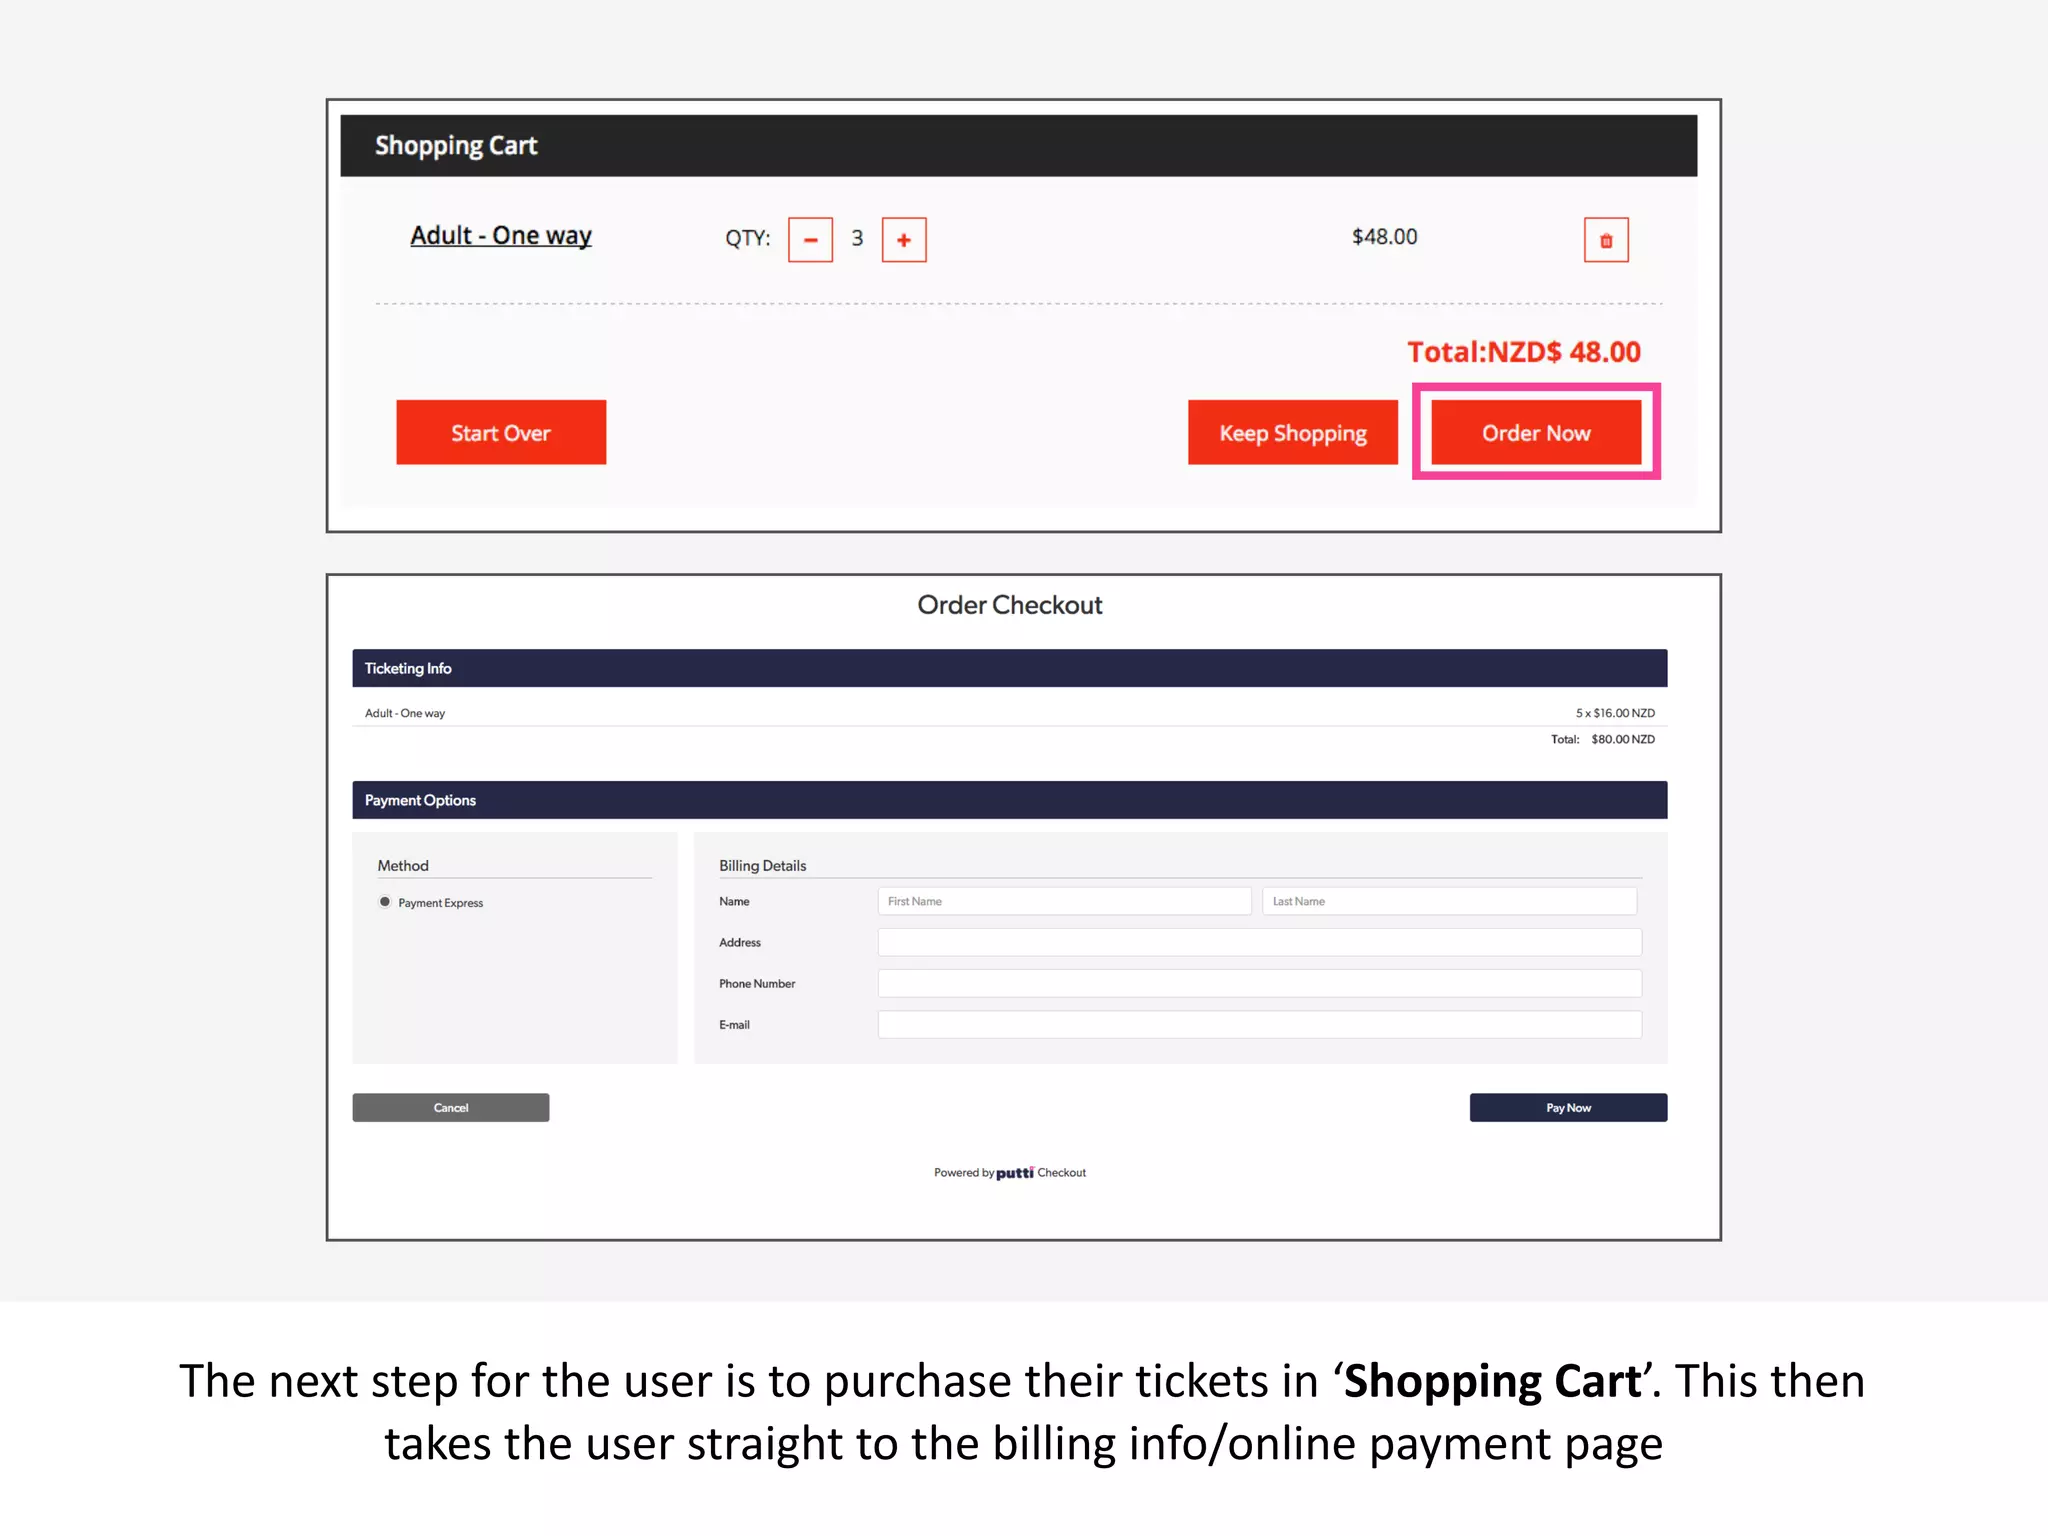
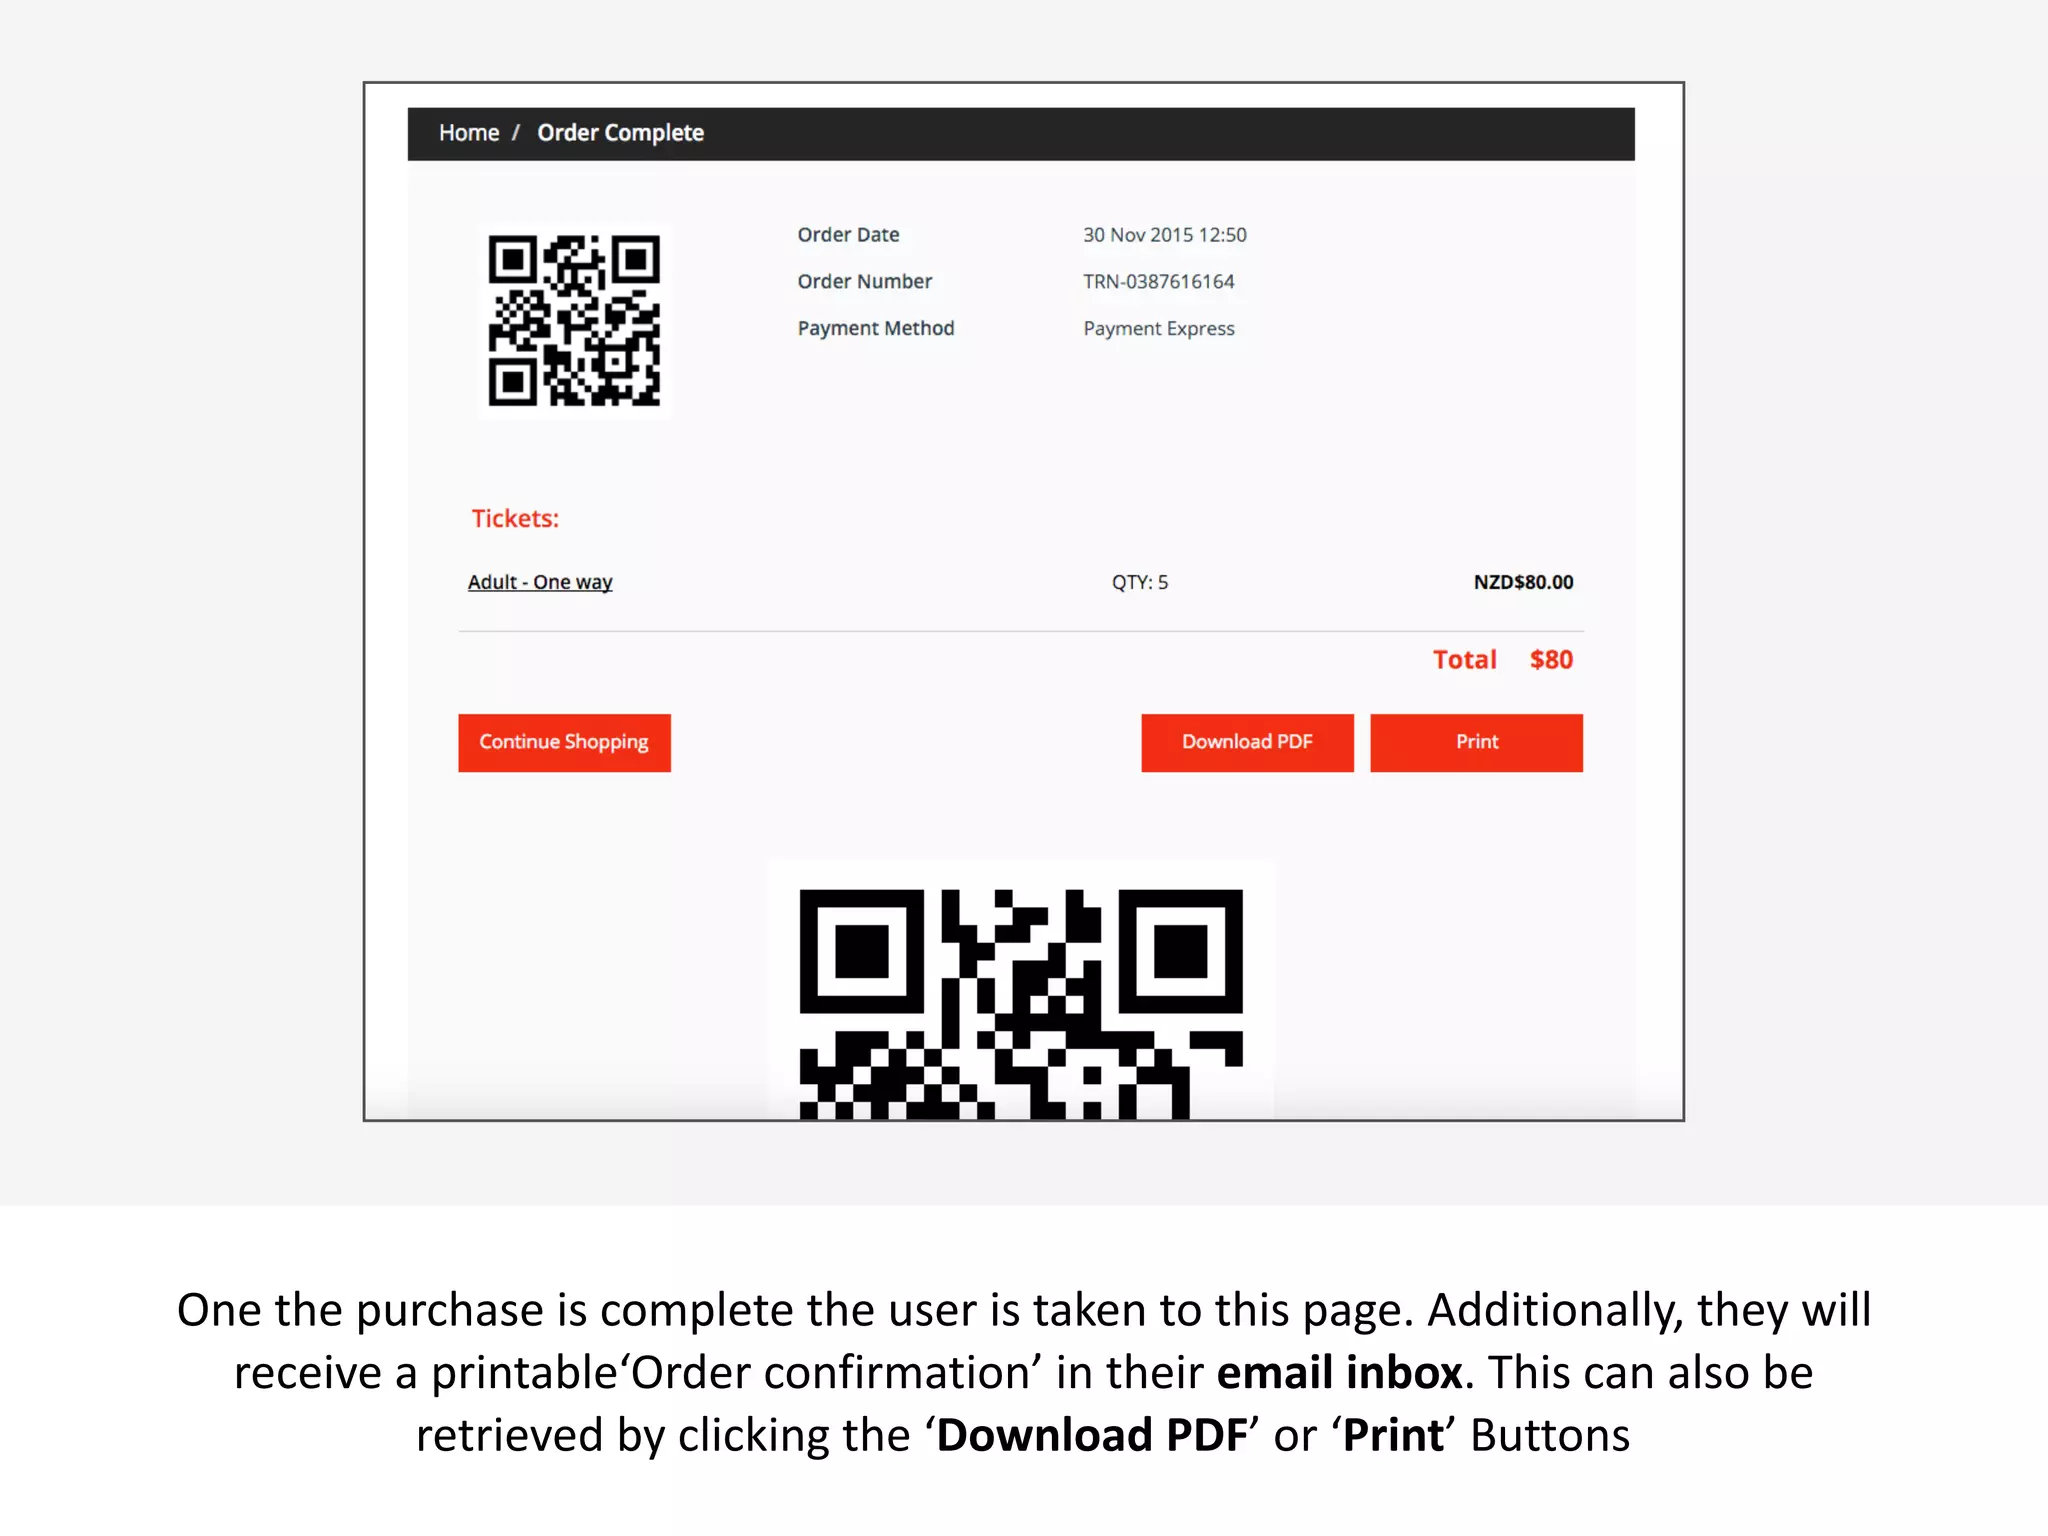
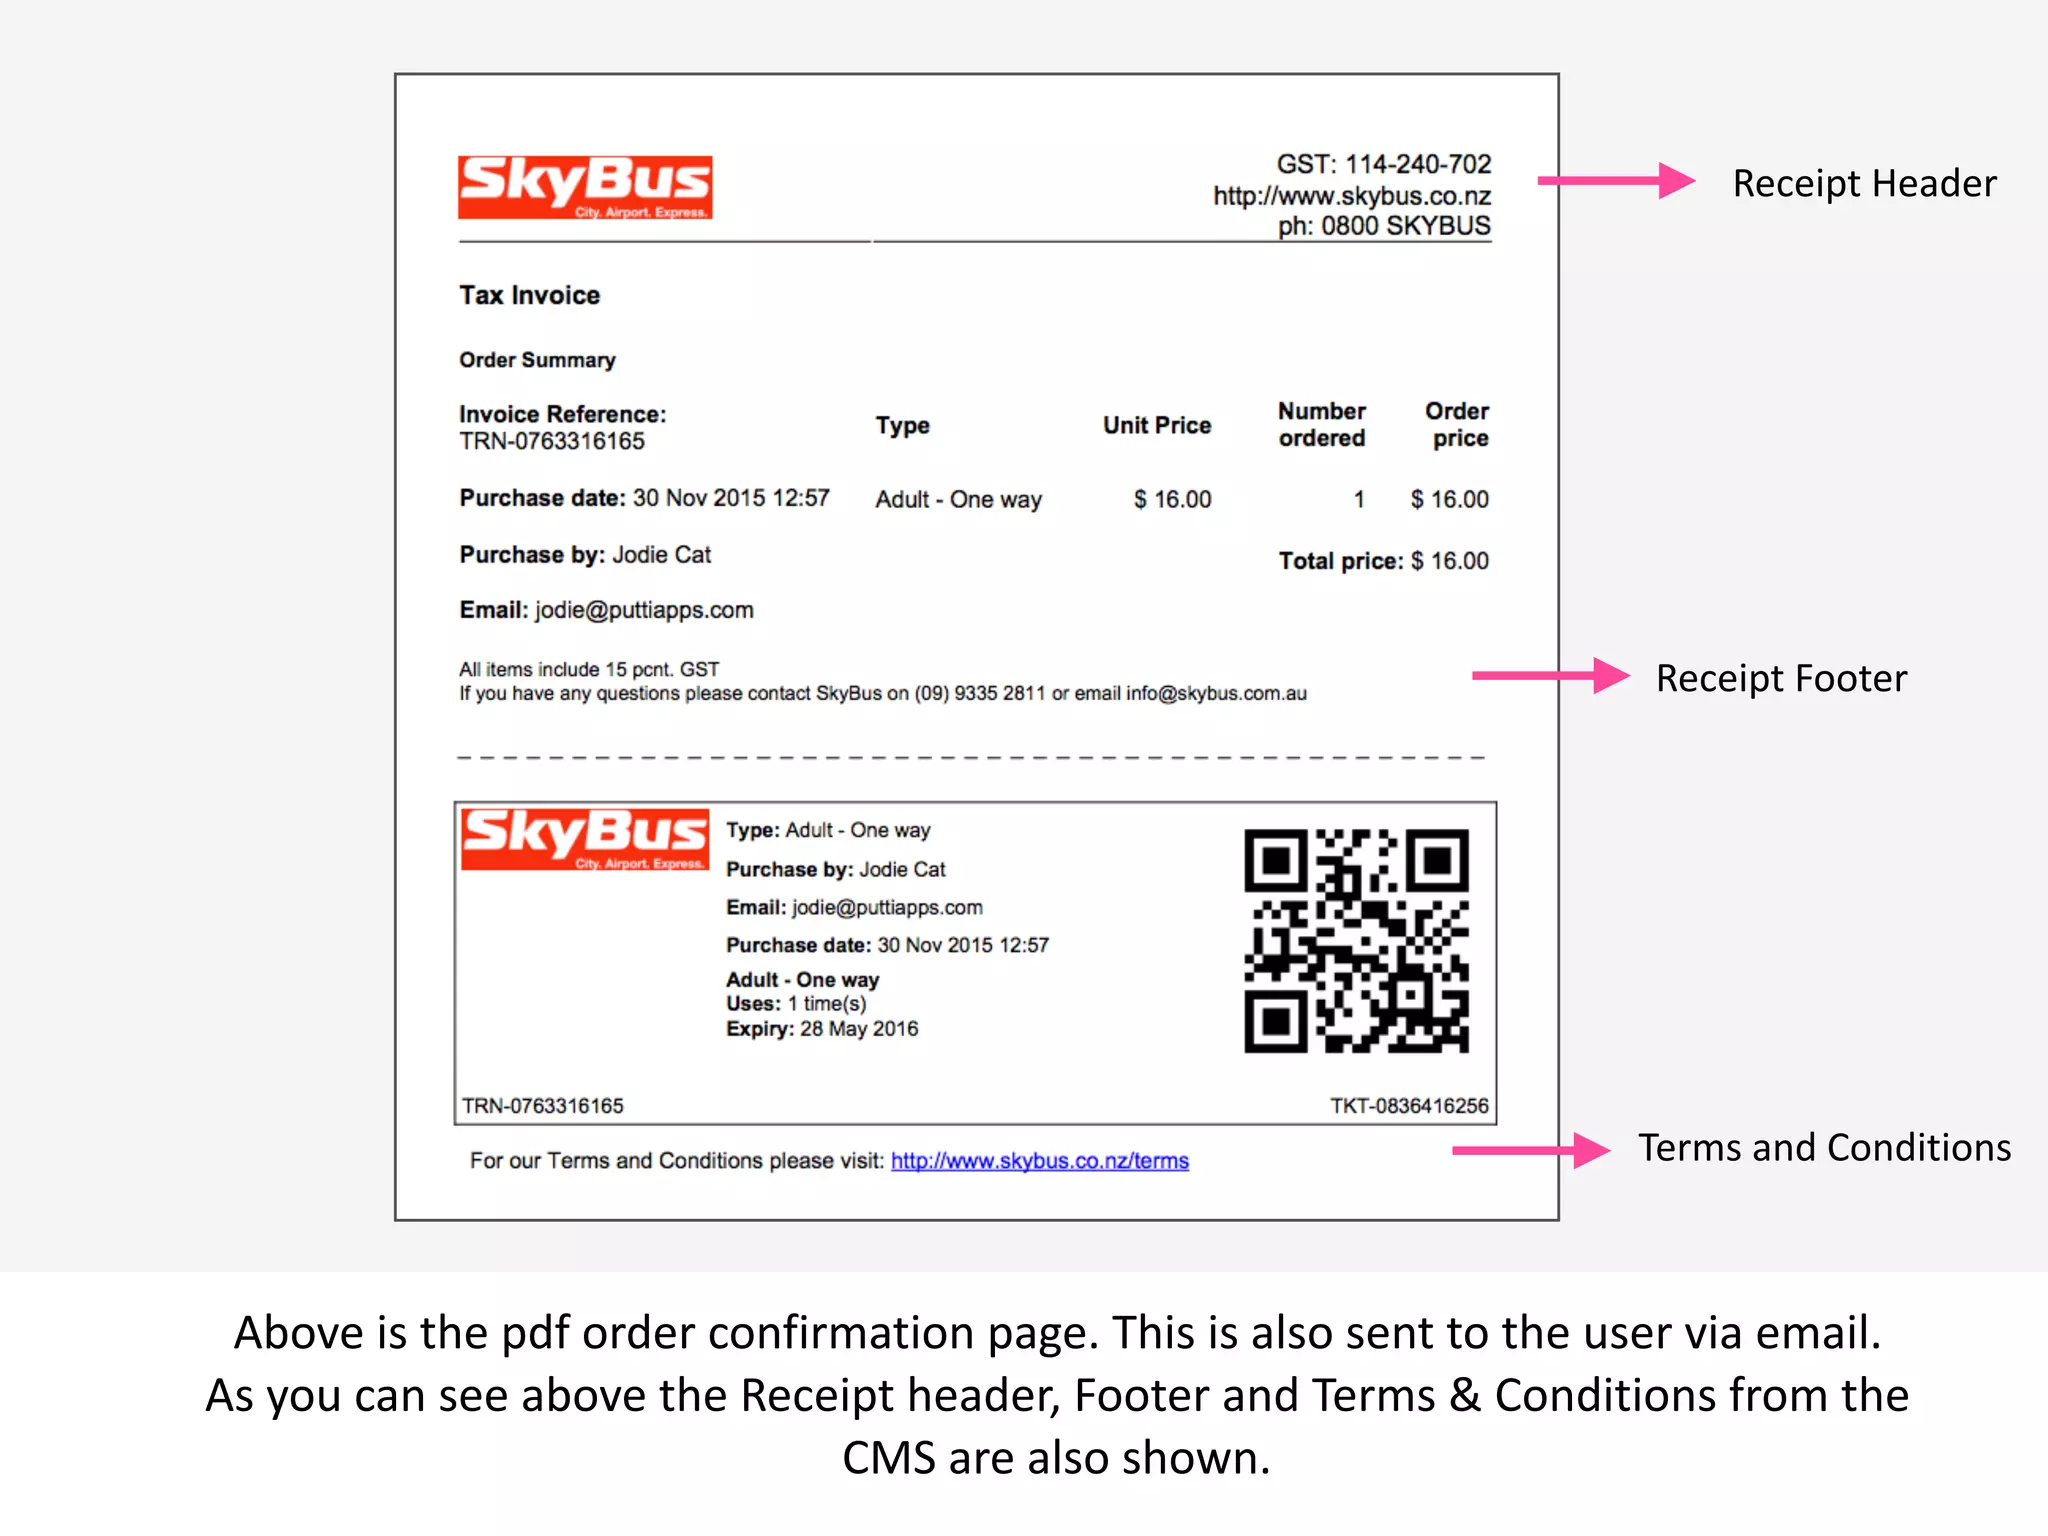
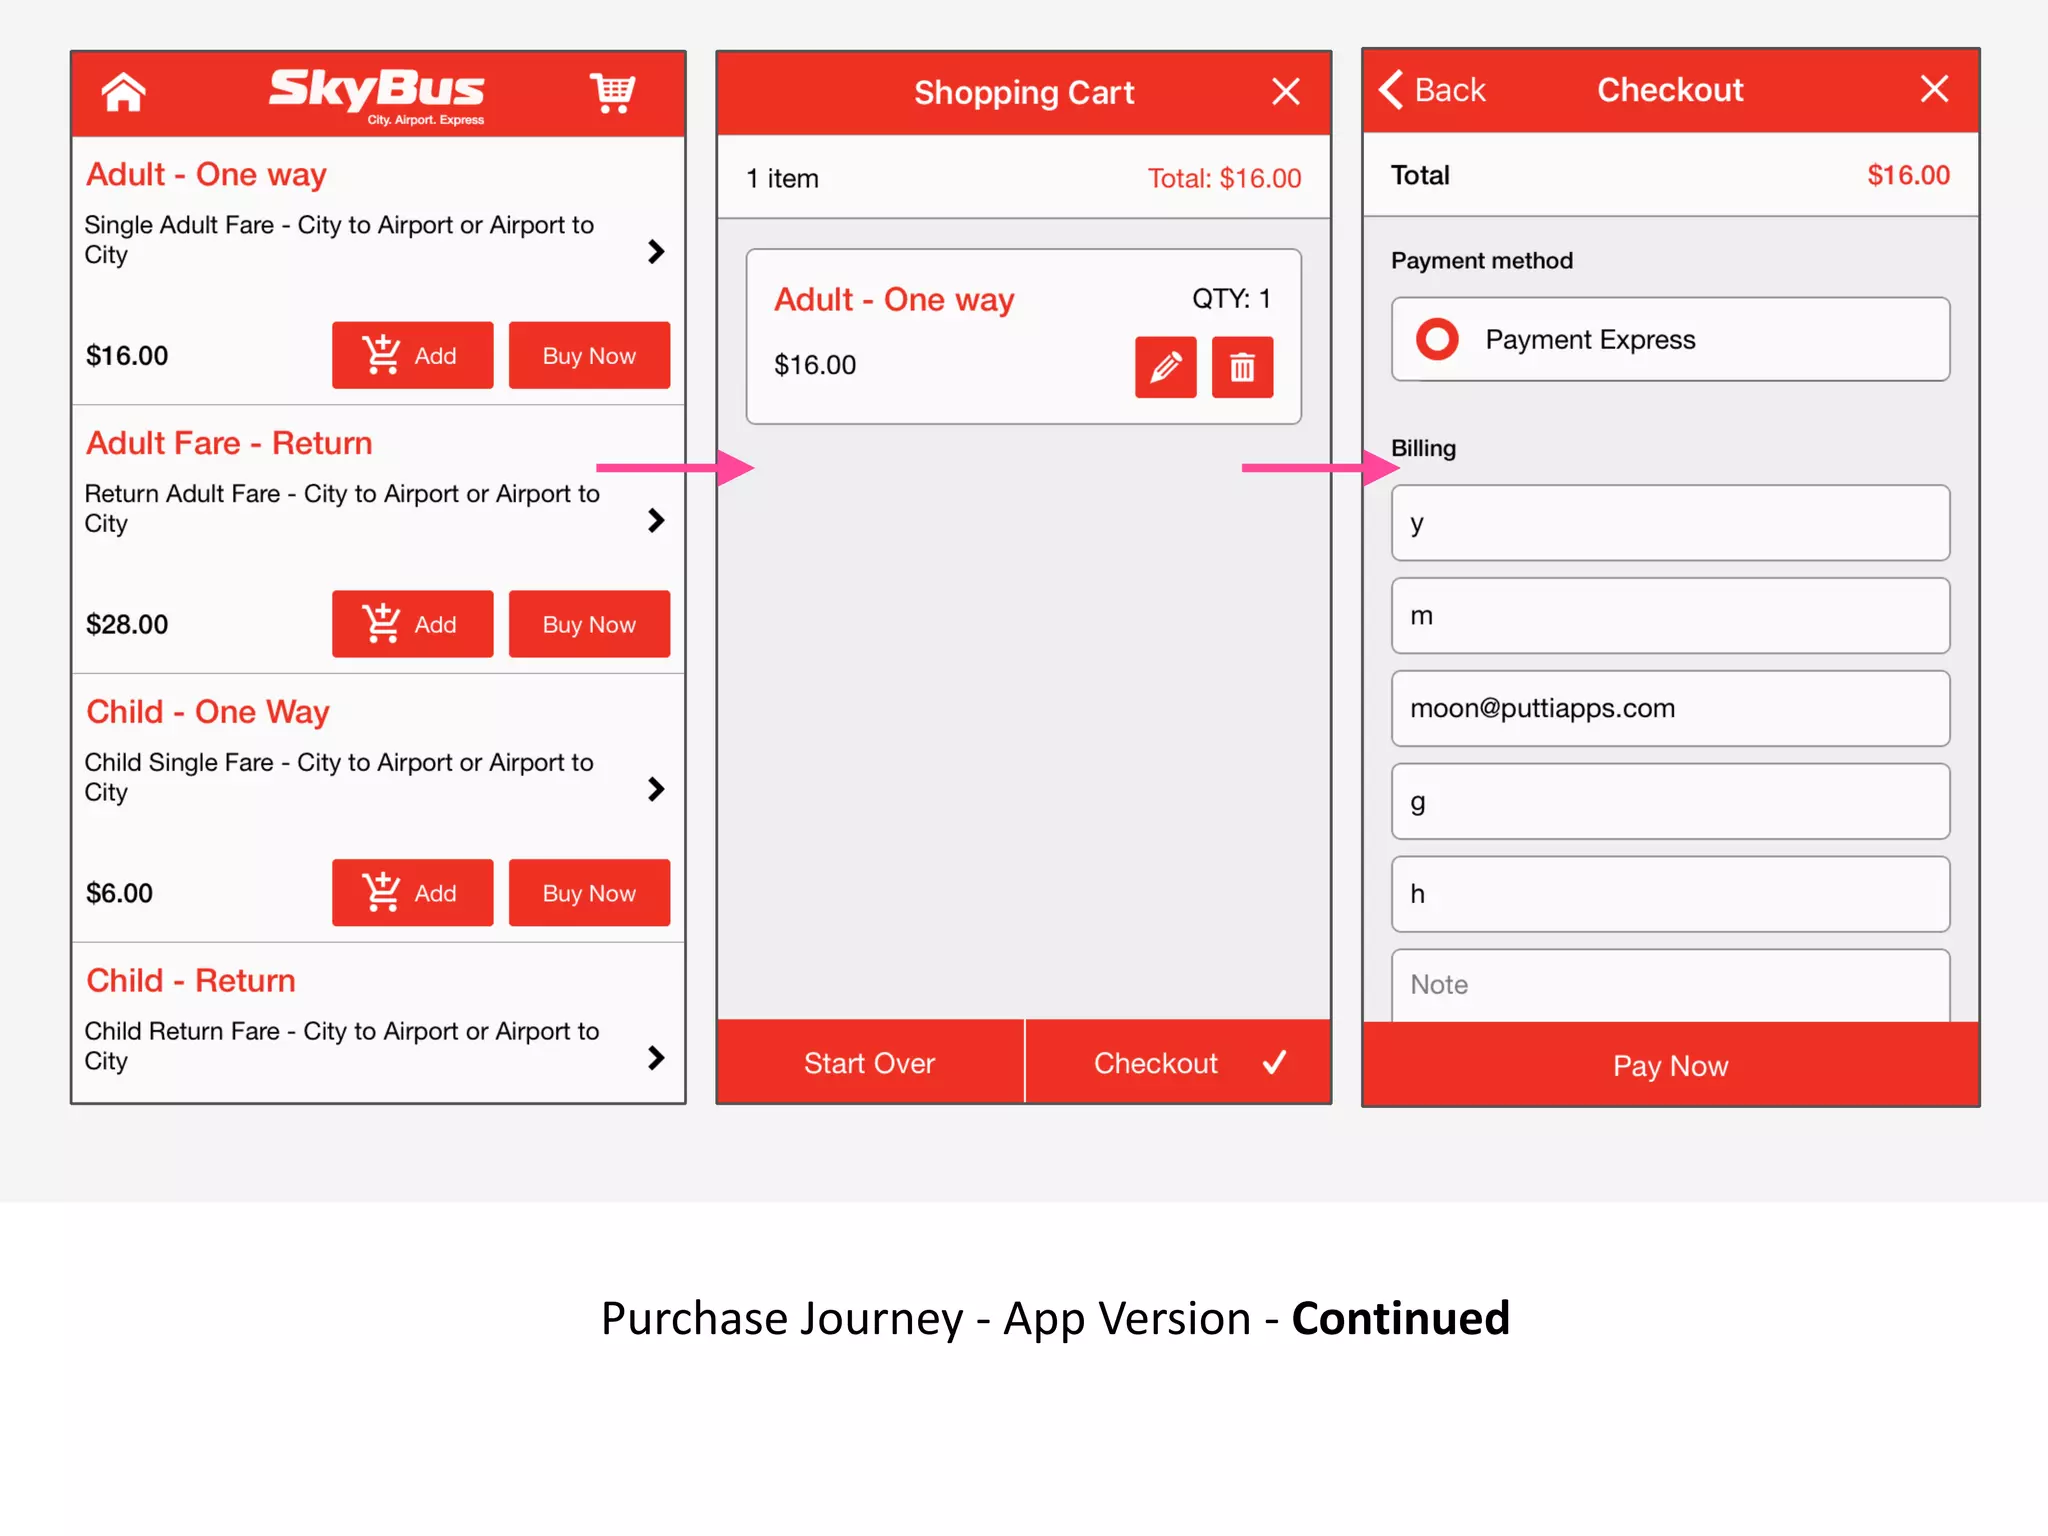
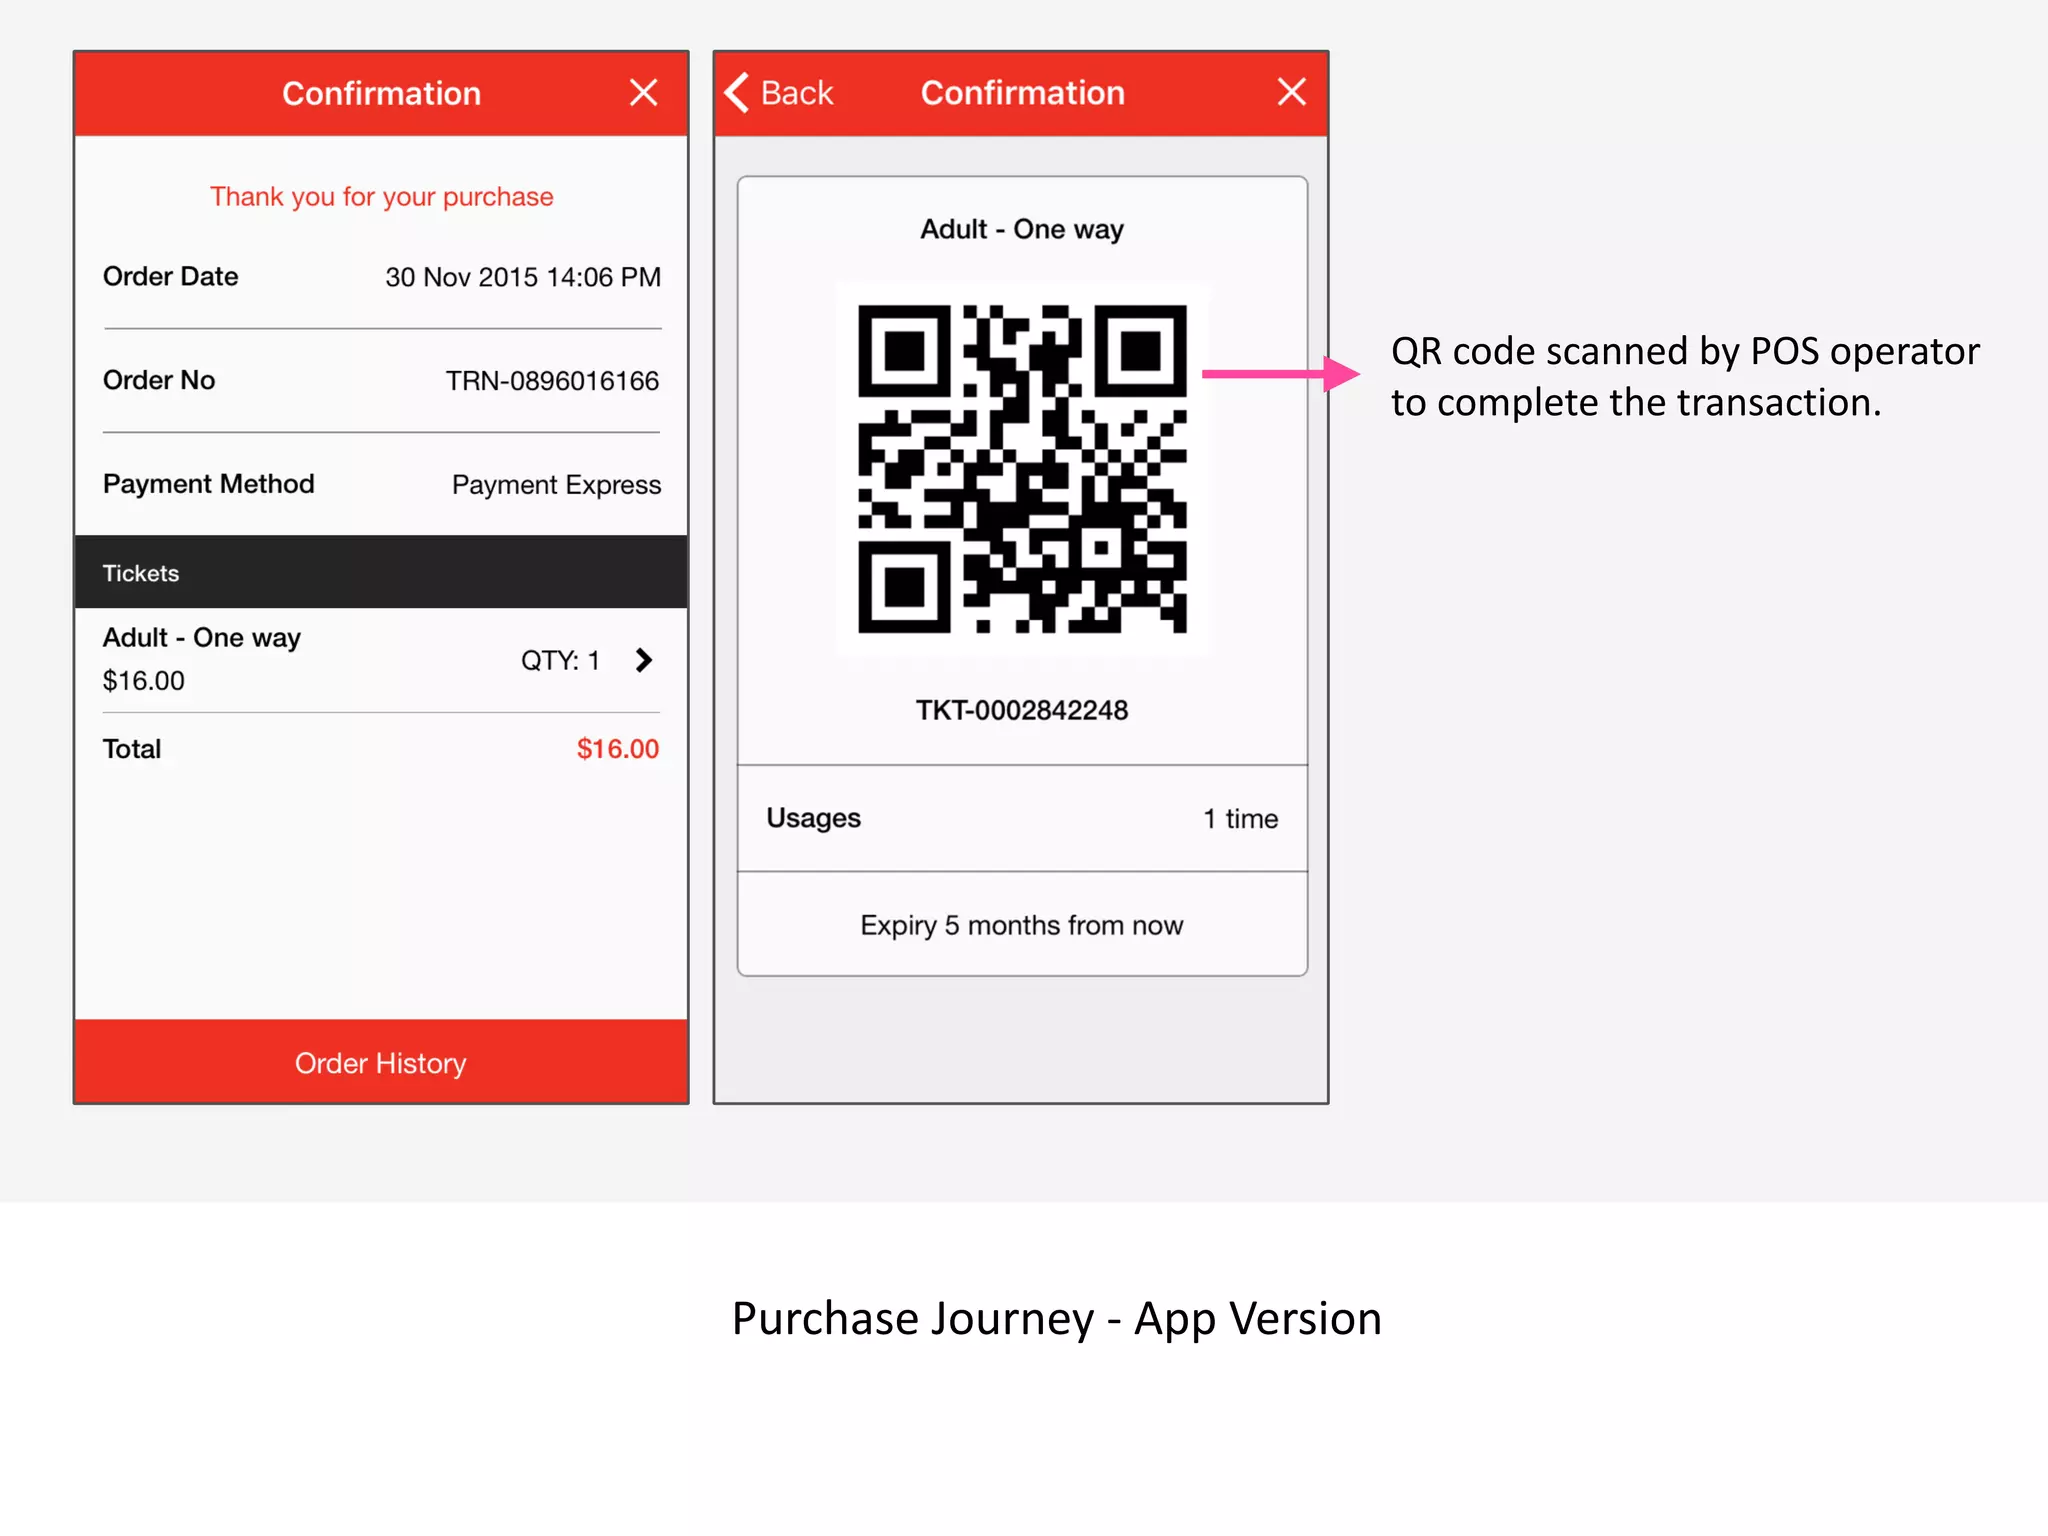
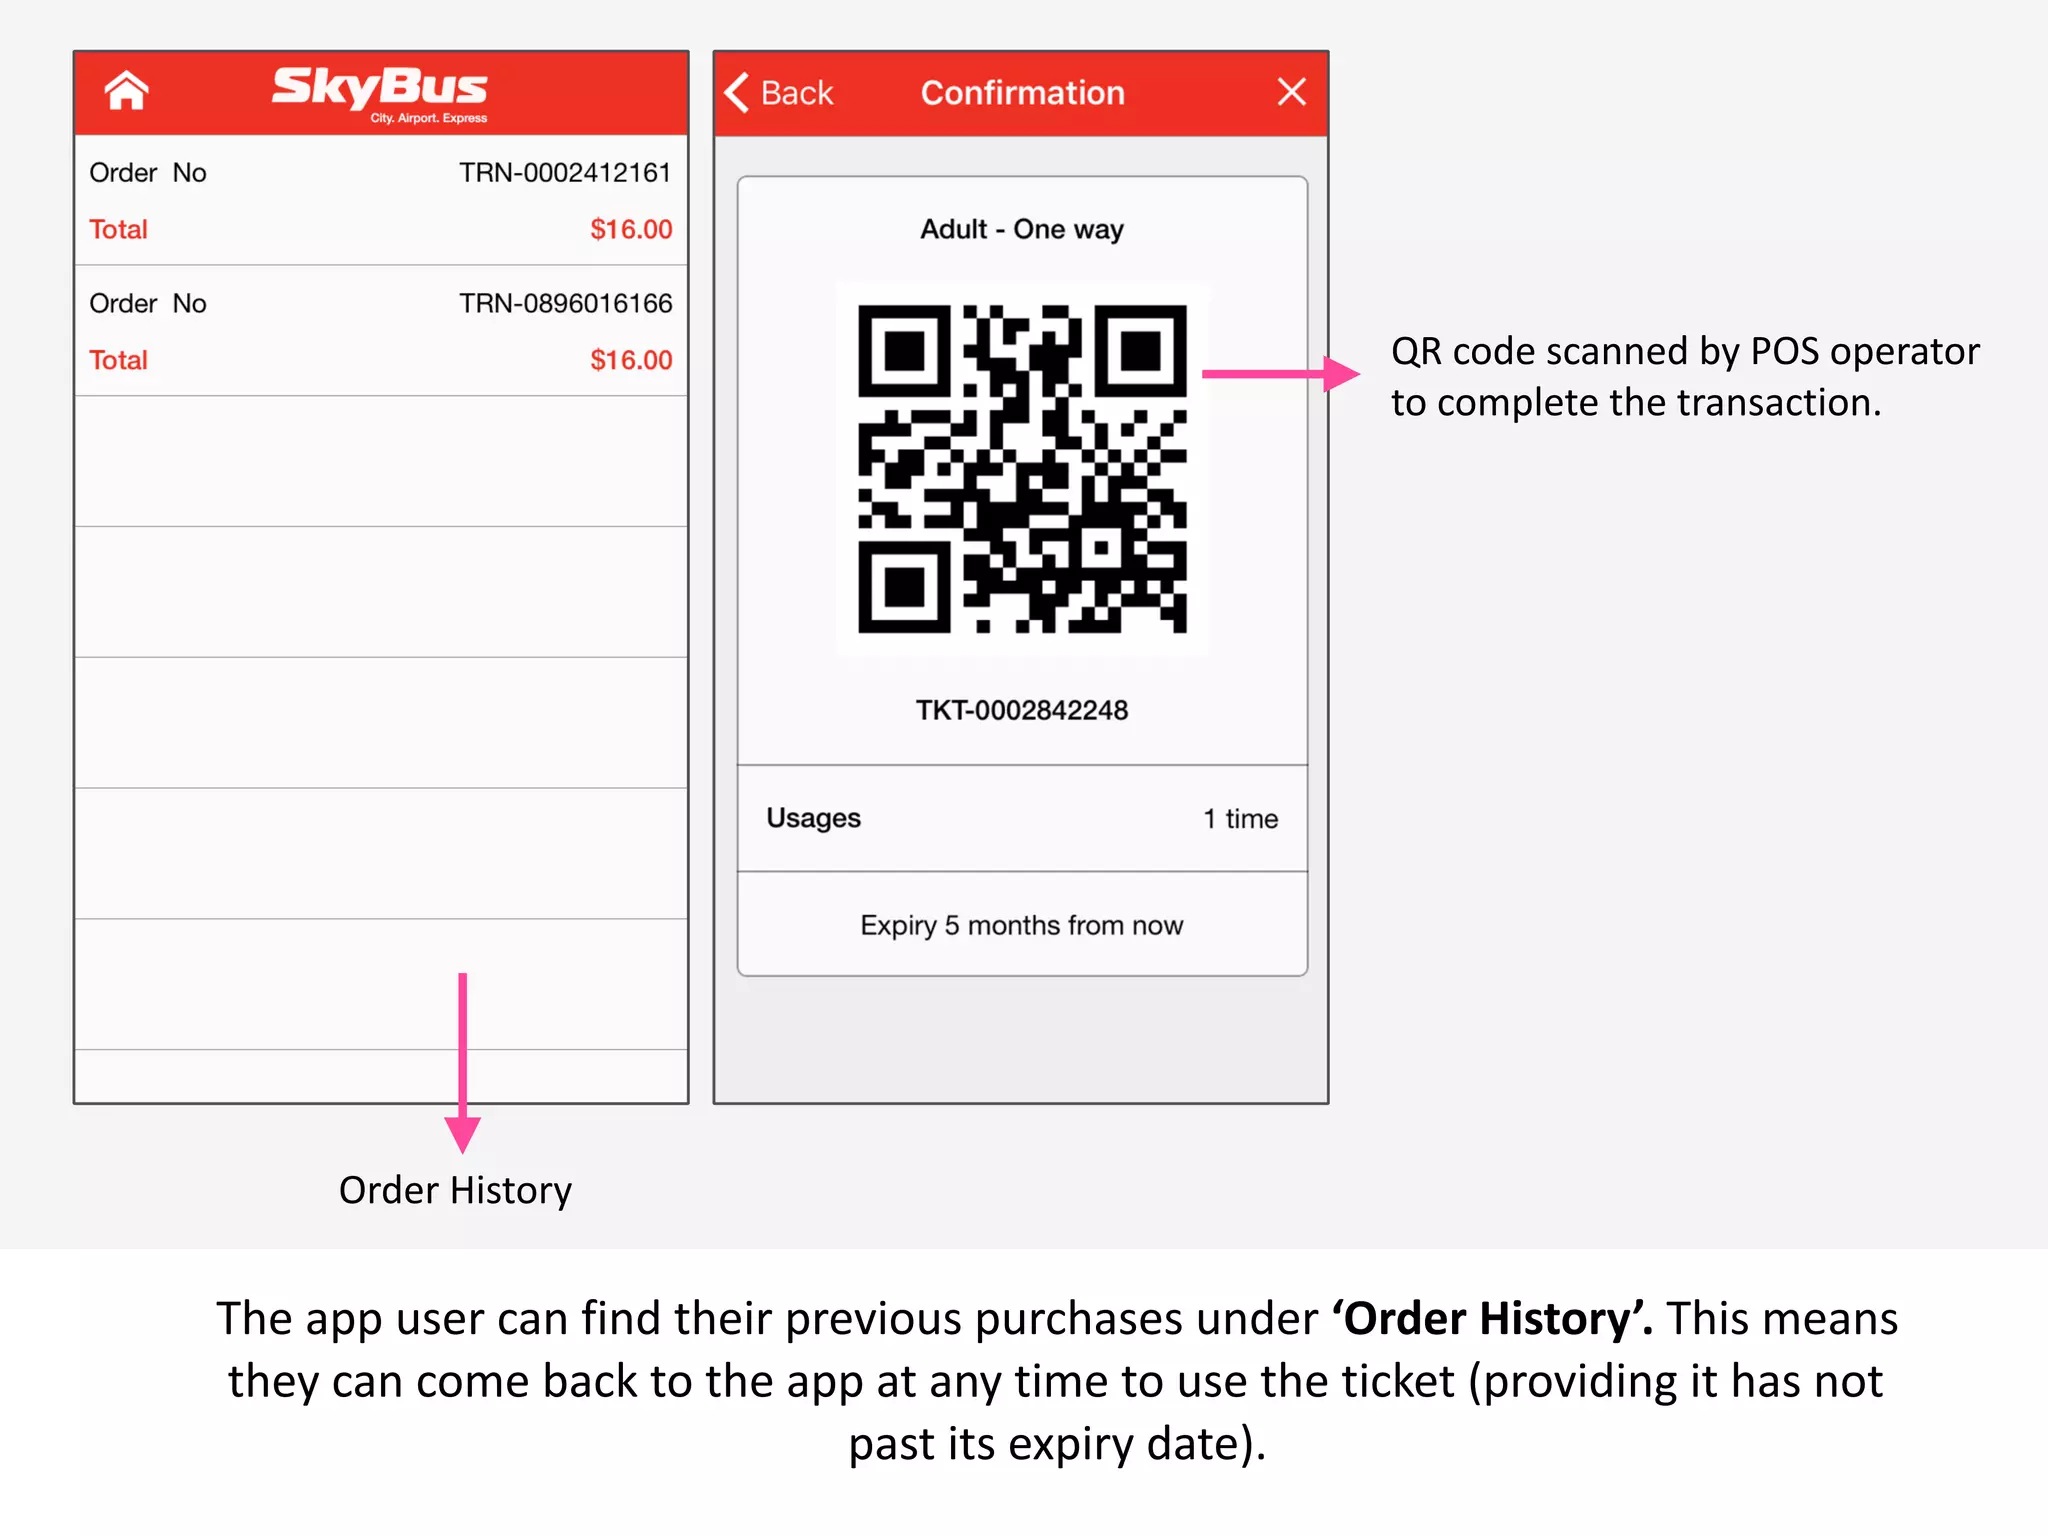
Putti Ticketing
Ticketing on the Putti CMS
3
!
To start editing your app/website feature, you can be on either the
‘App’ or ‘Web’ View located on the top Header Bar.
4
!
Access the ‘Features’ tab on the App Panel
5
Once the ‘Features’ tab has been selected the app panel will appear with a list
of the features that are already applied to your app. On the top right of the panel
there is a ‘Manage’ button, click this to access the features menu where you can
pick and choose which features you would like on your app.
Activate the ticketing feature by adding it to the Features Panel
Press customise to change the name and icon of your feature
To chose an icon or to upload your own custom icon press
the ‘Browse’ button.
!
Choose an icon from the list provided, or to upload your own icon
press the ‘Upload custom icon’ tab.
!
To upload your custom icon drag and drop your 60 x 60 pixel image into the blue
area, or press browse to find your icon manually. Press set when you have chosen
your icon.
11
!
Press ‘Save’ once you have finished customising your features
name and icon.
Press ‘add’ to begin adding tickets
Customise the purchasing experience using the text fields and the drop
down menus as shown above.
By selecting Pos the user can sync the ticket settings to the merchant app.
When selecting ‘Pos Only’ the ticket will not appear on the website and can
only be purchased in person.
The ticket feature has its own ‘Settings’ section. Here you can modify and
view ticketing info.
The user can search for individual
tickets or a transaction (multiple
tickets may be purchased per
transaction)
This section allows the user to
search within specific dates.
Now the user is able to export
CSV files allowing them to save
their data in a table structured
format, rather than relying solely
on the CMS.
In the Ticket ‘List’ Section the user can not only view the transition info but
also the uses of each ticket. (eg. when/where the ticket was used.)
By clicking the ‘Uses’ Tab we are able to see when & where each ticket is used.
You are also able to view uses for a singular branch with the drop down above.
Under	
  the	
  settings	
  tab	
  in	
  the	
  tickets	
  panel	
  the	
  user	
  is	
  able	
  to	
  customise	
  the	
  receipt	
  
header,	
  footer	
  and	
  terms	
  &	
  conditions	
  url.	
  This	
  information	
  will	
  also	
  be	
  visible	
  
during	
  an	
  online	
  purchase.	
  
Receipt	
  example
Ticketing on a Putti Website
 v
With	
  the	
  introduction	
  of	
  the	
  Ticketing	
  feature	
  came	
  a	
  new	
  template	
  that	
  is	
  solely	
  
for	
  customers	
  who	
  want	
  ONLY	
  ticketing	
  on	
  their	
  website.	
  With	
  this	
  template	
  the	
  
user	
  is	
  also	
  able	
  to	
  add	
  ‘mobile	
  website’	
  links	
  in	
  the	
  nav	
  bar	
  (see	
  above)
Template	
  reminder	
  1	
  (in	
  web	
  layout	
  section)
Template	
  reminder	
  2	
  (under	
  the	
  manage	
  featured	
  panel)
Mobile	
  Website	
  URL	
  in	
  Nav	
  Bar	
  (ticket	
  only	
  template)
 v
As	
  you	
  can	
  see,	
  the	
  ticketing	
  feature	
  looks	
  very	
  similar	
  to	
  the	
  online	
  shopping	
  
feature,	
  because	
  it	
  is!	
  The	
  website	
  user	
  has	
  the	
  option	
  to	
  read	
  more	
  or	
  add	
  an	
  item	
  
straight	
  to	
  their	
  cart	
  with	
  one	
  easy	
  click.
 v
Above	
  is	
  an	
  example	
  of	
  what	
  the	
  user	
  will	
  see	
  when	
  clicking	
  ‘Read	
  more’.
Product	
  description
Terms	
  and	
  condition	
  url:	
  
This	
  can	
  be	
  changed	
  via	
  the	
  	
  
ticket	
  settings	
  panel	
  in	
  the	
  CMS
Ticket	
  Name	
  and	
  Price
 v
The	
  next	
  step	
  for	
  the	
  user	
  is	
  to	
  purchase	
  their	
  tickets	
  in	
  ‘Shopping	
  Cart’.	
  This	
  then	
  
takes	
  the	
  user	
  straight	
  to	
  the	
  billing	
  info/online	
  payment	
  page
 v
One	
  the	
  purchase	
  is	
  complete	
  the	
  user	
  is	
  taken	
  to	
  this	
  page.	
  Additionally,	
  they	
  will	
  
receive	
  a	
  printable‘Order	
  confirmation’	
  in	
  their	
  email	
  inbox.	
  This	
  can	
  also	
  be	
  
retrieved	
  by	
  clicking	
  the	
  ‘Download	
  PDF’	
  or	
  ‘Print’	
  Buttons
 v
Above	
  is	
  the	
  pdf	
  order	
  confirmation	
  page.	
  This	
  is	
  also	
  sent	
  to	
  the	
  user	
  via	
  email.	
  
As	
  you	
  can	
  see	
  above	
  the	
  Receipt	
  header,	
  Footer	
  and	
  Terms	
  &	
  Conditions	
  from	
  the	
  
CMS	
  are	
  also	
  shown.
Receipt	
  Header
Receipt	
  Footer	
  
Terms	
  and	
  Conditions	
  
Ticketing on a Putti App
 v
Purchase	
  Journey	
  -­‐	
  App	
  Version	
  -­‐	
  Continued
 v
Purchase	
  Journey	
  -­‐	
  App	
  Version
QR	
  code	
  scanned	
  by	
  POS	
  operator	
  
to	
  complete	
  the	
  transaction.
 v
The	
  app	
  user	
  can	
  find	
  their	
  previous	
  purchases	
  under	
  ‘Order	
  History’.	
  This	
  means	
  
they	
  can	
  come	
  back	
  to	
  the	
  app	
  at	
  any	
  time	
  to	
  use	
  the	
  ticket	
  (providing	
  it	
  has	
  not	
  
past	
  its	
  expiry	
  date).
QR	
  code	
  scanned	
  by	
  POS	
  operator	
  
to	
  complete	
  the	
  transaction.
Order	
  History	
  
31

Putti Ticketing

  • 1.
  • 2.
  • 3.
    3 ! To start editingyour app/website feature, you can be on either the ‘App’ or ‘Web’ View located on the top Header Bar.
  • 4.
    4 ! Access the ‘Features’tab on the App Panel
  • 5.
    5 Once the ‘Features’tab has been selected the app panel will appear with a list of the features that are already applied to your app. On the top right of the panel there is a ‘Manage’ button, click this to access the features menu where you can pick and choose which features you would like on your app.
  • 6.
    Activate the ticketingfeature by adding it to the Features Panel
  • 7.
    Press customise tochange the name and icon of your feature
  • 8.
    To chose anicon or to upload your own custom icon press the ‘Browse’ button.
  • 9.
    ! Choose an iconfrom the list provided, or to upload your own icon press the ‘Upload custom icon’ tab.
  • 10.
    ! To upload yourcustom icon drag and drop your 60 x 60 pixel image into the blue area, or press browse to find your icon manually. Press set when you have chosen your icon.
  • 11.
    11 ! Press ‘Save’ onceyou have finished customising your features name and icon.
  • 12.
    Press ‘add’ tobegin adding tickets
  • 13.
    Customise the purchasingexperience using the text fields and the drop down menus as shown above.
  • 14.
    By selecting Posthe user can sync the ticket settings to the merchant app. When selecting ‘Pos Only’ the ticket will not appear on the website and can only be purchased in person.
  • 15.
    The ticket featurehas its own ‘Settings’ section. Here you can modify and view ticketing info.
  • 16.
    The user cansearch for individual tickets or a transaction (multiple tickets may be purchased per transaction) This section allows the user to search within specific dates. Now the user is able to export CSV files allowing them to save their data in a table structured format, rather than relying solely on the CMS.
  • 17.
    In the Ticket‘List’ Section the user can not only view the transition info but also the uses of each ticket. (eg. when/where the ticket was used.)
  • 18.
    By clicking the‘Uses’ Tab we are able to see when & where each ticket is used. You are also able to view uses for a singular branch with the drop down above.
  • 19.
    Under  the  settings  tab  in  the  tickets  panel  the  user  is  able  to  customise  the  receipt   header,  footer  and  terms  &  conditions  url.  This  information  will  also  be  visible   during  an  online  purchase.   Receipt  example
  • 20.
    Ticketing on aPutti Website
  • 21.
     v With  the  introduction  of  the  Ticketing  feature  came  a  new  template  that  is  solely   for  customers  who  want  ONLY  ticketing  on  their  website.  With  this  template  the   user  is  also  able  to  add  ‘mobile  website’  links  in  the  nav  bar  (see  above) Template  reminder  1  (in  web  layout  section) Template  reminder  2  (under  the  manage  featured  panel) Mobile  Website  URL  in  Nav  Bar  (ticket  only  template)
  • 22.
     v As  you  can  see,  the  ticketing  feature  looks  very  similar  to  the  online  shopping   feature,  because  it  is!  The  website  user  has  the  option  to  read  more  or  add  an  item   straight  to  their  cart  with  one  easy  click.
  • 23.
     v Above  is  an  example  of  what  the  user  will  see  when  clicking  ‘Read  more’. Product  description Terms  and  condition  url:   This  can  be  changed  via  the     ticket  settings  panel  in  the  CMS Ticket  Name  and  Price
  • 24.
     v The  next  step  for  the  user  is  to  purchase  their  tickets  in  ‘Shopping  Cart’.  This  then   takes  the  user  straight  to  the  billing  info/online  payment  page
  • 25.
     v One  the  purchase  is  complete  the  user  is  taken  to  this  page.  Additionally,  they  will   receive  a  printable‘Order  confirmation’  in  their  email  inbox.  This  can  also  be   retrieved  by  clicking  the  ‘Download  PDF’  or  ‘Print’  Buttons
  • 26.
     v Above  is  the  pdf  order  confirmation  page.  This  is  also  sent  to  the  user  via  email.   As  you  can  see  above  the  Receipt  header,  Footer  and  Terms  &  Conditions  from  the   CMS  are  also  shown. Receipt  Header Receipt  Footer   Terms  and  Conditions  
  • 27.
    Ticketing on aPutti App
  • 28.
     v Purchase  Journey  -­‐  App  Version  -­‐  Continued
  • 29.
     v Purchase  Journey  -­‐  App  Version QR  code  scanned  by  POS  operator   to  complete  the  transaction.
  • 30.
     v The  app  user  can  find  their  previous  purchases  under  ‘Order  History’.  This  means   they  can  come  back  to  the  app  at  any  time  to  use  the  ticket  (providing  it  has  not   past  its  expiry  date). QR  code  scanned  by  POS  operator   to  complete  the  transaction. Order  History  
  • 31.