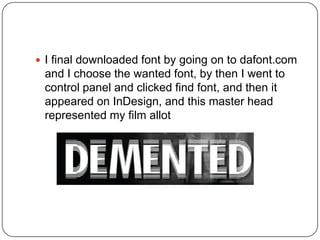
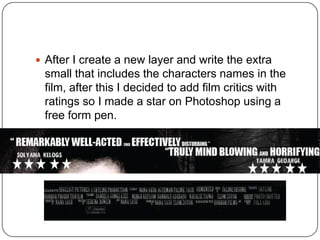
2. Ancillary task 1: Poster
February 18th
for my ancillary task firstly I , researched poster and
deconstructed them to the point where I knew all
the key codes and conventions. Below is an
example of what I deconstructed , drag me to hell
3. February 20
After analysing the poster, I was able to create a
template of how I wanted to produce my poster.
This gave me a overview of what I needed and
vital elements.
4. After taking pictures with my camera, I was able
to use these images to produce my ancillary task.
Using codes and conventions, I was able to start
creating my main image.
I compared and analysed three poster, black
swan, drag me to hell and shutter, which gave me
a good grounding into what elements to include
e.g. barcode and pricing.
5. Here’s the original photo, before I started editing
to create, a more scarier and higher impact film
6. February 23
I started edited the photo by removing her eyes, to
add bigger impact to the photo, although the photo
was already scary from feedback I knew that it was
remunerable so I began on Photoshop
7. February 23
The photo was also still to dark for a horror poster
so I used a filter called diffuse glow
8. February 24
i was still not convinced that the picture was
achieving the effect I wanted, her facial expression
needed brighten up, it was to casual and did not
strike fear, so I decided to change her features, I
went on to Google and found a mouth with blood
and which would change the overall look on her
face
9. I used magic wand and selected the area of mouth
that I wanted and placed it across her mouth, in
replacement of her
10. I began to use colour replacement, on her
eyelids to add a darker effect to her eyelids
which resemble black swan
11. I also added a scar on her face, to make her look
more ragged, by using a blank canvas and
selected
And then I Click the button to create a new layer
in the LAYERS panel. And Selected Lasso Tool
in toolbox and make one outline, fill in with red
colour. Select colour replacement in toolbox to
add a part of the colour. Then i select
SmudgeTool to smudged the outline that you
want it to be.an then added scar lines using
freedom pen
Finally I went to Filter -> Texture ->
Texturizer, and set at a set Scaling to 200%,.
12. After I added all these effect the photo still
needed to be darker, so I added another filter on
the photo used smudge filter, I then highlighted
her hair and background and filter that section
alone. the contrast in her face and hair will be
even more deeper to get this final photo
13. To then add my background for my photo I got a
picture of a dark Forrest and I smudged the two
photos together using a smudging tool
14. After making the main background for my media, I
decided that there was still not enough image to tell
a story
So I logged on to my abode premiere and took
images from the timeline to use on my
magazine, these were the two photos I decided, the
two male victims tied up to create this effect I
change the opacity of the image to 50 % and then
turned it black and white, so it would not take away
attention from the main image
15. I final downloaded font by going on to dafont.com
and I choose the wanted font, by then I went to
control panel and clicked find font, and then it
appeared on InDesign, and this master head
represented my film allot
16. After I create a new layer and write the extra
small that includes the characters names in the
film, after this I decided to add film critics with
ratings so I made a star on Photoshop using a
free form pen.