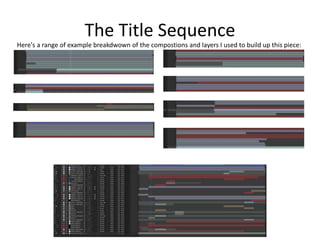
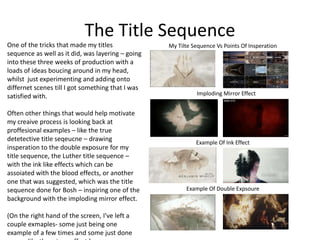
Matthew Burniston created a poster and pre-title sequence for a production. He experimented with different lighting and color adjustments to improve the quality. For the title sequence, he was inspired by True Detective and used double exposure effects by layering footage and adjustment layers. It took 3 weeks to create the poster, pre-title sequence, and title sequence, experimenting with different compositions and effects like mirrors. He found inspiration from professional title sequences and examples.
Why do so many people bash PowerPoint? Learn to use this tool more effectively, impress your audience, and save time creating your professional content as well! More tutorials can be found on my YouTube Channel: https://www.youtube.com/user/smcvey85.
New photoshop tutorials to learn creative techniquesShahadath Hossain
This tutorial will deal with one aspect of that larger project, creating custom rust and distress effects. Because when you are stomping around a city in your giant robot suit beating up enormous alien creatures. You can expect to take a few hits. Your mechsuit isn’t going to be pristine!
How to Make a Field invisible in Odoo 17Celine George
It is possible to hide or invisible some fields in odoo. Commonly using “invisible” attribute in the field definition to invisible the fields. This slide will show how to make a field invisible in odoo 17.
Welcome to TechSoup New Member Orientation and Q&A (May 2024).pdfTechSoup
In this webinar you will learn how your organization can access TechSoup's wide variety of product discount and donation programs. From hardware to software, we'll give you a tour of the tools available to help your nonprofit with productivity, collaboration, financial management, donor tracking, security, and more.
Embracing GenAI - A Strategic ImperativePeter Windle
Artificial Intelligence (AI) technologies such as Generative AI, Image Generators and Large Language Models have had a dramatic impact on teaching, learning and assessment over the past 18 months. The most immediate threat AI posed was to Academic Integrity with Higher Education Institutes (HEIs) focusing their efforts on combating the use of GenAI in assessment. Guidelines were developed for staff and students, policies put in place too. Innovative educators have forged paths in the use of Generative AI for teaching, learning and assessments leading to pockets of transformation springing up across HEIs, often with little or no top-down guidance, support or direction.
This Gasta posits a strategic approach to integrating AI into HEIs to prepare staff, students and the curriculum for an evolving world and workplace. We will highlight the advantages of working with these technologies beyond the realm of teaching, learning and assessment by considering prompt engineering skills, industry impact, curriculum changes, and the need for staff upskilling. In contrast, not engaging strategically with Generative AI poses risks, including falling behind peers, missed opportunities and failing to ensure our graduates remain employable. The rapid evolution of AI technologies necessitates a proactive and strategic approach if we are to remain relevant.
June 3, 2024 Anti-Semitism Letter Sent to MIT President Kornbluth and MIT Cor...Levi Shapiro
Letter from the Congress of the United States regarding Anti-Semitism sent June 3rd to MIT President Sally Kornbluth, MIT Corp Chair, Mark Gorenberg
Dear Dr. Kornbluth and Mr. Gorenberg,
The US House of Representatives is deeply concerned by ongoing and pervasive acts of antisemitic
harassment and intimidation at the Massachusetts Institute of Technology (MIT). Failing to act decisively to ensure a safe learning environment for all students would be a grave dereliction of your responsibilities as President of MIT and Chair of the MIT Corporation.
This Congress will not stand idly by and allow an environment hostile to Jewish students to persist. The House believes that your institution is in violation of Title VI of the Civil Rights Act, and the inability or
unwillingness to rectify this violation through action requires accountability.
Postsecondary education is a unique opportunity for students to learn and have their ideas and beliefs challenged. However, universities receiving hundreds of millions of federal funds annually have denied
students that opportunity and have been hijacked to become venues for the promotion of terrorism, antisemitic harassment and intimidation, unlawful encampments, and in some cases, assaults and riots.
The House of Representatives will not countenance the use of federal funds to indoctrinate students into hateful, antisemitic, anti-American supporters of terrorism. Investigations into campus antisemitism by the Committee on Education and the Workforce and the Committee on Ways and Means have been expanded into a Congress-wide probe across all relevant jurisdictions to address this national crisis. The undersigned Committees will conduct oversight into the use of federal funds at MIT and its learning environment under authorities granted to each Committee.
• The Committee on Education and the Workforce has been investigating your institution since December 7, 2023. The Committee has broad jurisdiction over postsecondary education, including its compliance with Title VI of the Civil Rights Act, campus safety concerns over disruptions to the learning environment, and the awarding of federal student aid under the Higher Education Act.
• The Committee on Oversight and Accountability is investigating the sources of funding and other support flowing to groups espousing pro-Hamas propaganda and engaged in antisemitic harassment and intimidation of students. The Committee on Oversight and Accountability is the principal oversight committee of the US House of Representatives and has broad authority to investigate “any matter” at “any time” under House Rule X.
• The Committee on Ways and Means has been investigating several universities since November 15, 2023, when the Committee held a hearing entitled From Ivory Towers to Dark Corners: Investigating the Nexus Between Antisemitism, Tax-Exempt Universities, and Terror Financing. The Committee followed the hearing with letters to those institutions on January 10, 202
Honest Reviews of Tim Han LMA Course Program.pptxtimhan337
Personal development courses are widely available today, with each one promising life-changing outcomes. Tim Han’s Life Mastery Achievers (LMA) Course has drawn a lot of interest. In addition to offering my frank assessment of Success Insider’s LMA Course, this piece examines the course’s effects via a variety of Tim Han LMA course reviews and Success Insider comments.
Read| The latest issue of The Challenger is here! We are thrilled to announce that our school paper has qualified for the NATIONAL SCHOOLS PRESS CONFERENCE (NSPC) 2024. Thank you for your unwavering support and trust. Dive into the stories that made us stand out!
Francesca Gottschalk - How can education support child empowerment.pptxEduSkills OECD
Francesca Gottschalk from the OECD’s Centre for Educational Research and Innovation presents at the Ask an Expert Webinar: How can education support child empowerment?
2. Poster
Before actually making a start on
piece, I had the idea to make to
variant products out of this – a
poster as intended and a
thumbnail - a widened version of
the same artwork without the logo
– for things such as if it was put on
iPlayer, they often use thumbnails
on the video? So to start this idea, I
used a template cut out - two
black bars either side to inform
me where it'd be cropped.
A cheap trick I often find can help
trick the quality into looking higher
whilst also giving back a lot of the
texture lost with things like 'surface
blur' and 'reduce noise' is by
overlaying a solid layer of noise
above all the layers – so that it adds
noise to all the layers bellow it. When it came to cutting myself out of a
photo I took for this (or anything else in
photoshop,) I chose to use the 'polygonal
lasso tool,' to select around myself of the
object, to be taken into 'select and mask...'
- especially with things like hair, which I
often cut out separately – as with the hair
I use a high edge detection, which messes
with the lines...
Adjustments (Layer)
Brush opacity
3. Poster
When coming to tweaking my
poster after completing the
first rendition. I fixed a lot of
the problems it bared – such
as the brightness issue using
the 'brightness/contrast
adjustment (layer,) sometimes
using the mask to pin point
and focus light where it was
needed more – for example
the protagonist to make him
stand out more, as well as
glares from light sources – as
to bring up the contrast and
brightness in areas of the
piece, not mention making it
feel more grimy?
On top of this I included a lot
more colour to piece
(something which with time I
felt it was lacking a lot of.)
To do that I used layer
modes, – like overlay, in
accompany of either 'paint
bucket tool' or the 'brush tool'
- for either focused or general
applied light.
First Attempt Final Product
Also, when coming to adjustments, I wanted to fill up some of
the blank spaces (and somewhat cover up some advice some
pointed out that glares can often be a way to cover up
emptiness,) thus I fell the need to add more, so I added a
smashed glass effect, over the piece, to add to the
grimy aesthetic of the product – using the screen mode, I could
only keep the lighter areas (made easy with a lot of the
searched photos being white on black.)
Furthermore, I sharpened the
piece using the 'unsharpen
mask...` filter, giving that
sharpen look, whilst also
allowing me to work into the
shadows of the piece –
helping the image pop that
much more.
One of the other problems I
had with my piece is that you
could see the stars through
the background, so to get
around this, I went onto the
original layer and used the
'eraser tool' to cut out the
stars that shouldn't be there –
originally left to have the
interion of a cool starry effect
leak, but coming off just more
cheap and tacky...
Another quick lighting
adjustment I did was using the
pen tool (with a black colour)
and painting on the shadow,
to be completed with the
layer mode and often dabbing
4. Pre-Title Sequence
When trying to play about
with turning my footage into
night rather than day and
eventually settling on the
darker blue – dusk look that I
had.
To this, I played about with a
lot of effects placed into a
layer adjustment and later –
would mainly be composed
of things such as 'lumetri
colour' - to adjust a lot of the
colour and brightness,
'unsharpen mask' - to help
sharpen is as I had on the
poster' and 'crop' - to add a
tram line effect to the
product.
(Though I may have over
complicated this process, my
colour grade was borken
down into 3
adjusment layers..)
At the start of my product, I use frame wipe, the way I do this is
by using an animated mask – created using the 'pen tool' across
the areas I want to remove into the transition of the next frame,
which would be placed under the current footage.
To add the BBC water mark over my product I went online to
find a BBC logo and place it over all the footage and used the
'screen' layer mode to bring out the white over the footage, for
me then bring down the opacity down to make it look more
authentic next to actual BBC footage.
When editing this sequence together, I was trying to have the
pacing of cutting the shots getting faster – to show the rise in
tension as the piece went along. On top of this, I try and set up a
fake formula for the audience to follow – when it swithces
between the killer and the victim, before cuting one of the shots
of victim short with killer coming in – earlier than expected,
creating a jumpscare in conection with a lound and abrassive
sting.
Pen Tool
Animated Mask
What really helped me modify this
sequence's colour grade – after
the remains of the night affect
attempt was looking at examples
of proffessiaonal colour grades
such as one I looked at from a
Doctor Who episode.
5. The Title Sequence
With my title seuqnence, what
heavily inspired my title sequence
was the true detective one – using a
double exposure effect, an effect I
achieved by layering a lot of footage
and using various layer modes –
mainly 'lighten,' placing images into
the darker tones of images, whilst
also using things like 'screen' to place
only the highlights over the layers
below.
Whilst doing my title sequence, I'd
make everything monochromatic
(very rarley keeping what would've
be the original tone,) to later and in
some colour over/into the piece – in
which I'd later do with things like
'curves' adjustments.
To place text in (forgetting
the logo I'd previosly
created and saved in
Photoshop,) I used, using
the text tool – placing it
into the emptist places on
each cut to fill in the spaces
or state whole the
character show is being
played by.
To finish this all of, I'd later
be importing this into
premier and make it blend
in more with the rest of the
products – such as the tram
lines and BBC watermark.
To impliment a lot a lot buildings into my
product, I'd often play about with them in to
Photoshop to play about with the siloute into
my product – such as getting the right
highlights or shadows.
Whith the mirrored image going into to each
other, I got this affect from moving footage
and applying the 'mirror' adjustment at my
desired angle.
As whole, the title sequence took me three
weeks, with the first week bieng used for the
poster and pre-title sequence...
6. The Title Sequence
Here's a range of example breakdwown of the compostions and layers I used to build up this piece:
7. The Title Sequence
One of the tricks that made my titles
sequence as well as it did, was layering – going
into these three weeks of production with a
loads of ideas boucing around in my head,
whilst just experimenting and adding onto
differnet scenes till I got something that I was
satisfied with.
Often other things that would help motivate
my creaive process is looking back at
proffesional examples – like the true
detetective title seqeucne – drawing
insperation to the double exposure for my
title sequence, the Luther title sequence –
with the ink like effects which can be
assoiated with the blood effects, or another
one that was suggested, which was the title
sequence done for Bosh – inspiring one of the
background with the imploding mirror effect.
(On the right hand of the screen, I've left a
couple exmaples- some just being one
example of a few times and some just done
Imploding Mirror Effect
My Tilte Sequence Vs Points Of Insperation
Example Of Ink Effect
Example Of Double Expsoure
Editor's Notes
What were the strengths of your research? How did your research help your product?
What were the weaknesses of your research? What could you have done better/improve? What effect would this have had on your product?
What were the strengths of your research? How did your research help your product?
What were the weaknesses of your research? What could you have done better/improve? What effect would this have had on your product?
What were the strengths of your research? How did your research help your product?
What were the weaknesses of your research? What could you have done better/improve? What effect would this have had on your product?
What were the strengths of your research? How did your research help your product?
What were the weaknesses of your research? What could you have done better/improve? What effect would this have had on your product?
What were the strengths of your research? How did your research help your product?
What were the weaknesses of your research? What could you have done better/improve? What effect would this have had on your product?
What were the strengths of your research? How did your research help your product?
What were the weaknesses of your research? What could you have done better/improve? What effect would this have had on your product?