The document is a production log that details the progress of creating a music magazine. It describes adding images, editing photos, designing pages and sections. Key steps include:
1) Creating templates and placing elements like the logo.
2) Designing the cover with the magazine name and secondary stories.
3) Producing the contents page with article titles, page numbers and sections.
4) Formatting a double page spread with an artist interview and large background image.
5) Creating additional elements like an album cover and branding elements.
OCR – Level 3 Cambridge Introductory Diploma in Media
Unit 14: Producing a Print Based Media Product
LO3: Be able to produce materials for use in an original print media product.
Emily Thompson 6107
The French Revolution, which began in 1789, was a period of radical social and political upheaval in France. It marked the decline of absolute monarchies, the rise of secular and democratic republics, and the eventual rise of Napoleon Bonaparte. This revolutionary period is crucial in understanding the transition from feudalism to modernity in Europe.
For more information, visit-www.vavaclasses.com
How to Make a Field invisible in Odoo 17Celine George
It is possible to hide or invisible some fields in odoo. Commonly using “invisible” attribute in the field definition to invisible the fields. This slide will show how to make a field invisible in odoo 17.
How to Create Map Views in the Odoo 17 ERPCeline George
The map views are useful for providing a geographical representation of data. They allow users to visualize and analyze the data in a more intuitive manner.
Welcome to TechSoup New Member Orientation and Q&A (May 2024).pdfTechSoup
In this webinar you will learn how your organization can access TechSoup's wide variety of product discount and donation programs. From hardware to software, we'll give you a tour of the tools available to help your nonprofit with productivity, collaboration, financial management, donor tracking, security, and more.
This is a presentation by Dada Robert in a Your Skill Boost masterclass organised by the Excellence Foundation for South Sudan (EFSS) on Saturday, the 25th and Sunday, the 26th of May 2024.
He discussed the concept of quality improvement, emphasizing its applicability to various aspects of life, including personal, project, and program improvements. He defined quality as doing the right thing at the right time in the right way to achieve the best possible results and discussed the concept of the "gap" between what we know and what we do, and how this gap represents the areas we need to improve. He explained the scientific approach to quality improvement, which involves systematic performance analysis, testing and learning, and implementing change ideas. He also highlighted the importance of client focus and a team approach to quality improvement.
Operation “Blue Star” is the only event in the history of Independent India where the state went into war with its own people. Even after about 40 years it is not clear if it was culmination of states anger over people of the region, a political game of power or start of dictatorial chapter in the democratic setup.
The people of Punjab felt alienated from main stream due to denial of their just demands during a long democratic struggle since independence. As it happen all over the word, it led to militant struggle with great loss of lives of military, police and civilian personnel. Killing of Indira Gandhi and massacre of innocent Sikhs in Delhi and other India cities was also associated with this movement.
Synthetic Fiber Construction in lab .pptxPavel ( NSTU)
Synthetic fiber production is a fascinating and complex field that blends chemistry, engineering, and environmental science. By understanding these aspects, students can gain a comprehensive view of synthetic fiber production, its impact on society and the environment, and the potential for future innovations. Synthetic fibers play a crucial role in modern society, impacting various aspects of daily life, industry, and the environment. ynthetic fibers are integral to modern life, offering a range of benefits from cost-effectiveness and versatility to innovative applications and performance characteristics. While they pose environmental challenges, ongoing research and development aim to create more sustainable and eco-friendly alternatives. Understanding the importance of synthetic fibers helps in appreciating their role in the economy, industry, and daily life, while also emphasizing the need for sustainable practices and innovation.
Read| The latest issue of The Challenger is here! We are thrilled to announce that our school paper has qualified for the NATIONAL SCHOOLS PRESS CONFERENCE (NSPC) 2024. Thank you for your unwavering support and trust. Dive into the stories that made us stand out!
Ethnobotany and Ethnopharmacology:
Ethnobotany in herbal drug evaluation,
Impact of Ethnobotany in traditional medicine,
New development in herbals,
Bio-prospecting tools for drug discovery,
Role of Ethnopharmacology in drug evaluation,
Reverse Pharmacology.
CLASS 11 CBSE B.St Project AIDS TO TRADE - INSURANCE
Production Log
1. Production Log
Entry 1
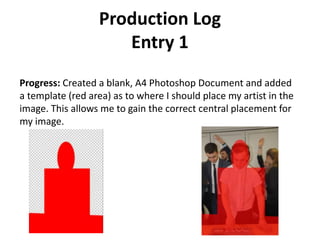
Progress: Created a blank, A4 Photoshop Document and added
a template (red area) as to where I should place my artist in the
image. This allows me to gain the correct central placement for
my image.
2. Production Log
Entry 2
Progress: Added my main image to the A4 Photoshop document.
Proceeded to edit the image, making the background black and white, but
keeping the colour of my main artist to make him stand out. I then enforced
this effect by blurring the background of my image, but retaining the quality
of my main artist as I intended on making him stand out further.
3. Production Log
Entry 3
Progress: Produced the Logo for my magazine ‘Majestic’. By
creating a colourful background and putting a white template
with the cut out text ‘majestic’ over the top of the background.
4. Production Log
Entry 3 - Continued
Progress: Added the logo to my Front Cover and began to plan
which areas I would dedicate my secondary stories to.
5. Production Log
Entry 4
Progress: Added the rest of the secondary story spaces and
proceeded to fill them in. I also added text above the magazine
name.
I added two
articles: One
dedicated to the
music festival
‘Holy Ship’ and
another
dedicated to
‘London
Clubbing’.
Finally, I added
the
advertisement
for the ‘Label
Focus’ section.
6. Production Log
Entry 5
Progress: I employed the same technique I used for creating my
Magazine Logo to create the introductory title for my Artist.
I simply created a colourful background and overlaid the cut out
text over the background.
Next, I chose to add my strap-line, just as my final draft shows.
I used the colour red for the letters E, D and M to shadow the
use of the term ‘EDM’ that’s used as an abbreviation of the
term: ‘electronic dance music’.
7. Production Log
Entry 5 - Continued
Progress: Finally, I proceeded to
follow my final draft of my magazine
by adding the introductory
sentences below my main artists’
title and adding a barcode and
pricing inclusions.
8. Production Log
Entry 6
Progress: I began to produce my Contents page this lesson. I
created a new A4 Photoshop document, then followed my draft
and created the sections in which I will be adding my images. I
also added my Logo and a large text reading: ‘Contents:’,
allowing readers to instantly recognise the page as a contents
page.
9. Production Log
Entry 7
Progress: I added the borders as to where I would be adding my
text boxes in order to assist myself when I finally decide to add
them. I also added the date for the particular issue of my
magazine and underlined the logo to make it
stand out more and be recognised as a logo.
10. Production Log
Entry 8
Progress: Today I chose to implement my images into my production.
Before doing so, I edited the images in order to make them look more
effective and aesthetically pleasing. I added an ‘Iris blur’ filter to each image,
then added a ‘warming filter’ to image 1 and adjusted the brightness and
contrast by small amounts.
Image 2)Image 1)
11. Production Log
Entry 8 – Continued
Progress: I then added my edited images to my production. I
also added my artist’s name: ‘Illicit’.
12. Production Log
Entry 9
Progress: Continuing work on my contents page, I chose to start
working on the page numbers of the various ‘articles’ I would
include.
13. Production Log
Entry 9 – Continued
Progress: I included the use of the colours blue and green
throughout the page in order to create a fluent, effective
looking colour scheme.
14. Production Log
Entry 10
Progress: I added this particular section into my contents page
in order to welcome readers to first edition of my Music
Magazine. I created small Logo for my magazine using shapes
(Left) and also edited the ‘Majestic’ Logo using the Colour
Balance tool (Right).
15. Production Log
Entry 11
Progress: I added the
finishing touches to my
contents page such as the
name of the magazine
website towards the bottom
of the page.
16. Production Log
Entry 12
Progress: I began my producing my double page spread this
lesson. I started off by creating a blank 13 canvas that I split into
2 sections to make two A4 pages.
17. Production Log
Entry 13
Progress: I began working on the page that would be dedicated
to my artist interview and began thinking about how the pre-
made interview would fit into the space I produced.
18. Production Log
Entry 13 - Continued
Progress: Additionally, I added the title of the article that I had
planned to write on my final draft. I underlined the title using a
straight line from the ‘Shape’ tool. I edited the text using
‘Blending options’ and allowed the font to be bright and
noticeable.
19. Production Log
Entry 14
Progress: This lesson, I formatted my
interview and fitted it in a way that
allowed it to work well with my
canvas. Also, I added the name of my
artist: ‘Illicit’ in a bold noticeable font
towards the top of the page. This
allows readers to recognise my artists
name and perhaps read on.
20. Production Log
Entry 15
Progress: Through experimenting, I
found that adding an image of my
protagonist underneath my
interview looked effective, I had
seen this done before in different
examples of magazines I had
looked at, so I chose to replicate
this technique. This was my end
result (Below) after changing the
opacity of the image and editing
the edges using the blur filter and
select tool.
21. Production Log
Entry 16
Progress: This lesson, I started
producing the second page of
my double page spread I aimed
to fill up the full page with an
image of my artist DJ-ing, but
also wanted to add some
effects. I started off by adding
the image to an A4 canvas and
fitting in onto the page.
22. Production Log
Entry 16 - Continued
Progress: I then selected my
artist using the magnetic select
tool and pressed ‘Ctrl + J’. This
allowed me to create a copy of the
area I had selected and gave me an
opportunity to edit the
background of the image but
retain the original quality of the
area I had selected. I applied a blur
effect to the background and
slightly shifted the brightness and
contrast to give an effective and
highly defined look to the image.
23. Production Log
Entry 17
Progress: This lesson I chose to add a clever effect to my image
by surrounding my artists hands with ‘electrical energy’. This
effect suggests my protagonist has supernatural powers and he
uses them to operate musical equipment for further effect. I did
this using the pen tool and then selecting the ‘Stroke’ option
when using a brush with soft edges.
24. Production Log
Entry 17 – Continued
Progress: I used a white
brush and then added inner
and outer glow blending
options with the colour light
blue in order to make the
graphic glow and look how I
desired it to look.
25. Production Log
Entry 18
Progress: as a small sub-
project I chose to create an
album cover for my artists’
upcoming album. I used similar
effects to the ones in which I
used on my production in
order to create it. I took a
picture of myself also using a
self set up timer photo using a
bipod.
26. Production Log
Entry 19
Progress: In this current lesson I chose to implement my album
cover into my current production and add the ‘majestic’ logo. I
altered the logo also using the colour balance tool in order to
make it fit in with the current colour scheme.