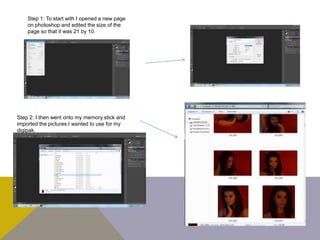
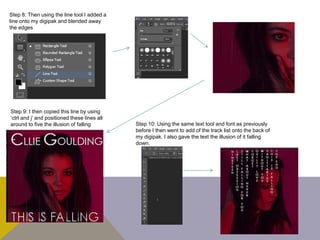
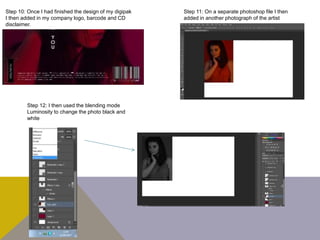
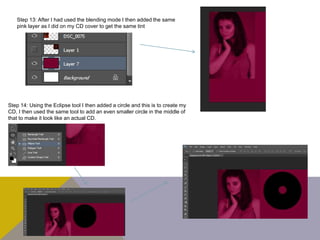
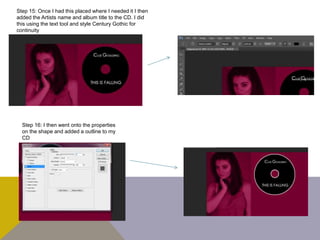
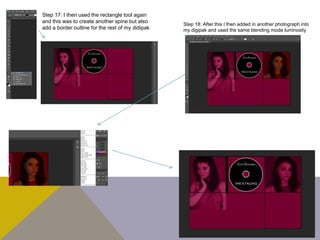
Step 1: To start with I opened a new page
on photoshop and edited the size of the
page so that it was 21 by 10.
Step 2: I then went onto my memory stick and
imported the pictures I wanted to use for my
digipak.
Step 3: I then added these photographs
onto a photoshop file.
Step 4: Then using the rectangle tool I
added a rectangle in between the
photographs to be the spine of the
digipak.
Step 5: After I done this I then added a pink layer
over the top of my images and blended this in
Step 6: Using the text tool and the font
Century Gothic I then added the artists
name and album title to the spine
Step 7: Then using the same tool ad font I added
the album title and artists name to the front of my
digipak using font size 48
Step 8: Then using the line tool I added a
line onto my digipak and blended away
the edges
Step 9: I then copied this line by using
‘ctrl and j’ and positioned these lines all
around to five the illusion of falling Step 10: Using the same text tool and font as previously
before I then went to add of the track list onto the back of
my digipak. I also gave the text the illusion of it falling
down.
Step 10: Once I had finished the design of my digipak
I then added in my company logo, barcode and CD
disclaimer.
Step 11: On a separate photoshop file I then
added in another photograph of the artist
Step 12: I then used the blending mode
Luminosity to change the photo black and
white
Step 13: After I had used the blending mode I then added the same
pink layer as I did on my CD cover to get the same tint
Step 14: Using the Eclipse tool I then added a circle and this is to create my
CD, I then used the same tool to add an even smaller circle in the middle of
that to make it look like an actual CD.
Step 15: Once I had this placed where I needed it I then
added the Artists name and album title to the CD. I did
this using the text tool and style Century Gothic for
continuity
Step 16: I then went onto the properties
on the shape and added a outline to my
CD
Step 17: I then used the rectangle tool again
and this was to create another spine but also
add a border outline for the rest of my didipak
Step 18: After this I then added in another photograph into
my digipak and used the same blending mode luminosity
Step 19: I then used the text tool and the same font
Century Gothic and added in a quote from the song onto
my digipak
Step 20: I then imported my CD cover into my digipak for the final product.

Digipak development

  • 2.
    Step 1: Tostart with I opened a new page on photoshop and edited the size of the page so that it was 21 by 10. Step 2: I then went onto my memory stick and imported the pictures I wanted to use for my digipak.
  • 3.
    Step 3: Ithen added these photographs onto a photoshop file. Step 4: Then using the rectangle tool I added a rectangle in between the photographs to be the spine of the digipak. Step 5: After I done this I then added a pink layer over the top of my images and blended this in
  • 4.
    Step 6: Usingthe text tool and the font Century Gothic I then added the artists name and album title to the spine Step 7: Then using the same tool ad font I added the album title and artists name to the front of my digipak using font size 48
  • 5.
    Step 8: Thenusing the line tool I added a line onto my digipak and blended away the edges Step 9: I then copied this line by using ‘ctrl and j’ and positioned these lines all around to five the illusion of falling Step 10: Using the same text tool and font as previously before I then went to add of the track list onto the back of my digipak. I also gave the text the illusion of it falling down.
  • 6.
    Step 10: OnceI had finished the design of my digipak I then added in my company logo, barcode and CD disclaimer. Step 11: On a separate photoshop file I then added in another photograph of the artist Step 12: I then used the blending mode Luminosity to change the photo black and white
  • 7.
    Step 13: AfterI had used the blending mode I then added the same pink layer as I did on my CD cover to get the same tint Step 14: Using the Eclipse tool I then added a circle and this is to create my CD, I then used the same tool to add an even smaller circle in the middle of that to make it look like an actual CD.
  • 8.
    Step 15: OnceI had this placed where I needed it I then added the Artists name and album title to the CD. I did this using the text tool and style Century Gothic for continuity Step 16: I then went onto the properties on the shape and added a outline to my CD
  • 9.
    Step 17: Ithen used the rectangle tool again and this was to create another spine but also add a border outline for the rest of my didipak Step 18: After this I then added in another photograph into my digipak and used the same blending mode luminosity
  • 10.
    Step 19: Ithen used the text tool and the same font Century Gothic and added in a quote from the song onto my digipak Step 20: I then imported my CD cover into my digipak for the final product.