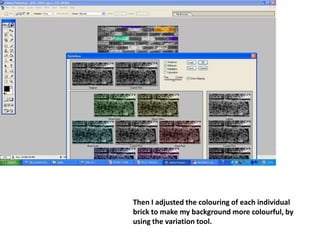
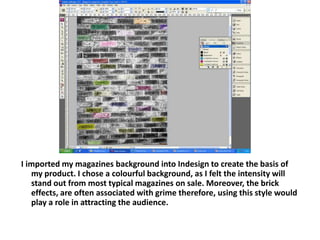
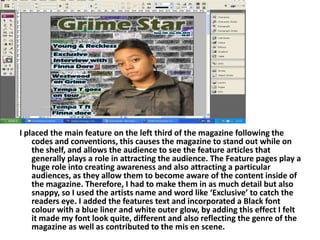
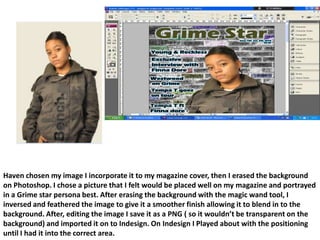
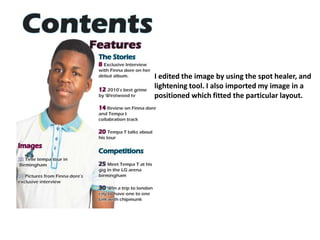
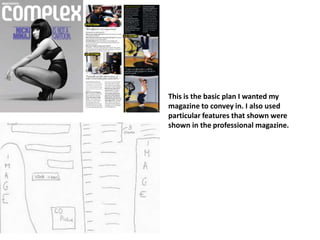
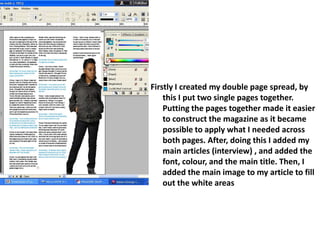
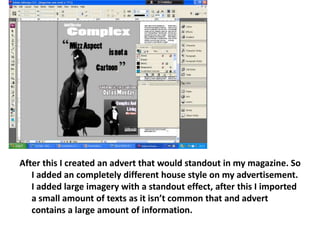
The document describes the process of designing a magazine cover and layout using Adobe Photoshop and InDesign. Key steps included editing background images in Photoshop, importing them into InDesign, designing the masthead and features text using consistent fonts and colors, and arranging images and articles on the pages. The goal was to create a magazine with a consistent style throughout that would appeal to fans of grime music.
A copy of the slides used by Stephen Bohane during his talk to businesses attending the Collaborate Cornwall Conference held on the 24th September 2010.
Stephen Bohane is the Head of Business Development – Cornwall & Isles of Scilly for the South West Regional Development Agency (SWRDA).
2. The programmes I used: Adobe Photoshop CS3- I used this programme to edit images. InDesign- I used this program to create my magazine.
3. Flat plan This is the basic plan I wanted my magazine to convey in. I also used particular features that shown were shown in the professional magazine above.
4. Firstly, I took a picture of a brick wall and imported in to Photoshop.
5. I changed my plain brick wall by editing the image, so I add a chalk and charcoal filter on top of the imagery.
6. Then I adjusted the colouring of each individual brick to make my background more colourful, by using the variation tool.
7. I imported my magazines background into Indesign to create the basis of my product. I chose a colourful background, as I felt the intensity will stand out from most typical magazines on sale. Moreover, the brick effects, are often associated with grime therefore, using this style would play a role in attracting the audience.
8. Masthead- most Grime/ hip-hop magazines normally consists in rather bold and simple font, therefore I selected a font that I felt reflected this(Eras bold ITC), I used this font face as it consisted in a bold style, the main colours used in my masthead is grey with a blue liner and a white outer glow I selected these colours as they complemented my house style. I created my masthead within InDesign, after selecting the font I manipulated it, by increasing the height by stretching the font.
9. I placed the main feature on the left third of the magazine following the codes and conventions, this causes the magazine to stand out while on the shelf, and allows the audience to see the feature articles that generally plays a role in attracting the audience. The Feature pages play a huge role into creating awareness and also attracting a particular audiences, as they allow them to become aware of the content inside of the magazine. Therefore, I had to make them in as much detail but also snappy, so I used the artists name and word like ‘Exclusive’ to catch the readers eye. I added the features text and incorporated a Black font colour with a blue liner and white outer glow, by adding this effect I felt it made my font look quite, different and also reflecting the genre of the magazine as well as contributed to themis en scene.
10. Haven chosen my image I incorporate it to my magazine cover, then I erased the background on Photoshop. I chose a picture that I felt would be placed well on my magazine and portrayed in a Grime star persona best. After erasing the background with the magic wand tool, I inversed and feathered the image to give it a smoother finish allowing it to blend in to the background. After, editing the image I save it as a PNG ( so it wouldn’t be transparent on the background) and imported it on to Indesign. On Indesign I Played about with the positioning until I had it into the correct area.
12. The programmes I used: Adobe Photoshop CS3- I used this programme to edit images. InDesign- I used this program to create my magazine.
13. This is the layout I followed to create the particular standards need for the contents page of my magazine. By having the features on one side and the picture on the other.
14. I deliberately made the word contents large to allow the audience to be aware of what this page is about. I added the same typical house style (COLOURS )which is consisted throughout my magazine.
15. Whilst creating my contents I kept the page very simple by sticking to my house style and using minimal colours, which has allowed me to keep a constant look through out. For the features I wanted minimalism standard, by adding short and snappy features so the reader would be attractive to the articles.
16. I edited the image by using the spot healer, and lightening tool. I also imported my image in a positioned which fitted the particular layout.
18. The programmes I used: Adobe Photoshop CS3- I used this programme to edit images. InDesign- I used this program to create my magazine.
19. This is the basic plan I wanted my magazine to convey in. I also used particular features that shown were shown in the professional magazine.
20. Firstly I created my double page spread, by this I put two single pages together. Putting the pages together made it easier to construct the magazine as it became possible to apply what I needed across both pages. After, doing this I added my main articles (interview) , and added the font, colour, and the main title. Then, I added the main image to my article to fill out the white areas
21. After this I created an advert that would standout in my magazine. So I added an completely different house style on my advertisement. I added large imagery with a standout effect, after this I imported a small amount of texts as it isn’t common that and advert contains a large amount of information.
22. Finally I added the page number, a tiny convention which allows the audience to have a visual aid to discover/ find particular pages quicker than just flicking through each page.
24. 1 I imported the brick background in to Indesign I put it on an new layer.
25. 2 An outer glow was added to my font face. My masthead fonts face is Berlin san fb and consists I added the masthead and the barcode, on two different layers. I rotated my barcode and reduced the size.
26. 3 Added first feature on a separate layer, I used Eras bold font, whit a blue font colour and white outer glow.
27. 4 I added the edited central image into the correct position, on the front cover. I enlarged the picture so the was much free space.
28. 5 I added a second feature with the font face Berlin san fb, in red whit a white outer glow.
29. 6 I changed my name from grime Endz to grime star, once I noticed that, me and my classmate’s magazine was similar. So, we decided to do different editions of the same magazine.
30. 7 My masthead font face is Berlin san fb it consist in a white and purple outer glow. I also added some features which contains black, with a blue liner and white outer glow, I did this so my font stands out from my busy background
31. 8 I added the rest of the features with the same font and colour as the others.
32. 9 I changed the font on my masthead from Berlin san fb, to eras bold. I also changed the font colour to grey with a blue liner and a white outer glow. I also added the date issue and price under the masthead using same font and colour as the masthead.
33. 10 I imported a grey background to my article page to create an advert, I added it on a new layer.
34. 11 I used the font face Poplar Std on this text to make it stand out on the page from the rest of the article, I used a different colour scheme to make the advert realistic. I used a bright white colour on this font to create this effect.
35. 12 I added some more texts using the font popular Std I added a black colour to create a contrasted.
36. 13 I added my CD cover box and added a parental advisory sign on it. The colour of my CD was a black and white with a gradient effect.
38. 15 I added a small image to the CD cover and some white font, to make it look attractive/ realistic. I also added text above the CD cover , this added information ad also filled spear space.
39. 16 I added columns to my page, by going on layers on the top tab then i click on margins and columns and added the amount of columns needed
40. 17 I copied and pasted my article which i had typed up on Microsoft word.
41. 18 Then I added the central image taking up most of the white area’s left.
42. 19 I added the certain house styles on to my article to give it the perfect flow of colours.
43. 20 I added the word features to the page using font eras with a black colour and blue liner.
44. 21 I added the feature with the same font and font colour.
45. 22 I added the central image to create a typical music vibe, I kept the imagery fresh and as bright.
46. 23 I added the house styles and also the rest of the features to complete the magazine.