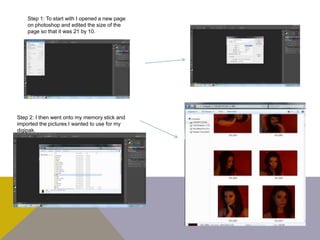
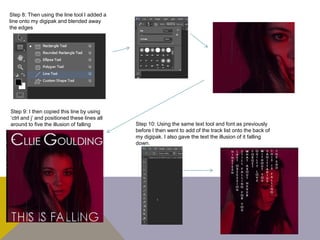
Step 1: To start with I opened a new page
on photoshop and edited the size of the
page so that it was 21 by 10.
Step 2: I then went onto my memory stick and
imported the pictures I wanted to use for my
digipak.
Step 3: I then added these photographs
onto a photoshop file.
Step 4: Then using the rectangle tool I
added a rectangle in between the
photographs to be the spine of the
digipak.
Step 5: After I done this I then added a pink layer
over the top of my images and blended this in
Step 6: Using the text tool and the font
Century Gothic I then added the artists
name and album title to the spine
Step 7: Then using the same tool ad font I added
the album title and artists name to the front of my
digipak using font size 48
Step 8: Then using the line tool I added a
line onto my digipak and blended away
the edges
Step 9: I then copied this line by using
‘ctrl and j’ and positioned these lines all
around to five the illusion of falling Step 10: Using the same text tool and font as previously
before I then went to add of the track list onto the back of
my digipak. I also gave the text the illusion of it falling
down.
Step 10: Once I had finished the design of my digipak I then added in my
company logo, barcode and CD disclaimer.
Final Digipak:

Digipak development

  • 2.
    Step 1: Tostart with I opened a new page on photoshop and edited the size of the page so that it was 21 by 10. Step 2: I then went onto my memory stick and imported the pictures I wanted to use for my digipak.
  • 3.
    Step 3: Ithen added these photographs onto a photoshop file. Step 4: Then using the rectangle tool I added a rectangle in between the photographs to be the spine of the digipak. Step 5: After I done this I then added a pink layer over the top of my images and blended this in
  • 4.
    Step 6: Usingthe text tool and the font Century Gothic I then added the artists name and album title to the spine Step 7: Then using the same tool ad font I added the album title and artists name to the front of my digipak using font size 48
  • 5.
    Step 8: Thenusing the line tool I added a line onto my digipak and blended away the edges Step 9: I then copied this line by using ‘ctrl and j’ and positioned these lines all around to five the illusion of falling Step 10: Using the same text tool and font as previously before I then went to add of the track list onto the back of my digipak. I also gave the text the illusion of it falling down.
  • 6.
    Step 10: OnceI had finished the design of my digipak I then added in my company logo, barcode and CD disclaimer. Final Digipak: