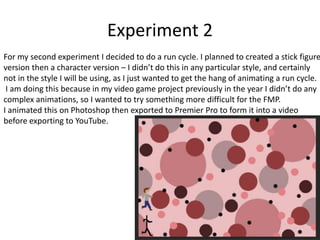
Experiments
Megan Bannister
Experiment 1
• For this experiment I practiced some pixel art
ideas for the game in different sizes. The
group of characters I made are 32x32 pixel.
• I also decided to create some 64x64
characters.
• The house was designed to live alongside the
32x32 people and is around 60 pixels tall.
Process
• I used the black pencil tool to create a silhouette for
each character on top of a 32x32 box. Then on a
separate layer I added the colours and details of each
design – I found that the detail was the most important
part of adding life to the character. For the blacksmith I
added wear to his apron and dirt on his face which
subtly adds a lot more to his character. After creating
the first silhouette of the old lady, I used her silhouette
to help shape the other designs so I wasn’t starting
from scratch every single time.
• For the house I used the line tool to create the outline
and the fill tool for the main colours. It might have
been more beneficial to work with a colour palette, so
the designs look more cohesive.
Reflection
• What elements of your experiments will you
include in your final product?
– I am going to include the size of the second lot of
characters but I’m going to add a lot of dynamic to
their design as they are very closed off figures. I
learnt from a video whilst I was creating these
experiments that a silhouette of the character should
explain a lot of what the character is. The silhouette
of the blacksmith is evidently a person but there is
not a lot else to say apart from the fact he has broad
shoulders.
– I realised through my experiment that even though
the 32x32 people have a lot of charm to them, it is
extremely hard to achieve intricate details. I noticed
this when trying to add meat and vegetable pictures
to the aprons to distinguish the butcher and grocer.
Experiment 2
For my second experiment I decided to do a run cycle. I planned to created a stick figure
version then a character version – I didn’t do this in any particular style, and certainly
not in the style I will be using, as I just wanted to get the hang of animating a run cycle.
I am doing this because in my video game project previously in the year I didn’t do any
complex animations, so I wanted to try something more difficult for the FMP.
I animated this on Photoshop then exported to Premier Pro to form it into a video
before exporting to YouTube.
Process
• I used a run cycle reference (shown below) to help with my animation. I started by drawing out a stick figure
version. I decided against using a head as I spent too long originally trying to figure out the positioning. Then I
copied and pasted the stick figure layers so I had the bones of the character version and added skin, clothes
and a head.
• I found that when it got to the character animation, I had to move some of the positions around or change how
they looked as they become a lot more noticeable when put onto a ‘proper’ person. The most challenging part
was making sure the legs looked correct as in the stick figure I had made them too short.
• Originally, I exported the animation with a transparent background. Then – upon uploading it – I realised the
transparent background turns black which meant the stick figure animation completely disappeared. I decided
to create a fun background with different sized brushes. When I exported it again to Premier Pro after adding a
background, I added a title that appears letter by letter. I did this by creating multiple text boxes and in each
one adding a letter.
Reflection
• What elements of your experiments will you include in
your final product?
• I am definitely going to add a walk cycle into my final
product. I don’t think I want to use a run cycle as the
game is a calm game - being able to run about may
take away from this effect. I also think it’s a good idea
to create the basics of an animation like a walk cycle
before adding the design on top to save time.
• Obviously, I will also be using a title screen for my
trailer but I think it will most likely go at the end of the
video as is conventional for a trailer.

Production Experiments.pptx

  • 1.
  • 2.
    Experiment 1 • Forthis experiment I practiced some pixel art ideas for the game in different sizes. The group of characters I made are 32x32 pixel. • I also decided to create some 64x64 characters. • The house was designed to live alongside the 32x32 people and is around 60 pixels tall.
  • 3.
    Process • I usedthe black pencil tool to create a silhouette for each character on top of a 32x32 box. Then on a separate layer I added the colours and details of each design – I found that the detail was the most important part of adding life to the character. For the blacksmith I added wear to his apron and dirt on his face which subtly adds a lot more to his character. After creating the first silhouette of the old lady, I used her silhouette to help shape the other designs so I wasn’t starting from scratch every single time. • For the house I used the line tool to create the outline and the fill tool for the main colours. It might have been more beneficial to work with a colour palette, so the designs look more cohesive.
  • 4.
    Reflection • What elementsof your experiments will you include in your final product? – I am going to include the size of the second lot of characters but I’m going to add a lot of dynamic to their design as they are very closed off figures. I learnt from a video whilst I was creating these experiments that a silhouette of the character should explain a lot of what the character is. The silhouette of the blacksmith is evidently a person but there is not a lot else to say apart from the fact he has broad shoulders. – I realised through my experiment that even though the 32x32 people have a lot of charm to them, it is extremely hard to achieve intricate details. I noticed this when trying to add meat and vegetable pictures to the aprons to distinguish the butcher and grocer.
  • 5.
    Experiment 2 For mysecond experiment I decided to do a run cycle. I planned to created a stick figure version then a character version – I didn’t do this in any particular style, and certainly not in the style I will be using, as I just wanted to get the hang of animating a run cycle. I am doing this because in my video game project previously in the year I didn’t do any complex animations, so I wanted to try something more difficult for the FMP. I animated this on Photoshop then exported to Premier Pro to form it into a video before exporting to YouTube.
  • 6.
    Process • I useda run cycle reference (shown below) to help with my animation. I started by drawing out a stick figure version. I decided against using a head as I spent too long originally trying to figure out the positioning. Then I copied and pasted the stick figure layers so I had the bones of the character version and added skin, clothes and a head. • I found that when it got to the character animation, I had to move some of the positions around or change how they looked as they become a lot more noticeable when put onto a ‘proper’ person. The most challenging part was making sure the legs looked correct as in the stick figure I had made them too short. • Originally, I exported the animation with a transparent background. Then – upon uploading it – I realised the transparent background turns black which meant the stick figure animation completely disappeared. I decided to create a fun background with different sized brushes. When I exported it again to Premier Pro after adding a background, I added a title that appears letter by letter. I did this by creating multiple text boxes and in each one adding a letter.
  • 7.
    Reflection • What elementsof your experiments will you include in your final product? • I am definitely going to add a walk cycle into my final product. I don’t think I want to use a run cycle as the game is a calm game - being able to run about may take away from this effect. I also think it’s a good idea to create the basics of an animation like a walk cycle before adding the design on top to save time. • Obviously, I will also be using a title screen for my trailer but I think it will most likely go at the end of the video as is conventional for a trailer.

Editor's Notes

  • #3 Outline your experiment – why are you doing it? What does it require? Etc Include screenshots, etc
  • #4 Discuss the tools and processes used in your experiments
  • #6 Outline your experiment – why are you doing it? What does it require? Etc Include screenshots, etc
  • #7 Discuss the tools and processes used in your experiments