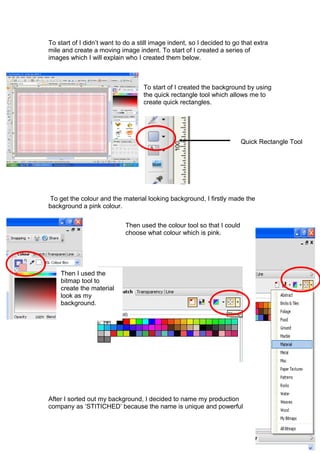
To start of I didn’t want to do a still image indent, so I decided to go that extra
mile and create a moving image indent. To start of I created a series of
images which I will explain who I created them below.


                                   To start of I created the background by using
                                   the quick rectangle tool which allows me to
                                   create quick rectangles.


                                                                         Quick Rectangle Tool


 To get the colour and the material looking background, I firstly made the
background a pink colour.

                             Then used the colour tool so that I could
                             choose what colour which is pink.


    Then I used the
    bitmap tool to
    create the material
    look as my
    background.


After I sorted out my background, I decided to name my production
company as ‘STITICHED’ because the name is unique and powerful
when you say the word. I would like my production company to come across
         as powerful and well known.


                                                          To create the text I used the text tool on
                                                          the left.


The type of font I have used is Century
Gothic, which is bold.


                                          Again I had to choose what colour I
                                          wanted to use which is a dark pink/
                                          purple. I used this because it shows that
                                          the company is light and laid back but
                                          also hardworking.


         Now I have come to the section which is
         significant to the company name, as the
name represents what is actually shown which is ‘Stitched’. How I produced
this is shown below.


                     I basically used the line
                    tool and the brush tool this
                    allows me to change the
                    outline of my text.


              To create the needle effect I
             used the quick rectangle tool.
             Then I used the filter effect to
             create the shiny look of the
             needle.
Once I have created all the pictures I needed, I then started to put them into a
video format. Having a lot of Jpeg files.


I put all the files onto Serif Movie Plus 6X , I also changed the times of each
side so that they run smoothly.

        I also added music which is copy right free as the music belongs to the


serif it self.
Process

Process

  • 1.
    To start ofI didn’t want to do a still image indent, so I decided to go that extra mile and create a moving image indent. To start of I created a series of images which I will explain who I created them below. To start of I created the background by using the quick rectangle tool which allows me to create quick rectangles. Quick Rectangle Tool To get the colour and the material looking background, I firstly made the background a pink colour. Then used the colour tool so that I could choose what colour which is pink. Then I used the bitmap tool to create the material look as my background. After I sorted out my background, I decided to name my production company as ‘STITICHED’ because the name is unique and powerful
  • 2.
    when you saythe word. I would like my production company to come across as powerful and well known. To create the text I used the text tool on the left. The type of font I have used is Century Gothic, which is bold. Again I had to choose what colour I wanted to use which is a dark pink/ purple. I used this because it shows that the company is light and laid back but also hardworking. Now I have come to the section which is significant to the company name, as the
  • 3.
    name represents whatis actually shown which is ‘Stitched’. How I produced this is shown below. I basically used the line tool and the brush tool this allows me to change the outline of my text. To create the needle effect I used the quick rectangle tool. Then I used the filter effect to create the shiny look of the needle.
  • 4.
    Once I havecreated all the pictures I needed, I then started to put them into a video format. Having a lot of Jpeg files. I put all the files onto Serif Movie Plus 6X , I also changed the times of each side so that they run smoothly. I also added music which is copy right free as the music belongs to the serif it self.