Photoshop Tools
I used the crop tool
to cut off the sides
of the photo as I did
not need as much of
the background as is
shown.
I used the spot
healing to reduce and
hide any blemishes
on the skin or lines
and creases on the
clothes.
The dodge tool used to
highlight certain areas of
the model such as the
cheekbones to brighten
them up.
Brightness and contest is the
first thing I did when editing
images. This is to create more
lighting and more shadows, it
helps to sharpen up images and
contrast tem up.
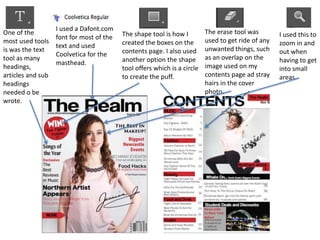
One of the
most used tools
is was the text
tool as many
headings,
articles and sub
headings
needed o be
wrote.
I used a Dafont.com
font for most of the
text and used
Coolvetica for the
masthead.
The shape tool is how I
created the boxes on the
contents page. I also used
another option the shape
tool offers which is a circle
to create the puff.
The erase tool was
used to get ride of any
unwanted things, such
as an overlap on the
image used on my
contents page ad stray
hairs in the cover
photo.
I used this to
zoom in and
out when
having to get
into small
areas.
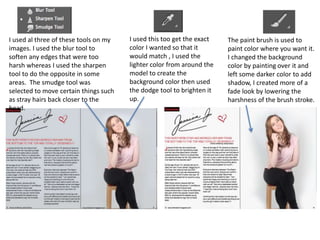
I used al three of these tools on my
images. I used the blur tool to
soften any edges that were too
harsh whereas I used the sharpen
tool to do the opposite in some
areas. The smudge tool was
selected to move certain things such
as stray hairs back closer to the
head.
The paint brush is used to
paint color where you want it.
I changed the background
color by painting over it and
left some darker color to add
shadow, I created more of a
fade look by lowering the
harshness of the brush stroke.
I used this too get the exact
color I wanted so that it
would match , I used the
lighter color from around the
model to create the
background color then used
the dodge tool to brighten it
up.

Photosop Tools

  • 1.
  • 2.
    I used thecrop tool to cut off the sides of the photo as I did not need as much of the background as is shown. I used the spot healing to reduce and hide any blemishes on the skin or lines and creases on the clothes. The dodge tool used to highlight certain areas of the model such as the cheekbones to brighten them up. Brightness and contest is the first thing I did when editing images. This is to create more lighting and more shadows, it helps to sharpen up images and contrast tem up.
  • 3.
    One of the mostused tools is was the text tool as many headings, articles and sub headings needed o be wrote. I used a Dafont.com font for most of the text and used Coolvetica for the masthead. The shape tool is how I created the boxes on the contents page. I also used another option the shape tool offers which is a circle to create the puff. The erase tool was used to get ride of any unwanted things, such as an overlap on the image used on my contents page ad stray hairs in the cover photo. I used this to zoom in and out when having to get into small areas.
  • 4.
    I used althree of these tools on my images. I used the blur tool to soften any edges that were too harsh whereas I used the sharpen tool to do the opposite in some areas. The smudge tool was selected to move certain things such as stray hairs back closer to the head. The paint brush is used to paint color where you want it. I changed the background color by painting over it and left some darker color to add shadow, I created more of a fade look by lowering the harshness of the brush stroke. I used this too get the exact color I wanted so that it would match , I used the lighter color from around the model to create the background color then used the dodge tool to brighten it up.