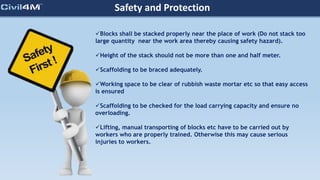
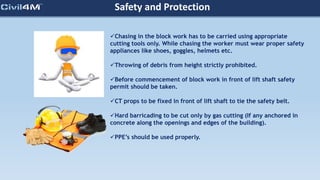
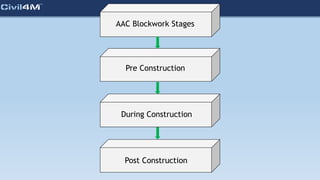
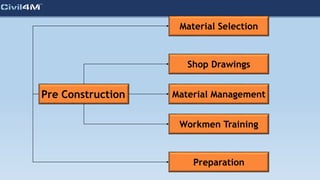
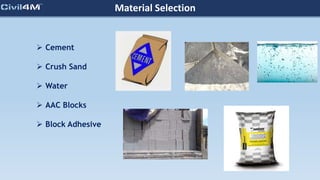
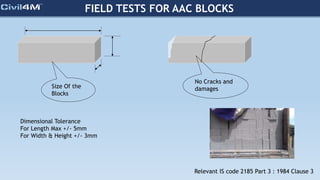
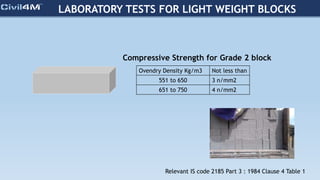
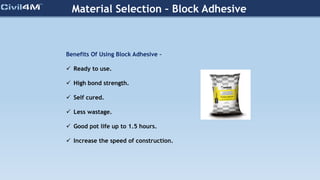
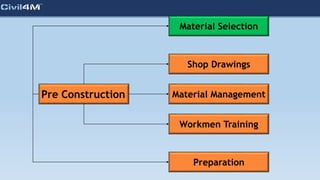
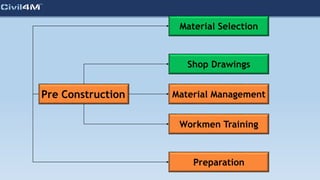
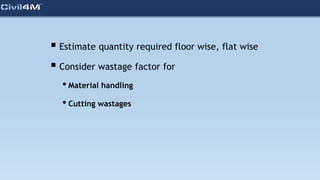
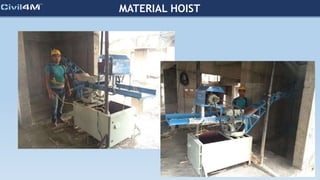
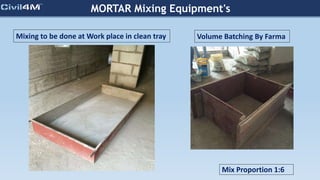
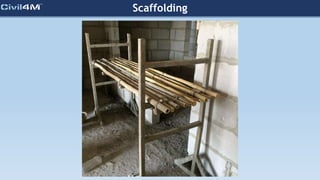
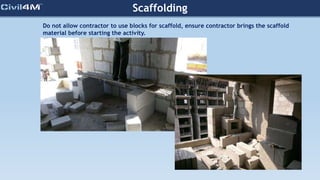
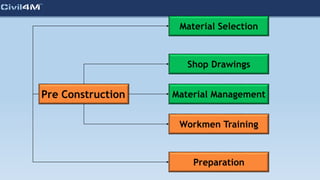
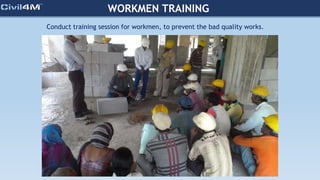
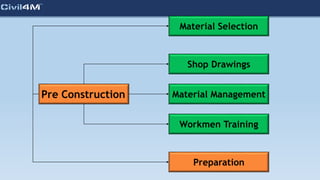
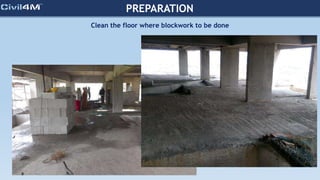
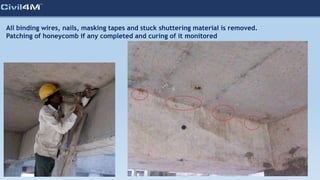
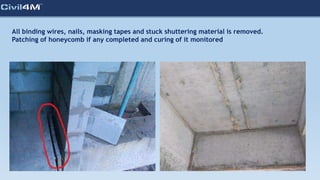
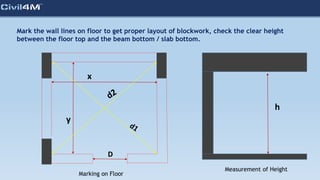
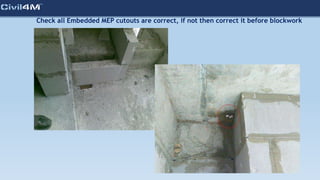
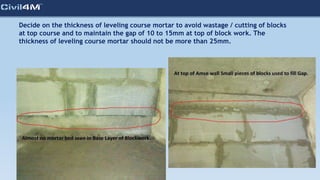
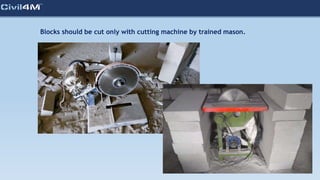
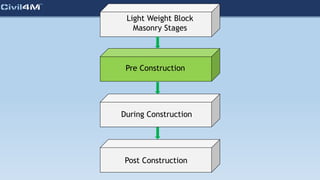
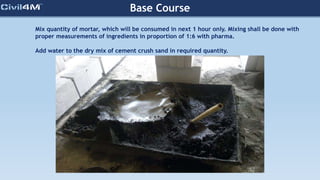
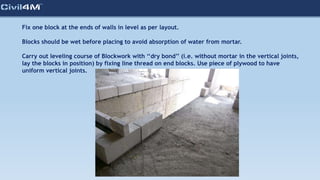
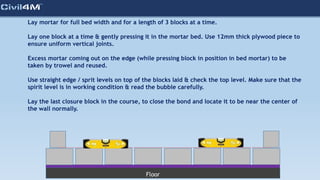
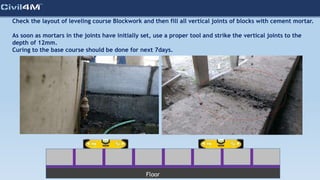
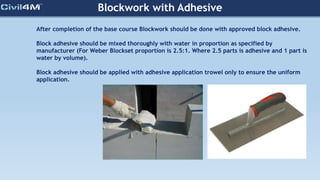
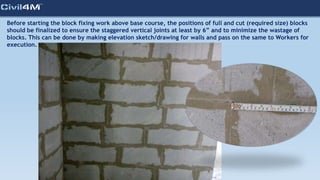
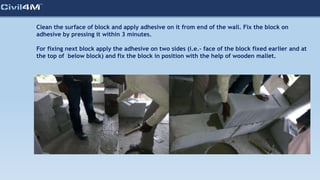
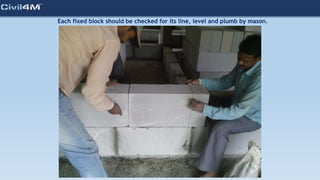
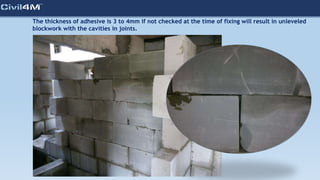
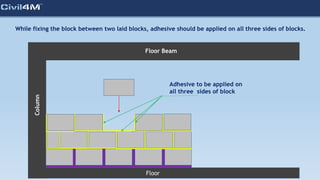
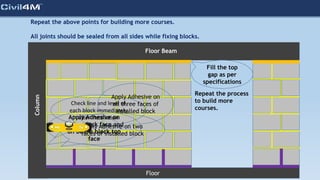
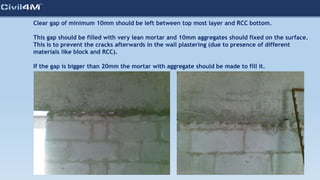
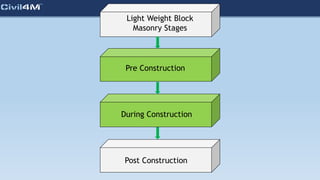
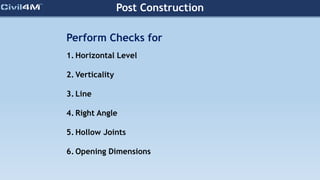
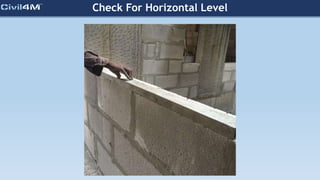
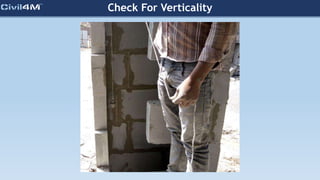
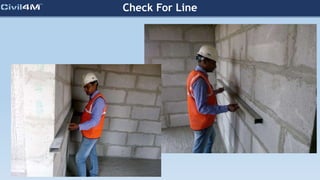
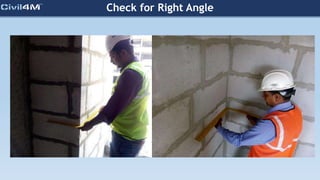
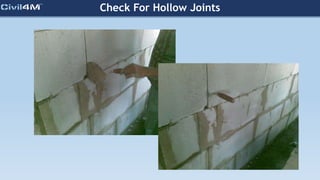
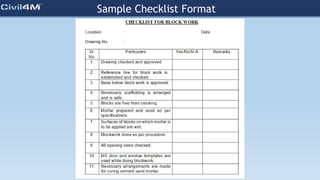
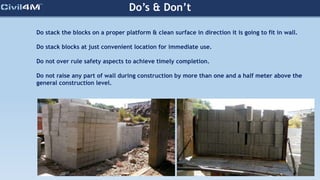
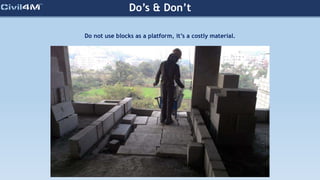
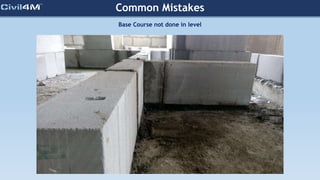
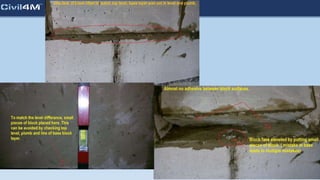
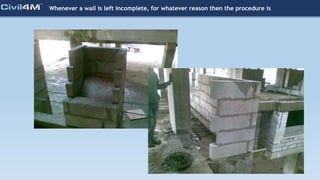
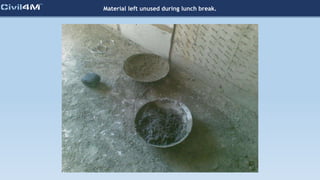
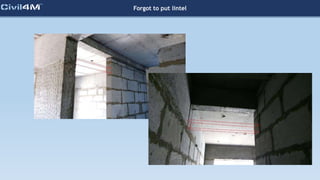
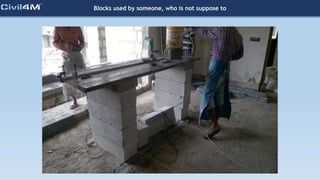
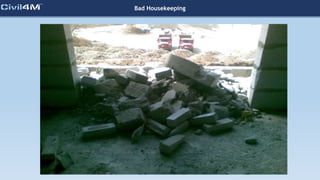
Presenting
How to Do AAC Blockwork
Safety and Protection
Blocks shall be stacked properly near the place of work (Do not stack too
large quantity near the work area thereby causing safety hazard).
Height of the stack should not be more than one and half meter.
Scaffolding to be braced adequately.
Working space to be clear of rubbish waste mortar etc so that easy access
is ensured
Scaffolding to be checked for the load carrying capacity and ensure no
overloading.
Lifting, manual transporting of blocks etc have to be carried out by
workers who are properly trained. Otherwise this may cause serious
injuries to workers.
Safety and Protection
Chasing in the block work has to be carried using appropriate
cutting tools only. While chasing the worker must wear proper safety
appliances like shoes, goggles, helmets etc.
Throwing of debris from height strictly prohibited.
Before commencement of block work in front of lift shaft safety
permit should be taken.
CT props to be fixed in front of lift shaft to tie the safety belt.
Hard barricading to be cut only by gas cutting (If any anchored in
concrete along the openings and edges of the building).
PPE’s should be used properly.
AAC Blockwork Stages
Pre Construction
During Construction
Post Construction
Pre Construction
Material Selection
Shop Drawings
Workmen Training
Preparation
Material Management
Material Selection
 Cement
 Crush Sand
 Water
 AAC Blocks
 Block Adhesive
CEMENT
FIELD TESTS
When handful of cement
dropped in water, should
float for a while
and then sink
When touched & rubbed
should be felt silky
No Presence of Lumps
CEMENT
LABORATORY TESTS
Initial Setting Time
Not less than 30 Min &
60 Min for 43-S
Final Setting Time
Not more than 600 Min
Consistency 29 – 30%
Grade 43 / 43-S
IS 8112:2013
Clause 6 Table 3
IS 4031:1988
Part 4
Material Selection – Crush Sand
Silt Content should be less than 5% by mass.
Sieve Size % Passing by mass
4.75 mm 100
2.36 mm 90 to 100
1.18 mm 70 to 100
600 micron 40 to 100
300 micron 5 to 70
150 micron 0 to 15
Grading of sand should fall within the below limits.
Relevant IS code 2116 : 1980
Material Selection – Water
Potable water to be used
Lab tests should reveal
•pH Value - not less than 6
•Chlorides - 2000mg/l (Max)
•Sulphates - 400mg/l (Max)
Relevant IS code 456 : 2000 Clause 5.4 Table 1
FIELD TESTS FOR AAC BLOCKS
Size Of the
Blocks
No Cracks and
damages
Dimensional Tolerance
For Length Max +/- 5mm
For Width & Height +/- 3mm
Relevant IS code 2185 Part 3 : 1984 Clause 3
LABORATORY TESTS FOR LIGHT WEIGHT BLOCKS
Compressive Strength for Grade 2 block
Ovendry Density Kg/m3 Not less than
551 to 650 3 n/mm2
651 to 750 4 n/mm2
Relevant IS code 2185 Part 3 : 1984 Clause 4 Table 1
Material Selection – Block Adhesive
Benefits Of Using Block Adhesive –
 Ready to use.
 High bond strength.
 Self cured.
 Less wastage.
 Good pot life up to 1.5 hours.
 Increase the speed of construction.
Pre Construction
Material Selection
Shop Drawings
Workmen Training
Preparation
Material Management
Shop Drawings
X
A
B
C
D
A : Architectural floor plans
B : Doors & Windows Schedule
C : MEP Coordinated Services
D : Specific Details
APPROVED & STAMPED
X - SHOP DRAWING AAC BLOCKWORK
Pre Construction
Material Selection
Shop Drawings
Workmen Training
Preparation
Material Management
Material Management
 Quantity Estimation
 Shifting Arrangements
 Mortar Mixing Equipment's
 Scaffolding Arrangements
 Accessories, Tools & Tackles
 Estimate quantity required floor wise, flat wise
 Consider wastage factor for
• Material handling
• Cutting wastages
Shifting Arrangements
Horizontal Shifting
Vertical Shifting
BOBCAT
WHEEL BARROW
MATERIAL LIFT
MATERIAL HOIST
MORTAR Mixing Equipment's
Volume Batching By Farma
Mix Proportion 1:6
Mixing to be done at Work place in clean tray
Scaffolding
Scaffolding
Do not allow contractor to use blocks for scaffold, ensure contractor brings the scaffold
material before starting the activity.
ACCESSORIES, TOOLS & TAKLES
Guiding Tools
 Plumb Bob
 Spirit Level
 Straight Edge
 Measuring Tape
 Tube Level
 Try Square
Usage Tools
 Mason Trowel & Adhesive Trowel
 12mm thick Ply piece
 Block Cutting Machine
 Wooden Float
 Hammer & Chisel
 Spade / Shovel
 Wire Brush
 Ghamela / Tray
Pre Construction
Material Selection
Shop Drawings
Workmen Training
Preparation
Material Management
WORKMEN TRAINING
Conduct training session for workmen, to prevent the bad quality works.
WORKMEN TRAINING
Conduct training session for workmen, to prevent the bad quality works.
Pre Construction
Material Selection
Shop Drawings
Workmen Training
Preparation
Material Management
PREPARATION
Clean the floor where blockwork to be done
RCC surface hacked
All binding wires, nails, masking tapes and stuck shuttering material is removed.
Patching of honeycomb if any completed and curing of it monitored
All binding wires, nails, masking tapes and stuck shuttering material is removed.
Patching of honeycomb if any completed and curing of it monitored
Mark the wall lines on floor to get proper layout of blockwork, check the clear height
between the floor top and the beam bottom / slab bottom.
x
y
D
h
Marking on Floor
Measurement of Height
Check all Embedded MEP cutouts are correct, if not then correct it before blockwork
Decide on the thickness of leveling course mortar to avoid wastage / cutting of blocks
at top course and to maintain the gap of 10 to 15mm at top of block work. The
thickness of leveling course mortar should not be more than 25mm.
Blocks should be cut only with cutting machine by trained mason.
Light Weight Block
Masonry Stages
Pre Construction
During Construction
Post Construction
Base Course
Mix quantity of mortar, which will be consumed in next 1 hour only. Mixing shall be done with
proper measurements of ingredients in proportion of 1:6 with pharma.
Add water to the dry mix of cement crush sand in required quantity.
Fix one block at the ends of walls in level as per layout.
Blocks should be wet before placing to avoid absorption of water from mortar.
Carry out leveling course of Blockwork with ‘‘dry bond’’ (i.e. without mortar in the vertical joints,
lay the blocks in position) by fixing line thread on end blocks. Use piece of plywood to have
uniform vertical joints.
Lay mortar for full bed width and for a length of 3 blocks at a time.
Lay one block at a time & gently pressing it in the mortar bed. Use 12mm thick plywood piece to
ensure uniform vertical joints.
Excess mortar coming out on the edge (while pressing block in position in bed mortar) to be
taken by trowel and reused.
Use straight edge / sprit levels on top of the blocks laid & check the top level. Make sure that the
spirit level is in working condition & read the bubble carefully.
Lay the last closure block in the course, to close the bond and locate it to be near the center of
the wall normally.
Floor
Check the layout of leveling course Blockwork and then fill all vertical joints of blocks with cement mortar.
As soon as mortars in the joints have initially set, use a proper tool and strike the vertical joints to the
depth of 12mm.
Curing to the base course should be done for next 7days.
Floor
In hot & dry weather the mortar is likely to dry up before it has attained its final set in the block
work. This leads to crumbling of mortar and resulting in weak block masonry. This shall be
prevented, by keeping the base Blockwork layer constantly wet, for at least seven days.
Blockwork done with adhesive doesn’t required curing.
Curing
Blockwork with Adhesive
After completion of the base course Blockwork should be done with approved block adhesive.
Block adhesive should be mixed thoroughly with water in proportion as specified by
manufacturer (For Weber Blockset proportion is 2.5:1. Where 2.5 parts is adhesive and 1 part is
water by volume).
Block adhesive should be applied with adhesive application trowel only to ensure the uniform
application.
Before starting the block fixing work above base course, the positions of full and cut (required size) blocks
should be finalized to ensure the staggered vertical joints at least by 6” and to minimize the wastage of
blocks. This can be done by making elevation sketch/drawing for walls and pass on the same to Workers for
execution.
Adhesive should be applied on both faces where block to RCC joint comes and on one face where block to
block joints come.
Clean the surface of block and apply adhesive on it from end of the wall. Fix the block on
adhesive by pressing it within 3 minutes.
For fixing next block apply the adhesive on two sides (i.e.- face of the block fixed earlier and at
the top of below block) and fix the block in position with the help of wooden mallet.
Each fixed block should be checked for its line, level and plumb by mason.
The thickness of adhesive is 3 to 4mm if not checked at the time of fixing will result in unleveled
blockwork with the cavities in joints.
While fixing the block between two laid blocks, adhesive should be applied on all three sides of blocks.
Floor
Column
Floor Beam
Adhesive to be applied on
all three sides of block
Repeat the above points for building more courses.
All joints should be sealed from all sides while fixing blocks.
Floor
Column
Floor Beam
Apply Adhesive on
RCC + block face and
on below block top
face
Apply Adhesive on two
faces of installed block
Check line and level of
each block immediately
after installation
Apply Adhesive on
all three faces of
installed block
Fill the top
gap as per
specifications
Repeat the process
to build more
courses.
Clear gap of minimum 10mm should be left between top most layer and RCC bottom.
This gap should be filled with very lean mortar and 10mm aggregates should fixed on the surface.
This is to prevent the cracks afterwards in the wall plastering (due to presence of different
materials like block and RCC).
If the gap is bigger than 20mm the mortar with aggregate should be made to fill it.
In walls where, the gap between Blockwork and RCC bottom is 100 to 150 mm flyash
bricks should be fixed at the top instead of cutting blocks.
In double wall area, opening for water drainage and circulation of air should be made in chajja.
After doing three layers of blockwork, ghotai to the chajja should be done with slope towards
opening. Ghotai should be done on all sides of box up to 300mm height.
Light Weight Block
Masonry Stages
Pre Construction
During Construction
Post Construction
Post Construction
Perform Checks for
1. Horizontal Level
2. Verticality
3. Line
4. Right Angle
5. Hollow Joints
6. Opening Dimensions
Check For Horizontal Level
Check For Verticality
Check For Line
Check for Right Angle
Check For Hollow Joints
Check For Opening Sizes
Post Construction
Completed work should be duly certified and recorded.
Record Checklist
Sample Checklist Format
Do’s & Don’t
Do stack the blocks on a proper platform & clean surface in direction it is going to fit in wall.
Do stack blocks at just convenient location for immediate use.
Do not over rule safety aspects to achieve timely completion.
Do not raise any part of wall during construction by more than one and a half meter above the
general construction level.
Do’s & Don’t
Do not use blocks as a platform, it’s a costly material.
Do’s & Don’t
Do not throw cut blocks in debris, stack them properly.
Common Mistakes
Base Course not done in level
Base course level of all walls which are interconnected should be same.
Whenever a wall is left incomplete, for whatever reason then the procedure is
Material left unused during lunch break.
Forgot to put lintel
Blocks used by someone, who is not suppose to
Bad Housekeeping
Quality is nothing but the shift in perception.
Just don’t see the activities, Observe it.
- Deshmukh D S

Presentation on how to do AAC Blockwork

  • 1.
  • 2.
    How to DoAAC Blockwork
  • 3.
    Safety and Protection Blocksshall be stacked properly near the place of work (Do not stack too large quantity near the work area thereby causing safety hazard). Height of the stack should not be more than one and half meter. Scaffolding to be braced adequately. Working space to be clear of rubbish waste mortar etc so that easy access is ensured Scaffolding to be checked for the load carrying capacity and ensure no overloading. Lifting, manual transporting of blocks etc have to be carried out by workers who are properly trained. Otherwise this may cause serious injuries to workers.
  • 4.
    Safety and Protection Chasingin the block work has to be carried using appropriate cutting tools only. While chasing the worker must wear proper safety appliances like shoes, goggles, helmets etc. Throwing of debris from height strictly prohibited. Before commencement of block work in front of lift shaft safety permit should be taken. CT props to be fixed in front of lift shaft to tie the safety belt. Hard barricading to be cut only by gas cutting (If any anchored in concrete along the openings and edges of the building). PPE’s should be used properly.
  • 5.
    AAC Blockwork Stages PreConstruction During Construction Post Construction
  • 6.
    Pre Construction Material Selection ShopDrawings Workmen Training Preparation Material Management
  • 7.
    Material Selection  Cement Crush Sand  Water  AAC Blocks  Block Adhesive
  • 8.
    CEMENT FIELD TESTS When handfulof cement dropped in water, should float for a while and then sink When touched & rubbed should be felt silky No Presence of Lumps
  • 9.
    CEMENT LABORATORY TESTS Initial SettingTime Not less than 30 Min & 60 Min for 43-S Final Setting Time Not more than 600 Min Consistency 29 – 30% Grade 43 / 43-S IS 8112:2013 Clause 6 Table 3 IS 4031:1988 Part 4
  • 10.
    Material Selection –Crush Sand Silt Content should be less than 5% by mass. Sieve Size % Passing by mass 4.75 mm 100 2.36 mm 90 to 100 1.18 mm 70 to 100 600 micron 40 to 100 300 micron 5 to 70 150 micron 0 to 15 Grading of sand should fall within the below limits. Relevant IS code 2116 : 1980
  • 11.
    Material Selection –Water Potable water to be used Lab tests should reveal •pH Value - not less than 6 •Chlorides - 2000mg/l (Max) •Sulphates - 400mg/l (Max) Relevant IS code 456 : 2000 Clause 5.4 Table 1
  • 12.
    FIELD TESTS FORAAC BLOCKS Size Of the Blocks No Cracks and damages Dimensional Tolerance For Length Max +/- 5mm For Width & Height +/- 3mm Relevant IS code 2185 Part 3 : 1984 Clause 3
  • 13.
    LABORATORY TESTS FORLIGHT WEIGHT BLOCKS Compressive Strength for Grade 2 block Ovendry Density Kg/m3 Not less than 551 to 650 3 n/mm2 651 to 750 4 n/mm2 Relevant IS code 2185 Part 3 : 1984 Clause 4 Table 1
  • 14.
    Material Selection –Block Adhesive Benefits Of Using Block Adhesive –  Ready to use.  High bond strength.  Self cured.  Less wastage.  Good pot life up to 1.5 hours.  Increase the speed of construction.
  • 15.
    Pre Construction Material Selection ShopDrawings Workmen Training Preparation Material Management
  • 16.
    Shop Drawings X A B C D A :Architectural floor plans B : Doors & Windows Schedule C : MEP Coordinated Services D : Specific Details APPROVED & STAMPED X - SHOP DRAWING AAC BLOCKWORK
  • 17.
    Pre Construction Material Selection ShopDrawings Workmen Training Preparation Material Management
  • 18.
    Material Management  QuantityEstimation  Shifting Arrangements  Mortar Mixing Equipment's  Scaffolding Arrangements  Accessories, Tools & Tackles
  • 19.
     Estimate quantityrequired floor wise, flat wise  Consider wastage factor for • Material handling • Cutting wastages
  • 20.
  • 21.
  • 22.
  • 23.
  • 24.
  • 25.
    MORTAR Mixing Equipment's VolumeBatching By Farma Mix Proportion 1:6 Mixing to be done at Work place in clean tray
  • 26.
  • 27.
    Scaffolding Do not allowcontractor to use blocks for scaffold, ensure contractor brings the scaffold material before starting the activity.
  • 28.
    ACCESSORIES, TOOLS &TAKLES Guiding Tools  Plumb Bob  Spirit Level  Straight Edge  Measuring Tape  Tube Level  Try Square Usage Tools  Mason Trowel & Adhesive Trowel  12mm thick Ply piece  Block Cutting Machine  Wooden Float  Hammer & Chisel  Spade / Shovel  Wire Brush  Ghamela / Tray
  • 29.
    Pre Construction Material Selection ShopDrawings Workmen Training Preparation Material Management
  • 30.
    WORKMEN TRAINING Conduct trainingsession for workmen, to prevent the bad quality works.
  • 31.
    WORKMEN TRAINING Conduct trainingsession for workmen, to prevent the bad quality works.
  • 32.
    Pre Construction Material Selection ShopDrawings Workmen Training Preparation Material Management
  • 33.
    PREPARATION Clean the floorwhere blockwork to be done
  • 34.
  • 35.
    All binding wires,nails, masking tapes and stuck shuttering material is removed. Patching of honeycomb if any completed and curing of it monitored
  • 36.
    All binding wires,nails, masking tapes and stuck shuttering material is removed. Patching of honeycomb if any completed and curing of it monitored
  • 37.
    Mark the walllines on floor to get proper layout of blockwork, check the clear height between the floor top and the beam bottom / slab bottom. x y D h Marking on Floor Measurement of Height
  • 38.
    Check all EmbeddedMEP cutouts are correct, if not then correct it before blockwork
  • 39.
    Decide on thethickness of leveling course mortar to avoid wastage / cutting of blocks at top course and to maintain the gap of 10 to 15mm at top of block work. The thickness of leveling course mortar should not be more than 25mm.
  • 40.
    Blocks should becut only with cutting machine by trained mason.
  • 41.
    Light Weight Block MasonryStages Pre Construction During Construction Post Construction
  • 42.
    Base Course Mix quantityof mortar, which will be consumed in next 1 hour only. Mixing shall be done with proper measurements of ingredients in proportion of 1:6 with pharma. Add water to the dry mix of cement crush sand in required quantity.
  • 43.
    Fix one blockat the ends of walls in level as per layout. Blocks should be wet before placing to avoid absorption of water from mortar. Carry out leveling course of Blockwork with ‘‘dry bond’’ (i.e. without mortar in the vertical joints, lay the blocks in position) by fixing line thread on end blocks. Use piece of plywood to have uniform vertical joints.
  • 44.
    Lay mortar forfull bed width and for a length of 3 blocks at a time. Lay one block at a time & gently pressing it in the mortar bed. Use 12mm thick plywood piece to ensure uniform vertical joints. Excess mortar coming out on the edge (while pressing block in position in bed mortar) to be taken by trowel and reused. Use straight edge / sprit levels on top of the blocks laid & check the top level. Make sure that the spirit level is in working condition & read the bubble carefully. Lay the last closure block in the course, to close the bond and locate it to be near the center of the wall normally. Floor
  • 45.
    Check the layoutof leveling course Blockwork and then fill all vertical joints of blocks with cement mortar. As soon as mortars in the joints have initially set, use a proper tool and strike the vertical joints to the depth of 12mm. Curing to the base course should be done for next 7days. Floor
  • 46.
    In hot &dry weather the mortar is likely to dry up before it has attained its final set in the block work. This leads to crumbling of mortar and resulting in weak block masonry. This shall be prevented, by keeping the base Blockwork layer constantly wet, for at least seven days. Blockwork done with adhesive doesn’t required curing. Curing
  • 47.
    Blockwork with Adhesive Aftercompletion of the base course Blockwork should be done with approved block adhesive. Block adhesive should be mixed thoroughly with water in proportion as specified by manufacturer (For Weber Blockset proportion is 2.5:1. Where 2.5 parts is adhesive and 1 part is water by volume). Block adhesive should be applied with adhesive application trowel only to ensure the uniform application.
  • 48.
    Before starting theblock fixing work above base course, the positions of full and cut (required size) blocks should be finalized to ensure the staggered vertical joints at least by 6” and to minimize the wastage of blocks. This can be done by making elevation sketch/drawing for walls and pass on the same to Workers for execution.
  • 49.
    Adhesive should beapplied on both faces where block to RCC joint comes and on one face where block to block joints come.
  • 50.
    Clean the surfaceof block and apply adhesive on it from end of the wall. Fix the block on adhesive by pressing it within 3 minutes. For fixing next block apply the adhesive on two sides (i.e.- face of the block fixed earlier and at the top of below block) and fix the block in position with the help of wooden mallet.
  • 51.
    Each fixed blockshould be checked for its line, level and plumb by mason.
  • 52.
    The thickness ofadhesive is 3 to 4mm if not checked at the time of fixing will result in unleveled blockwork with the cavities in joints.
  • 53.
    While fixing theblock between two laid blocks, adhesive should be applied on all three sides of blocks. Floor Column Floor Beam Adhesive to be applied on all three sides of block
  • 54.
    Repeat the abovepoints for building more courses. All joints should be sealed from all sides while fixing blocks. Floor Column Floor Beam Apply Adhesive on RCC + block face and on below block top face Apply Adhesive on two faces of installed block Check line and level of each block immediately after installation Apply Adhesive on all three faces of installed block Fill the top gap as per specifications Repeat the process to build more courses.
  • 55.
    Clear gap ofminimum 10mm should be left between top most layer and RCC bottom. This gap should be filled with very lean mortar and 10mm aggregates should fixed on the surface. This is to prevent the cracks afterwards in the wall plastering (due to presence of different materials like block and RCC). If the gap is bigger than 20mm the mortar with aggregate should be made to fill it.
  • 56.
    In walls where,the gap between Blockwork and RCC bottom is 100 to 150 mm flyash bricks should be fixed at the top instead of cutting blocks.
  • 57.
    In double wallarea, opening for water drainage and circulation of air should be made in chajja. After doing three layers of blockwork, ghotai to the chajja should be done with slope towards opening. Ghotai should be done on all sides of box up to 300mm height.
  • 58.
    Light Weight Block MasonryStages Pre Construction During Construction Post Construction
  • 59.
    Post Construction Perform Checksfor 1. Horizontal Level 2. Verticality 3. Line 4. Right Angle 5. Hollow Joints 6. Opening Dimensions
  • 60.
  • 61.
  • 62.
  • 63.
  • 64.
  • 65.
  • 66.
    Post Construction Completed workshould be duly certified and recorded. Record Checklist
  • 67.
  • 68.
    Do’s & Don’t Dostack the blocks on a proper platform & clean surface in direction it is going to fit in wall. Do stack blocks at just convenient location for immediate use. Do not over rule safety aspects to achieve timely completion. Do not raise any part of wall during construction by more than one and a half meter above the general construction level.
  • 69.
    Do’s & Don’t Donot use blocks as a platform, it’s a costly material.
  • 70.
    Do’s & Don’t Donot throw cut blocks in debris, stack them properly.
  • 71.
    Common Mistakes Base Coursenot done in level
  • 73.
    Base course levelof all walls which are interconnected should be same.
  • 74.
    Whenever a wallis left incomplete, for whatever reason then the procedure is
  • 75.
    Material left unusedduring lunch break.
  • 76.
  • 77.
    Blocks used bysomeone, who is not suppose to
  • 78.
  • 79.
    Quality is nothingbut the shift in perception. Just don’t see the activities, Observe it. - Deshmukh D S