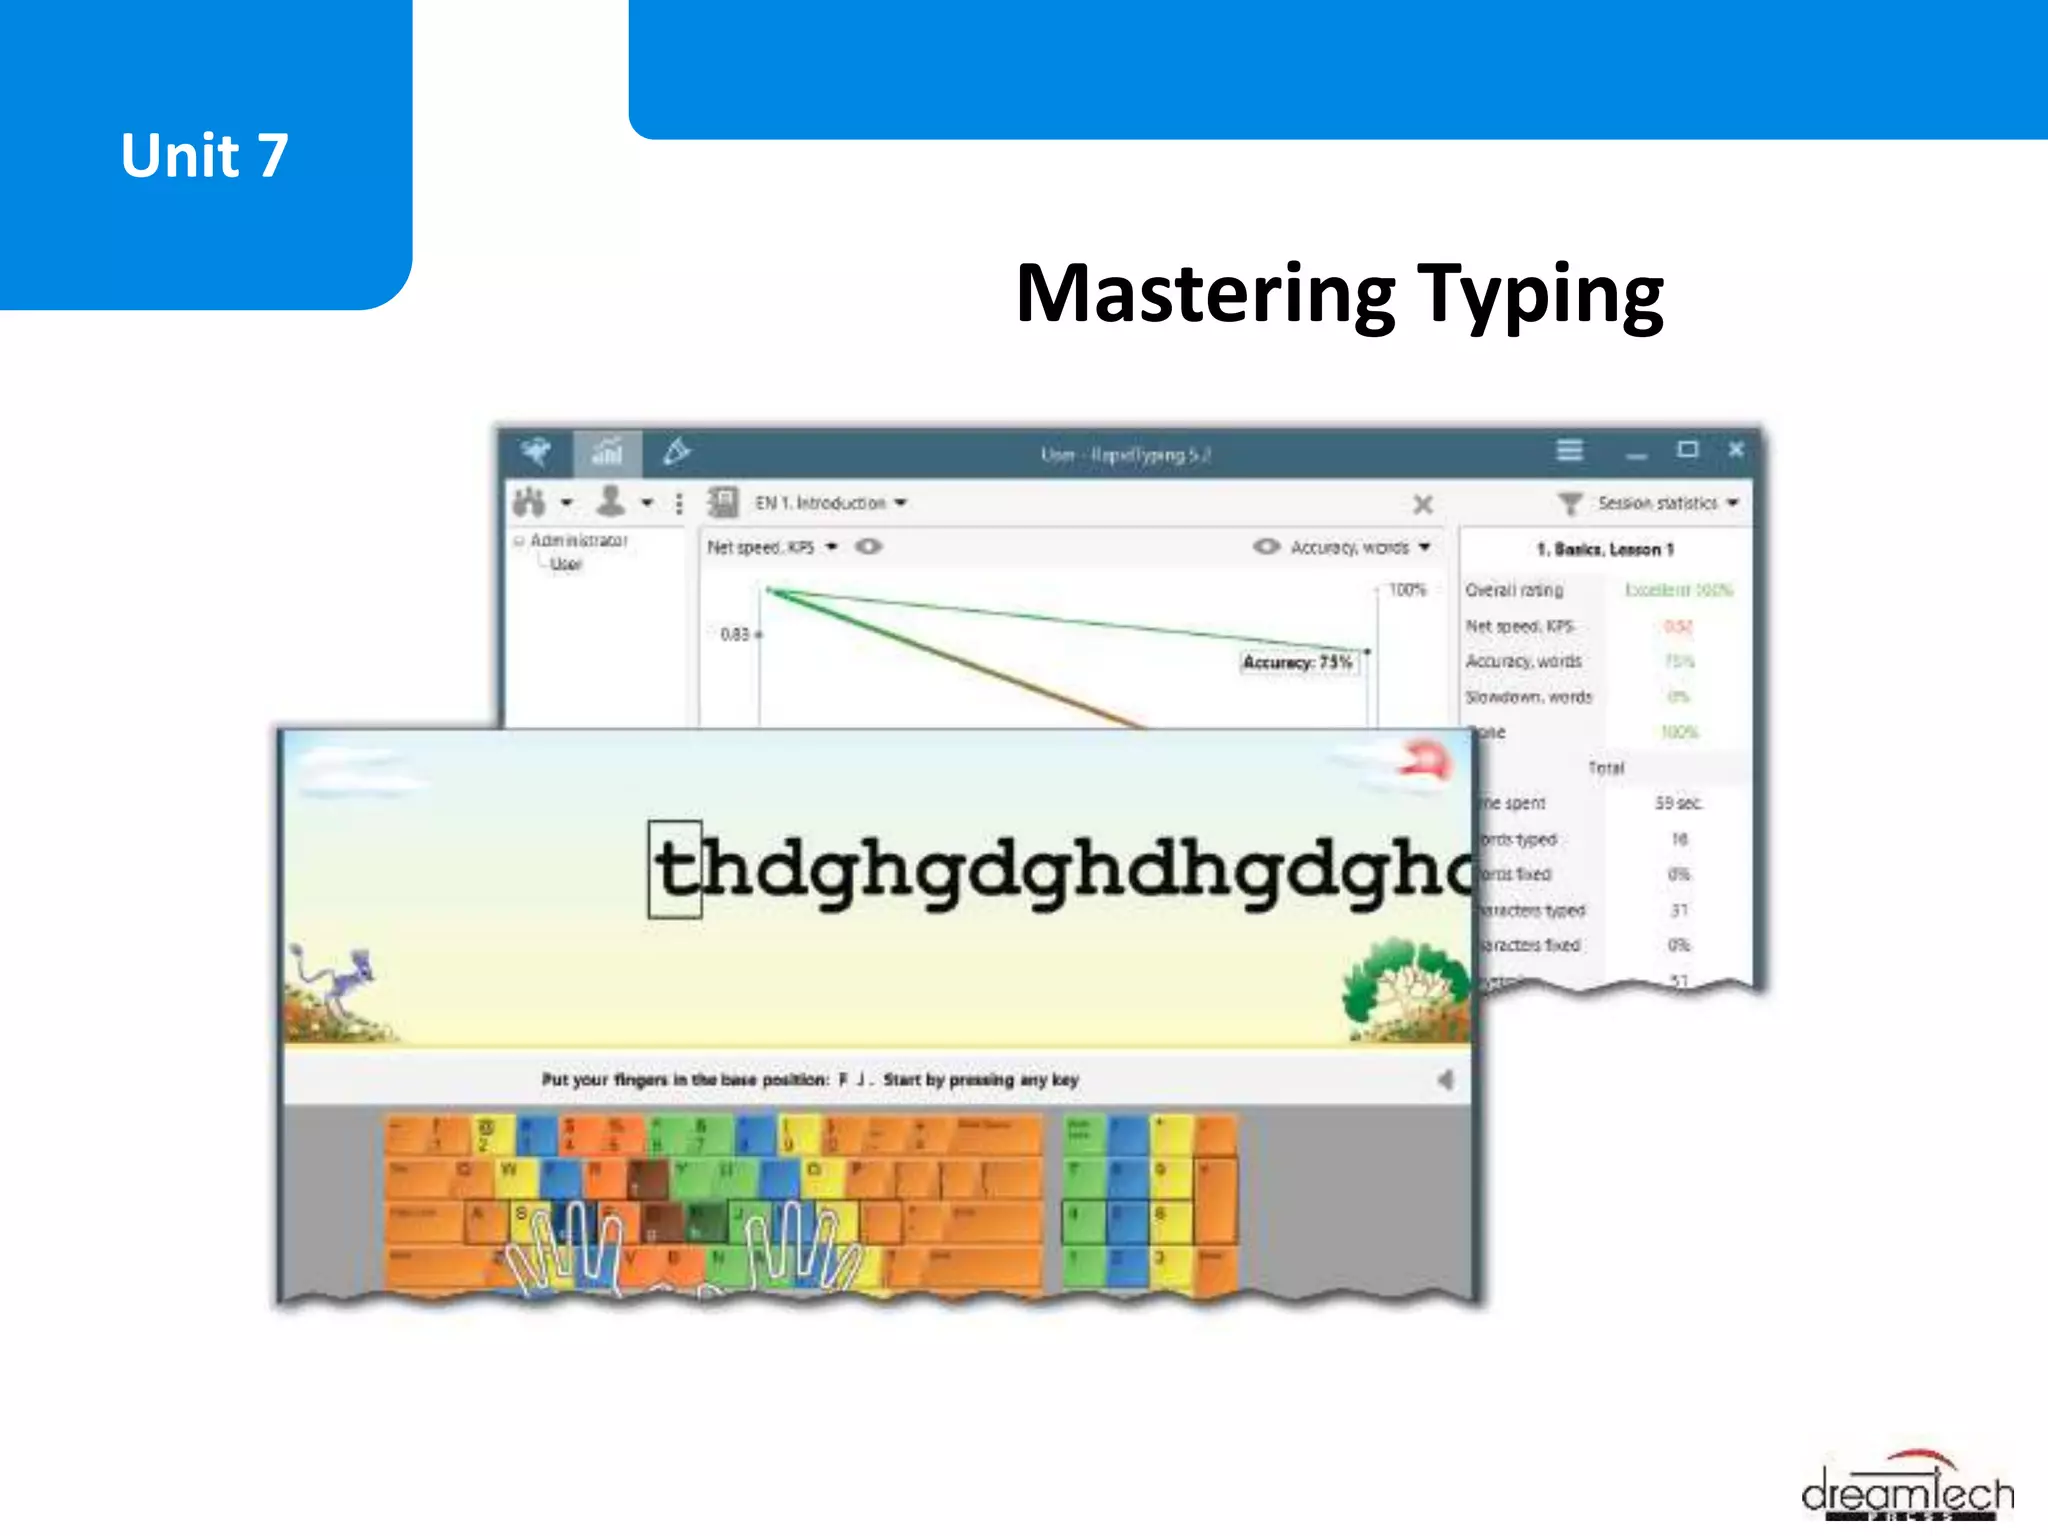
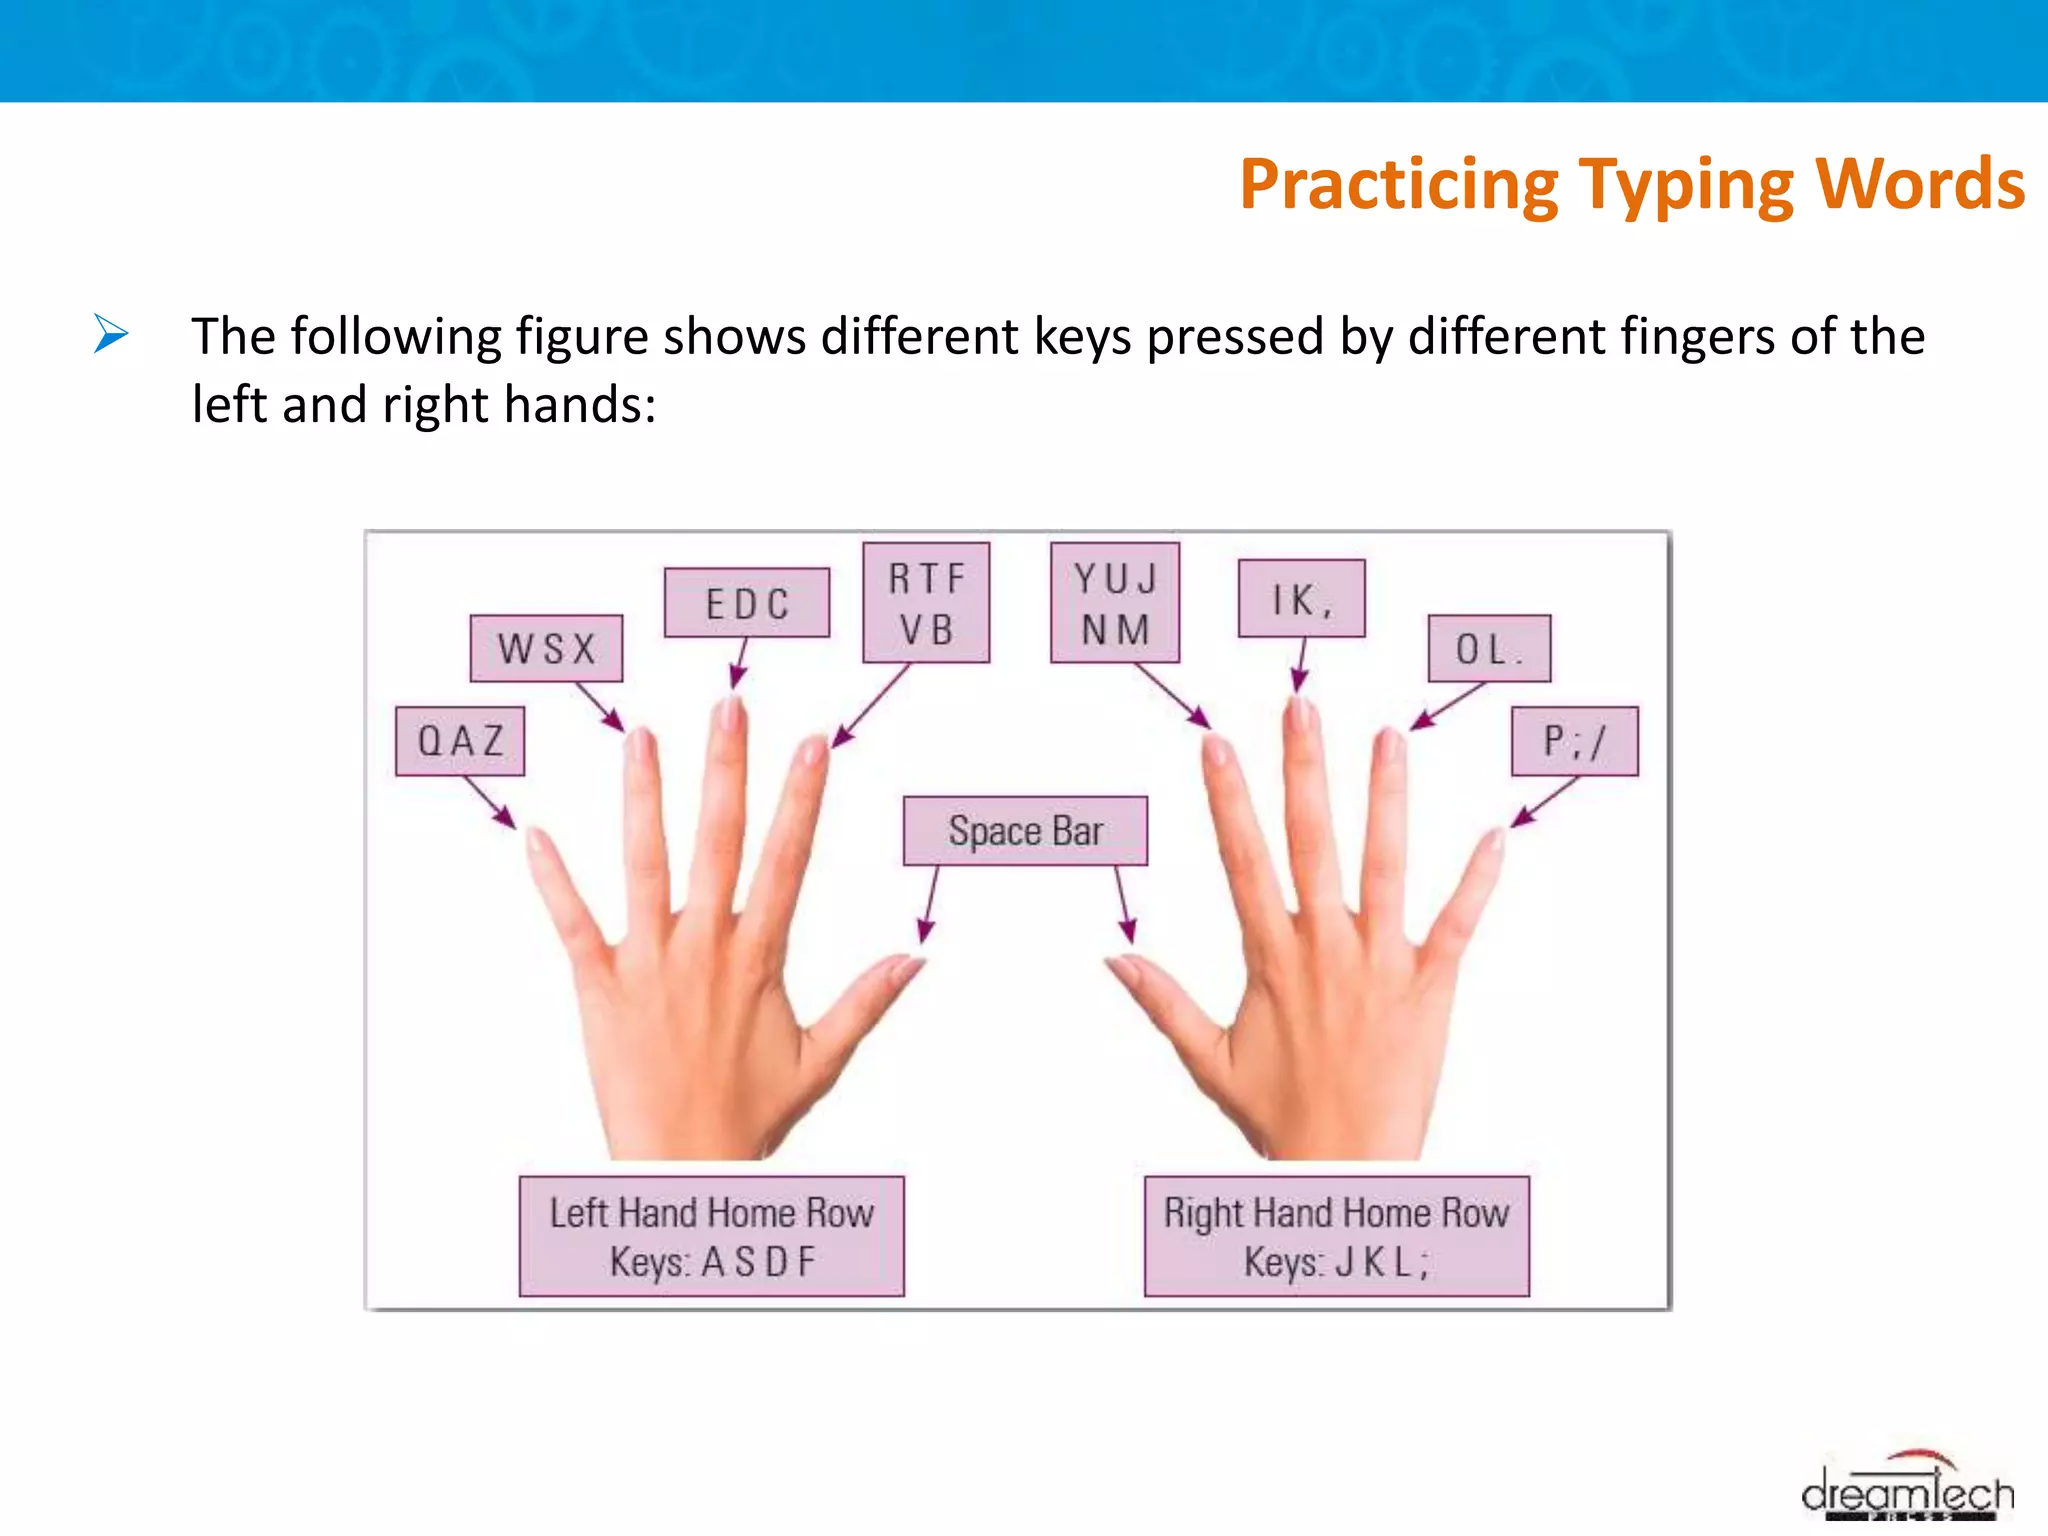
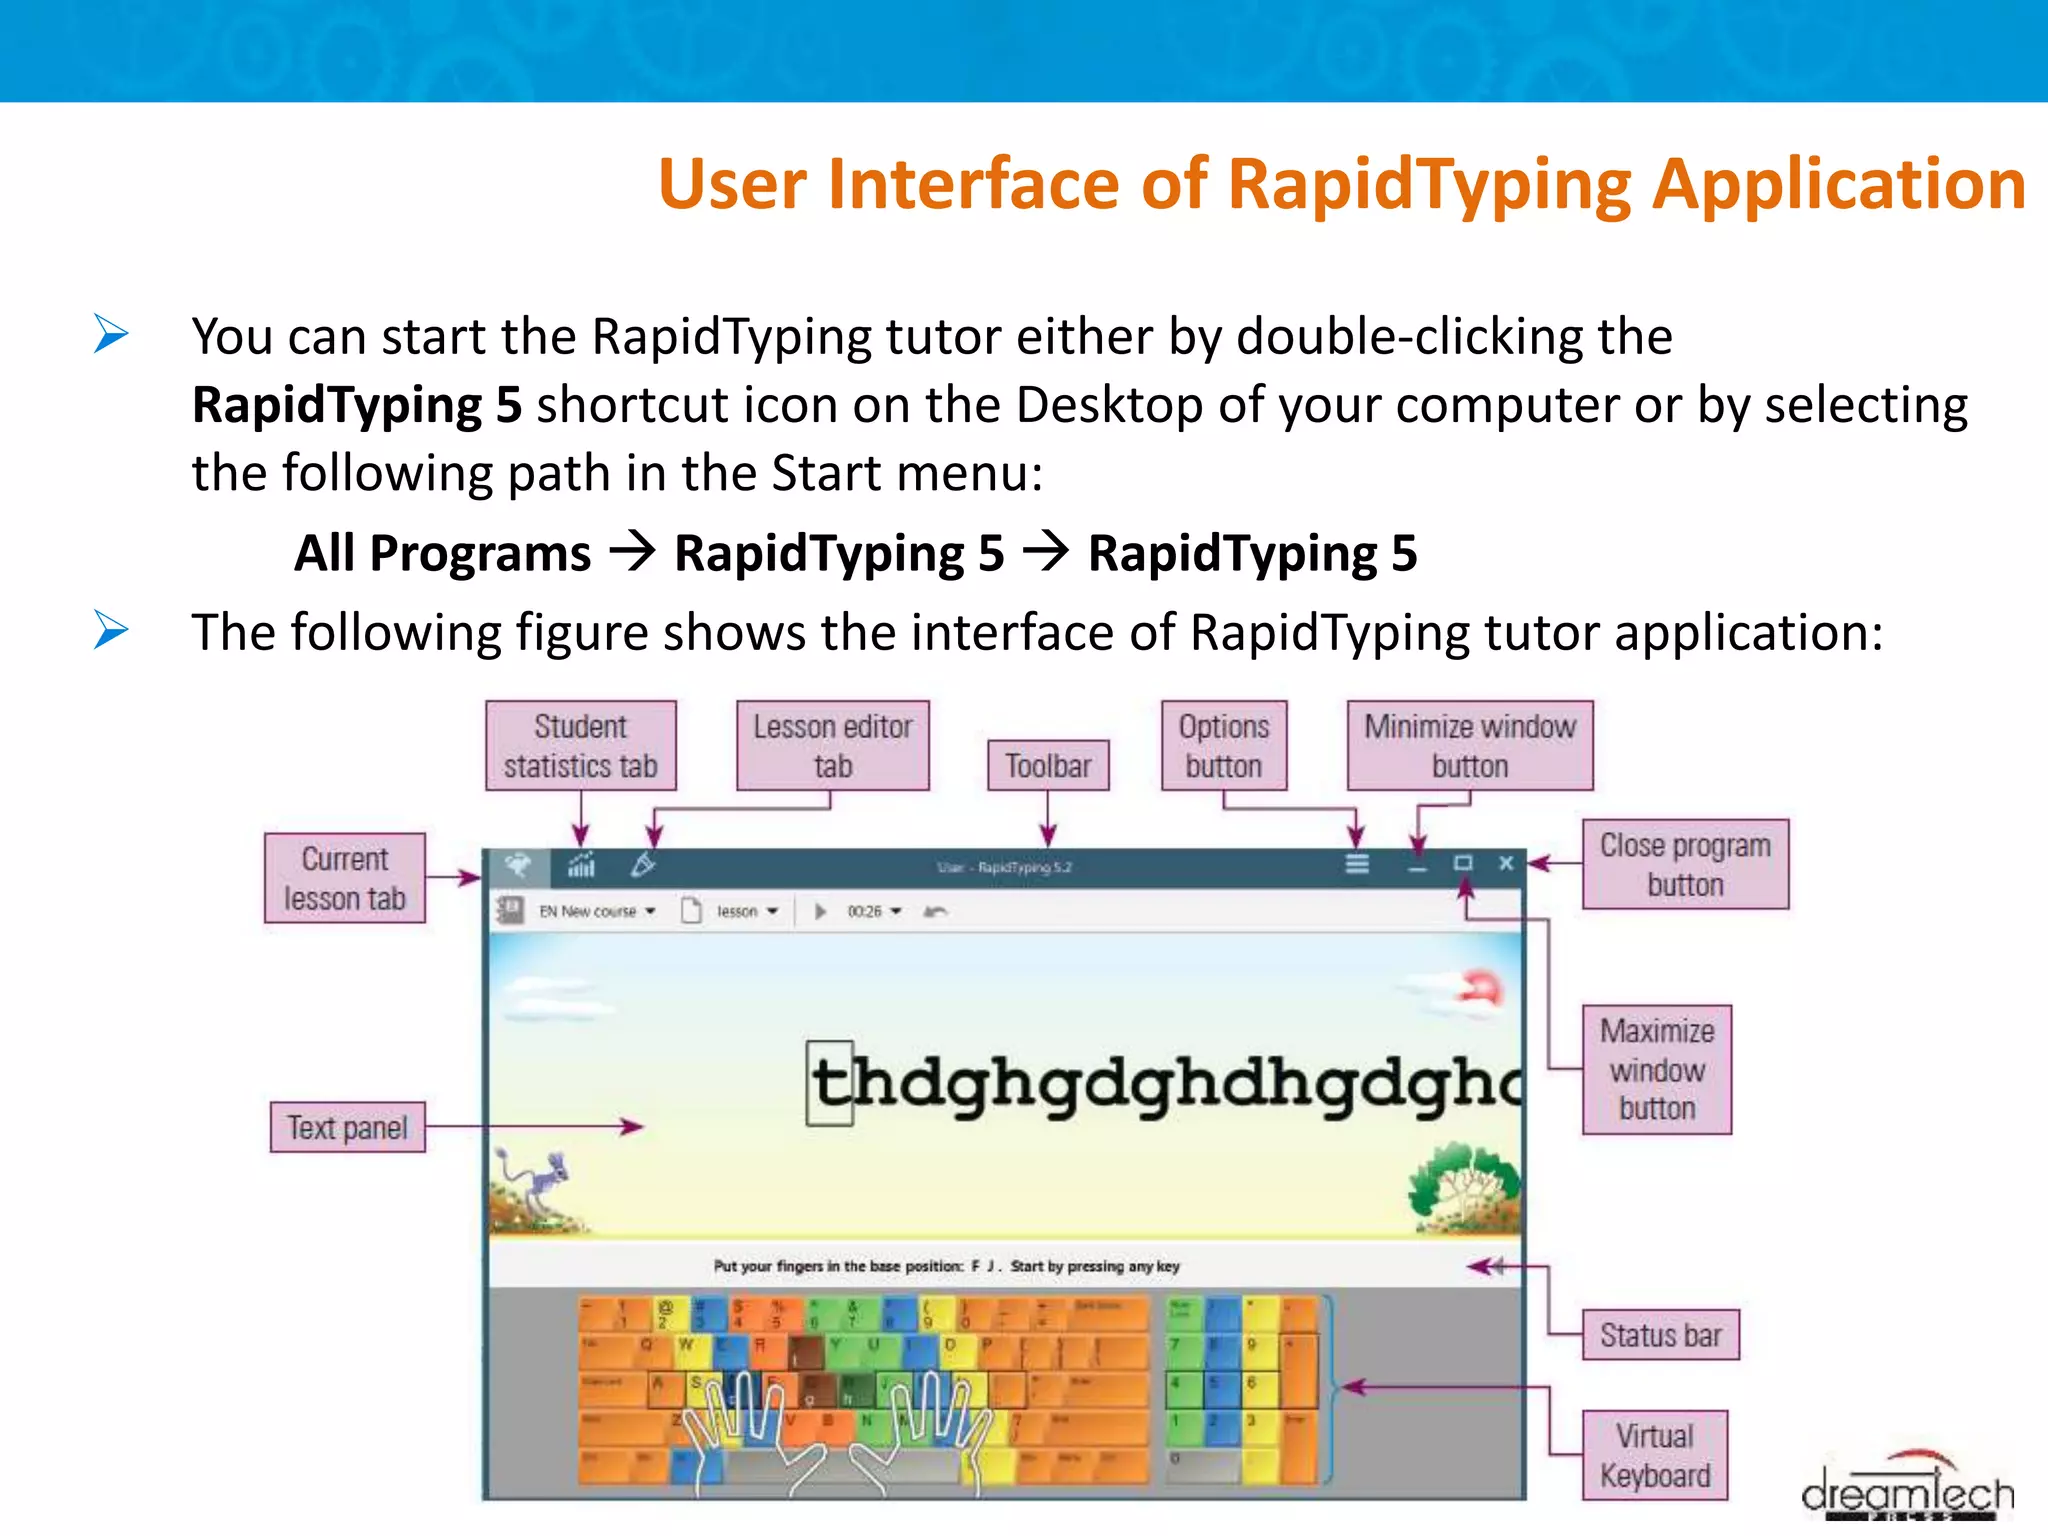
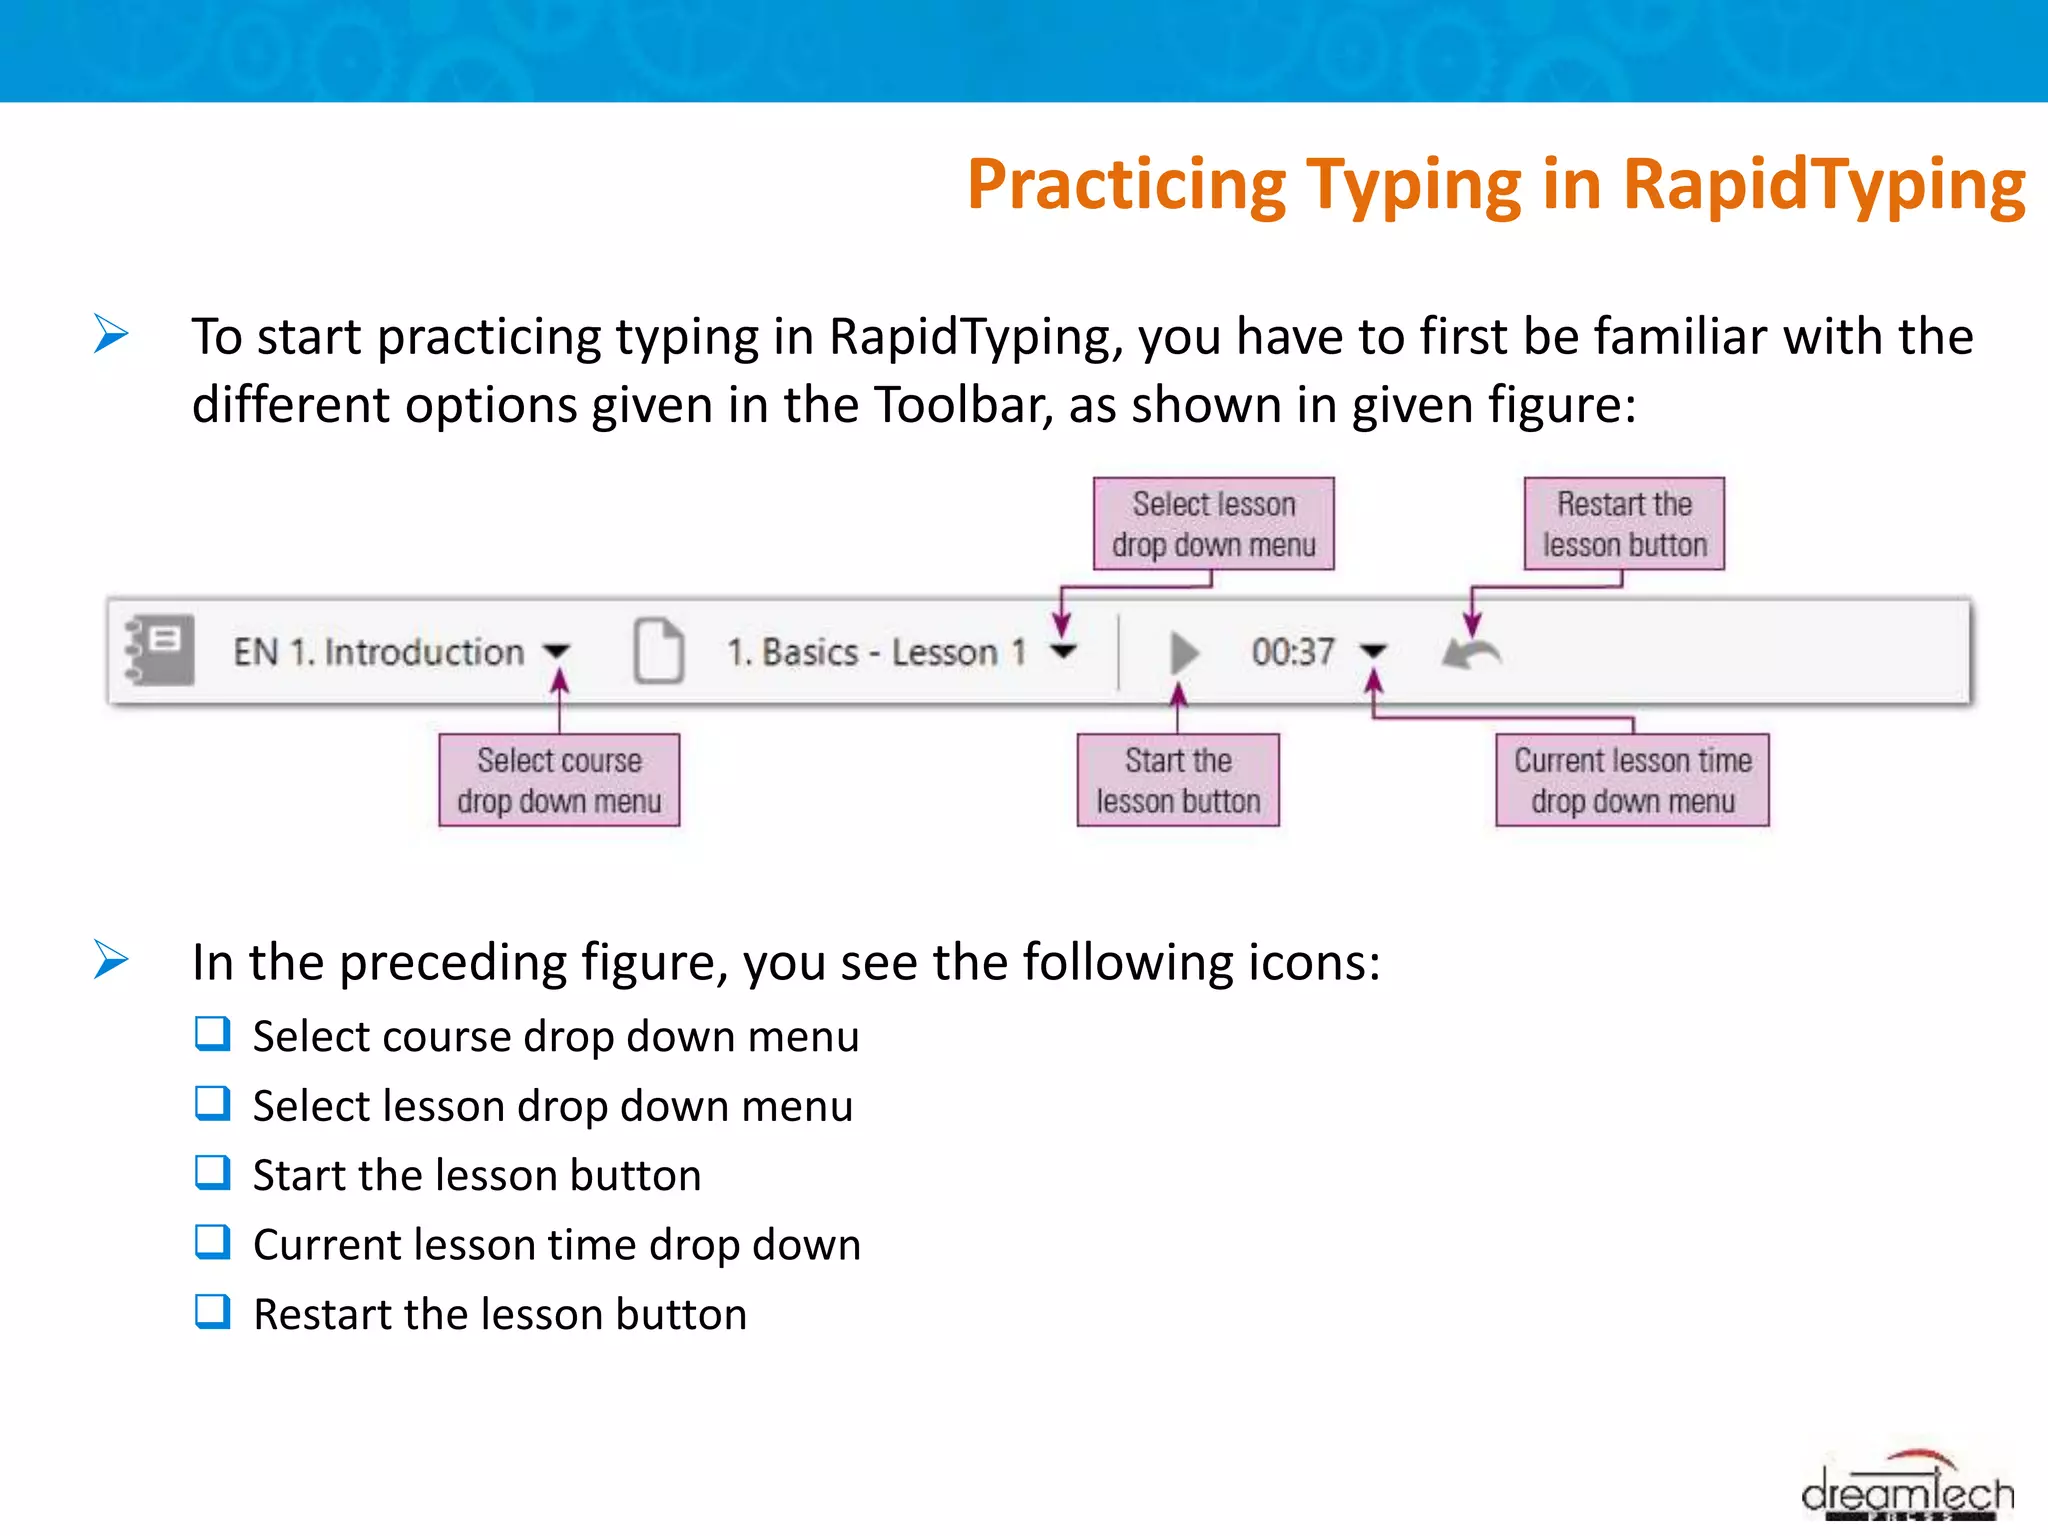
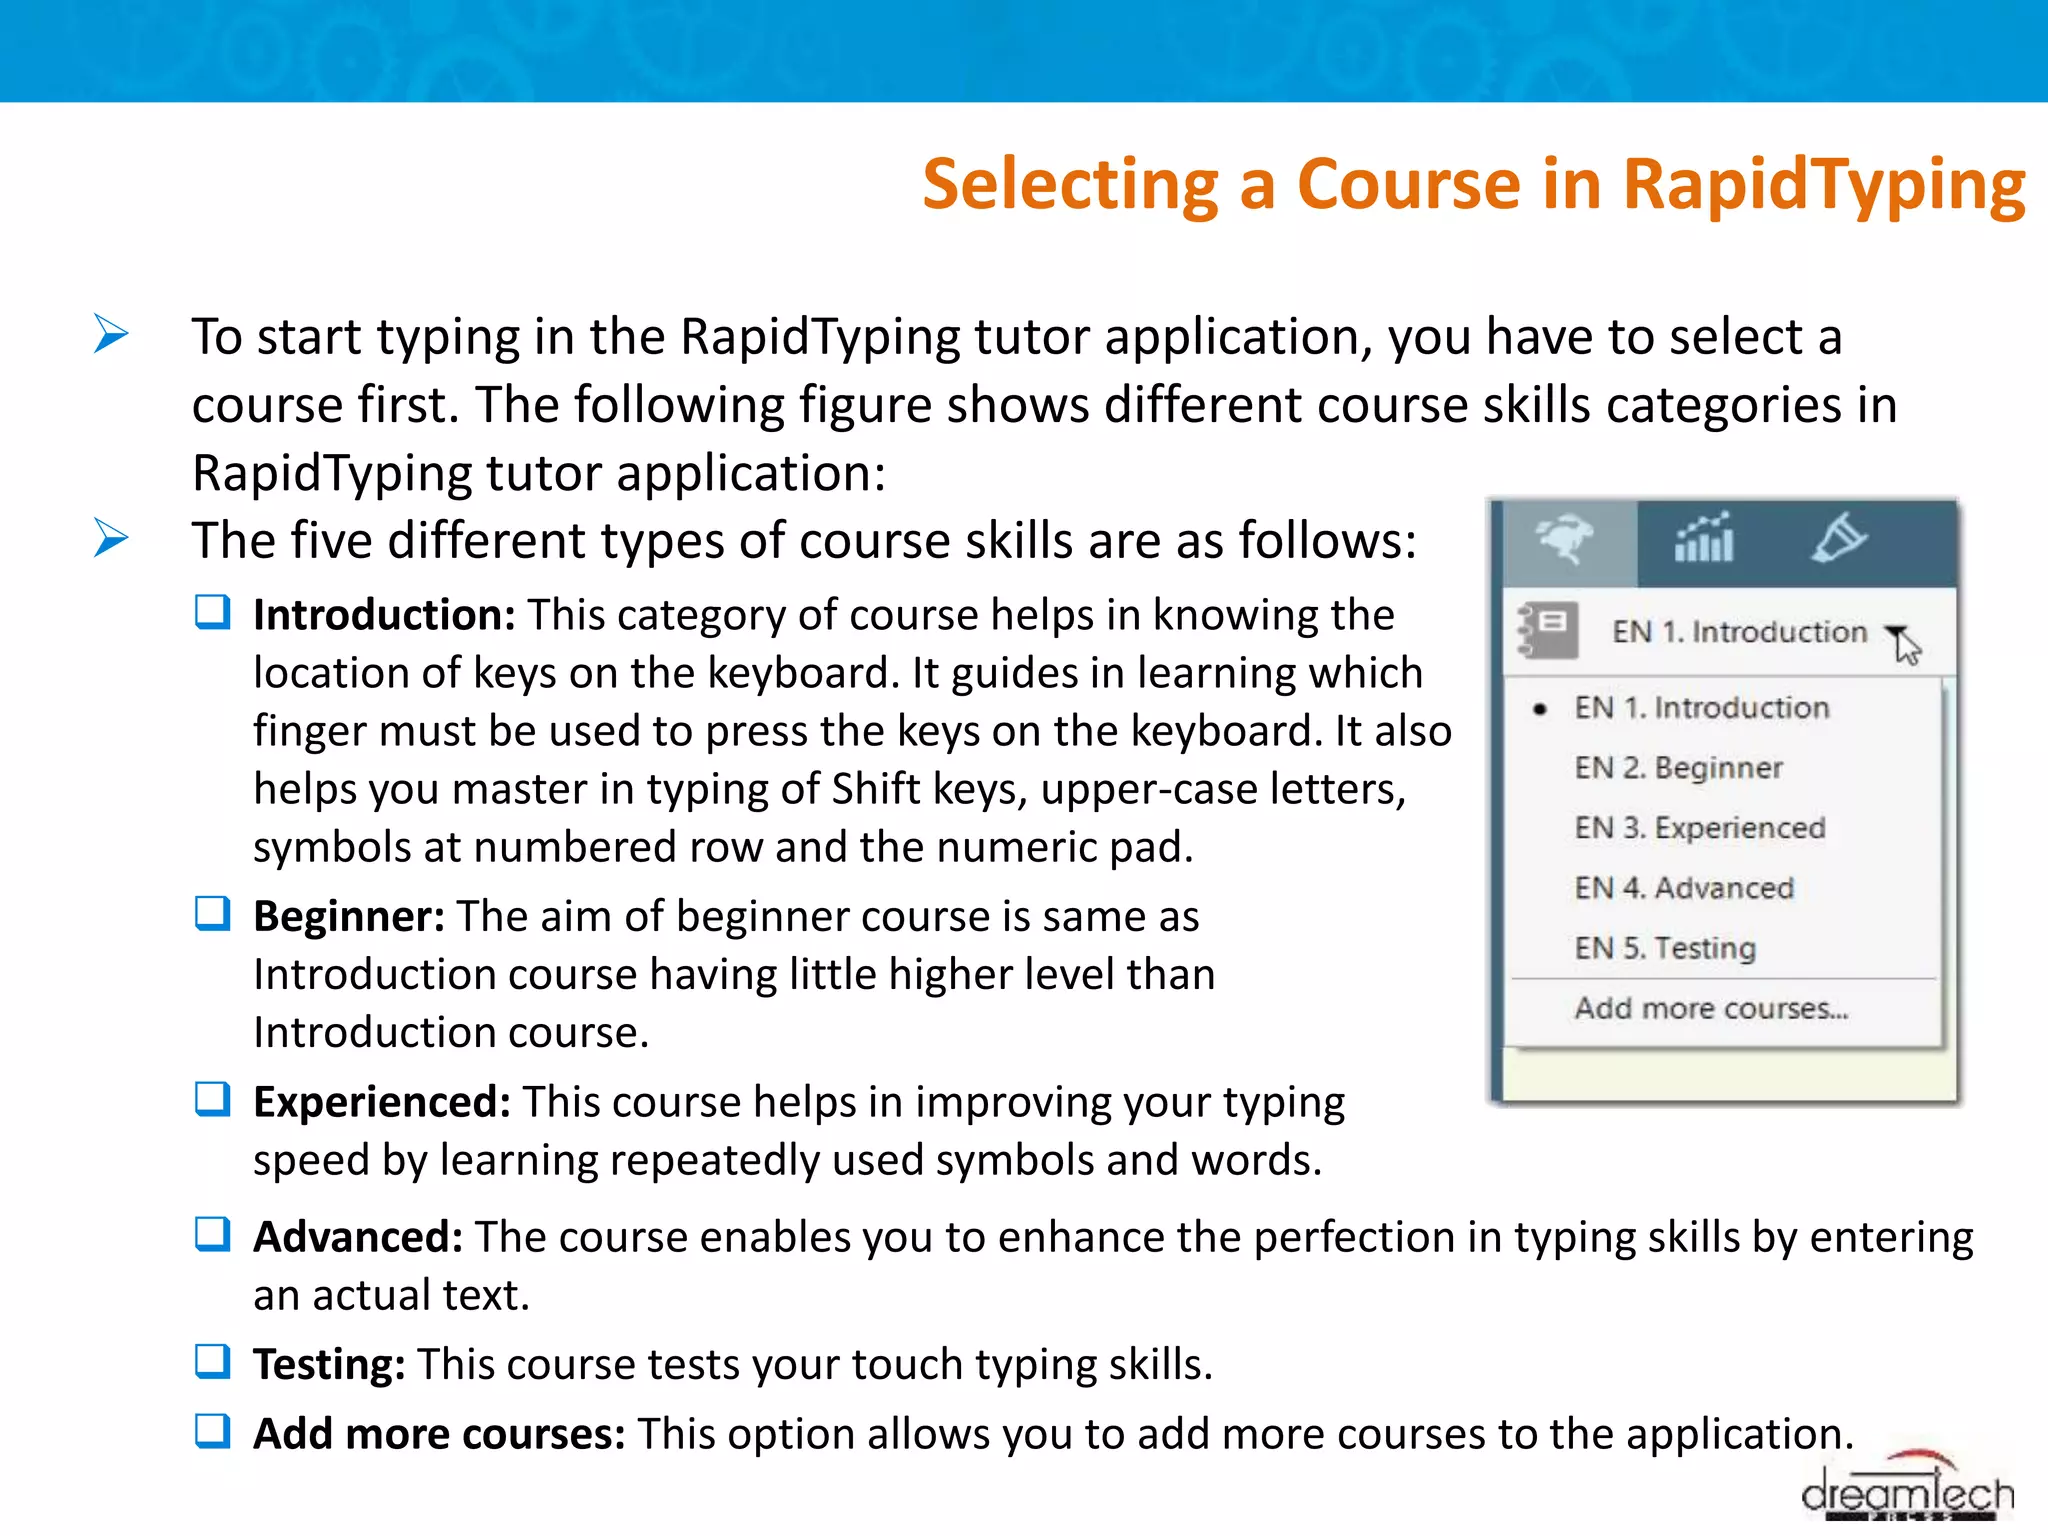
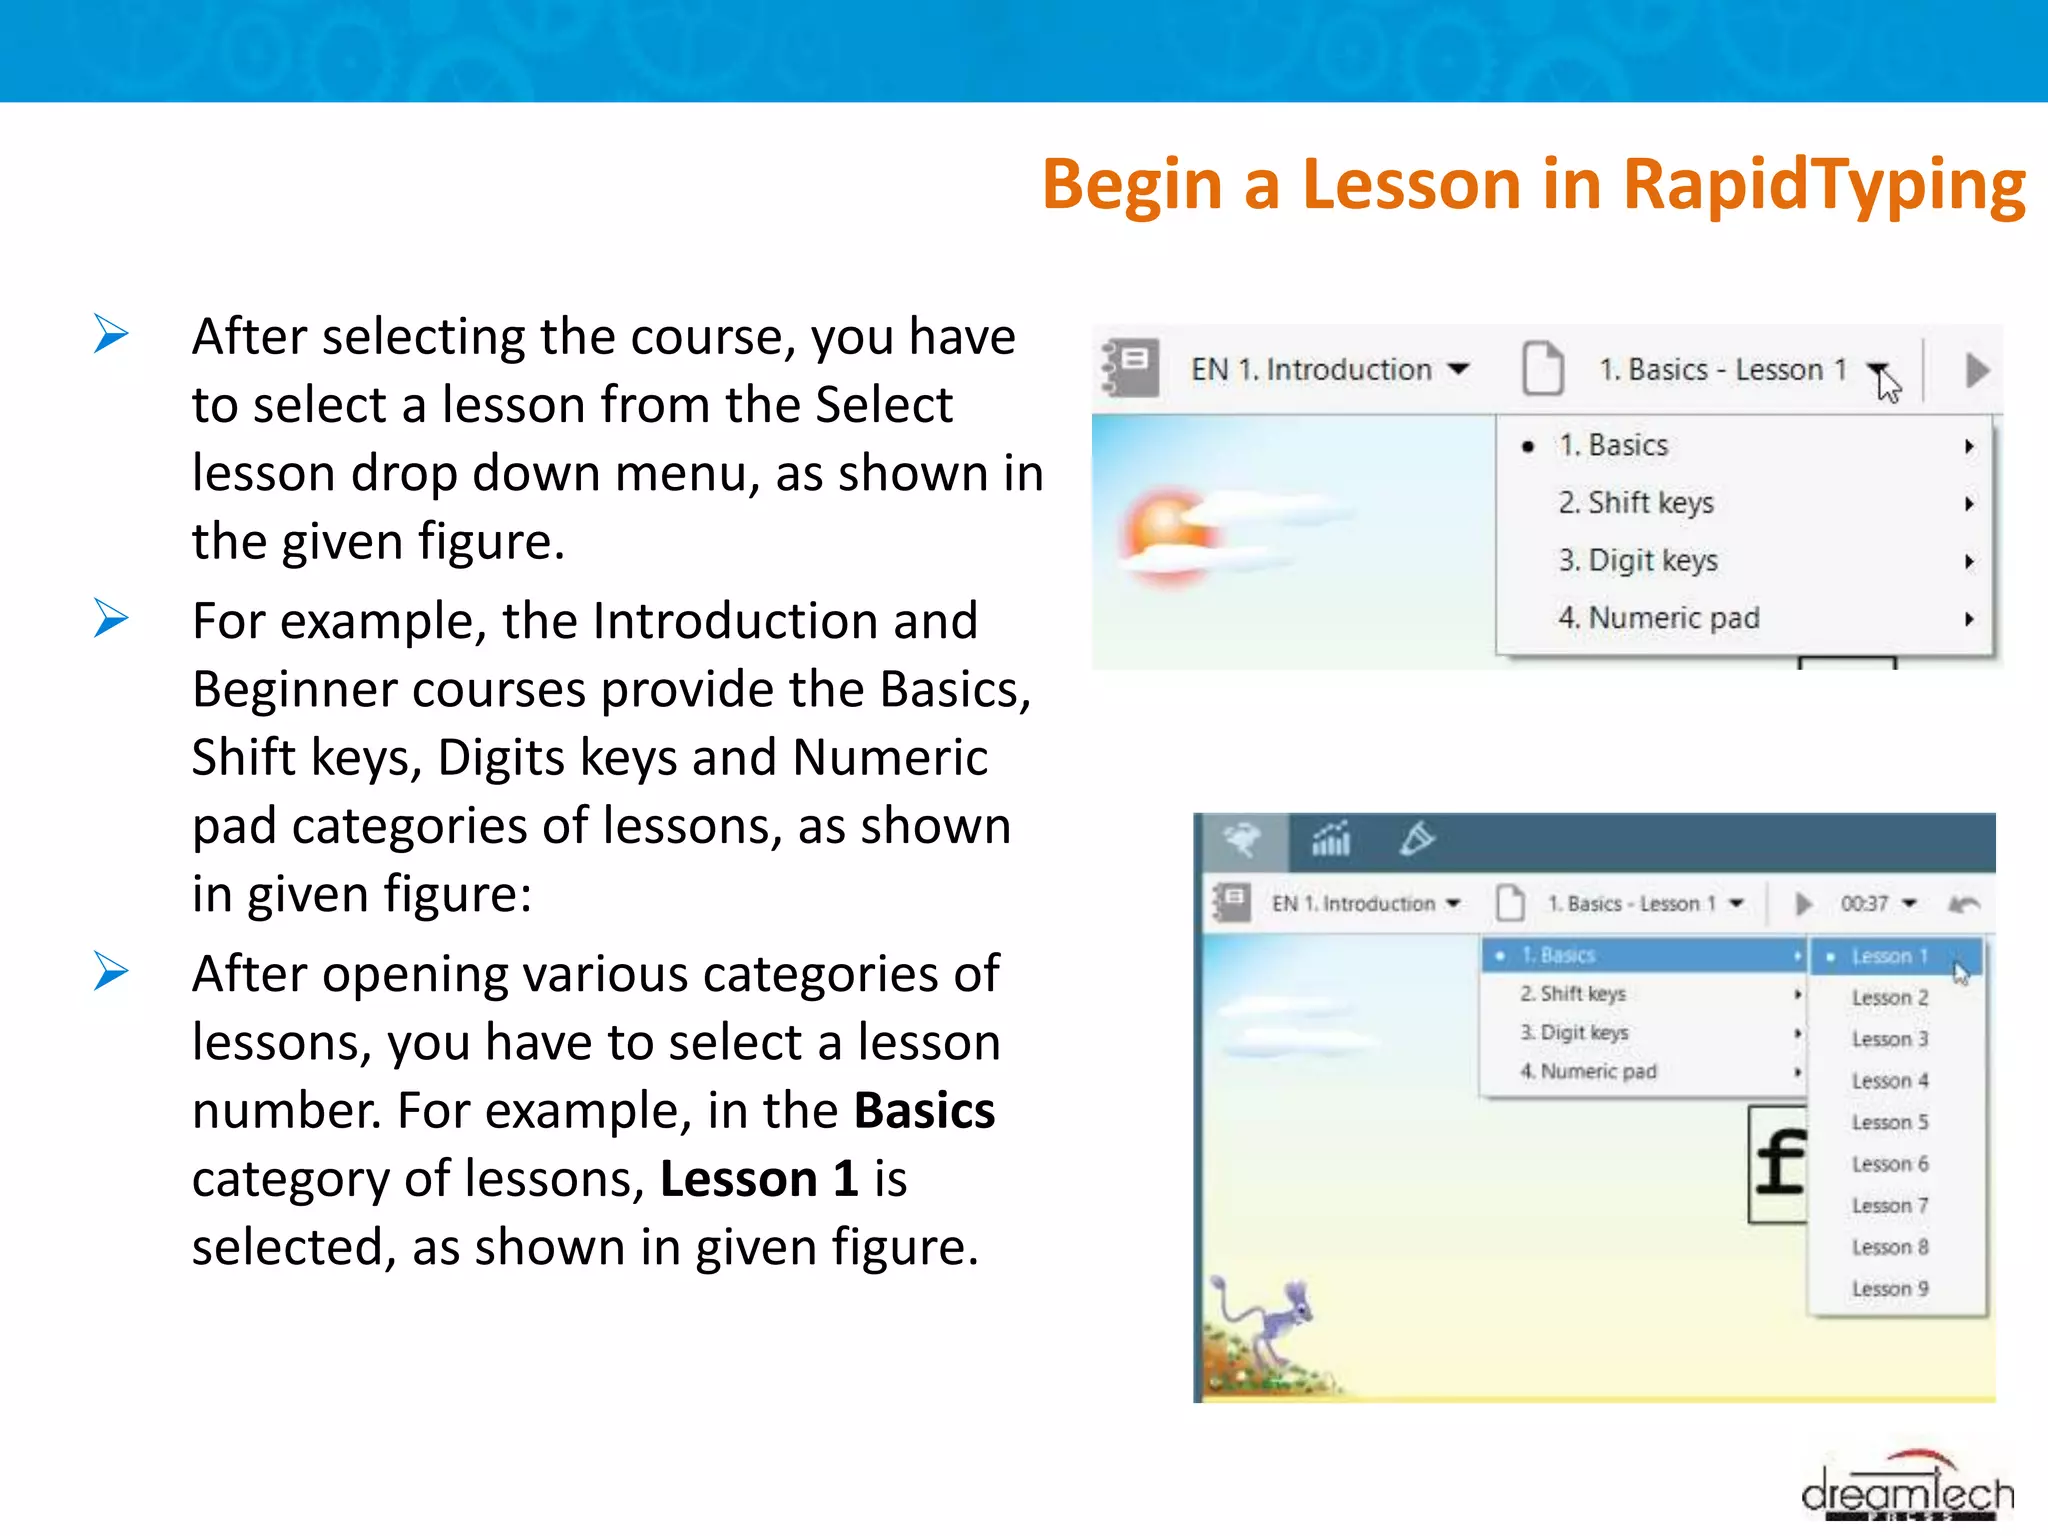
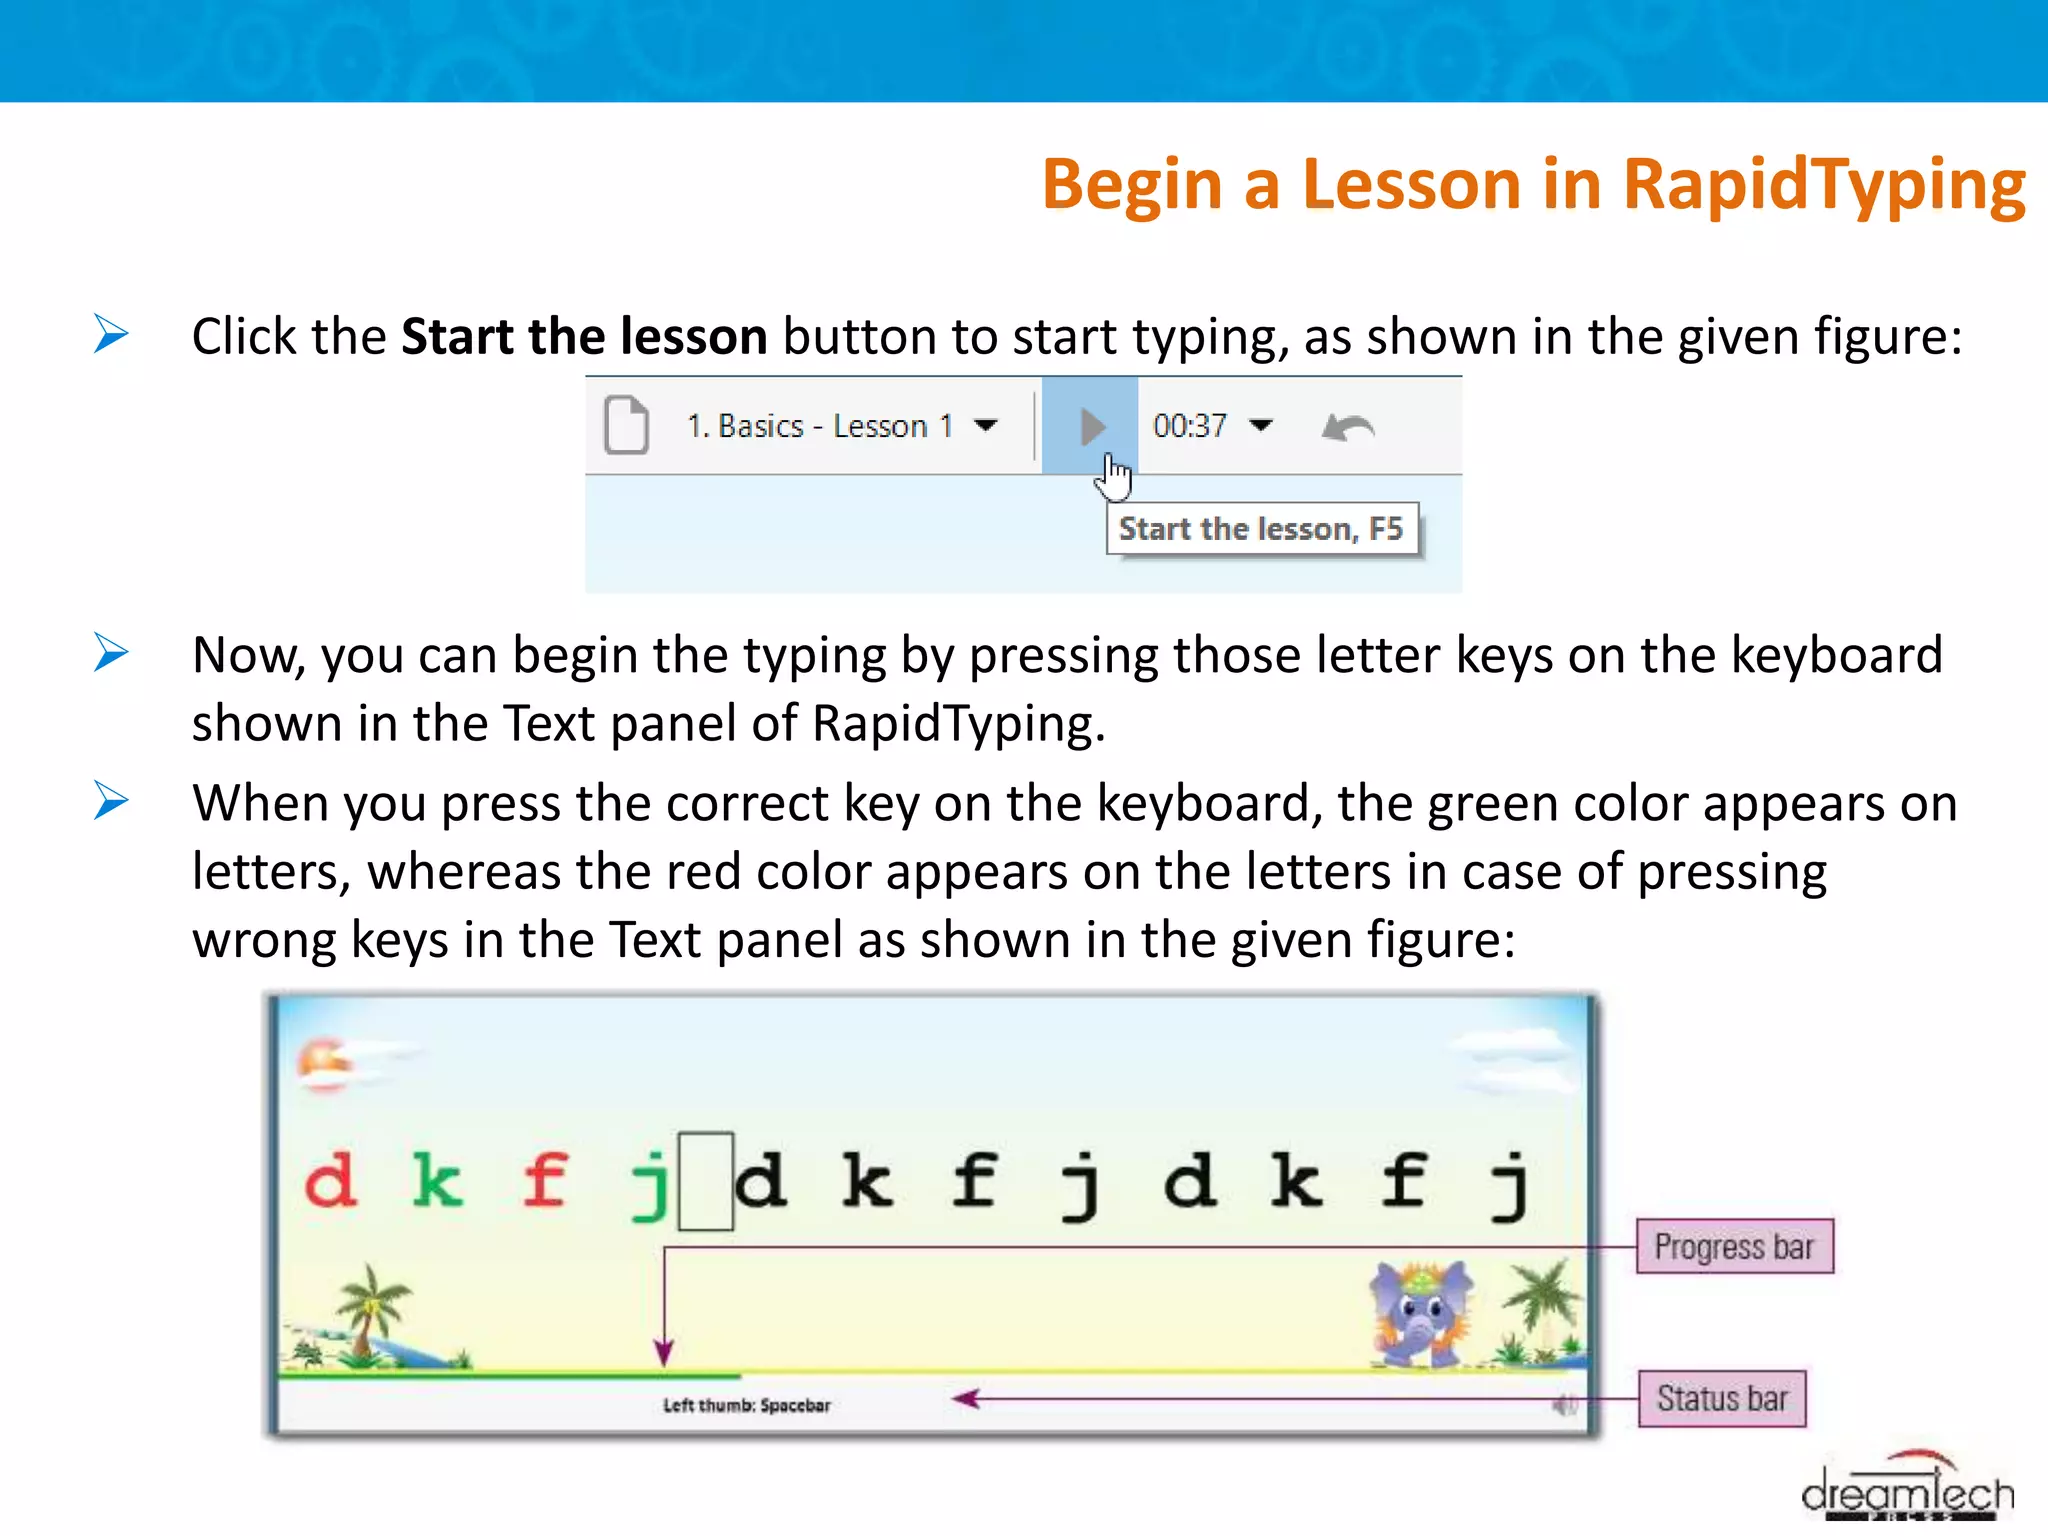
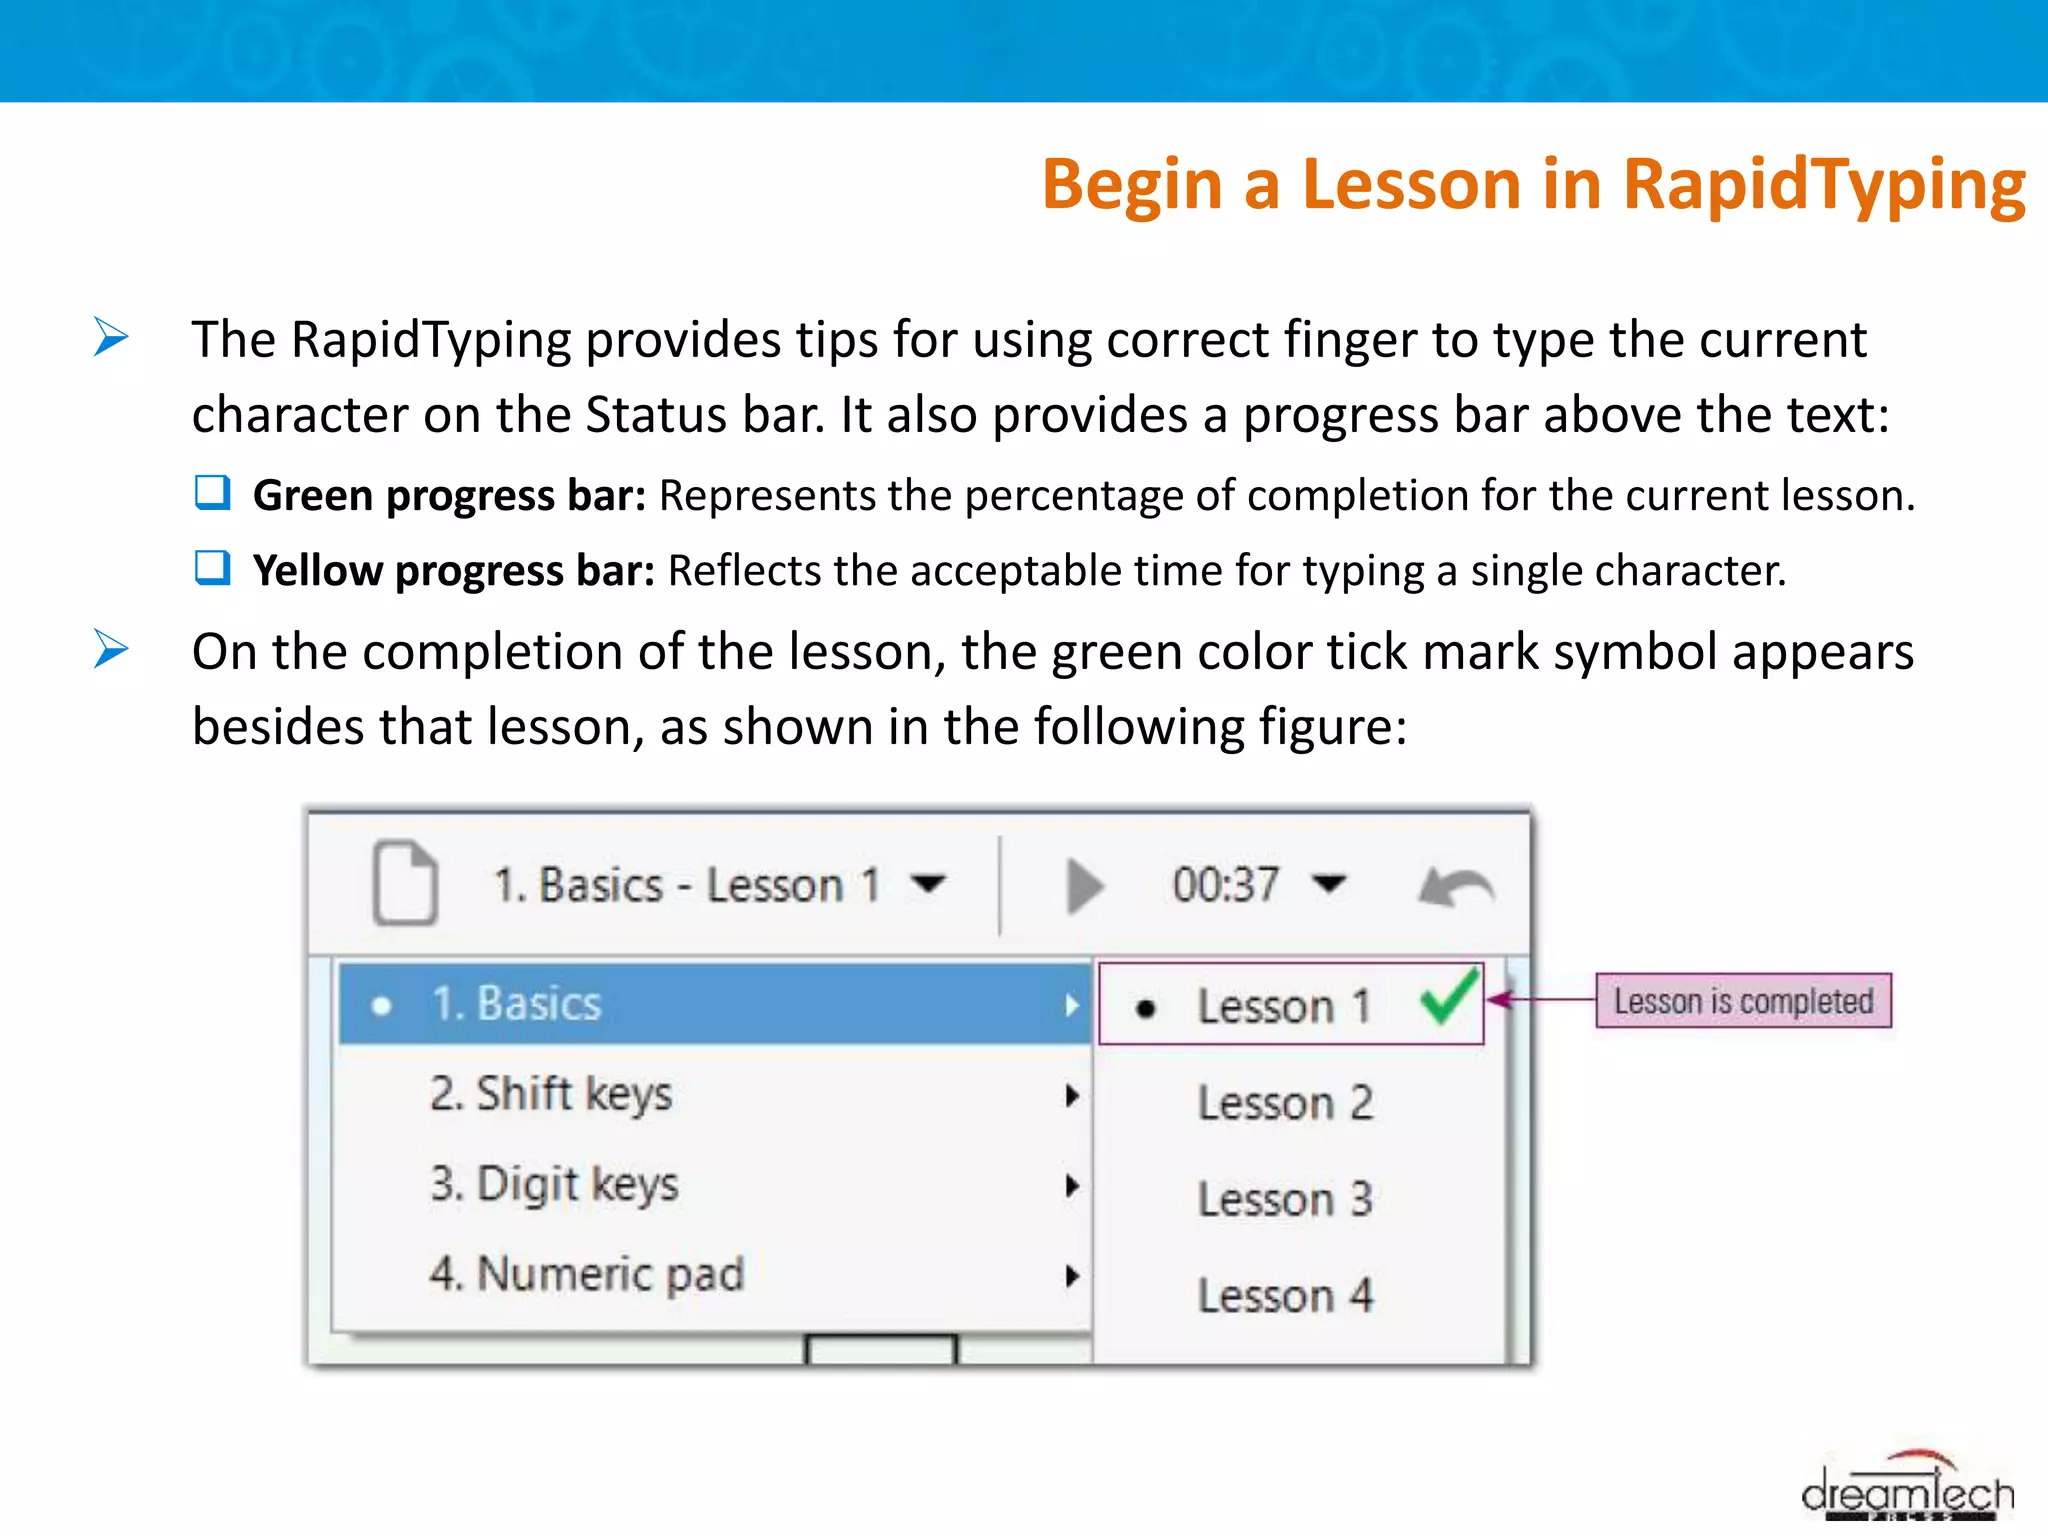
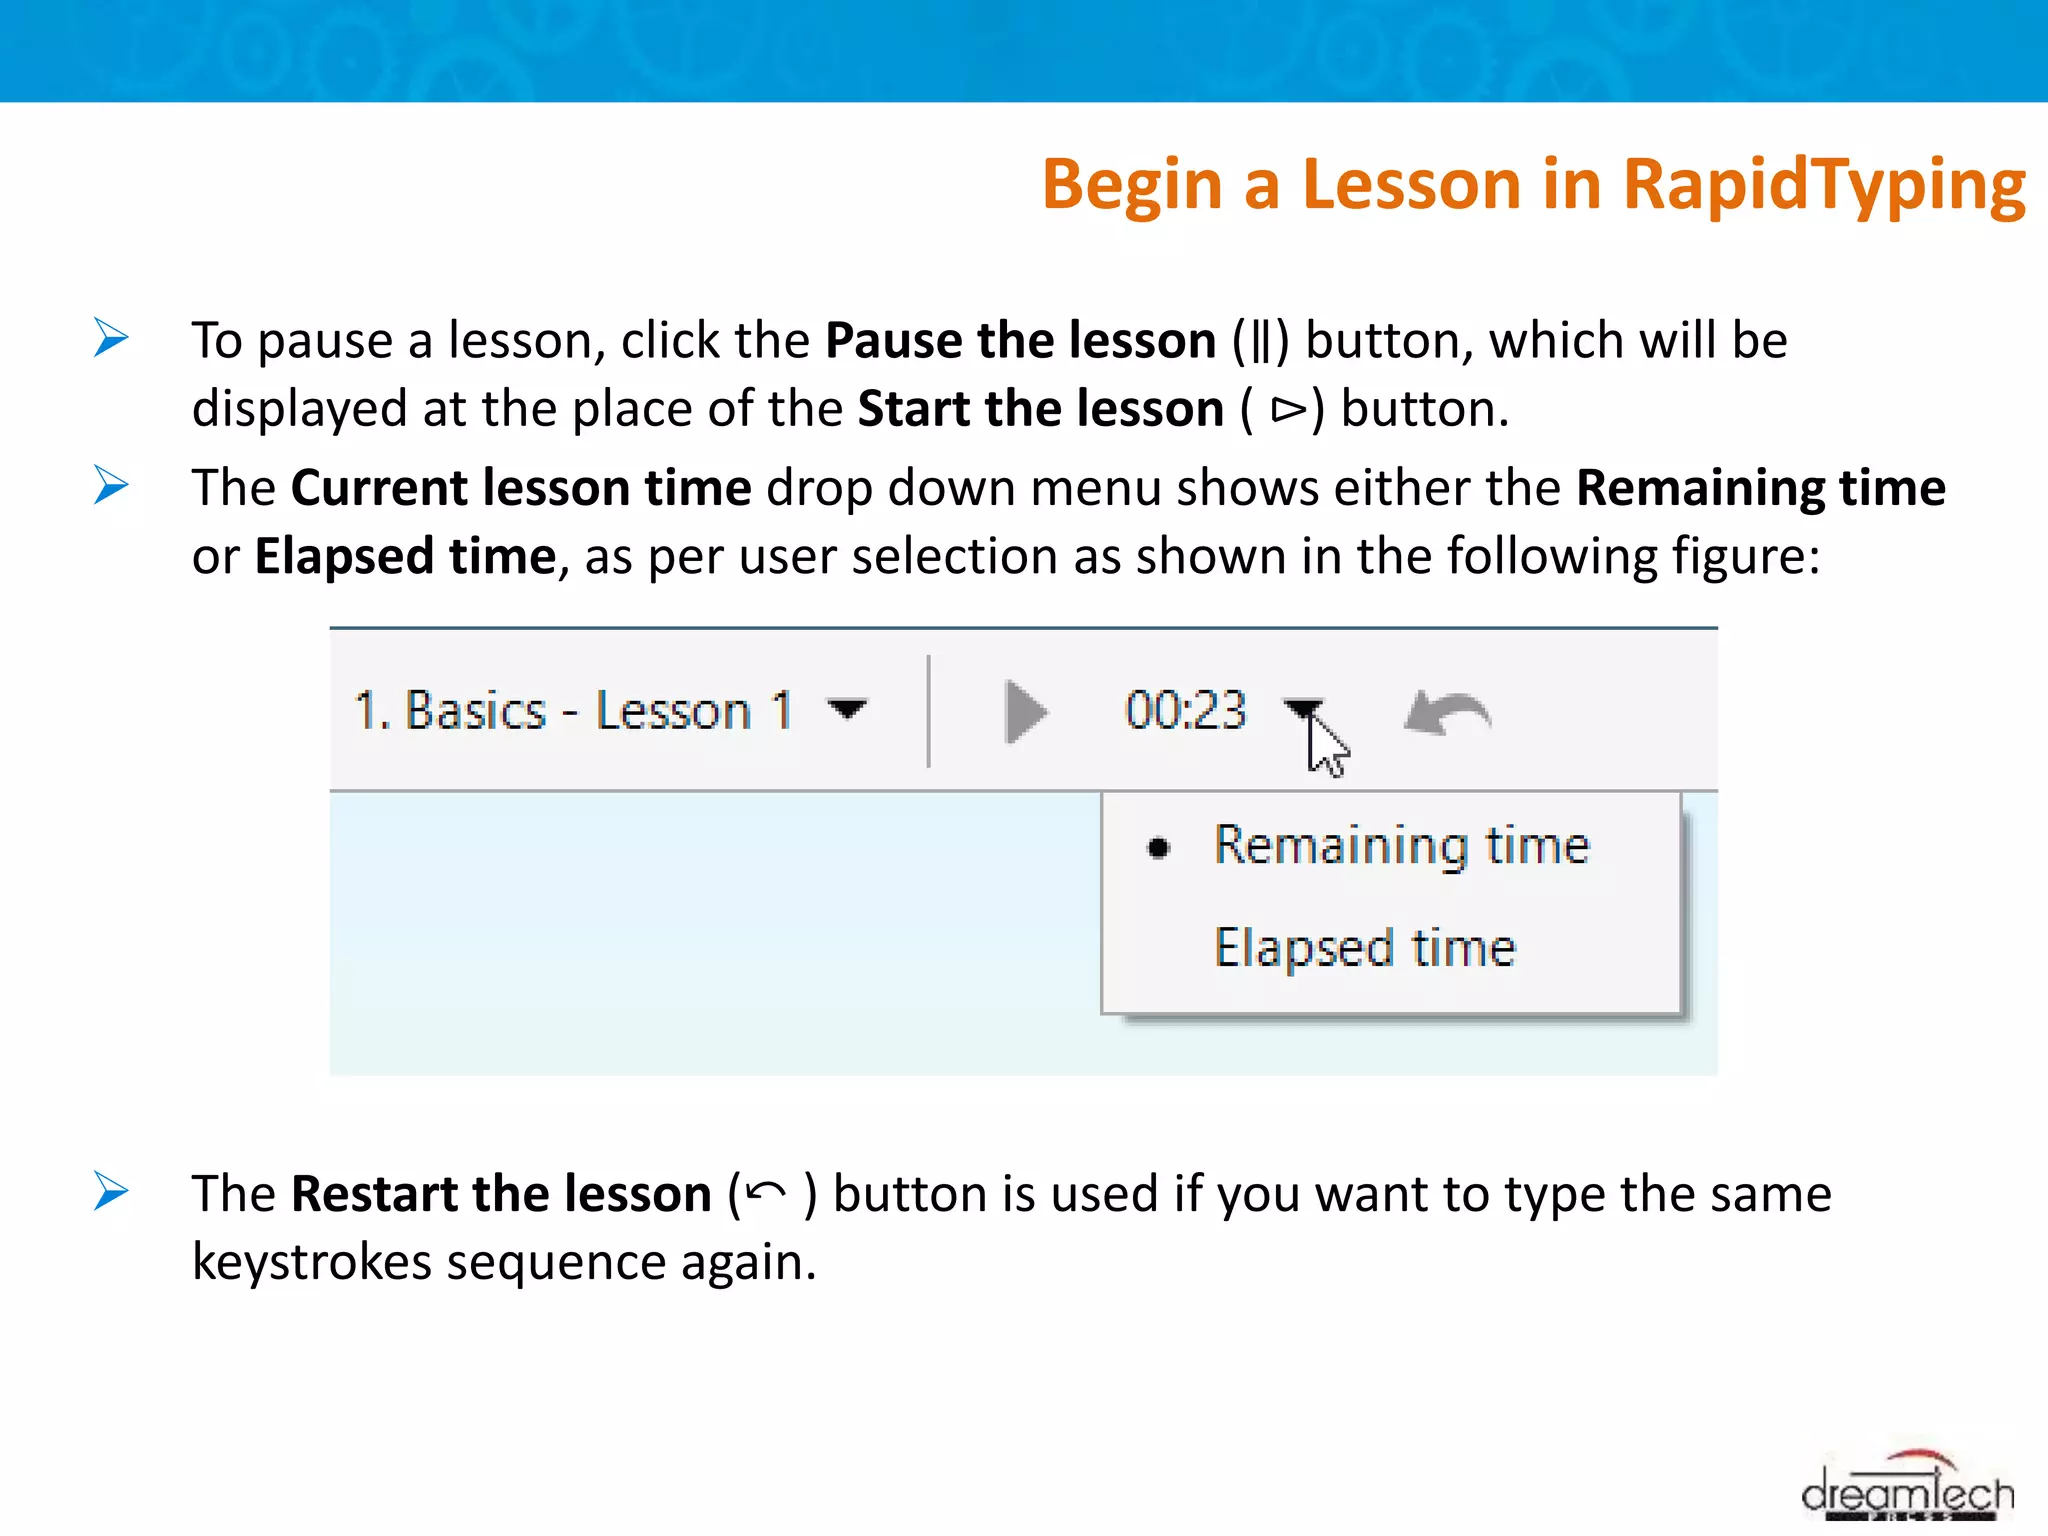
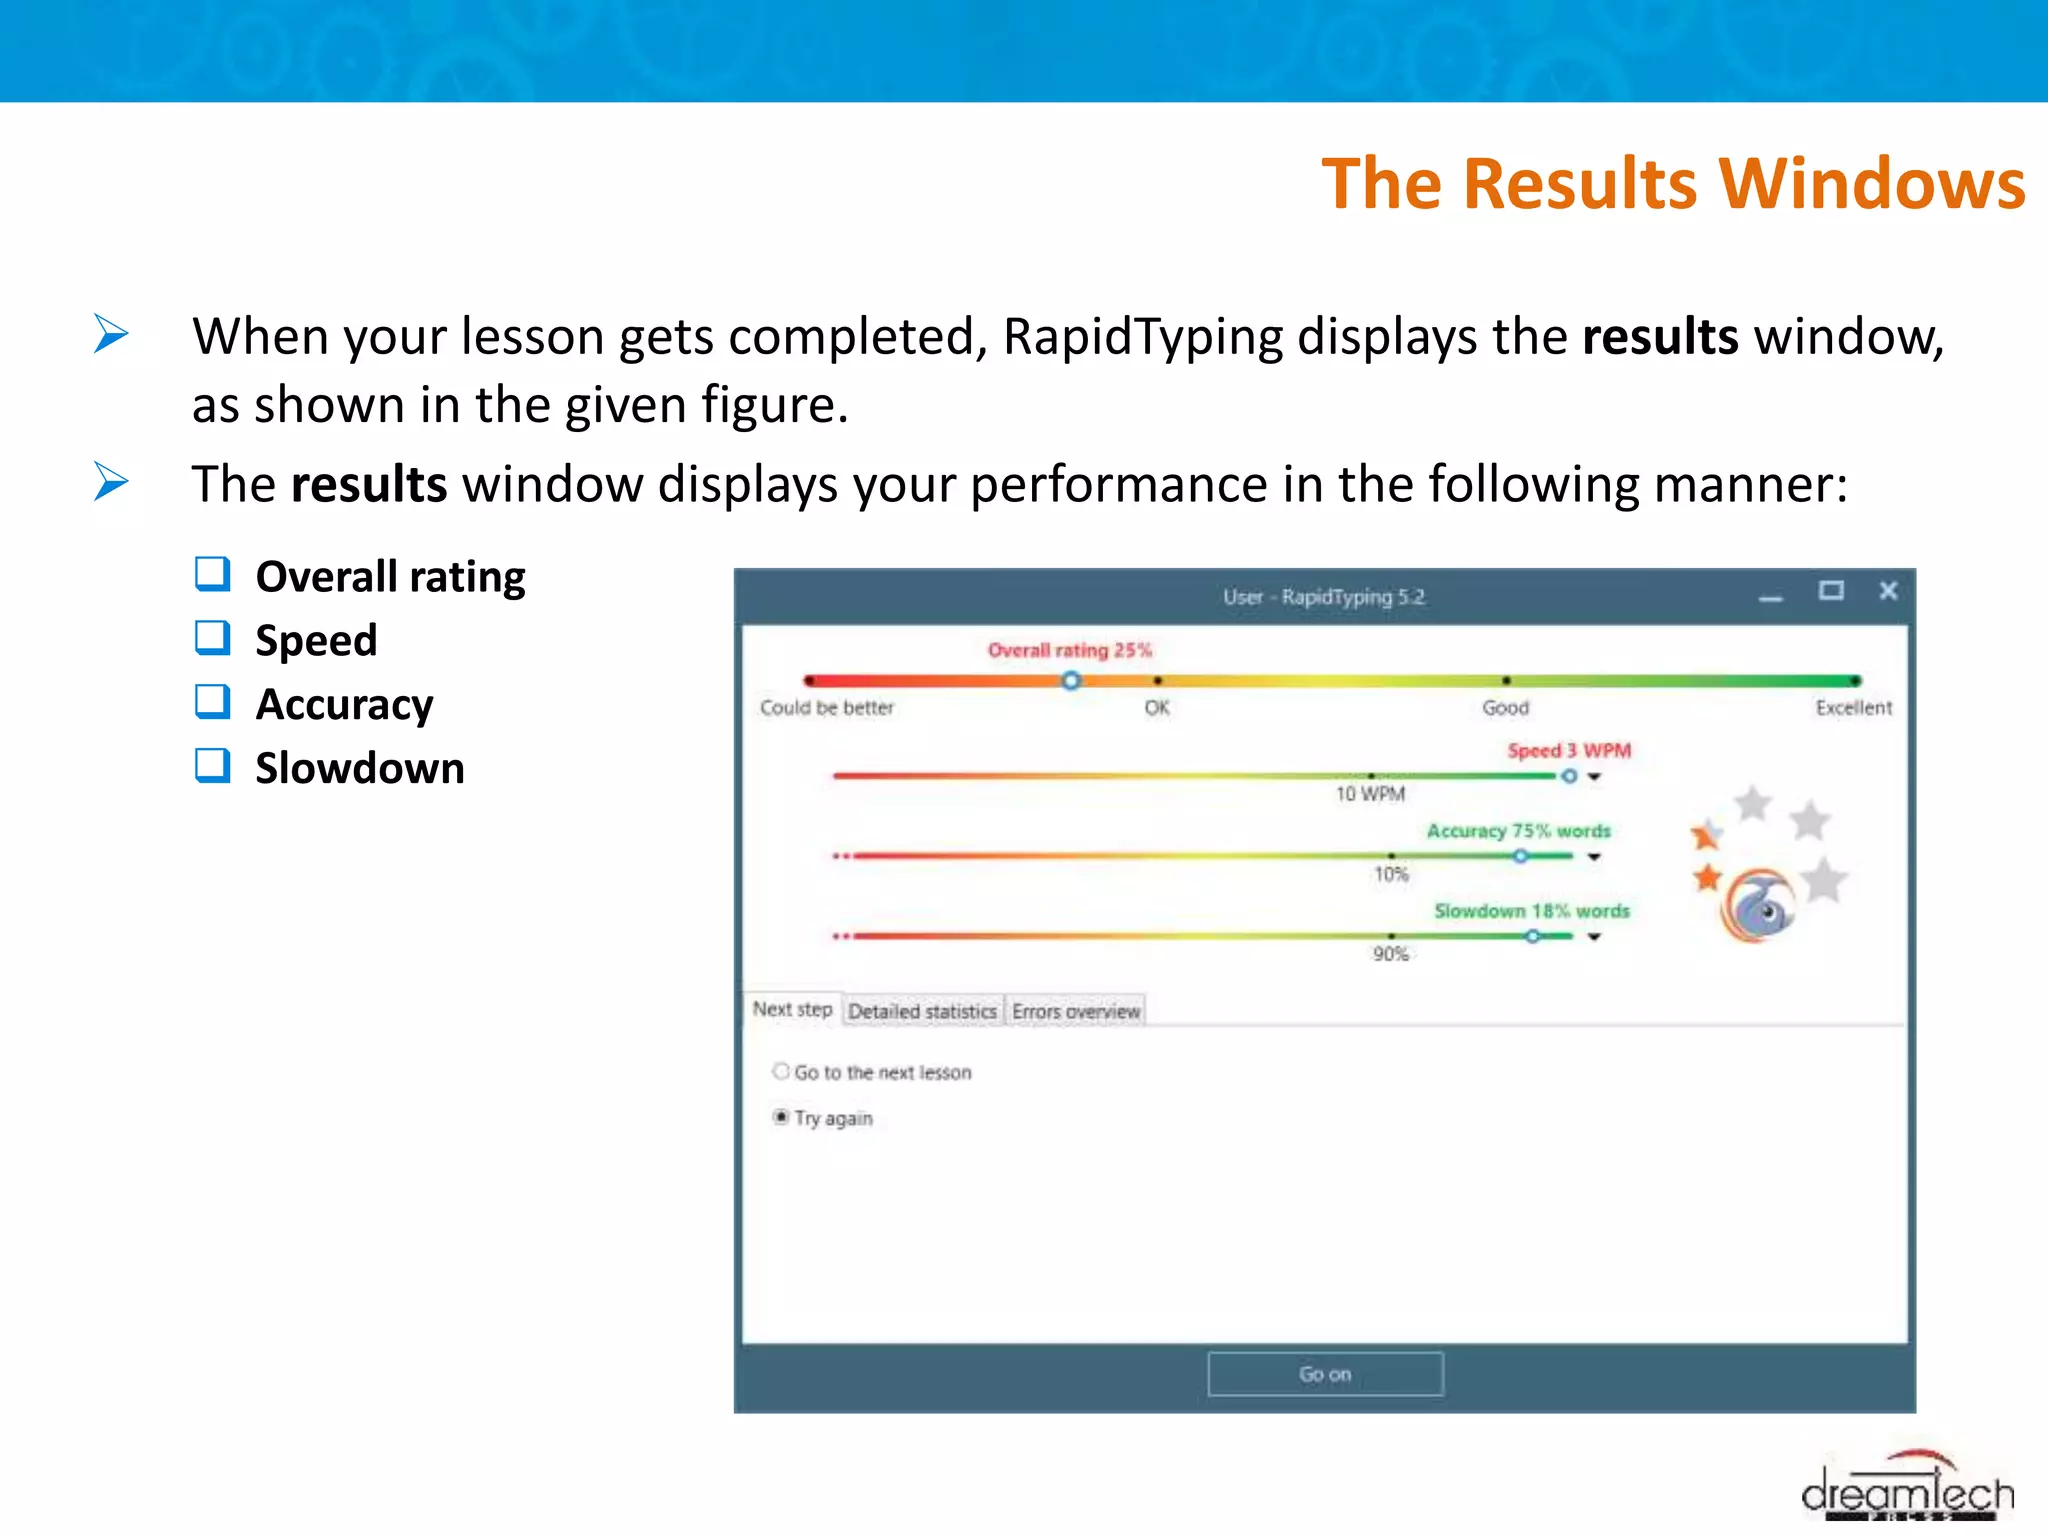
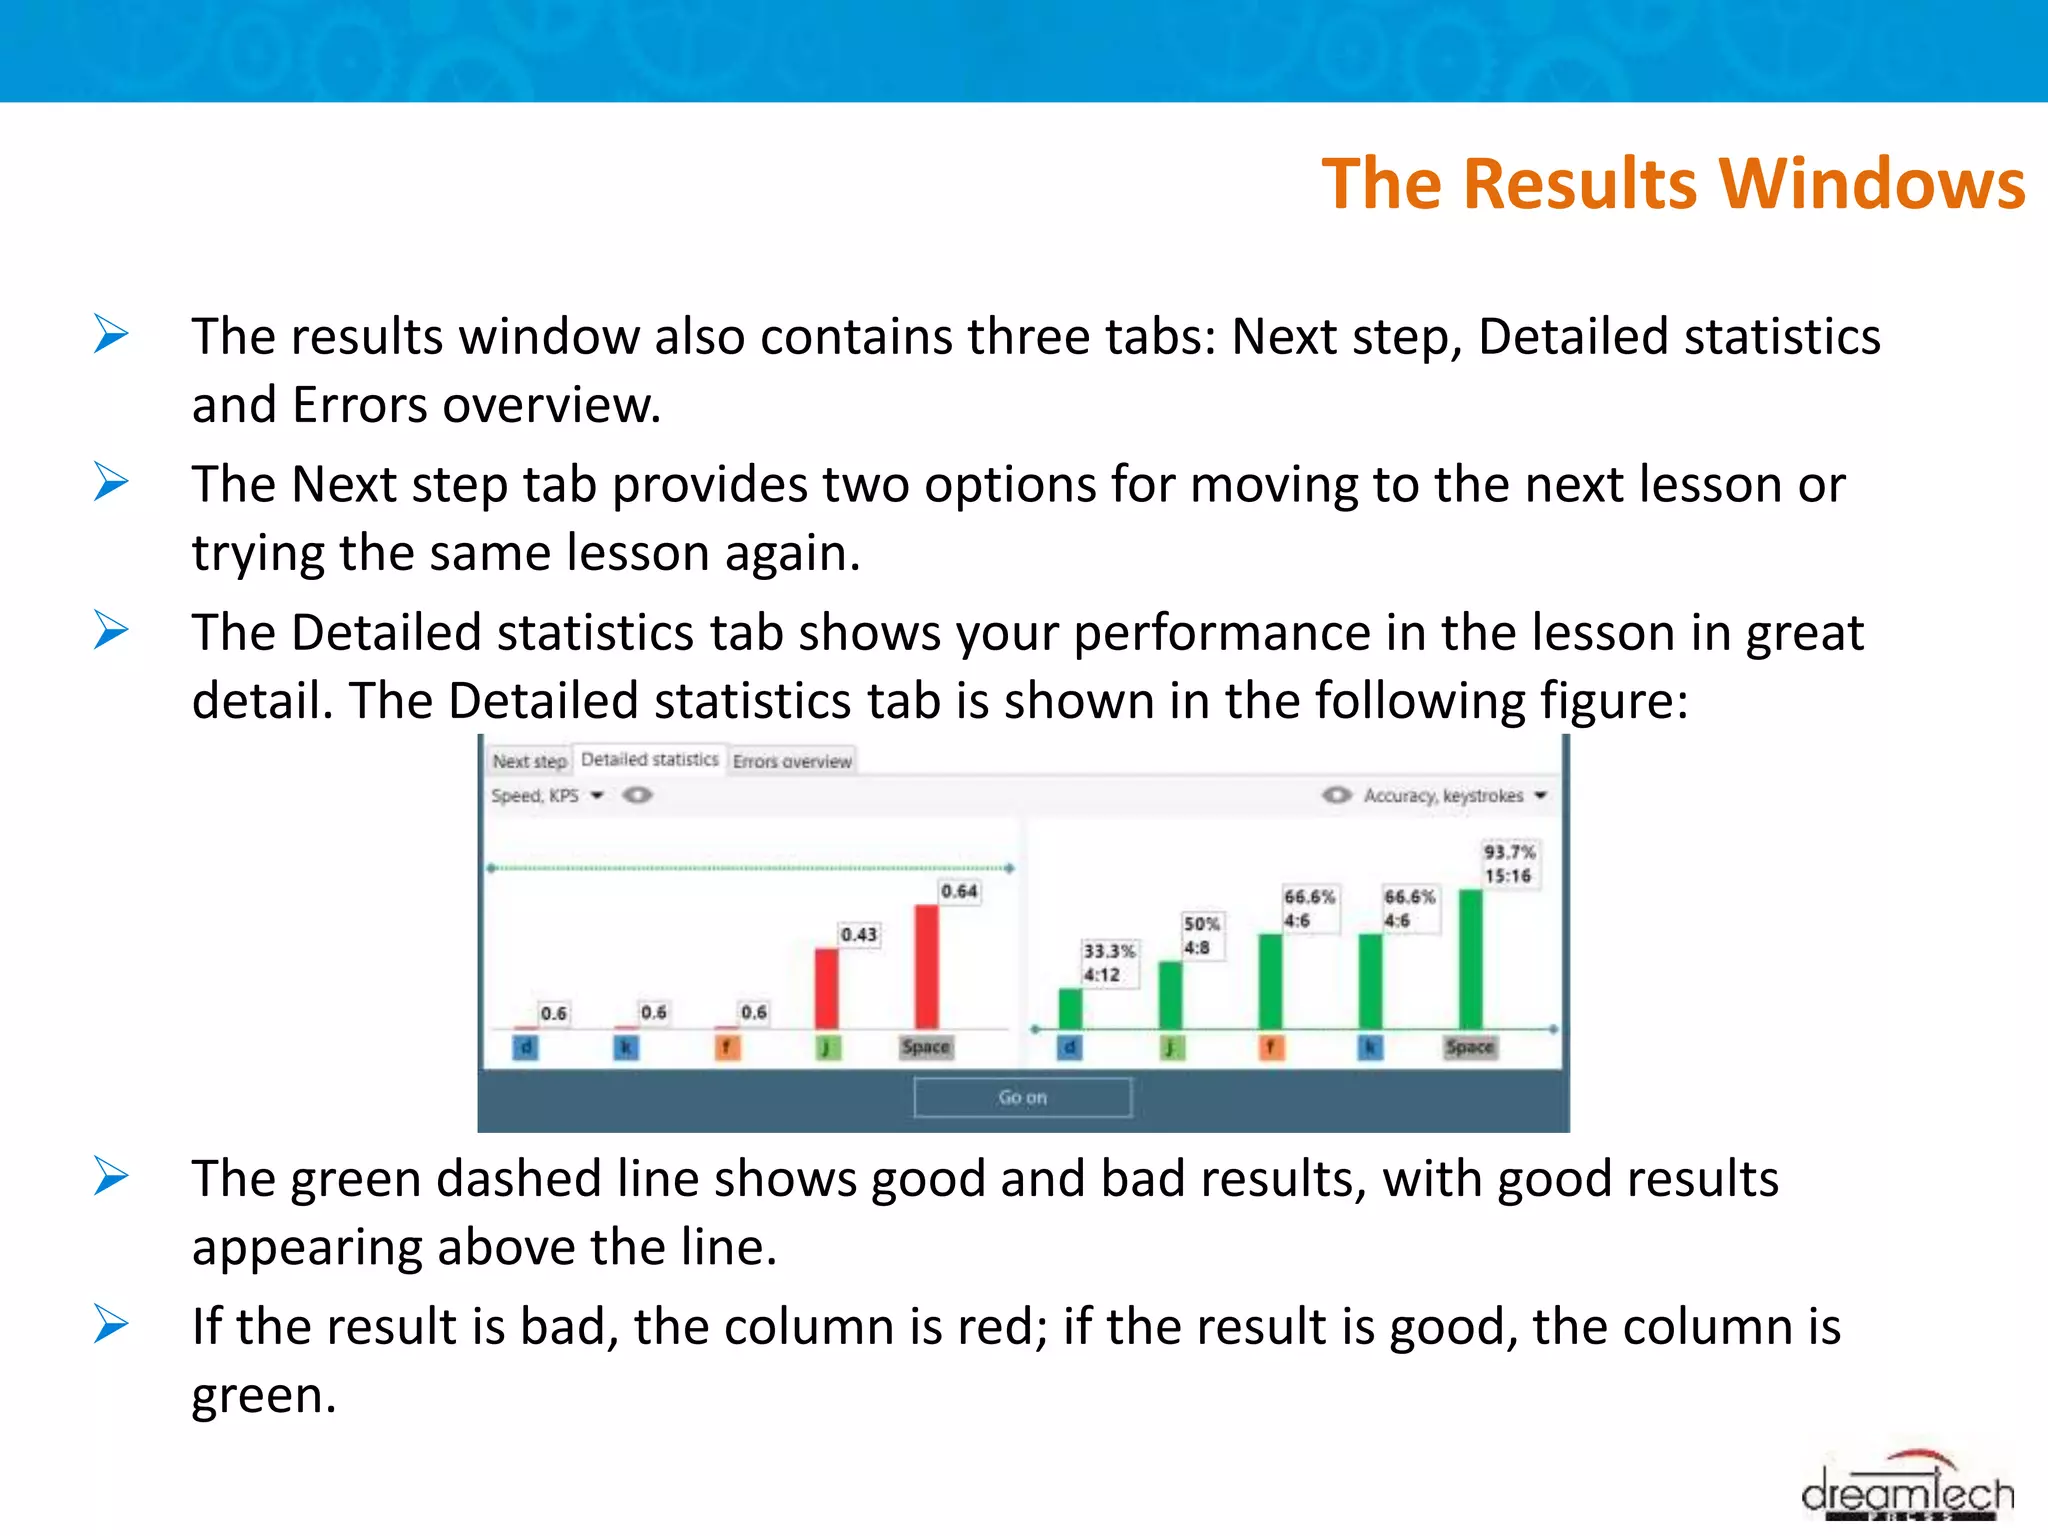
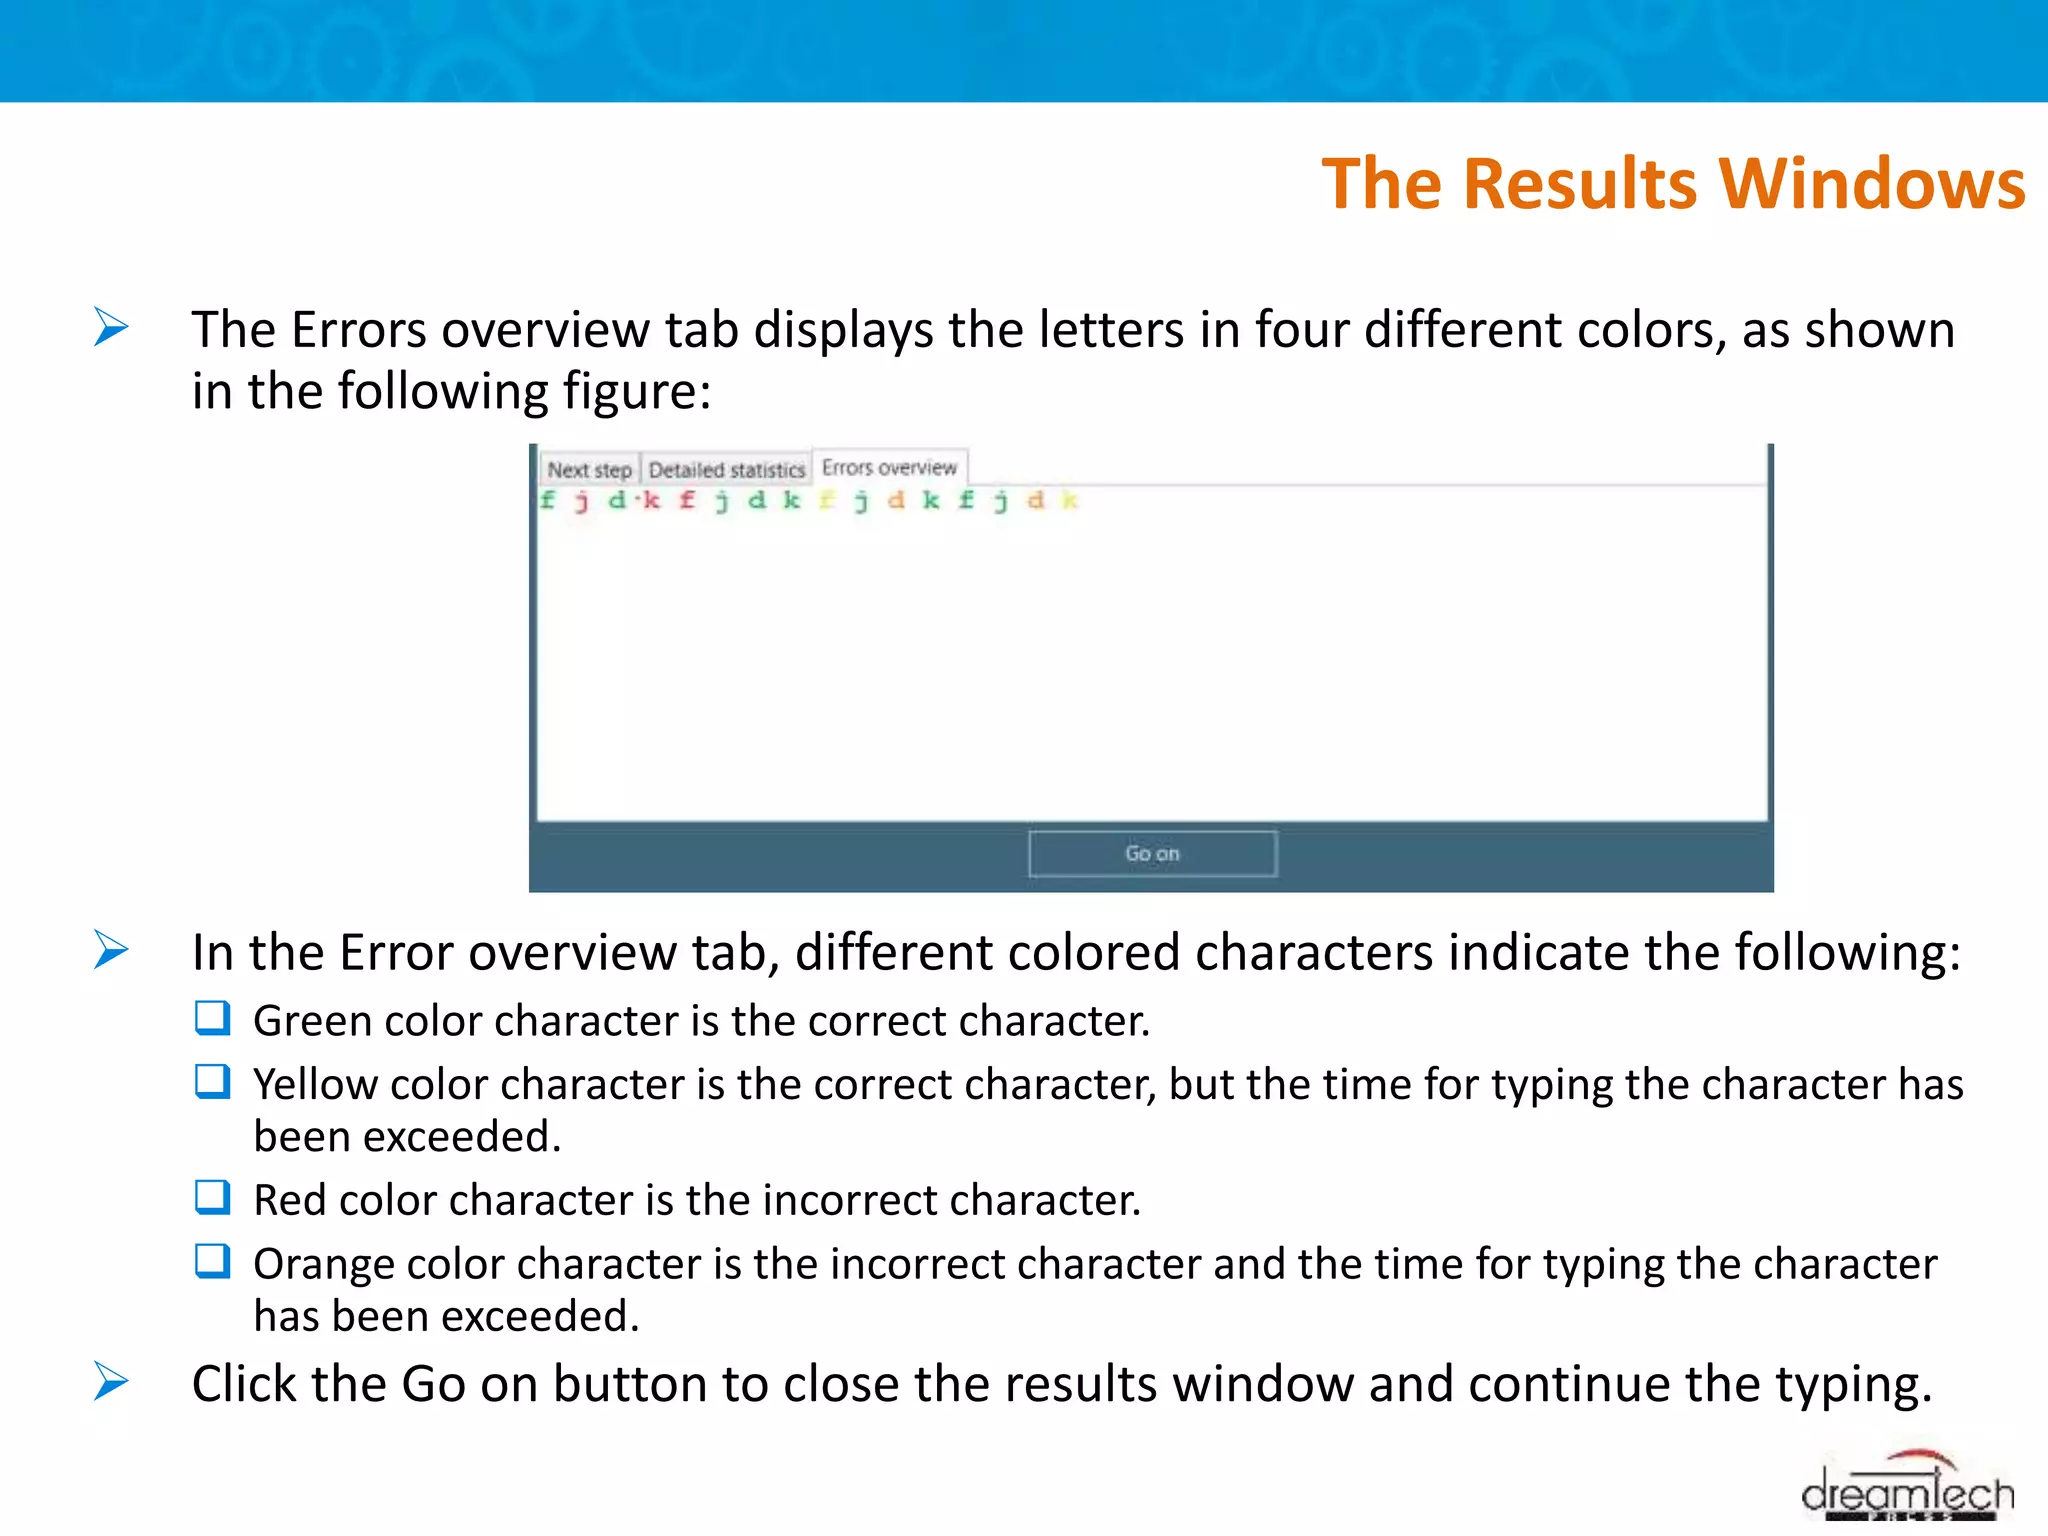
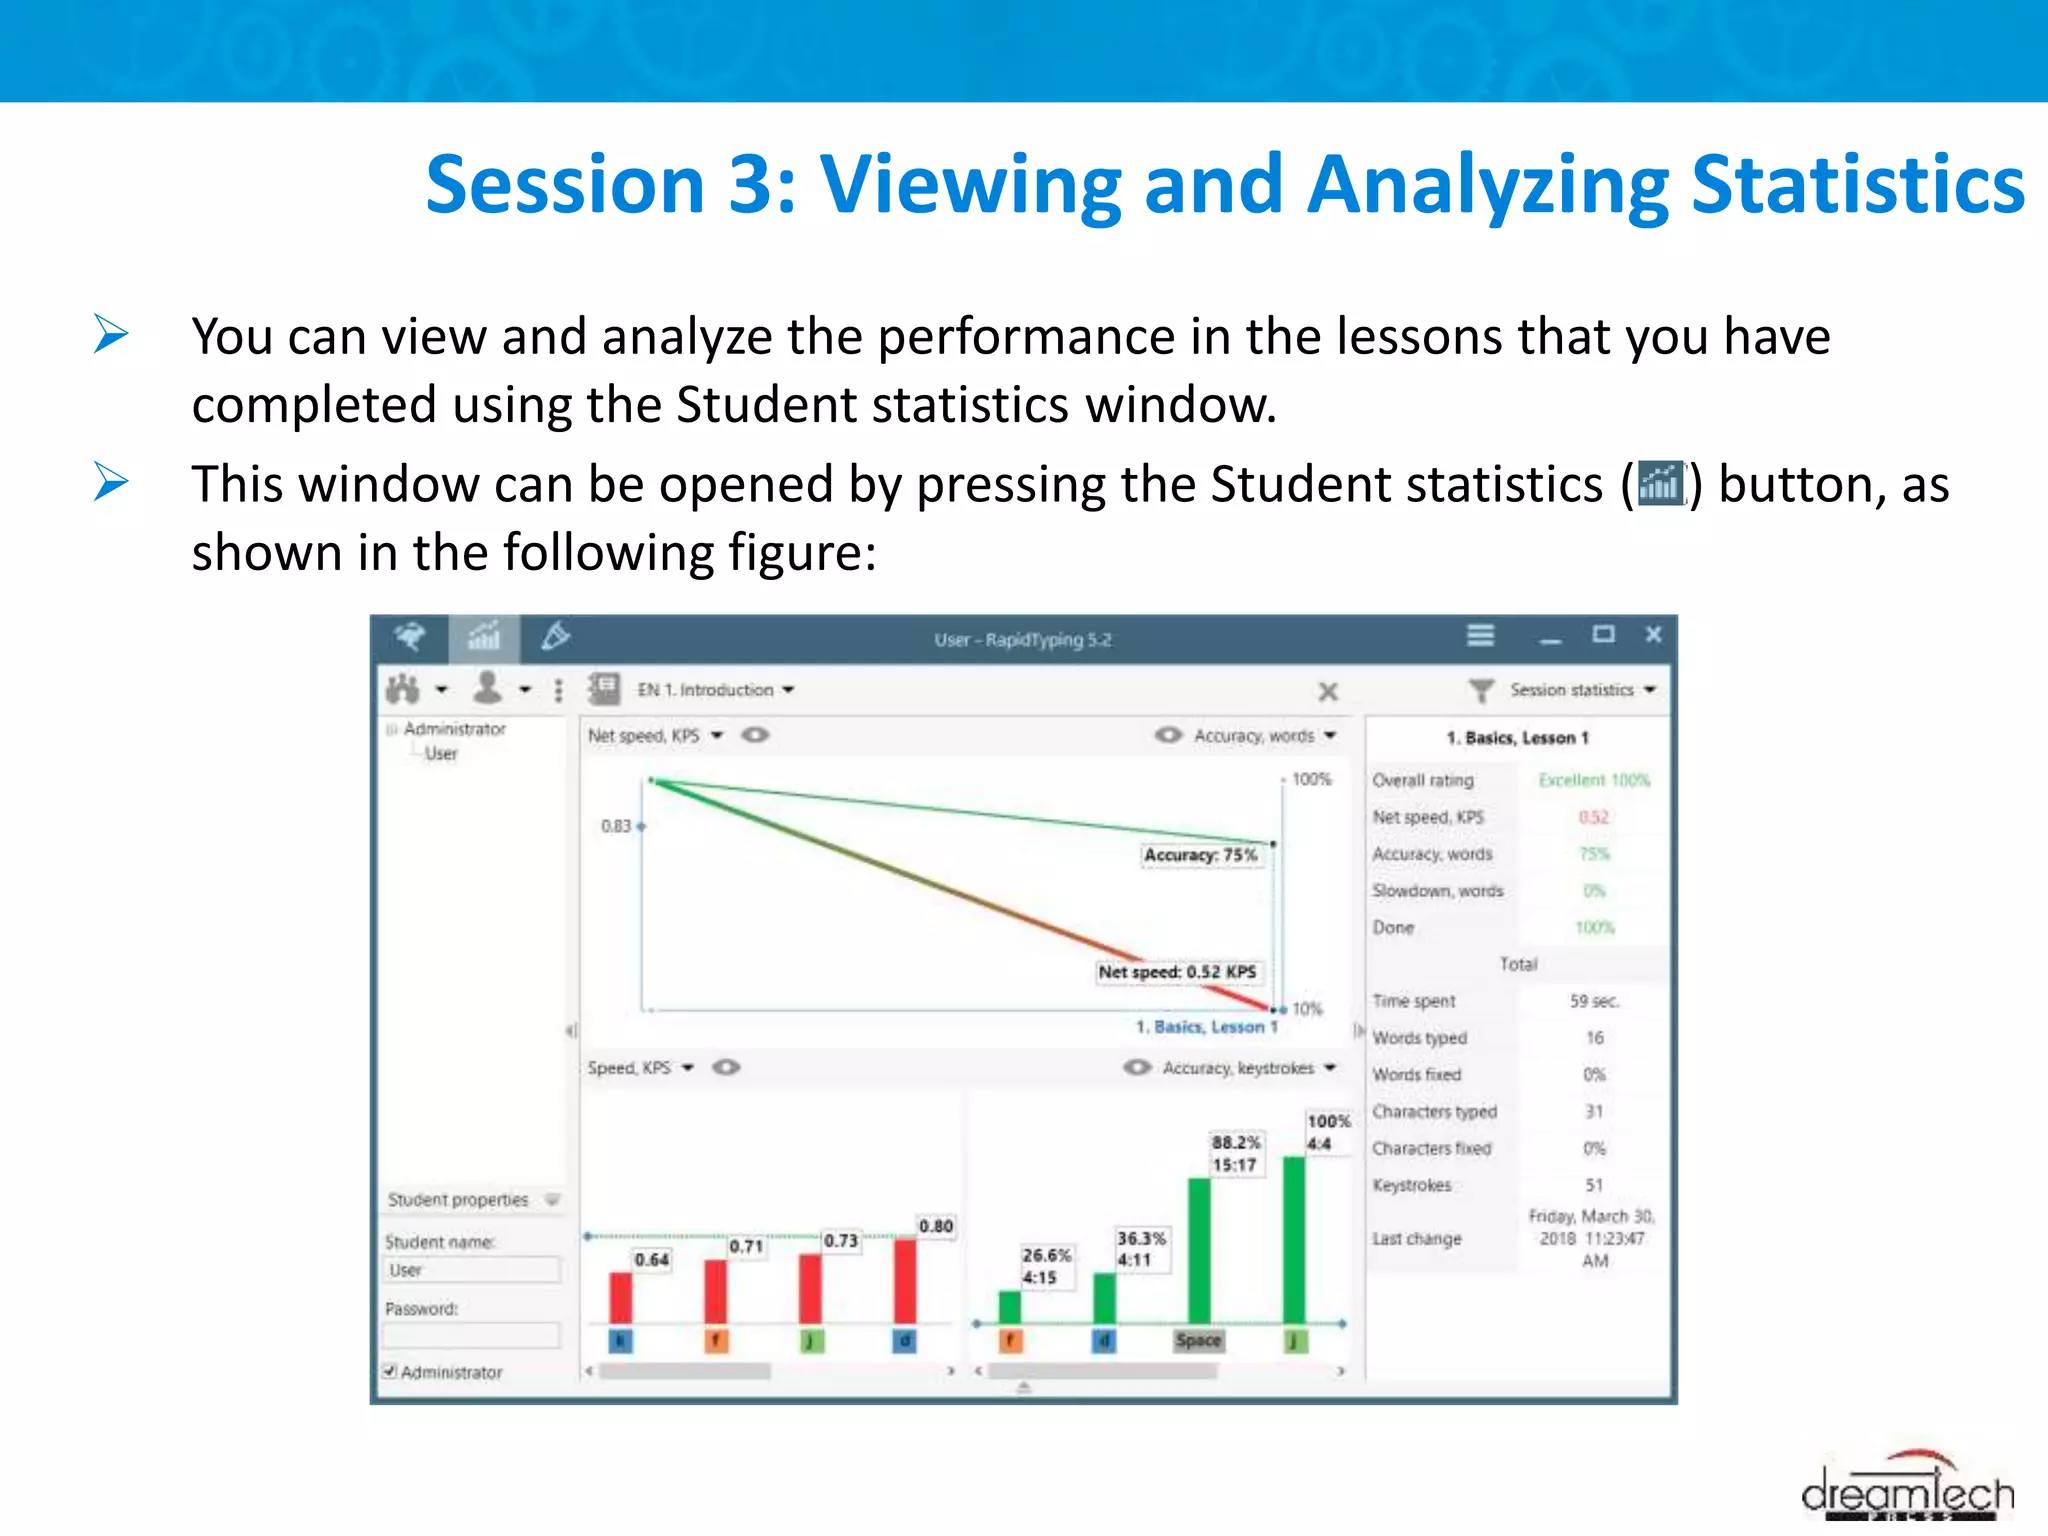
This document provides instructions on learning and improving touch typing skills through proper hand positioning, regular practice, and use of the RapidTyping software. It explains how to position hands on the keyboard, type letters and symbols using specific fingers, and access features in RapidTyping like selecting courses and lessons to enhance typing speed and accuracy over time. The goal is to train touch typing without looking at the keyboard through organized practice sessions and analyzing typing statistics.
Excel – is the world’s most widely used spreadsheet calculating program
It is used in many places like hospitals, hotels, school and companies etc.
A program that allows you to use data to forecast, manage, predict, and present information
Lets Just Go For It! Wish you an Awesome Leaning Experience.
Subscribe to our YouTube channel: https://www.youtube.com/c/TimesRide?sub_confirmation=1
Our Official Website: http://timesride.com
Follow us:
Facebook: https://www.facebook.com/rs.agrawal.9026
Instagram: https://www.instagram.com/timesridenetwork/
Twitter: https://twitter.com/TimesRide
Pinterest: https://in.pinterest.com/ride0472/
Thank You
#AwesomeLearningExperience
#SmartQuickTips&Tricks #LeaningVideos #TimesRide #Keep Learning to Keep Winning!
Introduction to Microsoft Excel basics | Excel Intro | Excel | Excel for star...Corp-sKool
Introduction to Microsoft excel. Document to explain basic working fundamental of excel i.e grids (rows and columns)Document specifies basic editing, formatting and validating the data entered in excel.
This courseware will introduce you to basics in working with Excel Spreadsheets. It'll serve as a compliment to the in-lab sessions that will be held during the data journalism training session - Voter's Count - in Kumasi
If you're a new user, Microsoft Excel can be pretty intimidating. This guide will help you learn 14 essential terms to get you started becoming literate in Excel.
Where fingers should be placed on the keyboard.docxTextile Industry
While keeping your palms raised while typing, there are also other tips you can follow to help prevent carpal tunnel and pain while you type. Keep the following suggestions in mind every time you type.
This PPT talks about all the components of a keyboard, who invented it and advice for increasing speed. It is based on class 9 IT (subject code-402) Chapter 7 'Data Entry and Keyboard Skills'.
This is the PowerPoint presentation of ch-4 food security in India of economics book of class 9 NCERT.
Food Security is the ability to assure, on a long term basis, that the system provides the total population access to a timely, reliable and nutritionally adequate supply of food.
CBSE Class 9 Chapter 4 – Food Security in India of Economics talks about topics related to the importance of food security, people who are insecure, an initiative taken by the government to tackle food insecurity, etc. The ppt consists of all the essential topics, as mentioned in the chapter.
#class9, #economics, #foodsecurityinIndia, #NCERT
Introduction to AI for Nonprofits with Tapp NetworkTechSoup
Dive into the world of AI! Experts Jon Hill and Tareq Monaur will guide you through AI's role in enhancing nonprofit websites and basic marketing strategies, making it easy to understand and apply.
Model Attribute Check Company Auto PropertyCeline George
In Odoo, the multi-company feature allows you to manage multiple companies within a single Odoo database instance. Each company can have its own configurations while still sharing common resources such as products, customers, and suppliers.
Honest Reviews of Tim Han LMA Course Program.pptxtimhan337
Personal development courses are widely available today, with each one promising life-changing outcomes. Tim Han’s Life Mastery Achievers (LMA) Course has drawn a lot of interest. In addition to offering my frank assessment of Success Insider’s LMA Course, this piece examines the course’s effects via a variety of Tim Han LMA course reviews and Success Insider comments.
Normal Labour/ Stages of Labour/ Mechanism of LabourWasim Ak
Normal labor is also termed spontaneous labor, defined as the natural physiological process through which the fetus, placenta, and membranes are expelled from the uterus through the birth canal at term (37 to 42 weeks
How to Make a Field invisible in Odoo 17Celine George
It is possible to hide or invisible some fields in odoo. Commonly using “invisible” attribute in the field definition to invisible the fields. This slide will show how to make a field invisible in odoo 17.
Francesca Gottschalk - How can education support child empowerment.pptxEduSkills OECD
Francesca Gottschalk from the OECD’s Centre for Educational Research and Innovation presents at the Ask an Expert Webinar: How can education support child empowerment?
Unit 8 - Information and Communication Technology (Paper I).pdfThiyagu K
This slides describes the basic concepts of ICT, basics of Email, Emerging Technology and Digital Initiatives in Education. This presentations aligns with the UGC Paper I syllabus.
Synthetic Fiber Construction in lab .pptxPavel ( NSTU)
Synthetic fiber production is a fascinating and complex field that blends chemistry, engineering, and environmental science. By understanding these aspects, students can gain a comprehensive view of synthetic fiber production, its impact on society and the environment, and the potential for future innovations. Synthetic fibers play a crucial role in modern society, impacting various aspects of daily life, industry, and the environment. ynthetic fibers are integral to modern life, offering a range of benefits from cost-effectiveness and versatility to innovative applications and performance characteristics. While they pose environmental challenges, ongoing research and development aim to create more sustainable and eco-friendly alternatives. Understanding the importance of synthetic fibers helps in appreciating their role in the economy, industry, and daily life, while also emphasizing the need for sustainable practices and innovation.
2. This Unit Covers:
Basics of Touch Typing
RapidTyping—A Software for Touch Typing
User interface of RapidTyping
Viewing and Analyzing Statistics
Use of Lesson editor
Learning Objectives
3. Today, computer is used in almost every field and, therefore, it has become an
important part of our life. From booking train tickets to online shopping, the
computer is used widely.
Due to wide use of computers in our daily life, the typing has also become a
significant activity in order to work faster.
The efficient and effective skills of typing are needed to operate the computer
swiftly.
The high speed of typing can be gained with constant and sincere
determination in the organized environment.
The person with good typing skills can enter the data swiftly into the
computer with high level of accuracy.
The enhanced typing skills make you smarter than others while handling
computer or entering data into it.
Introduction
4. Touch typing is a technique of typing using all the fingers and thumbs of both
hands, but without looking at the keyboard.
In touch typing, we use fingers of both the hands to type the text in such a
way that all the fingers as well as thumbs are equally used for typing.
Each finger and thumb are assigned some keys on the keyboard.
By practice, our fingers memorize the positions of letters on the keyboard
and then we can easily type these letters without looking at the keyboard.
Session 1: Basics of Touch Typing
5. The following figure shows the arrangement of keys in a normal keyboard:
Session 1: Basics of Touch Typing
6. When you want to start typing on a keyboard, your fingers of left and right
hands must be placed correctly.
You should place your fingers on the middle row of the keyboard which is
known as ‘Home Keys’, as shown in given figure:
Positioning of Hands
7. Starting with you left hand, place your little finger on key A, ring finger on key
S, middle finger on key D and index finger on key F.
With your right hand, place your Index finger on key J, middle finger on key K,
ring finger on key L and your little finger on the next key.
Your thumb must rest on the Space bar.
The following figure shows fingers used for typing keys:
Positioning of Hands
8. When you have to do typing, you should sit on a chair and face the screen.
You must be aware of few of the following guidelines related to body posture
while typing on a keyboard:
When you do typing, always sit by keeping your back straight, as shown in given figure.
You should keep your elbows to be bent at the right angle.
Keep your feet firmly on the ground.
When you see at the screen, your head must be tilted slightly forward.
Correct Posture for Typing
You should keep at least 20-30
inches (or 45-70 cm) of
distance between your eyes
and the screen while typing.
The keyboard must be kept at
the height of 28 to 30 inches
from the floor.
Put the least possible strain on
the shoulder, arms and wrist
muscles, while typing.
9. Once you learn to position your hands on a keyboard and identify the
location of home row, top row and bottom row, then you are ready to learn
to type words.
How to type capital letters and when to use Space bar and Enter keys.
Typing with Caps Lock, Space Bar and Enter Keys
You can press the Caps Lock key to activate it so that you can write in capital letters.
The Space Bar key is used to insert a blank space.
Press the Enter key with the little finger of your right hand. Always put your fingers back on
the Home keys after pressing any key.
Practicing Typing Words
10. Typing with G and H Keys: Both the keys are typed with the Index Fingers.
Press G with the Index Finger of your Left Hand.
Press H with the Index Finger of your Right Hand.
Typing with E and I Keys: You should place/ move your Middle Finger to the Upper Row.
Type E by moving the Middle Finger of your Left Hand from D.
Type I by moving the Middle Finger of your Right Hand from K.
Practicing Typing Words
11. Typing with R and U Keys: Slide your Index Fingers to the Upper Row.
Type R by sliding the Index Finger of your Left Hand from F.
Type U by sliding the Index Finger of your Right Hand from J.
Typing with T and Y Keys: Slide your Index Fingers correctly to the Upper Row.
Type T by sliding the Index Finger of your Left Hand from F.
Type U by sliding the Index Finger of your Right Hand from J.
Practicing Typing Words
12. Typing with W and O Keys: Both the keys are typed with the Ring Fingers.
Type W with the Ring Finger of your Left Hand sliding from S.
Type O with the Ring Finger of your Right Hand sliding from L.
Typing with Q and P Keys: Both the keys are typed with the Little Fingers.
Type Q with the Little Finger of your Left Hand sliding from A.
Type P with the Little Finger of your Right Hand sliding from ;.
Practicing Typing Words
13. Typing with C and Comma (,) Keys: Both these keys are typed with the Middle Fingers.
Type C with the Middle Finger of your Left Hand sliding down from S.
Type, with the Middle Finger of your Right Hand sliding down from K.
Typing with V and M Keys: Both the keys are typed with the Index Fingers.
Type V with the Index Finger of your Left Hand sliding from F.
Type M with the Index Finger of your Right Hand sliding from J.
Practicing Typing Words
14. Typing with B and N Keys: Both B and N keys are typed with the Index Fingers.
Type B with the Index Finger of your Left Hand sliding from F.
Type N with the Index Finger of your Right Hand sliding from J..
Typing with X and Full Stop (.) Keys: Both these keys are typed with the Ring Fingers.
Type X with the Ring Finger of your Left Hand sliding down from S.
Type (.) with the Ring Finger of your Right Hand sliding down from L..
Practicing Typing Words
15. Typing with Z and Slash (/) Keys: Both the keys are typed with the Little Fingers.
Type Z with the Little Finger of your Left Hand sliding from A.
Type ( / ) with the Little Finger of your Right Hand sliding down from ;.
Typing with ( ‘ ) Key: This key is typed with the Little Finger of the Right Hand.
This key is typed with the Little Finger of the Right Hand.
Practicing Typing Words
16. Typing with Shift Key
We use Shift Key when we need to write a capital letter while typing small letters. For
example, if we want to type S, we press the Shift key with the Little Finger of the Right
Hand. If we want to type P, we press the Shift key with the little finger of the Left Hand.
While using the Shift key, ensure that the Caps Lock key is not activated.
Practicing Typing Words
17. There are the following stages involved in Touch typing:
Stage 1: Learn to know the location of home row of the keyboard first. The home row
begins with the Caps Lock key from the left hand side. You should not look at the
keyboard, as looking at the keyboard is completely forbidden in touch typing. Then also
learn to locate the lower row, upper row, numbers row, upper-case letters and special
symbols.
Stage 2: Memorize frequently the syllabus and typing words contained in the
syllabuses.
Stage 3: Type the actual text and improve your skills by practicing regularly.
Practicing Typing Words
18. The following figure shows different keys pressed by different fingers of the
left and right hands:
Practicing Typing Words
19. In the numeric pad, the number 5 key for the middle finger, 4 for the
index finger and 6 for the ring finger represent the base position.
While typing the numerical data, the numeric pad must be preferred to
simplify and speed up the data input.
Upper-case letters and symbols in the numbers row are typed by one
hand while the little finger of the other hand holding down the Shift key.
You should try to locate the right key with your fingers, without looking at
the keyboard.
Do not press the keys in a hurry at the early stages of learning. Take your
time when typing to avoid mistakes as high speed makes sense when the
fingers hit the right keys. You should press the keys only with the fingers
for which they have been reserved.
Keep your hands and fingers close to the base position.
Don’t look at the keyboard while you are typing.
Do press keys hardly. You should check your typing does not make noise.
Use opposite hands when you have to switch between upper/lower case.
Practicing Typing Words
20. A popular software used for enhancing typing skills is RapidTyping tutor.
The RapidTyping tutor is a useful and easy-to-use application software that
trains you and helps you in improving your typing speed and decreasing
typographical errors.
This software mainly teaches you skills of touch typing or increases your
existing skills of touch typing.
The RapidTyping software is a freeware. Therefore, you can download it from
the Internet without paying any charges.
You can download the software from the following hyperlink:
www.rapidtyping.com/downloads.html
Session 2: RapidTyping – A Software for Touch Typing
21. You can start the RapidTyping tutor either by double-clicking the
RapidTyping 5 shortcut icon on the Desktop of your computer or by selecting
the following path in the Start menu:
All Programs RapidTyping 5 RapidTyping 5
The following figure shows the interface of RapidTyping tutor application:
User Interface of RapidTyping Application
22. To start practicing typing in RapidTyping, you have to first be familiar with the
different options given in the Toolbar, as shown in given figure:
In the preceding figure, you see the following icons:
Select course drop down menu
Select lesson drop down menu
Start the lesson button
Current lesson time drop down
Restart the lesson button
Practicing Typing in RapidTyping
23. To start typing in the RapidTyping tutor application, you have to select a
course first. The following figure shows different course skills categories in
RapidTyping tutor application:
Advanced: The course enables you to enhance the perfection in typing skills by entering
an actual text.
Testing: This course tests your touch typing skills.
Add more courses: This option allows you to add more courses to the application.
Selecting a Course in RapidTyping
The five different types of course skills are as follows:
Introduction: This category of course helps in knowing the
location of keys on the keyboard. It guides in learning which
finger must be used to press the keys on the keyboard. It also
helps you master in typing of Shift keys, upper-case letters,
symbols at numbered row and the numeric pad.
Beginner: The aim of beginner course is same as
Introduction course having little higher level than
Introduction course.
Experienced: This course helps in improving your typing
speed by learning repeatedly used symbols and words.
24. After selecting the course, you have
to select a lesson from the Select
lesson drop down menu, as shown in
the given figure.
For example, the Introduction and
Beginner courses provide the Basics,
Shift keys, Digits keys and Numeric
pad categories of lessons, as shown
in given figure:
After opening various categories of
lessons, you have to select a lesson
number. For example, in the Basics
category of lessons, Lesson 1 is
selected, as shown in given figure.
Begin a Lesson in RapidTyping
25. Click the Start the lesson button to start typing, as shown in the given figure:
Now, you can begin the typing by pressing those letter keys on the keyboard
shown in the Text panel of RapidTyping.
When you press the correct key on the keyboard, the green color appears on
letters, whereas the red color appears on the letters in case of pressing
wrong keys in the Text panel as shown in the given figure:
Begin a Lesson in RapidTyping
26. The RapidTyping provides tips for using correct finger to type the current
character on the Status bar. It also provides a progress bar above the text:
Green progress bar: Represents the percentage of completion for the current lesson.
Yellow progress bar: Reflects the acceptable time for typing a single character.
On the completion of the lesson, the green color tick mark symbol appears
besides that lesson, as shown in the following figure:
Begin a Lesson in RapidTyping
27. To pause a lesson, click the Pause the lesson (∥) button, which will be
displayed at the place of the Start the lesson ( ⊳) button.
The Current lesson time drop down menu shows either the Remaining time
or Elapsed time, as per user selection as shown in the following figure:
The Restart the lesson (⤺ ) button is used if you want to type the same
keystrokes sequence again.
Begin a Lesson in RapidTyping
28. When your lesson gets completed, RapidTyping displays the results window,
as shown in the given figure.
The results window displays your performance in the following manner:
The Results Windows
Overall rating
Speed
Accuracy
Slowdown
29. The results window also contains three tabs: Next step, Detailed statistics
and Errors overview.
The Next step tab provides two options for moving to the next lesson or
trying the same lesson again.
The Detailed statistics tab shows your performance in the lesson in great
detail. The Detailed statistics tab is shown in the following figure:
The green dashed line shows good and bad results, with good results
appearing above the line.
If the result is bad, the column is red; if the result is good, the column is
green.
The Results Windows
30. The Errors overview tab displays the letters in four different colors, as shown
in the following figure:
In the Error overview tab, different colored characters indicate the following:
Green color character is the correct character.
Yellow color character is the correct character, but the time for typing the character has
been exceeded.
Red color character is the incorrect character.
Orange color character is the incorrect character and the time for typing the character
has been exceeded.
Click the Go on button to close the results window and continue the typing.
The Results Windows
31. You can view and analyze the performance in the lessons that you have
completed using the Student statistics window.
This window can be opened by pressing the Student statistics ( ) button, as
shown in the following figure:
Session 3: Viewing and Analyzing Statistics
32. The Student statistics window consists of the following controls:
Student accounts: This area consists of three parts:
Student toolbar: It is used to add, remove, import, or save the existing student accounts and
student groups. It also allows saving student statistics in the different formats: PDF, HTML,
XML and CSV.
Student accounts: It allows selecting current student account or student group.
Property panel: It allows editing student or group properties, which is selected in the
navigation tree.
Statistics Panel: This area consists of four parts:
Statistics toolbar: Having buttons for selecting courses, removing selected statistics and
customizing the statistics display options.
Course diagram: Shows the common statistics for all lessons of the current course.
Lesson diagrams: Show the statistics for each character or keystroke of the selected lesson in
the course diagram.
Lesson statistics table: Shows the statistics of the selected lesson in the course diagram.
Characters used in the current lesson statistics are highlighted in red/black on the
virtual keyboard.
Session 3: Viewing and Analyzing Statistics
33. The Lesson editor button in the RapidTyping displays the Lesson editor
window, as shown in the following figure:
Session 4: Working with Lesson editor
34. The Lesson editor window has two tabs, namely Course options and About
course.
The Course options tab shows various options which are segregated in
different sections, such as Course goals, Lesson view, To continue the lesson,
Lesson duration, Metronome setting, The end of the lesson, At the close
application and Show.
You can set or select the various options provided these sections are as per
your requirement.
The About course tab shows the description of the course.
The right side in the Lesson editor window shows the various lesson metrics,
which include number of words, characters, spaces and other characters or
symbols present in the lesson.
Session 4: Working with Lesson editor
35. The Lesson editor window enables you to create or add a new user defined
course in the RapidTyping application.
When you click the Course menu, you get the options, as shown in given
figure:
You can create the new course by clicking the Lesson editor tab in the
RapidTyping application and then select Course menu Create new course
option.
Creating a New Course
The description of these options is given here:
Create new course: Allows you to create a new blank
course by just typing a new name.
Add courses: Allows you to add an existing course
from a file stored in the computer’s hard disk or from
an already existing library stored in the RapidTyping
application.
Save selected courses: Allows you to save a selected
course with the .rapidtyping.course extension.
Save all: Allows you to save all the changes in all the
existing courses.
36. You can see a new course entry in the navigation tree, as shown in given
figure:
Now, you can type a name of the course and press the Enter key to enter
the new course name into the system.
A new course will be created and displayed in the list of courses as shown
in the given figure:
Creating a New Course
37. Now, you can select a course file from the destined location in the Open
dialog box and click the Open button, as shown in the following figure:
You can add an existing course by clicking the
Lesson editor tab in the RapidTyping application
and then select Course menu Add courses
From file, as shown in the given figure.
Adding an Existing Course
38. The Lesson editor window also enables you to create or add a new user-
defined lesson to a course.
When you click the Lesson menu, you get the options, as shown in the given
figure:
Creating and Adding a New Lesson
The description of these options is given here:
Create a new lesson: Allows you to create a new blank
lesson by just typing a new name.
Add the existing lessons: Allows you to add an existing
lesson from a file stored in the computer’s hard disk or
from an already existing library stored in the
RapidTyping application.
Save a selected lessons: Allows you save a selected
lesson.
39. You can add and create a new lesson by selecting the course in the navigation
tree in which you want to add a lesson in the Lesson editor window.
Now, click the Lesson menu and select the Create new lesson option. A new
lesson entry is shown in the navigation tree.
Now, type a name of the lesson.
Creating and Adding a New Lesson
Selecting a Course Displaying a Newly Added Lesson Typing a Name of a Lesson
40. Now, type the required content for typing practice to be done by a user, as
shown in following figure:
Creating and Adding a New Lesson
41. After entering the required text in the lesson, you need to save the lesson.
You can do this by clicking the Lesson menu and select the Save selected
lessons option from the menu.
Now, enter the name in the Save As dialog box and click the Save button.
The lesson gets saved with the appropriate name.
To delete a newly created course, click the Delete button on the Taskbar.
You can also view and/or change properties of the current course by clicking
the button on the Taskbar.
Moreover, you can also delete a particular course or a lesson by right-clicking
them and select the Delete option.
Saving a Course and Lesson
Deleting a Course and Lesson