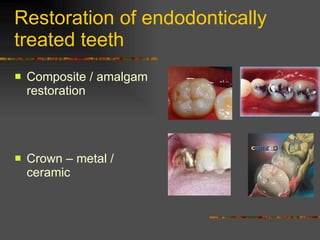
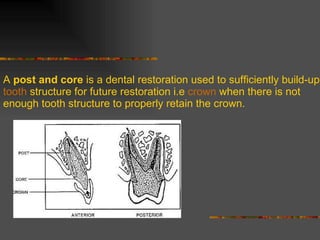
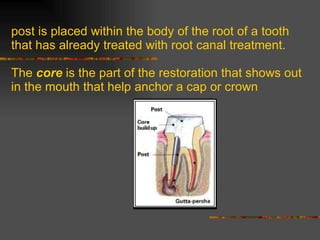
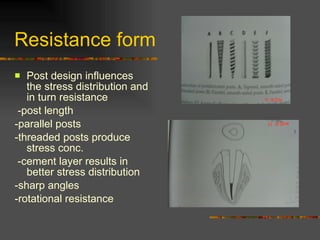
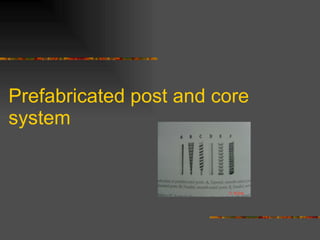
Restoration of endodontically treated teeth Composite / amalgam restoration Crown – metal / ceramic
A  post and core  is a dental restoration used to sufficiently build-up  tooth  structure for future restoration i.e  crown  when there is not enough tooth structure to properly retain the crown.
post is placed within the body of the root of a tooth that has already treated with root canal treatment. The  core  is the part of the restoration that shows out in the mouth that help anchor a cap or crown
Principles of tooth preparation Conservation of tooth structure Retention form Resistance form
Conservation of tooth structure -canal preparation-enlargement of canal should exceed about 1-2 additional file sizes beyond the largest size used. Coronal part preparation- removal of undercuts and ferrule (extension of axial wall of the crown apical to the missing tooth structure)
Retention form Post length Post diameter Surface texture Luting agent
Post length Greater post length=greater retention 2/3 length of root / post length should equal crown length Maintain 3 – 5mm apical seal
Post diameter Shouldn't exceed 1/3 diameter of the root A   minimum of 1 mm of sound dentin should be maintained circumferentially
SURFACE TEXTURE Serrated or roughened post is greater retentive than smooth post LUTING AGENT Znpo4,Resin and GIC are greater to other cements
Resistance form Post design influences the stress distribution and in turn resistance -post length -parallel posts -threaded posts produce stress conc. -cement layer results in better stress distribution -sharp angles -rotational resistance
Post and core systems Custom post and core – mainly used in flared canals,elliptical crossection canals ,multiple canal teeth Prefabricated – circular  crossection canals
Steps in tooth preparation Removal of RC filling material Enlargement of the canal Preparation of coronal tooth structure
Prefabricated post and core system
Eliminate weaker residual walls, clean up the cavity, preserving all healthy dentine
Prepare the root canal according to your usual procedure (Gates,paesso reamers ] the post is chosen according to the canal's diameter, not to the root's.
Prepare the composite bonding cement, coat the post Insert it immediately into the canal
Fit the core form boxing system Fill up with the core composite while pressing and polymerize
Custom cast post system Direct technique Indirect technique
Remove any weak, thin, and/or unsupported tooth structure. Direct technique
Using progressively larger diameter Pesso reamers remove the gutta percha to the predetermined  initial  depth Repeat this process as necessary leaving 4-5 mm of gutta percha as an apical seal.
Add a keyway to resist rotation of the post/core. Place the keyway in the bulkiest part of the remaining tooth structure.
Try-in the preformed plastic post and be sure it goes all the way down the prepared canal without binding (a totally passive fit). Trim it as necessary. Measure the post relative to the depth of the canal with a periodontal probe
Lubricate the canal with Duralay lubricant Using the "bead brush" technique, fill the canal completely with Duralay resin. Use the bristles of a brush (bent at a 45 degree angle for easier access) to force acrylic down the canal and express any trapped air
Immediately, dip the plastic post in acrylic liquid (to soften post and enhance bond of acrylic) and seat it in the canal to its full depth.  Move the post up and down in the canal 1-2 mm (only after the Duralay is nearly set) to avoid getting it "locked in."
Using hemostats, carefully remove the post pattern and inspect it to be sure it is fully formed (with no voids).
Cut off the top of the plastic post so that your patient can close completely
Using a large diameter coarse diamond (high speed handpiece at "near stall" speed with water spray), shape the pattern to ideal preparation form (on the tooth).
Using hemostats (held mesiodistally), remove the pattern from the tooth. The pattern should not be removed (except one time to check that the post portion is fully formed) until it is completed. There is the risk of breakage each additional time the pattern is removed.
Indirect technique of making custom post and core
Post and core   The tooth is prepared prior to the pattern fabrication. A heated endodontic condensor is used to safely remove the gutta percha (this is best accomplished at the same time the endodontic therapy is rendered). Gates & Parapost drills are used to shape the canals to an appropriate size and depth. The most common sizes used are Brown Yellow and Red (see the table below).
  The minimum length of the post is equal to the length of the clinical crown. The recommended length is two-thirds the length of the root in bone while maintaining 5 mm of gutta-percha at the apex. Remember chances of a perforation increase as the length of the post approaches the apex of the tooth.
The prefabricated posts are inserted into the canals.  In this case a precious metal post is being used in the lingual canal because the canal diameter is only equivalent to a brown sized Parapost (Gates #3 - see table).  The precious metal posts are issued from the Dispensing Window, and require an additional fee.
  An assistant holds the Duralay powder, liquid, and suction - while the core portion is made in resin.  First lubricate the remaining tooth structure with a water soluble lubricant (Surgilube) then apply the resin.   The assistant may move the suction near the resin, evaporating monomer from its surface, thus preventing the resin from slumping or running.
The completed resin core is allowed to polymerize - then it is prepared to the shape of an ideal crown preparation
Using conventional diamond instruments, water and suction, the resin core is prepared in the same manner as a conventional preparation
The preparation is completed to ideal form and in this case its path of insertion is aligned with the preparation of tooth #11
The completed post & core pattern is submitted to the Service Laboratory for investing & casting in gold alloy.
The casting is cleaned and sandblasted with alumina oxide in preparation for try-in, shaping, and cementation.  The canals are dried and the casting inserted using light pressure.  Small shiny marks on the casting surface help indicate where adjustment should be made.
The completed post is cemented

Post and core

  • 1.
    Restoration of endodonticallytreated teeth Composite / amalgam restoration Crown – metal / ceramic
  • 2.
    A postand core is a dental restoration used to sufficiently build-up tooth structure for future restoration i.e crown when there is not enough tooth structure to properly retain the crown.
  • 3.
    post is placedwithin the body of the root of a tooth that has already treated with root canal treatment. The core is the part of the restoration that shows out in the mouth that help anchor a cap or crown
  • 4.
    Principles of toothpreparation Conservation of tooth structure Retention form Resistance form
  • 5.
    Conservation of toothstructure -canal preparation-enlargement of canal should exceed about 1-2 additional file sizes beyond the largest size used. Coronal part preparation- removal of undercuts and ferrule (extension of axial wall of the crown apical to the missing tooth structure)
  • 6.
    Retention form Postlength Post diameter Surface texture Luting agent
  • 7.
    Post length Greaterpost length=greater retention 2/3 length of root / post length should equal crown length Maintain 3 – 5mm apical seal
  • 8.
    Post diameter Shouldn'texceed 1/3 diameter of the root A minimum of 1 mm of sound dentin should be maintained circumferentially
  • 9.
    SURFACE TEXTURE Serratedor roughened post is greater retentive than smooth post LUTING AGENT Znpo4,Resin and GIC are greater to other cements
  • 10.
    Resistance form Postdesign influences the stress distribution and in turn resistance -post length -parallel posts -threaded posts produce stress conc. -cement layer results in better stress distribution -sharp angles -rotational resistance
  • 11.
    Post and coresystems Custom post and core – mainly used in flared canals,elliptical crossection canals ,multiple canal teeth Prefabricated – circular crossection canals
  • 12.
    Steps in toothpreparation Removal of RC filling material Enlargement of the canal Preparation of coronal tooth structure
  • 13.
  • 14.
    Eliminate weaker residualwalls, clean up the cavity, preserving all healthy dentine
  • 15.
    Prepare the rootcanal according to your usual procedure (Gates,paesso reamers ] the post is chosen according to the canal's diameter, not to the root's.
  • 16.
    Prepare the compositebonding cement, coat the post Insert it immediately into the canal
  • 17.
    Fit the coreform boxing system Fill up with the core composite while pressing and polymerize
  • 18.
    Custom cast postsystem Direct technique Indirect technique
  • 19.
    Remove any weak,thin, and/or unsupported tooth structure. Direct technique
  • 20.
    Using progressively largerdiameter Pesso reamers remove the gutta percha to the predetermined initial depth Repeat this process as necessary leaving 4-5 mm of gutta percha as an apical seal.
  • 21.
    Add a keywayto resist rotation of the post/core. Place the keyway in the bulkiest part of the remaining tooth structure.
  • 22.
    Try-in the preformedplastic post and be sure it goes all the way down the prepared canal without binding (a totally passive fit). Trim it as necessary. Measure the post relative to the depth of the canal with a periodontal probe
  • 23.
    Lubricate the canalwith Duralay lubricant Using the "bead brush" technique, fill the canal completely with Duralay resin. Use the bristles of a brush (bent at a 45 degree angle for easier access) to force acrylic down the canal and express any trapped air
  • 24.
    Immediately, dip theplastic post in acrylic liquid (to soften post and enhance bond of acrylic) and seat it in the canal to its full depth. Move the post up and down in the canal 1-2 mm (only after the Duralay is nearly set) to avoid getting it "locked in."
  • 25.
    Using hemostats, carefullyremove the post pattern and inspect it to be sure it is fully formed (with no voids).
  • 26.
    Cut off thetop of the plastic post so that your patient can close completely
  • 27.
    Using a largediameter coarse diamond (high speed handpiece at "near stall" speed with water spray), shape the pattern to ideal preparation form (on the tooth).
  • 28.
    Using hemostats (heldmesiodistally), remove the pattern from the tooth. The pattern should not be removed (except one time to check that the post portion is fully formed) until it is completed. There is the risk of breakage each additional time the pattern is removed.
  • 29.
    Indirect technique ofmaking custom post and core
  • 30.
    Post and core The tooth is prepared prior to the pattern fabrication. A heated endodontic condensor is used to safely remove the gutta percha (this is best accomplished at the same time the endodontic therapy is rendered). Gates & Parapost drills are used to shape the canals to an appropriate size and depth. The most common sizes used are Brown Yellow and Red (see the table below).
  • 31.
    Theminimum length of the post is equal to the length of the clinical crown. The recommended length is two-thirds the length of the root in bone while maintaining 5 mm of gutta-percha at the apex. Remember chances of a perforation increase as the length of the post approaches the apex of the tooth.
  • 32.
    The prefabricated postsare inserted into the canals.  In this case a precious metal post is being used in the lingual canal because the canal diameter is only equivalent to a brown sized Parapost (Gates #3 - see table).  The precious metal posts are issued from the Dispensing Window, and require an additional fee.
  • 33.
    Anassistant holds the Duralay powder, liquid, and suction - while the core portion is made in resin.  First lubricate the remaining tooth structure with a water soluble lubricant (Surgilube) then apply the resin.   The assistant may move the suction near the resin, evaporating monomer from its surface, thus preventing the resin from slumping or running.
  • 34.
    The completed resincore is allowed to polymerize - then it is prepared to the shape of an ideal crown preparation
  • 35.
    Using conventional diamondinstruments, water and suction, the resin core is prepared in the same manner as a conventional preparation
  • 36.
    The preparation iscompleted to ideal form and in this case its path of insertion is aligned with the preparation of tooth #11
  • 37.
    The completed post& core pattern is submitted to the Service Laboratory for investing & casting in gold alloy.
  • 38.
    The casting iscleaned and sandblasted with alumina oxide in preparation for try-in, shaping, and cementation.  The canals are dried and the casting inserted using light pressure.  Small shiny marks on the casting surface help indicate where adjustment should be made.
  • 39.
    The completed postis cemented