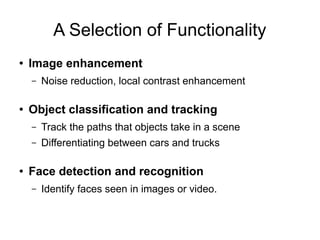
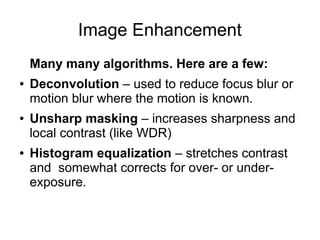
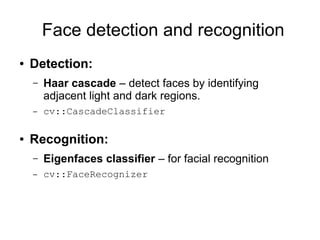
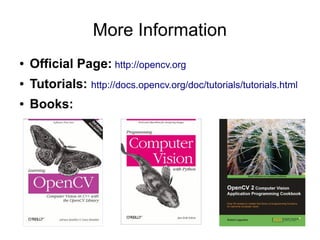
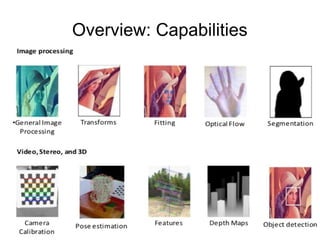
(Open Source Computer Vision)
Outline
●

Overview and practical issues.

●

A selection of OpenCV functionality:
–
–

Object classification and tracking

–

●

Image enhancement
Face detection and recognition

Conclusion and further resources.
Overview: Capabilities
Overview: License
●

BSD Licensed (free and open source)

●

May be used in commercial software.

●

No requirement to publish the source!

●

Must acknowledge OpenCV was used in the
documentation by including its copyright notice.
Note: There is a C#/.NET wrapper for OpenCV
called “Emgu CV” that may be commercially
licensed.
Overview: Patents

●

Note: A couple of algorithms (SIFT and SURF)
that are implemented are patented.
–

You can't accidentally use them because they are in
a separate module called “nonfree”.
Overview: Users

●

Stitching street-view images together,

●

Detecting intrusions in surveillance video in Israel

●

Detection of swimming pool drowning accidents in
Europe
Overview: Environment

Primary API
is C++

Leverages
ARM NEON
Overview: Installation
●

Ubuntu VM:
–

●

sudo apt-get install libopencv-dev

Windows:
–

Download latest version from http://opencv.org/
For Python:
●
●
●

Also install Python from http://www.python.org/
Install numpy module
Copy the “cv2” module from OpenCV to
C:Python27Libsite-packages
Overview: Hello World
Makefile
CC=g++
CFLAGS+=-std=c++0x `pkg-config
opencv --cflags`
LDFLAGS+=`pkg-config opencv
--libs`
PROG=hello
OBJS=$(PROG).o
.PHONY: all clean
$(PROG): $(OBJS)
$(CC) -o $(PROG).out $
(OBJS) $(LDFLAGS)

hello.cpp
#include <opencv2/core/core.hpp>
#include <opencv2/highgui/highgui.hpp>
#include <iostream>
int main()
{
cv::Mat image = cv::imread("lena.bmp");
if (image.empty())
{
std::cerr << "Could not load image";
return 1;
}

%.o: %.cpp
$(CC) -c $(CFLAGS) $<
all: $(PROG)
clean:
rm -f $(OBJS) $(PROG)

}

cv::namedWindow("Image");
cv::imshow("Image", image);
cv::waitKey();
return 0;
Overview: Hello World
hello.cpp

#include <opencv2/core/core.hpp>
#include <opencv2/highgui/highgui.hpp>
#include <iostream>
int main()
{
cv::Mat image = cv::imread("lena.bmp");
if (image.empty())
{
std::cerr << "Could not load image";
return 1;
}

}

cv::namedWindow("Image");
cv::imshow("Image", image);
cv::waitKey();
return 0;
Overview: Hello World
hello.cpp

#include
#include
#include
#include

<opencv2/core/core.hpp>
<opencv2/imgproc/imgproc.hpp>
<opencv2/highgui/highgui.hpp>
<iostream>

int main()
{
cv::Mat image = cv::imread("lena.bmp");
if (image.empty())
{
std::cerr << "Could not load image";
return 1;
}
cv::blur(image, image, cv::Size(10, 10));

}

cv::namedWindow("Image");
cv::imshow("Image", image);
cv::waitKey();
return 0;

Add a filter to blur
the image before
displaying it.
Overview: Hello World
hello.cpp

#include
#include
#include
#include

<opencv2/core/core.hpp>
<opencv2/imgproc/imgproc.hpp>
<opencv2/highgui/highgui.hpp>
<iostream>

int main()
{
cv::Mat image = cv::imread("lena.bmp");
if (image.empty())
{
std::cerr << "Could not load image";
return 1;
}
cv::blur(image, image, cv::Size(10, 10));

}

cv::namedWindow("Image");
cv::imshow("Image", image);
cv::waitKey();
return 0;
Python: Display an image file
import cv2
image = cv2.imread("lena.bmp");
if image.empty():
print "Could not load image"
exit(1)
cv2.namedWindow("Image")
cv2.imshow("Image", image)
cv2.waitKey()

Similar structure
and naming as C++
version means
Python is good for
prototyping.
Video from IP camera w/ RTSP!
#include <opencv/cxcore.h>
#include <opencv/highgui.h>
int main(int argc, char* argv[])
{
cv::Ptr<CvCapture> capture = cvCaptureFromFile(
"rtsp://admin:admin@10.10.32.33/video");
cv::namedWindow("Frame");
for (;;)
{
cv::Mat frame = cvQueryFrame(capture);
cv::imshow("Frame", frame);
if (cv::waitKey(1) >= 0)
break;
}
return 0;
}

Network comm.,
RTSP protocol, etc.
is all handled for you
so all you have to do
is process each
frame as an image
(a cv::Mat object).
A Selection of Functionality
●

Image enhancement
–

●

Noise reduction, local contrast enhancement

Object classification and tracking
–
–

●

Track the paths that objects take in a scene
Differentiating between cars and trucks

Face detection and recognition
–

Identify faces seen in images or video.
Image Enhancement
Many many algorithms. Here are a few:
●

●

●

Deconvolution – used to reduce focus blur or
motion blur where the motion is known.
Unsharp masking – increases sharpness and
local contrast (like WDR)
Histogram equalization – stretches contrast
and somewhat corrects for over- or underexposure.
Image Enhancement: Demo!
●

Deconvolution – Reducing motion blur below
where the motion is known.
Image Enhancement: Demo!
●

Deconvolution – Can also be used for poor
camera focus, but the parameters of the blur
must be estimated in advance.
Image Enhancement: Demo!
●

Deconvolution – Can also be used for poor
camera focus, but the parameters of the blur
must be estimated in advance.

Generated using OpenCV example:

/opencv/samples/python2/deconvolution.py
Image Enhancement
●

Histogram equalization: equalizeHist(img,

out)
Image Enhancement
●

Histogram equalization: equalizeHist(img,

Increases the
range of intensities
in an image, thereby
increasing contrast.

out)
Object detection and tracking
●

Foreground/background segmentation –
identify objects moving in a scene.
–

●

Histogram backprojection – identify objects by
their colour (even if they're not moving).
–

●

cv::BackgroundSubtractorMOG2

cv::calcBackProject()

Camshift tracking – track objects by their colour.
–

cv::CamShift
Face Detection and Recognition
Face detection and recognition
●

Detection:
–
–

●

Haar cascade – detect faces by identifying
adjacent light and dark regions.
cv::CascadeClassifier

Recognition:
–

Eigenfaces classifier – for facial recognition

–

cv::FaceRecognizer
Face detection: C++
cv::CascadeClassifier profileFaceCascade;
profileFaceCascade.load("haarcascade_profileface.xml");
std::vector<cv::Rect> faceRects;
profileFaceCascade.detectMultiScale(image, faceRects);
cv::Mat foundFacesImage = image.clone();
for (std::vector<cv::Rect>::const_iterator rect =
faceRects.begin(); rect != faceRects.end(); ++ rect)
{
cv::rectangle(foundFacesImage, *rect,
cv::Scalar(0, 0, 255), 3);
}
cv::namedWindow("Faces");
cv::imshow("Faces", foundFacesImage);
cv::waitKey();
Face detection: C++
cv::CascadeClassifier profileFaceCascade;
profileFaceCascade.load("haarcascade_profileface.xml");
std::vector<cv::Rect> faceRects;
profileFaceCascade.detectMultiScale(image, faceRects); with
OpenCV comes

other classifier XML
cv::Mat foundFacesImage = image.clone();
files for detecting other
for (std::vector<cv::Rect>::const_iterator rect (e.g eyes,
things =
faceRects.begin(); rect != faceRects.end(); ++ rect)
glasses, profile faces)
{
}

cv::rectangle(foundFacesImage, *rect,
cv::Scalar(0, 0, 255), 3);

cv::namedWindow("Faces");
cv::imshow("Faces", foundFacesImage);
cv::waitKey();
Face detection
●

Can be defeated with makeup...
Face detection
●

... or with special glasses containing IR LEDs.
Conclusion
●

●
●

●

OpenCV is for image/video processing and
computer vision.
Free and open source (BSD licensed)
Cross-platform and actively developed (also
downloaded over 3 million times)!
This presentation covered just a few of the over
2,000 algorithms available in OpenCV.
More Information
●

Official Page: http://opencv.org

●

Tutorials: http://docs.opencv.org/doc/tutorials/tutorials.html

●

Books:

OpenCV Introduction

  • 1.
  • 2.
    Outline ● Overview and practicalissues. ● A selection of OpenCV functionality: – – Object classification and tracking – ● Image enhancement Face detection and recognition Conclusion and further resources.
  • 3.
  • 4.
    Overview: License ● BSD Licensed(free and open source) ● May be used in commercial software. ● No requirement to publish the source! ● Must acknowledge OpenCV was used in the documentation by including its copyright notice. Note: There is a C#/.NET wrapper for OpenCV called “Emgu CV” that may be commercially licensed.
  • 5.
    Overview: Patents ● Note: Acouple of algorithms (SIFT and SURF) that are implemented are patented. – You can't accidentally use them because they are in a separate module called “nonfree”.
  • 6.
    Overview: Users ● Stitching street-viewimages together, ● Detecting intrusions in surveillance video in Israel ● Detection of swimming pool drowning accidents in Europe
  • 7.
  • 8.
  • 9.
    Overview: Installation ● Ubuntu VM: – ● sudoapt-get install libopencv-dev Windows: – Download latest version from http://opencv.org/ For Python: ● ● ● Also install Python from http://www.python.org/ Install numpy module Copy the “cv2” module from OpenCV to C:Python27Libsite-packages
  • 10.
    Overview: Hello World Makefile CC=g++ CFLAGS+=-std=c++0x`pkg-config opencv --cflags` LDFLAGS+=`pkg-config opencv --libs` PROG=hello OBJS=$(PROG).o .PHONY: all clean $(PROG): $(OBJS) $(CC) -o $(PROG).out $ (OBJS) $(LDFLAGS) hello.cpp #include <opencv2/core/core.hpp> #include <opencv2/highgui/highgui.hpp> #include <iostream> int main() { cv::Mat image = cv::imread("lena.bmp"); if (image.empty()) { std::cerr << "Could not load image"; return 1; } %.o: %.cpp $(CC) -c $(CFLAGS) $< all: $(PROG) clean: rm -f $(OBJS) $(PROG) } cv::namedWindow("Image"); cv::imshow("Image", image); cv::waitKey(); return 0;
  • 11.
    Overview: Hello World Makefile CC=g++ CFLAGS+=-std=c++0x`pkg-config opencv --cflags` LDFLAGS+=`pkg-config opencv --libs` PROG=hello OBJS=$(PROG).o .PHONY: all clean $(PROG): $(OBJS) $(CC) -o $(PROG).out $ (OBJS) $(LDFLAGS) hello.cpp #include <opencv2/core/core.hpp> #include <opencv2/highgui/highgui.hpp> #include <iostream> int main() { cv::Mat image = cv::imread("lena.bmp"); if (image.empty()) { std::cerr << "Could not load image"; return 1; } %.o: %.cpp $(CC) -c $(CFLAGS) $< all: $(PROG) clean: rm -f $(OBJS) $(PROG) } cv::namedWindow("Image"); cv::imshow("Image", image); cv::waitKey(); return 0;
  • 12.
    Overview: Hello World hello.cpp #include<opencv2/core/core.hpp> #include <opencv2/highgui/highgui.hpp> #include <iostream> int main() { cv::Mat image = cv::imread("lena.bmp"); if (image.empty()) { std::cerr << "Could not load image"; return 1; } } cv::namedWindow("Image"); cv::imshow("Image", image); cv::waitKey(); return 0;
  • 13.
    Overview: Hello World hello.cpp #include #include #include #include <opencv2/core/core.hpp> <opencv2/imgproc/imgproc.hpp> <opencv2/highgui/highgui.hpp> <iostream> intmain() { cv::Mat image = cv::imread("lena.bmp"); if (image.empty()) { std::cerr << "Could not load image"; return 1; } cv::blur(image, image, cv::Size(10, 10)); } cv::namedWindow("Image"); cv::imshow("Image", image); cv::waitKey(); return 0; Add a filter to blur the image before displaying it.
  • 14.
    Overview: Hello World hello.cpp #include #include #include #include <opencv2/core/core.hpp> <opencv2/imgproc/imgproc.hpp> <opencv2/highgui/highgui.hpp> <iostream> intmain() { cv::Mat image = cv::imread("lena.bmp"); if (image.empty()) { std::cerr << "Could not load image"; return 1; } cv::blur(image, image, cv::Size(10, 10)); } cv::namedWindow("Image"); cv::imshow("Image", image); cv::waitKey(); return 0;
  • 15.
    Python: Display animage file import cv2 image = cv2.imread("lena.bmp"); if image.empty(): print "Could not load image" exit(1) cv2.namedWindow("Image") cv2.imshow("Image", image) cv2.waitKey() Similar structure and naming as C++ version means Python is good for prototyping.
  • 16.
    Video from IPcamera w/ RTSP! #include <opencv/cxcore.h> #include <opencv/highgui.h> int main(int argc, char* argv[]) { cv::Ptr<CvCapture> capture = cvCaptureFromFile( "rtsp://admin:admin@10.10.32.33/video"); cv::namedWindow("Frame"); for (;;) { cv::Mat frame = cvQueryFrame(capture); cv::imshow("Frame", frame); if (cv::waitKey(1) >= 0) break; } return 0; } Network comm., RTSP protocol, etc. is all handled for you so all you have to do is process each frame as an image (a cv::Mat object).
  • 17.
    A Selection ofFunctionality ● Image enhancement – ● Noise reduction, local contrast enhancement Object classification and tracking – – ● Track the paths that objects take in a scene Differentiating between cars and trucks Face detection and recognition – Identify faces seen in images or video.
  • 18.
    Image Enhancement Many manyalgorithms. Here are a few: ● ● ● Deconvolution – used to reduce focus blur or motion blur where the motion is known. Unsharp masking – increases sharpness and local contrast (like WDR) Histogram equalization – stretches contrast and somewhat corrects for over- or underexposure.
  • 19.
    Image Enhancement: Demo! ● Deconvolution– Reducing motion blur below where the motion is known.
  • 20.
    Image Enhancement: Demo! ● Deconvolution– Can also be used for poor camera focus, but the parameters of the blur must be estimated in advance.
  • 21.
    Image Enhancement: Demo! ● Deconvolution– Can also be used for poor camera focus, but the parameters of the blur must be estimated in advance. Generated using OpenCV example: /opencv/samples/python2/deconvolution.py
  • 22.
  • 23.
    Image Enhancement ● Histogram equalization:equalizeHist(img, Increases the range of intensities in an image, thereby increasing contrast. out)
  • 24.
    Object detection andtracking ● Foreground/background segmentation – identify objects moving in a scene. – ● Histogram backprojection – identify objects by their colour (even if they're not moving). – ● cv::BackgroundSubtractorMOG2 cv::calcBackProject() Camshift tracking – track objects by their colour. – cv::CamShift
  • 25.
    Face Detection andRecognition
  • 26.
    Face detection andrecognition ● Detection: – – ● Haar cascade – detect faces by identifying adjacent light and dark regions. cv::CascadeClassifier Recognition: – Eigenfaces classifier – for facial recognition – cv::FaceRecognizer
  • 27.
    Face detection: C++ cv::CascadeClassifierprofileFaceCascade; profileFaceCascade.load("haarcascade_profileface.xml"); std::vector<cv::Rect> faceRects; profileFaceCascade.detectMultiScale(image, faceRects); cv::Mat foundFacesImage = image.clone(); for (std::vector<cv::Rect>::const_iterator rect = faceRects.begin(); rect != faceRects.end(); ++ rect) { cv::rectangle(foundFacesImage, *rect, cv::Scalar(0, 0, 255), 3); } cv::namedWindow("Faces"); cv::imshow("Faces", foundFacesImage); cv::waitKey();
  • 28.
    Face detection: C++ cv::CascadeClassifierprofileFaceCascade; profileFaceCascade.load("haarcascade_profileface.xml"); std::vector<cv::Rect> faceRects; profileFaceCascade.detectMultiScale(image, faceRects); with OpenCV comes other classifier XML cv::Mat foundFacesImage = image.clone(); files for detecting other for (std::vector<cv::Rect>::const_iterator rect (e.g eyes, things = faceRects.begin(); rect != faceRects.end(); ++ rect) glasses, profile faces) { } cv::rectangle(foundFacesImage, *rect, cv::Scalar(0, 0, 255), 3); cv::namedWindow("Faces"); cv::imshow("Faces", foundFacesImage); cv::waitKey();
  • 29.
    Face detection ● Can bedefeated with makeup...
  • 30.
    Face detection ● ... orwith special glasses containing IR LEDs.
  • 31.
    Conclusion ● ● ● ● OpenCV is forimage/video processing and computer vision. Free and open source (BSD licensed) Cross-platform and actively developed (also downloaded over 3 million times)! This presentation covered just a few of the over 2,000 algorithms available in OpenCV.
  • 32.
    More Information ● Official Page:http://opencv.org ● Tutorials: http://docs.opencv.org/doc/tutorials/tutorials.html ● Books: