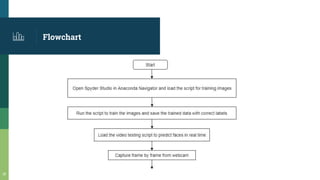
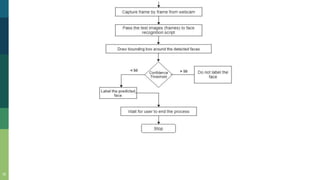
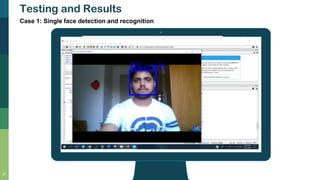
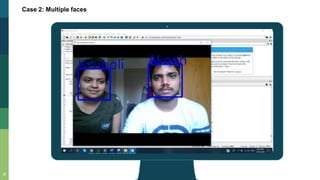
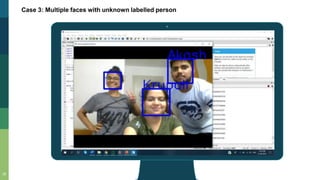
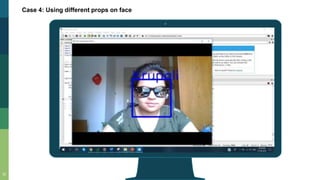
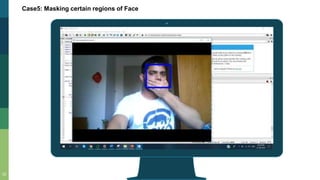
Real Time Facial
Recognition using
Open CV and Python
(using Laptop’s Webcam)
Master’s EMM – Computer Vision Project
👦
Presented By:
• Akash Satamkar (31672)
• Krupali Rana (31668)
Under guidance of : Prof. Dr. Stefan Elser.
Introduction
• Implementation of Face Detection and Recognition by simply
using Laptop’s Webcam.
• Real Time face detection using Face Detection algorithm to
visualize human faces in Digital image.
• We are using video feed from a webcam which are a sequence of
frames of still images being updated one after the other to
recognize and predict faces.
2
Goals
3
• To train the image dataset and store them with proper
faceID.
• Passing the frames captured by webcam one by one to
detect faces.
• Depending upon the confidence level, determine
whether to label the predicted face or not.
• Validating the test results with multiple test cases.
• Improving the training data with larger data sets of
images.
Software Analysis
4
• Anaconda IDE
• SpyDer studio with Python 3.7
version
• Open CV libraries
Haar Cascade Classifier
▪ Haar feature based classifier is a machine learning
based approach
▪ Detect objects in images
▪ Train a lot of Positive and negative images
▪ The haarcascade_frontalface_default.xml is a haar
cascade designed by OpenCV to detect the frontal
face
5
Positive and Negative images
▪ Positive face example images provide a lot of variations. It
manually crops and normalize each face into a standard
size
▪ Negative non face examples are images that don’t contain
faces. They are taken from arbitrary images which do not
contain the object you want to detect.
6
Positive face set of images
Negative non face set of images
Computation of Features
detectMultiscale() Module
- To create rectangle around the faces
detected in image.
Parameters :
scaleFactor = Adjust the size of image
minNeighbors = Specify how many
neighbors person can have
Cascade of Classifiers
Features are grouped together into stages
of classifiers.
If a window fails at 1st stage , it is discarded.
Else it is passed to 2nd stage of features.
The window which passes all stages is face
region.
7
LBPH Algorithm
8
• Local Binary Pattern is simple but
efficient texture operator.
• It is combined with HOG (Histogram of
Gradients) to recognize faces in image.
It uses 4 parameters : {Radius, Neighbours, Grid X, Grid Y }
LBP Operation:
It uses sliding window concept based on
parameters Radius and Neighbours.
9
Image Reference : https://towardsdatascience.com/face-recognition-how-lbph-works-90ec258c3d6b
• Extracting a portion of this grayscale image (3 x 3 pixels)
• Represented in a matrix of 3 x 3 of pixel intensities with each pixel intensity in range (0 – 255)
• Using centre value as threshold and perform thresholding. (0 = < threshold, 1 = > threshold)
• Obtain binary values and concatenate in clockwise manner.
• Convert binary value to decimal value and set it to centre value.
• In the end , we have obtained a new image with better characteristics.
10
Image Reference : https://towardsdatascience.com/face-recognition-how-lbph-works-90ec258c3d6b
LBP combined with Histogram to predict faces:
• Now we divide the new image generated into grids with Grid X and Grid Y parameters.
• Obtain the histogram of each grid .
• Now concatenate the individual histograms to obtain a new and bigger histogram.
• The final histogram represents characteristics of original image.
• The algorithm is trained and each histogram is used to represent each image of training
dataset.
• We compare the two histograms and return the image with closest histogram.
• The output is the ID with closest match and the calculated Euclidean distance can be a
confidence measurement.
▪ Confidence level :
The lower the value of confidence the better is the match which means the distance
between two histograms is closer.
Then we can use this confidence level to predict the face by defining the threshold.
This method is illumination invariant in nature.
Robust method to represent local features in image
11
12
Some important OpenCV functions :
1. FaceDetection function
2. Label for training data function
13
3. Draw Rectangle function
4. Put Text function
5. Train Classifier function
Our Process is easy
Creating Dataset
Creating two subdirectories
and loading them with set of
individual images for
training.
Training Dataset
Training the dataset
using LBPH algorithm
and save the trained
data into “.yml” file.
Predicting Faces in
Real time
Loading the trained data
file and predicting faces
frame by frame and label
them.
14
Flowchart
15
16
Place your screenshot here
Testing and Results
17
Case 1: Single face detection and recognition
Place your screenshot here
Case 2: Multiple faces
18
Place your screenshot here
Case 3: Multiple faces with unknown labelled person
19
Place your screenshot here
Case 4: Using different props on face
20
Place your screenshot here
Case 4: Using different props on face
21
Place your screenshot here
Case5: Masking certain regions of Face
22
Further Enhancements
23
• The training dataset can be improved by including
more no. of sample images.
• We can further implement CNN (Convolution Neural
Networks) using TensorFlow for better Face
Recognition.
References
▪ Working of LBPH : https://towardsdatascience.com/face-recognition-how-lbph-works-
90ec258c3d6b
▪ Article on face detection basics : https://www.datacamp.com/community/tutorials/face-
detection-python-opencv
▪ Link for downloading Anaconda package - https://www.anaconda.com/distribution/
▪ Link for Basics of Haar Cascade classifier-
https://docs.opencv.org/3.4.1/d7/d8b/tutorial_py_face_detection.html
▪ https://www.learnopencv.com/face-detection-opencv-dlib-and-deep-learning-c-python/
24
THANKS!
Any questions?
25
😉

Computer Vision - Real Time Face Recognition using Open CV and Python

  • 1.
    Real Time Facial Recognitionusing Open CV and Python (using Laptop’s Webcam) Master’s EMM – Computer Vision Project 👦 Presented By: • Akash Satamkar (31672) • Krupali Rana (31668) Under guidance of : Prof. Dr. Stefan Elser.
  • 2.
    Introduction • Implementation ofFace Detection and Recognition by simply using Laptop’s Webcam. • Real Time face detection using Face Detection algorithm to visualize human faces in Digital image. • We are using video feed from a webcam which are a sequence of frames of still images being updated one after the other to recognize and predict faces. 2
  • 3.
    Goals 3 • To trainthe image dataset and store them with proper faceID. • Passing the frames captured by webcam one by one to detect faces. • Depending upon the confidence level, determine whether to label the predicted face or not. • Validating the test results with multiple test cases. • Improving the training data with larger data sets of images.
  • 4.
    Software Analysis 4 • AnacondaIDE • SpyDer studio with Python 3.7 version • Open CV libraries
  • 5.
    Haar Cascade Classifier ▪Haar feature based classifier is a machine learning based approach ▪ Detect objects in images ▪ Train a lot of Positive and negative images ▪ The haarcascade_frontalface_default.xml is a haar cascade designed by OpenCV to detect the frontal face 5
  • 6.
    Positive and Negativeimages ▪ Positive face example images provide a lot of variations. It manually crops and normalize each face into a standard size ▪ Negative non face examples are images that don’t contain faces. They are taken from arbitrary images which do not contain the object you want to detect. 6 Positive face set of images Negative non face set of images
  • 7.
    Computation of Features detectMultiscale()Module - To create rectangle around the faces detected in image. Parameters : scaleFactor = Adjust the size of image minNeighbors = Specify how many neighbors person can have Cascade of Classifiers Features are grouped together into stages of classifiers. If a window fails at 1st stage , it is discarded. Else it is passed to 2nd stage of features. The window which passes all stages is face region. 7
  • 8.
    LBPH Algorithm 8 • LocalBinary Pattern is simple but efficient texture operator. • It is combined with HOG (Histogram of Gradients) to recognize faces in image. It uses 4 parameters : {Radius, Neighbours, Grid X, Grid Y } LBP Operation: It uses sliding window concept based on parameters Radius and Neighbours.
  • 9.
    9 Image Reference :https://towardsdatascience.com/face-recognition-how-lbph-works-90ec258c3d6b • Extracting a portion of this grayscale image (3 x 3 pixels) • Represented in a matrix of 3 x 3 of pixel intensities with each pixel intensity in range (0 – 255) • Using centre value as threshold and perform thresholding. (0 = < threshold, 1 = > threshold) • Obtain binary values and concatenate in clockwise manner. • Convert binary value to decimal value and set it to centre value. • In the end , we have obtained a new image with better characteristics.
  • 10.
    10 Image Reference :https://towardsdatascience.com/face-recognition-how-lbph-works-90ec258c3d6b LBP combined with Histogram to predict faces: • Now we divide the new image generated into grids with Grid X and Grid Y parameters. • Obtain the histogram of each grid . • Now concatenate the individual histograms to obtain a new and bigger histogram. • The final histogram represents characteristics of original image.
  • 11.
    • The algorithmis trained and each histogram is used to represent each image of training dataset. • We compare the two histograms and return the image with closest histogram. • The output is the ID with closest match and the calculated Euclidean distance can be a confidence measurement. ▪ Confidence level : The lower the value of confidence the better is the match which means the distance between two histograms is closer. Then we can use this confidence level to predict the face by defining the threshold. This method is illumination invariant in nature. Robust method to represent local features in image 11
  • 12.
    12 Some important OpenCVfunctions : 1. FaceDetection function 2. Label for training data function
  • 13.
    13 3. Draw Rectanglefunction 4. Put Text function 5. Train Classifier function
  • 14.
    Our Process iseasy Creating Dataset Creating two subdirectories and loading them with set of individual images for training. Training Dataset Training the dataset using LBPH algorithm and save the trained data into “.yml” file. Predicting Faces in Real time Loading the trained data file and predicting faces frame by frame and label them. 14
  • 15.
  • 16.
  • 17.
    Place your screenshothere Testing and Results 17 Case 1: Single face detection and recognition
  • 18.
    Place your screenshothere Case 2: Multiple faces 18
  • 19.
    Place your screenshothere Case 3: Multiple faces with unknown labelled person 19
  • 20.
    Place your screenshothere Case 4: Using different props on face 20
  • 21.
    Place your screenshothere Case 4: Using different props on face 21
  • 22.
    Place your screenshothere Case5: Masking certain regions of Face 22
  • 23.
    Further Enhancements 23 • Thetraining dataset can be improved by including more no. of sample images. • We can further implement CNN (Convolution Neural Networks) using TensorFlow for better Face Recognition.
  • 24.
    References ▪ Working ofLBPH : https://towardsdatascience.com/face-recognition-how-lbph-works- 90ec258c3d6b ▪ Article on face detection basics : https://www.datacamp.com/community/tutorials/face- detection-python-opencv ▪ Link for downloading Anaconda package - https://www.anaconda.com/distribution/ ▪ Link for Basics of Haar Cascade classifier- https://docs.opencv.org/3.4.1/d7/d8b/tutorial_py_face_detection.html ▪ https://www.learnopencv.com/face-detection-opencv-dlib-and-deep-learning-c-python/ 24
  • 25.