What is OpenCVLibrary?
OpenCV, short for Open Source
Computer Vision Library, is an open-
source computer vision and machine
learning software library. Originally
developed by Intel, it is now
maintained by a community of
developers under the OpenCV
Foundation
Opencv is ahuge open-source library
for computer vision, machine learning,
and image processing. Now, it plays a
major role in real-time operation which
is very important in today’s systems. By
using it, one can process images and
videos to identify objects, faces, or
even the handwriting of a human
5.
When it isintegrated with various
libraries, such as NumPy, python
is capable of processing the
opencv array structure for analysis.
To Identify an image pattern and its
various features we use vector
space and perform mathematical
operations on these features
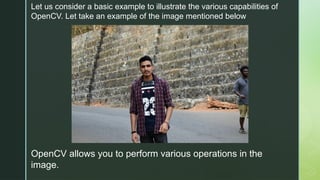
Let us considera basic example to illustrate the various capabilities of
OpenCV. Let take an example of the image mentioned below
OpenCV allows you to perform various operations in the
image.
8.
• Read theImage : OpenCV helps you to read the image fro file
or directly from camera to make it accessible for further
processing.
• Image Enhancement : You will be able to enhance image by
adjusting the brightness , sharpness or contract of the image.
This is helpful to visualize quality of the image.
• Object detection: As you can see in the below image object can
also be detected by using OpenCV , Bracelet , watch , patterns,
faces can be detected. This can also include to recognize faces ,
shapes or even objects .
• Image Filtering: You can change image by applying various
filters such as blurring or Sharpening.
• Draw the Image: OpenCV allows to draw text, lines and any
shapes in the images.
• Saving the Changed Images: After processing , You can save
images that are being modified for future analysis
9.
From the aboveoriginal image, lots of pieces of information that are
present in the original image can be obtained. Like in the above image
there are two faces available and the person(I) in the images is wearing a
bracelet, watch, etc. So with the help of OpenCV we can get all these types
of information from the original image.
10.
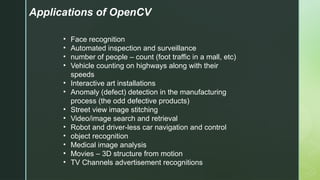
Applications of OpenCV
•Face recognition
• Automated inspection and surveillance
• number of people – count (foot traffic in a mall, etc)
• Vehicle counting on highways along with their
speeds
• Interactive art installations
• Anomaly (defect) detection in the manufacturing
process (the odd defective products)
• Street view image stitching
• Video/image search and retrieval
• Robot and driver-less car navigation and control
• object recognition
• Medical image analysis
• Movies – 3D structure from motion
• TV Channels advertisement recognitions
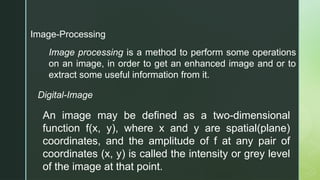
Image-Processing
Image processing isa method to perform some operations
on an image, in order to get an enhanced image and or to
extract some useful information from it.
Digital-Image
An image may be defined as a two-dimensional
function f(x, y), where x and y are spatial(plane)
coordinates, and the amplitude of f at any pair of
coordinates (x, y) is called the intensity or grey level
of the image at that point.
13.
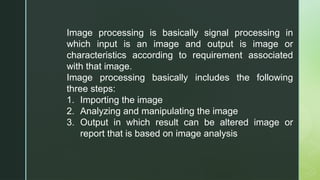
Image processing isbasically signal processing in
which input is an image and output is image or
characteristics according to requirement associated
with that image.
Image processing basically includes the following
three steps:
1. Importing the image
2. Analyzing and manipulating the image
3. Output in which result can be altered image or
report that is based on image analysis
14.
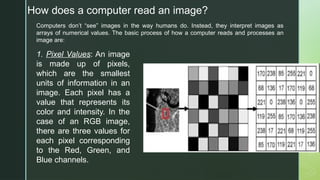
How does acomputer read an image?
Computers don’t “see” images in the way humans do. Instead, they interpret images as
arrays of numerical values. The basic process of how a computer reads and processes an
image are:
1. Pixel Values: An image
is made up of pixels,
which are the smallest
units of information in an
image. Each pixel has a
value that represents its
color and intensity. In the
case of an RGB image,
there are three values for
each pixel corresponding
to the Red, Green, and
Blue channels.
15.
2.Digital Representation: TheRGB values are usually represented as
integers ranging from 0 to 255. 0 represents the absence of color (black),
and 255 represents the maximum intensity of that color (full brightness).
16.
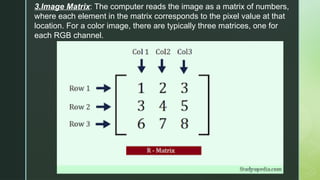
3.Image Matrix: Thecomputer reads the image as a matrix of numbers,
where each element in the matrix corresponds to the pixel value at that
location. For a color image, there are typically three matrices, one for
each RGB channel.
17.
4.Image Processing: Imageprocessing algorithms are applied
to manipulate these numerical representations. Common
operations include resizing, cropping, filtering, and more.
OpenCV is oneof the most popular computer vision libraries. If
you want to start your journey in the field of computer vision,
then a thorough understanding of the concepts of OpenCV is
of paramount importance. to understand the basic
functionalities of Python OpenCV module, we will cover the
most basic and important concepts of OpenCV intuitively:
1.Reading an image
2.Extracting the RGB values of a pixel
3.Extracting the Region of Interest (ROI)
4.Resizing the Image
5.Rotating the Image
6.Drawing a Rectangle
7.Displaying text
20.
Let’s start withthe simple task of reading an
image using OpenCV.
For the implementation, we need to install the
OpenCV library using the following command:
pip install opencv-
python
21.
Reading an Image
Firstof all, we will import cv2 module and then read the input image
using cv2’s imread() method. Then extract the height and width of
the image.
# Importing the OpenCV library
import cv2
# Reading the image using imread() function
image = cv2.imread('image.jpg')
# Extracting the height and width of an image
h, w = image.shape[:2]
# Displaying the height and width
print("Height = {}, Width = {}".format(h, w))
Height = 1603, Width = 2400
22.
Extracting the RGBValues of a Pixel
Now we will focus on extracting the RGB values of an individual pixel.
OpenCV arranges the channels in BGR order. So the 0th value will
correspond to the Blue pixel and not the Red.
# Extracting RGB values.
# Here we have randomly chosen a pixel
# by passing in 100, 100 for height and width.
(B, G, R) = image[100, 100]
# Displaying the pixel values
print("R = {}, G = {}, B = {}".format(R, G, B))
# We can also pass the channel to extract
# the value for a specific channel
B = image[100, 100, 0]
print("B = {}".format(B))
R = 211, G = 172, B = 165B = 165
23.
Extracting the Regionof Interest (ROI)
Sometimes we want to extract a particular part or region of an image. This can be
done by slicing the pixels of the image.
# We will calculate the region of interest
# by slicing the pixels of the image
roi = image[100 : 500, 200 : 700]
cv2.imshow("ROI", roi)
cv2.waitKey(0)
24.
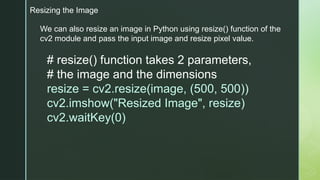
Resizing the Image
Wecan also resize an image in Python using resize() function of the
cv2 module and pass the input image and resize pixel value.
# resize() function takes 2 parameters,
# the image and the dimensions
resize = cv2.resize(image, (500, 500))
cv2.imshow("Resized Image", resize)
cv2.waitKey(0)
25.
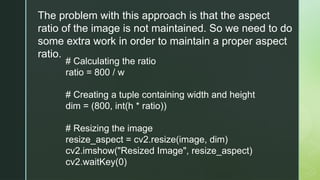
The problem withthis approach is that the aspect
ratio of the image is not maintained. So we need to do
some extra work in order to maintain a proper aspect
ratio.
# Calculating the ratio
ratio = 800 / w
# Creating a tuple containing width and height
dim = (800, int(h * ratio))
# Resizing the image
resize_aspect = cv2.resize(image, dim)
cv2.imshow("Resized Image", resize_aspect)
cv2.waitKey(0)
26.
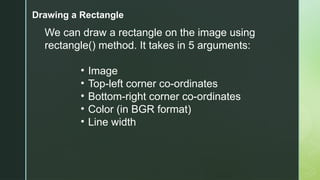
Drawing a Rectangle
Wecan draw a rectangle on the image using
rectangle() method. It takes in 5 arguments:
• Image
• Top-left corner co-ordinates
• Bottom-right corner co-ordinates
• Color (in BGR format)
• Line width
27.
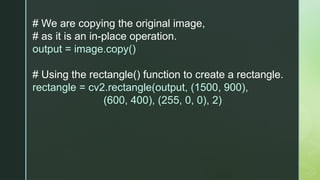
# We arecopying the original image,
# as it is an in-place operation.
output = image.copy()
# Using the rectangle() function to create a rectangle.
rectangle = cv2.rectangle(output, (1500, 900),
(600, 400), (255, 0, 0), 2)
28.
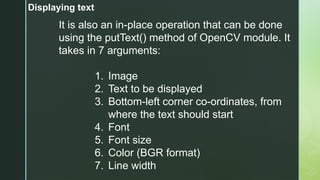
Displaying text
It isalso an in-place operation that can be done
using the putText() method of OpenCV module. It
takes in 7 arguments:
1. Image
2. Text to be displayed
3. Bottom-left corner co-ordinates, from
where the text should start
4. Font
5. Font size
6. Color (BGR format)
7. Line width
29.
# Copying theoriginal image
output = image.copy()
# Adding the text using putText() function
text = cv2.putText(output, 'OpenCV Demo', (500,
550),cv2.FONT_HERSHEY_SIMPLEX, 4, (255, 0,
0), 2)
31.
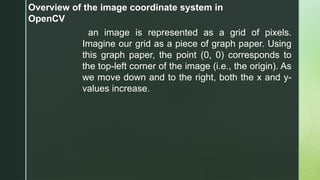
Overview of theimage coordinate system in
OpenCV
an image is represented as a grid of pixels.
Imagine our grid as a piece of graph paper. Using
this graph paper, the point (0, 0) corresponds to
the top-left corner of the image (i.e., the origin). As
we move down and to the right, both the x and y-
values increase.
32.
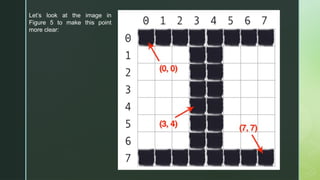
Let’s look atthe image in
Figure 5 to make this point
more clear:
34.
What is importcv2 in Python?
In Python, import cv2 is the
command used to import the
OpenCV library. Once installed, cv2
gives you access to all the
functions and classes that OpenCV
offers for image processing,
computer vision, and machine
learning tasks.
35.
How to Checkif OpenCV is Installed?
import cv2
# Check OpenCV version
print("OpenCV version:", cv2.__version__)
# Simple test to see if the library loads correctly
img = cv2.imread("path_to_an_image.jpg") # Replace
with an actual image path
if img is None:
print("Image not loaded correctly!")
else:
print("OpenCV is installed and working correctly!")
Reading an image
img= cv2.imread('LOCATION OF THE IMAGE')
The above function imread stores the image at the given location to the
variable img.
Converting an image to grayscale
img = cv2.imread('watch.jpg',cv2.IMREAD_GRAYSCALE)
The above function converts the image to grayscale and then stores it in
the variable img.
Showing the stored image
cv2.imshow('image',img)
The above function shows the image stored in img variable.
Save an image to a file
cv2.imwrite(filename, img)
The above function stores the image in the file. The image is stored in
the variable of type Mat that is in the form of a matrix.
38.
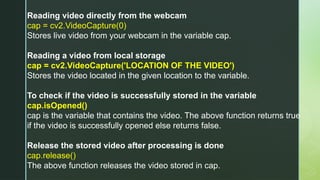
Reading video directlyfrom the webcam
cap = cv2.VideoCapture(0)
Stores live video from your webcam in the variable cap.
Reading a video from local storage
cap = cv2.VideoCapture('LOCATION OF THE VIDEO')
Stores the video located in the given location to the variable.
To check if the video is successfully stored in the variable
cap.isOpened()
cap is the variable that contains the video. The above function returns true
if the video is successfully opened else returns false.
Release the stored video after processing is done
cap.release()
The above function releases the video stored in cap.
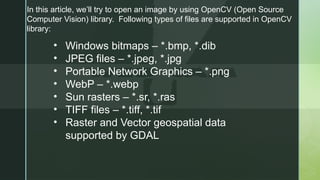
In this article,we’ll try to open an image by using OpenCV (Open Source
Computer Vision) library. Following types of files are supported in OpenCV
library:
• Windows bitmaps – *.bmp, *.dib
• JPEG files – *.jpeg, *.jpg
• Portable Network Graphics – *.png
• WebP – *.webp
• Sun rasters – *.sr, *.ras
• TIFF files – *.tiff, *.tif
• Raster and Vector geospatial data
supported by GDAL
41.
To use theOpenCV library in python, we need to install
these libraries as a prerequisite:
Numpy Library : The computer processes images in the
form of a matrix for which NumPy is used and OpenCV
uses it in the background.
OpenCV python : OpenCV library previously it was cv but
the updated version is cv2. It is used to manipulate images
and videos.
To install these libraries, we need to run these pip
commands in cmd:
pip install opencv-python
pip install numpy
pip install matplotlib
42.
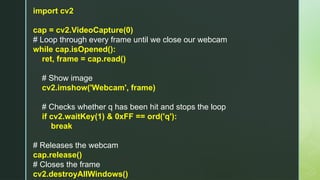
import cv2
cap =cv2.VideoCapture(0)
# Loop through every frame until we close our webcam
while cap.isOpened():
ret, frame = cap.read()
# Show image
cv2.imshow('Webcam', frame)
# Checks whether q has been hit and stops the loop
if cv2.waitKey(1) & 0xFF == ord('q'):
break
# Releases the webcam
cap.release()
# Closes the frame
cv2.destroyAllWindows()
43.
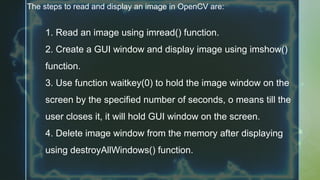
The steps toread and display an image in OpenCV are:
1. Read an image using imread() function.
2. Create a GUI window and display image using imshow()
function.
3. Use function waitkey(0) to hold the image window on the
screen by the specified number of seconds, o means till the
user closes it, it will hold GUI window on the screen.
4. Delete image window from the memory after displaying
using destroyAllWindows() function.
44.
Let’s start readingan image. using cv2.
To read the images cv2.imread() method is used. This method
loads an image from the specified file. If the image cannot be
read (because of missing file, improper permissions,
unsupported or invalid format) then this method returns an
empty matrix
================================================
Syntax: cv2.imread(path, flag)
Parameters:
path: A string representing the path of the image to be read.
flag: It specifies the way in which image should be read. It’s
default value is cv2.IMREAD_COLOR
Return Value: This method returns an image that is loaded from
the specified file.
45.
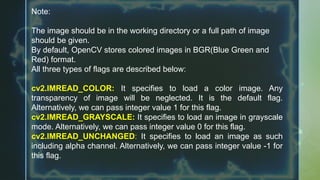
Note:
The image shouldbe in the working directory or a full path of image
should be given.
By default, OpenCV stores colored images in BGR(Blue Green and
Red) format.
All three types of flags are described below:
cv2.IMREAD_COLOR: It specifies to load a color image. Any
transparency of image will be neglected. It is the default flag.
Alternatively, we can pass integer value 1 for this flag.
cv2.IMREAD_GRAYSCALE: It specifies to load an image in grayscale
mode. Alternatively, we can pass integer value 0 for this flag.
cv2.IMREAD_UNCHANGED: It specifies to load an image as such
including alpha channel. Alternatively, we can pass integer value -1 for
this flag.
46.
Below codes areimplementations to read images and display images on the screen using
OpenCV and matplotlib libraries functions.
Example #1 (Using OpenCV) :
Image used is:
47.
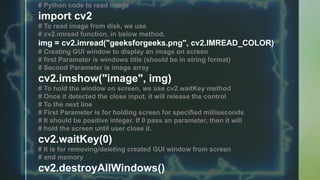
# Python codeto read image
import cv2
# To read image from disk, we use
# cv2.imread function, in below method,
img = cv2.imread("geeksforgeeks.png", cv2.IMREAD_COLOR)
# Creating GUI window to display an image on screen
# first Parameter is windows title (should be in string format)
# Second Parameter is image array
cv2.imshow("image", img)
# To hold the window on screen, we use cv2.waitKey method
# Once it detected the close input, it will release the control
# To the next line
# First Parameter is for holding screen for specified milliseconds
# It should be positive integer. If 0 pass an parameter, then it will
# hold the screen until user close it.
cv2.waitKey(0)
# It is for removing/deleting created GUI window from screen
# and memory
cv2.destroyAllWindows()
48.
We can seethe shape , i.e., width and height and channels of the image using
shape attribute.
img.shape
Output:
(225, 225, 3)
49.
#import cv2, numpyand matplotlib libraries
import cv2
import numpy as np
import matplotlib.pyplot as plt
img=cv2.imread("geeks.png")
#Displaying image using plt.imshow()
method
plt.imshow(img)
#hold the window
plt.waitforbuttonpress()
plt.close('all')
50.
# Python programto explain cv2.imread()
method
# importing cv2
import cv2
# path
path = r'geeksforgeeks.png'
# Using cv2.imread() method
# Using 0 to read image in grayscale mode
img = cv2.imread(path,
cv2.IMREAD_GRAYSCALE)
# Displaying the image
cv2.imshow('image', img)
cv2.waitKey(0)
cv2.destroyAllWindows()
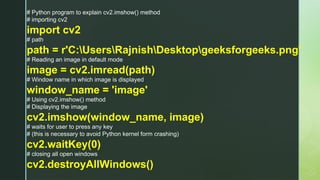
OpenCV-Python is alibrary of
Python bindings designed to
solve computer vision
problems. cv2.imshow()
method is used to display an
image in a window. The window
automatically fits the image
size.
# Python programto explain cv2.imshow() method
# importing cv2
import cv2
# path
path = r'C:UsersRajnishDesktopgeeksforgeeks.png'
# Reading an image in default mode
image = cv2.imread(path)
# Window name in which image is displayed
window_name = 'image'
# Using cv2.imshow() method
# Displaying the image
cv2.imshow(window_name, image)
# waits for user to press any key
# (this is necessary to avoid Python kernel form crashing)
cv2.waitKey(0)
# closing all open windows
cv2.destroyAllWindows()
OpenCV-Python is alibrary of Python
bindings designed to solve computer vision
problems.
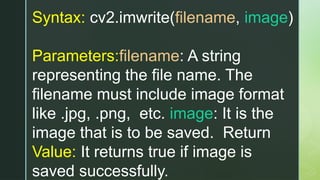
cv2.imwrite()
method is used to save an image to any
storage device. This will save the image
according to the specified format in current
working directory.
57.
Syntax: cv2.imwrite(filename, image)
Parameters:filename:A string
representing the file name. The
filename must include image format
like .jpg, .png, etc. image: It is the
image that is to be saved. Return
Value: It returns true if image is
saved successfully.
58.
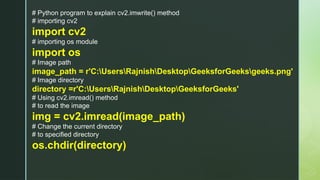
# Python programto explain cv2.imwrite() method
# importing cv2
import cv2
# importing os module
import os
# Image path
image_path = r'C:UsersRajnishDesktopGeeksforGeeksgeeks.png'
# Image directory
directory =r'C:UsersRajnishDesktopGeeksforGeeks'
# Using cv2.imread() method
# to read the image
img = cv2.imread(image_path)
# Change the current directory
# to specified directory
os.chdir(directory)
59.
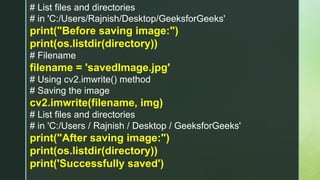
# List filesand directories
# in 'C:/Users/Rajnish/Desktop/GeeksforGeeks'
print("Before saving image:")
print(os.listdir(directory))
# Filename
filename = 'savedImage.jpg'
# Using cv2.imwrite() method
# Saving the image
cv2.imwrite(filename, img)
# List files and directories
# in 'C:/Users / Rajnish / Desktop / GeeksforGeeks'
print("After saving image:")
print(os.listdir(directory))
print('Successfully saved')
Color spaces area way to
represent the color channels
present in the image that gives
the image that particular hue.
There are several different
color spaces and each has its
own significance.
63.
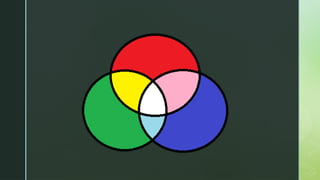
Some of thepopular color spaces are
RGB (Red, Green, Blue), CMYK (Cyan,
Magenta, Yellow, Black), HSV (Hue,
Saturation, Value), etc. BGR color
space: OpenCV’s default color space is
RGB. However, it actually stores color
in the BGR format. It is an additive
color model where the different
intensities of Blue, Green and Red give
different shades of color.
65.
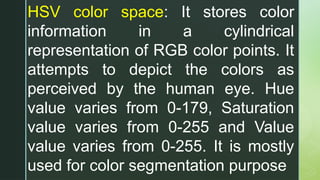
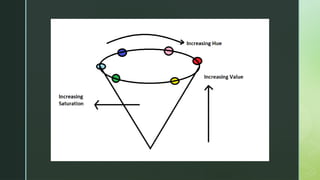
HSV color space:It stores color
information in a cylindrical
representation of RGB color points. It
attempts to depict the colors as
perceived by the human eye. Hue
value varies from 0-179, Saturation
value varies from 0-255 and Value
value varies from 0-255. It is mostly
used for color segmentation purpose
67.
CMYK color space:Unlike, RGB it is a
subtractive color space. The CMYK model
works by partially or entirely masking colors
on a lighter, usually white, background. The
ink reduces the light that would otherwise be
reflected. Such a model is called subtractive
because inks “subtract” the colors red,
green and blue from white light. White light
minus red leaves cyan, white light minus
green leaves magenta, and white light
minus blue leaves yellow.
69.
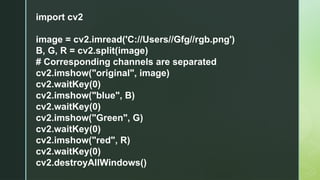
import cv2
image =cv2.imread('C://Users//Gfg//rgb.png')
B, G, R = cv2.split(image)
# Corresponding channels are separated
cv2.imshow("original", image)
cv2.waitKey(0)
cv2.imshow("blue", B)
cv2.waitKey(0)
cv2.imshow("Green", G)
cv2.waitKey(0)
cv2.imshow("red", R)
cv2.waitKey(0)
cv2.destroyAllWindows()
Arithmetic Operations likeAddition,
Subtraction, and Bitwise Operations(AND,
OR, NOT, XOR) can be applied to the input
images. These operations can be helpful in
enhancing the properties of the input
images. The Image arithmetics are
important for analyzing the input image
properties. The operated images can be
further used as an enhanced input image,
and many more operations can be applied
for clarifying, thresholding, dilating etc of the
72.
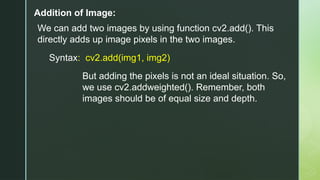
Addition of Image:
Wecan add two images by using function cv2.add(). This
directly adds up image pixels in the two images.
Syntax: cv2.add(img1, img2)
But adding the pixels is not an ideal situation. So,
we use cv2.addweighted(). Remember, both
images should be of equal size and depth.
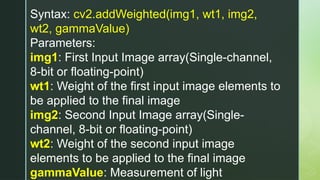
73.
Syntax: cv2.addWeighted(img1, wt1,img2,
wt2, gammaValue)
Parameters:
img1: First Input Image array(Single-channel,
8-bit or floating-point)
wt1: Weight of the first input image elements to
be applied to the final image
img2: Second Input Image array(Single-
channel, 8-bit or floating-point)
wt2: Weight of the second input image
elements to be applied to the final image
gammaValue: Measurement of light
# Python programto illustrate
# arithmetic operation of
# addition of two images
# organizing imports
import cv2
import numpy as np
# path to input images are specified and
# images are loaded with imread command
image1 = cv2.imread('input1.jpg')
image2 = cv2.imread('input2.jpg')
# cv2.addWeighted is applied over the
# image inputs with applied parameters
weightedSum = cv2.addWeighted(image1,
0.5, image2, 0.4, 0)
# the window showing output image
# with the weighted sum
cv2.imshow('Weighted Image',
weightedSum)
# De-allocate any associated memory usage
if cv2.waitKey(0) & 0xff == 27:
cv2.destroyAllWindows()
78.
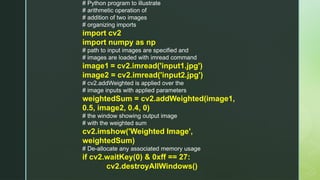
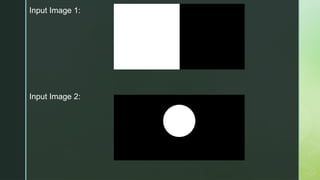
Subtraction of Image:
Justlike addition, we can subtract the pixel values in two images and merge them with the
help of cv2.subtract(). The images should be of equal size and depth.
Syntax: cv2.subtract(src1, src2)
Input Image1:
Input Image2:
80.
# Python programto illustrate
# arithmetic operation of
# subtraction of pixels of two images
# organizing imports
import cv2
import numpy as np
# path to input images are specified and
# images are loaded with imread command
image1 = cv2.imread('input1.jpg')
image2 = cv2.imread('input2.jpg')
# cv2.subtract is applied over the
# image inputs with applied parameters
sub = cv2.subtract(image1, image2)
# the window showing output image
# with the subtracted image
cv2.imshow('Subtracted Image', sub)
# De-allocate any associated memory usage
if cv2.waitKey(0) & 0xff == 27:
cv2.destroyAllWindows()
81.
Arithmetic Operations onImages using OpenCV |
Set-2 (Bitwise Operations on Binary Images)
Bitwise operations are used in image manipulation and
used for extracting essential parts in the image. In this
article, Bitwise operations used are :
1. AND
2. OR
3. XOR
4. NOT
Also, Bitwise operations helps in image masking. Image creation
can be enabled with the help of these operations. These
operations can be helpful in enhancing the properties of the input
images.
82.
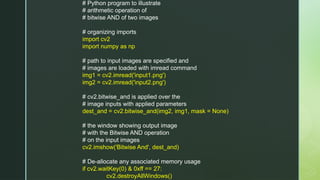
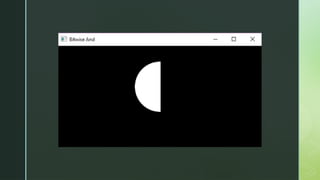
Bitwise AND operationon Image:
Bit-wise conjunction of input array elements.
Syntax: cv2.bitwise_and(source1, source2, destination, mask)
Parameters:
source1: First Input Image array(Single-channel, 8-bit or floating-
point)
source2: Second Input Image array(Single-channel, 8-bit or
floating-point)
dest: Output array (Similar to the dimensions and type of Input
image array)
mask: Operation mask, Input / output 8-bit single-channel mask
83.
# Python programto illustrate
# arithmetic operation of
# bitwise AND of two images
# organizing imports
import cv2
import numpy as np
# path to input images are specified and
# images are loaded with imread command
img1 = cv2.imread('input1.png')
img2 = cv2.imread('input2.png')
# cv2.bitwise_and is applied over the
# image inputs with applied parameters
dest_and = cv2.bitwise_and(img2, img1, mask = None)
# the window showing output image
# with the Bitwise AND operation
# on the input images
cv2.imshow('Bitwise And', dest_and)
# De-allocate any associated memory usage
if cv2.waitKey(0) & 0xff == 27:
cv2.destroyAllWindows()
Bitwise OR operationon Image:
Bit-wise disjunction of input array elements.
Syntax: cv2.bitwise_or(source1, source2, destination,
mask)
Parameters:
source1: First Input Image array(Single-channel, 8-bit or
floating-point)
source2: Second Input Image array(Single-channel, 8-
bit or floating-point)
dest: Output array (Similar to the dimensions and type of
Input image array)
87.
# organizing imports
importcv2
import numpy as np
# path to input images are specified and
# images are loaded with imread command
img1 = cv2.imread('input1.png')
img2 = cv2.imread('input2.png')
# cv2.bitwise_or is applied over the
# image inputs with applied parameters
dest_or = cv2.bitwise_or(img2, img1, mask
= None)
# the window showing output image
# with the Bitwise OR operation
# on the input images
cv2.imshow('Bitwise OR', dest_or)
# De-allocate any associated memory
usage
if cv2.waitKey(0) & 0xff == 27:
cv2.destroyAllWindows()
89.
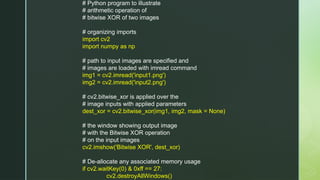
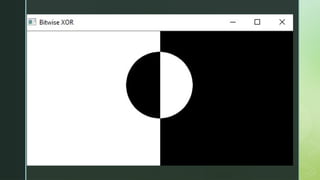
Bit-wise exclusive-OR operationon input array elements.
Syntax: cv2.bitwise_xor(source1, source2, destination, mask)
Parameters:
source1: First Input Image array(Single-channel, 8-bit or floating-point)
source2: Second Input Image array(Single-channel, 8-bit or floating-
point)
dest: Output array (Similar to the dimensions and type of Input image
array)
mask: Operation mask, Input / output 8-bit single-channel mask
90.
# Python programto illustrate
# arithmetic operation of
# bitwise XOR of two images
# organizing imports
import cv2
import numpy as np
# path to input images are specified and
# images are loaded with imread command
img1 = cv2.imread('input1.png')
img2 = cv2.imread('input2.png')
# cv2.bitwise_xor is applied over the
# image inputs with applied parameters
dest_xor = cv2.bitwise_xor(img1, img2, mask = None)
# the window showing output image
# with the Bitwise XOR operation
# on the input images
cv2.imshow('Bitwise XOR', dest_xor)
# De-allocate any associated memory usage
if cv2.waitKey(0) & 0xff == 27:
cv2.destroyAllWindows()
92.
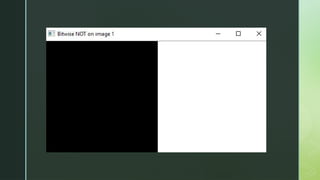
Bitwise NOT operationon Image:
Inversion of input array elements.
Syntax: cv2.bitwise_not(source, destination, mask)
Parameters:
source: Input Image array(Single-channel, 8-bit or
floating-point)
dest: Output array (Similar to the dimensions and type of
Input image array)
mask: Operation mask, Input / output 8-bit single-
channel mask
93.
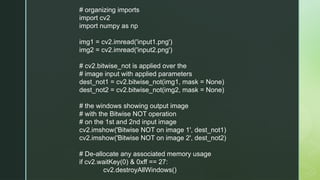
# organizing imports
importcv2
import numpy as np
img1 = cv2.imread('input1.png')
img2 = cv2.imread('input2.png')
# cv2.bitwise_not is applied over the
# image input with applied parameters
dest_not1 = cv2.bitwise_not(img1, mask = None)
dest_not2 = cv2.bitwise_not(img2, mask = None)
# the windows showing output image
# with the Bitwise NOT operation
# on the 1st and 2nd input image
cv2.imshow('Bitwise NOT on image 1', dest_not1)
cv2.imshow('Bitwise NOT on image 2', dest_not2)
# De-allocate any associated memory usage
if cv2.waitKey(0) & 0xff == 27:
cv2.destroyAllWindows()
Image resizing refersto the scaling of images.
Scaling comes in handy in many image processing as
well as machine learning applications. It helps in
reducing the number of pixels from an image and that
has several advantages e.g. It can reduce the time of
training of a neural network as the more the number of
pixels in an image more is the number of input nodes
that in turn increases the complexity of the model.
It also helps in zooming in on images. Many times we
need to resize the image i.e. either shrink it or scale it
up to meet the size requirements. OpenCV provides
us several interpolation methods for resizing an
image.
100.
Choice of InterpolationMethod for Resizing:
cv2.INTER_AREA: This is used when we need to
shrink an image.
cv2.INTER_CUBIC: This is slow but more efficient.
cv2.INTER_LINEAR: This is primarily used when
zooming is required. This is the default interpolation
technique in OpenCV.
Syntax: cv2.resize(source, dsize,
dest, fx, fy, interpolation)
101.
Parameters:
•source: Input Imagearray (Single-channel, 8-bit
or floating-point)
•dsize: Size of the output array
•dest: Output array (Similar to the dimensions and
type of Input image array) [optional]
•fx: Scale factor along the horizontal axis
[optional]
•fy: Scale factor along the vertical axis [optional]
•interpolation: One of the above interpolation
methods [optional]
102.
import cv2
import matplotlib.pyplotas plt
image = cv2.imread(r“sample.jpg", 1)
# Loading the image
half = cv2.resize(image, (0, 0), fx = 0.1, fy = 0.1)
bigger = cv2.resize(image, (1050, 1610))
stretch_near = cv2.resize(image, (780, 540), interpolation =
cv2.INTER_LINEAR)
Titles =["Original", "Half", "Bigger", "Interpolation Nearest"] I
mages =[image, half, bigger, stretch_near]
count = 4
for i in range(count):
plt.subplot(2, 2, i + 1)
plt.title(Titles[i])
plt.imshow(images[i])
plt.show()
Image Blurring refersto making the image less clear
or distinct. It is done with the help of various low pass
filter kernels. Advantages of blurring:
• It helps in Noise removal. As noise is considered as
high pass signal so by the application of low pass
filter kernel we restrict noise.
• It helps in smoothing the image.
• Low intensity edges are removed.
• It helps in hiding the details when necessary. For
e.g. in many cases police deliberately want to hide
the face of the victim, in such cases blurring is
required.
105.
Important types ofblurring:
Gaussian Blur: A smoothing technique that reduces
noise and detail by applying a Gaussian function to
an image, often used as a preprocessing step in
machine learning.
Median Blur: A non-linear filter that removes noise,
especially salt-and-pepper noise, while preserving
edges by replacing pixel values with the median of
nearby pixels.
Bilateral Blur: A non-linear filter that smooths images
while preserving edges by using a weighted average
based on pixel intensity and spatial distance.
OpenCV-Python is alibrary of Python bindings
designed to solve computer vision problems.
cv2.cvtColor()
method is used to convert an image from one color
space to another. There are more than 150 color-space
conversion methods available in OpenCV. We will use
some of color space conversion codes below.
109.
Syntax: cv2.cvtColor(src, code[,dst[, dstCn]])
Parameters:
• src: It is the image whose color space is to be
changed.
• code: It is the color space conversion code.
• dst: It is the output image of the same size and
depth as src image. It is an optional parameter.
• dstCn: It is the number of channels in the
destination image. If the parameter is 0 then the
number of the channels is derived automatically
from src and code. It is an optional parameter.
• Return Value: It returns an image.
110.
import cv2
path =r'C:UsersAdministratorDesktop
geeks.png'
# Reading an image in default mode
src = cv2.imread(path)
# Window name in which image is displayed
window_name = 'Image'
# Using cv2.cvtColor() method
# Using cv2.COLOR_BGR2GRAY color space
# conversion code
image = cv2.cvtColor(src,
cv2.COLOR_BGR2GRAY )
cv2.imshow(window_name, image)
Color segmentation inOpenCV is used to
identify regions of specific colors, often in
the HSV color space for better accuracy.
By defining a range of colors, a mask is
created to isolate the desired region. This
technique has various applications, such
as in cryptography, food preservation, and
infrared analysis. The process involves
setting threshold values for color ranges
and applying the mask to extract the target
region from the image.
114.
import cv2
import numpyas np
cap = cv2.VideoCapture(0)
while(1):
_, frame = cap.read()
# It converts the BGR color space of
image to HSV color space
hsv = cv2.cvtColor(frame,
cv2.COLOR_BGR2HSV)
# Threshold of blue in HSV space
lower_blue = np.array([60, 35, 140])
upper_blue = np.array([180, 255,
255])
115.
mask = cv2.inRange(hsv,lower_blue, upper_blue)
# The black region in the mask has the
value of 0,
# so when multiplied with original image
removes all non-blue regions
result = cv2.bitwise_and(frame, frame,
mask = mask)
cv2.imshow('frame', frame)
cv2.imshow('mask', mask)
cv2.imshow('result', result)
cv2.waitKey(0)
cv2.destroyAllWindows()
cap.release()
116.
Denoising of coloredimages using opencv
Denoising of an image refers to the process of
reconstruction of a signal from noisy images.
Denoising is done to remove unwanted noise from
image to analyze it in better form. It refers to one of
the major pre-processing steps. There are four
functions in opencv which is used for denoising of
different images.
117.
Syntax: cv2.fastNlMeansDenoisingColored( P1,P2, float P3, float P4, int
P5, int P6)
Parameters:
P1 – Source Image Array
P2 – Destination Image Array
P3 – Size in pixels of the template patch that is used to compute
weights.
P4 – Size in pixels of the window that is used to compute a weighted
average for the given pixel.
P5 – Parameter regulating filter strength for luminance component.
P6 – Same as above but for color components // Not used in a
118.
# importing libraries
importnumpy as np
import cv2
from matplotlib import pyplot as plt
# Reading image from folder where it is stored
img = cv2.imread('bear.png')
# denoising of image saving it into dst image
dst = cv2.fastNlMeansDenoisingColored(img, None, 10, 10, 7, 15)
# Plotting of source and destination image
plt.subplot(121), plt.imshow(img)
plt.subplot(122), plt.imshow(dst)
plt.show()
# importing libraries
importcv2
# Create a VideoCapture object and read from input file
cap = cv2.VideoCapture('Spend Your Summer Vacations
Wisely! Ft. Sandeep Sir _ GeeksforGeeks.mp4')
# Check if camera opened successfully
if (cap.isOpened()== False):
print("Error opening video file")
# Read until video is completed
while(cap.isOpened()):
122.
# Capture frame-by-frame
ret,frame = cap.read()
if ret == True:
# Display the resulting frame
cv2.imshow('Frame', frame)
# Press Q on keyboard to exit
if cv2.waitKey(25) & 0xFF == ord('q'):
break
# Break the loop
else:
break
# When everything done, release
# the video capture object
cap.release()
# Closes all the frames
cv2.destroyAllWindows()
123.
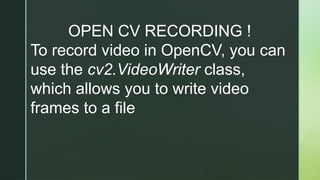
OPEN CV RECORDING!
To record video in OpenCV, you can
use the cv2.VideoWriter class,
which allows you to write video
frames to a file
124.
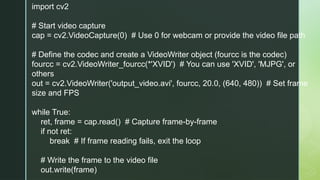
import cv2
# Startvideo capture
cap = cv2.VideoCapture(0) # Use 0 for webcam or provide the video file path
# Define the codec and create a VideoWriter object (fourcc is the codec)
fourcc = cv2.VideoWriter_fourcc(*'XVID') # You can use 'XVID', 'MJPG', or
others
out = cv2.VideoWriter('output_video.avi', fourcc, 20.0, (640, 480)) # Set frame
size and FPS
while True:
ret, frame = cap.read() # Capture frame-by-frame
if not ret:
break # If frame reading fails, exit the loop
# Write the frame to the video file
out.write(frame)
125.
# Display theframe
cv2.imshow('Video Recording', frame)
# Exit on pressing the 'Esc' key
if cv2.waitKey(1) & 0xFF == 27: # 27 is the ASCII value for
the Esc key
break
# Release the video capture and video writer objects
cap.release()
out.release()
# Close all OpenCV windows
cv2.destroyAllWindows()
126.
SYNTAX:
•cv2.VideoCapture(0): This startsthe video capture from the webcam.
You can replace 0 with a video file path to capture from a video file
instead.
•cv2.VideoWriter: Creates an object for writing the video:
•fourcc: This specifies the codec used to compress the video (e.g.,
'XVID', 'MJPG').
•output_video.avi: The name of the output video file.
•20.0: The frames per second (FPS) of the output video.
•(640, 480): The frame size of the output video (ensure it matches the
capture size).
•out.write(frame): This writes the current frame to the video file.
•cv2.imshow: Displays the video in a window.
•cv2.waitKey(1): Allows checking key presses and exits the loop if the
'Esc' key (ASCII 27) is pressed.


![Reading an Image
First of all, we will import cv2 module and then read the input image
using cv2’s imread() method. Then extract the height and width of
the image.
# Importing the OpenCV library
import cv2
# Reading the image using imread() function
image = cv2.imread('image.jpg')
# Extracting the height and width of an image
h, w = image.shape[:2]
# Displaying the height and width
print("Height = {}, Width = {}".format(h, w))
Height = 1603, Width = 2400](https://image.slidesharecdn.com/python-open-cv1kgjkg-250309005638-c564538a/85/PYTHON-OPEEEEEEEEEEEEEEN-CV-1-kgjkg-pptx-21-320.jpg)
![Extracting the RGB Values of a Pixel
Now we will focus on extracting the RGB values of an individual pixel.
OpenCV arranges the channels in BGR order. So the 0th value will
correspond to the Blue pixel and not the Red.
# Extracting RGB values.
# Here we have randomly chosen a pixel
# by passing in 100, 100 for height and width.
(B, G, R) = image[100, 100]
# Displaying the pixel values
print("R = {}, G = {}, B = {}".format(R, G, B))
# We can also pass the channel to extract
# the value for a specific channel
B = image[100, 100, 0]
print("B = {}".format(B))
R = 211, G = 172, B = 165B = 165](https://image.slidesharecdn.com/python-open-cv1kgjkg-250309005638-c564538a/85/PYTHON-OPEEEEEEEEEEEEEEN-CV-1-kgjkg-pptx-22-320.jpg)
![Extracting the Region of Interest (ROI)
Sometimes we want to extract a particular part or region of an image. This can be
done by slicing the pixels of the image.
# We will calculate the region of interest
# by slicing the pixels of the image
roi = image[100 : 500, 200 : 700]
cv2.imshow("ROI", roi)
cv2.waitKey(0)](https://image.slidesharecdn.com/python-open-cv1kgjkg-250309005638-c564538a/85/PYTHON-OPEEEEEEEEEEEEEEN-CV-1-kgjkg-pptx-23-320.jpg)


![Parameters:
•source: Input Image array (Single-channel, 8-bit
or floating-point)
•dsize: Size of the output array
•dest: Output array (Similar to the dimensions and
type of Input image array) [optional]
•fx: Scale factor along the horizontal axis
[optional]
•fy: Scale factor along the vertical axis [optional]
•interpolation: One of the above interpolation
methods [optional]](https://image.slidesharecdn.com/python-open-cv1kgjkg-250309005638-c564538a/85/PYTHON-OPEEEEEEEEEEEEEEN-CV-1-kgjkg-pptx-101-320.jpg)
![import cv2
import matplotlib.pyplot as plt
image = cv2.imread(r“sample.jpg", 1)
# Loading the image
half = cv2.resize(image, (0, 0), fx = 0.1, fy = 0.1)
bigger = cv2.resize(image, (1050, 1610))
stretch_near = cv2.resize(image, (780, 540), interpolation =
cv2.INTER_LINEAR)
Titles =["Original", "Half", "Bigger", "Interpolation Nearest"] I
mages =[image, half, bigger, stretch_near]
count = 4
for i in range(count):
plt.subplot(2, 2, i + 1)
plt.title(Titles[i])
plt.imshow(images[i])
plt.show()](https://image.slidesharecdn.com/python-open-cv1kgjkg-250309005638-c564538a/85/PYTHON-OPEEEEEEEEEEEEEEN-CV-1-kgjkg-pptx-102-320.jpg)


![Syntax: cv2.cvtColor(src, code[, dst[, dstCn]])
Parameters:
• src: It is the image whose color space is to be
changed.
• code: It is the color space conversion code.
• dst: It is the output image of the same size and
depth as src image. It is an optional parameter.
• dstCn: It is the number of channels in the
destination image. If the parameter is 0 then the
number of the channels is derived automatically
from src and code. It is an optional parameter.
• Return Value: It returns an image.](https://image.slidesharecdn.com/python-open-cv1kgjkg-250309005638-c564538a/85/PYTHON-OPEEEEEEEEEEEEEEN-CV-1-kgjkg-pptx-109-320.jpg)


![import cv2
import numpy as np
cap = cv2.VideoCapture(0)
while(1):
_, frame = cap.read()
# It converts the BGR color space of
image to HSV color space
hsv = cv2.cvtColor(frame,
cv2.COLOR_BGR2HSV)
# Threshold of blue in HSV space
lower_blue = np.array([60, 35, 140])
upper_blue = np.array([180, 255,
255])](https://image.slidesharecdn.com/python-open-cv1kgjkg-250309005638-c564538a/85/PYTHON-OPEEEEEEEEEEEEEEN-CV-1-kgjkg-pptx-114-320.jpg)


![Python imaging-library-overview - [cuuduongthancong.com]](https://cdn.slidesharecdn.com/ss_thumbnails/python-imaging-library-overview-cuuduongthancong-200418085009-thumbnail.jpg?width=640&height=640&fit=bounds)


![Unit 6 Image processing Libraries.[pptx]](https://cdn.slidesharecdn.com/ss_thumbnails/unit6imageprocessinglibraries-241221110926-7ed62a13-thumbnail.jpg?width=640&height=640&fit=bounds)