2. Photoshop
• First of all I used the software ‘Photoshop’ to
manipulate my pictures and to create my
magazine, we went through the layering
process and learning new techniques on how
to get the best out of it.
3. The manipulation of my magazine.
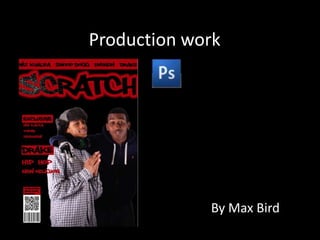
• Here is the start of my
magazine, firstly I have
used the Horizontal
type mask tool to get
the scratch effect on my
masthead letters.
4. • As you can see here I
have added a
‘BlackBerry Messenger’
sign on it, I got this by
using the CMD+Shift+4
tool which is screen
grab. I have taken this
from an existing
magazine called vibe.
5. • My next step was
creating a strap line to
draw in my audience, I
have added names of
big Hip-Hop artists. The
same font is used
throughout my front
cover .
6. • Its all coming together
now, I have added my
headlines in, I was inspired
by a existing magazine
called vibe and again the
same font is used. There is
a red block to make the
first words stand out so
that means the font colour
has to change.
7. • Its all come together now I
have added my main
image, as you can see I had
to bring some of the text
forward so the image isn’t
blocking it and the image
slots into the empty space.
I have used the Magic
eraser tool here to get ride
of the white background of
which the picture was
sitting in.
8. InDesign
• On InDesign you can add
images in you have
manipulated on
Photoshop and insert
them with no hassle, only
thing is you can’t copy
and past you have to
inset them through the:
File – Place so the images
background isn’t white.
Also you can get text in
columns so the format is
like a article in a
magazine which is helpful
for me as this is my
double page spread.