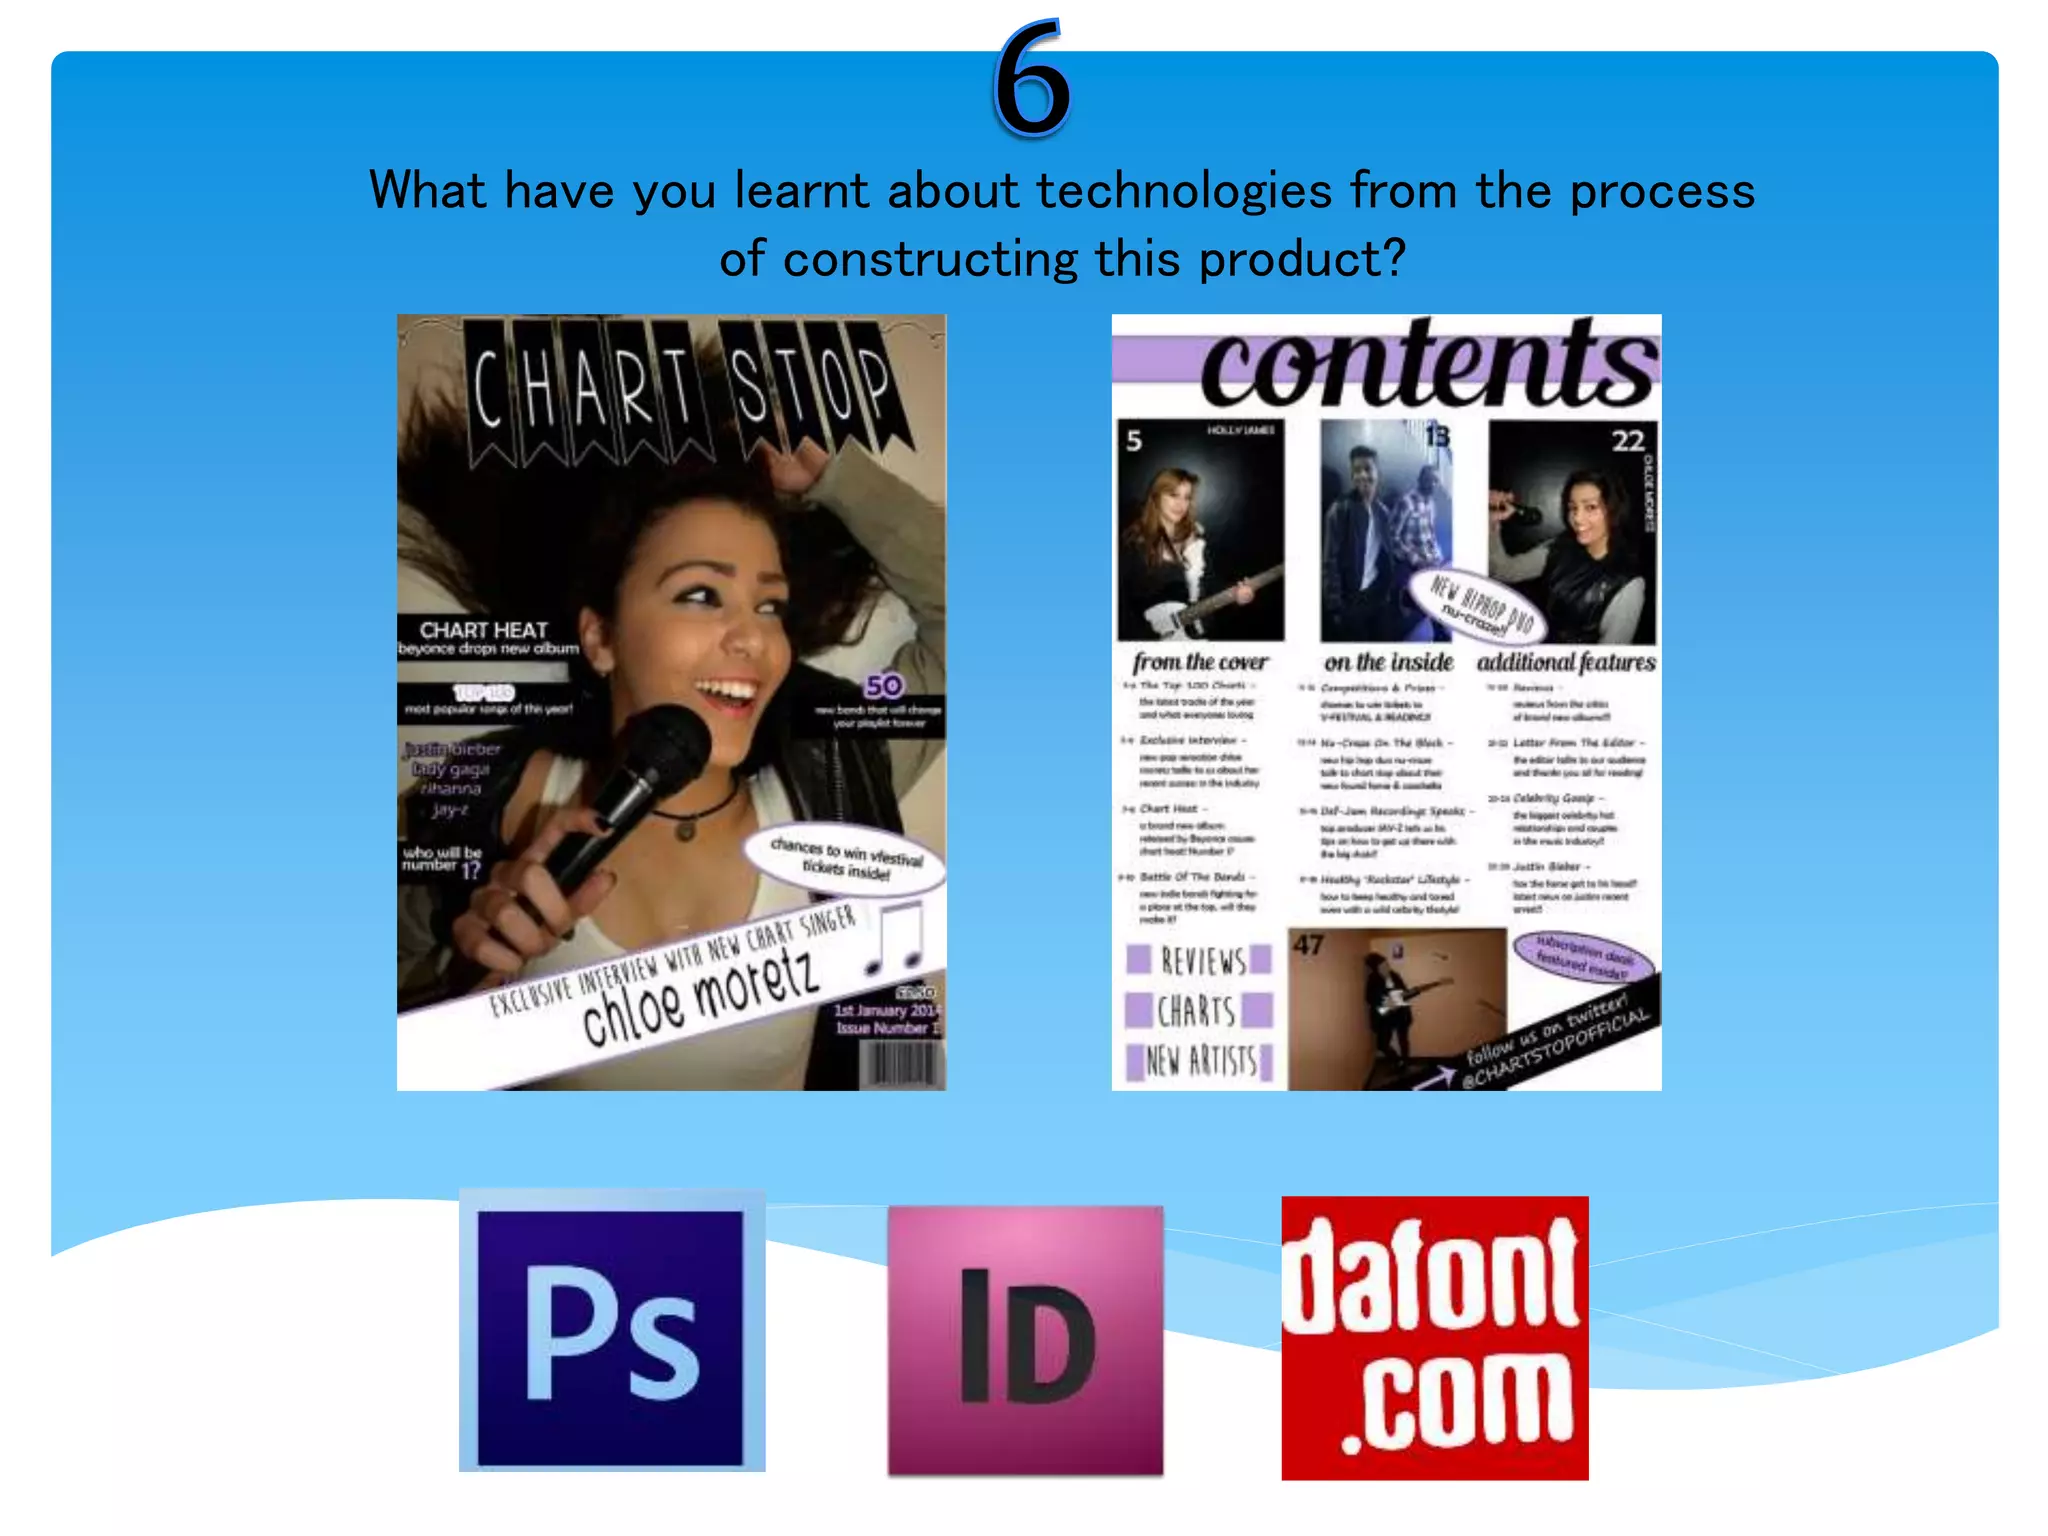
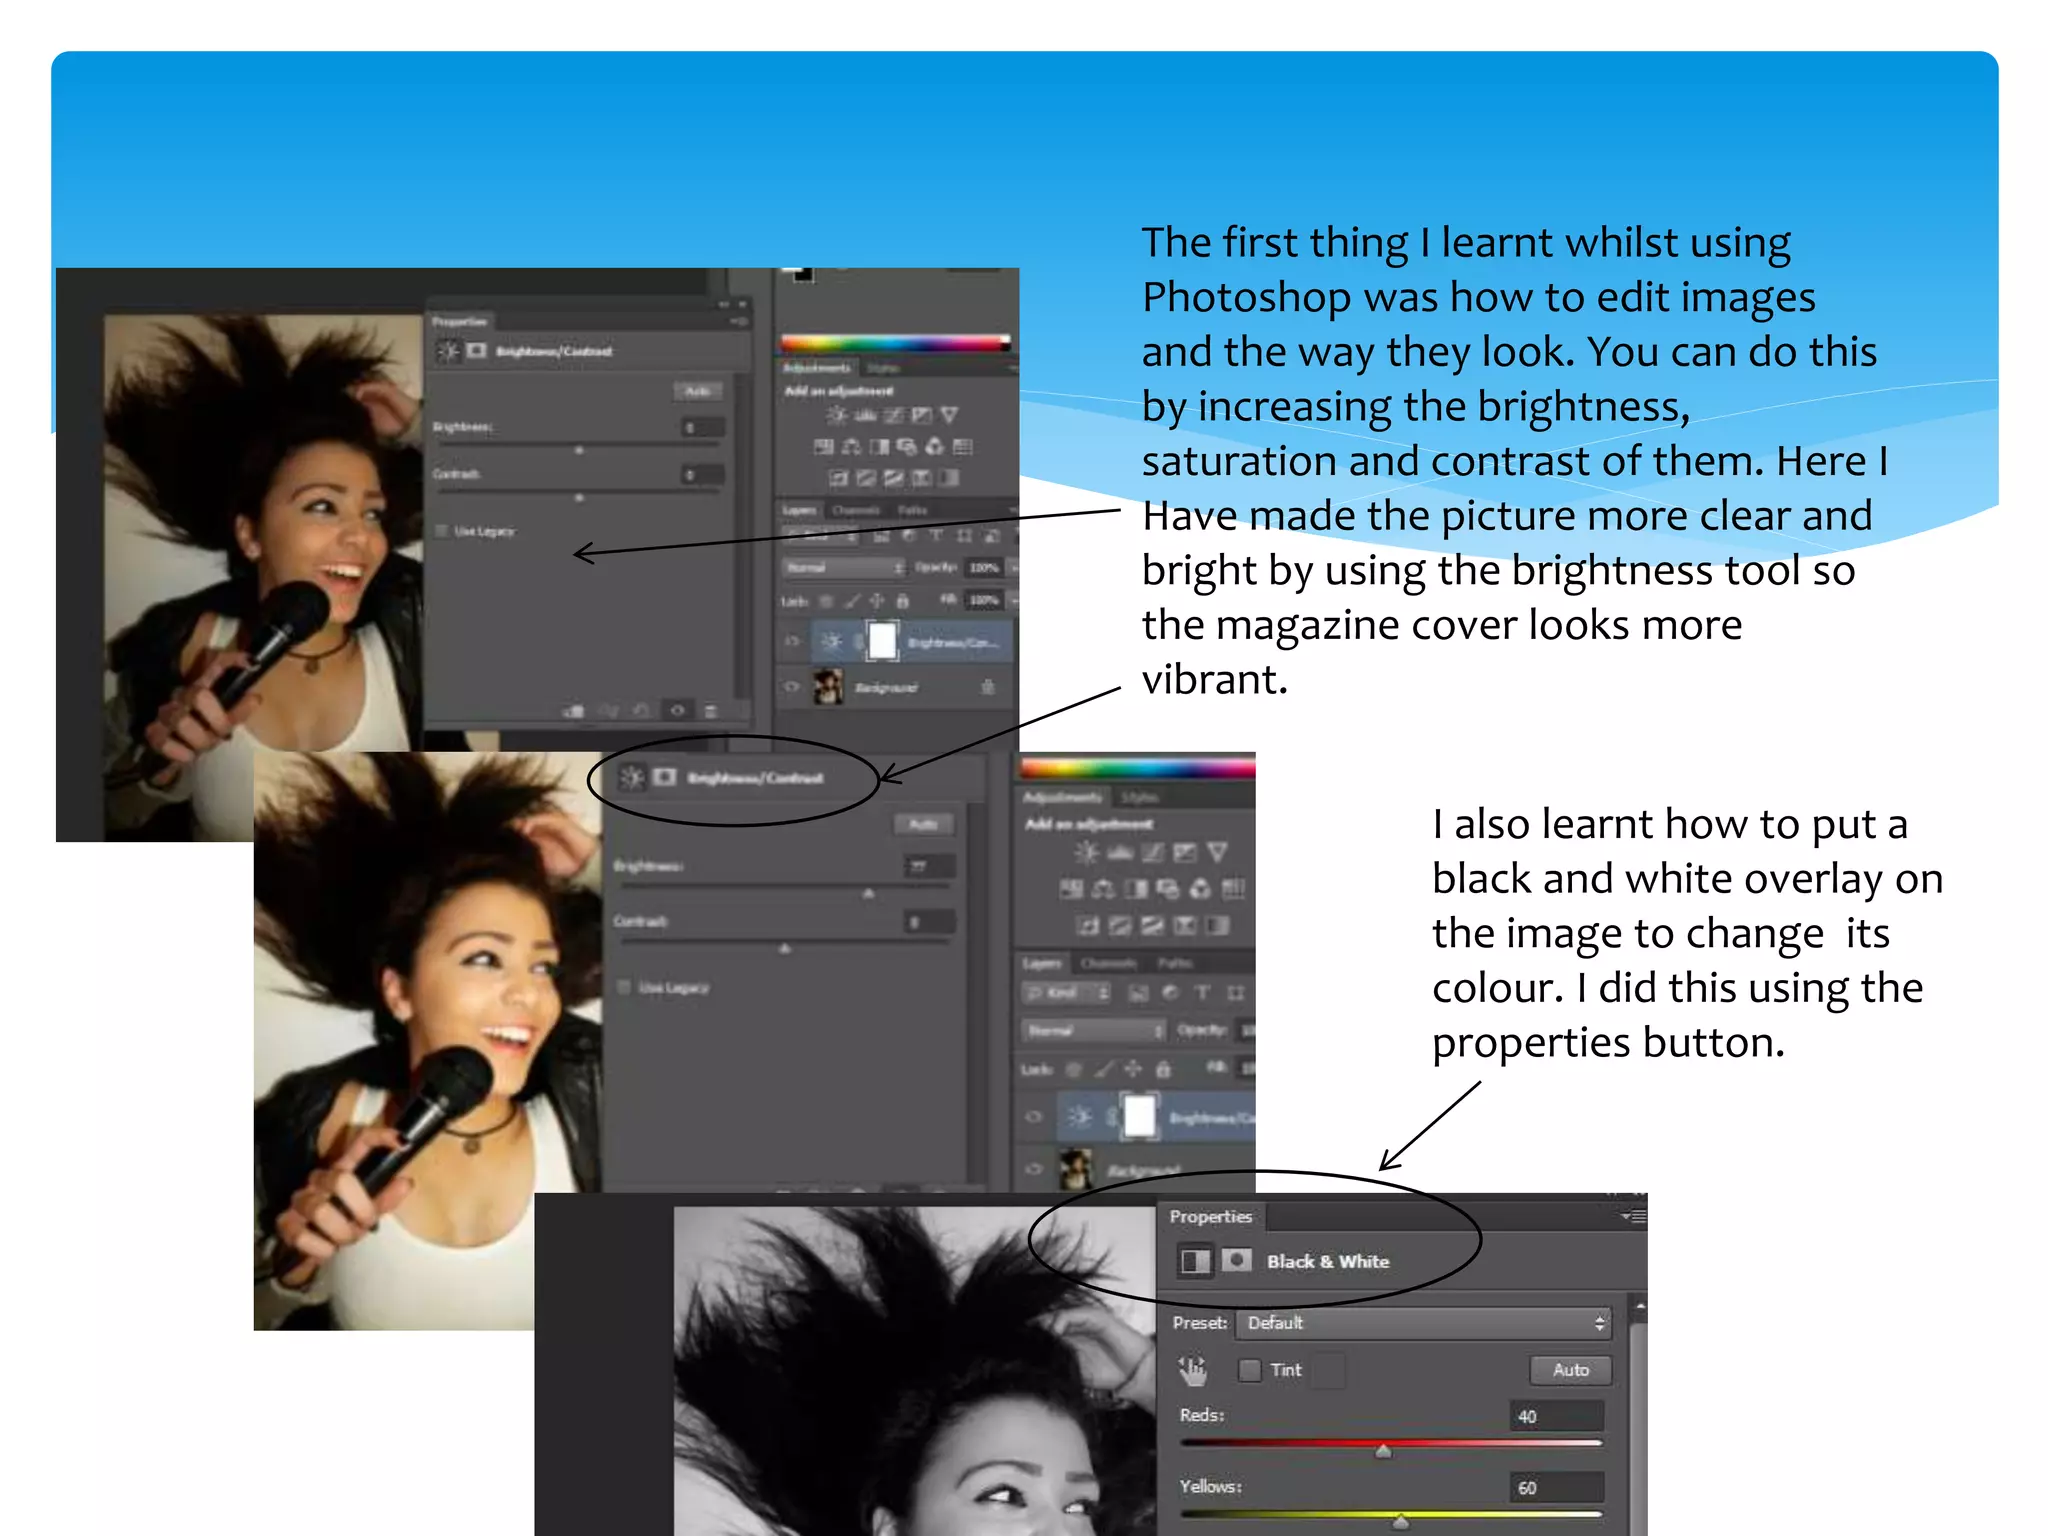
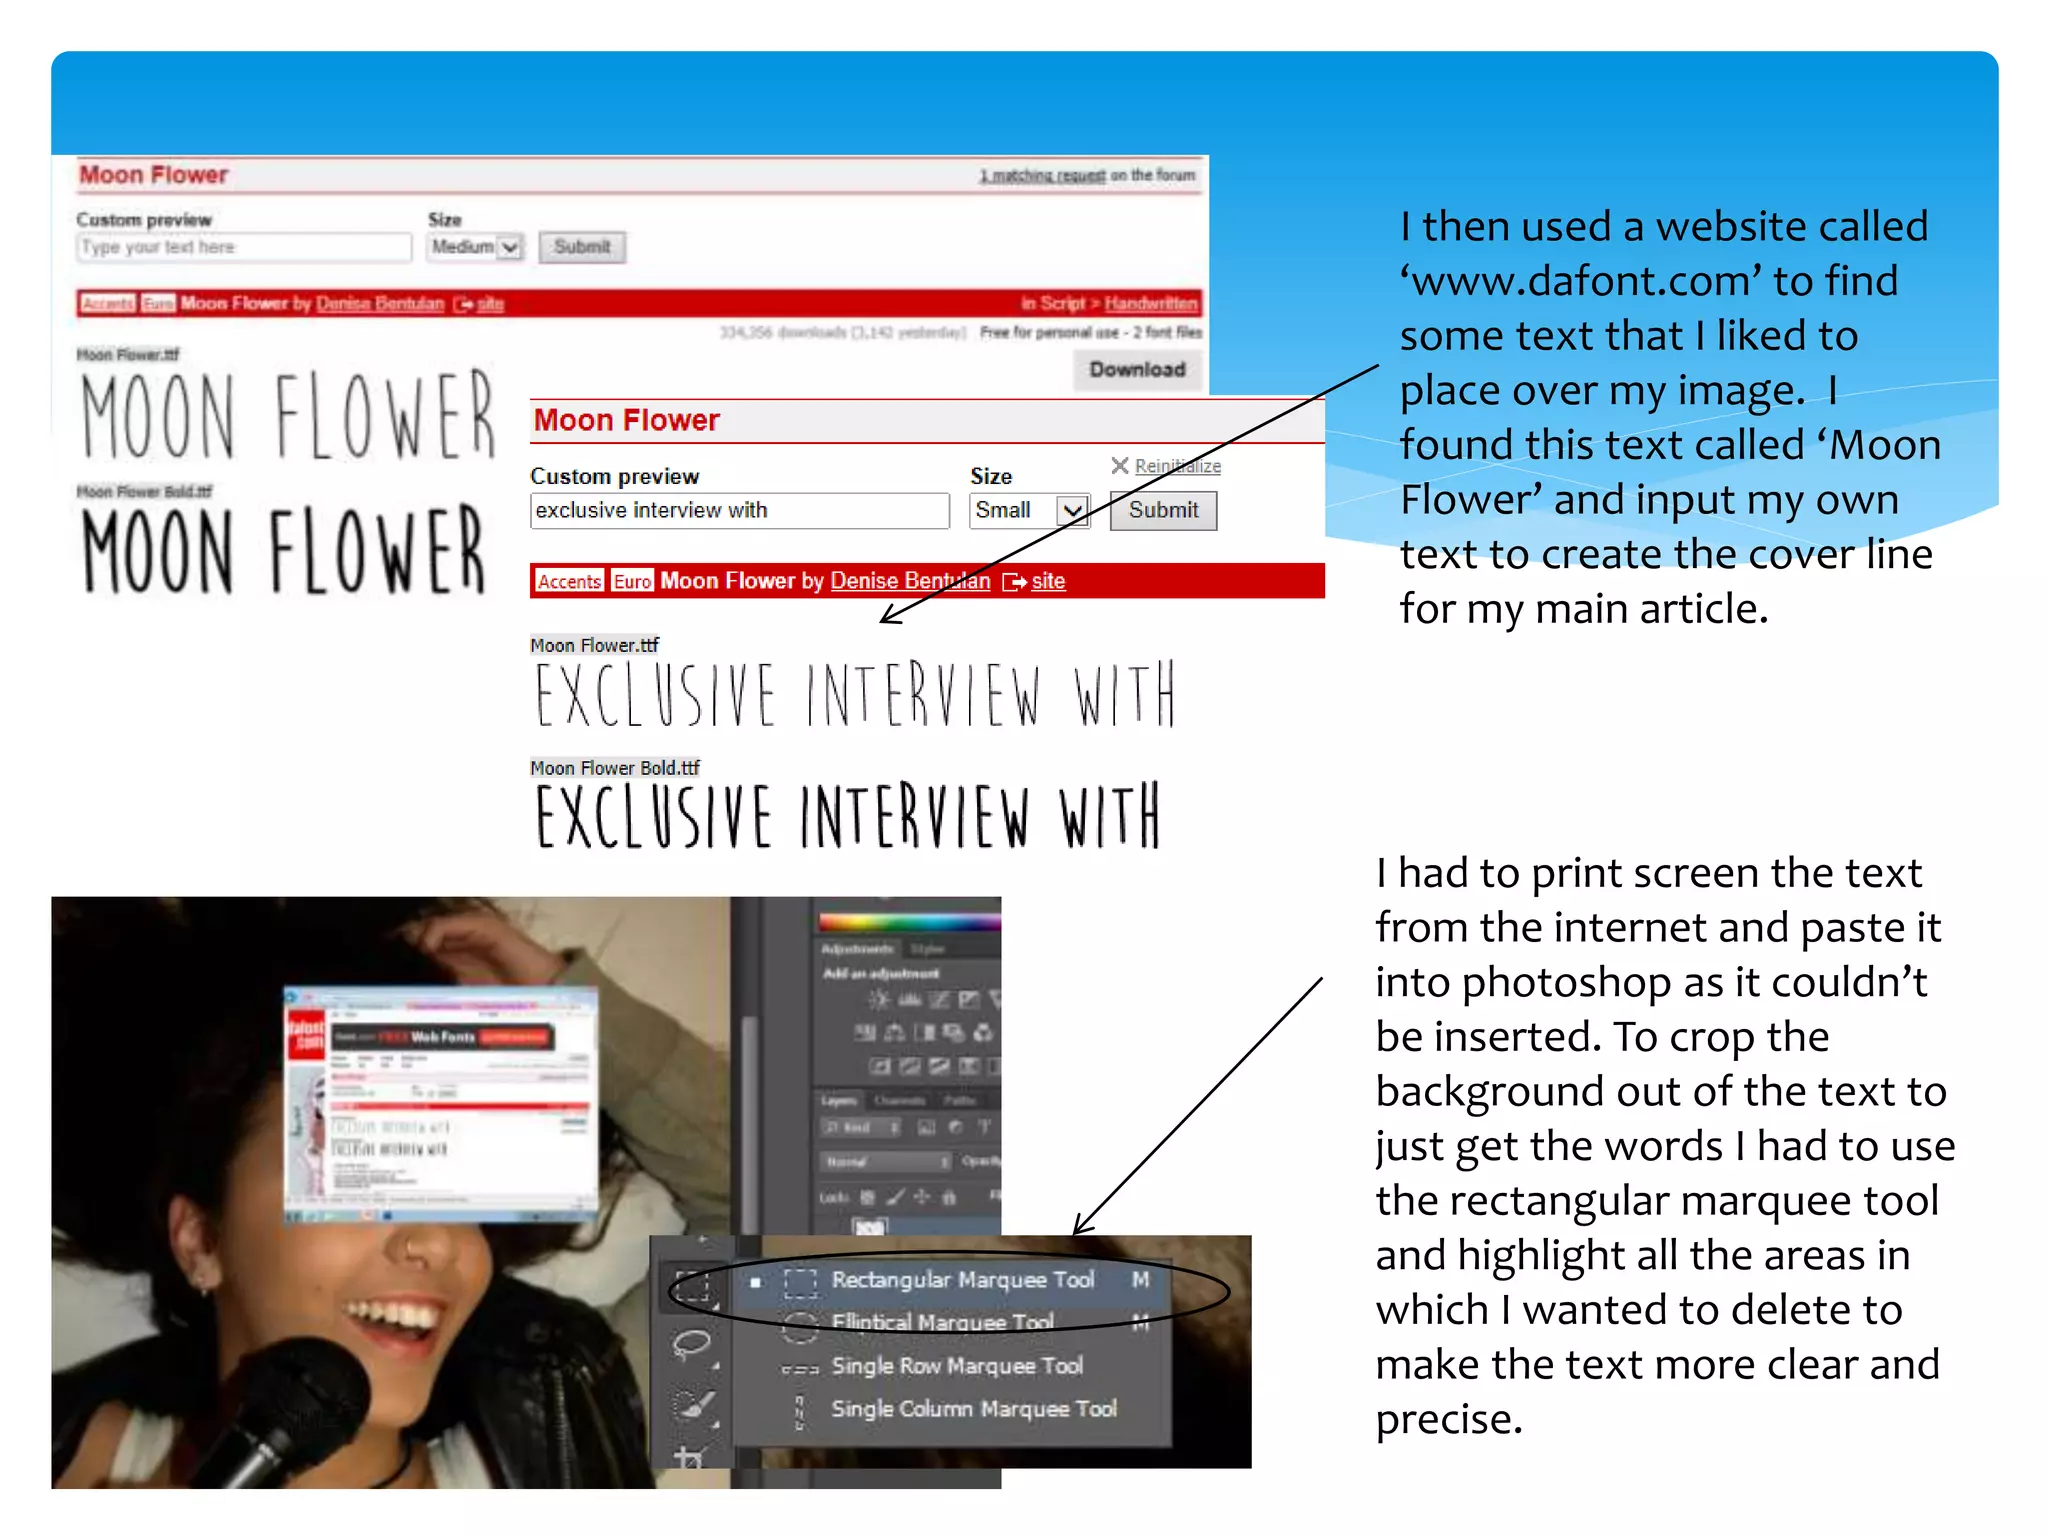
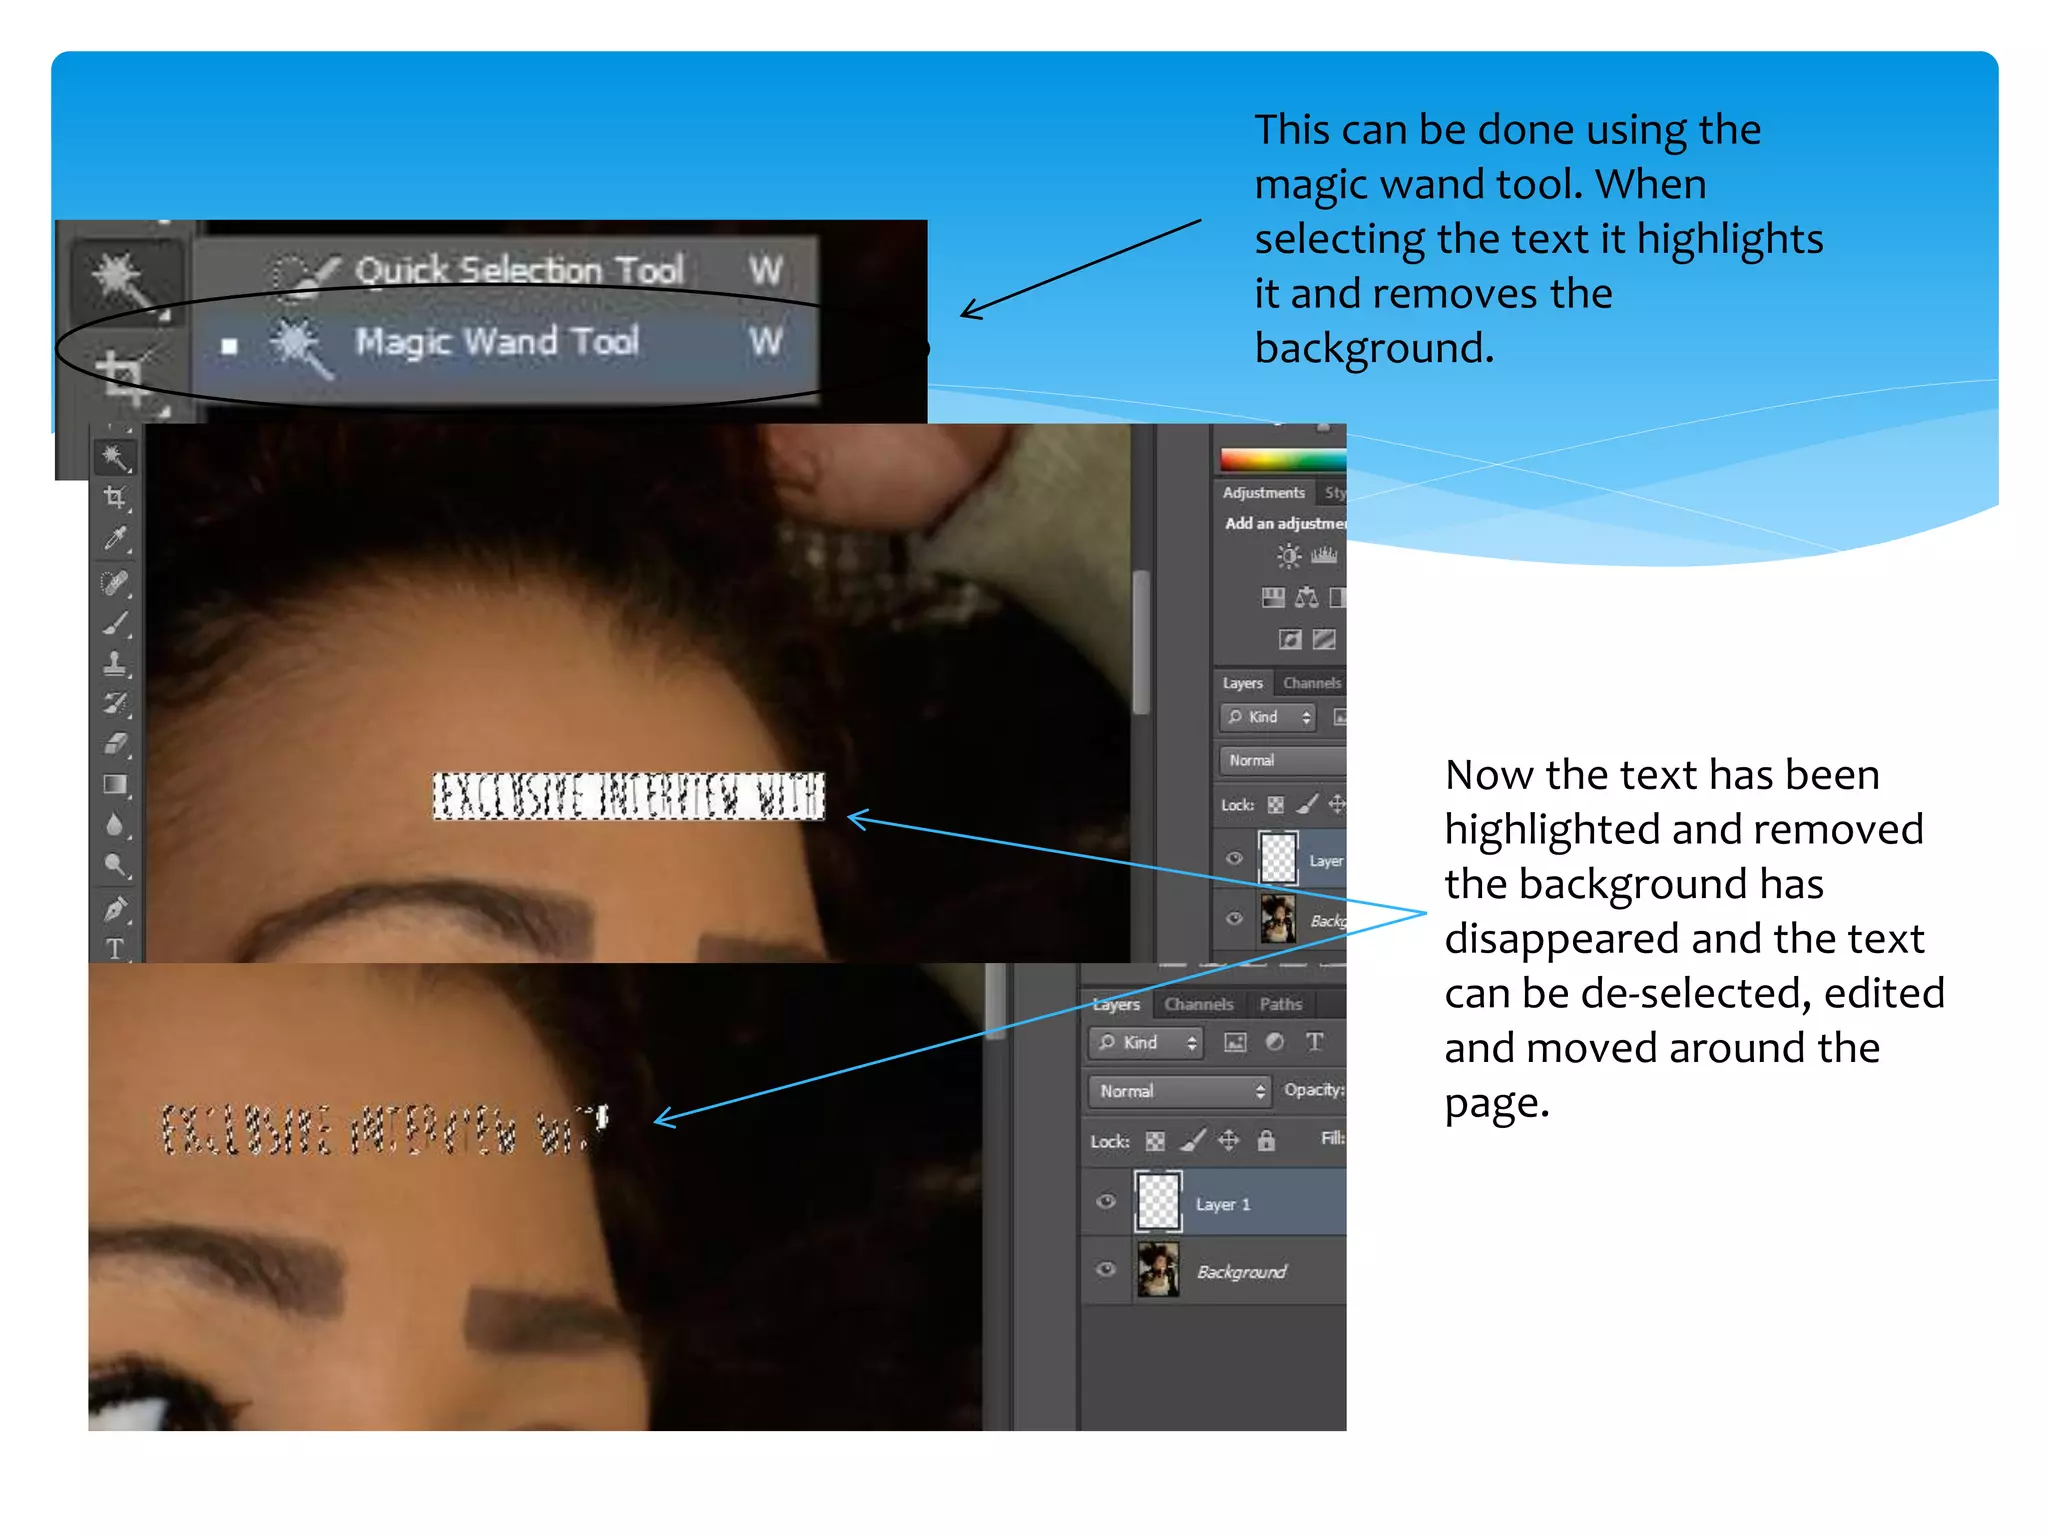
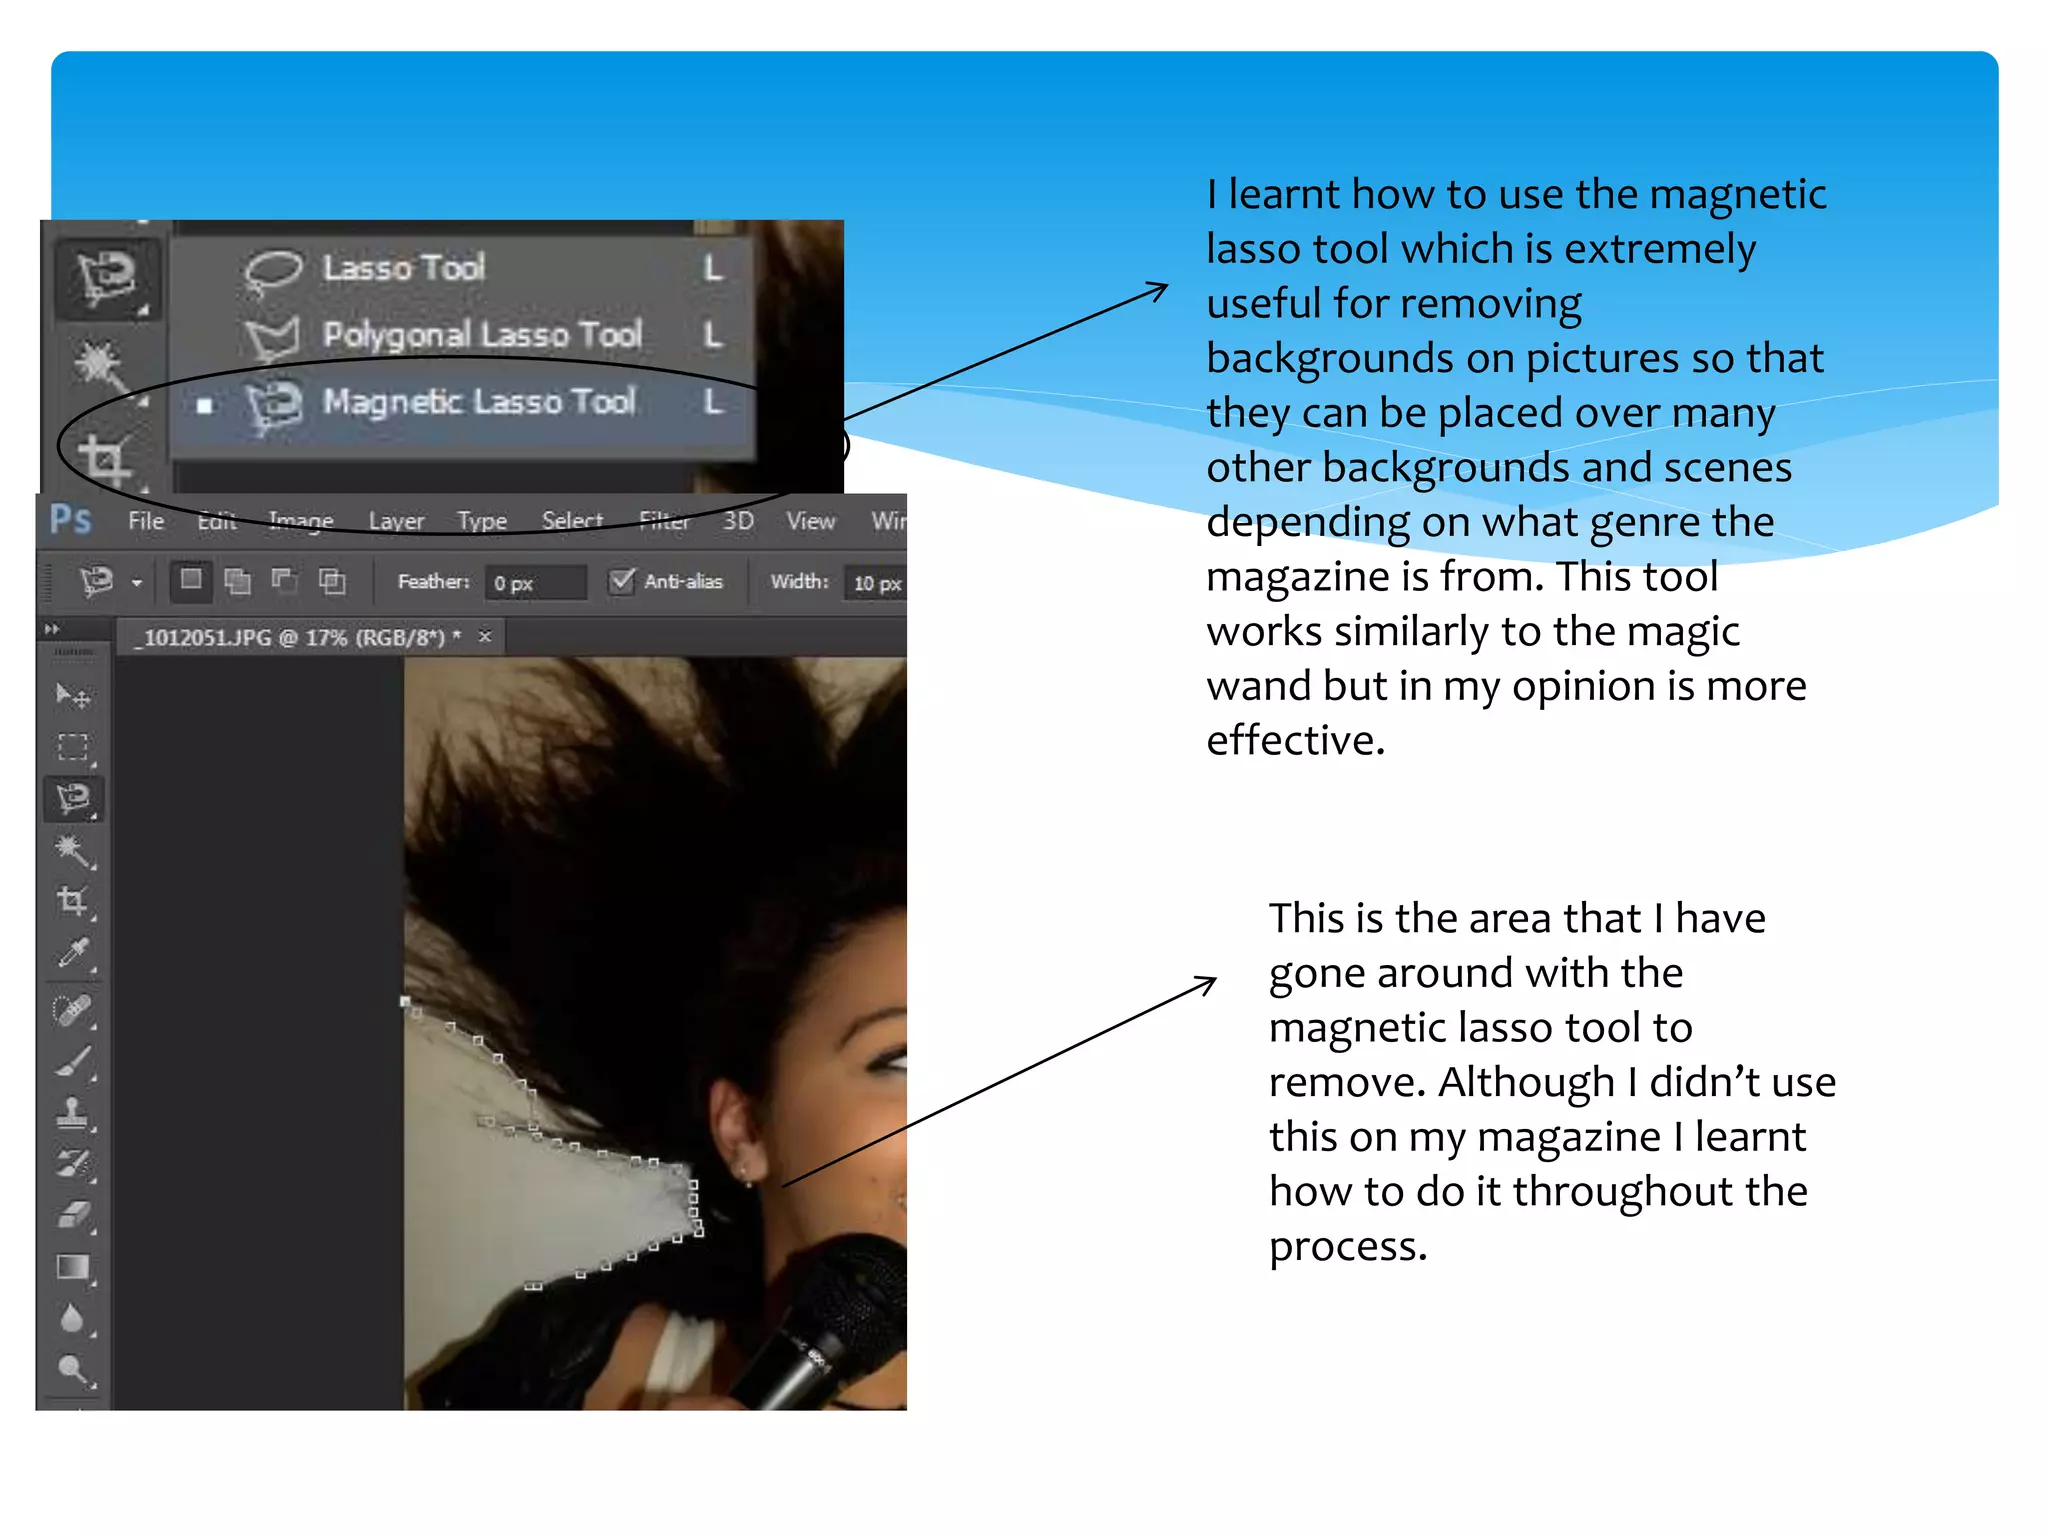
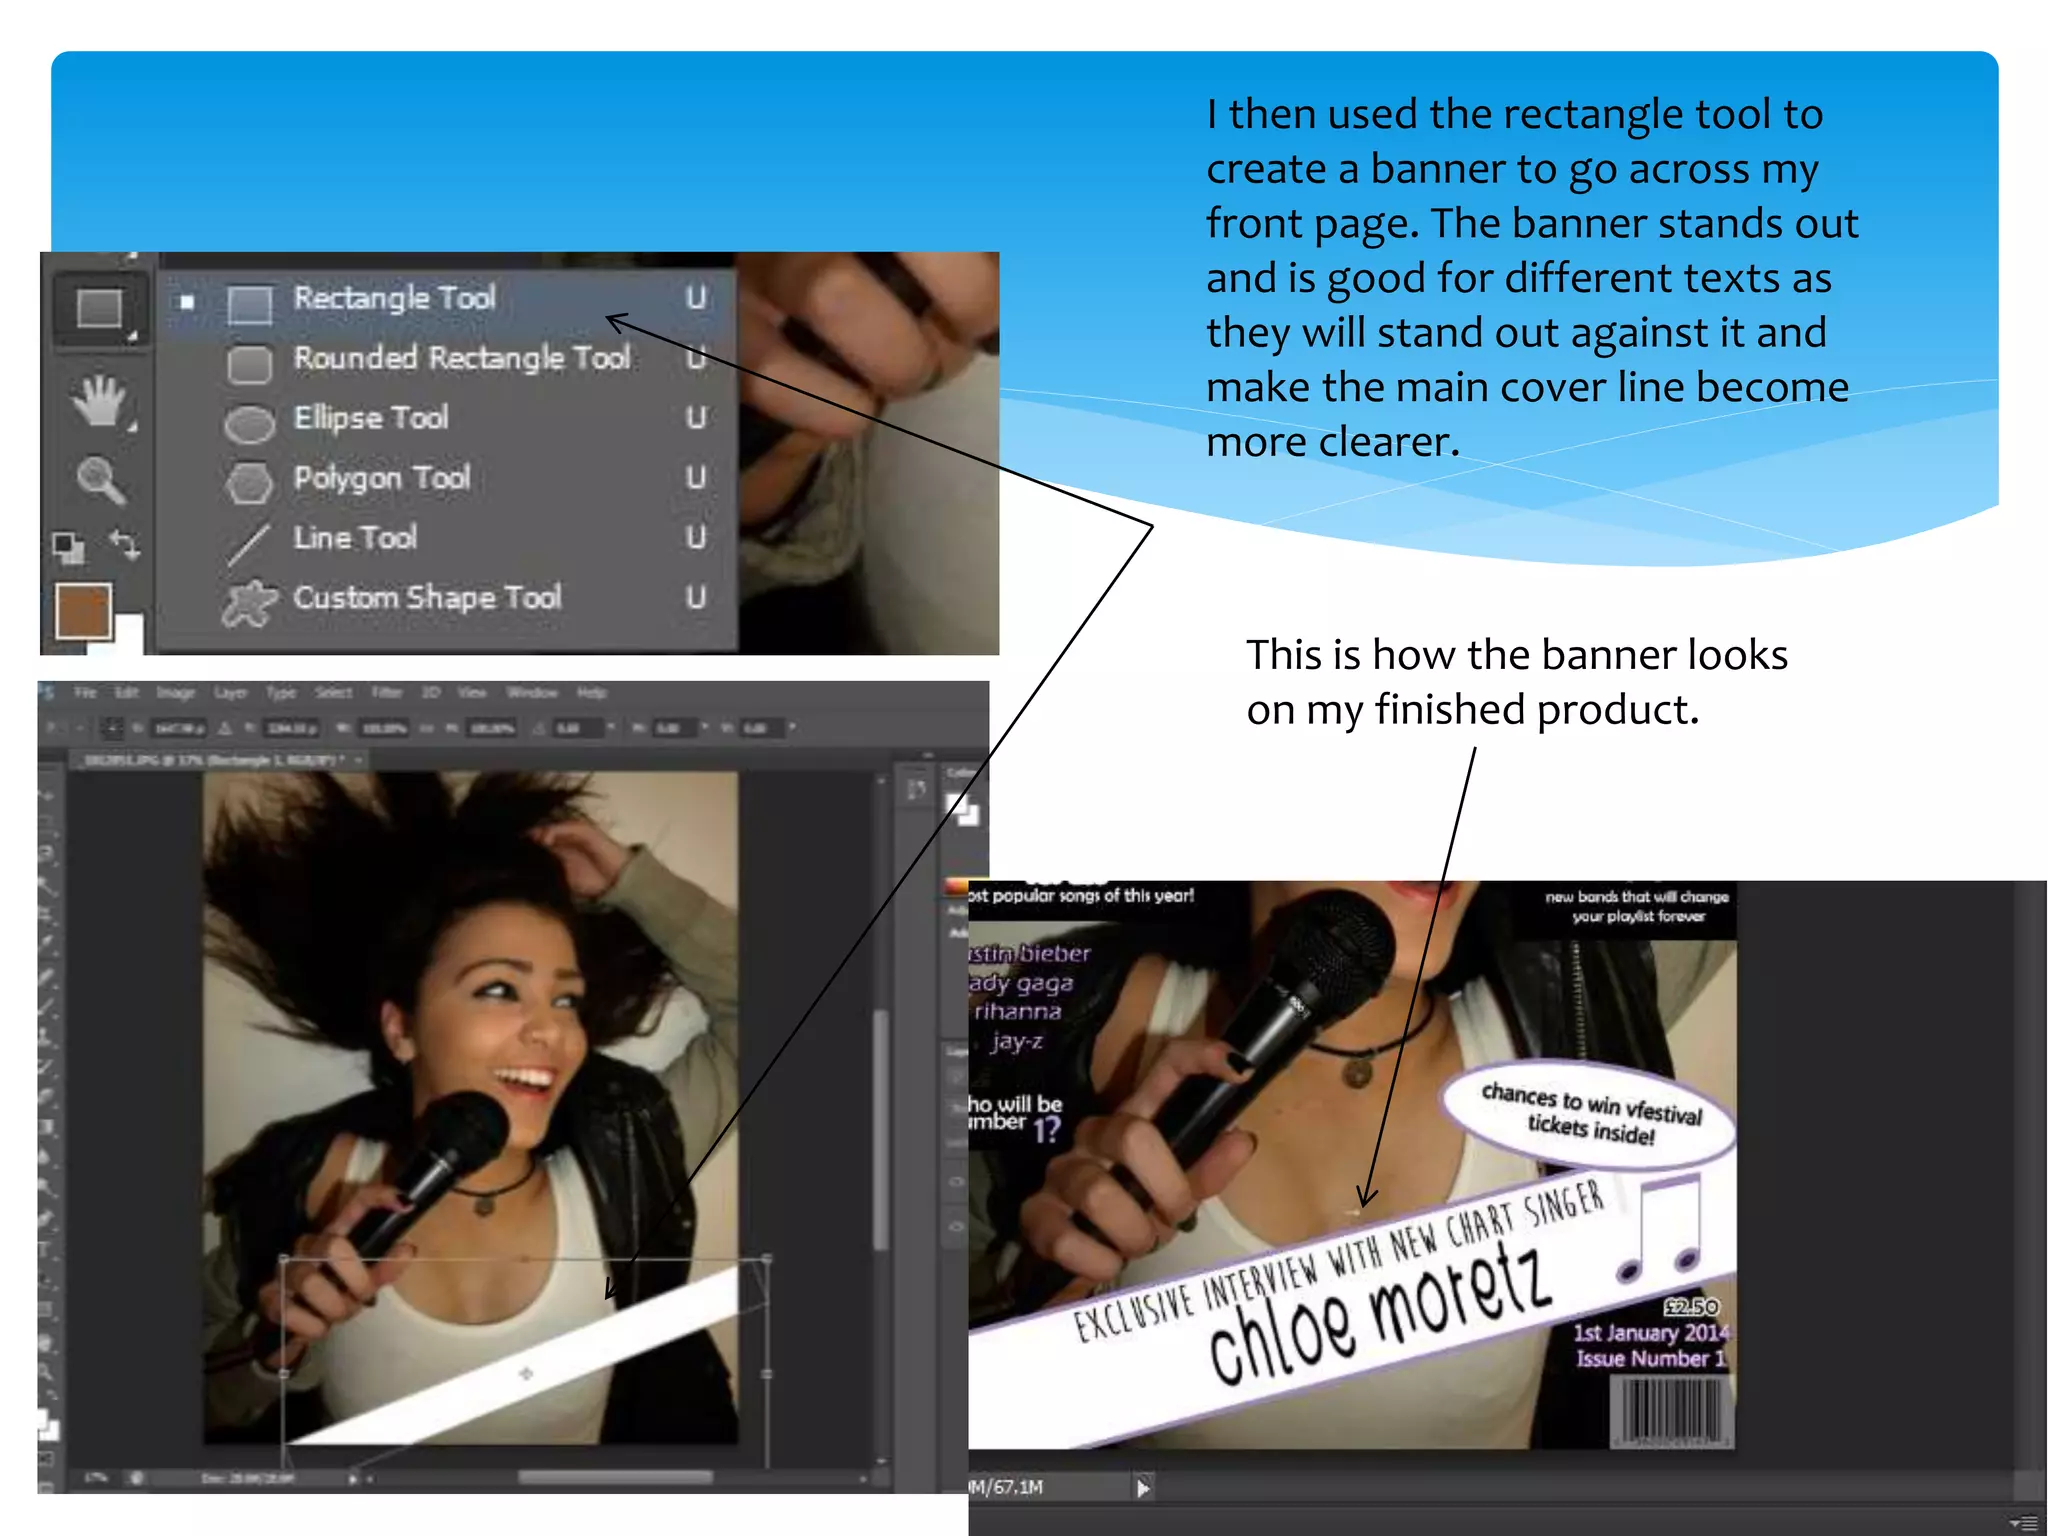
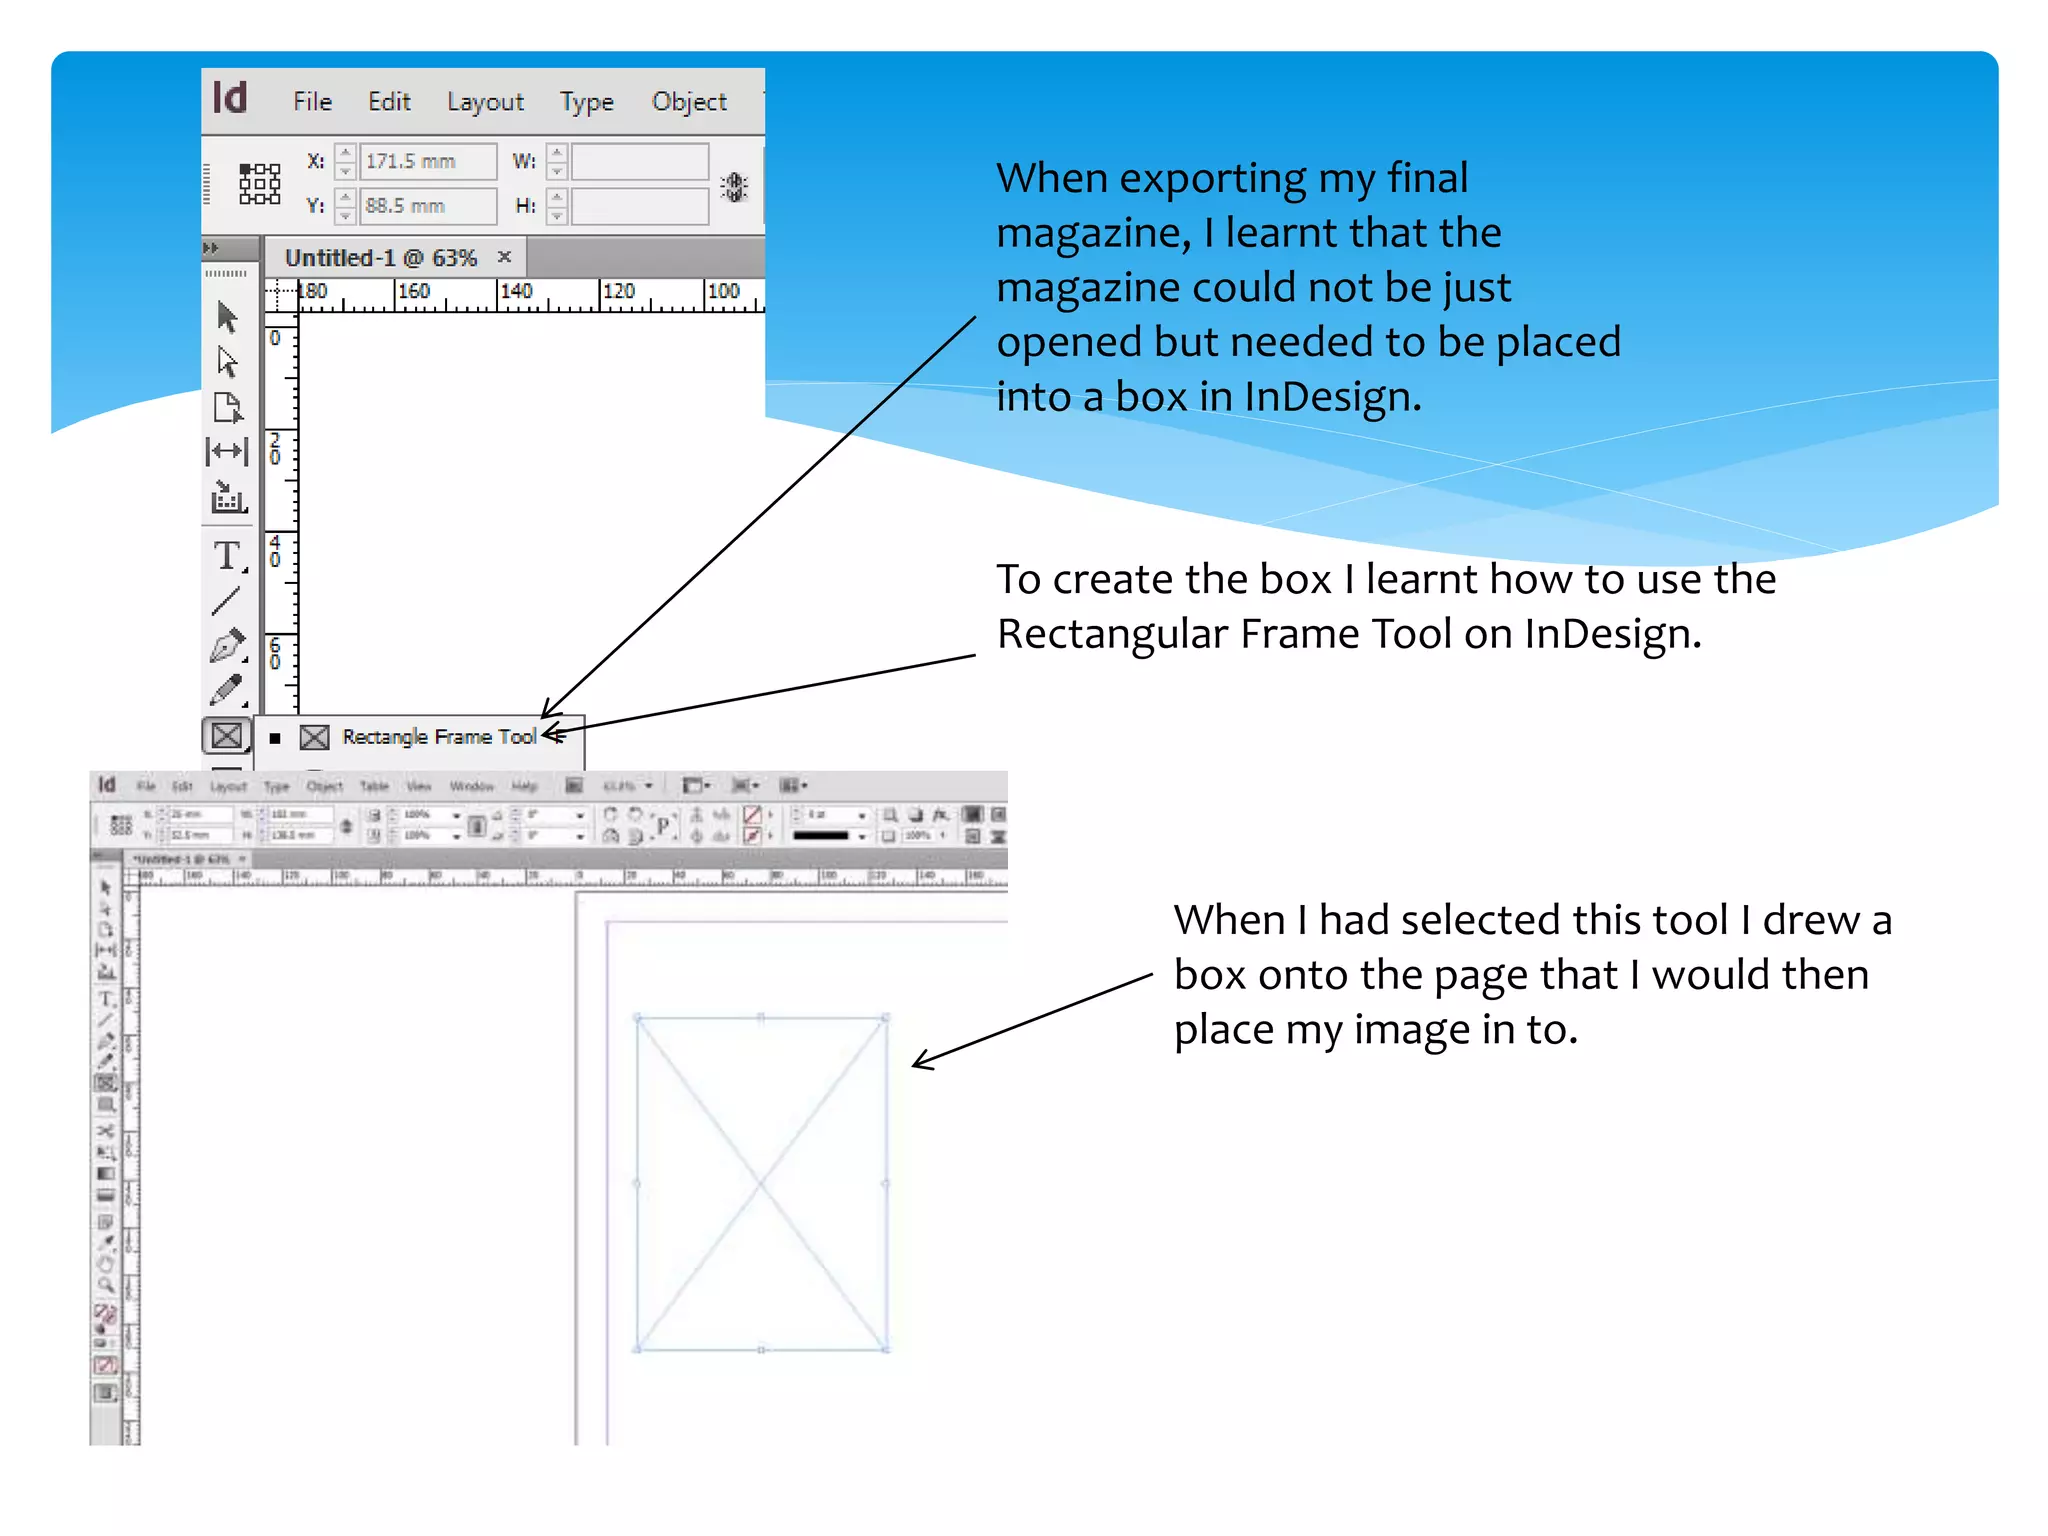
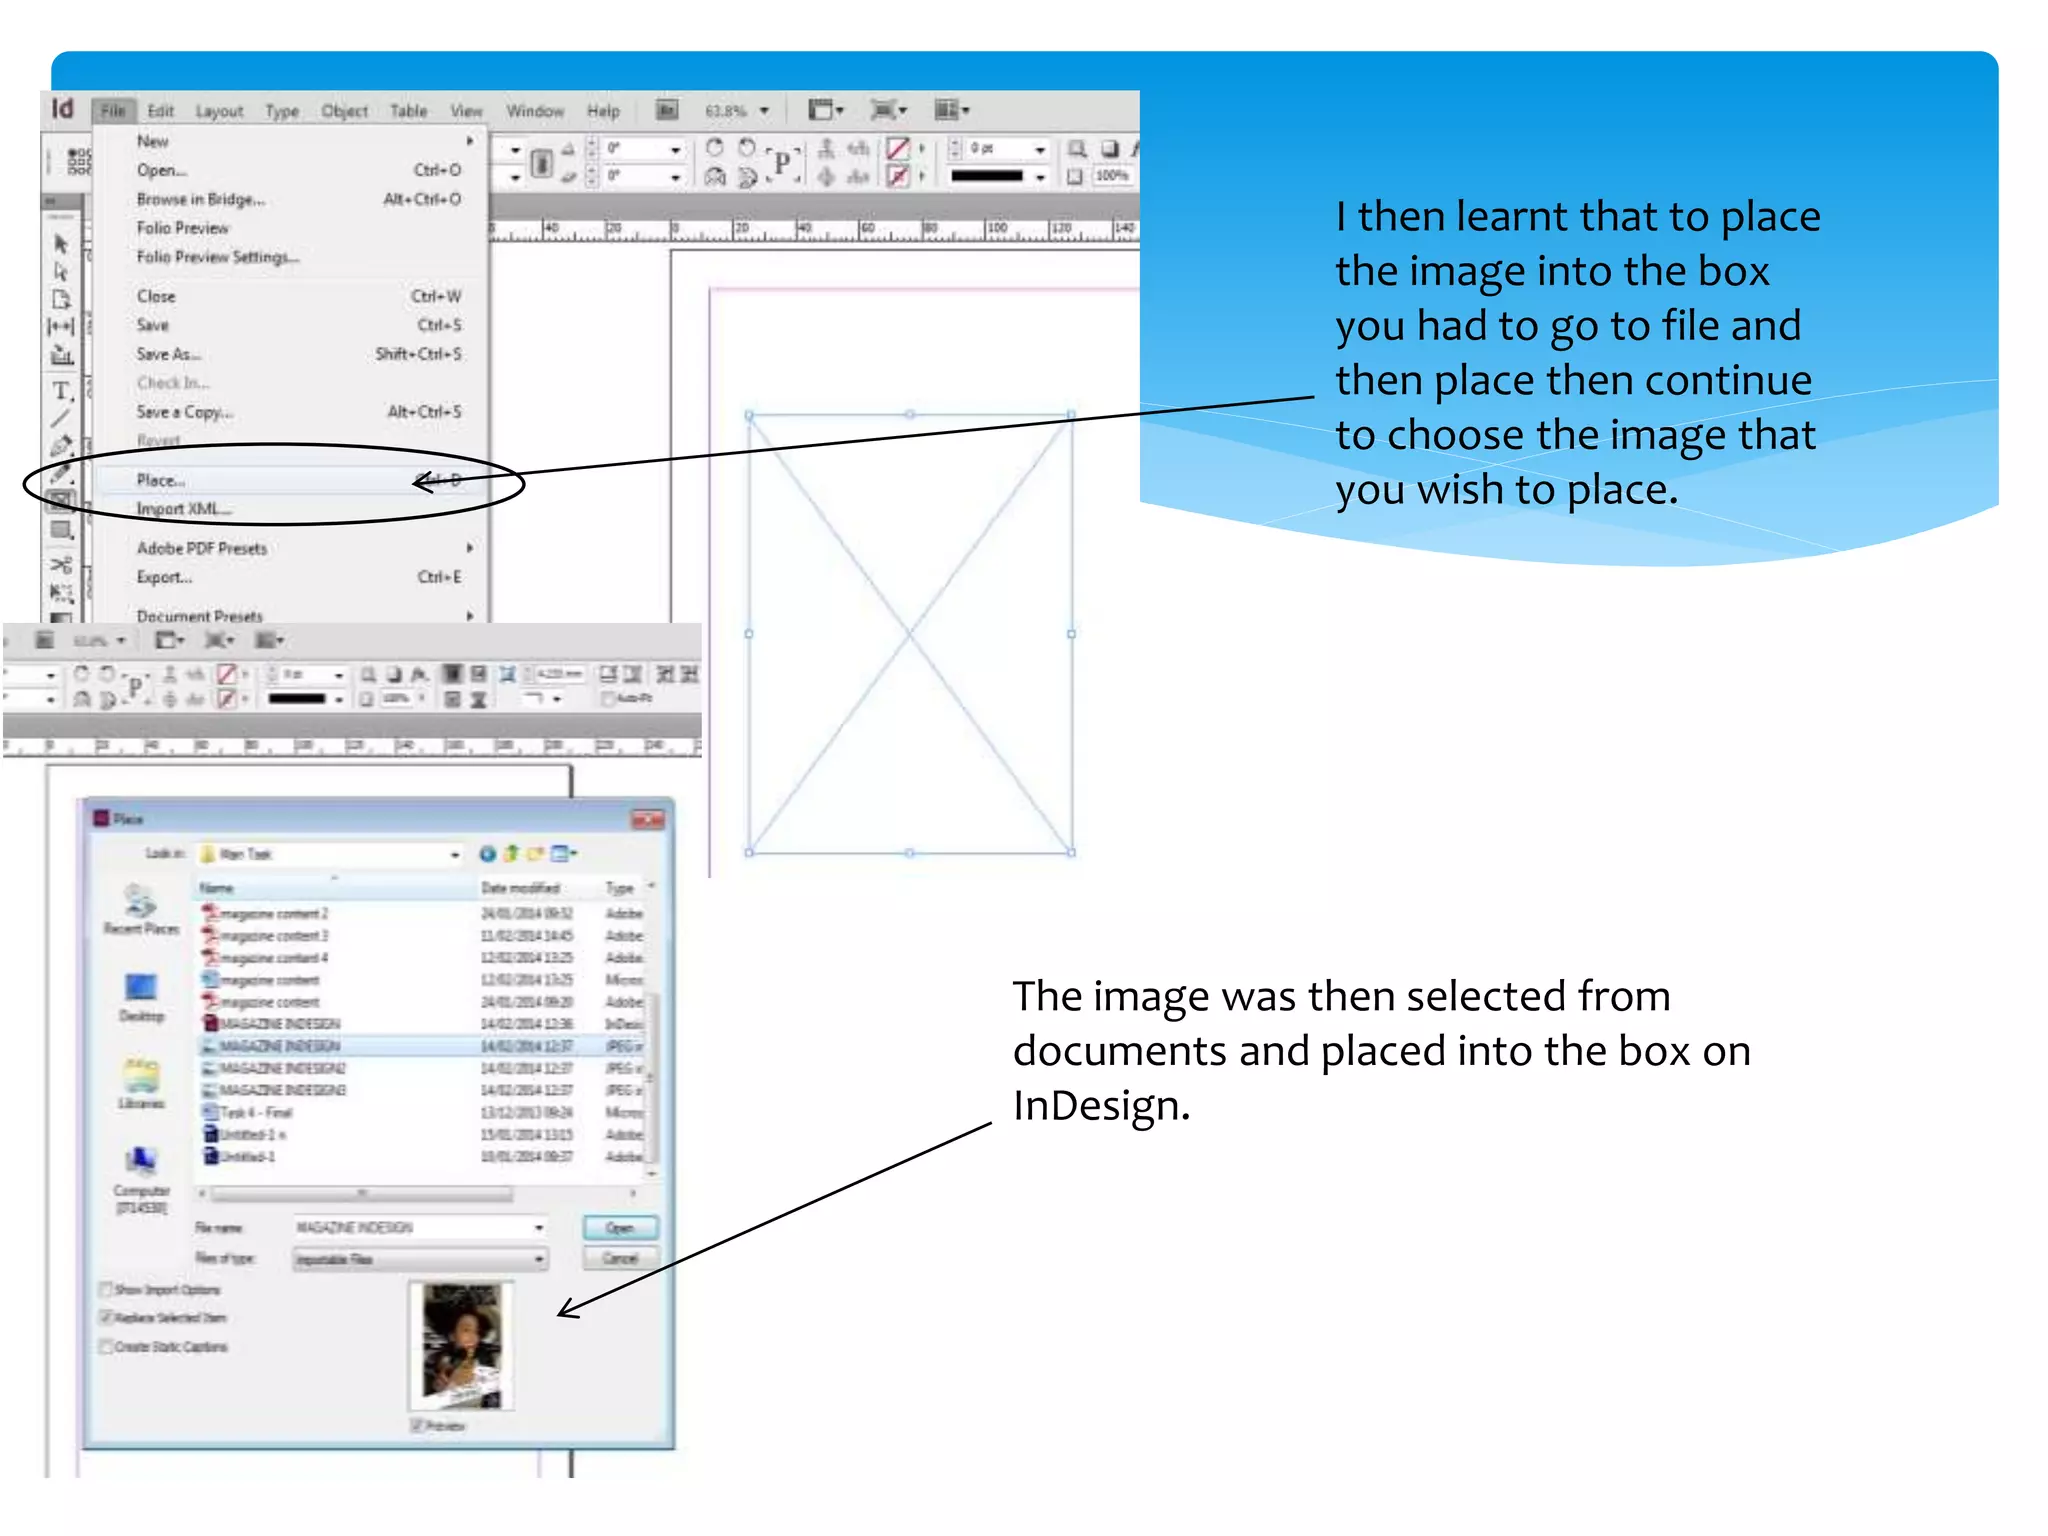
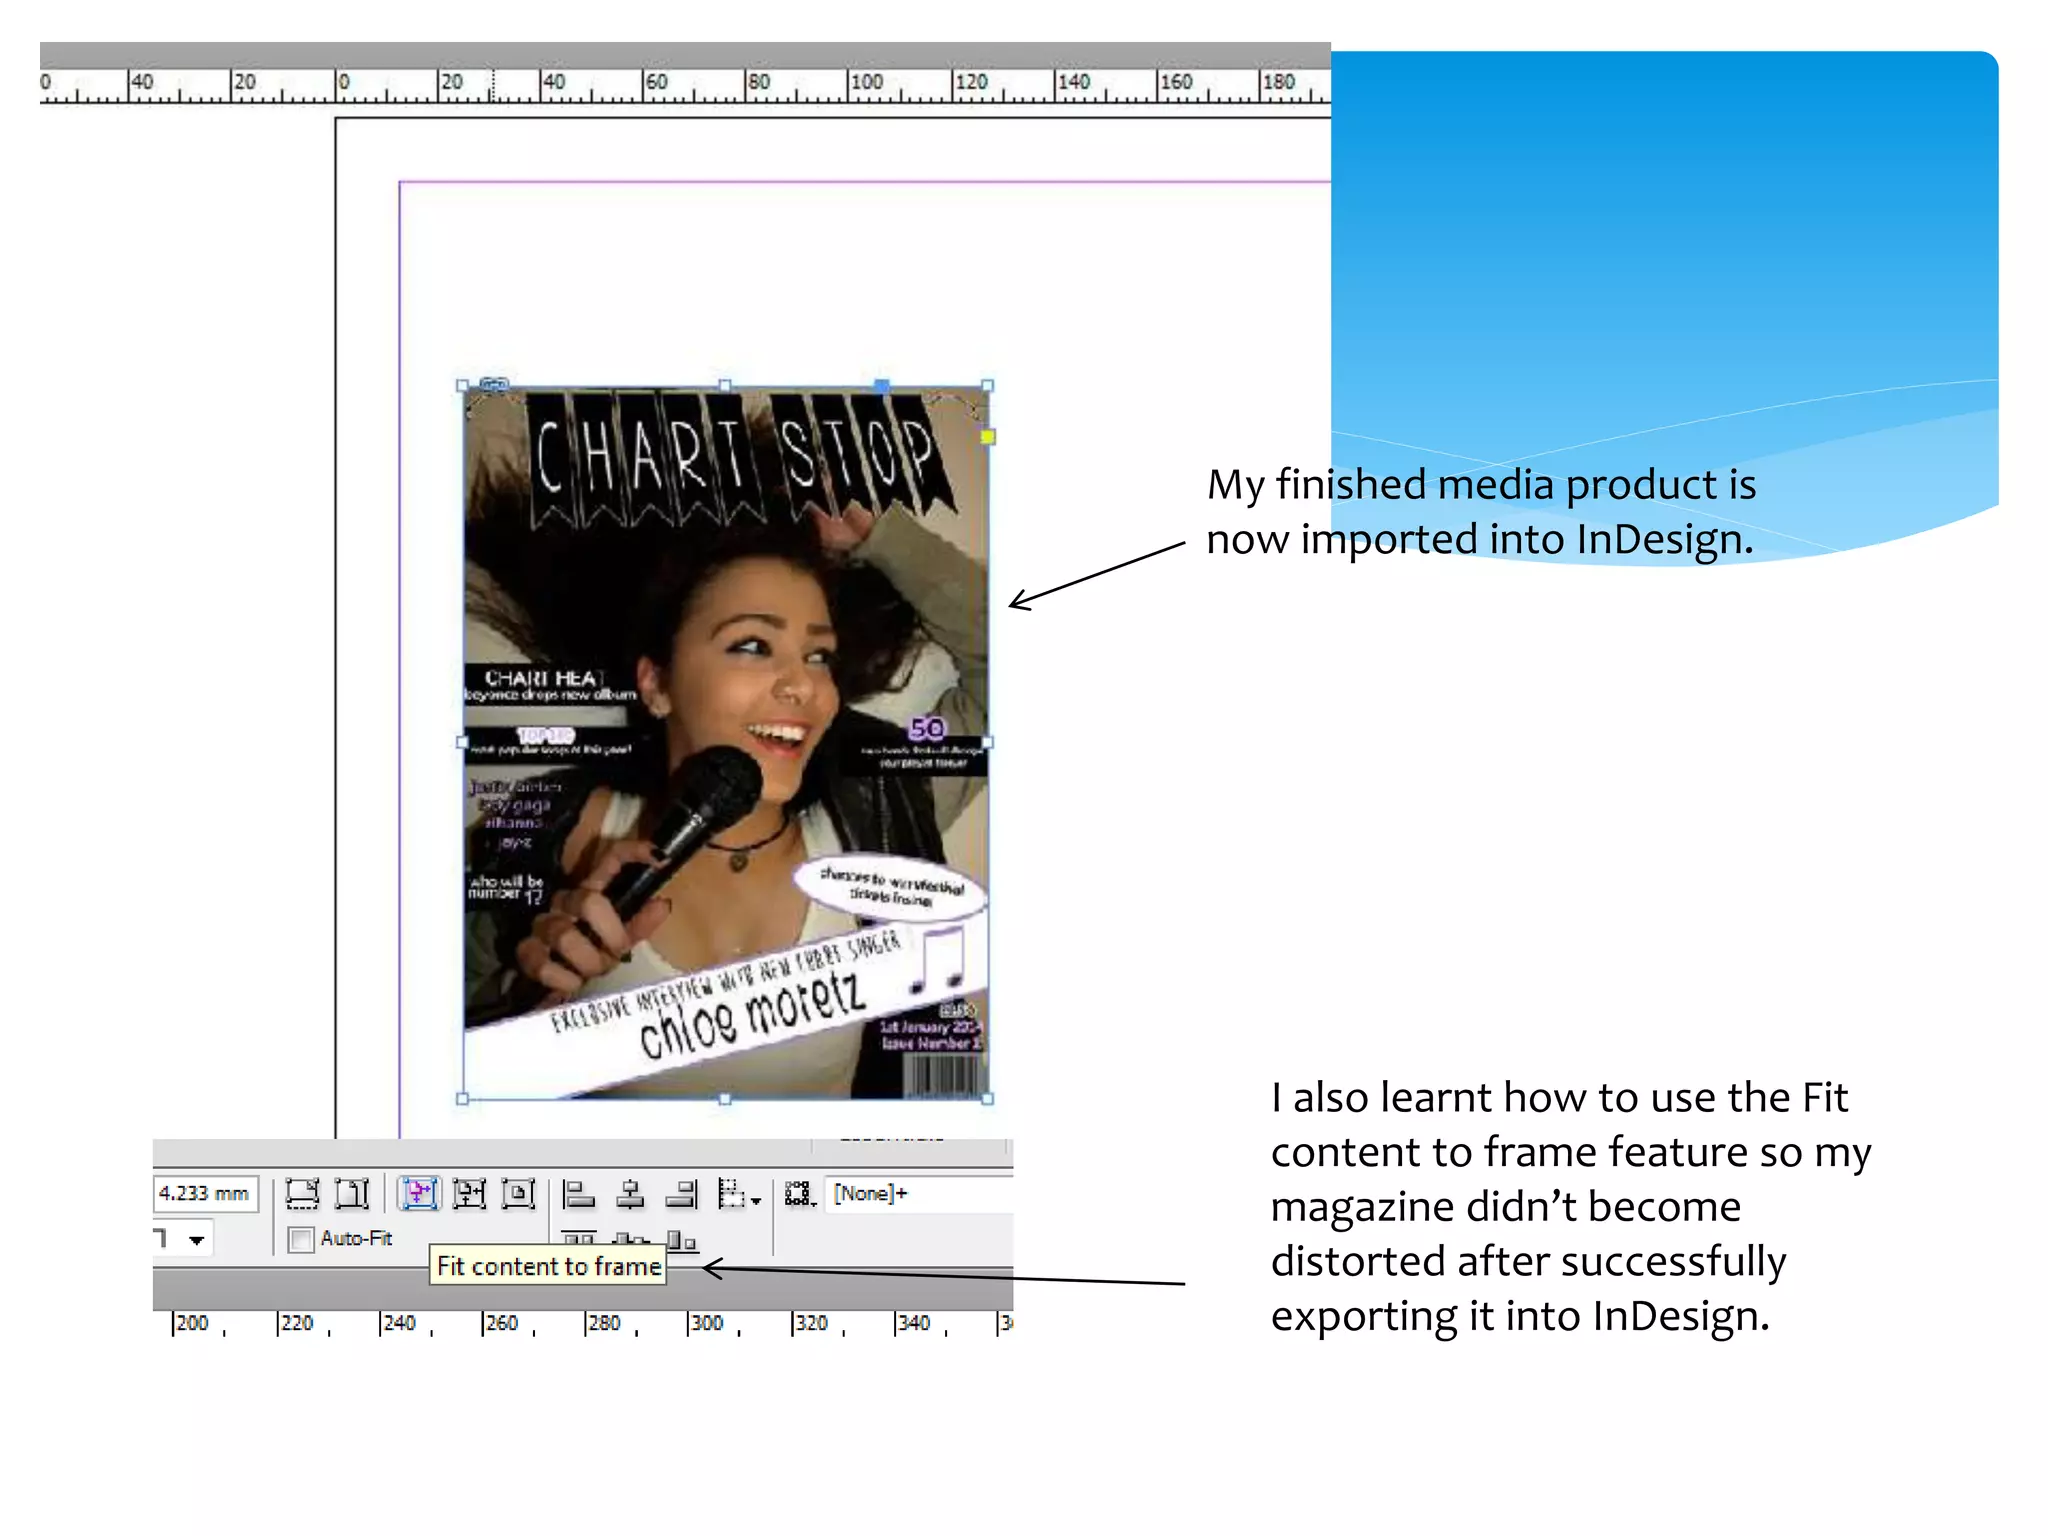
What have you learnt about technologies from the process
of constructing this product?
The first thing I learnt whilst using
Photoshop was how to edit images
and the way they look. You can do this
by increasing the brightness,
saturation and contrast of them. Here I
Have made the picture more clear and
bright by using the brightness tool so
the magazine cover looks more
vibrant.
I also learnt how to put a
black and white overlay on
the image to change its
colour. I did this using the
properties button.
I then used a website called
‘www.dafont.com’ to find
some text that I liked to
place over my image. I
found this text called ‘Moon
Flower’ and input my own
text to create the cover line
for my main article.
I had to print screen the text
from the internet and paste it
into photoshop as it couldn’t
be inserted. To crop the
background out of the text to
just get the words I had to use
the rectangular marquee tool
and highlight all the areas in
which I wanted to delete to
make the text more clear and
precise.
This is how the text looked after I
had used the rectangular marquee
tool as shown above in all the
unwanted areas.
The text is now on a plain
white background which I
kept as placed it over a
white banner, although I
did learn how to remove it
so the text could be placed
over any coloured banner
or just the photo itself. I will
demonstrate this on the
next slide.
This can be done using the
magic wand tool. When
selecting the text it highlights
it and removes the
background.
Now the text has been
highlighted and removed
the background has
disappeared and the text
can be de-selected, edited
and moved around the
page.
I learnt how to use the magnetic
lasso tool which is extremely
useful for removing
backgrounds on pictures so that
they can be placed over many
other backgrounds and scenes
depending on what genre the
magazine is from. This tool
works similarly to the magic
wand but in my opinion is more
effective.
This is the area that I have
gone around with the
magnetic lasso tool to
remove. Although I didn’t use
this on my magazine I learnt
how to do it throughout the
process.
I then used the rectangle tool to
create a banner to go across my
front page. The banner stands out
and is good for different texts as
they will stand out against it and
make the main cover line become
more clearer.
This is how the banner looks
on my finished product.
When exporting my final
magazine, I learnt that the
magazine could not be just
opened but needed to be placed
into a box in InDesign.
To create the box I learnt how to use the
Rectangular Frame Tool on InDesign.
When I had selected this tool I drew a
box onto the page that I would then
place my image in to.
I then learnt that to place
the image into the box
you had to go to file and
then place then continue
to choose the image that
you wish to place.
The image was then selected from
documents and placed into the box on
InDesign.
My finished media product is
now imported into InDesign.
I also learnt how to use the Fit
content to frame feature so my
magazine didn’t become
distorted after successfully
exporting it into InDesign.

Question 6 - Technologies

  • 1.
    What have youlearnt about technologies from the process of constructing this product?
  • 2.
    The first thingI learnt whilst using Photoshop was how to edit images and the way they look. You can do this by increasing the brightness, saturation and contrast of them. Here I Have made the picture more clear and bright by using the brightness tool so the magazine cover looks more vibrant. I also learnt how to put a black and white overlay on the image to change its colour. I did this using the properties button.
  • 3.
    I then useda website called ‘www.dafont.com’ to find some text that I liked to place over my image. I found this text called ‘Moon Flower’ and input my own text to create the cover line for my main article. I had to print screen the text from the internet and paste it into photoshop as it couldn’t be inserted. To crop the background out of the text to just get the words I had to use the rectangular marquee tool and highlight all the areas in which I wanted to delete to make the text more clear and precise.
  • 4.
    This is howthe text looked after I had used the rectangular marquee tool as shown above in all the unwanted areas. The text is now on a plain white background which I kept as placed it over a white banner, although I did learn how to remove it so the text could be placed over any coloured banner or just the photo itself. I will demonstrate this on the next slide.
  • 5.
    This can bedone using the magic wand tool. When selecting the text it highlights it and removes the background. Now the text has been highlighted and removed the background has disappeared and the text can be de-selected, edited and moved around the page.
  • 6.
    I learnt howto use the magnetic lasso tool which is extremely useful for removing backgrounds on pictures so that they can be placed over many other backgrounds and scenes depending on what genre the magazine is from. This tool works similarly to the magic wand but in my opinion is more effective. This is the area that I have gone around with the magnetic lasso tool to remove. Although I didn’t use this on my magazine I learnt how to do it throughout the process.
  • 7.
    I then usedthe rectangle tool to create a banner to go across my front page. The banner stands out and is good for different texts as they will stand out against it and make the main cover line become more clearer. This is how the banner looks on my finished product.
  • 8.
    When exporting myfinal magazine, I learnt that the magazine could not be just opened but needed to be placed into a box in InDesign. To create the box I learnt how to use the Rectangular Frame Tool on InDesign. When I had selected this tool I drew a box onto the page that I would then place my image in to.
  • 9.
    I then learntthat to place the image into the box you had to go to file and then place then continue to choose the image that you wish to place. The image was then selected from documents and placed into the box on InDesign.
  • 10.
    My finished mediaproduct is now imported into InDesign. I also learnt how to use the Fit content to frame feature so my magazine didn’t become distorted after successfully exporting it into InDesign.