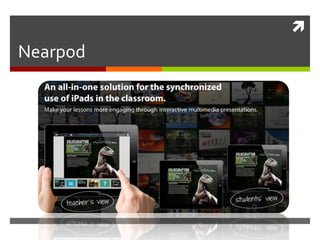
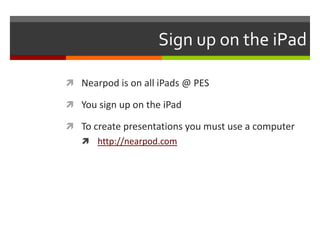
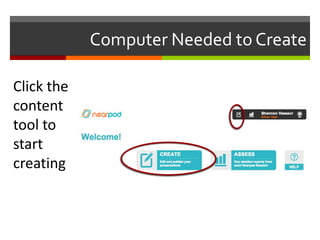
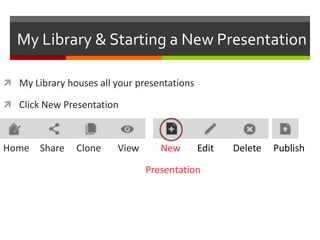
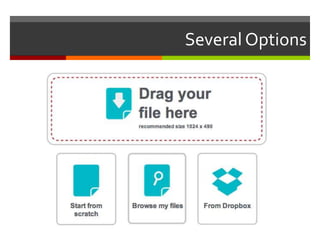
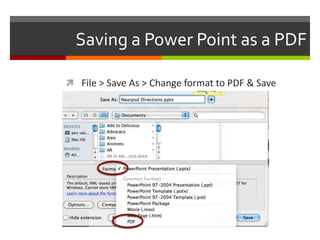
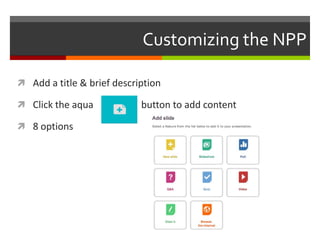
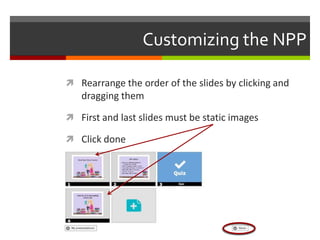
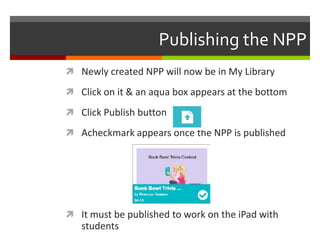
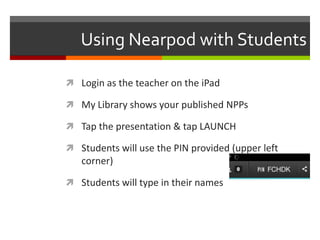
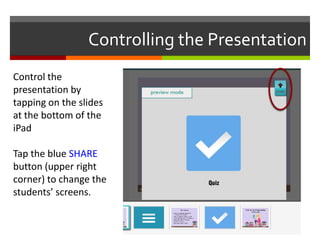

Nearpod
Sign up on the iPad

 Nearpod is on all iPads @ PES

 You sign up on the iPad

 To create presentations you must use a computer
    http://nearpod.com
Computer Needed to Create

Click the
content
tool to
start
creating
My Library & Starting a New Presentation

 My Library houses all your presentations

 Click New Presentation


Home Share      Clone    View      New       Edit   Delete   Publish

                                Presentation
Several Options
Saving a Power Point as a PDF

 File > Save As > Change format to PDF & Save
Customizing the NPP

 Add a title & brief description

 Click the aqua            button to add content

 8 options
Customizing the NPP

 Rearrange the order of the slides by clicking and
   dragging them

 First and last slides must be static images

 Click done
Publishing the NPP
 Newly created NPP will now be in My Library

 Click on it & an aqua box appears at the bottom

 Click Publish button

 Acheckmark appears once the NPP is published


 It must be published to work on the iPad with
   students
Using Nearpod with Students

 Login as the teacher on the iPad

 My Library shows your published NPPs

 Tap the presentation & tap LAUNCH

 Students will use the PIN provided (upper left
   corner)

 Students will type in their names
Controlling the Presentation
Control the
presentation by
tapping on the slides
at the bottom of the
iPad

Tap the blue SHARE
button (upper right
corner) to change the
students’ screens.
Reports & the Store

 On your computer, click the Reports button
   to obtain a data report for the presentation

 Report can be saved to your computer

 On the iPad, access the Nearpod Store for NPPs that
   are already made!

 Nearpod is on Pinterest too!
Tutorials & More

 Webinars (basics & advanced)

 Tutorialsavailable on the Nearpod website

 Vimeo

 Questions?

Nearpod Directions

  • 1.
  • 2.
    Sign up onthe iPad  Nearpod is on all iPads @ PES  You sign up on the iPad  To create presentations you must use a computer  http://nearpod.com
  • 3.
    Computer Needed toCreate Click the content tool to start creating
  • 4.
    My Library &Starting a New Presentation  My Library houses all your presentations  Click New Presentation Home Share Clone View New Edit Delete Publish Presentation
  • 5.
  • 6.
    Saving a PowerPoint as a PDF  File > Save As > Change format to PDF & Save
  • 7.
    Customizing the NPP Add a title & brief description  Click the aqua button to add content  8 options
  • 8.
    Customizing the NPP Rearrange the order of the slides by clicking and dragging them  First and last slides must be static images  Click done
  • 9.
    Publishing the NPP Newly created NPP will now be in My Library  Click on it & an aqua box appears at the bottom  Click Publish button  Acheckmark appears once the NPP is published  It must be published to work on the iPad with students
  • 10.
    Using Nearpod withStudents  Login as the teacher on the iPad  My Library shows your published NPPs  Tap the presentation & tap LAUNCH  Students will use the PIN provided (upper left corner)  Students will type in their names
  • 11.
    Controlling the Presentation Controlthe presentation by tapping on the slides at the bottom of the iPad Tap the blue SHARE button (upper right corner) to change the students’ screens.
  • 12.
    Reports & theStore  On your computer, click the Reports button to obtain a data report for the presentation  Report can be saved to your computer  On the iPad, access the Nearpod Store for NPPs that are already made!  Nearpod is on Pinterest too!
  • 13.
    Tutorials & More Webinars (basics & advanced)  Tutorialsavailable on the Nearpod website  Vimeo  Questions?